
Santo 3533-4 KG - Kühlschrank AEG - Kostenlose Bedienungsanleitung
Finden Sie kostenlos die Bedienungsanleitung des Geräts Santo 3533-4 KG AEG als PDF.


Benutzerfragen zu Santo 3533-4 KG AEG
0 Frage zu diesem Gerät. Beantworten Sie die, die Sie kennen, oder stellen Sie Ihre eigene.
Eine neue Frage zu diesem Gerät stellen
Laden Sie die Anleitung für Ihr Kühlschrank kostenlos im PDF-Format! Finden Sie Ihr Handbuch Santo 3533-4 KG - AEG und nehmen Sie Ihr elektronisches Gerät wieder in die Hand. Auf dieser Seite sind alle Dokumente veröffentlicht, die für die Verwendung Ihres Geräts notwendig sind. Santo 3533-4 KG von der Marke AEG.
BEDIENUNGSANLEITUNG Santo 3533-4 KG AEG
SANTO 3533KG / 3633KG
ÖKO\_SANTO SUPER
3473KG / 3573KG
Electronic Refrigerator/Freezer Combinations
Dear customer,
Before placing your new refrigerator/freezer into operation please read these operating instructions carefully. They contain important information for safe use, for installation and for care of the appliance.
Please keep these operating instructions for future reference. Pass them on to possible new owners of the appliance.
These operating instructions are for use with several technically comparable models with varying accessories. Please observe the notes which apply to your model.
Notes which are important for your safety or for the proper functioning of the appliance are stressed with a warning triangle and/or with signal words (Warning!, Caution!, Attention!). Please observe the following carefully.
This symbol guides you step by step in the operation of the appliance.
[i] Supplementary information regarding operation and practical applications of the appliance appear after this symbol.
[♣] Tips and notes concerning economical and environmentally sound use of the appliance are marked with the cloverleaf.
Explanations of the technical terminology used in the operating instructions can be found at the end in the section "Technical Terminology".
The operating instructions contain instructions for the correction of possible malfunctions by the user in the section "What to do if ...". If these instructions should not be sufficient, our customer service department is always available to you.
Printed on paper manufactured with environmentally sound processes. he who thinks ecologically acts accordingly ...
Content
Safety 5
Disposal 7
Appliance Packaging Information 7
Disposal of old Appliances 7
Appliance Transport 8
Remove transport safeguard 9
Installation 10
Installation Location 10
The refrigerator or freezer needs air 11
Appliance Alignment 11
Electrical connection 11
Re-Hanging Door 13
Door Alignment 17
Appliance Description 18
View of Appliance 18
Freezer tray with ice packs 19
Ice Packs 19
Control Panel 20
Temperature Regulator 21
Temperature Displays 21
Prior to Initial Start-Up 22
Initial Start-Up 23
Temperature Adjustment 24
Refrigerator 24
Freezer Compartment 24
FAST CHILL/FAST FREEZE 25
FAST CHILL 25
FAST FREEZE 25
Switching the Appliance Off 26
Vacation Mode 27
Control and Information Systems 28
"Open Door"-Warning 28
Power Interruption 28
Temperature Warning 29
Partial/Complete Thaw Warning 30
Function Errors 30
Opening the Freezer Compartment Door 30
Interior Accessories 31
Storage Shelves/Storage Racks 31
Models with glass storage shelves 31
Models with plastic storage shelves 32
Models with storage racks 32
Variable Inner Door 33
Trays and Compartments 33
Correct storage 34
Freezing 35
Frozen Storage 36
Preparation of Ice Cubes 37
Storage Goods Symbols/Freezing Calendar 37
Defrosting 37
The refrigerator is defrosted automatically 37
Freezer Compartment Defrosting 38
Cleaning and Care 39
Energy Saving Tips 40
What to do if ... 41
Correcting Malfunctions 41
Replace light bulb 43
Customer Service 44
Noises during Operation 45
Regulations, Standards, Guidelines 45
Technical Terminology 46
! Safety
The safety of our freezers is in accordance with recognised technological standards and appliance safety legislation. We nevertheless feel that it is important to acquaint you with the following safety guidelines:
Use for Intended Purpose
- The freezer is intended for household use. It is suited for the refrigeration, freezing and frozen storage of foods as well as the preparation of ice. It is suited for the freezing and frozen storage of foods as well as the preparation of ice.
- Alterations or changes to the freezer are not permitted for reasons of safety.
- If you use the refrigerator/freezer in a commercial application or for purposes other than the refrigeration, freezing or frozen storage of foods, please observe all valid legal regulations for your application.
Prior to initial start-up
- Check the refrigerator/freezer for transport damage. Do not under any circumstances connect a damaged appliance! Please contact your supplier in the event of damage.
Refrigerant
The refrigerant isobutane (R600a) is contained within the refrigerant circuit of the appliance, a natural gas with a high level of environmental compatibility, which is nevertheless flammable.
- During transportation and installation of the appliance, be certain that none of the components of the refrigerant circuit become damaged.
- If the refrigerant circuit should become damaged: - avoid open flames and sources of ignition; - thoroughly ventilate the room in which the appliance is situated.
Safety for Children
- Packaging materials (e.g. films, styrofoam) can be dangerous for children. Danger of suffocation! Keep packaging materials away from children!
- Before disposing of old appliances make them inoperable. Remove plug from mains, sever the power cable, remove or destroy any snap or latch closures. This eliminates the danger that playing children lock themselves into the appliance (danger of suffocation!) or place themselves into other life-endangering situations.
• Children often do not recognise the dangers involved with household appliances. Please provide for the necessary supervision and do not allow children to play with the appliance!
Daily Operation
- Containers with flammable gases or fluids can develop leaks through contact with the cold. Danger of explosion! Do not store containers with flammable substances, such as aerosol cans, refill cartridges for cigarette lighters etc. in the refrigerator/freezer.
- Bottles and cans may not be placed in the freezer compartment. They can burst when the contents freeze - or even explode if the contents contain carbonic acid! Never place sodas, juices, beer, wine, champagne etc. into the freezer compartment. Exception: Spirits with high alcohol content may be stored in the freezer compartment.
- Do not place ice cream or ice cubes directly from the freezer compartment into the mouth. Very cold ice can freeze to the lips or tongue and cause injury.
- Never touch frozen goods with wet hands. Hands can freeze to the goods.
- Do not operate any electrical appliances in the refrigerator/freezer (e.g. electric ice cream makers, mixers etc.).
- Before cleaning the appliance switch off and remove the plug from the mains, or switch off or turn out the circuit breaker or fuse.
- Placing frozen goods on the top of the appliance can lead to the accumulation of condensate in the cavity of the storage tray through contact with the cold. Electronic components are housed within this cavity. If condensate should drip onto these components, the appliance could be damaged by a short circuit. For this reason do not place frozen goods on top of the appliance.
- When unplugging always pull the plug from the mains socket, do not pull on the cable.
In case of malfunction
- If a malfunction should occur at the appliance, refer first to the section "What to do if ..." in these operating instruction. If the instructions in this section are not sufficient, do not undertake any further work on your own.
- Refrigerators/feezers may only be repaired by trained personnel. Repairs carried out by untrained personnel can lead to substantial danger. Please contact your dealer or our customer service department for repairs.
Disposal
Appliance Packaging Information
All materials are environmentally sound! They can be dumped or burned at an incinerating plant without danger!
About the materials: The plastics can be recycled and are identified as follows:
PE< for polyethylene, e.g. the outer covering and the bags in the interior.
PS< for polystyrene foam, e.g. the pads, which are all free of chloro-fluorocarbon.
The carton parts are made from recycled paper and should be disposed of at a waste-paper recycling collection location.
Disposal of old Appliances
For environmental reasons, refrigeration appliances must be disposed of properly. This applies to your old appliance, and - at the end of its service life - for your new appliance as well.

Warning! Before disposing of old appliances make them inoperable. Remove plug from mains, sever the power cable, remove or destroy any snap or latch closures. This eliminates the danger that playing children lock themselves into the appliance (danger of suffocation!) or place themselves into other life-endangering situations.
Disposal:
- The appliance may not be disposed of with domestic waste or bulky refuse.
- The refrigerant circuit, especially the heat exchanger at the back of the appliance, may not be damaged.
• Information concerning collection schedules or locations can be obtained from the local disposal authorities or town hall.
Appliance Transport
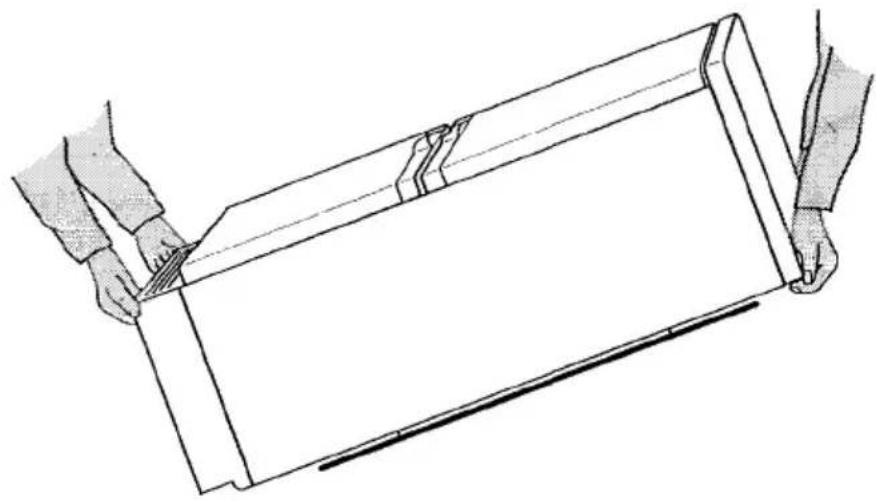
Two persons are required for transport of the appliance. There are two recessed handles at the front of the base and at the back of the appliance at the top for improved gripping.
Only for appliances with base cover: Pull cover up to remove.
Grip the appliance with the recessed handles positioned as in the drawing, and transport the appliance.
natural_image
Line drawing of two hands holding a rectangular object, no text or symbols presentIn order to push the appliance into its final position, press carefully at the top of the upper door and tip the appliance back slightly. The weight is thus transferred to the back casters and the appliance can be easily pushed.
Remove transport safeguard
The appliance as well as interior accessory parts are safeguarded for transport.
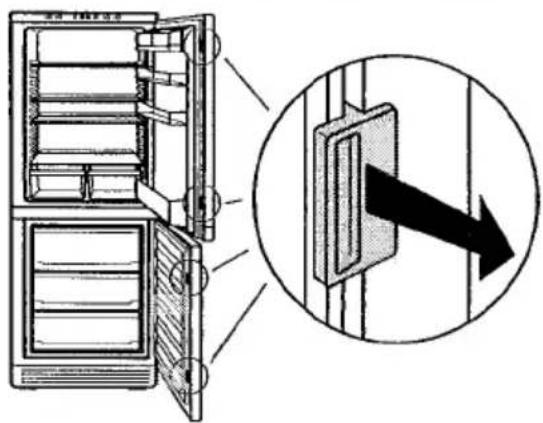
Remove tape from left and right of the outside of the door.
[i] Tape remnants can be removed with benzene.
Remove all tape and pads from the interior of the appliance.
Remove door seal safeguards from door seal at the inside of the door.
text_image
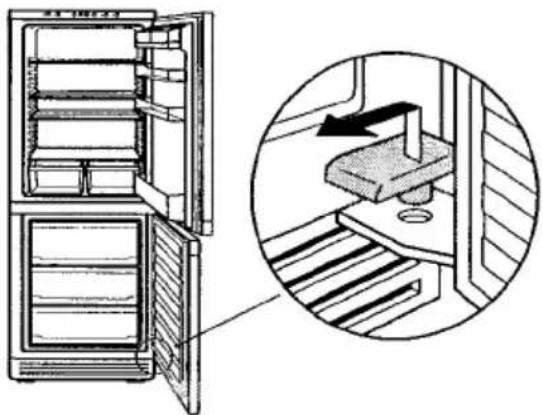
Diagram showing the open refrigerator with a close-up view of its door panel, highlighting a directional arrow.Remove transport safeguard at door pivot when door is open.
natural_image
Diagram of an open refrigerator with a close-up view showing the interior and exterior views (no text or symbols)Installation
Installation Location
The appliance should be set up in a well ventilated, dry room.
Energy use is affected by the ambient temperature.
The appliance should therefore
- not be exposed to direct sunlight;
- not be installed next to radiators, cookers or other sources of heat;
- only be installed at a location whose ambient temperature corresponds to the climate classification, for which the appliance is designed.
The climate classification can be found on the serial plate, which is located at the left on the inside of the appliance.
The following table shows which ambient temperature is correct for each climate classification: each climate classification:
| Climate classification | for an ambient temperature of |
| SN | +10 to +32 °C |
| N | +16 to +32 °C |
| ST | +18 to +38 °C |
| T | +18 to +43 °C |
If installation next to a source of heat is unavoidable, the following minimum clearances must be maintained at the sides of the appliance:
- for electric cookers 3 cm;
- for oil and coal fired ranges 30 cm.
If these clearances cannot be maintained a heat insulating pad is required between the cooker and the refrigeration appliance.
If the refrigeration appliance is installed next to another refrigerator or freezer a clearance of 5 cm at the sides is required, in order to prevent the formation of condensation on the outside of the appliance.
The refrigerator or freezer needs air
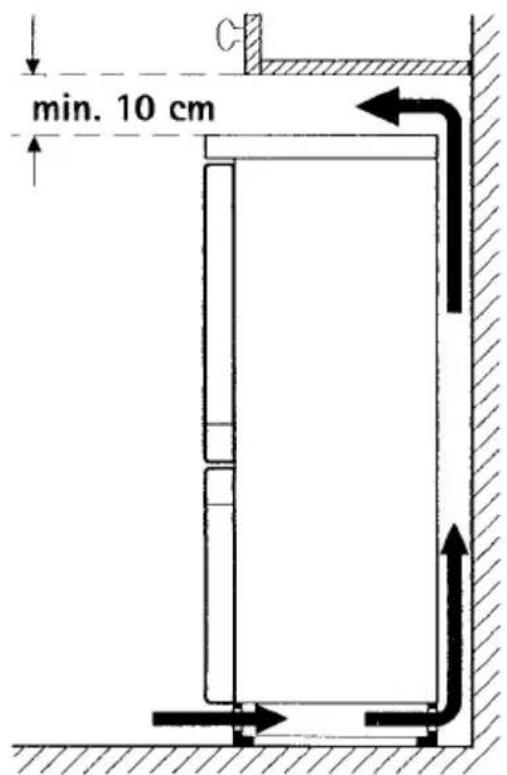
Air is fed under the door through the vent slots in the base and is exhausted upwards along the back wall. To ensure proper air circulation never cover or alter the vent openings.
Attention! If the appliance is installed under, for example, a hanging cabinet, a clearance of at least 10 cm between the top of the appliance and the cabinet above it must be maintained.
text_image
min. 10 cmAppliance Alignment

The appliance must have a solid, level footing. Please compensate for unevenness in the floor by turning the two adjustable feet at the front in or out.
Electrical connection

WARNING - THIS APPLIANCE MUST BE EARTHED
Please ensure that the voltage and current indicated on the rating plate agree with the voltage of your electricity supply.
220/240 volts (i. e. 220/240V AC).
If your appliance has been equipped with a mains lead with a moulded on type plug, you must comply with the following regulations:
The plug moulded on to the cord incorporates a fuse. For replacement, use a 13 amp BS 1362 fuse. Only ASTA approved or certified fuses should be used. The fuse cover/carrier must be replaced in the event of changing the fuse. The plug must not be used if the fuse cover/carrier
ist lost. A replacement cover/carrier must be obtained from an electrical goods retailer. If the socket outlets in your home are not suitable for the plug fitted to the appliance, then the plug must be cut off and an appropriate one fitted. When fitting the plug please note the following points:
Important
The wires in the mains lead are coloured in accordance with the following code:
Green and Yellow Earth
Blue Neutral
Brown Live
As the colours of the wires in the mains lead of this appliance may not correspond with the coloured markings indentifying the terminals in your plug, proceed as follows:
- The wire which is coloured green and yellow must be connected to the earth terminal in your plug, which is marked with the letter E or by the earth symbol ⏻ or coloured green, or green and yellow.
- The wire which is coloured brown must be connected to the live terminal which is marked with the letter L or coloured red.
- The wire which is coloured blue must be connected to the neutral terminal which is marked with the letter N or coloured black.
When wiring the plug, ensure that all strand of wire are securely retained in each terminal.
Do not forget to tighten the mains lead clamp on the plug.

Warning! A cut-off plug inserted into a 13 amp socket is a serious safety (shock) hazard. Ensure that the cut-off plug is disposed of safely.
Voltage 220/240V AC
Fuse rating 13 amps
See rating plate for further information. The rating plate is inside, on the left.
Re-Hanging Door
The side at which the door opens can be changed from the right side (factory adjustment) to the left side, if the installation site requires.

Warning! When changing the side at which the door opens, the appliance may not be connected to the mains. Remove plug from the mains beforehand.

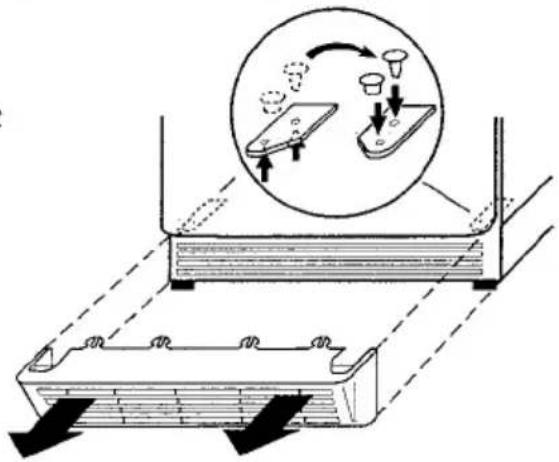
Only for models with base cover: Pull base cover forward to remove and reposition door pivot covers from the left to the right.
text_image
Diagram illustrating a mechanical or fluidic process with labeled components and directional arrows indicating flow or movement.
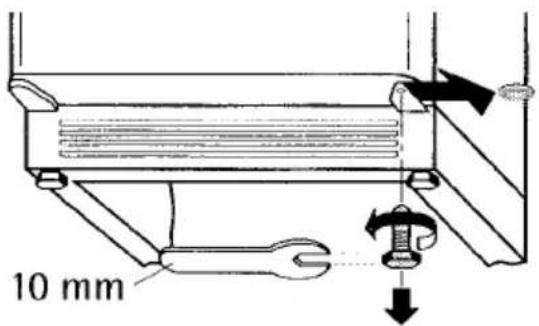
With freezer compartment door closed screw pivot pin out of lower door pivot.
text_image
10 mm
Remove freezer compartment door carefully to the front and set aside.

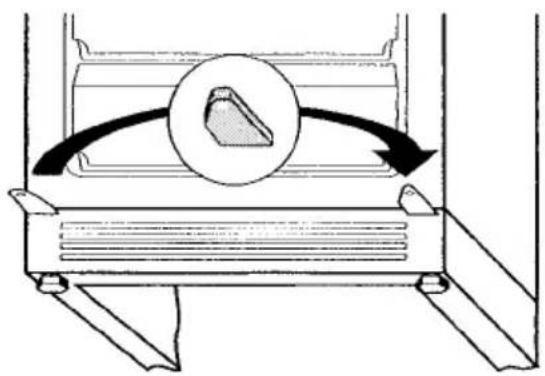
Only for models without base cover: pull push-on shoe from left door pivot and press onto right door pivot.
natural_image
Diagram of a mechanical device with a circular component and directional arrow indicating rotation or movement (no text or symbols)
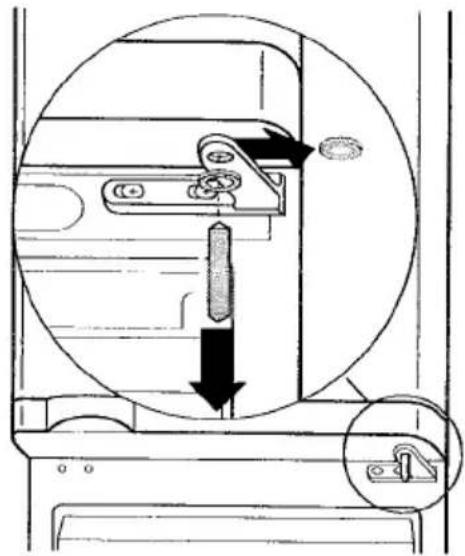
With refrigerator door closed pull pivot pin out of middle door pivot.
natural_image
Technical diagram of a door handle mechanism with arrows indicating movement (no text or symbols)
Remove refrigerator door carefully to the front and set aside.

Screw out middle door pivot and reposition to the left side.

text_image
Diagram illustrating a mechanical or electrical system with two circular insets showing tool positions and rotating components.
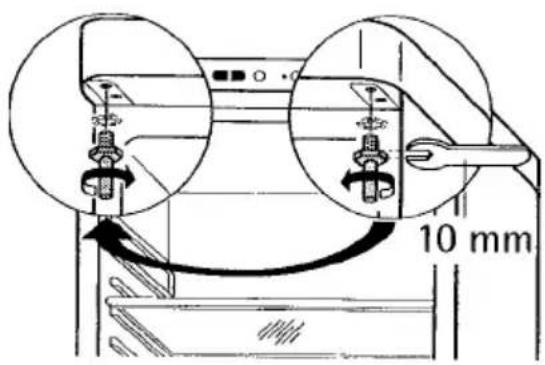
Reposition upper pivot pin to the left side.
text_image
10 mm
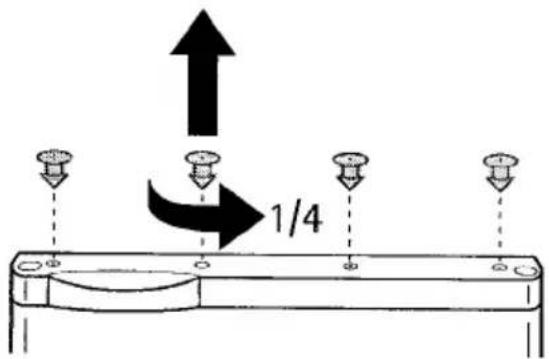
Remove door handles. Turn fulcrum pins 1/4 turn anticlockwise with a screwdriver and remove.
text_image
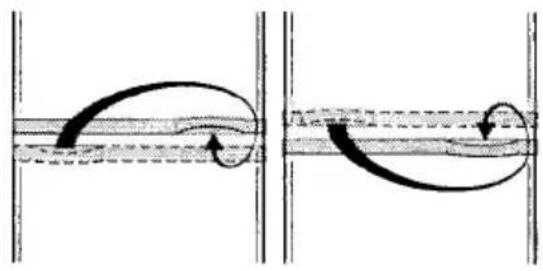
1/4Turn handles as shown in the diagram and replace respectively on the other door.
natural_image
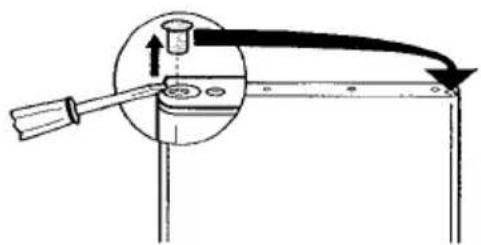
Diagram showing two curved arrows indicating motion or force direction between parallel lines, no text or symbols presentReposition cover plugs to the upper left of the refrigerator door.
natural_image
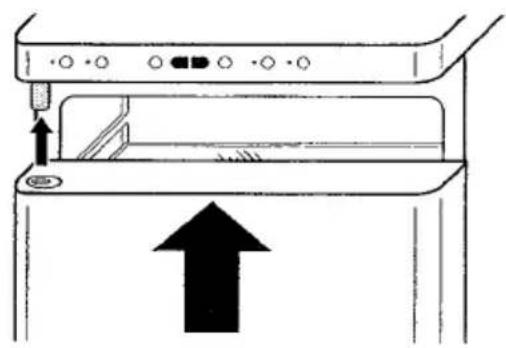
Diagram of a mechanical device with a lever and curved arrow, no text or symbols presentCarefully push refrigerator door onto upper pivot pin and close.
natural_image
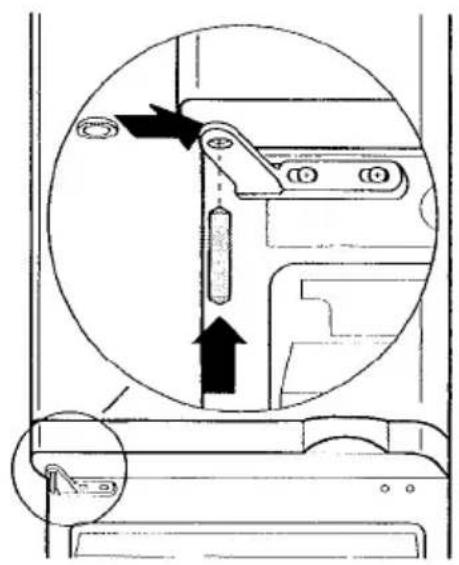
Diagram of a device with an upward arrow indicating movement or force, showing internal components and control buttons (no text or symbols present)Push pivot pins into middle door pivot. Do not forget the washer.
natural_image
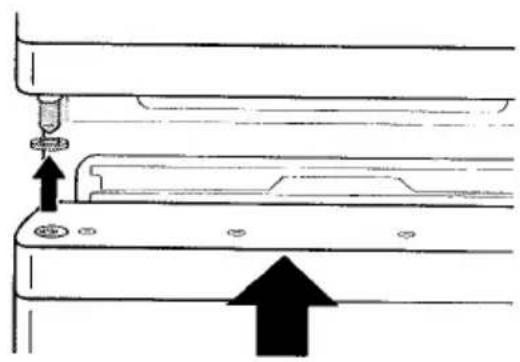
Technical diagram of a mechanical assembly with an inset close-up showing a component detail (no text or symbols)Carefully push freezer compartment door onto upper pivot pin and close. Do not forget the washer.
natural_image
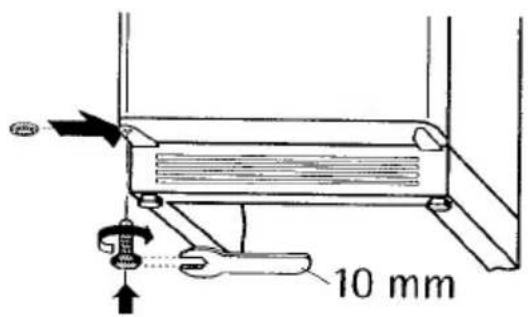
Diagram of a mechanical assembly with arrows indicating upward motion (no text or symbols)Place washer between freezer compartment door and lower door pivot, and screw in pivot pin.
text_image
10 mmOnly for models with base cover: replace base cover.
Door Alignment

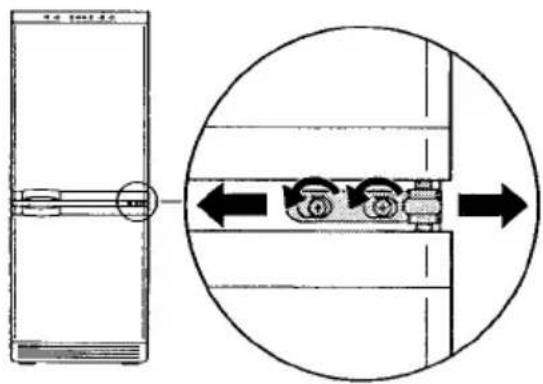
If necessary both doors can be aligned with a sideways adjustment to the middle door pivot.
text_image
42 190122If only one door needs to be aligned:

Remove the door to be aligned (see section: "Re-Hanging Door")

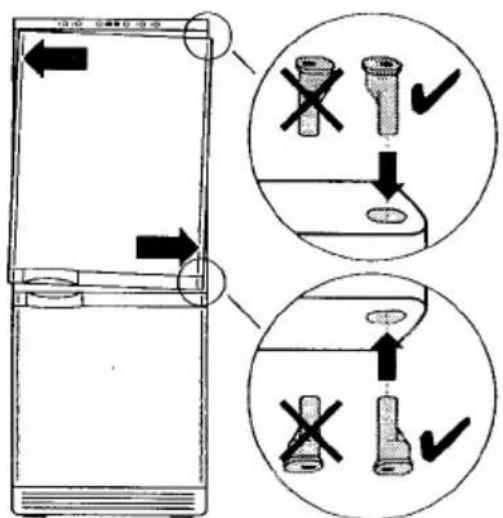
Pry out the eccentric pivot bushings at the top and/or at the bottom of the door as needed with a small screw driver, turn as shown in the diagram and press back into place.
text_image
Diagram showing correct and incorrect assembly of a refrigerator with labeled parts and checkmarks indicating disassembly or repair.
text_image
Diagram showing refrigerator door with correct and incorrect labeling, including checkmarks and crossed-out test tubes for cleaning or testing.The diagram only shows a right opening door.
For left opening doors please proceed accordingly at the left of the door at top and/or bottom.

Replace the door (see section: "Re-Hanging Door")
Appliance Description
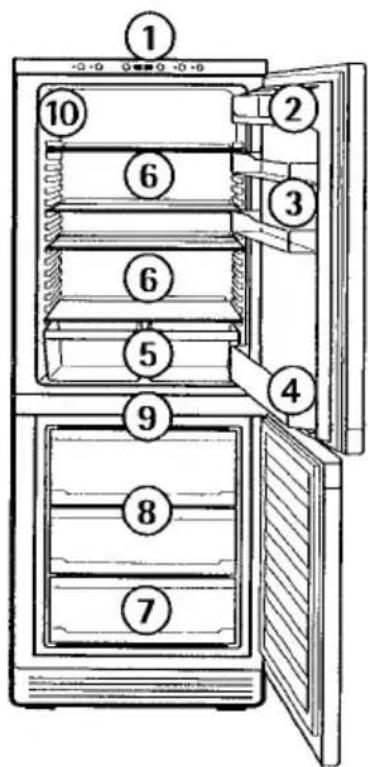
View of Appliance
(various models)
text_image
Diagram of a refrigerator with numbered compartments for cooking or storage purposes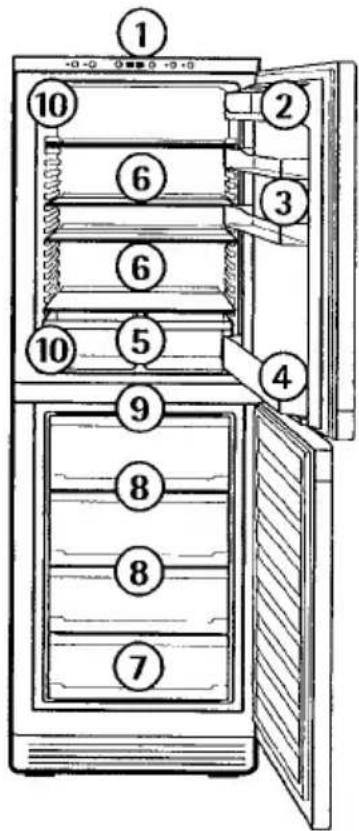
text_image
Diagram of a refrigerator interior with numbered compartments for cooking or storage① Control panel and elements
② Butter and cheese compartment with lid
③ Door storage compartments
④ Bottle compartment
⑤ Fruit and vegetable trays
⑥ Shelves
⑦ Drawer for frozen goods (only for storage)
When defrosting the bottom drawer also serves as a water collecting vessel.
⑧ Drawers for frozen goods (for storage and freezing)
⑨ Freezer tray with ice packs (not included with all models)
⑩ Serial plate (depending on model upper or lower left)
Freezer tray with ice packs
(not included with all models)
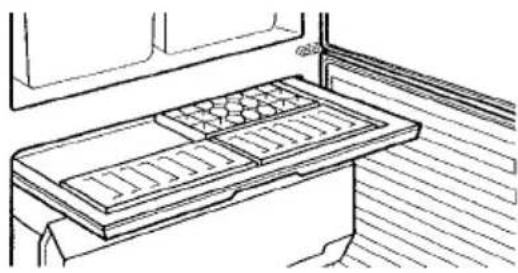
With some models a freezer tray with ice packs and ice tray is included above the upper drawer in the freezer compartment.
Refer to the section "Prior to Initial Start-Up" concerning freezing of the ice packs.
natural_image
Line drawing of a kitchen counter with grilles and a side panel (no text or symbols)In the event of power failure or a malfunction at the appliance, the ice packs extend the period of time after which unacceptable warming of frozen goods occurs by several hours.
Ice packs may also be used, in passing, in cold storage bags.
Berries, for example, can be pre-frozen on the freezer tray. Advantage: The berries are not squeezed and maintain their natural form. The frozen berries can then be stored in compartments or drawers packaged in individual portions.
Ice Packs
(not included with all models)
For some models two ice packs have been inserted into the freezer tray. Refer to the section "Prior to Initial Start-Up" concerning freezing of the ice packs.
In the event of power failure or a malfunction at the appliance, the ice packs extend the period of time after which unacceptable warming of frozen goods occurs by several hours.
Ice packs may also be used, in passing, in cold storage bags.
Control Panel

text_image
REFRIGERATOR ON/OFF FREEZER ON/OFF 1 2 3 4 REFRIGERATOR SET/ACTUAL + 5 °C -18 5 6 7 8 FAST CHILL/-FREEZE ON 11 12 WARNING OFF1 Stand-by display for refrigerator (green)
2 ON/OFF button for refrigerator
3 Stand-by display for freezer compartment (green)
4 ON/OFF button for freezer compartment
5 Temperature regulator for refrigerator
6 Temperature display for refrigerator
7 Temperature display for freezer compartment
8 Temperature regulator for freezer compartment
9 Stand-by display for FAST FREEZE function (yellow)
10 FAST CHILL/-FREEZE button
- FAST CHILL for intensive cooling in the refrigerator
- FAST FREEZE for fast freezing in the freezer compartment
11 Warning display (red)
12 WARNING OFF button
(see section: "Control and Information Systems")
Temperature Regulator
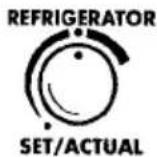
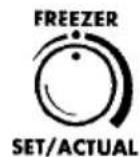
For temperature adjustment the respective temperature regulator for the refrigerator or freezer compartment must be freed from its recessed position.
- Briefly pressing on the respective temperature regulator frees it from its recessed position.
- Pressing on the respective temperature regulator returns it to its recessed position.
SET means:
With temperature regulator freed from recessed position; temperature which should exist in the refrigerator or freezer compartment (SET temperature), can be adjusted in increments of 1°C.
ACTUAL means:
With temperature regulator in recessed position; temperature display indicates current actual refrigerator or freezer compartment temperature (ACTUAL temperature).
Temperature Displays
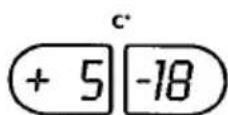
The temperature displays shows several types of information.
- In normal operation the current refrigerator or freezer compartment temperature is displayed (ACTUAL temperature). The temperature regulator must be in its recessed position.
- During temperature adjustment, a blinking display of the temperature selected at the moment occurs (SET temperature).
- (not included with all models) During a mains interruption the current refrigerator or freezer compartment temperature is indicated as a blinking display (ACTUAL temperature).
- If a malfunction has occurred at the appliance the temperature display alternately indicates:
- the current refrigerator or freezer compartment temperature (ACTUAL temperature) as well as
- an error message.
The error message is coded (e.g. F1, F2, etc.) and assists the customer service technician in error diagnosis. If the temperature can no longer be registered, only the error code is displayed.
Applies only to the temperature display for the refrigerator

- When the FAST CHILL function is switched on (see also section: "Fast Chill/Fast Freeze"), "IC" is displayed in the temperature display. As long as the FAST CHILL function is switched on, no refrigerator temperature is indicated in the temperature display.
Applies only to the temperature display for the freezer compartment
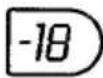
- If, for example, frozen goods have been partially or completely thawed due to a lengthy mains interruption, the temperature display alternately indicates:
- the current freezer compartment temperature (ACTUAL temperature) and
- the highest temperature to which the frozen goods have warmed.
Prior to Initial Start-Up
Please clean the appliance interior and all accessories prior to initial start-up (see section: "Cleaning and Care").
Remove both ice packs from the freezer tray, if they are included with your model.
Place the ice packs into a compartment or drawer only after the optimal storage temperature of -18^ has been reached, and allow to freeze.
After 24 hours place the ice packs at the front of the freezer tray.
Re-freeze thawed ice packs in the same fashion, e.g. after cleaning the appliance.
Initial Start-Up
Refrigerator and freezer compartments can be operated and controlled independently of one another.
(i) Within 5 minutes after the refrigerator and/or freezer compartments have been switched on, the electronics initialise a self-test. The compressors do not start until after completion of the self-test.
Insert plug into mains socket.
Refrigerator Start-Up
Press refrigerator ON/OFF button.
The green stand-by display for the refrigerator lights up. The refrigerator temperature display shows the current, actual refrigerator temperature. The blinking red warning display indicates that the required storage temperature has not yet been reached. After the self-test has been completed, the compressor starts and functions automatically thereafter.
Set the refrigerator to the desired temperature (see section: "Temperature Adjustment").
i Goods to be refrigerated can be loaded immediately after switching on, because the storage temperature in the refrigerator is quickly reached.
Freezer Compartment Start-Up
Press freezer compartment ON/OFF button.
The green stand-by display for the freezer compartment lights up. The freezer compartment temperature display shows the current, actual freezer compartment temperature. The blinking red warning display indicates that the required storage temperature has not yet been reached. After the self-test has been completed, the compressor starts and functions automatically thereafter.
The factory setting for the temperature of the freezer compartment is -15°C.
Set temperature to -18^ or colder (see section: "Temperature Adjustment").
Do not load freezer with goods until a temperature of -18^ has been reached, or until the red warning display has gone out.
Temperature Adjustment
With the individual temperature regulators the desired temperatures in the refrigerator and in the freezer compartment can be adjusted independent of one another.
Press desired temperature regulator, so that it pops out of its recessed position. The temperature display is switched to a blinking display of the currently selected reference temperature.
Turn temperature regulator to left or right to select the desired reference temperature. The temperature display immediately indicates the newly selected adjustment:
Refrigerator

Initial setting +5°C
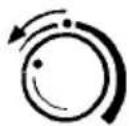
warmer to +10°C ^-1
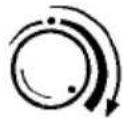
colder to +2°C
i A storage temperature of about +5°C in the refrigerator is generally considered to be sufficiently cold.
Freezer Compartment
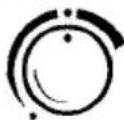
Initial setting (-18°C)
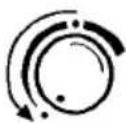
warmer (to -15°C)
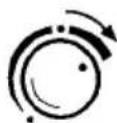
colder (to -24°C)
From a food sciences standpoint -18°C is considered to be a sufficiently cold storage temperature for the freezer compartment.
After temperature adjustment press the temperature regulator back into its recessed position.
The temperature display is switched back to indication of the current actual refrigerator or freezer compartment temperature.
Attention! Please check red warning display and temperature display regularly to assure maintenance of the storage temperature.
1) up to +15°C in vacation mode (see also section: "Vacation Mode")
FAST CHILL/FAST FREEZE
text_image
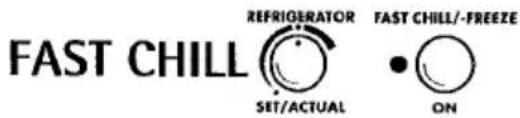
FAST CHILL REFRIGERATOR FAST CHILL/-FREEZE SET/ACTUAL ONThe FAST CHILL function is suited for quick cooling of large quantities of goods in the refrigerator, c.g. drinks and salads for a party.
To switch on the FAST CHILL function first press the temperature regulator for the refrigerator. The temperature regulator pops out of its recessed position. The blinking temperature display shows the refrigerator temperature setting.
Press FAST CHILL/-FREEZE button. "IC" appears in the refrigerator temperature display for intensive cooling.
Return refrigerator temperature regulator to its recessed position. The temperature display continues to indicate "IC", until the FAST CHILL function is ended.
The FAST CHILL function now provides for intensive cooling. A SET temperature of +2°C is automatically selected. The FAST CHILL function is ended automatically after a period of 6 hours. The originally selected SET temperature is again valid, and the temperature display again shows the actual refrigerator temperature.
You can stop the FAST CHILL function manually at any time by following the above steps, which are required for starting the FAST CHILL function, in the same sequence a second time.
text_image
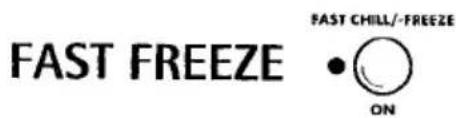
FAST FREEZE • ON FAST CHILL/-FREEZEThe FAST FREEZE function provides for quick freezing of fresh food products, and at the same time protects previously stored goods against undesired warming in the freezer compartment.
To start the FAST FREEZE function press the FAST CHILL/-FREEZE button. When the FAST FREEZE function is switched on, the yellow display next to the button lights up.
The appliance electronics automatically recognize, when the fast freezing process can be ended, and automatically switches off the FAST FREEZE function (after 30 to maximum 51 hours, depending on amount to be frozen).
You can stop the fast freezing process manually at any time by pressing the FAST CHILL/-FREEZE button again.
The FAST FREEZE function can only be switched on when the refrigerator temperature regulator is in the recessed position.
Switching the Appliance Off
In order to protect frozen goods, the appliance is guarded against accidental switching off (child-proof).
i Refrigerator and freezer compartments can be switched off independently of one another.
To switch off press and hold the ON/OFF button for about 5 seconds. A so-called "count down" is started in the temperature display, which counts backwards from "5" to "0". When "0" is reached the appliance switches off. Illumination at the temperature display goes off.
i) Applies only to models with mains failure warning:
If you remove the mains plug from its socket or disconnect the mains fuse or circuit breaker without previously having switched the appliance off with the ON/OFF buttons, the warning system remains active and calls your attention to the mains power interruption with an audible warning. You can temporarily silence the audible warning with the WARNING OFF button, but it nevertheless sounds again after about 2 hours. In such a case reconnect the appliance to the mains and press and hold both ON/OFF but or about 5 seconds.
If the appliance is to be removed from service for a lengthy period:
Switch appliance off by pressing and holding the ON/OFF button for about 5 seconds.
Remove the mains plug or switch off or turn out the circuit breaker or fuse.
Defrost freezer compartment and clean thoroughly (see section: "Cleaning and Care").
Leave door open after defrosting to avoid accumulation of odours.
Vacation Mode
In the vacation mode the REFERENCE temperature for the refrigerator is equal to +15°C. Thus you have the opportunity - without the accumulation of odours or mould - to leave the empty refrigerator closed rather than open, during periods of extended absence (e.g. vacation). Advantage: Unintentional closing of the door, or accidental closing of the door by persons who have access to your home during your absence, is no longer possible. Without the vacation mode this would lead to the accumulation of odours and mould.
To activate the vacation mode first press temperature regulator for refrigerator, so that it is freed from its recessed position.
Turn temperature regulator anticlockwise as far as possible. Indicated temperature in the temperature display is increased in 1° increments up to +10°C. The +10°C value is followed by +15°C. The refrigerator is now in the energy saving vacation mode.
Press temperature regulator back into recessed position.
Attention! Do not store any goods in the refrigerator when the vacation mode is operational. The temperature is regulated at about +15°C when the vacation mode is operational. This is too warm for food products.
Control and Information Systems
The control and information systems consist of a temperature display, an optical warning display and an acoustic warning device.
The system warns of:
- when the appliance door is open (not included with all models);
- power interruption (not included with all models);
- when the temperature in the refrigerator or freezer compartment is too high;
- possible partial or complete thawing of frozen goods;
- functional disturbances at the appliance.
"Open Door"-Warning
(not included with all models)
When the refrigerator or freezer compartment door is open, the red warning display blinks. If a door remains open for more than 80 seconds, an audible warning sounds as well. If you need more time for loading or rearranging frozen or refrigerated goods, you can switch off the audible warning by pressing the WARNING OFF button.
Power Interruption
(not included with all models)
If the power supply is interrupted, an audible warning sounds at 20 second intervals. In addition, the current actual temperatures in the refrigerator and the freezer compartment are indicated in blinking fashion by the temperature displays (2 seconds on, 2 seconds off). After one hour the audible warning only sounds at 40 second intervals. The audible warning can be switched off for about 2 hours with the WARNING OFF button.
In the event of a power interruption, the control and information systems can maintain operation of the temperature display and warning signal for up to 12 hours.
Temperature Warning
The red warning display blinks and an audible warning sounds, as soon as the temperature in the refrigerator or the freezer compartment climbs to more than 5°C above the respective, selected reference temperature. A rise in temperature of more than 5°C may be caused by:
- frequent door opening for long periods of time;
- loading with large quantities of warm foods;
- high ambient temperature;
- an error at the appliance.
The audible warning can be switched off with the WARNING OFF button. Both warning display and audible warning are automatically switched off, when the actual temperature in the refrigerator and/or the freezer compartment falls to 4°C warmer than the respective, selected reference temperature.
Note:
- The red warning display and the audible warning are inoperable:
- after adjusting the temperature to a colder setting, until the selected reference temperature is reached;
- for the refrigerator, with activated FAST CHILL.
- Only the audible warning is inoperable:
- after switching on the refrigerator or freezer compartment, until the selected reference temperature is reached for the first time;
- for the freezer compartment, with depressed FAST CHILL/-FREEZE button (see section: "Freezing").
Partial/Complete Thaw Warning
If frozen goods in the freezer compartment have been partially or completely thawed (e.g. during a temporary power interruption), the red warning display blinks. In addition the temperature display alternately indicates:
- the highest temperature to which the frozen goods have warmed; - and the current actual temperature in the freezer compartment. If suspicion of partial or complete thawing exists, you should check the quality of the foods to determine if they can be used, depending on extent of warming.
As soon as the temperature in the freezer compartment has again fallen below the critical thawing temperature of -4^ , the partial/complete thaw warning can be switched off with the WARNING OFF button.
Note: After the appliance has been switched on, the partial/complete thaw warning remains inoperative until the selected reference temperature has been reached for the first time.
Function Errors
If the appliance electronics have detected a technical malfunction which has to be corrected by a customer service technician, both optical and acoustic warnings are activated. In addition the respective temperature display alternately indicates:
- an error message (error codes F1 through F7) and - the current storage temperature (actual temperature).
Note: An appliance malfunction which is indicated by an error code, must be corrected by a customer service technician. The acoustic warning can be switched off for 24 hours with the WARNING OFF button. Cancelling of the error display is possible by switching the appliance off, which should however only be undertaken during repair by the customer service technician.
Opening the Freezer Compartment Door
If the freezer compartment door is closed when the appliance is in operation, it is possible that it cannot be immediately opened again, because a vacuum occurs in the freezer compartment which holds the door closed until pressure has been equalised. The door can be opened again after several minutes.
Interior Accessories
Storage Shelves/Storage Racks
Depending on the model, your appliance is equipped with either glass or plastic storage shelves, or storage racks.
Models with glass storage shelves
A storage shelf must be inserted into the lower guide track above the fruit and vegetable trays. It must always remain in this position, so that fruits and vegetable remain fresh longer.
The remaining storage shelves can be adjusted to various heights:
Pull the storage shelf forward until it can be tipped up or down and removed.
To insert at a different height use the same procedure in reverse.
Adjustment for tall goods:
Remove the front half of the two-part vario glass storage shelf and insert it at a different level. Space is thus gained for storage of tall goods on the underlying storage shelf.

natural_image
Hand placing a black arrow on a tray with an arrow indicating direction (no text or symbols)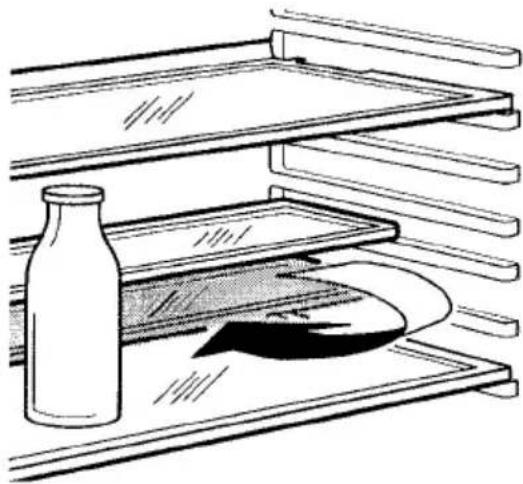
natural_image
Illustration of a bottle placed on a tray with a cloth inside, no text or symbols presentModels with plastic storage shelves
A package with clamp tabs is included for models with plastic storage shelves.
Before inserting the storage shelves into the guide tracks, set clamp tabs into the four pockets on the underside according to the included instruction sheet. This assures soft and stable positioning of the of the storage shelves.
A storage shelf must be inserted into the lower guide track above the fruit and vegetable trays. It must always remain in this position, so that fruits and vegetable remain fresh longer.
The remaining storage shelves can be adjusted to various heights:
Pull the storage shelf forward until it can be tipped up or down and removed.
To insert at a different height use the same procedure in reverse.
Models with storage racks
The glass or plastic storage shelf without openings must be inserted into the lower guide track above the fruit and vegetable trays. It must always remain in this position, so that fruit and vegetables remain fresh longer.
The storage racks can be adjusted to various heights:
Pull the storage rack forward until it can be tipped up or down and removed.
To insert at a different height use the same procedure in reverse. Always be certain that the bar at the back of the storage racks points up, so that refrigerated goods cannot come into contact with the back wall of the refrigerator compartment.
The storage racks can be set diagonally for the storage of opened bottles:
Pull the storage rack out until it can be tipped up and insert the front runners into the next highest guide track.
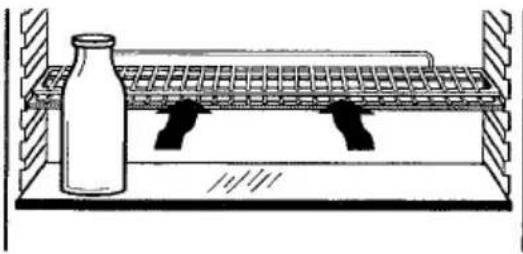
Adjustment for tall goods:

Insert the front half of the two-part vario storage rack (not included with all models) under the back half. Space is thus gained for storage of tall goods on the underlying storage shelf.
natural_image
Simple line drawing of a laboratory setup with a bottle and grid-patterned bench (no text or symbols)Variable Inner Door
The door compartments can be pulled up and removed, and inserted at other positions as needed.
Trays and Compartments
Vario tray-set (not included with all models)
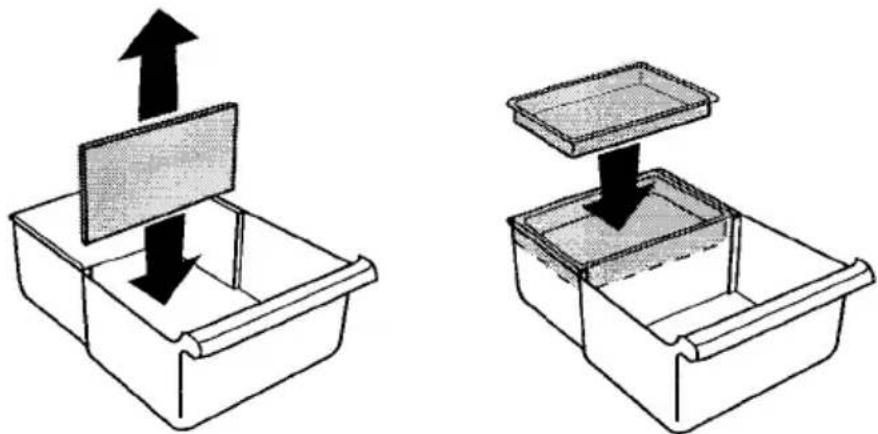
The two large fruit and vegetable trays can be divided with an adjustable partition. Half trays (if included) can be hung at the back of the fruit and vegetable trays.
Tube compartments (not included with all models)
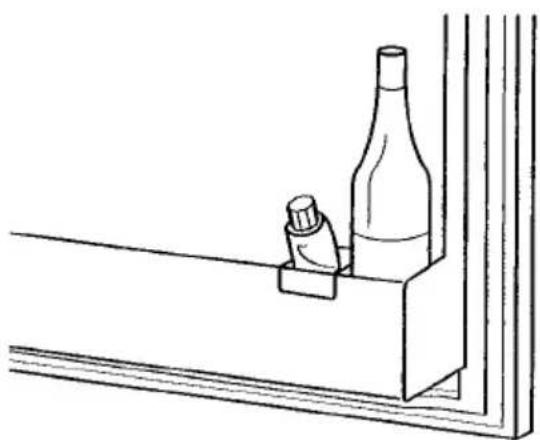
Some models are equipped with compartments for tubes and small articles. When set into the bottle compartment, the tube compartment also prevents tipping of individual bottles.
natural_image
Simple line drawing of a bottle and a small object on a shelf, no text or symbols presentCorrect storage
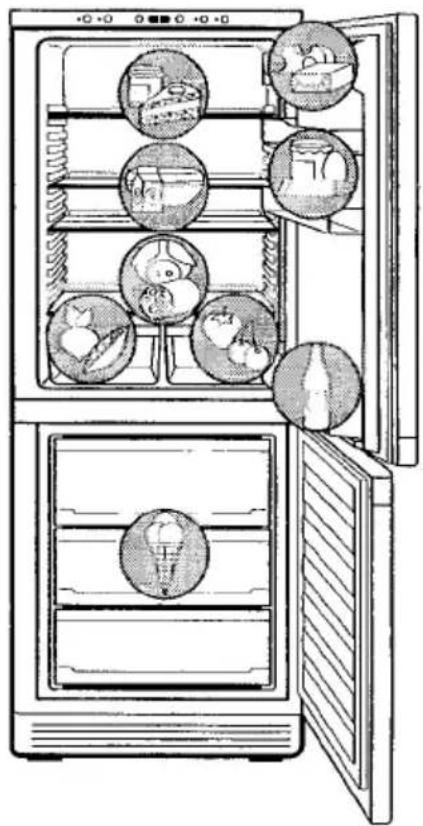
For physical reasons, the refrigerator compartment has different temperature zones. The coldest zone is on the lowest storage shelf immediately above the fruit and vegetable trays. Warmer zones are the upper storage shelves and door racks. The arrangement (see fig.) indicates where different types of food are best stored to make the most of temperature variations.
For instance, the shelf immediately above the fruit and vegetable trays should be 5 °C for safe storage of meat and fish products. In order to check that the appliance is at 5 °C on the lowest shelf you can carry out the following test yourself:
natural_image
Line drawing of an open refrigerator with six compartments filled with food items (no text or symbols)Place a cup of water in the center of the said shelf with a thermometer inside.
Leave the fridge door closed overnight and check the temperature first thing in the morning.
At this point the temperature should read no more than 5 °C; if it does, you need to adjust the temperature regulator to a colder setting.
For further information on keeping food cool and safe a guide published by the Ministry of Agriculture, Fisheries and Food is available and can be obtained free of charge by contacting:
Foodsense, London SE99 7TT. Tel: 0645 556000
Tip: Food stored in the refrigerator compartment should always be covered or packed so that they do not dry out, lose their flavour, or transfer their flavour to any other refrigerated food. The following are suitable for packing:
- polyethylene freshness bags and foil;
- plastic containers with lids;
- special plastic covers with rubber retainers;
- aluminium foil.
Freezing
Except for the bottom drawer, which serves only for storage purposes, all compartments and drawers in the freezer compartment are suited for freezing.
Attention!
- Before foods are frozen, the actual temperature in the freezer compartment must be -18^ or colder.
- Please observe indicated freezing capacity on the serial plate. The freezing capacity represents the maximum amount of fresh goods that can be frozen within 24 hours. If you freeze goods on several days, one after the other, freeze amounts equal to 2/3 to 3/4 of the capacity indicated on the serial plate.
- Thawed foods which have not been processed further (cooked into meals) may not under any circumstances be frozen a second time.
For exploitation of maximum freezing capacity press the FAST CHILL/FREEZE button 24 hours prior to freezing, or 4 to 6 hours for smaller quantities. Yellow display lights up.
[i] The FAST CHILL/-FREEZE button need not be pressed for freezing of small quantities of up to 3 kg.
All foods must be packed air tight prior to freezing, so that they do not dry out or lose their flavour, and so that no flavour contamination of other frozen goods occurs. Caution! Do not touch frozen goods with wet hands. Hands can freeze to the goods.
Place packaged goods in the drawers. Unfrozen goods may not come into contact with already frozen goods, otherwise the frozen goods may start to thaw.
The appliance electronics automatically recognise when the FAST FREEZE function can be stopped, and switch it off automatically. Yellow display goes out. You can also stop the FAST FREEZE function manually by pressing the FAST CHILL/-FREEZE button again.
Tips:
- The following are suited for the packaging of frozen goods:
- freezer bags and polyethylene wraps;
- special cans for frozen goods;
-
extra-thick aluminium foil
-
The following are suited for sealing bags and wraps: plastic clips, rubber bands or adhesive tape.
- Press air out of bags and wraps before sealing, because air encourages drying of frozen goods.
- Make flat packages, because these freeze more quickly.
- Do not fill cans for frozen goods to the brim with liquid or paste-like goods, because liquids expand during freezing.
Note for inspection authorities:
Batch plans for the determination of freezing performance or warm-up time can be requested directly from the manufacturer.
Frozen Storage
Attention! Before initial loading of the freezer compartment with previously frozen goods, the required storage temperature of -18°C must be reached.
- Load freezer only with packaged frozen goods, so that they do not dry out or lose their flavour, and so that no flavour contamination of other frozen goods can occur.
- Please observe maximum storage times and expiry dates of frozen goods.

In so far as possible store frozen goods separately according to type in drawers. Some models are provided with index-tabs which can be attached to the drawers. In order to identify the contents of individual compartments, attach the index-tabs so that they cover the storage goods symbols (see section: "Storage Goods Symbols/Freezing Calendar"). Thus you have a better overview, avoid opening the door for long periods and therefore save energy.
Preparation of Ice Cubes
Fill ice cube tray (not included with all models) 3/4 full with cold water and place in the freezer tray or a drawer and allow to freeze.
To remove the finished ice cubes twist the ice cube tray or hold under running water for a short time.
Attention! Do not, under any circumstances, free an ice tray which is frozen to the appliance with pointed or sharp edged objects. Use a spoon-handle or similar object.
Storage Goods Symbols/Freezing Calendar
(not included with all models)
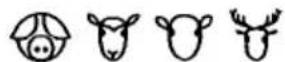
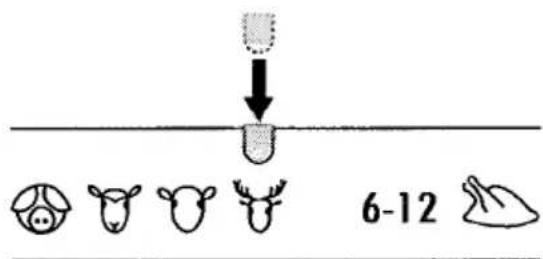
• The symbols on the drawers show different types of frozen goods.
6-12

- The numbers indicate storage times in months for the appropriate types of frozen goods. Whether the upper or lower value of the indicated storage time is valid depends on the quality of the foods and pre-treating before freezing. The lower value applies to foods with high fat content.
- By attaching the included index-tabs to the drawers, they can be marked according to which type of foods the individual compartments contain.
text_image
6-12Defrosting
The refrigerator is defrosted automatically
The electronics start the defrosting cycle in the refrigerator as needed based on economical energy use and the maintenance of a constant temperature. Defrosting cycles are started more or less often, depending on the degree of moisture accumulation. Because the greatest accumulation of moisture occurs when the door is open, the frequency
of defrosting cycles is determined by frequency and duration of door opening.
The water collects in the discharge trough at the back wall of the refrigerator, and is fed through the discharge opening in the catch tray at the compressor where it is evaporated.
Freezer Compartment Defrosting
Moisture is precipitated in the form of white frost in the freezer compartment during operation and when the door is opened, especially in the middle at the top. Remove this white frost from time to time with a soft plastic scraper, e.g. a dough scraper. Do not under any circumstances use hard or pointed objects for this purpose.
The appliance should be defrosted when the thickness of the white frost has reached about 4 mm; but at least once a year in any case. A convenient time for defrosting is any time when the appliance is empty, or only minimally loaded.
Warning!
- Do not use electrical heating appliances or any other mechanical or artificial devices to speed up the defrosting process, with the exception of those recommended in these operating instructions.
- Do not use defrosting sprays, because they may be health endangering and/or contain substances damaging to plastics.
About 12 hours prior to defrosting push the FAST CHILL/-FREEZE button, in order to build up sufficient chill reserve for the interruption in operation.
Caution! Do not touch frozen goods with wet hands. Hands can freeze to the goods.
Remove frozen goods, pack them in several layers of newspaper, cover them and store them in a cool place, e.g. in a refrigerator.
Switch off refrigerator and freezer and remove plug from the mains, or switch off or turn out the circuit breaker or the fuse.
Remove all drawers except for the one at the bottom. The bottom drawer serves as a practical water collecting vessel.
Tip: In order to speed up the defrosting process, place a pot of hot water in the freezer compartment and close the door. In addition, remove pieces of ice that break away before defrosting is complete.
After defrosting thoroughly clean the freezer interior, as well as interior accessories (see section: "Cleaning and Care").
Cleaning and Care
For hygienic reasons the appliance interior, including interior accessories, should be cleaned regularly.

Warning!
- The appliance may not be connected to the mains during cleaning. Danger of electrical shock! Before cleaning switch the appliance off and remove the plug from the mains, or switch off or turn out the circuit breaker or fuse.
- Never clean the appliance with a steam cleaner. Moisture could accumulate in electrical components, danger of electrical shock! Hot vapours can lead to the damage of plastic parts.
- The appliance must be dry before it is placed back into service.
Attention!
- Ethereal oils and organic solvents can attack plastic parts, e. g.
- lemon juice or the juice from orange peals;
- butyric acid;
- cleansers which contain acetic acid.
Do not allow such substances to come into contact with appliance parts. - Do not use any abrasive cleansers.

If only the refrigerator is to be cleaned, press the FAST CHILL/-FREEZE button several hours in advance, in order to build up sufficient chill reserve in the freezer compartment for the interruption in service. Thereafter, do not open the freezer compartment door.

Defrost freezer compartment before cleaning (see section: "Defrosting").

Switch off refrigerator and freezer and remove plug from the mains, or switch off or turn out the circuit breaker or the fuse.

Clean the appliance and the interior accessories with a cloth and lukewarm water. Commercially available dish washing detergents may also be used.

After cleaning wipe with fresh water and rub dry.

Check the water discharge opening at the back wall of the refrigerator. A clogged water discharge opening can be freed with the help of a wire.

Accumulation of dust at the condenser reduces cooling performance and increases energy consumption. For this reason carefully clean the
condenser at the back of the appliance once a year with a soft brush or a vacuum cleaner.

After everything is dry place appliance back into service.

Energy Saving Tips
- Do not install the appliance near cookers, radiators or other sources of warmth. High ambient temperatures cause longer, more frequent operation of the compressor.
- Ensure sufficient air circulation and exhaust at the appliance base and at the back wall of the appliance. Never cover air vent openings.
- Do not place warm foods into the appliance. Allow warm foods to cool first.
- Only leave door open as long as necessary.
- Do not set temperature any colder than necessary.
- Place frozen goods into the refrigerator for thawing. Cold from frozen goods is thus used for cooling in the refrigerator.
• Always keep the condenser at the back of the appliance clean.
What to do if ...
Correcting Malfunctions
Perhaps a malfunction has been caused by a minor error, which you can correct yourself with the help of the following instructions. Do not attempt any further repairs if the following instructions do not help in each specific case.

Warning! Refrigerators/freezers may only be repaired by trained personnel. Repairs carried out by untrained personnel can lead to substantial danger for the user. Please contact your dealer or our customer service department for repairs.
| Malfunction | Possible cause | Remedy |
| Appliance does not function, green stand-by display and temperature display are not lit. | Appliance is not switched on. | Switch appliance on. |
| Mains plug is not inserted or is loose. | Insert mains plug. | |
| Fuse has blown or is defective. | Check fuse, replace if necessary. | |
| Mains socket is defective. | Mains malfunctions are to be corrected by an electrician. | |
| Appliance does not function, green stand-by display is not lit, temperature is indicated as blinking display, audible warning sounds at regular intervals.1 | Mains interruption warning.1 | Please check to see if the mains plug is inserted or if the fuse has blown (see also section: "Control and Information Systems"). |
| Red warning display blinks, audible warning sounds, temperature display indicates an error (F1, F2, etc.). | A functions error has occurred. | Switch the audible warning off by pressing the WARNING OFF button.Please make a note of the indicated error and inform the customer service department. Do not open the appliance door again. |
| Red warning displayblinks, two temperaturesare indicated alternately bythe temperature display. | Partial/Complete ThawWarning.Frozen goods have beenwarmed to such an extentthat they have been partly-ally or completely thawed. | Please refer to the section"Control and Information Systems". |
| The freezer compartmenttemperature is insufficient. | Temperature is not pro-perly adjusted. | Please refer to the section"Temperature Adjustment". |
| Door was open for a longtime. | Only leave the door openas long as necessary. | |
| Within the last 24 hours alarge quantity of warmfoods were loaded. | Press FAST FREEZE button. | |
| Appliance is next to asource of warmth. | Please refer to the section"Installation Location". | |
| Interior illumination doesnot function. | Light bulb is defective. | Please refer to "Light BulbReplacement" in this sec-tion. |
| Large accumulation offrost in the appliance,perhaps also at the doorseal. | Door is not properly sealed(perhaps after re-hangingdoor). | Carefully warm the doorseal with a hand-held hairdryer at those points whichare not airtight (no warmerthan approx. 50°C). At thesame time, shape the war-med door seal by hand, sothat it is again properlyseated. |
| Unusual noises. | Appliance is not level. | Readjust the front levellingfeet. |
| Appliance is in contactwith wall or other objects. | Push appliance away ashort distance. | |
| A part at the back of theappliance, e.g. a tube, is incontact with anotherappliance part or the wall. | Bend this part away care-fully if necessary. | |
| The compressor does not start immediately after pressing the FAST CHILL/-FREEZE button, or after changing the temperature setting. | This is normal, no error has occurred. | The compressor starts after a period of time. |
| Compressor does not start after appliance is switched on. | Within the first 5 minutes after switching the appliance on, the electronics initialise a self-test. | The compressor is started automatically, after the self-test has been completed. |
1) not included with all models
Replace light bulb

Warning! Danger of electrical shock! Before replacing the light bulb switch appliance off and remove the mains plug, or switch off or turn out the circuit breaker or fuse.
Light bulb specifications: 220-240 V, max. 15 W, socket: E 14

To switch the appliance off press and hold both ON/OFF buttons for about 5 seconds.

Remove mains plug.

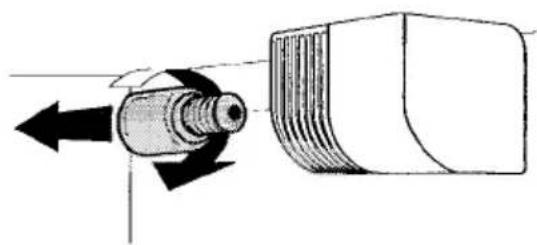
Replace defective light bulb. The light bulb is accessible from the back side of the lamp cover.
natural_image
Diagram of a mechanical component with directional arrows indicating motion (no text or symbols)Customer Service
If you cannot find the remedy for a malfunction in these operating instructions, please contact your dealer or our customer service department. Addresses and telephone numbers are listed in the accompanying booklet "Guarantee Conditions/Customer Service Locations".
Selective ordering of replacement parts can save unnecessary travel and costs. For this reason always provide the following appliance information:
This information can be found on the serial plate in the interior at the
- Model Name
- Model Number (PNC)
- Serial Number (S-No.)
text_image
Scanned document page with dense text columns and a grid of small rectangular blocks, likely a form or table section.left of the appliance. We recommend that you enter this information here, so that it is handy if needed.
If the temperature display should indicate an error (F1, F2, etc.), inform customer service of the displayed error.
Note: The customer bears the costs of unjustified customer service calls even during the guarantee period.
Noises during Operation
The following noises are characteristic of refrigeration appliances:
- Clicks Whenever the compressor switches on or off, a click can be heard.
• Humming As soon as the compressor is in operation, you can hear it humming.
- Bubbling/Splashing When refrigerant flows into thin tubes, you can hear bubbling or splashing noises. Even after the compressor has been switched off, this noise can be heard for a short time.
Regulations, Standards, Guidelines
This appliance was designed for household use and was manufactured in accordance with the appropriate standards. The necessary measures in accordance with appliance safety legislation regulations (GSG), accident prevention regulations for refrigeration appliances (VBG 20) and the regulations of the German Society of Electrical Engineers (VDE) were observed in the manufacture of this appliance. The refrigerant circuit has been checked for leaks.
CE This appliance is in accordance with the following EU guidelines: - 73/23/EWG dated 19 February 1973 - low voltage guidelines. - 89/336/EWG dated 3 May 1989 (including guideline change notice 92/31/EWG) - EMV guideline
Technical Terminology
- Refrigerant Fluids, which are used for refrigeration are called refrigerants. They have a relatively low boiling point; so low, that the warmth of foods in the refrigeration appliance can cause them to boil or vaporise.
- Refrigerant circuit Sealed circulation system, in which the refrigerant is found. The refrigerant circuit consists for the most part of an evaporator, a compressor, a condenser and tubing.
- Evaporator The refrigerant is evaporated in the evaporator. This warmth is withdrawn from the appliance interior, which is thus cooled. Like all fluids, refrigerants require warmth in order to be evaporated. For this reason the evaporator is located in the appliance interior or installed with foam directly behind the interior wall, and is thus invisible.
- Compressor The compressor looks like a small bin. It is powered by an electric motor and is housed at the back in the base of the appliance. It is the task of the compressor to withdraw vaporous refrigerant from the evaporator, to compress it and feed it to the condenser.
- Condenser The condenser is usually in the form of a grid. Compressed refrigerant from the compressor is liquefied in the condenser. Thus warmth is released, which is given off into the surrounding air at the surface of the condenser. The condenser is therefore outside of the appliance, usually at the back.
AEG Hausgeräte AG
Postfach 1036
D-90327 Nürnberg 1
© Copyright by AEG
H 271 282 500-01-0497
AEG Domestic Appliances Ltd
Customer Care Department
55-77 High Street
Slough
Berkshire SL1 1DZ
Telephone: 08705 350350