
Santo 1442 i U - Kühlschrank AEG - Kostenlose Bedienungsanleitung
Finden Sie kostenlos die Bedienungsanleitung des Geräts Santo 1442 i U AEG als PDF.


Benutzerfragen zu Santo 1442 i U AEG
0 Frage zu diesem Gerät. Beantworten Sie die, die Sie kennen, oder stellen Sie Ihre eigene.
Eine neue Frage zu diesem Gerät stellen
Laden Sie die Anleitung für Ihr Kühlschrank kostenlos im PDF-Format! Finden Sie Ihr Handbuch Santo 1442 i U - AEG und nehmen Sie Ihr elektronisches Gerät wieder in die Hand. Auf dieser Seite sind alle Dokumente veröffentlicht, die für die Verwendung Ihres Geräts notwendig sind. Santo 1442 i U von der Marke AEG.
BEDIENUNGSANLEITUNG Santo 1442 i U AEG
ÖKO\_SANTO 1442 iu SANTO 1500 iu ÖKO\_SANTO 1542 iu
Integrated Build-Under Automatic Refrigerator
Operating Instructions
text_image
A 1 2 0-4 3①
natural_image
Diagram of a mechanical component with a curved housing and directional arrow, no text or symbols present②
text_image
1 2 3 4 5③
text_image
6 7 8 9④
natural_image
Line drawing of a hand holding a tool above a rectangular object with a small object inside (no text or symbols)⑤
natural_image
Technical line drawing of a mechanical device with internal components and directional arrows (no text or symbols)⑥
Congratulations!
You have made a good choice!
By choosing an household appliance you have combined both high technical performances and a good operation.
Energy consumption in this appliance is reduced.
Furthermore, its operation is aimed to reduce air pollution, helping to conserve the environment.
We suggest you read this booklet carefully to use the appliance in the best way.
We hope that the use of the appliance meets fully your requirements.
Protect the environment!
Disposal of packaging
The packaging material is 100 % recyclable. It should sorted and taken of the local disposal sites for reprocessing.
Disposal of the appliance
This appliance is free of HCFC's (refrigerant circuit contains R 134 a) or free of HFC's (refrigerant circuit contains R 600 a – isobutane). For more details, please refer to the rating plate on the appliance.
The appliance was manufactured from reprocessable materials and, when scrapped, should be disposed of in a proper and environmentally appropriate way.
For this, the appliance is to be rendered unusable by cutting off the power supply cable at the appliance. Remove the door lock or render it unusable to prevent children being locked inside.
Contents
Page
Safety advice 13
Know your appliance 14
Selecting location 14
Setting up & electrical connection..... 14
Switching on & setting temperature ... 15
Adjusting interior & door compartments 16
Keeping foodstuffs.... 16
Storing frozen food 17
Making ice.... 17
Defrosting freezer section.... 17
Cleaning.... 17
Interior light 18
Tips on saving electricity 18
Recommendations.... 18
Faults – What to do? 18
Faults and servicing.... 19
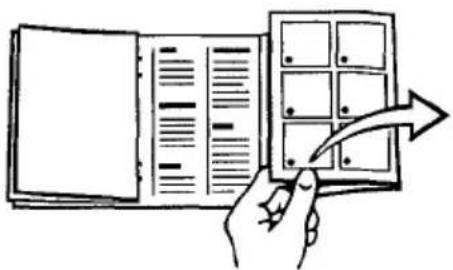
You will find the drawings concerning these instructions on the inside of the back cover.
By opening it, you will have the drawings facing the text.
text_image
Illustration showing a hand inserting a grid into a notebook with an arrow indicating the direction of insertion.The technical data refer to an ambient temperature between +10 °C and +32 °C, appliances with ***-compartment +16 °C and +32 °C.
This appliance has been submitted to hermeticity tests and it complies with anti-accidents regulations for cooling appliances VBG 20 and to CEE N° 87/308 on radio - interference.
Safety advice
Before operating the appliance, please read these instructions carefully.
The Manufacturer cannot be held responsible if the following instructions are not observed.
- If the appliance is damaged it must not be operated. In case of doubt, please contact your supplier.
● This appliance has been designed for domestic use.
In case of industrial use, please follow the regulations for the particular field.
● The installation and the electrical connection of the appliance have to be carried out by a qualified technician, in compliance with the instructions given by the Manufacturer. Please check that the voltage in your home corresponds to the voltage indicated on the rating plate.
● The electrical security of the appliance is granted only if the domestic installation is in compliance with local by-laws. Do not use extension cords.
● Technical interventions and repairs have to be carried out by qualified technicians only.
- In case of faults or when cleaning the appliance, disconnect it from the electrical supply. Unplug the appliance or cut electricity at the mains supply. When unplugging the appliance, do not pull the cord, but the plug.
- If the appliance is discarded, remove the cord and make it inoperable. Destroy the catch so as to avoid the risk of children being trapped inside and suffocated, whilst playing.
● Avoid exterior and interior damages to the appliance, i.e. damages to the refrigerating circuit caused by cuts with sharp or cutting instruments, bent pipes or damages to the protections; the refrigerating substance may damage the eyes.
- Do not obstruct or cover the ventilation openings provided on the appliance.
- Do not store any explosive material. High-percentage alcohol should be stored closed and upright. Bottles containing liquids which may freeze should not be placed in the freezer compartment, as bottles can break when liquids inside them freeze.
- Do not store sealed containers of carbonated drinks in the freezer compartment as they explode. Only use plastic containers from the freezer.
- Important – do not eat ice cubes or ice lollies immediately after their removal from the freezer compartment as they may give rise to cold burns.
For appliances with isobutane (R 600 a)
The refrigerant isobutane is a natural gas of high environmental compatibility but which is inflammable.
Therefore, it is essential to ensure that the ducts of the refrigerant circuit do not get damaged.
In the event of damage occurring, avoid open fires or potential ignition sources. The room in which the appliance is situated must be thoroughly ventilated.
Know your appliance
User Instructions
You will find all important information on your appliance in these User Instructions.
The instructions may slightly dependent on models.
Please read through the instructions carefully, and mark any passages which are particularly important to you. Take care of these pages, so that they are always available for reference.
Versions:
Refrigerator only
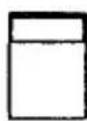
Refrigerator with ***-frozen food storage compartment.
Energy-saving tips:
Boxed-in sections of text in these User Instructions contain advice on how to save energy.
Selecting location
Dry and well-ventilated rooms are suitable. Very, cold rooms are not suitable for operation of this appliance. In a humid location, moisture will condense on the external surfaces of the appliance.
The appliance should not be located in a place which is subject to dripping water or rain.
High room temperatures, direct sunlight, or location near heating or stoves increase the power consumption and should be avoided. If it is not possible to avoid placing the appliance next to a source of heat, note that the following spacings should be maintained:
to coal or oil ovens or heaters 30 cm to electric cookers 3 cm
Where the refrigeration appliance must be placed next to a cooker, suitable insulating panels (not asbestos) can be obtained from dealers, for placing between the appliances.
Setting up & electrical connection
Please check your appliance and ensure that it is undamaged; any transport damage must be reported to your dealer within 24 hours of receipt.
The provided Installation Instructions advise you on how to set up and build in the appliance.
The appliance may be connected only to a properly-installed, earthed plug and/or socket. Check that the supply voltage and frequency match those given on the Rating Label (at the bottom inside the refrigerator).
Earthing of this appliance is compulsory by law. The Manufacturer cannot be held responsible for damage to objects or injury to persons arising from the non-observance of this requirement.
Let the appliance stand upright for at least 2 hours before connecting it up and switching on, to allow any oil which has moved during transportation to drain back down into the compressor.
Wipe the appliance interior with a damp cloth, then rub dry, before first putting food in. Advice on cleaning is given on in section "Cleaning".
Important!
If the socket outlets in the home are not suitable for the plug supplied with this appliance, it should be cut off and an appropriate three pin plug fitted.
Note: The plug severed from the mains lead must be destroyed, as a plug with bared flexible cord is hazardous if engaged in a live socket outlet.
Use a 13 A fuse approved by ASTA to BS 1362, i. e. carries the

mark.
Always replace the fuse cover, never use the plug with the fuse cover omitted.
The wires in this mains lead are coloured in accordance with the following code:
Green & Yellow = Earth, Blue = Neutral, Brown = Live.
As the colours of the wires in the mains lead of this appliance may not correspond the coloured markings identifying the terminals in your plug, proceed as follows:
The wire which is coloured green & yellow must be connected to the terminal in the plug which is marked with the letter E or by the earth symbol 12 or coloured green or green & yellow.
The wire which is coloured blue must be connected to the terminal which is marked with the letter N or coloured black.
The wire which is coloured brown must be connected to the terminal which is marked with the letter L or coloured red.
Warning - this appliance must be earthed.
Switching on & setting temperature
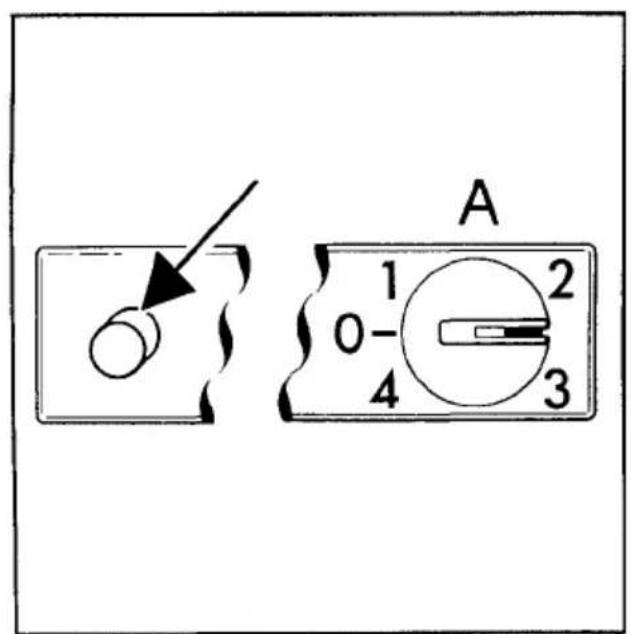
Illustration ①, temperature selector A.
The selector gives stepless setting of temperature, and switches the appliance on (turn clockwise) and off.
Setting to 0—, the cooling system and the interior light are switched off.
Setting to 1, the cooling system has minimum effect (highest temperature).
Setting to medium 2-3 the cooling system gives medium temperature (see Illustration ①).
Setting to 4, the cooling system gives maximum effect (lowest temperature).
The correct setting of the temperature selector depends on how much food is in the refrigerator, how often the door is opened, and what the room temperature is. We recommend a middle setting. You will soon find out what setting suits your conditions.
Advice
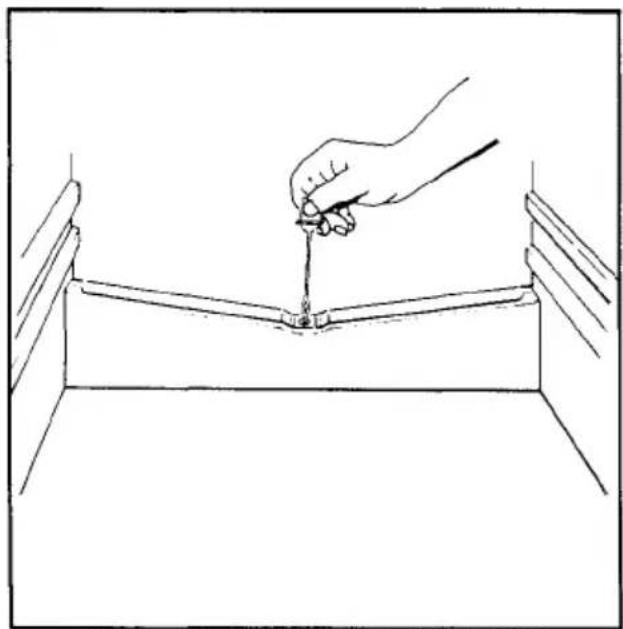
During running, frost or drops of water appear in sequence on the rear panel inside the refrigerator. This is normal. It is not necessary to wipe or scrape off the water drops or frost. The rear panel is defrosted automatically. The defrost water collects in the drain channel (Illustration ⑤) and is directed to a trough over the compressor, where it evaporates.
Adjusting interior and door compartments
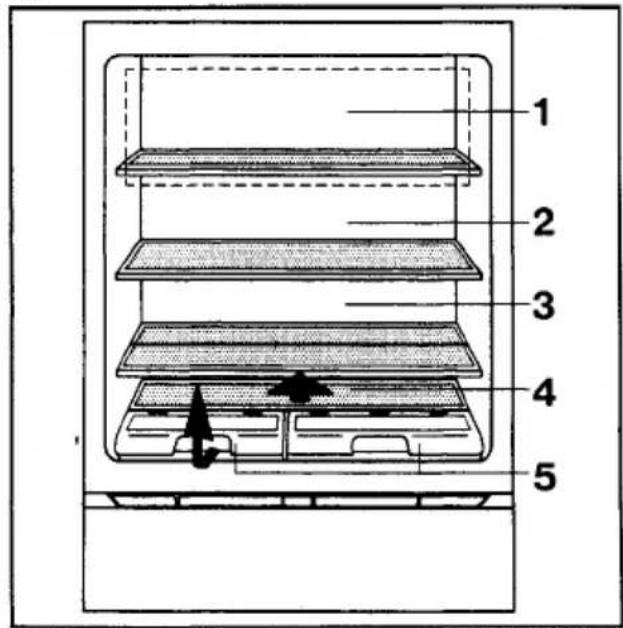
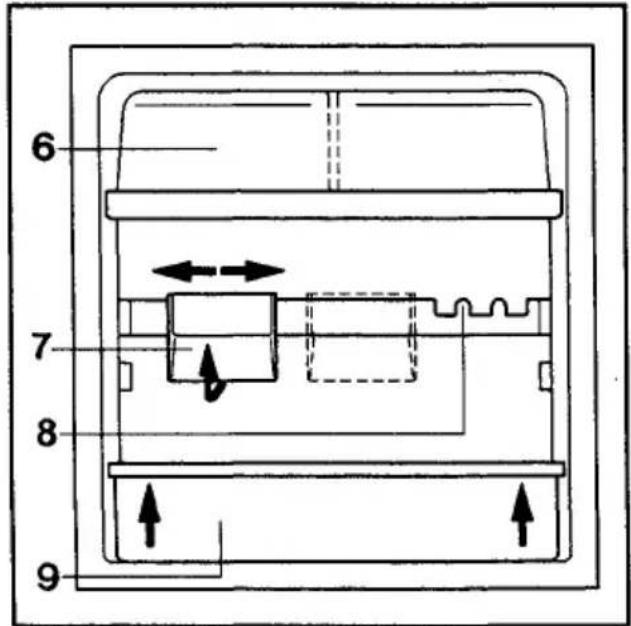
Fig. ③ + ④
Refrigerator compartment
Shelves 2 and 3 are height-adjustable. Removable halfshelves 3 (where fitted) allow tall containers to be stored upright.
Removing the vegetable bins: Lift lid (where fitted) and take out vegetable bins 5.
Inside door
The compartments in the inside door can be removed simply by lifting. The moveable tube holder 7 (where fitted) can be removed by pulling forward and lifting. Hook (where fitted) 8 for hanging small sausages etc.
Keeping foodstuffs
Various temperature zones are available in the refrigerator. The coldest zone is on the panel above the vegetable crispers, at the rear.
- Small quantities (1.5 kg max.) of food can be frozen and stored for a month or more in the *** compartment, where the temperature is -18°C or lower.
Important:
If the temperature where the refrigerator is located drops below +16 °C over long periods, the temperature in the *** compartment will not be low enough to store frozen food to another.
● Wherever possible, produce should be covered or packaged when in the refrigerator, to prevent drying out and the transfer of taste from one food to another.
The following foods are not suited to storage in a refrigerator:
● Sliced lemons, pineapples, onions and garlic (because of the strong smells given off).
● Bread and potatoes (they dry out).
● Half-ripe fruit and vegetables (e.g. tomatoes) will not continue to ripen.
● Bananas go bad very quickly because of their sensitivity to coldness.
Suggested food storage Fig. ③ + ④):
1 Making ice and storing frozen food (in models with *** ice compartment)
2 Cooked food, bakery products, dairy products, eggs.
3 Canned foods, drinks lying down
4 Fish, meat, sausage
5 Fruit, salad, vegetables
6 Cheese, butter
7/8, Tubes, small tins, small bottles, small sausuges etc.
9 Bottles
Storing frozen food
(in models with *** compartment)
The allowable storage time depends on the type of food. With proprietary frozen foods, the storage time is given on the package. Defrosting or defrosted food should be used at once, or prepared (cooking, roasting) – it should never be re-frozen. Only after defrosted food has been cooked can it be re-frozen.
Making ice
(in models with *** compartment)
Fill ice tray (where fitted) 34 full with water and stand it on the floor of the *** compartment. If you require more ice capacity, you can order extra trays from your dealer.
To loosen the tray if it is frozen to the compartment floor, lever it with the handle of a spoon. Never use pointed or sharp-edged implements – this could result in damage to the cooling system. Loosen ice cubes from plastic trays by bending the tray.
With aluminium trays, hold the underside of the tray under running water.
Defrosting
Automatic defrosting occurs only in the main refrigerator compartment, not in the *** compartment (to avoid stored frozen produce defrosting also). The frost layer should be scraped off from time top time with an ice scraper (do not use pointed or sharp-edged implements).
As the ice/frost layer in the *** compartments increases, so does the electricity consumption. When the layer is about 3 mm thick the appliance should be defrosted.
Remove all food from the *** compartment (put it somewhere cool), turn the temperature selector to 0-. Mop up the defrosted water with a sponge or cloth.
Do not use any electrical heater to speed-up defrosting!
Cleaning
Always remove the plug or switch off at the socket before doing any cleaning!
If the plug/socket cannot be reached, switch off at the house fuse box/circuit breaker.
Use lude-warm water with some mild washing-up liquid added to clean the interior and the accessories. Then wipe over with a cloth soaked in clean water, followed by a dry cloth.
Do not use powder or acidic cleaners, nor chemical grease removers (they create smell).
Concerning removal of the door compartments see "Adjusting interior and door compartments".
Wipe the door seal occasionally using clean water, and dry it thoroughly.
Do not let oil or fat get on the seal.
Do not forget to switch the appliance on again at the plug/socket when cleaning is completed.
The drain channel (Illustration ⑤) in the automatically-defrosted refrigerator must be kept clear, to allow the defrost water to drain away. Clean channel and aperture carefully with the provided cleaning stick, or a similar one.
Ventilation
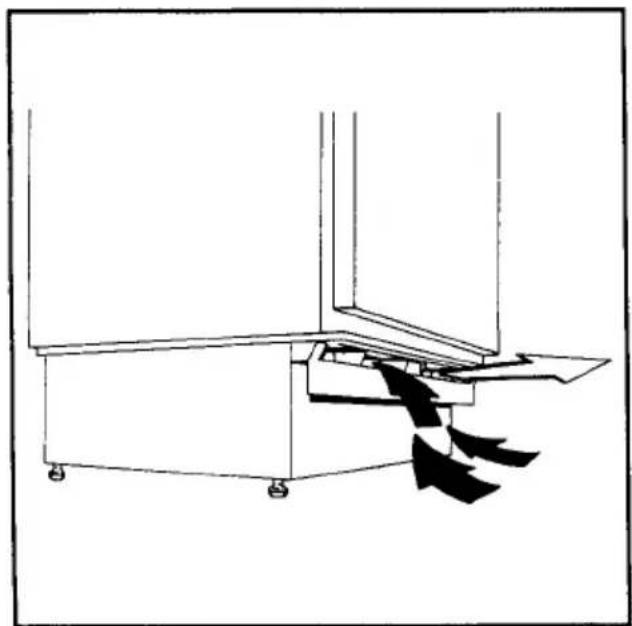
The slots provided for ventilation (Illustration ⑥) must not be covered. If fluff or dirt builds up on the slots, remove it with a suitable brush.
Interior light
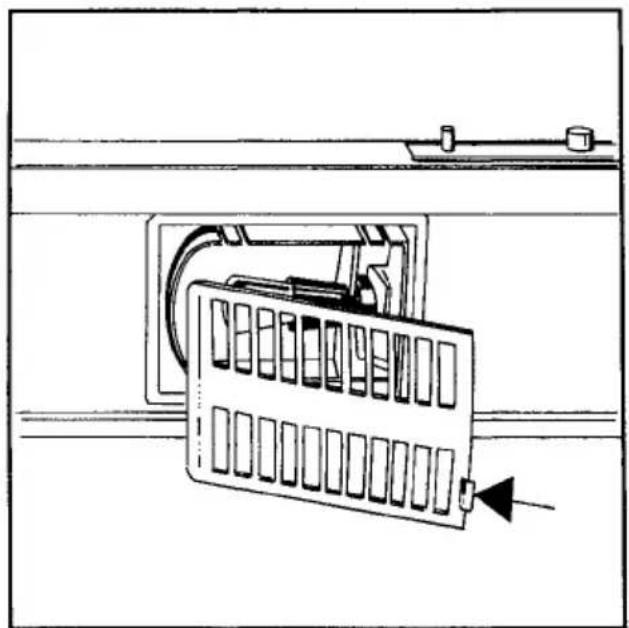
Illustration ②
This comes on when the door is opened and goes off when it is closed. The light switch actuator is on the upper front panel (Illustration ①, see arrow).
Advice:
A built-in safety switch (not visible) switches off the interior light if it gets too warm because the door has been left open for too long. The light will operate normally again once the door has been closed for a short time.
Replacing interior light bulb
Illustration ②
If the light does not come on when the door is opened, press the actuator in a few times to see if it is working correctly (also, has the door been left open for a long time just before this, and the safety switch has operated?).
When neither of these factors seems to be the reason for the light not coming on, the bulb should be replaced.
Switch off at the plug/socket or at the fusebox.
Push tag (Illustration ②) to the left and remove the light cover downwards. Unscrew bulb. The replacement should be E 14 screw base, 220–240 V/15 Watt, pear shape. Replace the cover, making sure that it snaps into place.
Summary of tips on saving electricity
● High room temperatures, direct sunlight, or location near to a source of heat (cooker, heating) increase electricity consumption and should be avoided.
● Ensure that all apertures for inlet and outlet of ventilating air are unobstructed.
● Set the temperature selector correctly.
● Do not put warm food into the appliance.
- When defrosting frozen food, put it in the refrigerator section, so that it helps to keep the other food cool as it defrosts.
- Do not leave the door open any longer than is necessary when putting food in or taking it out.
● Ice/frost in the freezer-compartment increases the electricity consumption; defrost when the ice/frost layer reaches 3 mm thick.
Recommendations
When the appliance is not being used for a long period, switch it off by turning the temperature selector to 0 —. Clean the interior. Leave the door open (to avoid mould and smell developing inside).
Door seal
Check occasionally that the door seal is working properly. In particular, do this when the refrigerator is first installed, or when the door hinges are changed over (see Installation Instructions).
Rub talcum powder on the seal occasionally (to keep it elastic).
Faults - what to do?
The high quality and the construction in the van of technology, are a guarantee of a perfect operation. However, should the appliance operate uncorrectly, before contacting Service, we recommend you check if you have followed all the suggestions given in this booklet. In most cases you can solve the problem by yourself.
| Fault | Possible cause | Action |
| No lights on | Power failure | Check fuse or circuit breaker (switch house light on to see if failure is general) |
| Plug not properly in socket | Push it fully in | |
| Temperature selector is set to 0 - | Turn selector on | |
| Light switch actuator sticking | Free actuator by operating it firmly several times | |
| Door left open for too long | Wait a short time (close door) | |
| Defective bulb | Replace it | |
| Water in refrigerator section | Defrost water drain blocked | Clean drain with plastic or wooden stick |
| Reduced cooling output | Door being opened frequently or more food than usual stored | Set temperature selector higher |
| Freezer section badly iced-up | Defrost | |
| Compressor and condenser thick with dirt | Clean them (remove built-in model from housing - see Installation Instructions) | |
| Ventilation of appliance obstructed | Clear inlet and outlet air apertures | |
| Loud noise | Appliance is not standing firm & level | Adjust (pack under corners) |
| Cooling pipes touching cabinet | Bend out of contact carefully | |
| Please note that noises caused by refrigerant circulation cannot be avoided. | ||
Faults and servicing
In order to keep your appliance in perfectly safe condition, you should arrange for repairs, particularly to the "live" parts, to be carried out only by qualified electricians.
In the event of break-down you should therefore contact your electrical dealer or our Customer Service Centre.
Before calling the Service Centre, please check whether there is power in the mains socket (e.g. by plugging a lamp in). Your local electrician will repair any defects in the mains supply.
If the defect lies in the appliance, please inform the nearest Service Centre. In order to
avoid unnecessary travel or expense, please state:
- Model description
- E-number
- F-number of your appliance.
You will find these data on the rating plate on the left inside your appliance. We recommend that you enter them here:
- Model description ....
- E-number ....
- F-number
Please note: We have to make a charge if our Customer Service technician is called in for no adequate reason, even if the guarantee has not yet expired.
AEG Hausgeräte AG
Postfach 1036
D-90327 Nürnberg 1
© Copyright by AEG
H 271 278 500 - 0595/03 - 156
AEG Domestic Appliances Ltd
Customer Care Department
55-77 High Street
Slough
Berkshire SL1 1DZ
Telephone: 08705 350350