
Santo 1632-1 U - Kühlschrank AEG - Kostenlose Bedienungsanleitung
Finden Sie kostenlos die Bedienungsanleitung des Geräts Santo 1632-1 U AEG als PDF.


Benutzerfragen zu Santo 1632-1 U AEG
0 Frage zu diesem Gerät. Beantworten Sie die, die Sie kennen, oder stellen Sie Ihre eigene.
Eine neue Frage zu diesem Gerät stellen
Laden Sie die Anleitung für Ihr Kühlschrank kostenlos im PDF-Format! Finden Sie Ihr Handbuch Santo 1632-1 U - AEG und nehmen Sie Ihr elektronisches Gerät wieder in die Hand. Auf dieser Seite sind alle Dokumente veröffentlicht, die für die Verwendung Ihres Geräts notwendig sind. Santo 1632-1 U von der Marke AEG.
BEDIENUNGSANLEITUNG Santo 1632-1 U AEG
SAN 1632-2U
Integral build-in automatic refrigerator for installation under work-top.
Operating Instructions
Contents
Page
Safety instructions
12
General instructions
12
Setting up the appliance
12:13
Before starting up
13
Features
13
Starting up and setting the temperature
14
Tips on proper storage
14:15
Freezing and storing in deep freeze
15
Making ice-cubes
15
Defrosting, care and cleaning
15:16
Tips on saving energy
16
What's to be done if
16 17
Customer service
17
text_image
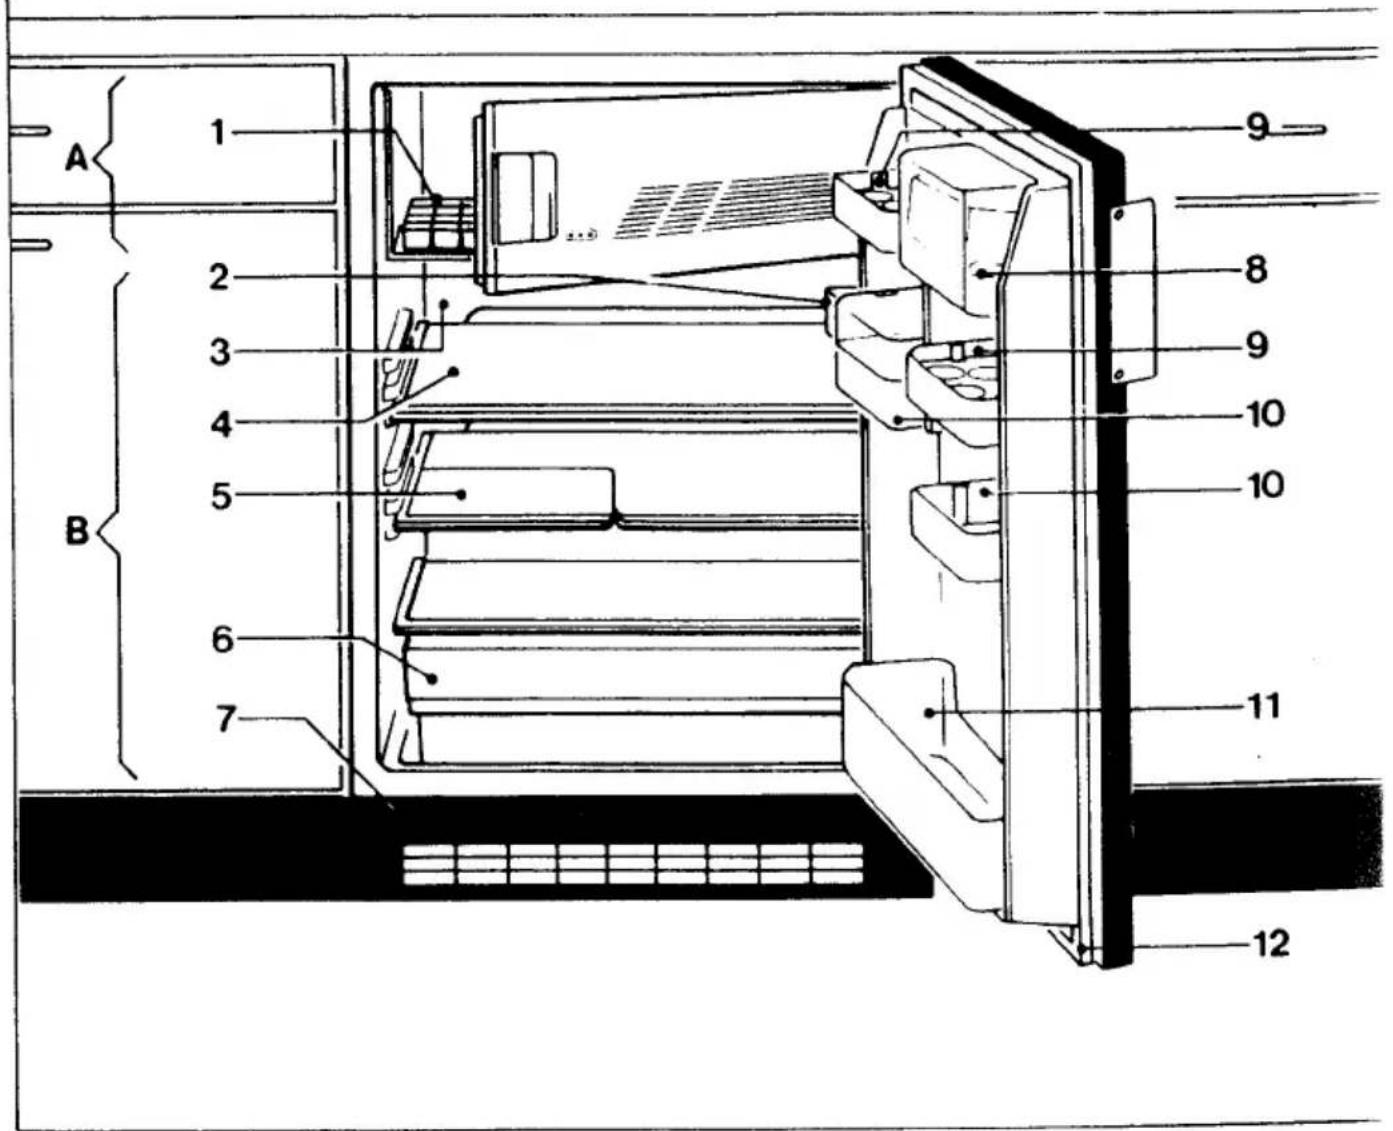
A 1 2 3 4 5 6 7 B 9 8 9 10 10 11 12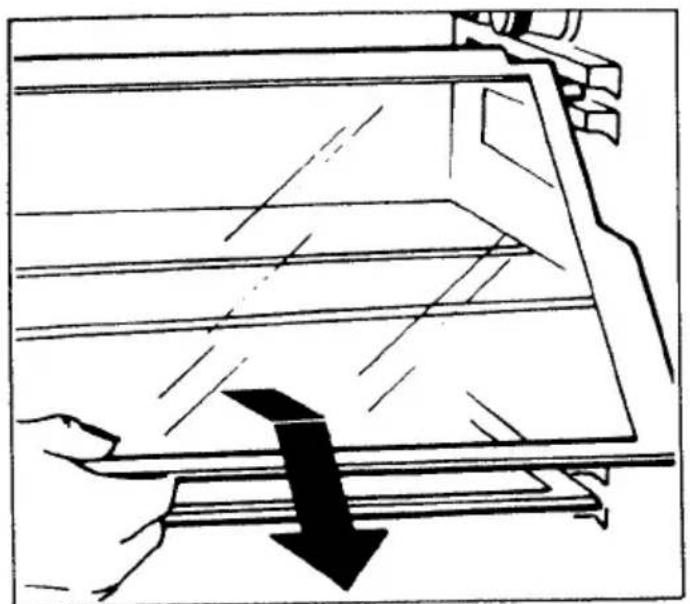
natural_image
Diagram of a mechanical or structural assembly with a downward arrow indicating force or direction (no text or symbols present)2a
natural_image
Illustration of a hand holding a tablet with arrows indicating rotation or movement (no text or symbols)3
natural_image
Illustration of a hand pressing down on a wooden beam with an upward arrow indicating force or motion (no text or symbols)2b
natural_image
Technical line drawing of a mechanical component with an arrow indicating direction (no text or symbols)4
natural_image
Line drawing of a hand holding a small electronic component with a black triangular component on top (no text or symbols)5
natural_image
Diagram of a storage rack with a directional arrow indicating rotation or movement (no text or symbols present)6
natural_image
Diagram of a mechanical assembly with arrows indicating force or movement, no text or symbols present9
text_image
Technical diagram of a device with labeled parts, showing a circular component and two numbered parts.7
text_image
2 2 16 1510
text_image
3 13 148
GB
How do you do?
Allow me to introduce myself. I am your new refrigerator. From now on I hope I will give you much pleasure from the way I store food for you. Not just because I am good-looking, but also because of my "inner values". I am easy to operate and look after.
These usage instructions are designed for a number of technically similar models with a varying selection of features. Please only take note of the instructions that apply to me.
Before using me for the first time, please study my instructions for use carefully. If while doing so you fold out the page of illustrations, you will get to know my appealing features in words and pictures.
Thank you very much.
Safety instructions
NOTE
Older appliances are often fitted with a snap-lock or a lock with a catch. If you intend to dispose of such an appliance, please wreck the lock first. Otherwise children might lock themselves in while playing and that could put their lives in danger.
Please make sure the pipes in your old appliance are protected from damage until it can be taken away for proper, environmentally friendly disposal. If coolant were to spurt out it could cause injuries to your skin or eyes.
NOTE
Repairs to electrical appliances must only ever be carried out by a qualified electrician. Improper tampering can lead to considerable damage and to the loss of guarantee protection.
Risk of explosion
My freezer compartment is not the right place for carbonated drinks such as lemonade, beer, or cola; if the contents are frozen solid the internal pressure rises and the bottle or can might explode!
NOTE
Never touch deep-frozen food with wet hands, and never put ice-cubes straight into your mouth. Your hands or your tongue might freeze solid.
General instructions
You have acquired a refrigerator for your household which has been manufactured in compliance with all the industrial standards that apply to appliances of this kind.
The German "VBG 20" accident prevention regulations for refrigeration equipment were adhered to during manufacture.
The coolant circuit has been checked for leaks. This appliance also complies with the EC radio and tv suppression directive 87/308 EC.
Information on the packaging of the appliance
All the kinds of plastic used are environmentally compatible. They can be disposed of without any risk onto a rubbish-tip or by incineration.
The different kinds of plastic are identified as follows and can be recycled:
PE for polyethylene, e.g. for outer wrap and the bags inside
PS for expanded polystyrene, e.g. for the padding, produced entirely without the use of CFC's.
The cardboard parts were produced from recycled paper and should be torn apart and handed in to your waste-paper recycling centre.
Commercial use
Should you use this appliance commercially, or for any other purpose than freezing food and keeping it cool, please observe the statutory regulations in force in your area.
Setting up the appliance
I need air!
If my refrigeration machinery is to work faultlessly, it needs good ventilation. Please make sure that the ventilation openings are not covered over or blocked.
Ambient temperature has an effect on the amount of power consumed by my refrigeration machinery. This is why I should not stand in the direct sunshine or next to a radiator or the cooker.
Use in a room in which the temperature can fall below +16 °C or exceed +32 °C for any length of time should be avoided.
Setting up
Please make sure that I have a firm, horizontal surface to stand on. Any unevenness in the floor can be compensated for by screwing one of my adjustable feet in or out.
Installation
See enclosed installation instructions.
Before starting up
Like all new appliances I have a certain odour of my own. Please clean out the interior of the appliance and all parts and accessories before starting up for the first time (see also "Care and Cleaning").
Electrical connection
WARNING - THIS APPLIANCE MUST BE EARTHED
Please ensure that the voltage and current indicated on the rating plate agree with the voltage of your electricity supply.
220/240 volts (i. e. 220/240 V AC).
If your appliance has been equipped with a mains lead with a moulded-on type plug, you must comply with the following regulations: The plug moulded on to the cord incorporates a fuse. For replacement, use a 13 amp BS 1362 fuse. Only ASTA approved or certified fuses should be used. The fuse cover/ carrier must be replaced in the event of changing the fuse. The plug must not be used if the fuse cover/ carrier is lost. A replacement cover/carrier must be obtained from an electrical goods retailer. If the socket outlets in your home are not suitable for the plug fitted to the appliance, then the plug must be cut off and an appropriate one fitted. When fitting the plug please note the following points:
Important
The wires in the mains lead are coloured in accordance with the following code:
| Green and Yellow | Earth |
| Blue | Neutral |
| Brown | Live |
As the colours of the wires in the mains lead of this appliance may not correspond with the coloured markings identifying the terminals in your plug, proceed as follows:
- The wire which is coloured green and yellow must be connected to the earth terminal in your plug, which is marked with the letter E or by the earth symbol ↓ or coloured green, or green and yellow.
- The wire which is coloured brown must be connected to the live terminal which is marked with the letter L or coloured red.
- The wire which is coloured blue must be connected to the neutral terminal which is marked with the letter N or coloured black.
When wiring the plug, ensure that all strands of wire are securely retained in each terminal. Do not forget to tighten the mains lead clamp on the plug.
Warning! A cut-off plug inserted into a 13 amp socket is a serious safety (shock) hazard. Ensure that the cut-off plug is disposed of safely.
Voltage 220/240 V AC
Fuse rating 13 amps
See rating plate for further information.
The rating plate is inside, on the left near the bottom.
Features
General summary
Fig. 1
1 Ice-cube tray
2 On/Off switch and temperature regulator
3 Rear wall of refrigeration space (cooling bars)
4 Storage shelf
5 VARIO storage shelf
6 Fruit and vegetable container
7 Plinth facia (with ventilation slits)
8 Butter compartment
9 Egg rack
10 Storage compartments
11 Bottle rack
12 Door seal
A □-deep-freeze compartment
B Refrigerating compartment
Inserting and adjusting the glass storage shelves
Fig. 2a
If you wish to vary the distance between the storage shelves, pull one of them forwards until you can tilt it upwards or downwards and take it out. Insert it in its
new position by following the same procedure in the reverse order.
Inserting and adjusting the plastic storage shelves
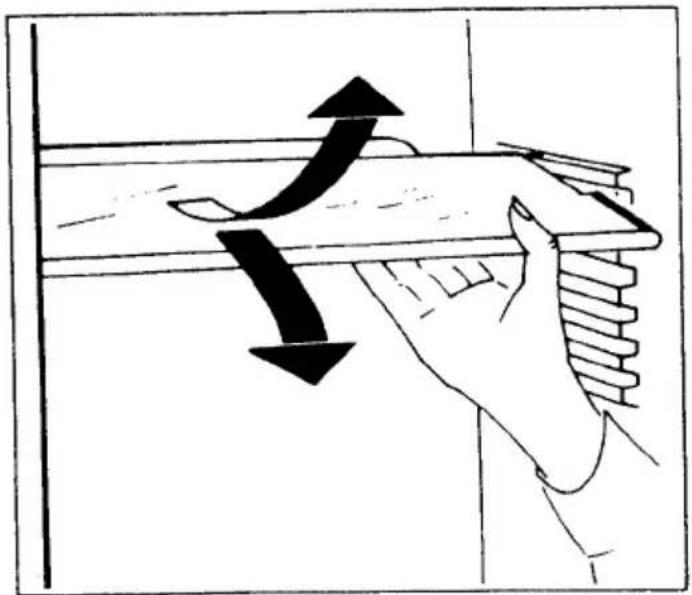
Fig. 2b
If you wish to vary the distance between the storage shelves, pull one of them forwards until you can tilt it downwards and take it out. Insert it in its new position by following the same procedure in the reverse order.
VARIO glass storage shelf
If, for instance, you wish to store bottles, cans, or jars in an upright position, please fit the front half of the VARIO storage shelf at a different level. This will give you the room you need to store tall items on the storage shelf beneath.
VARIO plastic storage shelf
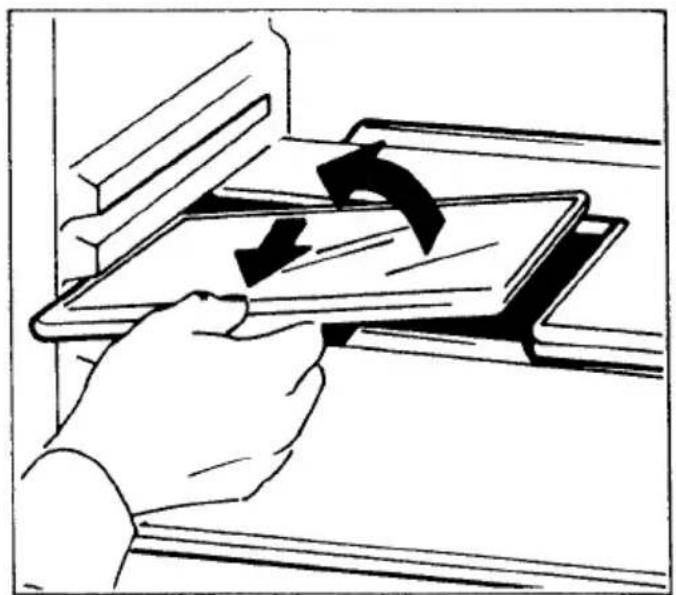
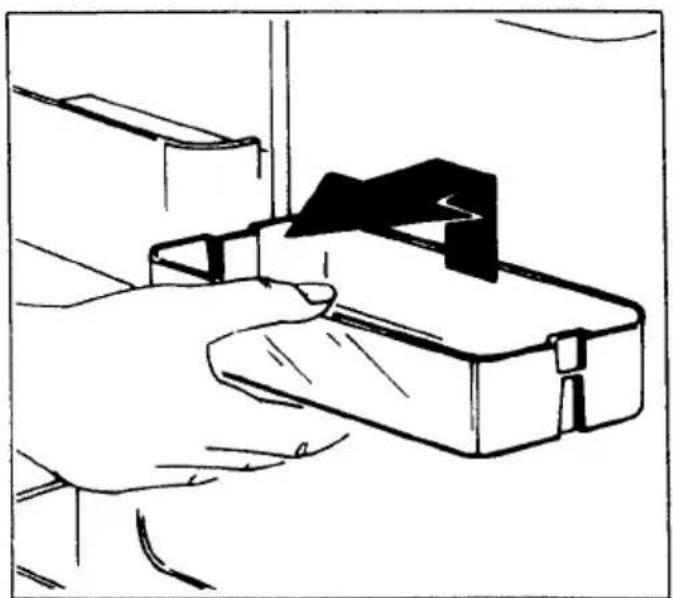
Fig. 3
If for instance you would like to store bottles, cans, or jars upright, you can take out the smaller part of the divided storage shelf. This will provide you with the space you need for storing tall objects on the shelf below.
Fruit and vegetables container
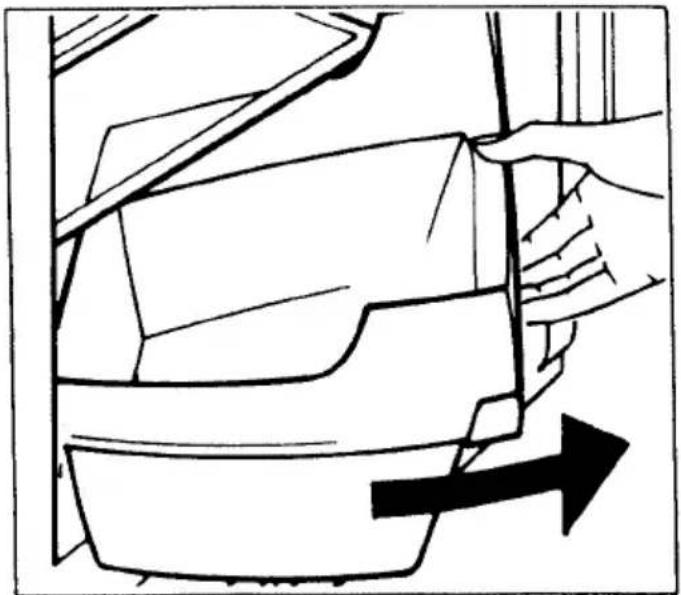
Fig. 4
If you wish to take out the fruit and vegetable container, pull it a little way forwards, swing it to one side, and lift it out.
Storage shelves in the door
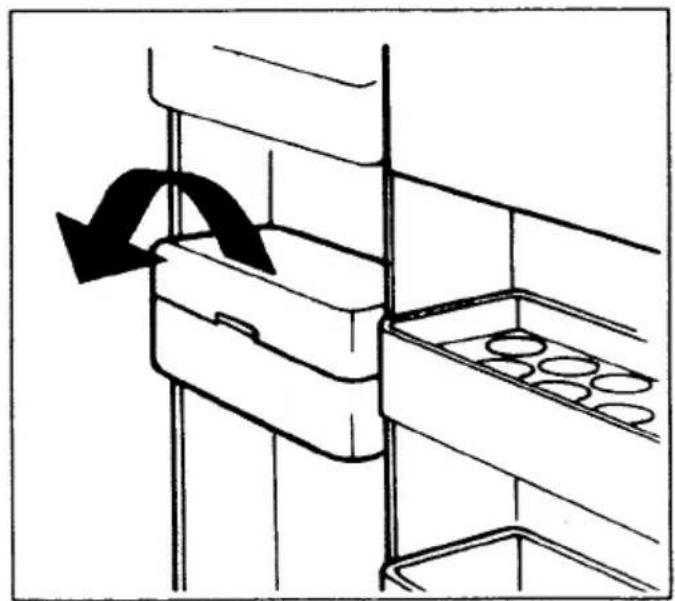
Fig. 5
If you would like to take one of the storage shelves (Fig. 1 (9-11)) out or put it in a different position, lift it up a little way and fit it into the required position.
Fig. 6
The lid part of the storage compartment (10) can be lifted out.
Starting up and setting the temperature
Fig. 7
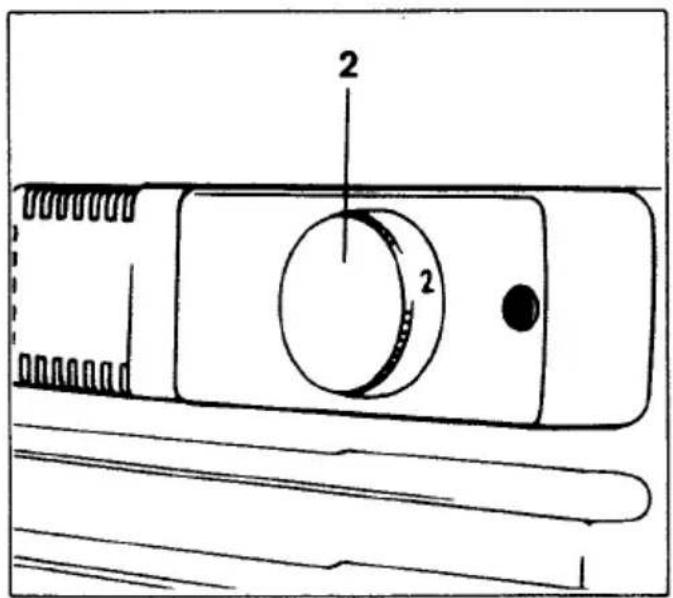
I can be switched on by rotating the temperature regulator (2) from the "0" setting in the direction of "1". The interior light is on whenever the appliance door is open, and the refrigeration machinery then starts to work.
Setting the temperature
The cooling output of the appliance can be infinitely varied by means of the temperature regulator (2). This sets the temperature in the ☐ deep-freeze compartment (A) and in the refrigerating compartment (B) at the same time.
Position "1" means: low output, the least cold setting.
Positions higher than "1" means: higher output, colder settings.
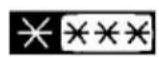
The "●●●" setting means: highest refrigeration output, coldest possible setting.
With normal refrigeration in the refrigeration compartment (B), without the deep-freeze compartment being in use, I recommend Position "1", and if lower temperatures are required "2" or "....".
When deep-frozen food is being stored in the deep-freeze compartment, turn the temperature regulator (2) to the "☐" position, so that the temperature in the deep-freeze compartment is maintained at -18 °C or below.
Switching off
I can be switched off by turning the temperature regulator (2) to the "0" setting. The interior light then remains off even if the appliance door is open.
If no-one is going to be at home for a long period of time, I should be emptied, my plug should be pulled out of the socket, and my door should be left open.
Tips on proper storage
Fig. 1
You can store deep-frozen food, ice-cream, and ice-cubes in my ☐ deep-freeze compartment (A).
For technical reasons, there will always be slight differences in temperature from one part of the refrig-
eration compartment (B) to another. The relatively colder areas will be the lower half of the rear wall (where the cooling unit is) and the lowest storage shelf. The less cold areas are the top storage shelf, the storage shelves in the door, and the fruit and vegetable container.
Different kinds of food need different temperatures for optimum storage. You should store fresh meat or dairy products as cool as possible, meaning on the bottom shelf, whereas it is best to keep bakery products or ready-to-eat meals on the top shelves. Eggs, cheese, and butter have the best conditions in the storage compartments designed for them in the door, and fruit and vegetables, including lettuce, keep fresh longest in the fruit and vegetable container.
Freezing food and keeping it in deep freeze
You can store deep-frozen food in my ☐ deep-freeze compartment, and freeze small quantities (up to 1.5 kilos) of fresh food yourself.
Always make sure that the door of my deep-freeze compartment is always closed so firmly that you can hear (!) it click shut.
Tips on proper freezing and storage
- If you wish to store deep-frozen food, or to freeze fresh food, turn my temperature regulator (2) to the "●●●" setting so that I attain the optimum storage temperature of -18 °C in my deep-freeze compartment ●●● (see "Setting the temperature"). If frozen food is only to be stored temporarily and for a short time, setting "2" on the temperature regulator will suffice. You will thus save electricity and avoid low temperatures in the refrigerator compartment. However, if you wish to make use of the maximum shelf life of the frozen food the temperature regulator has to be left at the "●●●" setting.
- Check the "best before" date on the deep-frozen food.
- If you wish to freeze food yourself, check first that it is fresh and in perfect condition.
- Food must always be packed in an airtight wrapping or a closed container.
- You will attain a better quality if the food is frozen through to its core quickly, so always lay the wrapped or packed food as flat as possible on the floor of the deep-freeze compartment. Make sure
that food that has not yet been frozen is separate from food that is already frozen, as otherwise the already frozen food may begin to thaw out.
Making ice-cubes
Fig. 1
You can make ice-cubes in my ice-cube tray (1). Fill it three-quarters full with water and place it on the floor of the ☐ deep-freeze compartment. The temperature regulator (2) should be set at ☐
Note:
If the ice-cube tray is frozen down, you can loosen it with a plastic scraper but never with any sharp or pointed object, as you might otherwise damage the condenser.
When the ice-cubes are ready it will be easier to take them out if you hold the ice-cube tray briefly under running water.
Defrosting, care and cleaning
I should be cleaned at regular intervals. This is best done when I am empty or nearly empty.
It is important that I should be disconnected from the mains during cleaning (pull the plug out or undo the fuse).
Defrosting the \*\*\* deep-freeze compartment
My deep-freeze compartment does no: defrost automatically. You will know that the time has come to defrost it when a layer of frost has formed about 4 mm thick.
Note:
Any increase in temperature above -18 °C shortens the shelf-life of the deep-frozen food. In order to ensure it warms up during the defrosting process only to the smallest possible extent, wrap it in plenty of layers of newspaper and store it in a cool place.
Note:
You can speed up the defrosting process by placing a container of hot water inside the refrigerator compartment and removing any loose pieces of ice before they melt completely.
GB
Please do not try to remove the ice with any sharp or pointed object, if anything only with a plastic scraper. And please do not try to hurry the defrosting up with electrical heating appliances! There would be an acute danger of an accident to you and of destruction to me.
Note:
Please make sure while cleaning that no water enters my temperature regulator.
Only ever use lukewarm water with a mild, non-scouring cleaner in it to clean my interior and its fittings. Then wipe round with clear water and rub dry.
Fig. 8
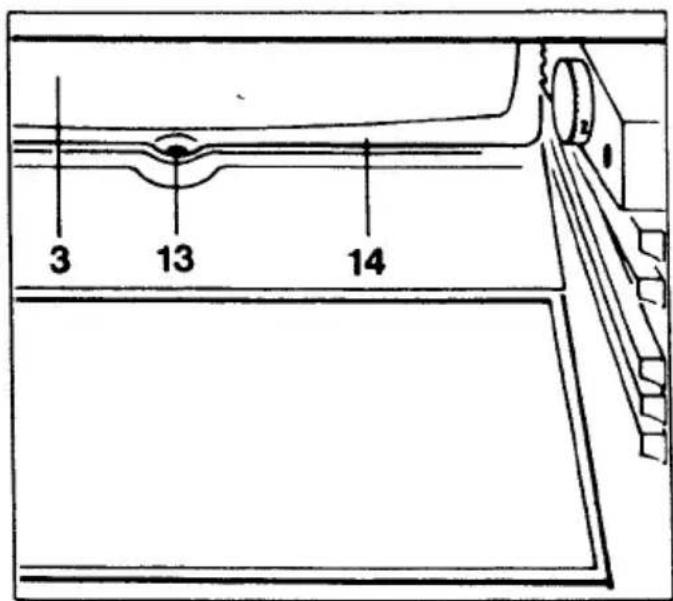
Please make sure that the outlet (13) of my condensation-water gully (14) is always free. To check, pour a small quantity of water into the gully. If the outlet should be blocked it can be opened up with a tooth-pick or a piece of wire.
After cleaning me, rub my interior thoroughly dry and start me up again.
You should thoroughly clean the condenser, which gives off heat and is located on the outside of my rear wall, once year. The dust that accumulates there acts like insulation and increases my power consumption.
Fig. 9
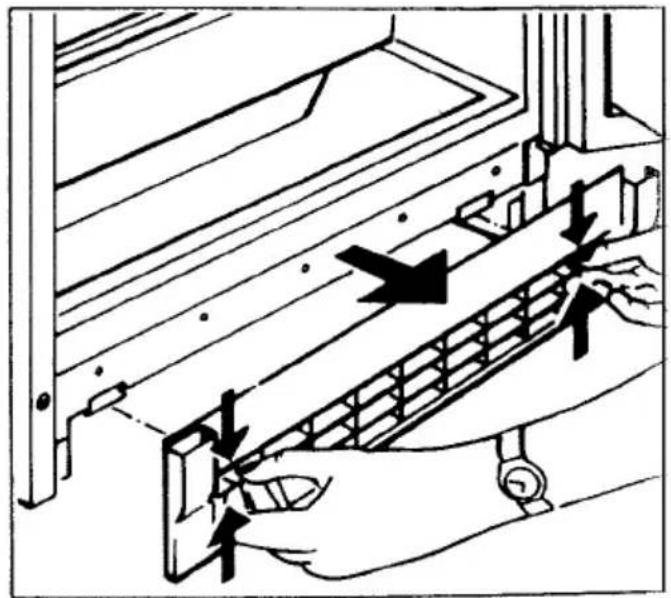
The plinth facia can be removed. Press the two clips in the ventilation slits downwards and at the same time pull the plinth facia out forwards.
Removing the layer of frost from the refrigerator compartment
In normal operation, when the door is opened atmospheric humidity accumulates at the coldest points in my interior in the form of frost.
This is defrosted automatically. The condensation water collects in the gully (14) and evaporates outside my rear wall.
Tips on saving energy
- Ambient temperature has an effect on the amount of power consumed by my refrigeration machinery. This is why I should not stand in the direct sunshine or next to a radiator or the cooker.
- Never place hot food inside my refrigerator compartment. Leave it to cool down to room temperature first.
- Do not open my door any more often than necessary, and close it again as soon as you can.
- Set the temperature regulator to a setting which saves electricity. Position "1" is sufficient if you merely want to keep food cool in the refrigeration compartment (B). Position "2" is sufficient if low temperatures are required in the refrigeration compartment (B) or if deep-frozen food is being stored only temporarily in the ☐ deep-freeze compartment (A).
If on the other hand you want to make full use of the shelf-life of the deep-frozen food, the temperature regulator must be set to the "●●●" position.
- Defrost the deep-freeze compartment as soon as the thickness of the frost exceeds 4 mm. Layers of frost and ice hinder the circulation of air around the frozen food and increase my electricity consumption.
- Place deep-frozen food in the refrigeration compartment to defrost it. During this time it can be "radiating coldness", so I will need less energy to keep everything else cool. However, defrosting frozen food does take longer this way.
- Ensure I have plenty of ventilation, as this will mean less work for my refrigeration machinery
- Keep the condenser (heat-exchanger) clean – that is the metal grill on my rear wall that gives off heat. Clean it thoroughly at least once a year.
What's to be done if ... ?
... the interior light does not come on when the door is open?
1. Please check to see whether the temperature regulator is at the "0" position (Off), the plug has been pulled out, the fuse has blown, or there is a power failure all over your neighbourhood.
2. Fig. 10
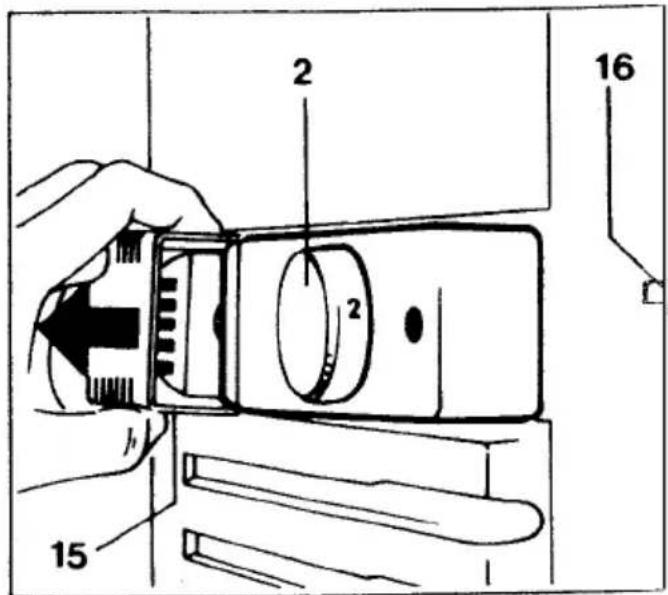
If the bulb has burnt out, unplug the appliance from the mains. Remove the cover (15) and replace the bulb (max. 15 W, 220 V, fitment E14).
3. If the switch (16) is sticking, please call the service centre.
... unpleasant noises occur:
1. Check whether I am standing firmly and in a horizontal position (see "Setting up the appliance").
2 Check whether some foreign body is lodged in the area of the condenser (the grid in the rear wall).
If any part of the condenser cannot move freely to and fro and touches either the appliance or the wall, please carefully bend it to one side.
... a heavy layer of ice forms in the deep-freeze compartment:
Check whether the door of my deep-freeze compartment has been properly closed so that you can hear it click shut.
... the internal temperature is too high.
- Check whether the appliance door has been left open for long periods of time, or has been frequently opened and shut
2 Check whether the air flow to and from the appliance has been blocked
3 Make sure that the temperature regulator has not been set at the "0" position (Off), that the appliance has not been disconnected, and that there has not been a power failure all over your neighbourhood.
4 If the refrigeration machinery still does not start up, keep the appliance closed if at all possible and call the service centre at once
Our appliances comply with the relevant safety regulations. Repairs to electrical appliances must only ever be carried out by a qualified electrician. Improper tampering can lead to considerable danger to the user.
Please note:
A charge will have to be made even during the guarantee period if the service centre is called in for no valid reason
Customer service
Before you call the service centre, please check that power is available at the socket (e.g. plug a lamp in) If the power supply needs repair, please consult an electrician
If you can find no reference in my instructions for use to explain the breakdown, please contact the nearest customer service centre (see service centre address list). In order to save unnecessary journeys and costs, please tell the service centre my E-number and my F-number, which you will find on the rating plate in my interior. So that you will always have these numbers to hand, it is recommended that you enter them here:
- Model description
- E-number
- F-number
AEG Hausgerate AG
Postfach 1036
D-8500 Nurnberg 1
© Copyright by AEG
H 271 273 200 0593 03 157
AEG Domestic Appliances Ltd
Customer Care Department
55-77 High Street
Slough
Berkshire SL1 1DZ
Telephone: 08705 350350
1 709 987 378 (7305)