
1021 - Nähmaschine SINGER - Kostenlose Bedienungsanleitung
Finden Sie kostenlos die Bedienungsanleitung des Geräts 1021 SINGER als PDF.


Benutzerfragen zu 1021 SINGER
0 Frage zu diesem Gerät. Beantworten Sie die, die Sie kennen, oder stellen Sie Ihre eigene.
Eine neue Frage zu diesem Gerät stellen
Laden Sie die Anleitung für Ihr Nähmaschine kostenlos im PDF-Format! Finden Sie Ihr Handbuch 1021 - SINGER und nehmen Sie Ihr elektronisches Gerät wieder in die Hand. Auf dieser Seite sind alle Dokumente veröffentlicht, die für die Verwendung Ihres Geräts notwendig sind. 1021 von der Marke SINGER.
BEDIENUNGSANLEITUNG 1021 SINGER
INSTRUCTION MANUAL AND ACCESSORIES
Full zig-zag sewing machine
free-arm
Model 1022
or
Flat-bed
Model 1021
SINGER
IMPORTANT SAFETY INSTRUCTIONS
When using an electrical appliance, basic safety precautions should always be followed, including the following:
Read all instructions before using the sewing machine.
DANGER
To reduce the risk of electric shock:
-
An appliance should never be left unattended when plugged in. Always unplug this appliance from the electric outlet immediately after using and before cleaning.
-
Always unplug before relamping. Replace bulb with same type rated max. 15 Watts.
WARNING
To reduce the risk of burns, fire, electric shock, or injury to persons:
-
Do not allow to be used as a toy. Close attention is necessary when this appliance is used by or near children.
-
Use this appliance only for its intended use as described in this manual. Use only attachments recommended by the manufacturer as contained in this manual.
-
Never operate this appliance if it has a damaged cord or plug, if it is not working properly, if it has been dropped or damaged, or dropped into water. Return the appliance to the nearest authorized dealer or service center for examination, repair, electrical or mechanical adjustment.
-
Never operate the appliance with any air openings blocked. Keep ventilation openings of the sewing machine and foot controller free from the accumulation of lint, dust, and loose cloth.
-
Never drop or insert any object into any opening.
-
Do not use outdoors.
-
Do not operate where aerosol (spray) products are being used or where oxygen is being administered.
-
To disconnect, turn all controls to the off ("0") position, then remove plug from outlet.
- Do not unplug by pulling on cord. To unplug, grasp the plug, not the cord.
- Keep fingers away from all moving parts. Special care is required around the sewing machine needle.
- Always use the proper needle plate. The wrong plate can cause the needle to break.
- Do not use bent needles.
- Do not pull or push fabric while stitching. It may deflect the needle causing it to break.
- Switch the sewing machine off ("0") when making any adjustments in the needle area, such as threading needle, changing needle, threading bobbin, or changing presser foot, and the like.
- Always unplug sewing machine from the electrical outlet when removing covers, lubricating, or when making any other user servicing adjustments mentioned in the instruction manual.
- Machine has been stored in dry and clean rooms to protect against rust.
SAVE THIS INSTRUCTION
CONTENTS
Page
Getting to Know Your Sewing Machine 2
Principal Parts — And What They Do 2
Accessories — And When To Use Them 6
Getting Ready to Sew
Preliminary Steps 9
Choosing Needle and Thread 10
Threading Your Sewing Machine 11
Straight Stiching 16
Adjusting Selectors 17
Sewing a Seam 19
Zick-Zack Stitching 22
Satin Stitching 24
Twin-Needle Stitching 25
Preparation 25
Threading the Needle 26
Buttons and Buttonholes 27
Buttons 27
Buttonholes 28
Sewing the Professional Way 31
Lingerie, Seam finishes 31
Hints on Sewing Special Fabrics 32
Construction Details 34
Aplique, Attaching elastic 36
Free Arm Sewing 37
Keeping Up Appearances 41
Caring for Your Machine 44
Cleaning the Machine 44
Removing Bobbin Case, Face Plate and Bulb 45
Performance Checklist 46
principal parts
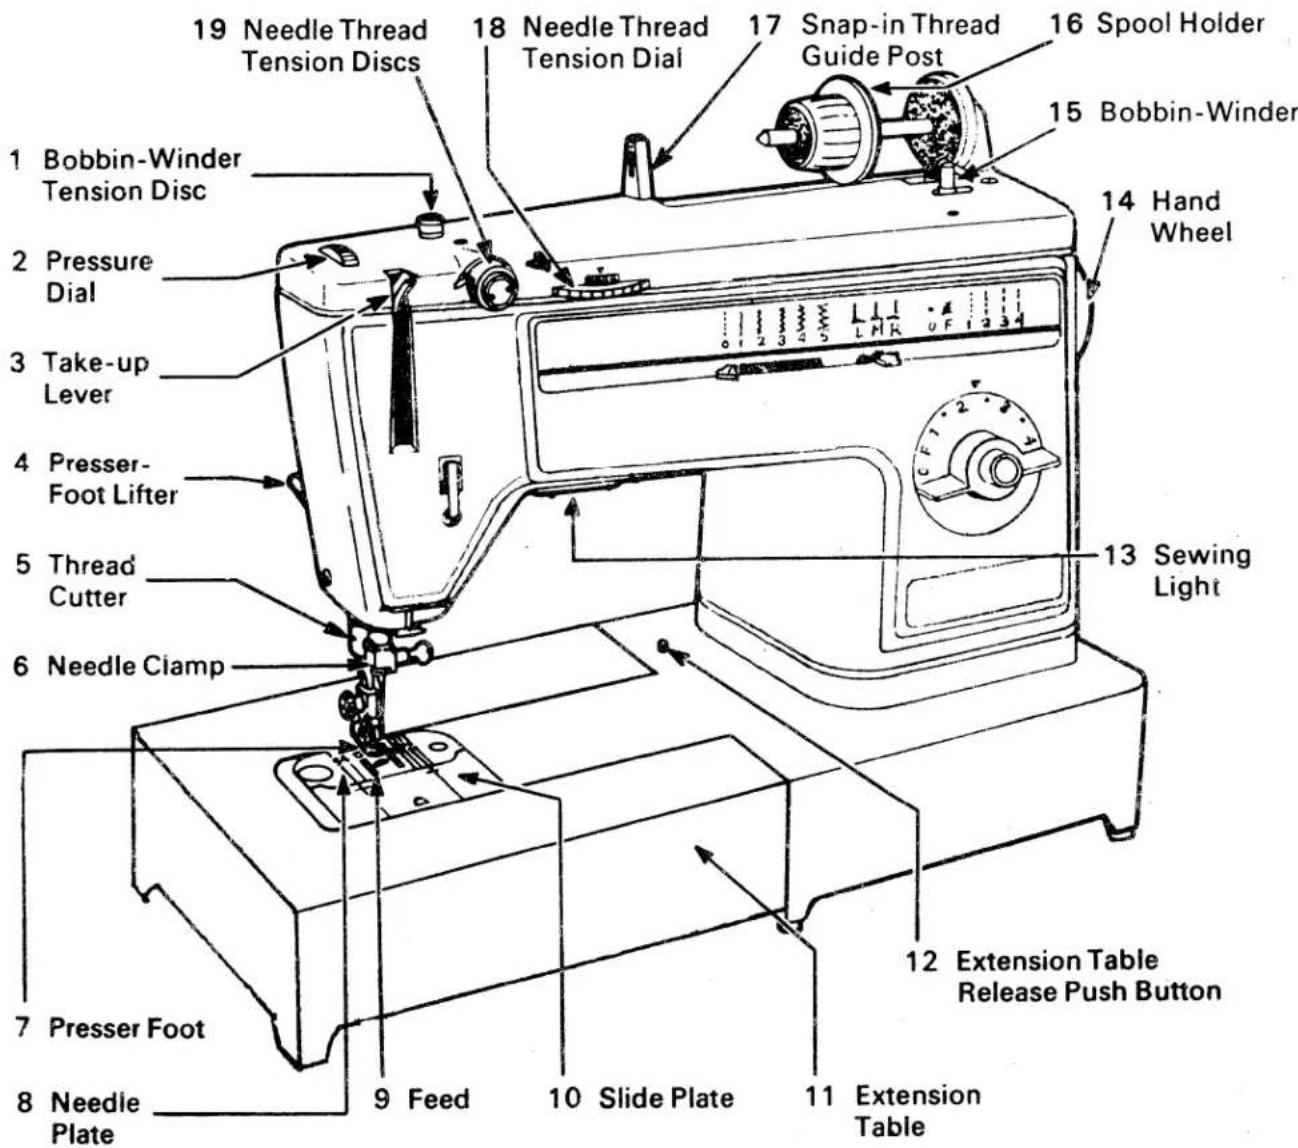
text_image
19 Needle Thread Tension Discs 18 Needle Thread Tension Dial 17 Snap-in Thread Guide Post 16 Spool Holder 15 Bobbin-Winder 14 Hand Wheel 13 Sewing Light 12 Extension Table Release Push Button 11 Extension Table 10 Slide Plate 9 Feed 8 Needle Plate 7 Presser Foot 6 Needle Clamp 5 Thread Cutter 4 Presser-Foot Lifter 3 Take-up Lever 2 Pressure Dial 1 Bobbin-Winder Tension Discand what they do
- Bobbin-Winder Tension Disc regulates thread tension for bobbin winding.
- Pressure Dial regulates presser-foot pressure on fabric. It has an all-purpose setting plus settings for extra-light and extra-heavy pressure, and for darning.
- Take-up Lever controls flow of needle thread.
- Presser-Foot Lifter, at back of machine, allows you to raise and lower presser foot. High-lift position allows easy placement of bulky fabrics.
- Thread Cutter is built into presser bar for safety and convenience.
- Needle Clamp holds single and twin needles and is designed to eliminate the possibility of inserting needle backwards.
- Presser Foot holds fabric against feed. The foot snaps off for quick removal.
- Needle Plate lifts out for easy removal. Guidelines on right and left sides extend to slide plate to help you keep seams straight.
- Feed moves fabric under the presser foot.
- Slide Plate opens for easy removal and replacement of the bobin, and raises and lowers the pin that holds the needle plate in position.
- Extension Table lets you convert the machine for either flat or tubular bed sewing.
- Extension Table Release Push Button unlocks the extension table.
- Sewing Light illuminates the sewing area.
- Hand Wheel positions take-up lever and needle. Always turn it toward you.
- Bobbin-Winder lets you fill the bobbin with thread quickly and easily.
- Spool Holder with Horizontal Pin holds thread spools of various sizes.
- Snap-in Thread Guide Post provides smooth flow of thread from spool holder to tension discs.
- Needle-Thread Tension Dial lets you select the appropriate tension for your stitch, thread, and fabric. The numbers eliminate guesswork in duplicating settings.
-
Needle-Thread Tension Discs, controlled by the tension dial, regulate the amount of tension on your needle thread.
-
Stitch Width Selector controls the width of zig-zag stitching and positions needle for straight stitching. Use : setting for straight stitching
- Needle-Position Selector places needle in either left, center or right stitching position. Use center position for straight stitching.
- Stitch Control Dial allows for a variety of stitch lengths, including 0-1 for zig-zag satin stitching.
- Reverse-Stitch Push Button lets you reverse stitching direction.
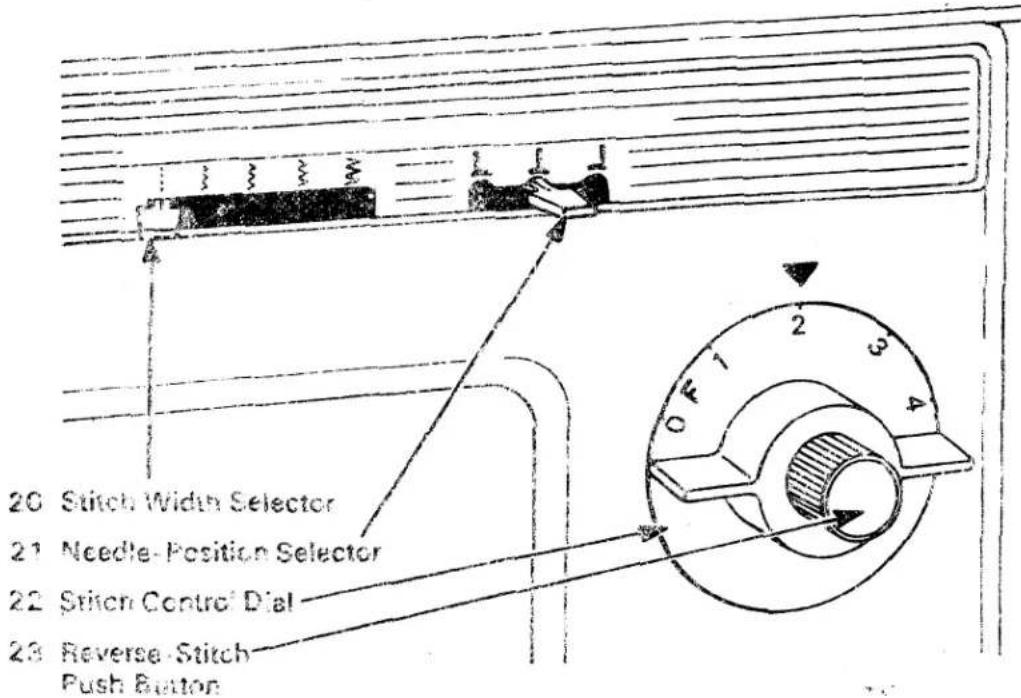
text_image
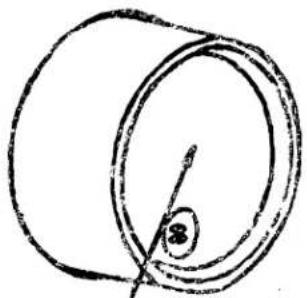
20 Stitch Width Selector 21 Needle- Position Selector 22 Stitch Control Dial 23 Reverse-Stitch Push Button- Hand Wheel Disc automatically disengages clutch for easy bobbin winding.
natural_image
Simple line drawing of a circular object with an arrow pointing inward, no text or symbols presentHand Wheel Disc
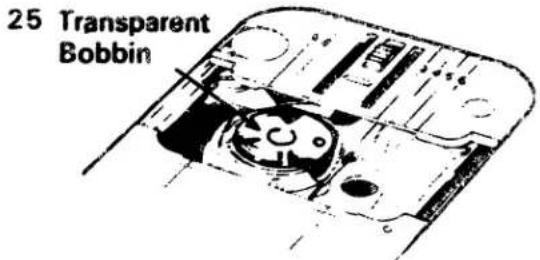
- Transparent Bobbin shows thread supply ... is easily removed for bobbin winding.
text_image
25 Transparent Bobbin-
Power and Light Switch turns on the power and the sewing light simultaneously.
-
Electrical Connections and Speed Controller are designed for convenience and safety.
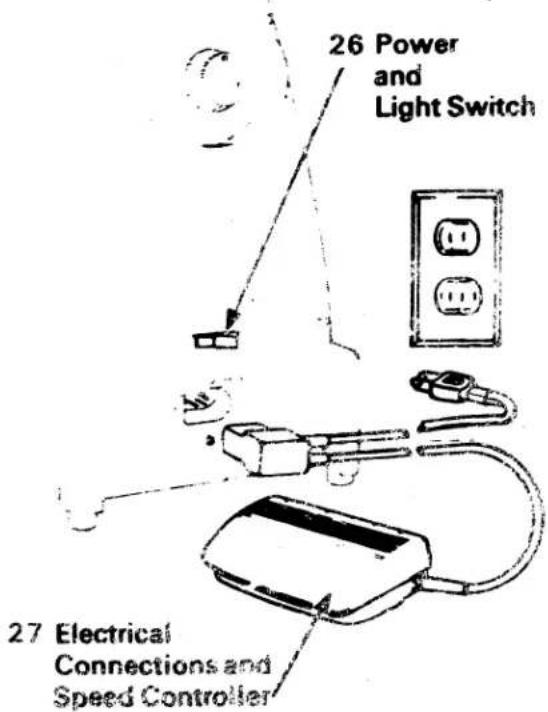
text_image
26 Power and Light Switch 27 Electrical Connections and Speed ControllerSee instructions for connecting and operating machine and controller on page 9.
accessories... and when to use them

text_image
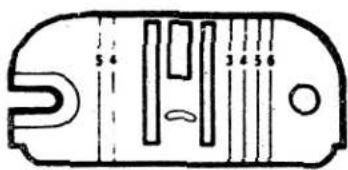
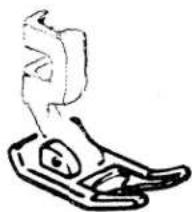
General Purpose Foot General Purpose Needle PlateGENERAL PURPOSE FOOT AND NEEDLE PLATE
The general purpose foot and the general purpose needle plate are in place on the machine. Use them for all utility sewing, with either straight or zig-zag stitching.
natural_image
Line drawing of a mechanical clamp or bracket component (no text or symbols)Zipper Foot
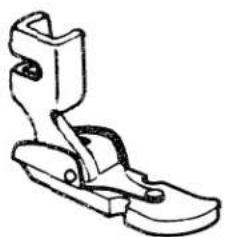
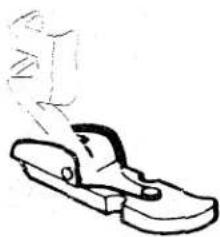
ZIPPER FOOT
The zipper foot is used to place stitching close to a raised edge. It can be fitted to the presser-foot shank for use on either right or left side of the needle.
natural_image
Technical line drawing of a mechanical clamp or bracket component (no text or symbols)Special Purpose Foot
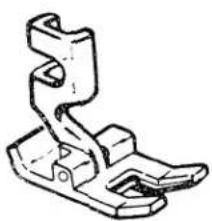
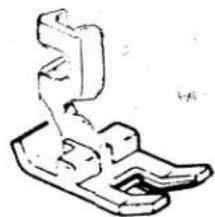
SPECIAL PURPOSE FOOT
The special purpose foot is used for all kinds of decorative zig-zag stitching. Use this foot for:
• Zig-zag satin stitching
• Appliqué
- Buttonholes
• Twin-needle stitching
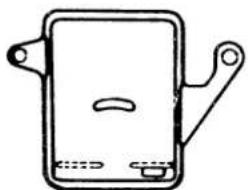
FEED-COVER PLATE
The feed-cover plate which allows free fabric movement is used for darning (page 43), embroidery and button sewing (page 27). By covering the feed with the feed-cover plate the fabric is not moveable.
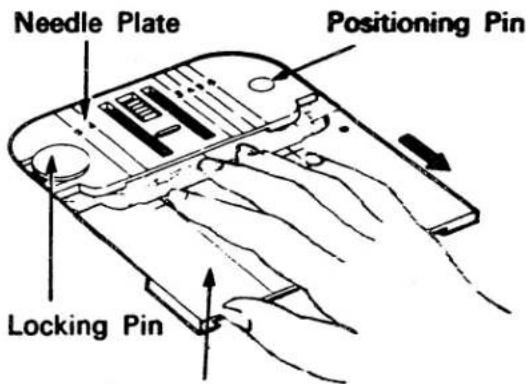
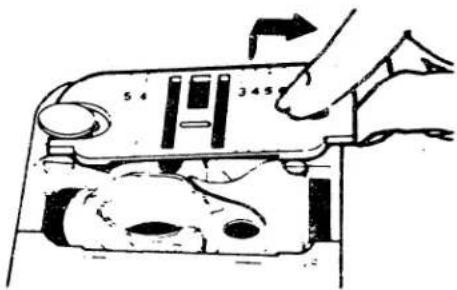
CHANGING NEEDLE PLATE
- Raise presser foot. (You do not need to remove the foot.)
- Turn hand wheel toward you until needle is in its highest position.
- Open slide plate with downward finger pressure.
- Place thumb under needle plate and draw plate to the right to remove.
- Insert new needle plate under locking pin and over positioning pin.
- Close slide plate.
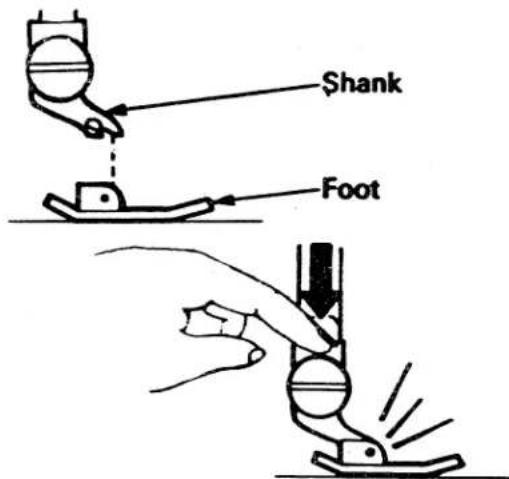
CHANGING PRESSER FEET
The presser feet that are supplied with your machine snap on and off a common shank. To change the foot:
- Raise presser-foot lifter and turn hand wheel toward you to raise needle to its highest position.
- Press toe of presser foot upward (as far as it will go) and then snap down to remove the foot.
- Center the new presser foot under the shank and lower the presser-foot lifter so that shank fits over the presser-foot pin.
- Press down on presser-foot screw until foot snaps into place.
natural_image
Simple line drawing of a rectangular device with a handle and mounting holes (no text or symbols)Feed-Cover Plate
text_image
Needle Plate Positioning Pin Locking PinSlide Plate
text_image
5.4 345Changing Needle Plate
text_image
Shank FootChanging Presser Foot
text_image
Transparent Bobbin Regular Needle Twin NeedleBall-point (Yellow Band) Needle
text_image
Needle-Clamp Screw Needle Clamp Flat Side to BackChanging the Needle

text_image
Small and Large Spool Holders Detachable Spool PinBOBBINS
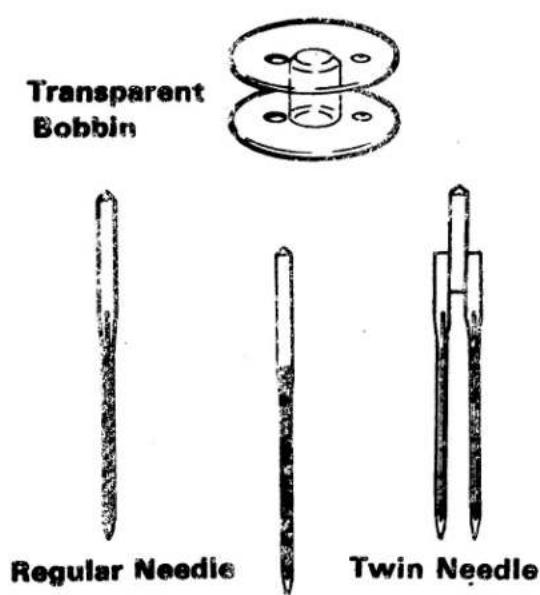
Transparent, drop-in bobbin, shows thread supply at a glance.
NEEDLES
- Type 705 H needles for all-purpose sewing
• Type 705 HS ball-point (yellow band) needles, for sewing knits and stretch fabrics.
Type 705 H twin needle for decora-
• tive twin-needle stitching.
ATTACHING FEED-COVER PLATE
- Raise presser foot. (You do not need to remove the foot).
- Turn hand wheel toward you until is at its highest position.
- Slide feed-cover plate under the presser foot, until securing pins are located directly over holes in needle plate. Then snap down.
CHANGING THE NEEDLE
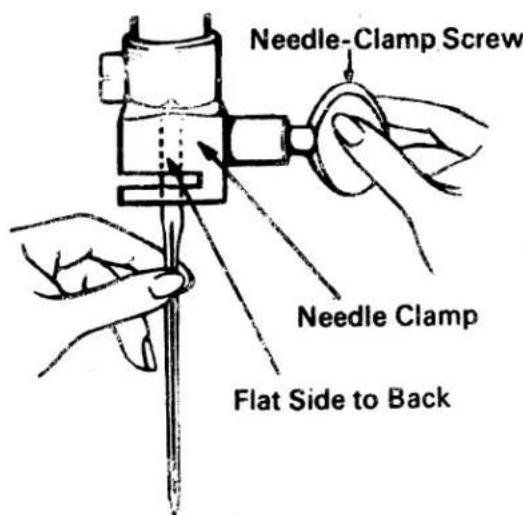
The needle clamp is designed so that the needle can only be inserted with the flat side of the needle to the back. To change the needle:
- Raise needle bar to its highest position, loosen needle-clamp screw, and remove needle.
- Insert new needle in clamp, with the flat side of the needle to the back; push it up as far as it will go.
- Tighten needle-clamp screw.
SPOOL HOLDERS
The spool holders hold spools of various sizes in position on the horizontal spool pin. Because spool does not turn, thread unwinds smoothly.
DETACHABLE SPOOL PIN
The secondary detachable spool pin is used for twin-needle sewing.
preliminary steps
CONNECTING THE MACHINE
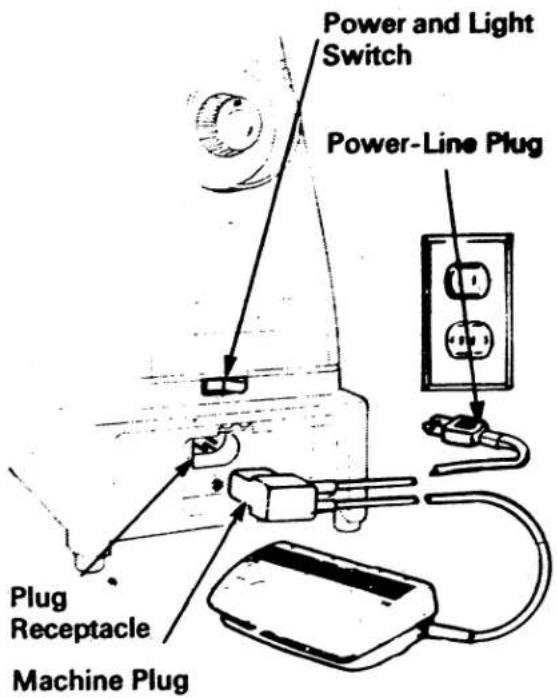
Before plugging in your machine, be sure that the voltage and number of cycles indicated on the plate under the hand wheel conform to your electrical power supply.
Push the machine plug into the receptacle at the right end of the machine bed. Then connect the power-line plug to your electrical outlet.
OPERATING MACHINE AND CONTROLLER
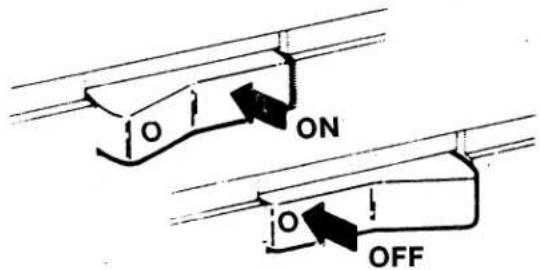
To turn on both machine and sewing light, press power and light switch to ON position. To turn off machine and light, press switch at „0” to OFF position.
WARNING: Turn off the power and light switch before changing needles, presser feet, and needle plates and when leaving the machine unattended. This eliminates the possibility of starting the machine by accidentally pushing the speed controller.
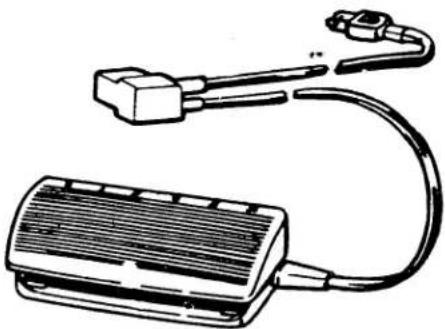
To start the machine, press the speed controller. The harder you press, the faster the machine will sew.
To stop the machine from sewing, remove pressure from speed controller.
text_image
Power and Light Switch Power-Line Plug Plug Receptacle Machine PlugElectrical Connections
text_image
ON OFFPower and Light Switch
natural_image
Line drawing of a handheld electronic device with connectors and wiring (no text or symbols)Speed Controller
choosing needle and thread
The needle and thread you choose will depend upon the fabric being stitched. The table below is a practical guide to needle and thread selection. Refer to it before starting a sewing project. Be sure to use the same size and type of thread in both needle and bobbin.
FABRIC, THREAD AND NEEDLE TABLE
| FABRIC | THREAD | NEEDLES | |
| Type | Size | ||
| DELICATE—tulle, chiffon, fine lace, organza | Fine polyester, nylon, and cotton thread | 705 H | 70 |
| LIGHTWEIGHT—batiste, organdy, jersey, voile, taffeta, crepe, chiffon, velvet, plastic film | 50 mercerized cotton"A" silkPolyester threadCotton-wrapped polyester | 705 H | 80 |
| MEDIUM WEIGHT—gingham, percale, piqué, linen, chintz, faille, satin, fine corduroy, velvet, suitings, deep-pile fabrics, vinyl | 50 mercerized cotton60 cotton"A" silkPolyester threadCotton-wrapped polyester | 705 H | 90 |
| MEDIUM HEAVY—gabardine, tweed, sailcloth, denim, coatings, drapery fabrics, vinyl, deep-pile fabrics | Heavy-duty mercerized cotton40 to 60 cottonPolyester thread | 705 H | 100 |
| HEAVY—overcoatings, denim, upholstery fabrics, canvas | Heavy-duty mercerized cotton24 to 40 cottonPolyester thread | 705 H | 110 |
| ALL WEIGHTS—decorative straight stitch topstitching in woven fabrics | "D" silkt (Buttonhole twist) | 705 H | 100 or 110 |
| KNIT, WOVEN, STRETCH and ELASTIC FABRICS—polyester doubleknit, spandex, nylon, tricot, ciré tricot, jersey, panné velvet | "A" nylon50 mercerized cotton"A" silkCotton-wrapped polyester | 705 HS Ball-Point (Yellow Band) | 90 |
| LEATHER—suede, kidskin, capeskin, lambskin, lined leathers | 50 mercerized cottonPolyester thread"A" silkCotton-wrapped polyester | 705 H | 80 90 100 |
| LIGHT and MEDIUM WEIGHTS—decorative twin-needle stitching in woven fabrics | 50 mercerized cotton | 705 H (twin) | 90 |
† Use with 50 mercerized cotton or "A" silk in bobbin.
threading your sewing machine
Like all sewing machines that produce what is called a "lockstitch", your sewing machine sews with two threads. The upper thread comes from the spool and is threaded through the eye of the needle. The lower thread comes from bobbin, the small transparent spool that you wind using the machine. It is best to wind the bobbin before the needle.
THE SPOOL HOLDER
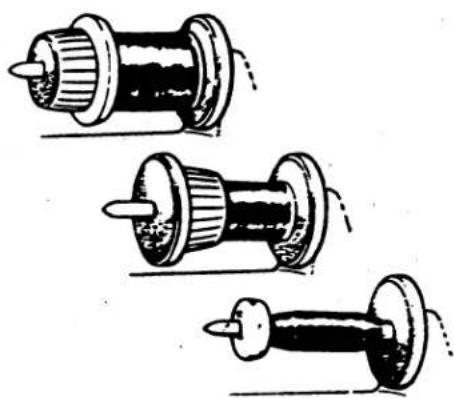
- Remove spool holder from spindle by sliding it to the left.
- Place spool of thread on horizontal spool pin. If spool being used has a retaining slit, this should be placed against the spool cushion on the right.
- Select correct spool holder according to type and diameter of the end of the spool being used. The diameter of the end of the spool holder should always be larger than that of the spool itself.
- Press spool holder firmly against spool.
THE BOBBIN THREAD
Winding the Bobbin
- Raise the presser foot and turn the hand wheel toward you until needle is at its highest position.
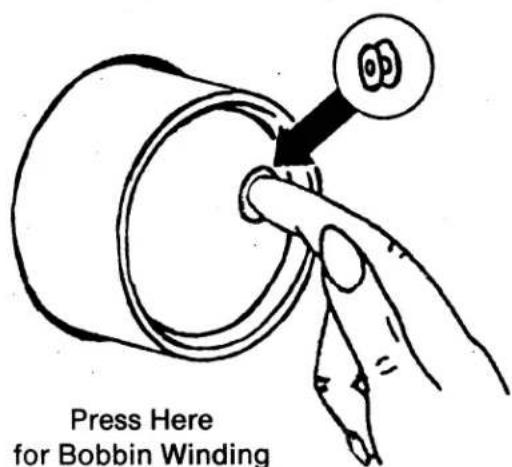
- To disengage clutch, place your thumb directly on bobbin symbol located inside hand wheel disc and press down.
- Open slide plate to make bobbin accessible.
- Lift out bobbin and close slide plate to make sure needle plate is secure while winding.
natural_image
Three mechanical components with no visible text or symbolsSpool Holders
text_image
Press Here for Bobbin Winding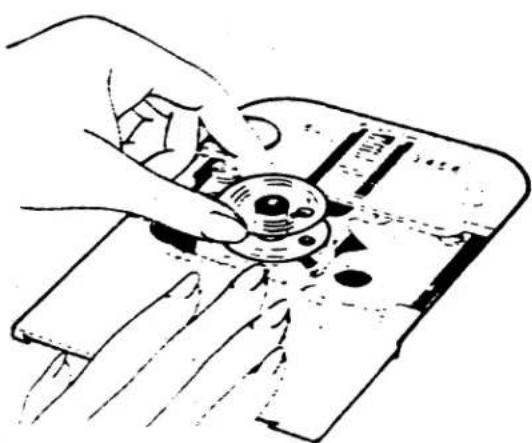
natural_image
Illustration of a hand pressing down on a device with a circular component (no text or symbols visible)Removing Bobbin
text_image
Technical diagram illustrating the procedure of a sewing machine tool, showing steps from cutting to assembly with labeled components and directional arrows.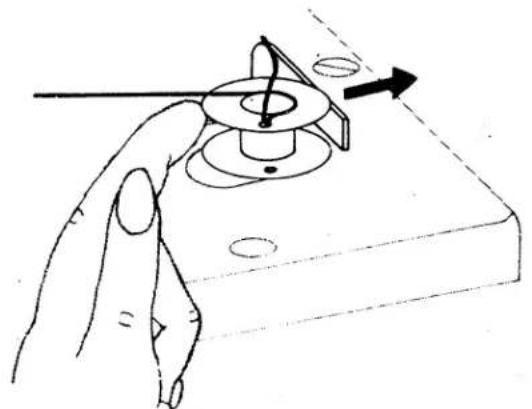
natural_image
Hand holding a mechanical component with a pointer and arrow indicating direction (no text or symbols)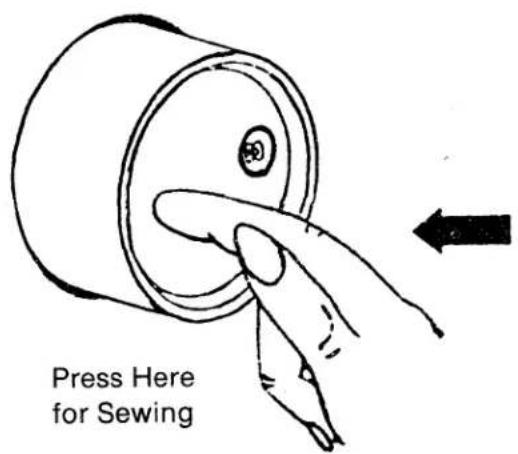
text_image
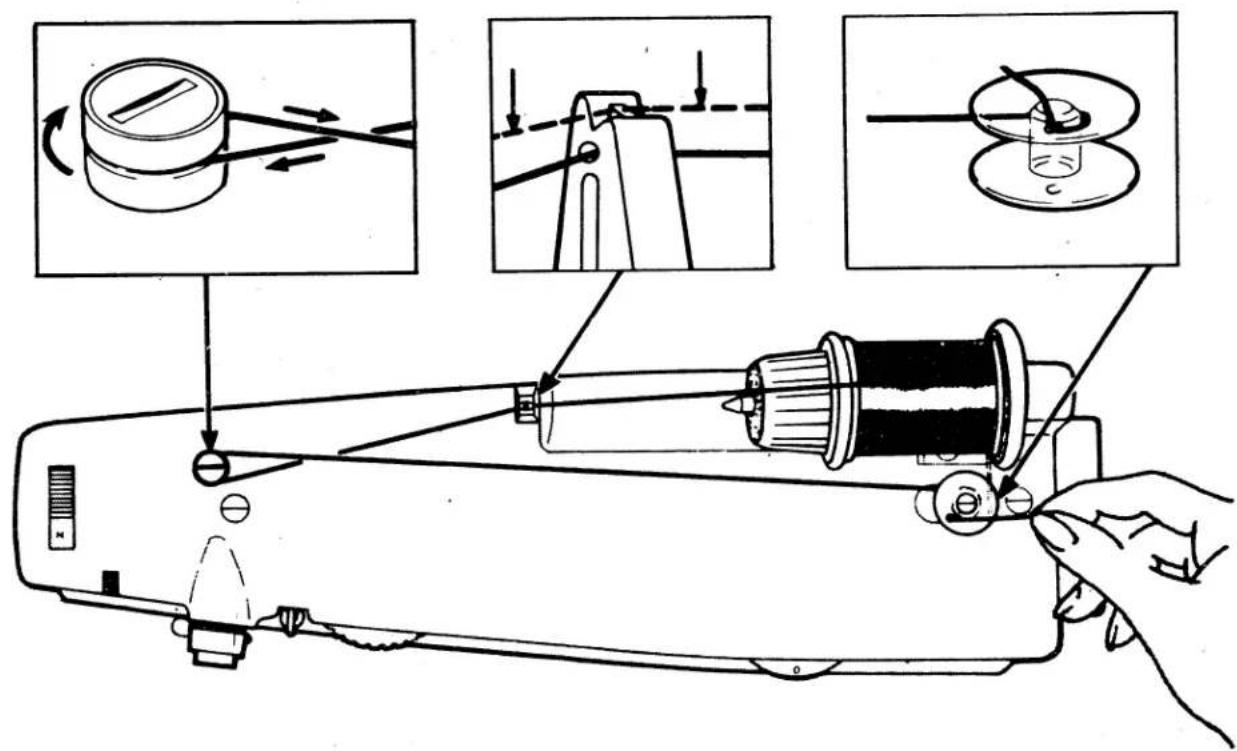
Press Here for Sewing- Place spool of thread on spool pin. Snap thread in the thread guide post then lead thread around bobbin winder tension disc, as illustrated above.
• Pass thread, from the inside, through hole in bobbin and place bobbin on spindle. - Push bobbin and spindle to the right to engage the bobbin winder. Hold thread end as shown and start the machine, winding at moderate speed.
- Cut off thread end after a few coils have been wound on the bobbin.
- When required amount of thread has been wound (winding will stop when bobbin is full), stop machine. Cut connecting thread.
- Push bobbin and spindle toward the left to disengage bobbin winder. Remove bobbin.
- Release hand wheel disc for sewing.
THREADING THE BOBBIN CASE
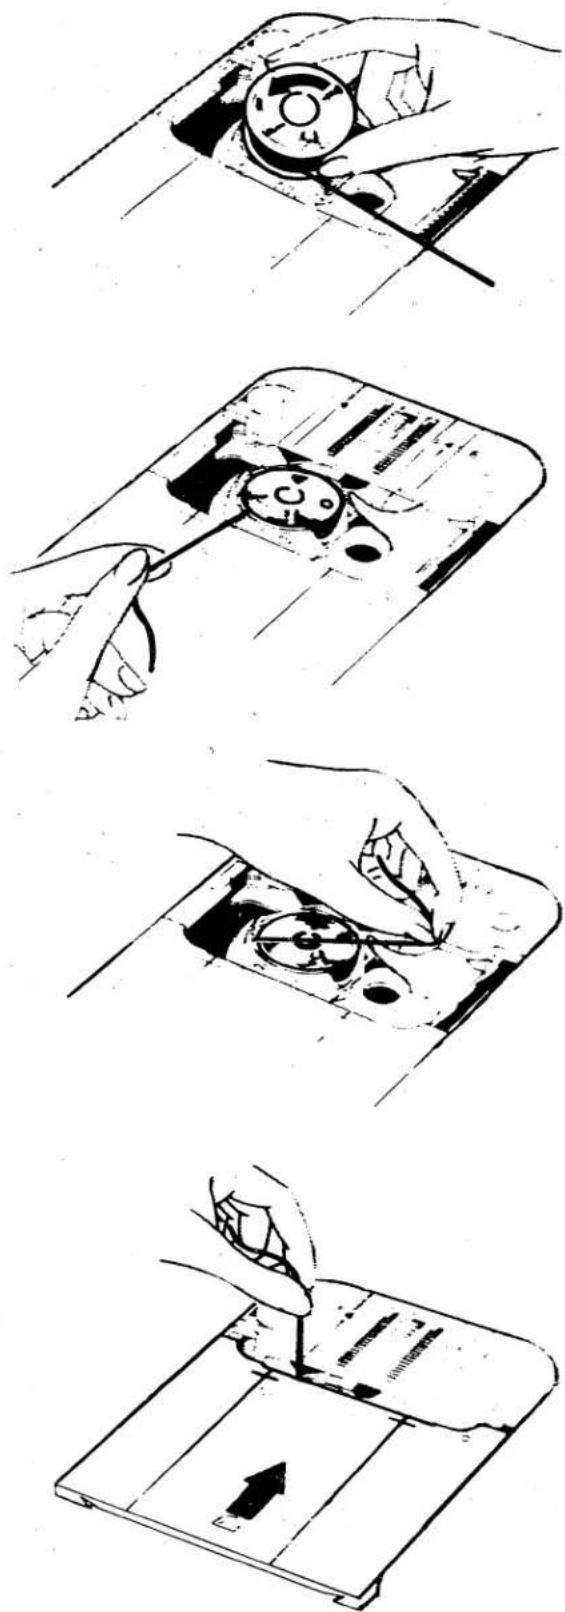
-
Open slide plate. Hold bobbin so that thread unwinds in direction shown, and put bobbin in bobbin case.
-
Pull thread into notch, draw it under tension spring and back into slot.
-
Draw about three inches of thread diagonally across the bobbin.
-
Close slide plate allowing thread to enter slot between the needle plate and the slide plate.
THE NEEDLE THREAD
text_image
Hold thread here as you thread tension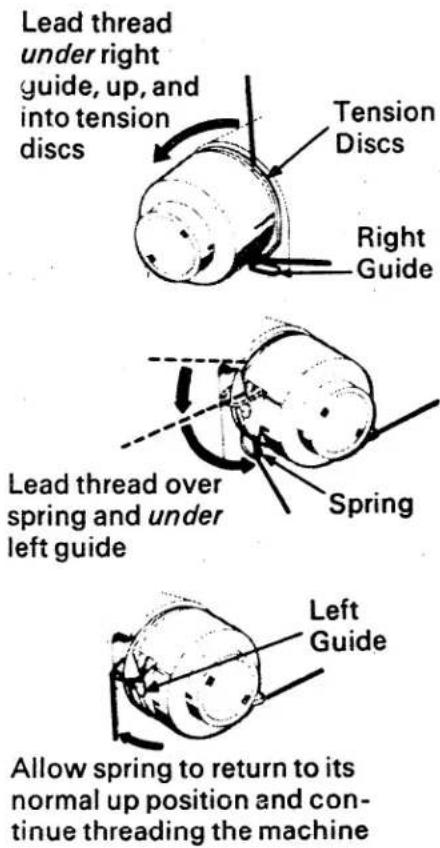
text_image
Lead thread under right guide, up, and into tension discs Tension Discs Right Guide Lead thread over spring and under left guide Spring Left Guide Allow spring to return to its normal up position and con- tinue threading the machine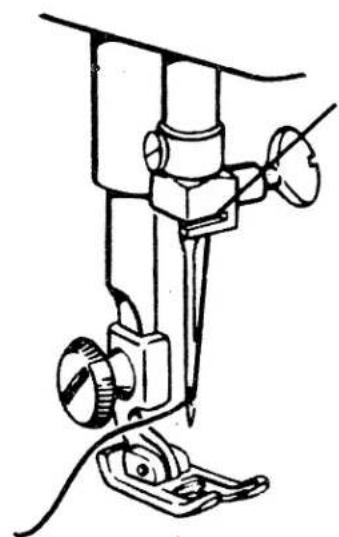
natural_image
Line drawing of a sewing machine needle and base mount (no text or symbols)Threading the Needle
-
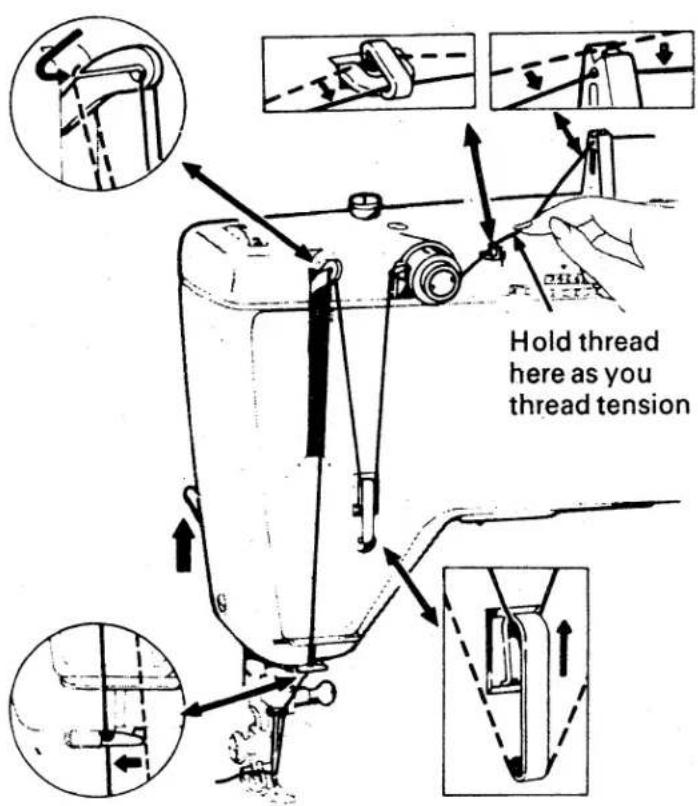
Turn hand wheel to raise take-up lever to its highest position, and raise presser foot to release the tension discs.
-
Place spool of thread on spool holder and lead thread through all points as shown, making sure to:
- Hold thread as illustrated while guiding thread into tension discs.
- Thread tension discs as illustrated.
- Thread take-up lever from back to front, guiding thread down over top of lever and then up into eyelet.
- Thread needle from front to back, drawing about 10 cm of thread through eye of needle.
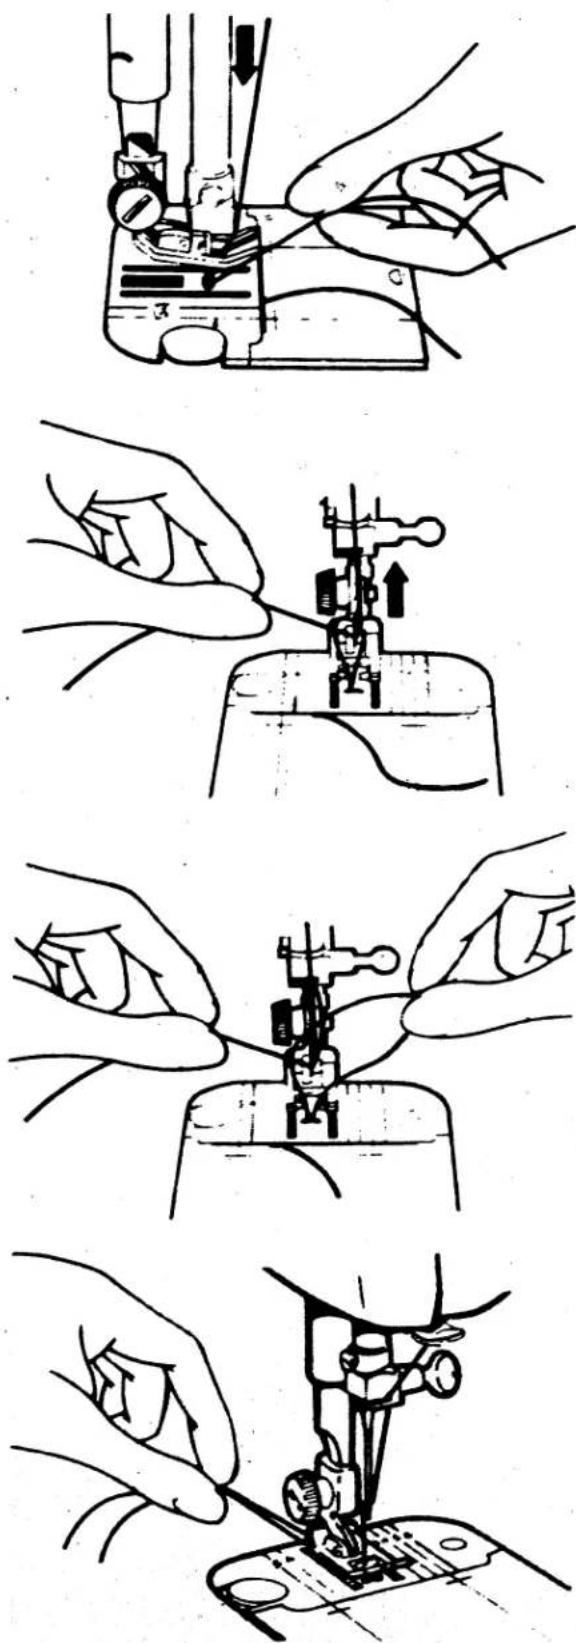
RAISING THE BOBBIN THREAD
Nov/ that you have wound the bobbin and threaded the needle, you will need to raise the bobbin thread through the needle hole in the needle plate.
-
Hold needle thread lightly with left hand and turn hand wheel slowly toward you so that needle enters hole in needle plate.
-
Continue turning hand wheel and holding needle thread until needle rises. Tighten your hold on the needle thread and bring up bobbin thread in a loop.
-
Open the loop with your fingers.
-
Place both needle and bobbin threads under presser foot, and draw to back of machine.
... You are now ready to sew
text_image
Technical illustration showing four steps of sewing machine tooling a sewing machine, with Chinese labels indicating each step.
natural_image
Pure diagram of a faucet with three heads and a vertical dashed line below (no text or symbols)Needle Position
natural_image
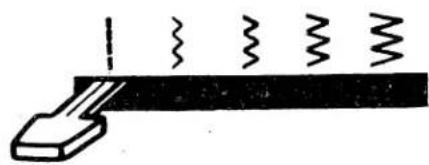
Simple line drawing of a tool emitting wavy lines from a surface (no text or symbols)Stitch Width
Before you move the selectors to set your sewing machine for straight stitching, turn the hand wheel toward you until the needle is above the needle plate.
SETTING THE MACHINE
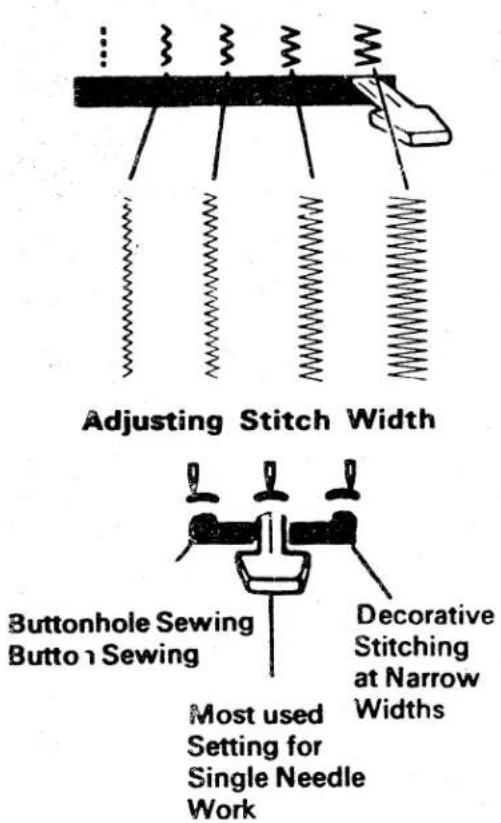
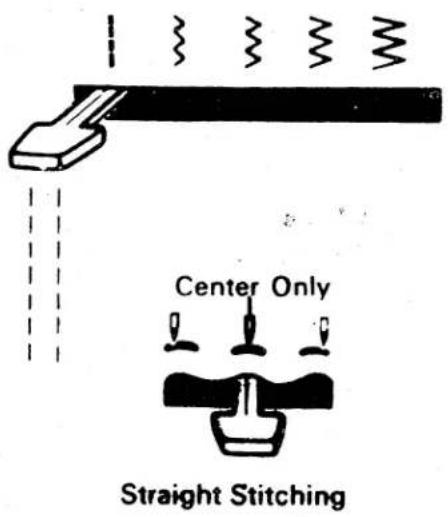
- Move needle position selector to (center).
- Set stitch width selector on
STARTING TO SEW
- Place needle and bobbin threads under presser foot and draw to back of machine.
- Position the needle in the fabric where desired for stitching start.
- Lower the presser foot and start the machine.
To sew perfectly on a wide variety of fabrics, adjust stitch length, pressure and thread tension as instructed on the following pages.
text_image
5 4 3 4 5 6Accessories
adjusting selectors for your fabric
ADJUSTING STITCH LENGTH
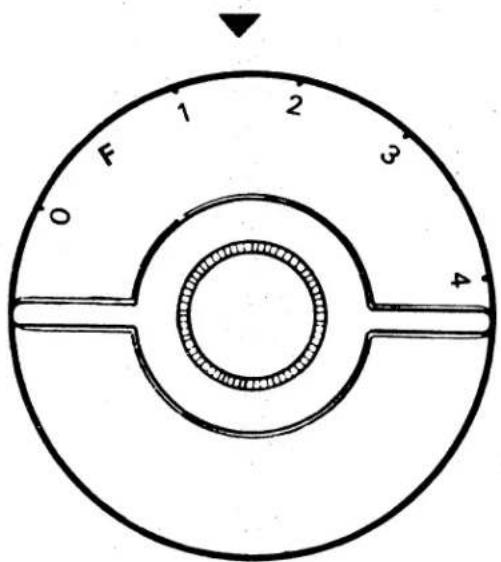
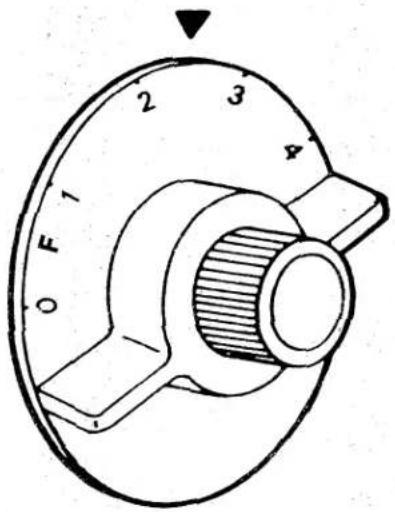
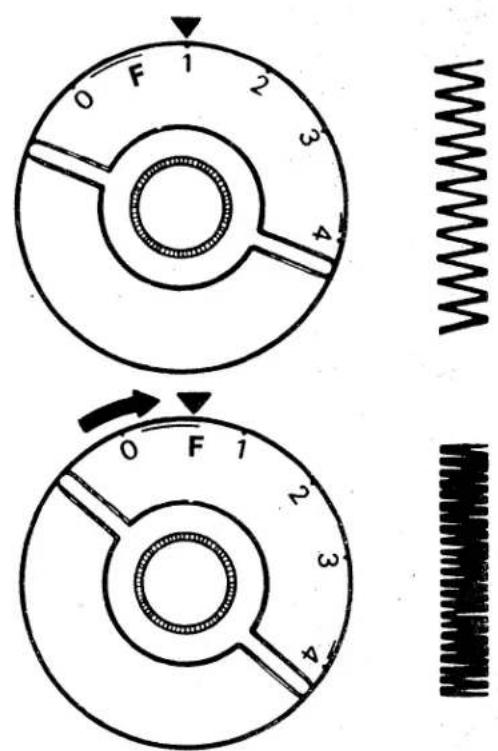
The stitch length dial regulates the length of stitches. The numbers on the dial express stitch length in mm; the higher the number the longer the stitch. Generally, shorter stitches are best for lightweight fabric; longer ones for heavy fabric. The 0—1 area is used for the adjustment of zigzag satin stitching.
Setting the Selector
- Turn dial so that the stitch length desired is positioned under the ▼ symbol on the control panel.
• To shorten the stitch length, turn the dial clockwise to a lower number.
• To lengthen the stitch, turn the dial counterclockwise to a higher number.
For reverse stitching, press the reverse-stitch push button (located in the center of the dial) in as far as it will go and hold in place (the button can be pushed in while the machine is sewing). Release pressure on the push button to return to forward stitching.
(For detailed instructions on adjusting the stitch length for zig-zag satin stitching, see page 24.)
text_image
F 1 2 3 O 4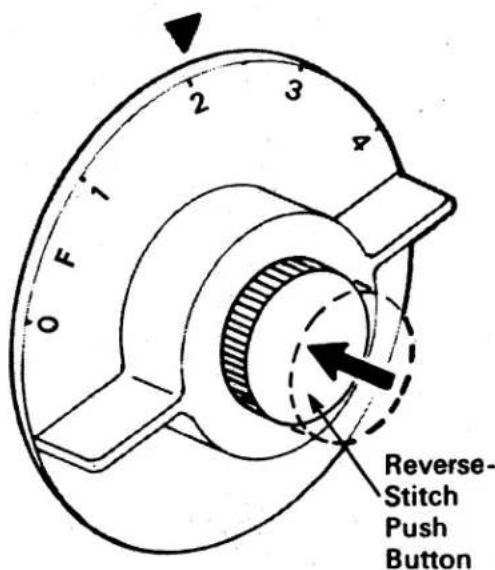
text_image
Reverse- Stitch Push ButtonReverse Stitching
text_image
Pressure Dial Lower Presser Foot To Increase To DecreaseAdjusting Pressure
Dial
natural_image
Pure geometric lines forming a V-shape with dashed and solid segments (no text or symbols)Too Tight
Too Loose
text_image
2 3 4 5Increase
Decrease
natural_image
Simple geometric line drawing with a dashed diagonal line and a solid V-shape (no text or symbols)Correct
Adjusting Thread Tension
ADJUSTING PRESSURE
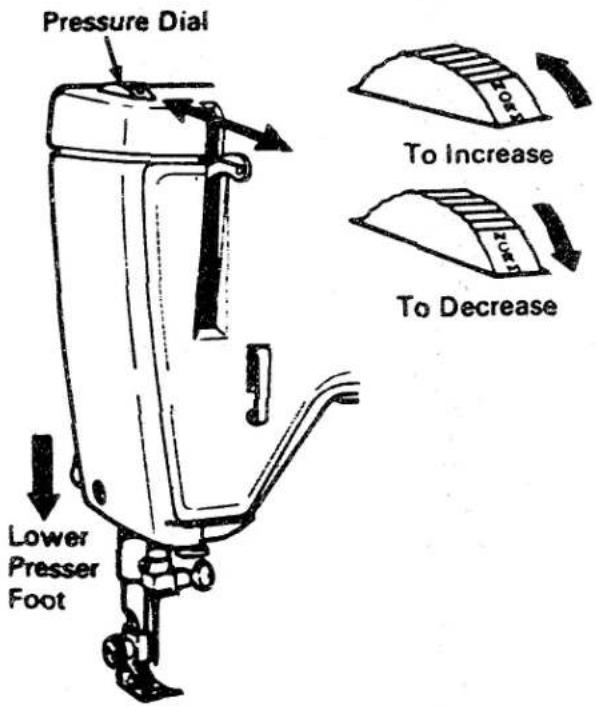
Numbered settings on pressure dial will assist you in obtaining correct pressure for fabric you are using. NORM (normal) setting is an all purpose setting for sewing a wide variety of fabrics of different weights and textures. Settings above and below NORM setting are also provided. When you need extra control, regulate the setting to heavier or lighter pressure to suit fabric being sewn.
When darning without an embroidery hoop, set dial at lowest setting, # . See page 42 for instructions.
Lower presser foot before setting pressure.
• To increase pressure, turn dial from NORM (normal) toward MAX (maximum).
• To decrease pressure, turn dial from NORM (normal) toward #.
- For darning, set dial on # .
REGULATING THREAD TENSION
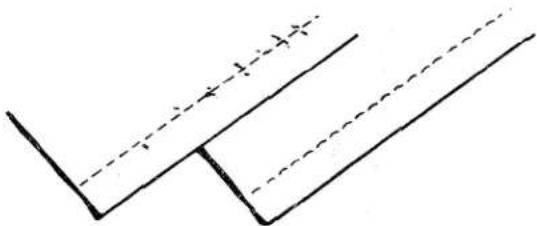
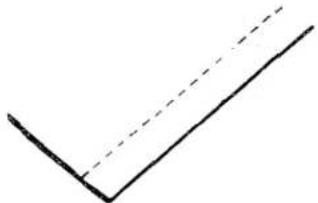
Correct tension is important because too much or too little will weaken your seams or cause your fabric to pucker. Make a test sample with fabric and thread you plan to use and examine it. A perfect stitch will have needle and bobbin threads locked between two layers of fabric with no loops on top or bottom and no puckers.
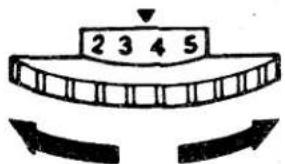
The tension dial regulates the degree of tension on your needle thread. Set it according to the type of thread and fabric you use. The numbers on the dial eliminate guesswork in duplicating settings.
If the stitches in your test sample look loose, increase needle-thread tension. If the fabric puckers, decrease tension.
• To increase tension, turn dial to higher number.
• To decrease tension, turn dial to lower number.
sewing a seam
PIN BASTING
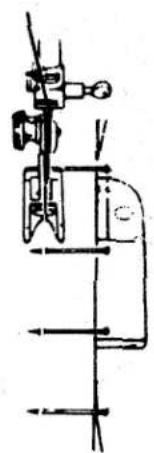
Pin basting is a time-saver and can be used when you sew easy-to-handle fabric. Use fine pins and place them:
- On top of the fabric (never on the - underside in contact with the feed).
- At right angles to the stitching line.
- Just nipping into the fabric at the stitching line (never extending under both sides of the presser foot).
natural_image
Technical line drawing of a sewing machine (no text or symbols)STARTING A SEAM
-
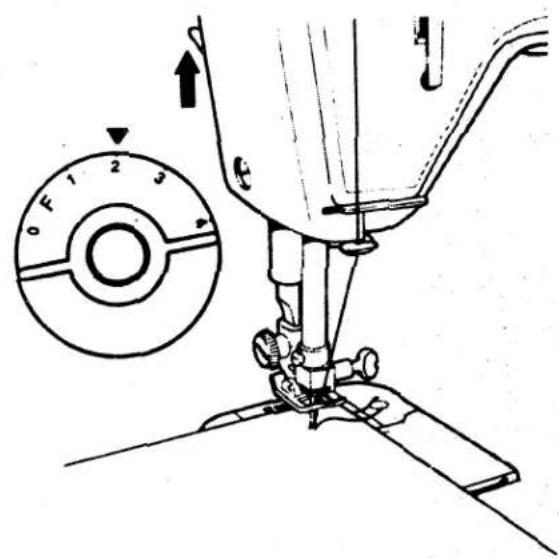
Set stitch length dial for desired length.
-
With presser foot up, align fabric with appropriate seam guideline on needle plate (as described on the following page). Position needle in fabric about 1.2 cm from the back edge.
-
Lower presser foot. Backstitch to the edge of the fabric for reinforcement by pushing in the reverse-stitch push button located in the center of the stitch length dial. Hold the button until the stitches reach the edge of the fabric and then release for forward stitching.
text_image
Technical diagram of a sewing machine with labeled parts and an inset showing the dial indicator.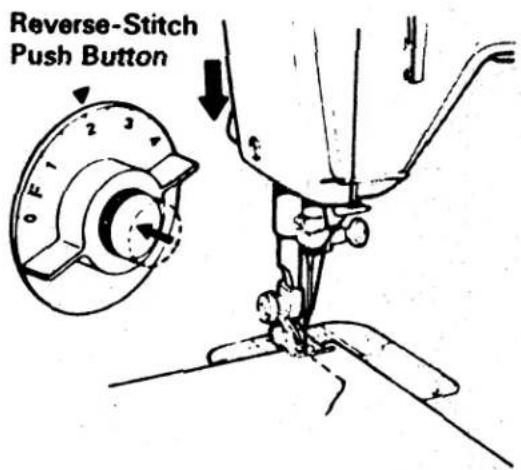
text_image
Reverse-Stitch Push Button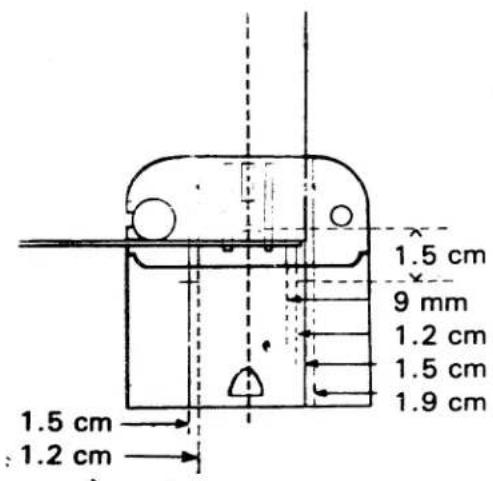
text_image
1.5 cm 9 mm 1.2 cm 1.5 cm 1.9 cm 1.5 cm : 1.2 cmUsing Guidelines
text_image
Cornering CrosslinesFabric at Crosslines
natural_image
Pure mechanical diagram showing a sewing machine needle and base mount (no text or symbols)Fabric after Turning Pivoting at Corner
KEEPING THE SEAM STRAIGHT
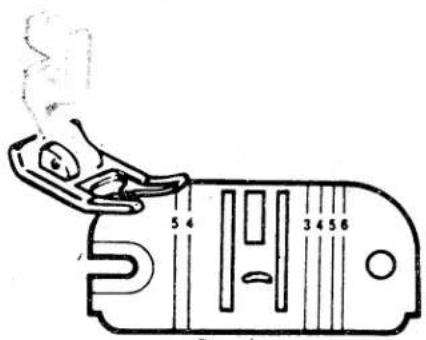
As you stitch, use one of the numbered lines on the needle plate as a guide for keeping the seams straight. Numbers indicate distances in eights of a cm from the needle. If you want a 1.5 cm seam, for example, keep the righthand edge of your fabric on the number 5 guideline.
TURNING SQUARE CORNERS
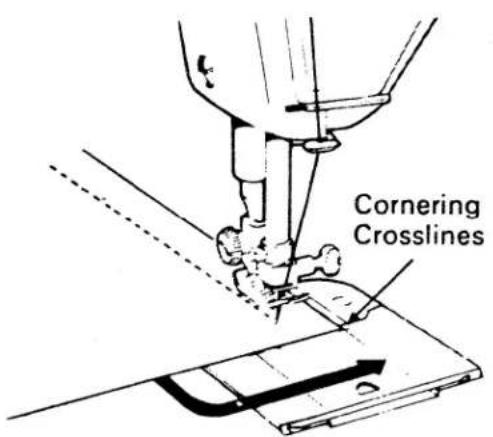
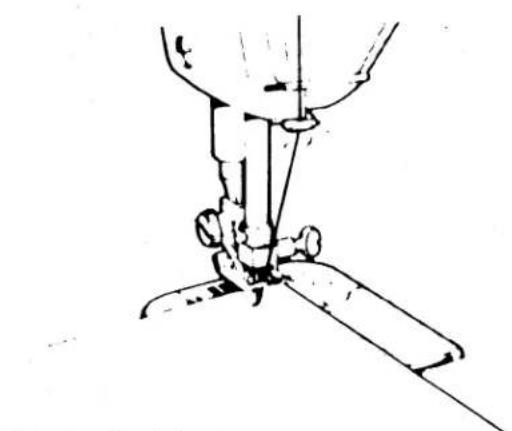
To turn a square corner 1.5 cm from the fabric edge, you need not measure or mark the seam. Simply use the crosslines on the slide plate.
- Line up your fabric with right or left guideline 5 on the needle plate. Stitch seam, slowing speed as you approach corner.
- Stop stitching, with the needle down, when the bottom edge of the fabric reaches the cornering crosslines on the slide plate.
- Raise presser foot and turn fabric on needle, bringing bottom edge of fabric in line with guideline 5.
- Lower the presser foot and stitch in new direction.
GUIDING AND SUPPORTING THE FABRIC
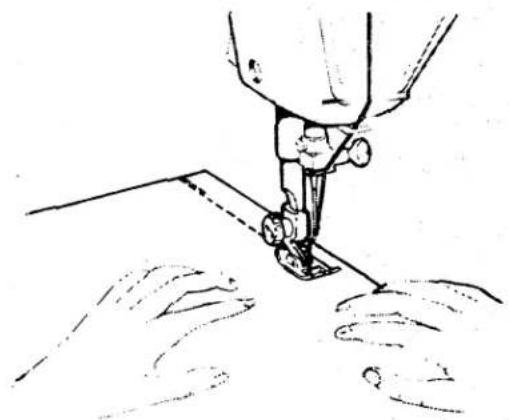
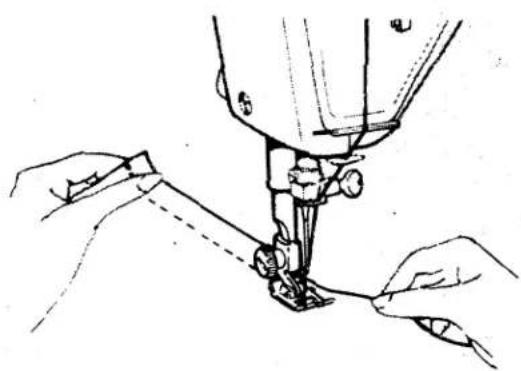
Most fabrics need only to be guided in front of the presser foot. Some fabrics, however, require support while being stitched. Filmy sheers, panné velvet, and tricots, for example, need to be held taut in front and back of the presser foot while being sewn.
WARNING: Do not pull the fabric while you are stitching as this may deflect the needle causing it to break.
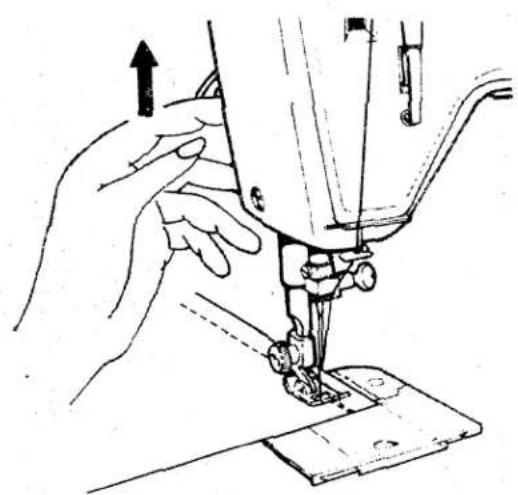
REINFORCING END OF SEAM
- Stitch to the fabric edge.
- Push in reverse-stitch push button and backstitch 1.5 cm to reinforce the end of the seam.
- Raise presser foot and remove fabric by drawing it to the back and left.
- Cut threads on thread cutter at rear of presser bar.
natural_image
Line drawing of a sewing machine needle stitching fabric (no text or symbols)Guiding Fabric
natural_image
Line drawing of a sewing machine needle stitching fabric, with hands operating the work (no text or symbols present)Supporting Fabric
natural_image
Illustration of hands operating a sewing machine with an upward arrow indicating motion (no text or symbols present)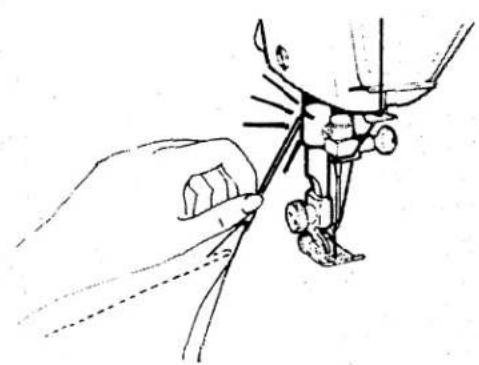
natural_image
Illustration of a hand using a tool to adjust or install a mechanical component (no text or symbols visible)Ending a Seam
text_image
Adjusting Stitch Width Buttonhole Sewing Button Sewing Most used Setting for Single Needle Work Decorative Stitching at Narrow WidthsAdjusting Stitch Placement
text_image
Too Tight CorrectAdjusting Needle-Thread Tension
Before moving stitch width and needle position selectors make sure needle is above fabric.
ADJUSTING WIDTH OF DESIGN
To produce a zig-zag stitch pattern, move the stitch width selector from straight stitch setting to any zig-zag setting to the right. Stitch width is increased as the selector is moved to the right.
ADJUSTING STITCH PLACEMENT
Most of your basic zig-zag stitching will be done in center (☐) needle position. Left (☐) and right (☐) settings are used for special stitch placement, as in buttonhole sewing and button sewing.
ADJUSTING NEEDLE-THREAD TENSION
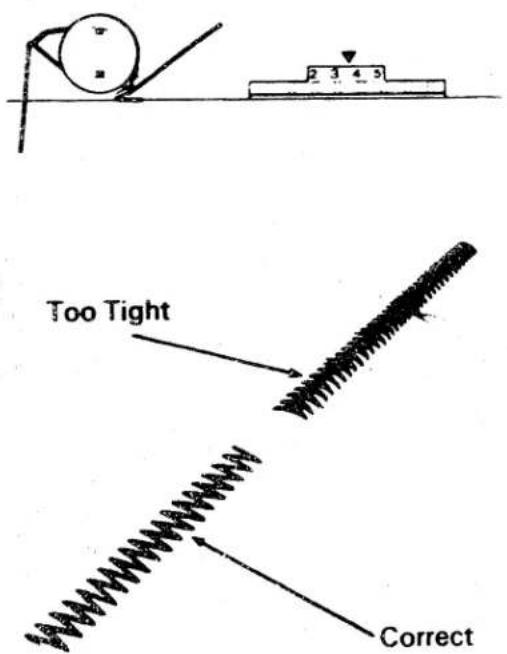
Zig-zag stitching requires less needle-thread tension than straight stitching. Make a test sample with the fabric and thread you plan to use so that you can adjust the tension properly. The stitches should lie flat against the fabric without causing the fabric to pucker.
If the stitches are not flat and the fabric is puckered, reduce needle-thread tension by turning the dial to a lower number.
ADJUSTING STITCH LENGTH
Any stitch length setting from 1 to 4 will give you an open zig-zag stitch. The higher the number, the more open, or farther apart, your stitches will be. The stitch area, between 0 and 1 on the dial, is used for adjusting zig-zag satin stitching (see next page for specific instructions).
text_image
2 3 4 O F 1Stitch Length Dial
ADJUSTING PRESSURE AND CHOOSING ACCESSORIES
Turn to page 18 under "Straight Stitching" for instructions on adjusting pressure.
For information on choosing accessories, refer to pages 6 and 7 and to detailed instructions for sewing with zig-zag stitch patterns included in the section called "Sewing the Professional Way" that starts on page 31.
text_image
5.4 3.4 5.6General Purpose Needle Plate
natural_image
Simple line drawing of a foot and ankle base (no text or symbols)General Purpose Foot
natural_image
Simple line drawing of a mechanical clamp or bracket with a hanging weight (no text or symbols)Zipper Foot
natural_image
Simple line drawing of a mechanical clamp or bracket (no text or symbols)Special Purpose Foot
text_image
0 F 1 2 3 4 0 F 1 2 3 4Adjusting Stitch Length
natural_image
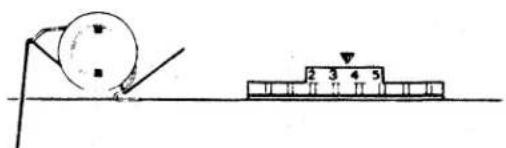
Simple line drawing of a ball rolling down an inclined plane and a block on a surface (no text or symbols)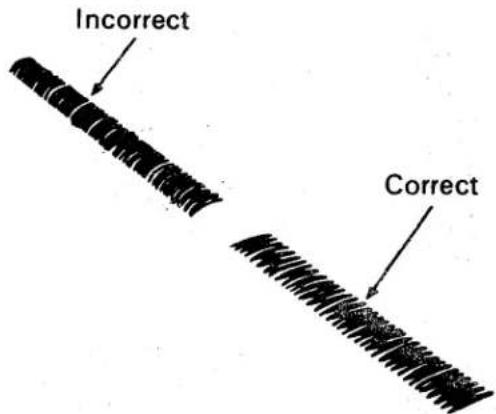
text_image
Incorrect CorrectAdjusting Thread Tension
satin stitching
Satin stitching—a series of closely spaced zig-zag stitches that form a smooth, satin-like surface—is useful for both practical and decorative work.
When you wish to produce a satin stitch for appliqué or bar tacks, for example, make a test sample first so that you can adjust the stitch length and thread tension properly. Soft fabrics may require a backing to ensure firm satin stitching.
ACCESSORIES AND SELECTOR SETTINGS
- Needle Position:

- Stitch Width:

- Stitch Length: 0-1
• General Purpose Needle Plate
• Special Purpose Foot - Pressure: NORM
Adjusting Stitch Length
- Turn stitch length selector dial to 1 (the beginning of 0-1 area).
- Run machine at a slow speed.
- Gradually turn the stitch length dial clockwise until stitches are closely spaced and form a smooth surface.
Adjusting Thread Tension
Satin stitching requires less tension than straight stitching or open zig-zag stitching. Futhrhermore, the wider the stitch, the lighter the tension on the thread must be. Notice the stitching on your sample. If the fabric is puckered, lower the needle-thread tension by turning the tension dial to a lower number.
By using a twin needle, you can produce two parallel, closely spaced, decorative lines of stitching simultaneously. You can use either one or two colors of thread and you can choose either a straight-stitch or zig-zag stitch.
SETTING THE MACHINE
Straight Stitching
- Needle Position: ♩ only
- Stitch Width:
- Stitch Length: Optional
• General Purpose Needle Plate - General Purpose Foot
text_image
Center Only Straight StitchingZig-Zag Stitching
- Needle Position: ♪ only
- Stitch Width: See illustrations at right
- Stitch Length: Optional
- General Purpose Needle Plate
- General Purpose Foot (Open Stitching)
• Special Purpose Foot (Satin Stitching)
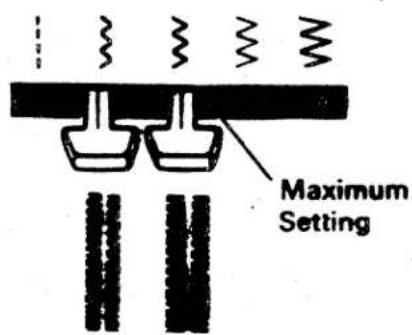
text_image
Maximum SettingCenter ( ⚠ ) needle position setting must be used. Stitch width must not exceed settings illustrated at right.
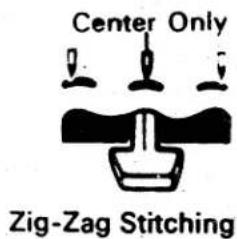
text_image
Center Only Zig-Zag StitchingUse twin needle, Type 705 H (size 90).
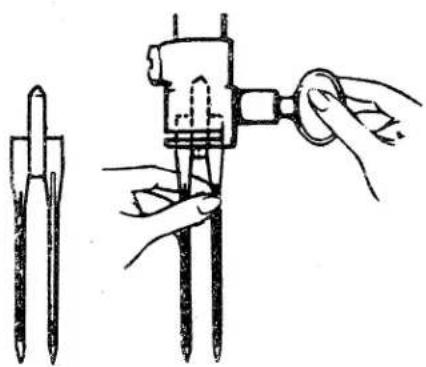
natural_image
Illustration of a hand using a tool to adjust or install a mechanical component, with no visible text or symbols.INSERTING THE TWIN NEEDLE
Before inserting the twin needle, make sure you are using the general-purpose needle plate and that the needle position dial is set at 🔒, and the stitch width does not exceed the settings shown on page 25.
To insert the twin needle, simply raise needle to its highest point and loosen the needle-clamp screw. Remove the single needle and insert the twin needle in its place. Tighten needle-clamp screw securely.
threading for twin-needle stitching
For best results, use No. 50 mercerized or synthetic thread. Thread the machine as for single-needle stitching, except pass thread between center and back tension discs, and through right eye of needle. Attach secondary spool pin in hole on top cover. Pass thread from second spool through guide (by-passing the snap-in thread guide post) as illustrated, then between center and front tension discs. Thread through remaining points, making certain to omit the thread guide above the needle and pass thread through left eye of needle.
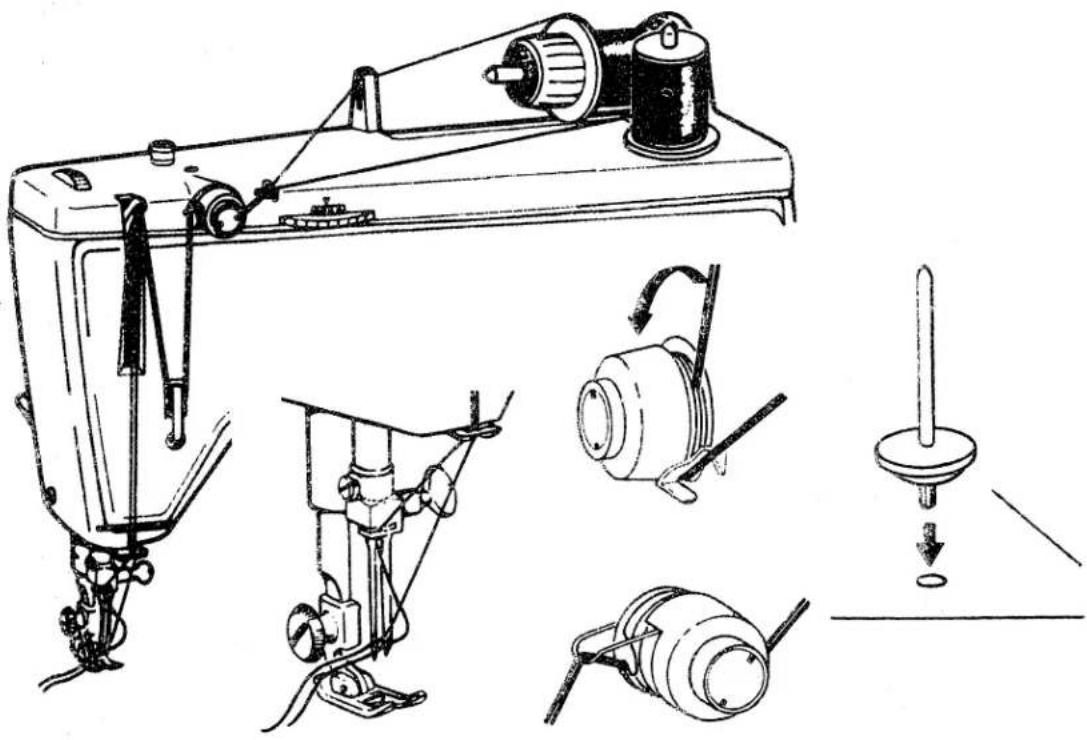
natural_image
Technical line drawings of a sewing machine and its internal components, including a needle, handle, and base (no text or labels)buttons
- Needle Position: ⚠ (left)
• General Purpose Presser Foot - Feed Cover Plate
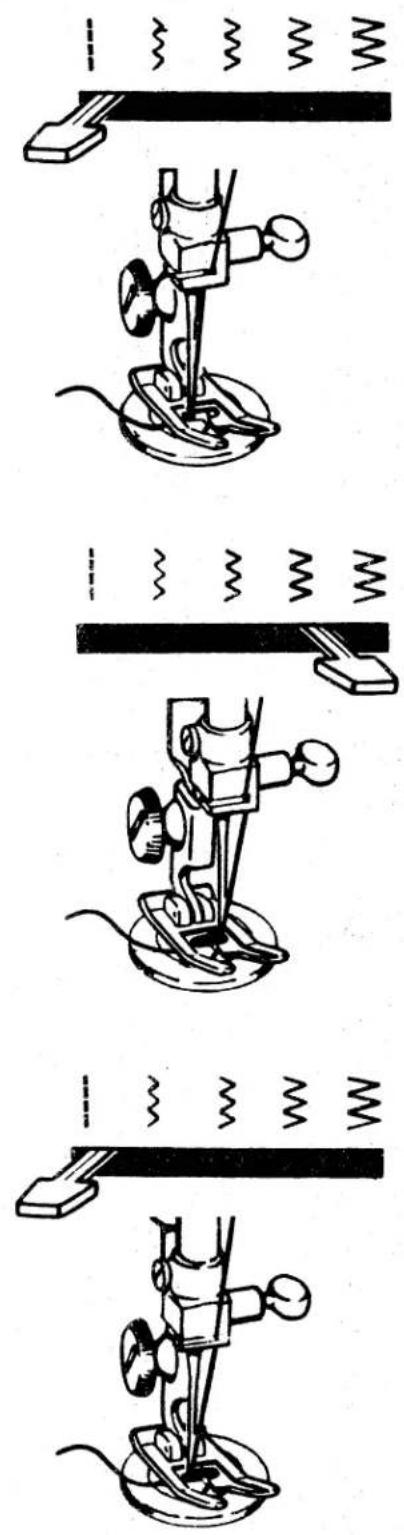
Flat buttons can be sewn on quickly and easily using the plain zig-zag stitch. The space between the holes in the button determines stitch width settings. For buttons with standard hole spacing, use settings; and ≧ as shown. For buttons with unusual hole spacing, use setting; and increase or decrease the width ( ≧) as necessary.
- Attach feed-cover needle plate (see page 7).
- Set stitch width at : and needle position at ⚠ (left). Position button under foot and lower needle into center of left hole by turning hand wheel toward you. Lower foot. Turn hand wheel toward you until needle rises out of button and is just above the foot.
- Set stitch width at medium-wide zig-zag ( 52 ) setting. Check stitch width by turning hand wheel slowly toward you; the needle should enter the right hole of the button. Take six or more zig-zag stitches to attach button. End on left side.
- To fasten stitching, return to stitch width; and take three or four stitches.
Remove feed-cover plate from the general-purpose needle plate when work is completed.
text_image
Diagram illustrating a mechanical or electrical device operation with spring and damper mechanisms, showing step-by-step assembly.buttonholes
BUTTONHOLE POSITION
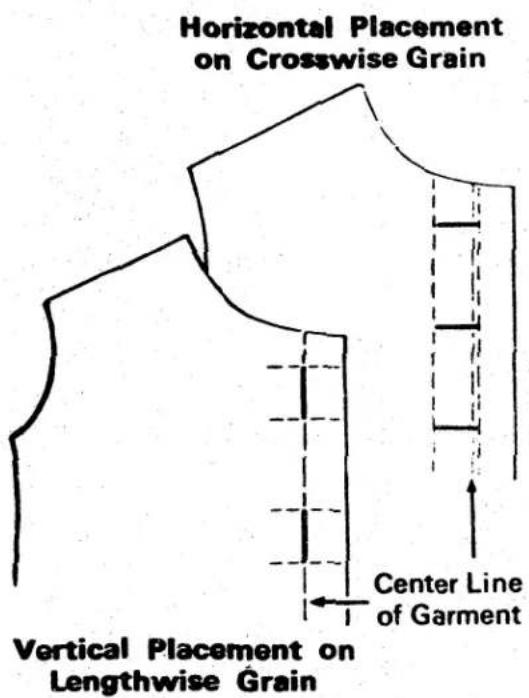
Accurate guidelines are essential to keep buttonholes a uniform distance from the faced edge of the garment, evenly spaced, and on the grain of the fabric. For center closures, place guidelines as follows:
text_image
Horizontal Placement on Crosswise Grain Vertical Placement on Lengthwise Grain Center Line of Garment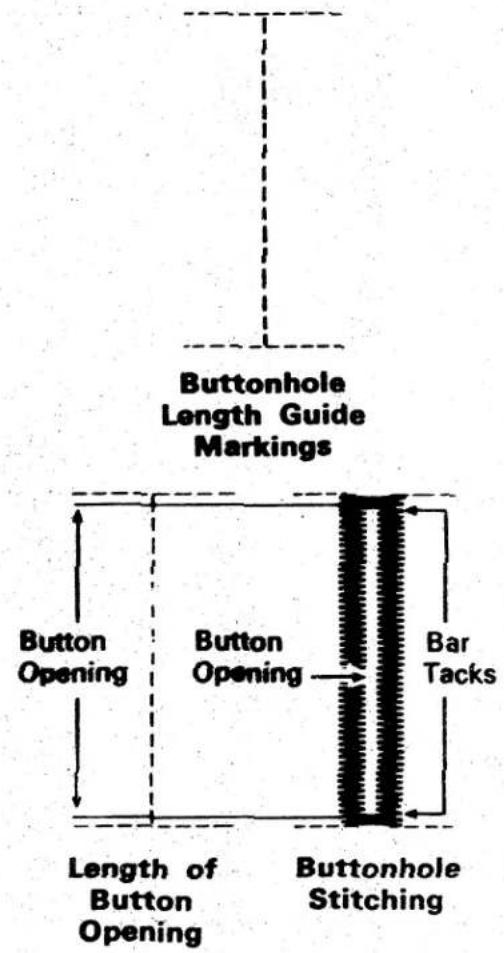
text_image
Buttonhole Length Guide Markings Button Opening Button Opening Bar Tacks Length of Button Opening Buttonhole Stitching- Mark the center line of the garment as indicated on your pattern. This guideline can be hand basted and should follow a lengthwise fabric thread.
- Mark a position guideline for each buttonhole.
- Horizontal buttonholes are placed to extend 3 mm beyond the center-line basting of the garment. Horizontal guidelines for the buttonholes should follow a cross-wise thread of the fabric, and, if basted, be longer than the finished length of the buttonhole. Determine the length of the buttonhole (as described below) and mark ends of each buttonhole vertically.
- Vertical buttonholes are placed so that the center-line basting of the garment is in the center of the buttonholes. Determine buttonhole length and mark ends of each button-hole horizontally across the center line and use the center-line basting as a buttonhole guide when stitching.
BUTTONHOLE LENGTH
First, decide how long the button opening must be. Then, add 2 mm to the measurement for each bar tack (the closing stitches at each end of the buttonhole). To find the length of the button opening, cut a slit in a scrap of fabric the diameter of the button you intend to use. Increase length of opening until button slips through easily.
STITCH WIDTH
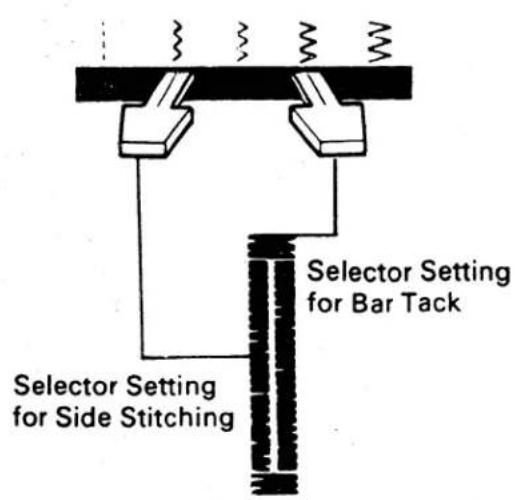
Two stitch width settings are required for making buttonholes: one for side stitching and one for the bar tack. Two possible combinations are illustrated.
text_image
Selector Setting for Bar Tack Selector Setting for Side Stitching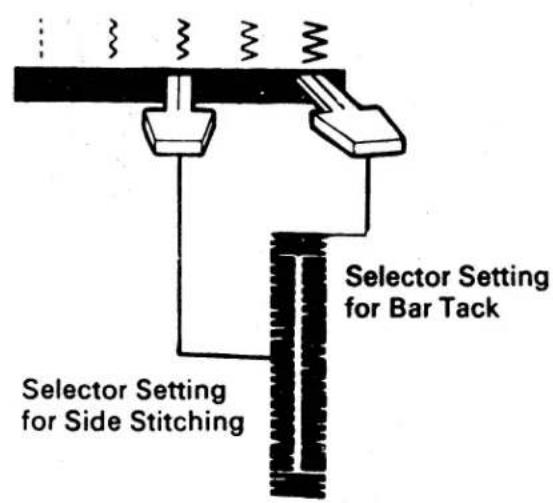
text_image
Selector Setting for Bar Tack Selector Setting for Side StitchingProcedure
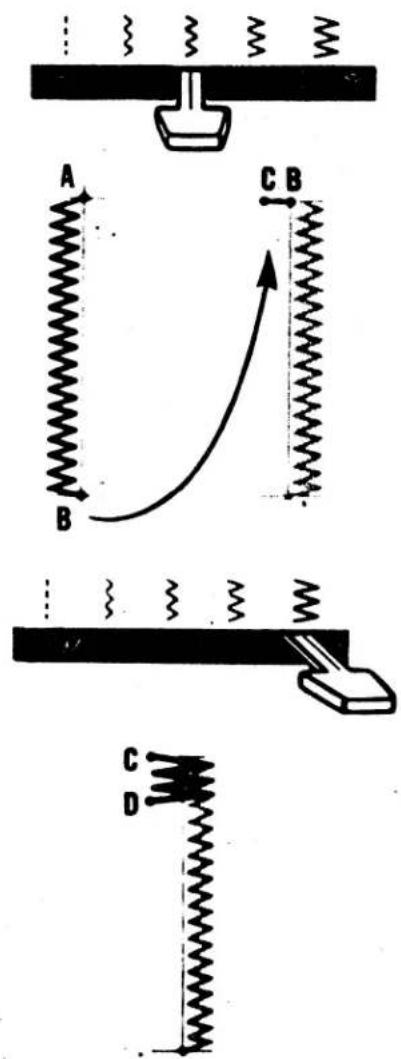
Set stitch length in 0-1 area of stitch length dial. Attach special purpose foot. Set the pattern selector at ☐, needle position selector at ☐, and stitch width selector at the width desired for the side stitching. Place work under needle, aligning center marking of buttonhole with center slot in the special purpose foot.
Side Stitching
Position needle in fabric at point A. Lower foot and stitch to end of marking. Leave needle in fabric at point B. Raise foot and pivot work on needle. Lower foot. Take one stitch without changing width setting, bringing work to point C.
Bar Tack
Adjust stitch width selector for bar tacks and take at least six stitches. Stop at point D.
text_image
A B C B C DBUTTONHOLES (Continued)

text_image
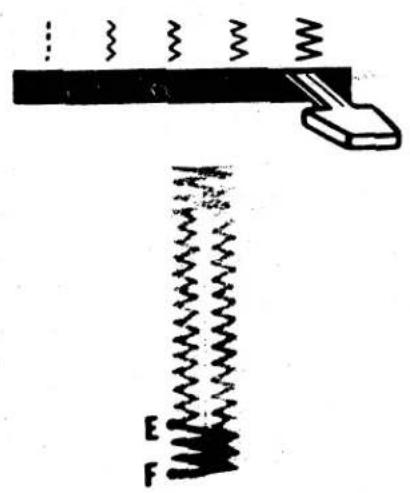
Diagram showing a spring mechanism with labeled parts D and E, and spring symbols above the spring.Side Stitching
Readjust stitch width selector for side stitching. Complete work to point E. Leave needle in fabric.
text_image
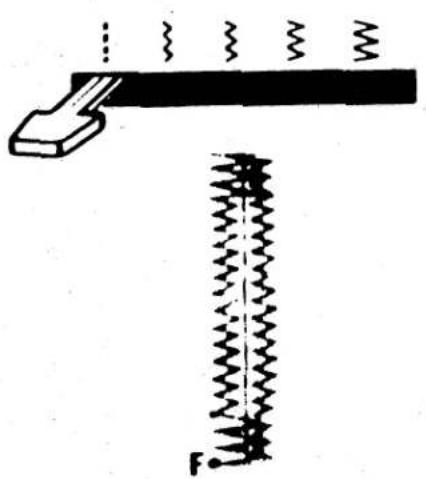
Diagram illustrating a spring-mass system with labeled force vectors E and FFinal Bar Tack
Adjust stitch width selector for bar tacks, and take at least six stitches ending at point F.
natural_image
Simple line drawing of a mechanical setup with a lever and spring, no text or symbols presentFastening Stitch
To secure stitching, move selector to : and take three stitches. Remove work, draw threads to underside, fasten, and trim. Cut opening for button with sharp scissors.
LINGERIE SEAMS
To make seams in lingerie durable and flexible, use a combination of straight and zig-zag stitching.
Method 1
For 1.5 cm bias seam in woven fabric:
- Straight-stitch the seam (with stitch width at : ) on wrong side of fabric.
- Press both seam allowances in the same direction. Then, from the right side, top-stitch with narrow zig-zag stitching, letting needle alternately enter seam line and seam thickness.
Method 2
For narrow seams in nylon tricot:
- Cut fabric for 1.5 cm seam allowance.
- Straight-stitch-seam line on wrong side of fabric. Then place a line of medium-wide, open zig-zag stitching close to the straight stitching.
SEAM FINISHES
- Needle Position:
• Stitch Width: } or ≧ (maximum) - Stitch Length: 1,2 to 3 mm depending on choice of stitch and fabric
• General Purpose Needle Plate and Foot
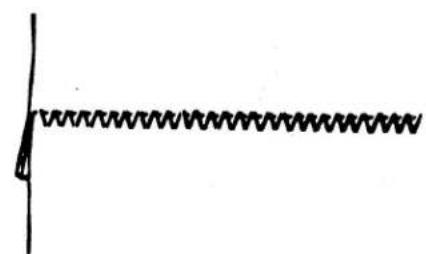
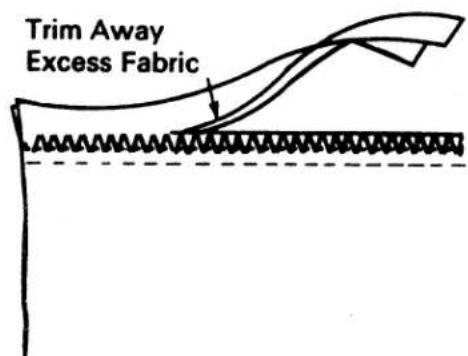
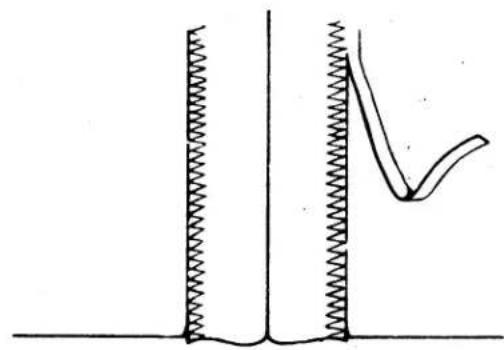
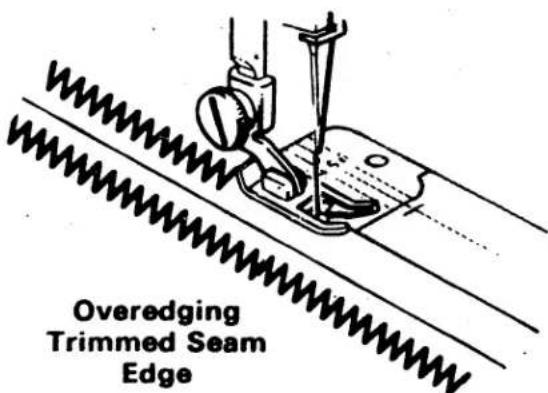
Seam edges support the garment and should be given a durable finish if the fabric is likely to ravel. There are two methods of finishing seams in such fabrics: trimming seam edge or overedging. Make a test sample first to determine which method best suits your fabric.
natural_image
Simple line drawing of a zigzag line with a triangular end (no text or symbols)For a 1.5 cm Seam
text_image
Trim Away Excess FabricFor a Narrow Seam
natural_image
Simple line drawing of a spring-mass system with no text or symbolsTrimming Seam Edges after Stitching
text_image
Overedging Trimmed Seam Edgehints on sewing special fabrics
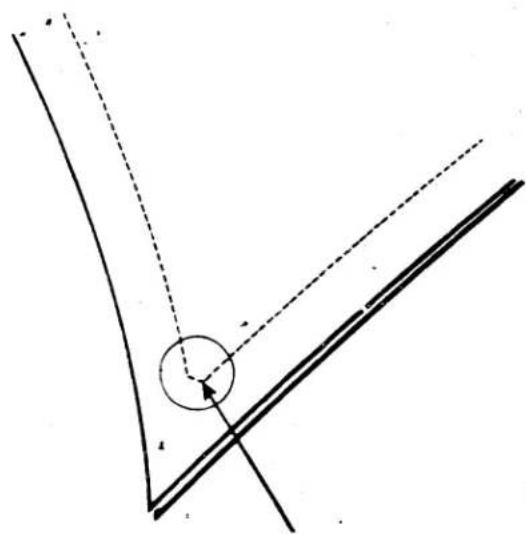
natural_image
Pure geometric lines forming a V-shape with a circle and dashed construction lines (no text or symbols)Diagonal Stitching Across the Point
LEATHER-LOOK VINYL
- Use masking tape or zipper adhesive tape instead of pins or basting to hold seams, zippers and hems in place for stitching.
- Stitch with a long stitch (1 to 3 mm). A short stitch may cut the fabric.
- Sew with a steady, even pace and stitch accurately. Seams cannot be ripped out without leaving needle marks in the fabric.
- The shiny side of some vinyls tends to stick to metal surfaces. Use a strip of tissue paper between the fabric and metal machine surfaces to prevent this.
- Topstitching holds seams and garment edges smooth and flat and adds a decorative note.
- Reinforce button and buttonhole areas with interfacing. Bound buttonholes are the best choice for vinyls with knit backing.
- For sharp points on collars and lapels, take one or two stitches diagonally across the point to allow enough space to smoothly enclose the seam edge.
CIRÉ (Wet-Look Taffeta and Tricot)
- Use masking tape or zipper adhesive tape instead of pins or basting to hold seams, zippers, and hems in place for stitching.
- Stitch accurately; seams cannot be ripped out because needle marks remain in the fabric.
- Sew seams under light tension by holding fabric slightly taut at front and back of needle.
- Stitch ciré taffeta with a fairly long stitch 2,5 to 3 mm and use an enclosed edge finish for seams and hems.
- Stitch ciré knits with a medium length-stitch 2 mm and use a fine ball-point needle.
- Machine-worked buttonholes (as well as bound buttonholes) can be made in ciré fabric. Always use an interfacing and make sure the close zig-zag stitches do not cut the fabric.
DEEP-PILE FABRICS (Fake Fur)
- Pin, rather than baste, seams. Place pins at close intervals at right angles to the seam line. Pins with colored heads are easy to see and remove.
- Sew in direction of nap.
- Stitch with a fairly long machine stitch(2,5 to 3mm) and use polyester/cotton thread in a size 90 or 100 Type 705 H needle.
- As seam is stitched, smooth pile away from seam allowance with a darning needle or upholstery pin.
• After stitching seams with a 1.5 cm seam allowance, use small hand scissors to shear pile from entire seam allowance to reduce bulk.
- Stitch 6 mm pre-shrunk tape into neckline and shoulder seams for stability and reinforcement or stitch with the straight stretch stitch.
• Leather and leather-look fabrics complement fur fabrics; use them for bound buttonholes and easy button loops.
- Coat hems are less bulky if they are narrow and finished with a 8 cm fabric facing or grosgrain ribbon.
- Slash through the center fold of darts and finger-press open, or stitch with a narrow zig-zag stitch and trim away excess fabric after stitching.
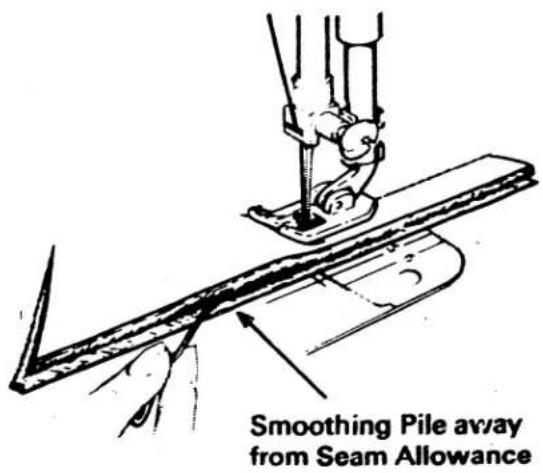
text_image
Smoothing Pile away from Seam AllowanceDeep-Pile Fabrics
VELVET AND VELVETEEN†
- Use a light-pressure dial setting to prevent crushing pile.
• Mark and baste with silk thread.
- Use a Type 705 H, size 80 needle, and a fine thread for seaming. "A" silk or nylon thread is recommended for velvet.
• Always stitch in the direction of the nap.
- For unpuckered seams, pin or hand baste together and then stitch under light tension (see page 18). Extra-long, straight seams may be machine basted with a long, wide zig-zag stitch.
- To sew panné velvet, use a ball-point needle and a shorter-than-normal stitch length (1.5 to 2 mm).
construction details
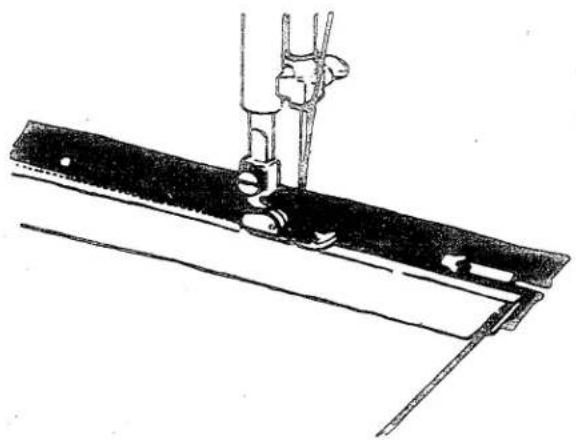
natural_image
Technical line drawing of a sewing machine needle stitching a metal frame (no text or symbols)Zippor Insertion
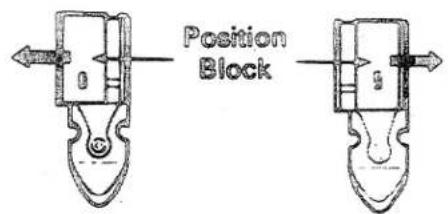
text_image
Position Block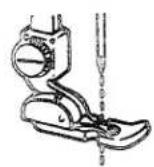
Zipper Foot
to Left of Needle
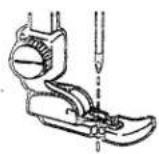
Zipper Foot
to Right of Needle
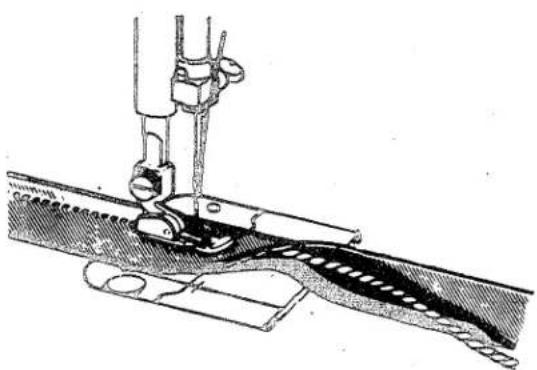
natural_image
Technical line drawing of a sewing machine needle stitching fabric (no text or symbols)Making Welting for a Corded Seam
ZIPPERS
At the notions counter in your Sewing Center, you will find many different kinds of zippers, one of which will be just right for whatever you want to sew. The zipper package will contain easy-to-follow instructions for inserting the zipper. And, with the zipper foot, you will find it easy to form an even line of stitching close to the zipper.
- Needle Position:
- Stitch Width:
- General Purpose Needle Plate
- Zipper Foot
Attaching the Zipper Foot
When the zipper is to the right of the needle:
- Move position block on zipper foot to left, to allow shank to enter right side of foot, so that needle will enter right notch in foot.
When the zipper is to the left of the needle:
- Move position block on zipper foot to right, to allow shank to enter left side of foot, so that needle will enter left notch in foot.
(The zipper foot is snapped onto shank as instructed on page 7.)
CORDED SEAMS
The corded seam is a professional treatment for slipcovers, children's clothes, blouses, and lingerie. To make a corded seam, make the welting first (or buy it ready-made at a notions counter), then stitch it into the seam. For both steps, use the zipper foot to place the stitching close to the cord.
TOPSTITCHING
A practical, simple way to accent the lines of a dress or coat is to place one or more rows of stitching along collars, lapels, facing edges, pockets, seams, etc. For a tailored look, use lines of regular straight stitching; sew them with button-hole twist for added emphasis. For decorative interest, use a zig-zag stitch.
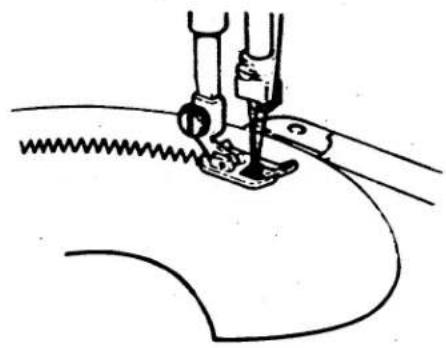
natural_image
Line drawing of a sewing machine needle stitching fabric (no text or symbols)Topstitching with Zig-Zag Stitch
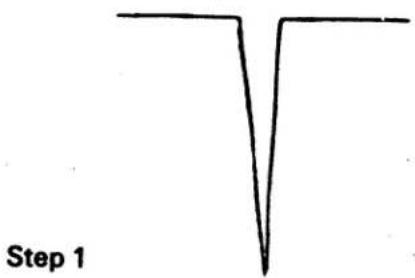
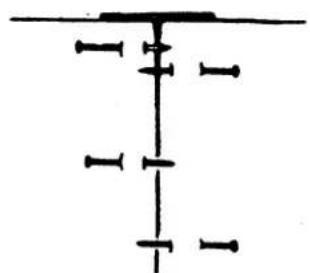
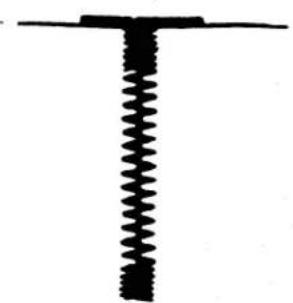
Steps in Making a Dart in Interfacing
text_image
Step 1DARTS IN INTERFACING
- Needle Position:
- Stitch Width: ≧ (maximum)
- Stitch Length: 1 mm or to suit fabric
• General Purpose Needle Plate and Foot
Step 2
natural_image
Pure electrical circuit lines without any symbolsWith zig-zag stitching, interfacings can be shaped without bulk.
- Cut out the dart allowance on the stitching line.
- Bring raw edges together and pin or baste in place over a muslin stay.
- Stitch, backstitching at both ends of dart for reinforcement.
Step 3
natural_image
Simple black-and-white line drawing of a T-shaped spring (no text or symbols)APPLIQUÉ
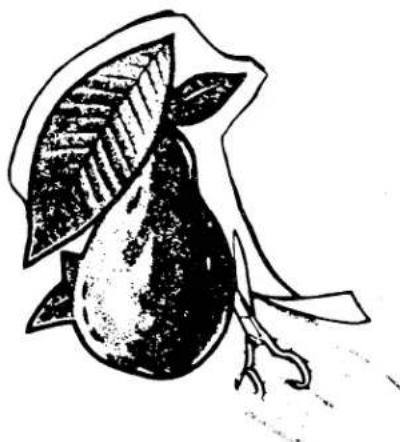
Appliqué adds beauty and interest to clothing and household linens. You can create your own design, trace a simple outline from a coloring book, or use a motif cut from a printed fabric. Fabrics of like or different texture combine equally well.
A closely spaced zig-zag stitch is most commonly used in appliqué work. Although you may vary stitch width to accommodate fabric weave or texture, never allow the stitch to be too wide.
natural_image
Illustration of a pear with leaves and stem, no text or symbols present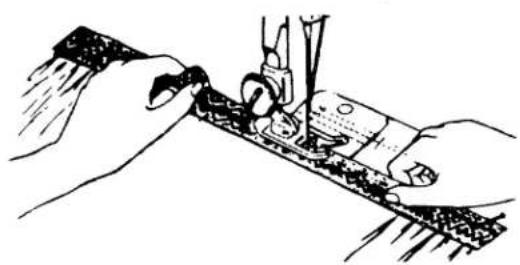
natural_image
Illustration of hands operating a sewing machine needle (no text or symbols visible)Attaching Elastic with Plain Zig-Zag
Preparation
• Baste appliqué design to fabric.
- Outline design with straight stitching (use a short stitch).
- Remove basting and press.
- Attach special purpose foot.
Appliquéing
- Set machine for desired stitch width. Adjust stitch length in the 0-1 area of the stitch length dial.
- Outline the entire design with appliqué stitching.
- Cut away the fabric on the outer edges of the stitching with embroidery scissors.
ATTACHING ELASTIC
Elastic will remain stretchable when it is attached with the plain zig-zag stitch. The flexible joining produced by this stitch allows elastic banding to be stitched under, over, or between fabric layers, making it particularly useful in the construction of lingerie and swimsuits.
- Needle Position:
- Stitch Width: - (maximum)
• Stitch Length: About 1.25 mm
• General Purpose Needle Plate and Foot
free arm sewing
natural_image
Line drawing of a woman wearing a ruffled top and skirt (no text or symbols)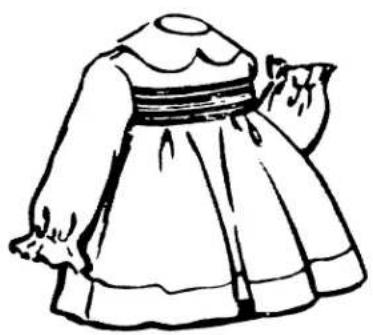
natural_image
Line drawing of a person wearing a traditional dress with pleated skirt and collar (no text or symbols)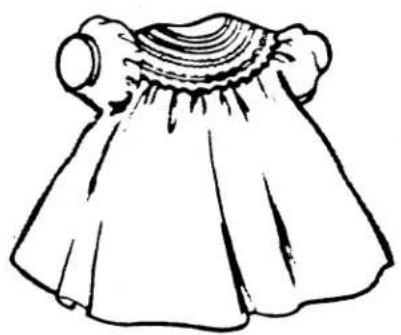
natural_image
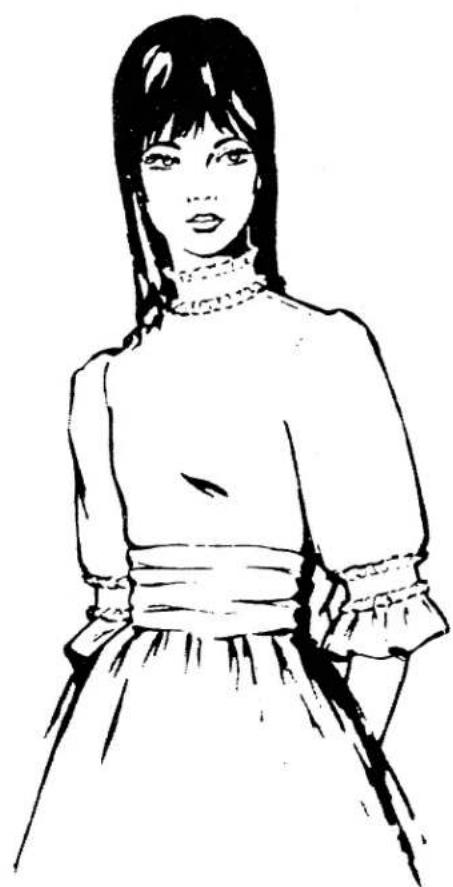
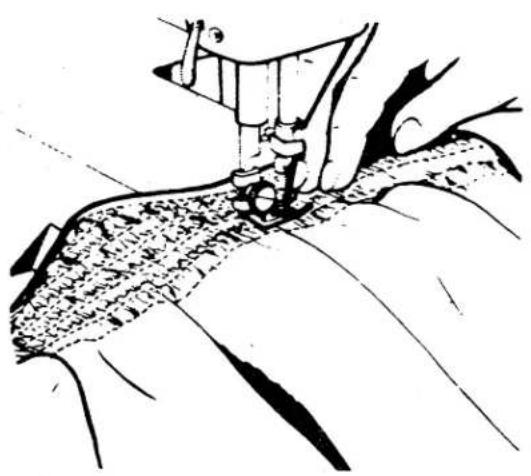
Simple line drawing of a pleated dress with a collar and skirt (no text or symbols)Free arm sewing simplifies fabric handling when you sew circular and hard-to-reach garment areas. A few of the sewing jobs for which you will find it particularly useful are illustrated. To prepare your machine for free arm sewing, press the extension table release push-button and remove the extension table.
natural_image
Line drawing of a sewing machine stitching fabric (no text or symbols)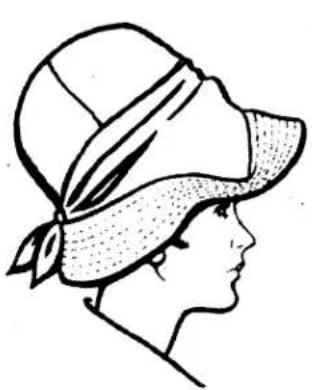
natural_image
Side profile illustration of a person wearing a wide-brimmed hat (no text or symbols)
natural_image
Side profile illustration of a person wearing a patterned hat (no text or symbols)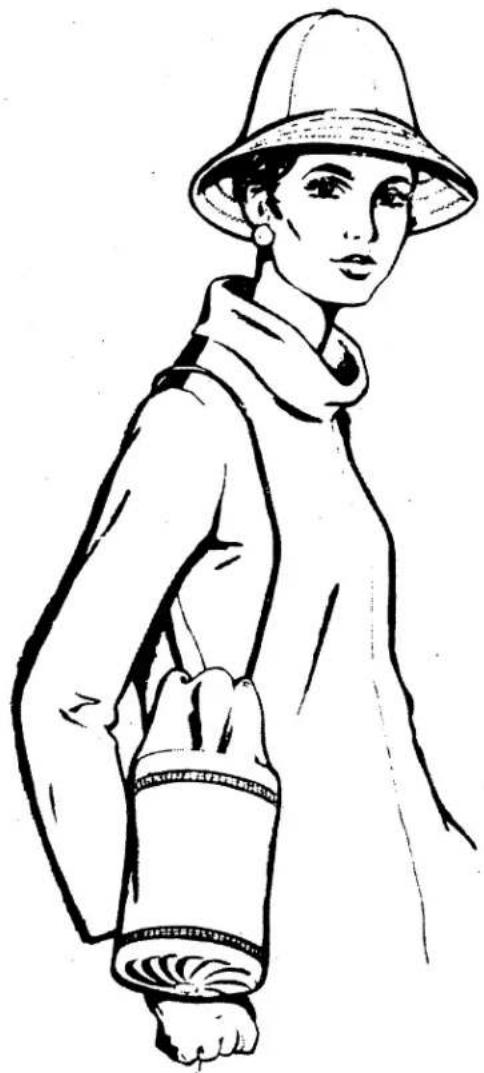
natural_image
Line drawing of a woman wearing a wide-brimmed hat and scarf, holding a sleeveless sleeve (no text or symbols)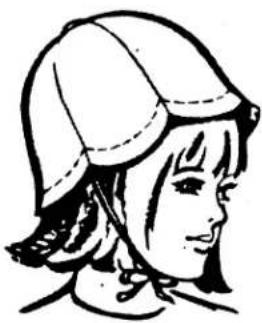
natural_image
Line drawing of a person wearing a cap and feathered garment (no text or symbols)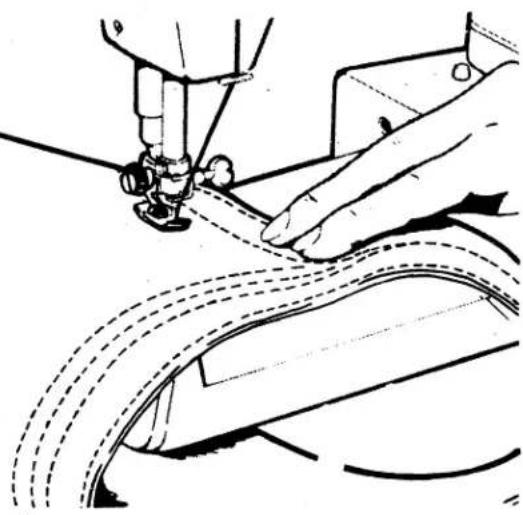
natural_image
Line drawing of a sewing machine needle stitching fabric, showing hands operating the thread (no text or symbols)HATS, BAGS AND DOLLS' CLOTHES
Use the free arm of your machine when you make hats, bags and dolls' clothes. You will find it a real advantage for seaming small circular areas, and in the placement of decorative top stitching.
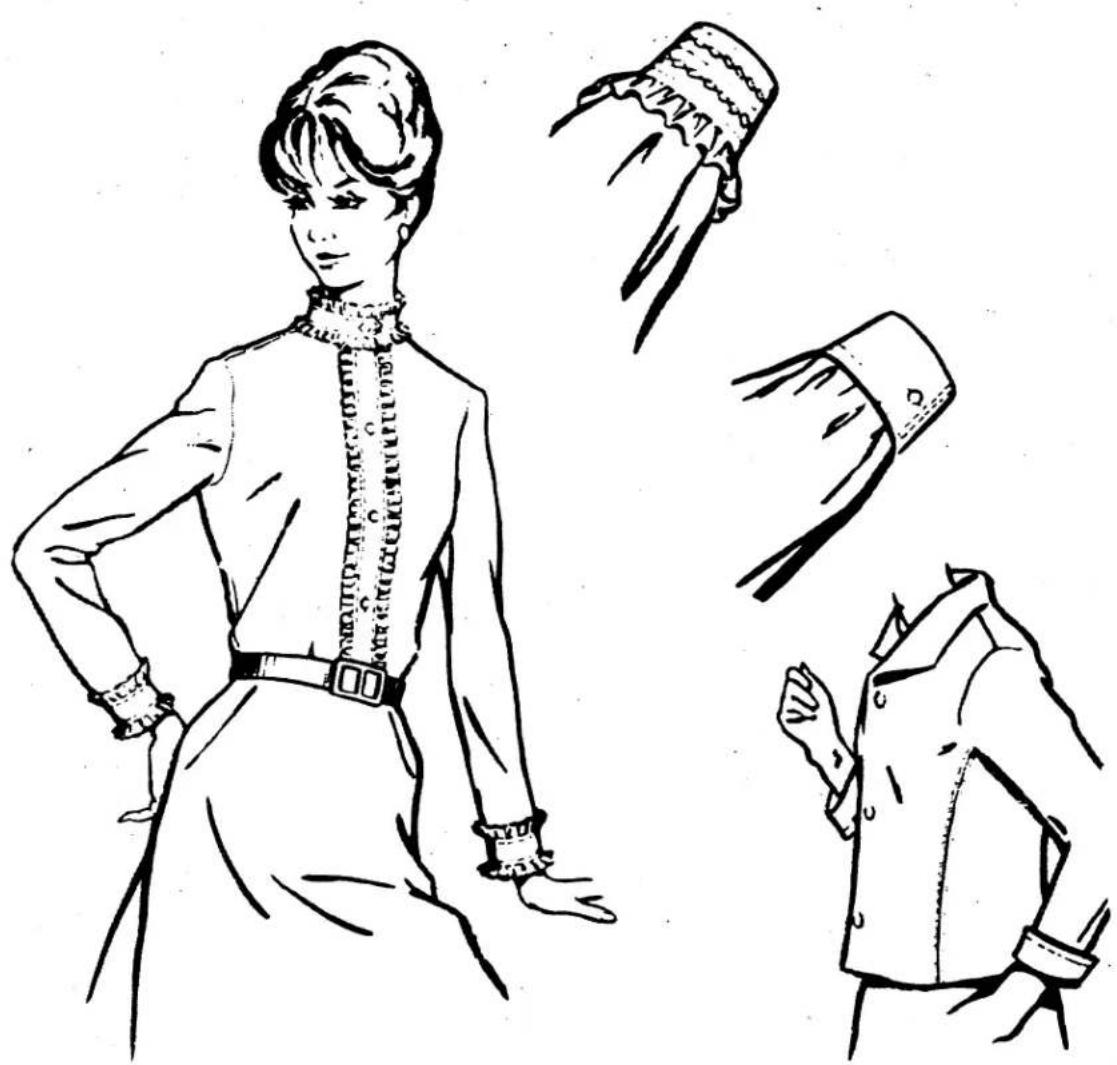
CUFFS
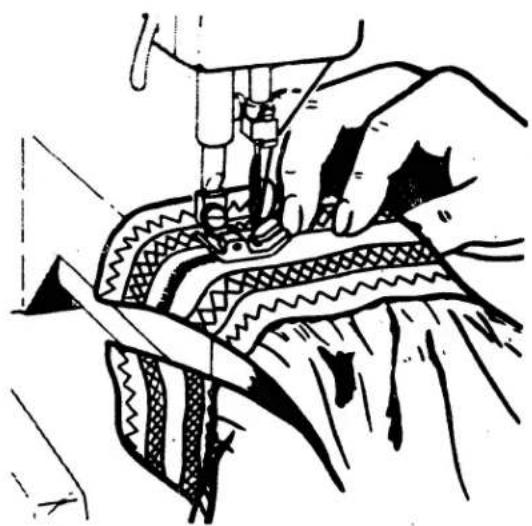
Attaching a cuff to a gathered sleeve or accenting it with decorative top stitching is greatly simplified when you use the free arm. The fabric flows smoothly around the bed giving you full visibility and control of the seam line.
natural_image
Illustration of a hand sewing a garment with a sewing machine (no text or symbols visible)FREE ARM SEWING (Continued)
natural_image
Line drawing of a person's lower body part wearing trousers and shorts (no text or symbols)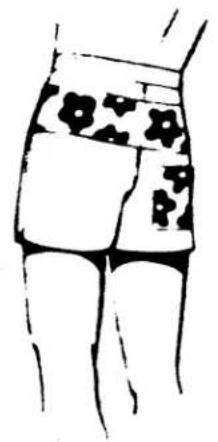
natural_image
Line drawing of a person's lower body wearing a patterned skirt (no text or symbols)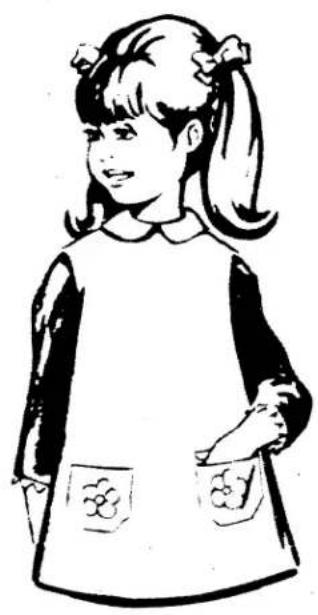
natural_image
Illustration of a young girl with pigtails wearing a dress and holding a cup (no text or symbols)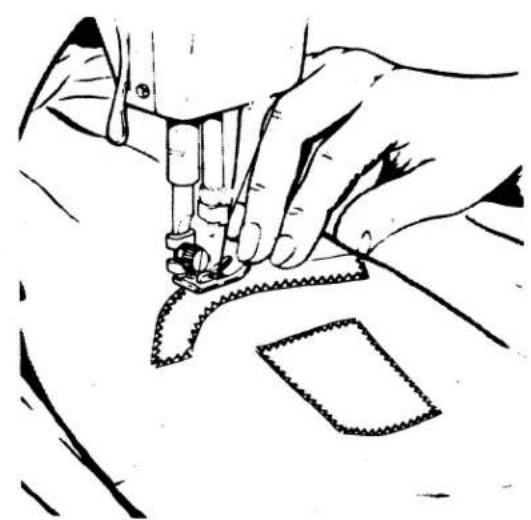
natural_image
Line drawing of hands operating a sewing machine on fabric (no text or symbols)BADGES, EMBLEMS AND INSIGNIA
Badges, emblems and insignia of all sizes and shapes can be quickly attached to shirts and uniforms when the free arm is used. Slip the sleeve or other hard-to-reach area over the free arm and secure emblem with zig-zag sewing.
keeping up appearances
MENDING
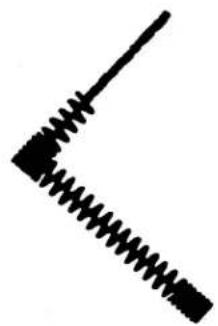
The zig-zag stitch is just as useful for mending as it for creative sewing. It forms a flexible bond for repairing tears or sewing stretch garments.
Mending a Tear
-
Needle Position:
• Stitch Width: } or ≧ (maximum)
• Stitch Length: About 1 mm
• General Purpose Needle Plate and Foot -
Trim ragged edges.
- Place underlay on the wrong side of tear for reinforcement. (It is best not to baste or pin the underlay since you will be bringing the edges of tear together in the next step.)
- Stitch on the right side, bringing the edges of the tear together.
- Shorten stitch length at ends and corners to give extra strength.
- Trim underlay.
Bar Tacks
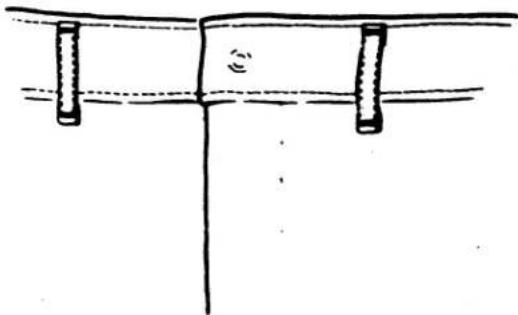
Bar tacks, to reinforce points of strain, are made with the zig-zag stitch at satin stitch length. Use them at pocket corners, to attach garters, secure shoulder straps, belt loops and zipper openings.
natural_image
Pure electrical circuit lines without any symbolsTear Mended with Zig-Zag Stitch
natural_image
Simple line drawing of two vertical bars above a horizontal line, no text or symbols presentBar-Tacked Belt Loops
natural_image
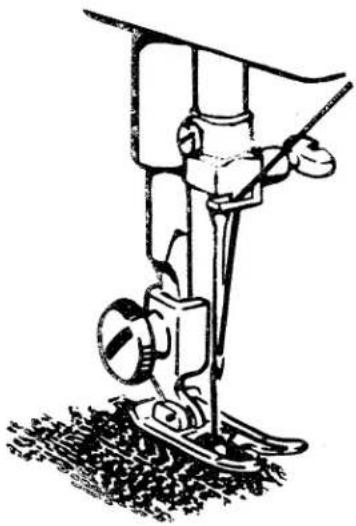
Line drawing of a sewing machine needle and base mount (no text or symbols)Darning Without Embroidery Hoop
natural_image
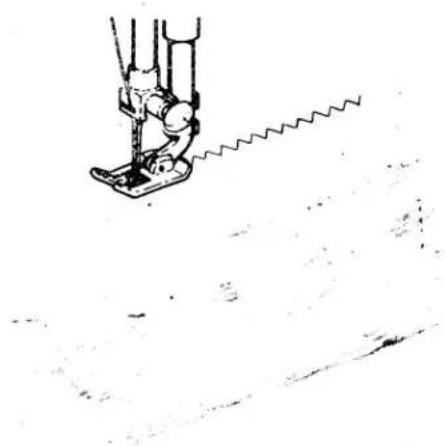
Line drawing of a sewing machine needle stitching fabric (no text or symbols)Stretch Garment Repair
DARNING
Worn or torn spots on children's clothes, knits, and household linens can be darned effortlessly and quickly with little practice. You may choose to darn either with or without an embroidery hoop. When greater control is needed, an embroidery hoop is usually best.
Darning without Embroidery Hoop
- Needle Position:
- Stitch Width:
- Stitch Length: 2 mm
• General-Purpose Needle Plate and Foot - Pressure:

- If the area to be darned is open, baste an underlay in place.
- Place area to be darned under presser foot; lower presser foot and start stitching, alternately drawing fabric toward you and pulling it gently away from you.
- Continue this forward and backward motion as you fill the area with parallel lines of stitching. For additional strength, cover area with crosswise lines of stitching.
Repairing Stretch Garments
- Needle Position:
- Stitch Width: } to ≅
• Stitch Length: 1 or to suit fabric
• General Purpose Needle Plate and Foot
Seams and hems in stretch and elasticized garments retain their elasticity when stitched with the zig-zag stitch. This stitch is particularly effective when used in top-stitch applications (as shown) or to over-edge. Make a test sample to check selector settings.
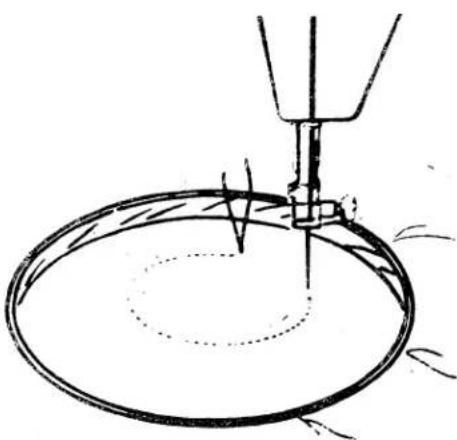
Darning with Embroidery Hoop\*
- Needle Position:
- Stitch Width:
• Stitch Length: In 0-1 Area - Feed Cover Plate
- No Presser Foot
- Presser Bar: Lowered
Preparation
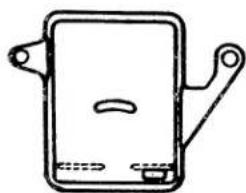
Remove presser foot with shank (by removing the screw which fastens the shank to the presser bar). Attach feed-cover needle plate. Instruction for attaching the feet-cover plate is given on page 8.
- Trim ragged edges from area to be darned.
- Center worn section in embroidery hoop.
- Position work under needle over feed-cover plate and lower presser bar to engage tension.
- Hold needle thread loosely with left hand, turn hand wheel over and draw bobbin thread up through fabric. Hold both thread ends and lower needle into fabric.
- Outline area to be darned with running stitches for reinforcement.
- Stitch across opening, moving hoop under needle at a slight angle from lower left to upper right. Keep lines of stitching closely spaced and even in length.
- When opening is filled, cover area with crosswise lines of stitching.
This method of controlling fabric movement with an embroidery hoop may be used to do embroidering and monogramming.
* Embroidery Hoop not included with machine accessories.
natural_image
Simple line drawing of a rectangular device with mounting feet and a handle (no text or symbols)Feed-Cover Plate
natural_image
Simple line drawing of a sewing machine needle stitching a circular ring (no text or symbols)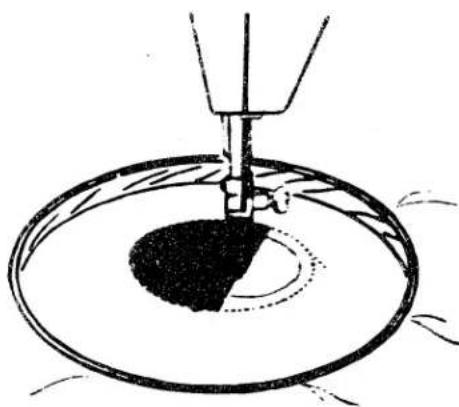
natural_image
Diagram of a sewing machine needle stitching fabric into a circular ring (no text or symbols)Darning With Embroidery Hoop
cleaning the machine
Your machine will serve you perfectly for many years if you take a few moments of your time to keep it clean. How often you will need to clean the machine will depend on how often you use it.
WARNING: Before cleaning your machine, disconnect power-line plug from electrical supply.
text_image
Clean between tension discs Clean Clean Clean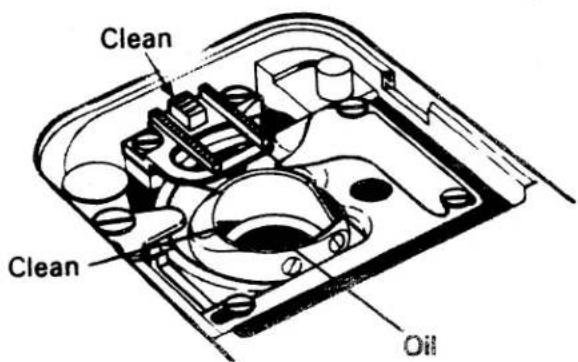
text_image
Clean Clean OilRemove lint from exposed parts.
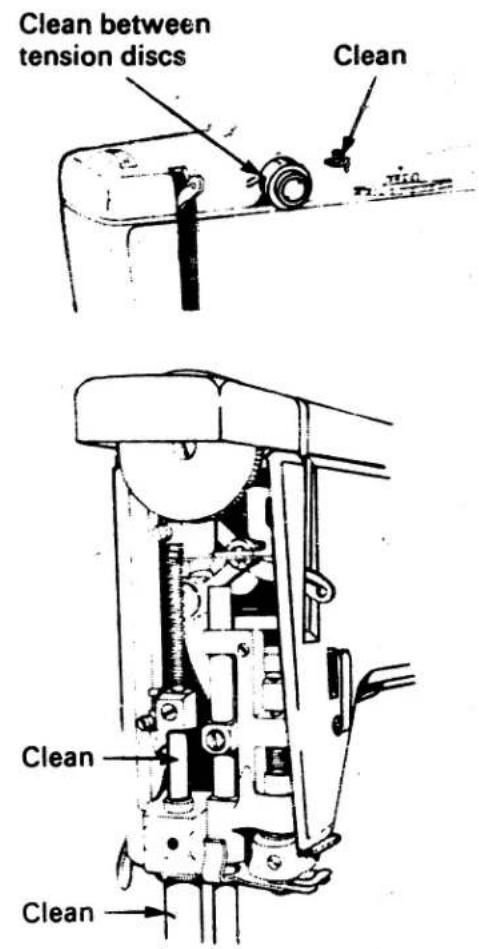
With a soft cloth, clean:
- Tension discs, take-up lever, and thread guides.
- Presser bar and needle bar.
- Bobbin case. (If there is an excessive amount of lint in the area, remove the bobbin case for cleaning. See page 45 for instructions.)
• Machine surface. (If necessary, dampen the cloth and use a mild soap.)
Remove face plate as instructed on page 45 and clean area behind it with a lint brush.*
Remove needle plate as instructed on page 7 and, using a brush, clean the rotating hook area under the needle plate and slide plate.
NOTE: Your machine requires oiling at only one point under normal conditions.
removing bobbin case, face plate and bulb
DANGER: Before removing bobbin case, face plate and light bulb disconnect power-line pulg from electrical supply.
REMOVING AND REPLACING BOBBIN CASE
- Raise the presser foot.
- Turn hand wheel toward you until needle is above the presser foot.
- Remove needle plate as instructed on page 7.
- Remove bobbin.
To remove bobbin case, turn bobbin case holder to back as far as it will go. Lift out bobbin case.
To replace bobbin case, guide the forked end under the feed and then draw the bobbin case under the position plate as illustrated. Turn holder all the way forward to lock bobbin case in position. After locking bobbin case in position, check that bobbin case is not jammed, but has slight rotational movement.
- Replace needle plate.
• Fully close slide plate.
REMOVING FACE PLATE
- Loosen and remove screw and remove face plate by sliding it downward.
REPLACING FACE PLATE
- Slide face plate up so that rim is engaged under edge of top cover.
- Align screw hole at lower edge of plate with screw hole in machine and replace and tighten screw.
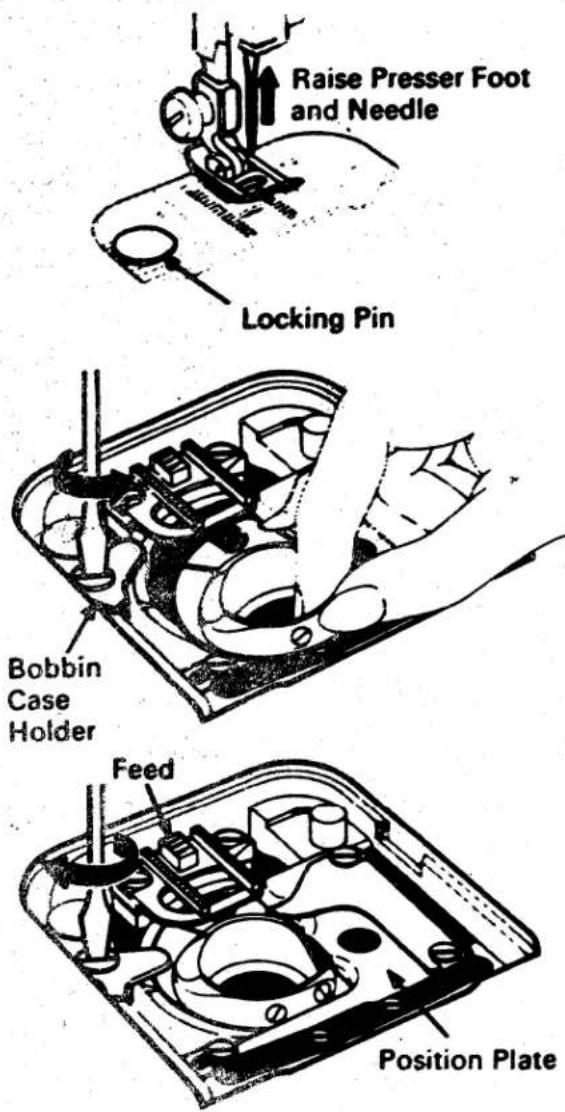
text_image
Raise Presser Foot and Needle Locking Pin Bobbin Case Holder Feed Position Plate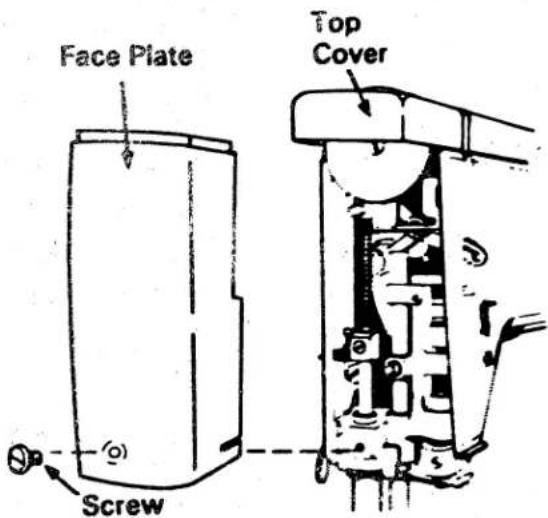
text_image
Face Plate Screw Top Cover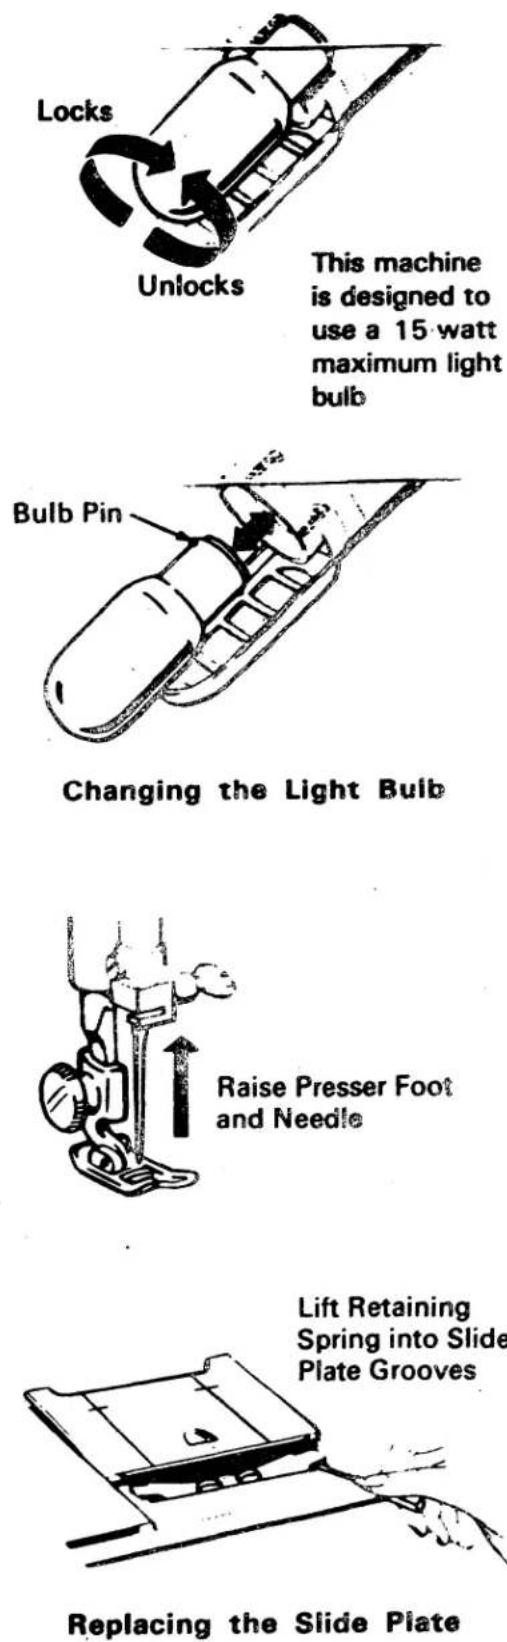
This machine is designed to use a 15-watt maximum light bulb
This machine is designed to use a 15 watt maximum light bulb.
CHANGING THE LIGHT BULB
Disconnect power-line plug from electrical supply.
Removing the Bulb
With thumb and forefinger lower the light bracket. Do not attempt to unscrew bulb. Press it up into socket and at same time turn bulb over in direction shown to unlock bulb pin.
Replacing the Bulb
Press new bulb into socket with bulb pin entering slot of socket, and turn it over in direction shown to lock bulb in position. Release bracket, and entire assembly will snap back into recess.
REPLACING THE SLIDE PLATE
You will not have any occasion to remove the slide plate. However, if it should accidentally become disengaged from the machine, it is easily replaced.
- Raise presser foot and needle.
- Place slide plate in slideway with the front edge close to, but not covering, the retaining spring (as shown in illustration).
- With a screwdriver, lift each end of the spring into each of the side grooves on the underside of the slide plate.
- Draw the plate gently toward you and fully engage the spring.
- Close slide plate.
performance checklist
Should sewing difficulty be encountered, review the sections of this instruction book that explain the sewing operation you are performing. If the problem still exists, the following hints will help you correct it.
If the machine does not sew; make sure...
• Machine is connected to electrical supply.
• Power and light switch is on.
- Hand wheel disc is in sewing position. (See page 12.)
If needle bar moves but stitch is not formed, make sure...
- Needle is straight and sharp.
- Needle size is correct for the thread you are using. (See page 10.)
• Machine is correctly threaded.
• Bobbin contains thread.
• Bobbin and bobbin case are correctly inserted in machine.
• Bobbin case area is free of lint and loose thread ends.
If fabric does not move, make sure...
- Presser foot is down and that pressure dial is adjusted for the weight and texture of your fabric.
• Stitch length selector is correctly set. - Feed-cover plate has been removed from the general purpose needle plate.
- All lint is removed from around the feed.
To avoid breaking of needles, make sure...
- Needle is not bent and that it is correct for machine, and proper size for the thread you are using.
- Needle is fully inserted in needle clamp.
- Twin needle does not strike needle plate when doing twin-needle stitching. (See page 25.)
- Presser-foot shank is securely fastened to presser bar.
- Needle plate is correctly seated and slide plate is fully closed.
- Fabric being guided or supported behind the needle is not being pulled too hard or too fast.
If stitching is irregular, or needle thread breaks, make sure...
• Machine is correctly threaded.
- Thread is even and free from knots.
- Needle is straight and sharp, and correct size for thread.
- Needle-thread tension is not too tight.
- Bobbin case is correctly threaded and properly inserted.
- Threads are correctly placed under presser foot when you start to sew.
- Bobbin case area is free of lint and loose thread ends.
• Bobbin or bobbin case is not damaged.
Also remember to ...
- Turn hand wheel toward you to position needle and take-up lever.
- Raise needle above fabric before making adjustments to stitch width and needle position.
- Start and finish sewing with take-up lever in its highest position.
- Adjust stitch length, pressure, and thread tension to suit your fabric.
- Test stitch on a fabric sample before starting a sewing job.
- Lower presser foot before setting pressure dial.
- Tighten hand wheel knob and disengage bobbin winder after winding a bobbin.
- Remove feed-cover needle plate after button sewing and after darning with an embroidery hoop.
- Clean your machine periodically.
CAUTION
Do not attempt to adjust the motor drive belt. Refer to your nearest Service Centre should any adjustment be required.
The machine is intended for household use.
Voltage rating 120 Volts
Rated frequency 60 Hz (Hertz, cycle per second)
Light bulb power (1 amp) max 12 Watts
Appliances class II — machine does not require earthing
CAUTION
Read all instructions before using the sewing machine.
DANGER
An appliance should never be left unatlended when plugged in. Always unplug this appliance from the electric outlet immediately after using and before cleaning.
WARNINGS
- Never operate the appliance with the air openings blocked. Keep the air openings free of lint, hair, loose clothes and the like.
- Keep fingers away from all moving parts. Special care is required around the sewing machine needle.
- Do not use bent needles.
- Always use the proper needle plate. The wrong plate can cause the needle to break.
- Do not pull or push fabric while slitching. It may deflect the needle causing it to break.
- Switch the sewing machine off „0” when making any adjustments in the needle area, such as threading needle, changing needle, threading bobbin, or changing presser foot, and the like.
- Always unplug sewing machine from the electrical outlet when removing covers, lubricating, or when making any other user servicing adjustments mentioned the instruction manual.
- Operate sewing machine only when mounted in sewing machine table, case, and the like.
- Always unplug before relamping. Replace bulb with same type rated max 15 Watts.
- Sewing machine has a DOUBLE ELECTRICAL INSULATION. Replacement parts for a double insulated product must be identical to those parts in the product.
NEW SEWING MACHINE WARRANTIES MECHANICAL MODELS
(applies to machines other than the Touch-Tronic* and Creative Touch* Fashion Machine Models)
LIMITED 10 YEAR WARRANTY SEWING MACHINE HEAD
If any manufacturing defect appears in the sewing machine head or any of its parts other than those listed below within 10 years of purchase, we will repair it free of charge.

LIMITED 2 YEAR WARRANTY MOTORS, LIGHT ASSEMBLY, WIRING, SWITCHES AND SPEED CONTROLS
If any manufacturing defect appears in these parts within 2 years of purchase, we will repair it free of charge.
LIMITED 90 DAY WARRANTY
ADJUSTMENTS, BELTS, RINGS, BULBS and ATTACHMENTS
Within 90 days of purchase we will provide, free of charge, required adjustments. During the same period we will also replace, free of charge, defective belts, bobbin winder rubber rings, light bulbs, or attachments, if any.
GENERAL
THESE WARRANTIES MAY ONLY BE USED BY THE ORIGINAL CONSUMER OWNER OF THE SEWING MACHINE; THEY ARE NOT TRANSFERABLE TO ANY SUBSEQUENT OWNERS. SERVICE UNDER THESE WARRANTIES MAY ONLY BE OBTAINED WITHIN THE 48 CONTIGUOUS STATES, ALASKA AND HAWAII.
Service under the above warranties may be obtained by returning the sewing machine with this warranty document and proof of purchase to your place of purchase or authorized service center as listed on the back of this sheet. Please consult your phone book for the location nearest you. If you have any questions regarding these warranties, you may write to:
SINGER SEWING COMPANY 200 METROPLEX DRIVE EDISON, NJ 08817
This sewing machine is warranted only in normal household (non-commercial) use. These warranties do not cover failures caused by abuse, lack of maintenance in accordance with SINGER care and cleaning instructions, misuse, or events beyond our control. These warranties give you specific legal rights, and you may also have other rights which vary from state to state.
ANY IMPLIED WARRANTY, INCLUDING WITHOUT LIMITATION THE WARRANTIES OF MERCHANTABILITY OR FITNESS FOR A PARTICULAR PURPOSE. APPLICABLE TO THIS SEWING MACHINE IS LIMITED IN DURATION TO THE DURATION OF THIS WRITTEN WARRANTY. SINGER SHALL NOT BE LIABLE FOR CONSEQUENTIAL ECONOMIC DAMAGES RESULTING FROM BREACH OF THIS WARRANTY OR ANY IMPLIED WARRANTY. Some states do not allow limitations on how long an implied warranty will last or the exclusion or limitation of incidental or consequential damages, so the above limitations or exclusions may not apply to you.
The Singer Company does not authorize any person to create for it any obligation or liability in connection with the above machines and parts beyond those set fourth herein.
THE SINGER COMPANY DISCLAIMS LIABILITY UNDER THIS WARRANTY FOR ANY DAMAGE OR DEFECT RESULTING FROM THE USE OF OTHER THAN SINGER PARTS AND APPROVED SERVICE IN THE REPAIR OF YOUR MACHINE.
To keep your machine operating properly, we recommend that you take instructions on use provided for new machine owners, follow the operating instructions and periodically have your machine serviced and tuned by a sewing machine specialist knowledgeable about Singer* Sewing Machines.
ARIZONA
2340 West Grand Avenue
Phoenix, AZ 85009
(602) 252-1340
INDIANA
Devington Plaza
6000 East 46th
Indianapolis, IN 46226
(317) 546-3400
OHIO
Silverton Center
6928 Montgomery Rd
Silverton, OH 45236
(513) 793-7977
TEXAS
Royal Hines Bus. Park
11171 Harry Hines Blvd.
Suite 116
Dallas, TX 75229
(214) 241-4222
CALIFORNIA
14399 Paramount Blvd.
Paramount, CA 90723
(213) 531-6352
IOWA
419 Brady Street
Davenport, IA 52801
(319) 322-8092
1929 E. Aurora Rd.
Twinsburg, OH 44087-1920
(216) 425-2240
6003-B Bellaire Blvd.
Houston, TX 77081
(713) 664-1478
4737 Auburn Blvd.
Sacramento, CA 95841
(916) 334-0322
MARYLAND
8560 Laureldale Drive
Laurel, MD 20724
(301) 792-4530
OKLAHOMA
9449 E. 31st. St.
Tulsa, OK 74145
(918) 622-9277
UTAH
55 East Center St.
Midvale, Utah 84047
(801) 566-2031
740 El Camino Real
San Carlos, CA 94070
(415) 592-8065
MICHIGAN
785 East Big Beaver
Troy, MI 48084
(313) 528-1670
OREGON
2613 S.E. 122nd. Avenue
Portland,OR 97236
(503) 760-4780
VIRGINIA
1529 Azalea Garden Rd.
Norfolk, VA 23502
(804) 855-3946
COLORADO
7865 W. 16th. Avenue
Lakewood, CO 80215
(303) 232-0283
MINNESOTA
1031 E. Moore Lake Dr. N.E.
Fridley, MN 55432
(612) 571-7113
PENNSYLVANIA
329 Basin St.
Bristol, PA 19007
(215) 788-9200
WASHINGTON
1519 130th Ave. N.E.
Bellevue, WA 98005
(206) 462-1274
FLORIDA
3454 Beach Blvd.
Jacksonville, FL 32207
(904) 396-1578
MISSOURI
Ashari Plaza
7177 N. Lindbergh Blvd.
Hazelwood, MO 63042
(314) 895-1119
2063-A Route 286
Pittsburg, PA 15239
(412) 733-1114
E. 1503 Francis
Spokane, WA 99207
(509) 483-9435
7875 Gateway Mall
St. Pettersburg, FL 33702
(813) 577-6263
5158 Ararat Dr.
Kansas City, MO 64129
(816) 861-6161
RHODE ISLAND
38 East Ave.
Pawtucket, RI 02860
(401) 724-5347
WEST VIRGINIA
5006 MacCorkle Ave. S.E.
Charleston, WV 25304
(304) 925-8288
GEORGIA
3501 Memorial Drive
Decatur, GA 30032
(404) 289-3510
NEW JERSEY
1029 Chestnut St.
Roselle, NJ 07203
(201) 272-8555
SOUTH CAROLINA
505 W. Palmeilo Jr.
Florence, SC 29501
(803) 662-0901
WISCONSIN
8203 W. Silver Springs Dr.
Milwaukee, WI 53218
(414) 438-1889
ILLINOIS
2316 East Rand Road
Arlington Heights, IL 60004
(708) 253-3325
NEW YORK
1216 Burnet Ave.
Syracuse, NY 13203-3212
(315) 474-0202
TENNESSEE
3664 Cherry Road
Memphis, TN 38118
(901) 365-6614
TONY NASRALLA
(213) 630-1358
Fax: (213) 630-1304
Paramount, CA 90723
GLENN DOLAN
(313) 528-1670
Fax
Troy, MI 48084