
NSX-AJ203 - CD-Player AIWA - Kostenlose Bedienungsanleitung
Finden Sie kostenlos die Bedienungsanleitung des Geräts NSX-AJ203 AIWA als PDF.


| Produkttyp | Kompakt-CD-Stereosystem |
| Modell | NSX-AJ203 |
| Marke | Aiwa |
| Abmessungen (B x H x T) | 260 × 323 × 291 mm |
| Gewicht | 5,9 kg (Hauptgerät) |
| Stromversorgung | 120 V AC, 60 Hz |
| Leistungsaufnahme | 58 W (Betrieb), 0,6 W (ECO Standby), 15 W (Standby ohne ECO) |
| Verstärkerleistung | 2 × 40 W (50 Hz – 20 kHz, 1% THD, 6 Ω) |
| CD-Player | 3-CD-Wechsler, kompatibel mit CD, CD-R/RW |
| Audio-D/A-Wandler | 1-Bit-Dual |
| Signal-Rauschabstand (CD) | 85 dB |
| Klirrfaktor (CD) | 0,05 % |
| Kassettendeck | Doppeldeck (Deck 1: Wiedergabe, Deck 2: Aufnahme/Wiedergabe) |
| Bandtyp | Nur Typ I (Normalband) |
| Frequenzbereich (Kassette) | 50 Hz – 8 kHz |
| UKW-Empfänger | 87,5 – 108 MHz, 75 Ω |
| MW-Empfänger | 530 – 1710 kHz (10-kHz-Schritt) oder 531 – 1602 kHz (9-kHz-Schritt) |
| Lautsprecher (Front) | SX-NAJ205, 3-Wege-Bassreflex, 6 Ω, 120 mm Woofer, 60 mm Hochtöner, 20 mm Super-Hochtöner |
| Lautsprechergehäuse Abmessungen | 220 × 324 × 198 mm |
| Lautsprechergewicht | 2,5 kg pro Stück |
| Surround-Lautsprecher | Nicht im Lieferumfang des NSX-AJ203 |
| Kopfhöreranschluss | 6,3 mm Stereo-Klinke |
| Zusätzliche Anschlüsse | VIDEO/AUX (Cinch), FM- und MW-Antennenanschluss |
| Besondere Funktionen | Timer-Wiedergabe/-Aufnahme, Sleep-Timer, Equalizer (Rock/Pop/Classic), T-BASS, ECO-Modus, Zufalls-/Wiederholwiedergabe, Programmwiedergabe, AI-Edit-Aufnahme |
| Stromverbrauch im ECO-Standby | 0,6 W |
Häufig gestellte Fragen - NSX-AJ203 AIWA
Benutzerfragen zu NSX-AJ203 AIWA
0 Frage zu diesem Gerät. Beantworten Sie die, die Sie kennen, oder stellen Sie Ihre eigene.
Eine neue Frage zu diesem Gerät stellen
Laden Sie die Anleitung für Ihr CD-Player kostenlos im PDF-Format! Finden Sie Ihr Handbuch NSX-AJ203 - AIWA und nehmen Sie Ihr elektronisches Gerät wieder in die Hand. Auf dieser Seite sind alle Dokumente veröffentlicht, die für die Verwendung Ihres Geräts notwendig sind. NSX-AJ203 von der Marke AIWA.
BEDIENUNGSANLEITUNG NSX-AJ203 AIWA
aiwa
Compact Disc Stereo System
NSX-AJ200
NSX-AJ203
NSX-AJ205
U

For assistance and information
call toll free 1-800-BUY-AIWA
(United States and Puerto Rico)
8B-NFA-903-01
001215AKY-U-S
PRECAUTIONS
Read these Operating Instructions carefully and completely before operating the unit. All precautions on this booklet and on the unit should be strictly followed. Keep the Operating Instructions for future reference.
WARNING
To reduce the risk of fire or electric shock, do not expose this appliance to rain or moisture.
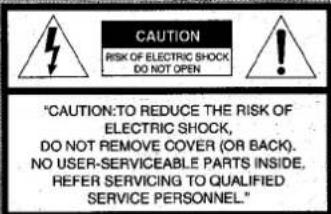
Explanation of Graphical Symbols:

The lightning flash with arrowhead symbol, within an equilateral triangle, is intended to alert the user to the presence of uninsulated "dangerous voltage" within the product's enclosure that may be of sufficient magnitude to constitute a risk of electric shock to persons.

The excitation point within an equilateral triangle is intended to alert the user to the presence of important operating and maintenance (servicing) instructions in the literature accompanying the appliance.
Installation
1 Water and moisture — Do not use this unit near water, such as near a bathtub, washbowl, swimming pool, or the like.
2 Heat — Do not use this unit near sources of heat, including heating vents, stoves, or other appliances that generate heat. It also should not be placed in temperatures less than 5°C (41°F) or greater than 35°C (95°F).
3 Mounting surface — Place the unit on a flat, even surface.
4 Ventilation — The unit should be situated with adequate space around it so that proper heat ventilation is assured. Allow 10 cm (4 in.) clearance from the rear and the top of the unit, and 5 cm (2 in.) from each side.
- Do not place the unit on a bed, rug, or similar surface that may block the ventilation openings.
- Do not install the unit in a bookcase, cabinet, or airtight rack where ventilation may be impeded.
5 Objects and liquid entry — Take care that objects or liquid do not get inside the unit through the ventilation openings.
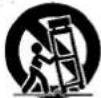
6 Carts and stands — When placed or mounted on a stand or cart, the unit should be moved with care. Quick stops, excessive force, and uneven surfaces may cause the unit or cart to overturn or fall.
7 Condensation — Moisture may form on the CD pickup lens when:
- The unit is moved from a cold spot to a warm spot
- The heating system has just been turned on
- The unit is used in a very humid room
- The unit is cooled by an air conditioner
When this unit has condensation inside, it may not function normally. Should this occur, leave the unit for a few hours, then try to operate again.
8 Wall or ceiling mounting — The unit should not be mounted on a wall or ceiling, unless specified in the Operating Instructions.
Electric Power
1 Power sources — Connect this unit only to power sources specified in the Operating Instructions, and as marked on the unit.
2 Polarization — As a safety feature, some units are equipped with polarized AC power plugs which can only be inserted one way into a power outlet. If it is difficult or impossible to insert the AC power plug into an outlet, turn the plug over and try again. If it still does not easily insert into the outlet, please call a qualified service technician to service or replace the outlet. To avoid defeating the safety feature of the polarized plug, do not force it into a power outlet.
3 AC power cord
- When disconnecting the AC power cord, pull it out by the AC power plug. Do not pull the cord itself.
- Never handle the AC power plug with wet hands, as this could result in fire or shock.
- Power cords should be firmly secured to avoid being severely bent, pinched, or walked upon. Pay particular attention to the cord from the unit to the power outlet.
- Avoid overloading AC outlets and extension cords beyond their capacity, as this could result in fire or shock.
4 Extension cord — To help prevent electric shock, do not use a polarized AC power plug with an extension cord, receptacle, or other outlet unless the polarized plug can be completely inserted to prevent exposure of the blades of the plug.
5 When not in use — Unplug the AC power cord from the power outlet if the unit will not be used for several months or more. When the cord is plugged in, a small amount of current continues to flow to the unit, even when the power is turned off.
Outdoor Antenna
1 Power lines — When connecting an outdoor antenna, make sure it is located away from power lines.
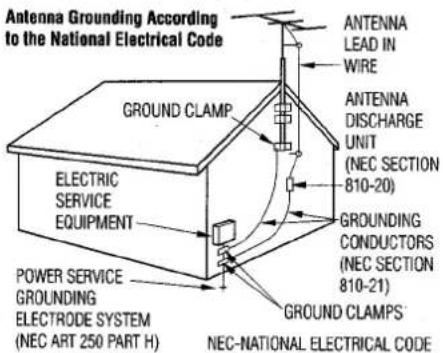
2 Outdoor antenna grounding — Be sure the antenna system is properly grounded to provide protection against unexpected voltage surges or static electricity build-up. Article 810 of the National Electrical Code, ANSI/NFPA 70, provides information on proper grounding of the mast, supporting structure, and the lead-in wire to the antenna discharge unit, as well as the size of the grounding unit, connection to grounding terminals, and requirements for grounding terminals themselves.
Maintenance
Clean the unit only as recommended in the Operating Instructions.
Damage Requiring Service
Have the units serviced by a qualified service technician if:
- The AC power cord or plug has been damaged
- Foreign objects or liquid have gotten inside the unit
- The unit has been exposed to rain or water
- The unit does not seem to operate normally
- The unit exhibits a marked change in performance
- The unit has been dropped, or the cabinet has been damaged DO NOT ATTEMPT TO SERVICE THE UNIT YOURSELF.
OWNER'S RECORD
Record the model number and serial number of your set (found at the rear of your set) below. Refer to them when contacting your Aiwa dealer.
Model No. ____ Serial No. ____
TABLE OF CONTENTS
PRECAUTIONS 2
PREPARATIONS 4
PARTS AND CONTROLS 5
ADJUSTMENTS BEFORE OPERATIONS ..... 8
SOUND ADJUSTMENTS 9
CD OPERATIONS 10
RADIO OPERATIONS 12
TAPE OPERATIONS 13
TIMER OPERATIONS 16
REFERENCE 18
System and accessories
NSX-AJ200
CX-NAJ200 Compact disc stereo cassette receiver
SX-NAJ202 Front speakers
NSX-AJ203
CX-NAJ203 Compact disc stereo cassette receiver
SX-NAJ205 Front speakers
NSX-AJ205
CX-NAJ205 Compact disc stereo cassette receiver
SX-NAJ205 Front speakers
SX-R145 Surround speakers
Remote control
FM antenna
AM antenna
PREPARATIONS
Connection
Plug in the AC power cord to the AC power outlet after all other connections are made.
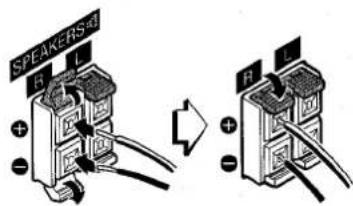
1 Connect the front speakers.
Connect the right front speaker to the SPEAKERS R terminals and the left to the SPEAKERS L terminals. The speaker cords with the white stripes go to the + terminals.
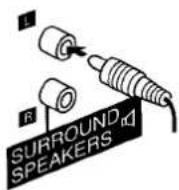
2 Connect the surround speakers (only for NSX-AJ205).
Connect each surround speaker cord to the SURROUND SPEAKERS R jack or the SURROUND SPEAKERS L jack.
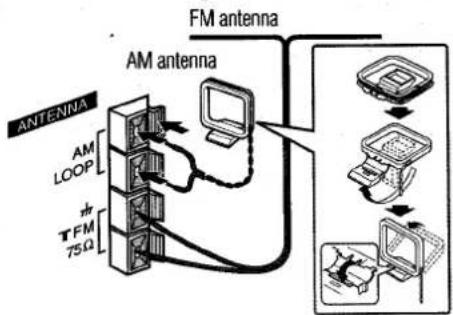
3 Connect the supplied antennas.
Connect the FM antenna to the FM 75 Ω terminals and the AM antenna to the AM LOOP terminals.
flowchart
graph TD
    A["AM antenna"] -->|AM LOOP| B["TFM 75Ω"]
    A --> C["Computer"]
    D["FM antenna"] --> E["PC Device"]
    E --> F["Computer"]
    B --> G["Computer"]
    style A fill:#f9f,stroke:#333
    style D fill:#ccf,stroke:#333
4 Connect the AC power cord to an AC outlet. When the AC power cord is connected to an AC outlet for the first time, DEMO appears on the display. To deactivate the DEMO, press DEMO/ECO.
- Do not short-circuit the + and - speaker cord leads.
- Do not leave objects generating magnetism or objects affected by magnetism near the speakers.
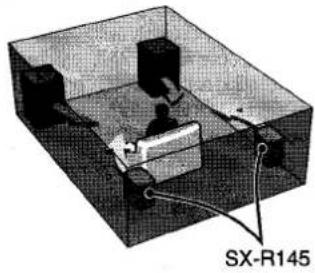
To position the surround speakers (only for NSX-AJ205)
Position the surround speakers behind the listening area to make the most of the surround effect.
natural_image
3D diagram of an electronic device with labeled component SX-R145, showing internal components and wiring (no readable text or symbols beyond label)To mount the surround speakers on the wall (only for NSX-AJ205)
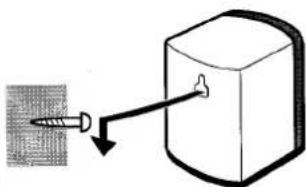
Mount each speaker on a spot that can hold its weight.
natural_image
Diagram showing a screw being inserted into a cube with a downward arrow indicating force (no text or symbols)AIWA disclaims any responsibility for injury to persons or other accidents caused by not fitting the surround speakers properly or if the place of installation is not suitable.
PARTS AND CONTROLS
Remote control
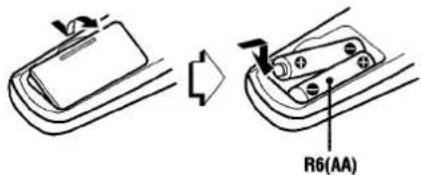
Detach the battery compartment lid at the rear of the remote control and insert two R6 (size AA) batteries with correct polarity.
- Replace the batteries with new ones when the operational distance between the remote control and main unit becomes shorter.
- Remove the batteries if the unit is not going to be used for an extended period of time.
- The remote control may not operate if it is used under intense sunlight, etc., or if its line of sight is obstructed.
Main unit: rear
*This illustration is only for NSX-AJ205.
There are no SURROUND SPEAKERS jacks on CX-NAJ200 and CX-NAJ203 for NSX-AJ200 and NSX-AJ203 respectively.
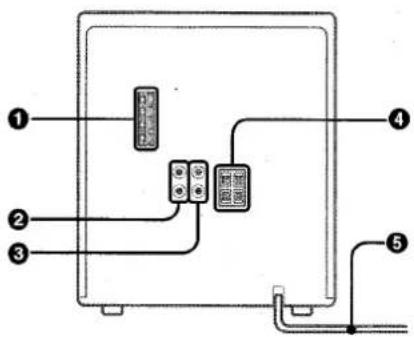
① AM LOOP, FM 75 Ω terminals
Plug in the supplied AM and FM antennas here.
② VIDEO/AUX jacks
Accepts analog sound signals from external equipment. Connect using an optional connecting cable with RCA phono plugs (red plug to R jack, white plug to L jack). Refer also to the operating instructions of your equipment. To switch function to external input, press VIDEO/AUX to select the VIDEO (AUX/TV) function.
Tip:
To change the displayed name for this function, turn the unit on, then hold down VIDEO/AUX and press POWER. Repeat the procedure to select one of the "VIDEO", "AUX" or "TV".
③ SURROUND SPEAKERS jack (only for NSX-AJ205)
Connect the speaker cord of the supplied surround speakers here.
4 SPEAKERS terminals
Connect the speaker cord of the supplied front speakers here.
⑤ AC power cord
Main unit: front
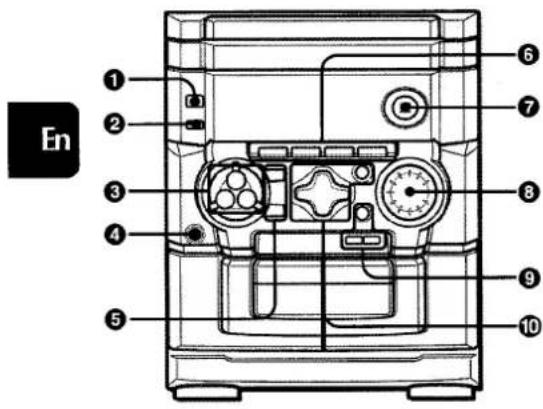
① POWER ⏻STANDBY/ON
Switches the unit on and off (standby).
② DEMO/ECO
When the unit is turned off: switches DEMO on and off. When the unit is turned on: enters ECO or dimmer setting mode.
③ DISC DIRECT PLAY 1-3
Selects a CD tray.
④ PHONES jack
Plug in here an optional headphones set with a standard stereo plug (ø6.3 mm). Speaker output is canceled.
⑤ DISC CHANGE
Rotates the CD trays.
▲OPEN/CLOSE
Opens or closes the disc compartment.
⑥ TAPE DECK 1/2
Selects Tape function, and deck 1 or 2.
TUNER/BAND
Selects Radio function and the radio band.
VIDEO/AUX
Selects the function of external equipment connected to VIDEO/AUX jacks.
CD
Selects CD function.
⑦ ELECTRONIC GRAPHIC EQUALIZER
Selects a sound equalization curve.
8 VOLUME
Adjusts the volume.
⑨ T-BASS
Emphasizes low frequency sound.
● REC/REC MUTE
Starts recording.
SYNC DUB
Starts dubbing a whole tape.
10 IISET
Tape : pauses tape playback or recording (deck 2 only) CD: pauses playback.
Radio: stores the received station to preset.
Determines the mode and the time (ECO, dimmer, clock and timer).
PRESET
CD and Tape: plays back.
Radio: tunes into a preset station.
◀◀/◀◀DOWN, ▶▶/▶▶IUP TUNING
CD: skips to a previous or a succeeding track when pressed, searches a track in fast forward or fast reverse playback when held down.
Tape: fast forwards or rewinds the tape.
Radio: manually tunes down or up within the band.
CLEAR
CD and Tape: stops playback.
Radio: clears a station preset.
Remote control
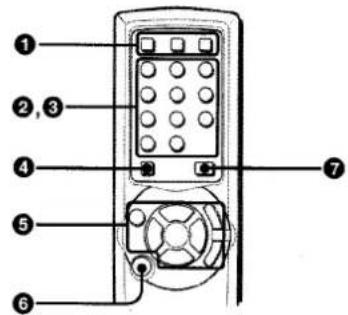
Buttons with same or similar names with the main unit basically have the same function.
① DISC DIRECT PLAY 1-3
② 0-9, +10
CD: selects a CD track of the specified number.
Radio: tunes in to the station with the specified preset number.
③ The numbered buttons take on these functions when pressed together with SHIFT held down:
CD EDIT/CHECK
Displays the remaining playback time of a CD when pressed during playback.
Enters AI Edit Recording or Programmed Edit Recording mode when pressed during stop.
PRGM
Enters programmed CD playback mode.
RANDOM/REPEAT
Enters random or repeat CD playback mode.
GEQ
Selects a sound equalization curve.
T-BASS
TIMER
Enters timer setting mode.
SLEEP
Enters sleep-timer setting mode.
CLOCK
Enters clock adjustment mode.
MONO TUNER
Switches between stereo or monaural FM reception.
BAND
Switches the radio band.
4 SHIFT
Hold down when pressing a numbered button to change its function to that printed above the number.
e.g.) "Press SHIFT+SLEEP on the remote control" indicates "Hold down SHIFT and press '8' (SLEEP)", so that you can use 'Sleep timer' function.
⑤ IISET
PRESET
◀◀/◀◀DOWN, ▶▶/▶▶IUP TUNING
CLEAR
VOL(∧,∨)
⑥ POWER
7 FUNCTION
Switches the active function among TAPE, TUNER/BAND, VIDEO/AUX and CD.

ADJUSTMENTS BEFORE OPERATIONS
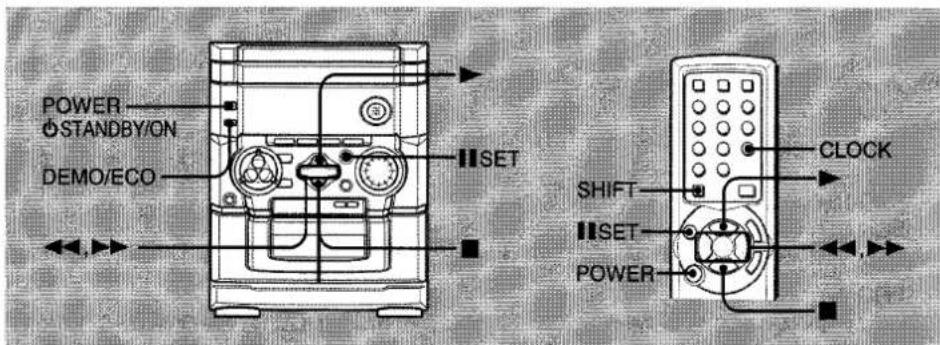
Power
Turning the unit on
Press POWER ⬇STANDBY/ON (POWER on the remote control).
Or press TAPE, TUNER/BAND, VIDEO/AUX or CD, the playback will start automatically if a disc or tape is inserted.
Turning the unit off
Press POWER ⏻STANDBY/ON again.
The unit goes into standby.
DEMO
If the clock has not been set, a DEMO appears on the display when the unit is turned off. There are two kinds of DEMO: "Illumination demo" and "Game demo". You can enjoy both on the unit.
To deactivate and activate the DEMO
Press DEMO/ECO when the unit is turned off.
To switch between "Illumination demo" and "Game demo"
Hold down DEMO/ECO and press POWER.
To play the Game demo
Press ▶ so that three numbers start to run and then press
■ three times to stop the numbers.
If the three numbers are equal, you win points. If not, you lose them.
Tip:
To change the winning probability, press ◀◀ or ▶▶ so that the CD tray number indicator changes between 1 (lowest) and 3 (highest).
ECO mode
Reduces power consumption with the following operations, etc.
ECO ON mode
- The unit blacks out when the power is turned off. Only the red indicator lights up. (Only when the clock is set.)
- If dimmer mode is set to on, the unit illumination brightens (for 10 seconds) only when you operate the unit.
- When the unit turns on with the timer recording, the dimmer mode is set to dimmest and the volume is set to minimum.
ECO AUTO mode
- In addition to the operations of ECO ON mode, the unit automatically turns itself off if you do not operate the unit for 10 minutes and the sound source is mute for 10 minutes.
1 Press DEMO/ECO once when the unit is turned on, and then within 4 seconds press ■.
2 Press ◀◀ or ▶▶ to select one of the ECO modes and then press ||.
If there is no button operation within 4 seconds, the setting is canceled.
To cancel the ECO mode
Repeat the above and select "ECO OFF".
Dimmer
Adjusts the brightness of the display.
1 Press DEMO/ECO twice when the unit is turned on, and then within 4 seconds press ■.
2 Press ◀◀ or ▶▶ to select one of the three dimmer modes or "DIM-OFF", and then press ||.
"DIM-OFF" is the brightest and "DIMMER 3" is the dimmest.
If there is no button operation within 4 seconds, setting is canceled.
To cancel the dimmer
Repeat the above and select "DIM-OFF".
SOUND ADJUSTMENTS
Setting the clock
1 Press SHIFT+CLOCK on the remote control.
2 Press ◀◀ or ▶▶ to set the time.
Each press changes the time in 1-minute steps. Holding it down changes the time in 10-minute steps.
If ◀◀ or ▶▶ is not pressed within 4 seconds, setting is canceled.
3 Press ■SET.
The time display stops flashing and the clock starts from 00 seconds.
To display the time
Press SHIFT+CLOCK on the remote control. The time will be displayed for 4 seconds, but it cannot be displayed during recording.
To switch to the 24-hour standard
Display the time and press ■ within 4 seconds. With each press, the clock alternates between the 12-hour standard and the 24-hour standard.
Tip: In the 12-hour standard, "AM 12:00" indicates midnight and "PM 12:00" noon.
If the clock display flashes when the unit is turned off
There has been a power interruption. Re-set the clock.
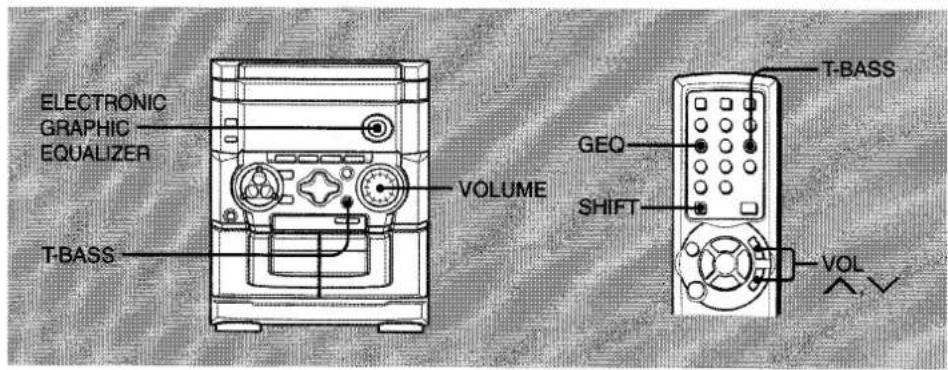
Volume
Turn VOLUME (Press VOL ∧, ∨ on the remote control).
Adjust from 0 (minimum) to 30 and MAX (maximum).
Tip:
Volume level setting is retained during power-off standby. If the power is turned off with the volume set to 17 or more, it is automatically turned down to 16 the next time the unit is turned on.
Super T-BASS
Emphasizes low frequencies for a heavy, powerful sound.
Press T-BASS (SHIFT+T-BASS on the remote control) repeatedly to select one of the three emphasis levels or the off position.
- When the sound becomes distorted with the T-BASS effect, cancel it.
Graphic equalizer
Selects a sound equalization curve to match the music type. Press ELECTRONIC GRAPHIC EQUALIZER (SHIFT+GEQ on the remote control) repeatedly to select one of the three equalization curves.
- ROCK: Powerful sound emphasizing treble and bass
- POP : More presence in the vocals and midrange
- CLASSIC : Enriched sound with heavy bass and fine treble
To display the current equalization mode
Press ELECTRONIC GRAPHIC EQUALIZER (SHIFT+GEQ on the remote control) once. The mode will be displayed for 4 seconds.
To cancel equalization
Press ELECTRONIC GRAPHIC EQUALIZER (SHIFT+GEQ on the remote control) repeatedly until "GEQ OFF" is displayed.
CD OPERATIONS
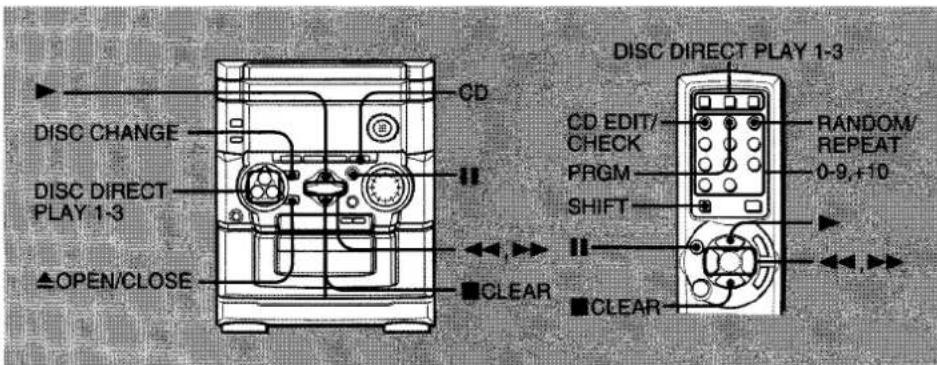
This unit plays back finalized CD-R/RW discs as well as audio CDs.
Playback
1 Press CD and load disc(s)
Press ▲ OPEN/CLOSE to open the disc compartment and place one or two disc(s) with the labeled side up. To place three discs, press DISC CHANGE so that the trays rotate, then place the third one. Lastly, close the compartment with ▲ OPEN/CLOSE.
- When loading an 8-cm (3-inch) disc, place it on the inner circle of the tray.
2 To play all discs, press ▶.
To play one desired disc, press DISC DIRECT PLAY 1-3.
To stop playback
Press ■
To pause playback
Press ■. Press again to resume playback.
To skip to the beginning of the current/preceding/succeeding track
Press ◀◀ or ▶▶ repeatedly.
To search (playback in fast forward or fast reverse)
Hold down ◀◀ or ▶▶. Release at the desired point.
To select a track with the remote control
Press DISC DIRECT PLAY 1-3 to select a disc and then press the numbered buttons to select a track.
- To select track 25, press +10, +10 and 5.
- To select track 10, press +10 and 0.
To display the remaining playback time of the CD
Press SHIFT+CD EDIT/CHECK on the remote control. Press again to return to the elapsed time display.
- Remaining playback time cannot be displayed during random playback or programmed playback.
To replace disc(s) during playback without interruption
While one disc is being played back, press DISC CHANGE so that the compartment opens, replace disc(s) with other one(s), and press DISC CHANGE to close the compartment.
Random/Repeat playback
Random playback plays all the tracks on one desired disc or all the discs in random order. Repeat playback plays all the tracks repeatedly on one desired disc or all the discs.
1 Press SHIFT+RANDOM/REPEAT repeatedly on the remote control to select one of the following modes:
- Random playback: "RANDOM" lights up.
- Repeat playback: "◀" lights up.
- Random and repeat playback: "RANDOM" and " nights up.
2 To play one desired disc, press DISC DIRECT PLAY 1-3.
To play all discs, press ▶.
To cancel random/repeat playback
Press SHIFT+RANDOM/REPEAT repeatedly on the remote control so that both "RANDOM" and "→" disappear on the display.
To repeat a selected set of tracks
Select the tracks with programmed playback, then press SHIFT+RANDOM/REPEAT on the remote control to select repeat playback.
- It is impossible to play a selected set of tracks in random order.
Programmed playback
Plays back up to 30 selected tracks in programmed order.
1 Press SHIFT+PRGM on the remote control during stop. "PRGM" lights up on the display.
2 Press DISC DIRECT PLAY 1-3 to select a disc. Go to the next step when the tray stops rotating.
3 Press the numbered buttons on the remote control to program a track. The selected track number lights up on the display. -To select the 25th track, press +10, +10 and 5. -To select the 10th track, press +10 and 0.
4 Repeat step 2 and 3 to program other tracks.
5 Press ▶.
- During programmed playback, you cannot select a disc or a track with the numbered buttons. "CAN'T USE" is displayed when you try to select a track.
- If the total playback time of the program exceeds 99:59 minutes, or if a track with a track number exceeding 30 is programmed, the playing time is displayed as "--:-".
- You cannot program more than 30 tracks. "FULL" is displayed.
To check the program
Press ◀◀ or ▶▶ repeatedly during stop. The disc number, track number and program number are displayed in succession.
To clear the program
Press ■ CLEAR during stop. "PRGM" disappears on the display.
To add tracks to the program
Repeat step 2 and 3 before starting playback. The tracks are added to the end of the program.
To change the programmed tracks
Clear the program and reselect the tracks in your desired order.
Notes on CDs
- Do not place more than one disc on one tray.
- Do not tilt the unit with discs loaded.
- The unit may not play a CD-R/RW disc recorded on personal computers or certain kinds of CD-R/RW recorders.
- Do not attach adhesive label, etc. to either side of a CD-R/RW disc, as doing so may cause malfunction.
- Do not load an unrecorded CD-R/RW disc. The disc may be damaged.
- Do not use irregular-shaped CDs.
RADIO OPERATIONS
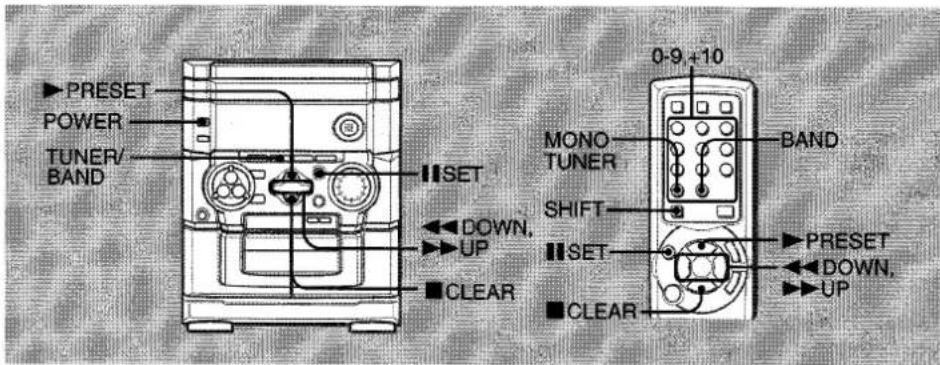
Manual tuning
1 Press TUNER/BAND (SHIFT+BAND on the remote control) repeatedly to select a band.
The unit switches to the radio from any other function and alternates between FM and AM.
2 Press ◀◀DOWN or ▶▶UP to tune in to a station.
"TUNE" is displayed when a station is tuned in. "((()))" lights up for FM stereo reception.
To search for a station automatically (Auto Search) Hold down ◀◀DOWN or ▶▶UP.
The unit searches for a station up or down the band and stops at reception.
To stop the search manually, press ◀◀DOWN or ▶▶UP.
• Auto Search may not stop at stations with weak signals.
Preset tuning
Preset your favorite stations and tune them in directly.
Presetting stations
1 Press TUNER/BAND to select the band.
2 Press ◀◀DOWN or ▶▶UP to tune in to the desired station.
3 Press ■SET to store the station.
The preset number, beginning from "1", appears on the display.
4 Repeat step 1 to 3 to preset other stations.
- You cannot store more than a total of 32 preset stations. "FULL" is displayed.
Tuning in to preset stations
On the unit
1 Press TUNER/BAND to select the band.
2 Press ▶PRESET repeatedly.
With each press, the station with the succeeding preset number is tuned in.
On the remote control
1 Press SHIFT+BAND to select the band.
2 Press the numbered buttons for the preset number of your desired station.
- To select preset number 20, press +10, +10 and 0.
- To select preset number 15, press +10 and 5.
To clear a preset station
1 Tune in to the station by preset tuning.
2 Press ■ CLEAR, then press ■ SET within 4 seconds.
Preset numbers of preset stations in the band with higher numbers decrease by one.
Adjustments
Antennas
Keep antennas away from metallic objects, electrical equipment and cords.
FM antenna: Extend fully in a T-shape. If receiving condition is poor, connect optional outdoor antenna to FM 75 Ω terminal. Be sure to connect the shield braid of the antenna to the π terminal.
AM antenna: Rotate to find best reception.
To switch to monaural FM reception
Press SHIFT+MONO TUNER on the remote control. With each press, "MONO" and "STEREO" are displayed alternately on the display.
Tip: When FM stereo reception is poor, switching to monaural reduces noise.
To switch the AM tuning interval
Hold down TUNER/BAND and press POWER. With each press, the AM tuning interval alternates between 9 kHz/step and 10 kHz/step.
Tip: The default is 10 kHz/step. Change it only when using the unit in a 9 kHz/step area. Switching AM tuning interval clears all the preset stations.
TAPE OPERATIONS
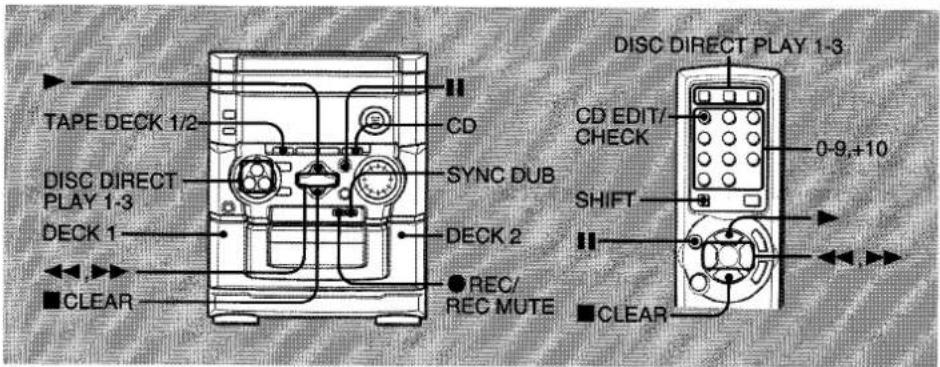
Playback
Use only type I (normal) tapes.
1 Press TAPE and insert the tape in either deck. Press ▲ PUSH EJECT to open the cassette holder, and insert with the exposed side down and playback side facing out from the unit. Push the cassette holder to close.
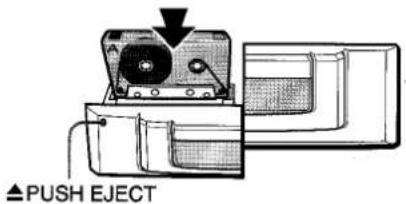
2 Press ▶.
To stop playback
Press ■.
To pause playback (DECK 2 only)
Press ■. Press again to resume.
To fast forward or rewind
Press ◀◀ or ▶▶.
To select a deck (DECK 1 or DECK 2)
Press TAPE in stop mode when tapes are loaded in both decks. The deck number ("TP1" or "TP2") is displayed.
To reset the tape counter
Press ■ CLEAR in stop mode, and the tape counter on the display is reset to "0000".
Opening and closing the cassette holder will also reset the tape counter.
To play continuously (DECK 1 to DECK 2)
Load tapes in both decks and start playback on DECK 1. Then, as soon as playback on DECK 1 finishes, playback on DECK 2 will start without interruption.
Notes on cassettes
- Use of 120-minute or longer tapes is not recommended since they are extremely thin and easily deformed or damaged.
• Take up any slack in the tape with a pencil or similar tool before use. Slack tape may jam in the mechanism.
Basic recording
Use only type I (normal) tapes. DECK 2 is the recording deck. Only one side of the tape can be recorded at a time.
1 Insert the recording tape in DECK 2.
Press ▲ PUSH EJECT to open the cassette holder, and insert with the exposed side down and the side to be recorded on facing out from the unit.
Wind up the tape to the desired point if needed.
2 Prepare the source.
To record a CD(s), select the CD function and load disc(s).
To record a radio broadcast, tune in to the desired station.
To record a tape, select the tape function and insert the source tape in DECK 1.
To record from connected external equipment, select the VIDEO/AUX function and prepare the equipment.
3 Press ● REC/REC MUTE to start recording.
When recording a CD or tape, playback starts automatically.
When recording input from connected equipment, manually start playback of the source.
- When recording on tape, close the disc compartment before starting to record.
• Volume or tone adjustment does not affect recording.
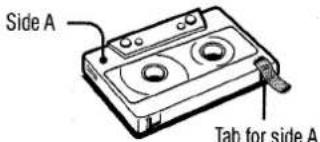
- "CAN'T REC" is displayed if you attempt to record a tape with the tab broken off.
To stop recording
Press ■.
To pause recording (only for TUNER or VIDEO/AUX source)
Press Ⅱ. Press again to resume.
To record a selected set of tracks from a CD
Program the desired tracks (see "Programmed playback") and then press ●REC/REC MUTE.
To record a 4-second blank space (only for TUNER or VIDEO/AUX source)
1 Press ● REC/REC MUTE during recording or in recording pause mode.
"REC" flashes on the display for 4 seconds (a blank space is made in the meantime) and then the unit enters recording pause mode.
To record less than a 4-second blank space, press ●REC/REC MUTE again while "REC" flashes.
To record more than a 4-second blank space, press ●REC/REC MUTE again after the unit enters recording pause mode. Each time the button is pressed, a 4-second blank space is added.
2 Press ■ to resume recording.
To erase a tape
1 Insert the tape in DECK 2. Set the tape to the desired point if needed.
2 Press TAPE to select "TP2".
3 Press ●REC/REC MUTE.
Whole tape dubbing
1 Press TAPE.
2 Insert the original tape in DECK 1 and the recording tape in DECK 2.
3 Press SYNC DUB.
The tapes are rewound to the beginning of the front side and recording starts.
• Dubbing cannot start from a point halfway in the tape.
- Only one side of the tape can be recorded at a time.
To stop dubbing
Press ■
Edited CD recording
AI Edit Recording
When recording a whole CD, AI Edit Recording takes the length of your tape into account and rearranges the recording order of the tracks if necessary, so that no track is cut short at the end of the side. Prepare a tape long enough to record the CD.
1 Insert the recording tape in DECK 2.
2 Press CD to select the CD function and load the disc.
3 Press SHIFT+CD EDIT/CHECK once on the remote control.
The "EDIT" indicator lights up and "AI C-00" appears on the display.
4 Press DISC DIRECT PLAY 1-3 to select a disc.
5 Press the numbered buttons on the remote control to enter the length of the recording tape. 10 to 99 minutes can be specified.
- For a 60-minute tape press 6 and 0.
In a few seconds, the unit determines the tracks to be recorded for each side.
The recording time left for side A appears on the display.
•◀◀, ▶▶ can also be used to specify tape length.
6 Press ●REC/REC MUTE to start recording on side A.
The tape is rewound to the beginning of the first side and recording starts.
Go to the next step when recording on side A finishes.
7 Press SHIFT+CD EDIT/CHECK once on the remote control.
The recording time left for side B appears on the display.
8 Turn over the tape and press ●REC/REC MUTE to start recording on side B.
- AI edit recording cannot be used with discs with more than 30 tracks. "TR OVER" is displayed.
• Recording cannot start from a point halfway in the tape.
Programmed Edit Recording
As you program the CD tracks to record, Programmed Edit Recording displays the remaining recording time for each side of the tape, so you can easily select a set of desired tracks within the length of your tape.
1 Insert the recording tape in DECK 2.
2 Press CD to select the CD function and load the disc.
3 Press SHIFT+CD EDIT/CHECK twice on the remote control.
The "PRGM" indicator flashes, "EDIT" indicator lights up and "PRGMC-00" appears on the display.
4 Press the numbered buttons on the remote control to enter the length of the recording tape. 10 to 99 minutes can be specified.
•◀◀, ▶▶ can also be used to specify tape length.
5 Press DISC DIRECT PLAY 1-3 to select a disc. Then, press the numbered buttons on the remote control to select the first track to be recorded on side A.
-To select the 25th track, press +10, +10 and 5.
-To select the 10th track, press +10 and 0.
6 Repeat step 5 to select the rest of the tracks for side A.
The remaining recording time of side A is displayed. You cannot select a track with a longer playing time.
7 Press SHIFT+CD EDIT/CHECK on the remote control to switch to side B and select the tracks for the side.
8 Press SHIFT+CD EDIT/CHECK on the remote control to switch back to side A and press ●REC/REC MUTE to start recording on side A.
The tape is rewound to the beginning of side A and recording starts.
Go to the next step when recording on side A finishes.
9 Press SHIFT+CD EDIT/CHECK on the remote control to switch to side B, turn over the tape, and press ●REC/REC MUTE to start recording on side B.
- You cannot program more than 30 tracks. "FULL" is displayed.
- You cannot program a track with a track number larger than 30.
- Recording cannot start from a point halfway in the tape.
- You cannot program more than 30 tracks. "FULL" is displayed. - You cannot program a track with a track number larger than 30. - Recording cannot start from a point halfway in the tape.
To stop recording
Press ■. Recording and CD playback stop simultaneously.
To check the program
1 Before recording, press SHIFT+CD EDIT/CHECK on the remote control to select side A or B.
2 Press ◀◀ or ▶▶ repeatedly. The track number and program number are displayed in succession.
To change the program of each side
Press SHIFT+ CD EDIT/CHECK on the remote control to select side A or B, and press ■ CLEAR to clear the program for the selected side. Then, select tracks again.
To clear the edit program
Press ■ CLEAR twice so that "EDIT" disappears from the display.
To prevent accidental erasure
Break off the plastic tab of the cassette tape with a screwdriver or other pointed tool. To record on the tape again, cover the detection slot with adhesive tape.

TIMER OPERATIONS
Sleep timer
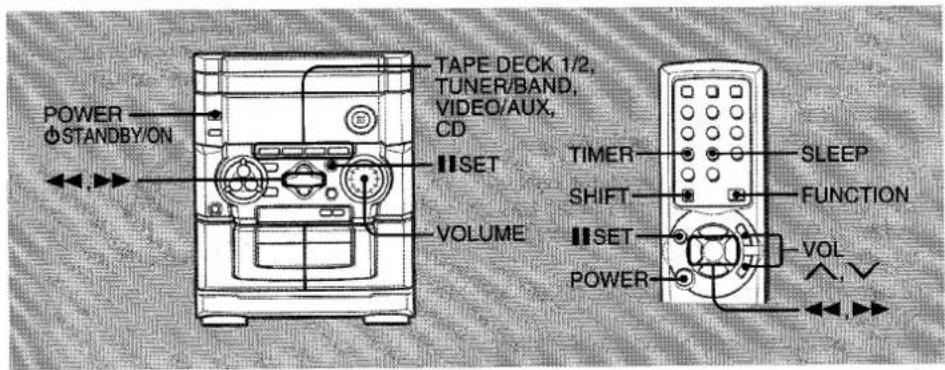
Turns off the unit automatically after a specified time.
1 Press SHIFT+SLEEP on the remote control. "SLEEP" appears on the display.
2 Press ◀◀ or ▶▶ repeatedly to set the sleep timer duration.
With each press, the timer duration changes in 5-minute steps between 5 to 240 minutes. If there is no button input for 4 seconds, the current setting is entered automatically. The unit turns off after the selected time.
Tip:
The display is dimmed while the sleep timer is active.
To check the remaining time until the unit turns off Press SHIFT+SLEEP on the remote control. The remaining time is displayed for 4 seconds.
To cancel the sleep timer
Press SHIFT+SLEEP twice on the remote control so that "SLEEP OFF" is displayed.
Timer playback
Turns on the unit at a specified time for the specified duration. Make sure the clock is set correctly.
1 Press one of the function buttons to select the desired playback source.
2 Press SHIFT+TIMER on the remote control.
"◎" indicator lights up and "◎ PLAY" appears on the display. Then, the timer-on time and the source name appear alternately on the display.
3 Press ◀◀ or ▶▶ to set the timer-on time, then press ■SET.
If ◀◀ or ▶▶ is not pressed within 4 seconds, you will exit the timer setting mode and the previous setting, however, is entered.
4 Press ◀◀ or ▶▶ to set the timer-activated duration, then press ■SET.
With each press, the timer-activated duration changes in 5-minute steps between 5 to 240 minutes.
If there is no button input for 4 seconds, the current setting is entered automatically.
5 Adjust the volume and tone for timed playback. If the volume level is set to 17 or higher, it is automatically turned down to 16 when the unit is turned on by the timer.
6 Prepare the source.
To play a CD(s), load disc(s).
To play the radio, select the band and tune in to the desired station.
To play a tape, insert the tape.
To play external equipment connected to the VIDEO/AUX jacks, set an external timer for the equipment so that its playback begins at the same time.
7 Press POWER ⬤STANDBY/ON to turn the unit off.
“⊖” remains on the display to indicate the timer standby mode.
At timer-on time, the unit turns on and plays the selected source. After the specified timer-activated duration, the unit turns off again.
- Timer playback will not begin unless the unit is turned off first.
- Connected equipment cannot be turned on or off by the built-in timer of this unit. Use an external timer.
- The timer source can be changed with the function buttons before completing step 3.
To display the timer setting
Press SHIFT+TIMER on the remote control.
The timer-on time, the source and the timer-activated duration are displayed for 6 seconds.
Tip:
Timer setting can be displayed even while the unit is turned off, and at that time if you press ■ within 6 seconds after SHIFT+TIMER is pressed, you can enter the timer setting mode and change the setting.
To change the timer setting
Re-set the timer again.
To cancel the timer
Press SHIFT+TIMER on the remote control repeatedly until "OFF" is displayed. "☐" disappears from the display.
Tip:
Your timer setting is retained even if the timer is canceled. Next time the timer is activated, you can change your previous setting, or simply use the same setting again.
Timer recording
Timer recording is available only for TUNER and VIDEO/AUX (with an external timer) sources.
1 Press either TUNER/BAND or VIDEO/AUX to select a source.
2 Press SHIFT+TIMER on the remote control repeatedly until "① REC" appears on the display.
3 Carry out step 3 to step 5 described in "Timer playback".
4 Prepare the source.
To record the radio, select the band and tune in to the desired station.
To record external equipment connected to the VIDEO/AUX jacks, set an external timer for the equipment so that its playback begins at the same time.
5 Insert the recording tape in DECK 2 and then turn the unit off.
REFERENCE
Care and maintenance
Occasional care and maintenance of the unit and the software are needed to optimize the performance of your unit.
To clean the cabinet
Use a soft and dry cloth. If the unit surfaces are extremely dirty, use a soft cloth lightly moistened with mild detergent solution. Do not use strong solvents such as alcohol, benzine or thinner.
To clean the tape heads
Dirty tape heads cause sound deterioration. After every 10 hours of use, clean the tape heads with a head cleaning cassette. Refer to the instructions of the cleaning cassette.
To demagnetize the tape heads
Use a demagnetizing cassette after every 20 to 30 hours of use. Refer to the instructions of the demagnetizing cassette.
Care of CDs
When a CD becomes dirty, wipe it from the center out with a cleaning cloth. After playing a CD, store it in its case. Do not keep it in hot or humid places.
Care of tapes
Store tapes in their cases after use. Do not leave tapes near magnets, motors, television sets, or any source of magnetism. Do not expose tapes to direct sunlight, or leave them in a car parked in direct sunlight.
Troubleshooting
If your unit fails to perform properly, check the following guide and the relevant sections of the Operating Instructions.
There is no sound.
- Are the speakers and AC power cord connected properly?
The unit shut off suddenly.
- Possibly a short circuit in the speaker terminals. Disconnect the AC power cord from the AC power outlet and re-connect the speaker cords correctly.
The unit blacks out when the unit is turned off.
• Is ECO mode set to on?
Erroneous display.
- Reset the unit.
Poor radio reception.
- Check antenna connection. Adjust the antenna to find the best reception.
- Move unit and antenna away from other electric appliances and cords.
The tape does not run.
• Is the deck in pause?
Poor tape sound.
- Check for dirty heads. Clean them if needed.
- Use type I (normal) tapes.
Cannot record.
- Is the erasure prevention tab of the tape broken off? If so, cover the detection slot with adhesive tape.
The CD player works poorly.
• Is the disc correctly loaded?
- Is the disc dirty?
- Is the lens affected by condensation? If so, wait approximately one hour and try again.
Resetting the unit
If an unusual condition occurs in the display window or the cassette deck, reset the unit as follows:
1 Press POWER to turn off the power.
If the power cannot be turned off, disconnect the AC power cord, then plug it in again.
2 Hold down ■ and press POWER.
Everything stored in memory after purchase is cleared.
Specifications
MAIN UNIT CX-NAJ200/CX-NAJ203/CX-NAJ205
TUNER
| FM tuning range | 87.5 MHz to 108 MHz |
| FM usable sensitivity (IHF) | 13.2 dBf |
| FM antenna terminals | 75 ohms (unbalanced) |
| AM tuning range | 530 kHz to 1710 kHz (10 kHz step) |
| 531 kHz to 1602 kHz (9 kHz step) | |
| AM usable sensitivity | 350 μV/m |
| AM antenna | Loop antenna |
AMPLIFIER
CX-NAJ200
| Power output | 20 W + 20 W (50 Hz - 20 kHz, THD less than 1%, 6 ohms) |
| 25 W + 25 W (1 kHz, THD less than 10%, 6 ohms) | |
| Total harmonic distortion | 0.1 % (10 W, 1 kHz, 6 ohms, DIN AUDIO) |
CX-NAJ203/CX-NAJ205
| Power output | 40 W + 40 W (50 Hz - 20 kHz, THD less than 1%, 6 ohms) |
| 50 W + 50 W (1 kHz, THD less than 10%, 6 ohms) | |
| Total harmonic distortion | 0.1 % (20 W, 1 kHz, 6 ohms, DIN AUDIO) |
| Input | VIDEO/AUX: 500 mV |
| Outputs | SPEAKERS: 6 ohms or more SURROUND SPEAKERS (only for CX-NAJ205): 8 ohms to 16 ohms PHONES: 32 ohms or more |
CASSETTE DECK
| Track format | 4 tracks, 2 channels stereo |
| Frequency response | 50 Hz - 8 kHz |
| Recording system | AC bias |
| Heads | DECK 1: playback x 1DECK 2: recording/playback x 1, erase x 1 |
CD PLAYER
| Laser | Semiconductor laser ( = 780 nm) |
| D/A converter | 1 bit dual |
| Signal-to-noise ratio | 85 dB (1 kHz, 0 dB) |
| Harmonic distortion | 0.05 % (1 kHz, 0 dB) |
GENERAL
| Power requirementsCX-NAJ200 |
| Power consumption |
| Power consumptionin standby mode |
| Dimensions (W x H x D) |
Weight
| CX-NAJ203 |
| Power consumption |
| Power consumption |
| in standby mode |
| Dimensions (W x H x D) |
Weight
| CX-NAJ205 |
| Power consumption |
| Power consumption in standby mode |
| Dimensions (W x H x D) |
| Weight |
120V AC, 60 Hz
| 60 W |
| With ECO mode on: 0.6 W |
| With ECO mode off: 15 W |
| 260 × 323× 291 mm |
| (10 1/4 × 12 3/4 × 11 1/2 in.) |
| 4.9 kg (10 lbs 13 oz) |
| 58 W |
| With ECO mode on: 0.6 W |
| With ECO mode off: 15 W |
| 260 × 323× 291 mm |
| (10 1/4 x 12 3/4 x 11 1/2 in.) |
| 5.9 kg (13 lbs) |
| 67 W |
| With ECO mode on: 0.6 W |
| With ECO mode off: 15 W |
| 260 × 323× 291 mm |
| (10 1/4 x 12 3/4 x 11 1/2 in.) |
| 5.9 kg (13 lbs) |
FRONT SPEAKERS SX-NAJ202 (only for NSX-AJ200)
| Speaker system | 2 way, bass reflex (magnetic shielded) |
| Speaker units | Woofer: 120 mm ( 434 in.) coneTweeter: 20 mm ( ^13/_16 in.) cone |
| Impedance | 6 ohms |
| Dimensions (W x H x D) | 220 x 324 x 198 mm( 834 x 1278 x 778 in.) |
| Weight | 2.3 kg (5 lbs 1 oz) |
FRONT SPEAKERS SX-NAJ205 (only for NSX-AJ203 and NSX-AJ205)
| Speaker system | 3 way, bass reflex (magnetic shielded) |
| Speaker units | Woofer: 120 mm ( 434 in.) coneTweeter: 60 mm ( 238 in.) coneSuper tweeter: 20 mm ( ^13/_16 in.)ceramic |
| Impedance | 6 ohms |
| Dimensions (W x H x D) | 220 x 324 x 198 mm( 834 x 1278 x 778 in.) |
| Weight | 2.5 kg (5 lbs 8 oz) |
SURROUND SPEAKERS SX-R145 (only for NSX-AJ205)
| Speaker system | 1 way, bass reflex |
| Speaker units | Full range: 80 mm (3 1/4 in.) cone |
| Impedance | 8 ohms |
| Dimensions (W x H x D) | 100 x 132 x 116 mm(4 x 5 1/4 x 4 5/8 in.) |
| Weight | 0.5 kg (1 lbs 2 oz) |
Accessories: Wall mounting screws (2)
Specifications and external appearance are subject to change without notice.
COPYRIGHT
Check copyright laws relevant to recordings from discs, radio or tape for the country where the unit is to be used.
NOTE
This equipment has been tested and found to comply with the limits for a Class B digital device, pursuant to Part 15 of the FCC Rules. These limits are designed to provide reasonable protection against harmful interference in a residential installation.
This equipment generates, uses, and can radiate radio frequency energy and, if not installed and used in accordance with the instructions, may cause harmful interference to radio communications. However, there is no guarantee that interference will not occur in a particular installation. If this equipment does cause harmful interference to radio or television reception, which can be determined by turning the equipment off and on, the user is encouraged to try to correct the interference by one or more of the following measures:
- Reorient or relocate the receiving antenna.
- Increase the separation between the equipment and receiver.
- Connect the equipment into an outlet on circuit different from that to which the receiver is connected.
- Consult the dealer or an experienced radio/TV technician for help.
CAUTION
Modifications or adjustments to this product, which are not expressly approved by the manufacturer, may void the user's right or authority to operate this product.
Printed in China
As an ENERGY STAR® Partner, AIWA has determined that this product meets the ENERGY STAR® guidelines for energy efficiency.
For assistance and information call toll free 1-800-BUY-AIWA (United States and Puerto Rico)
AIWA CO.,LTD.

http://www.aiwa.co.jp

- aiwa
- Compact Disc Stereo System
- PRECAUTIONS
- WARNING
- Explanation of Graphical Symbols:
- Installation
- Electric Power
- AC power cord
- Outdoor Antenna
- Maintenance
- Damage Requiring Service
- OWNER'S RECORD
- TABLE OF CONTENTS
- System and accessories
- PREPARATIONS
- Connection
- PARTS AND CONTROLS
- Remote control
- Main unit: rear
- ▲OPEN/CLOSE
- TUNER/BAND
- VIDEO/AUX
- ● REC/REC MUTE
- SYNC DUB
- PRESET
- ◀◀/◀◀DOWN, ▶▶/▶▶IUP TUNING
- CLEAR
- CD EDIT/CHECK
- PRGM
- RANDOM/REPEAT
- GEQ
- T-BASS
- TIMER
- SLEEP
- CLOCK
- MONO TUNER
- BAND
- ADJUSTMENTS BEFORE OPERATIONS
- Power
- Turning the unit on
- Turning the unit off
- DEMO
- To deactivate and activate the DEMO
- To switch between "Illumination demo" and "Game demo"
- To play the Game demo
- Tip:
- ECO mode
- ECO ON mode
- ECO AUTO mode
- To cancel the ECO mode
- Dimmer
- To cancel the dimmer
- SOUND ADJUSTMENTS
- Setting the clock
- To display the time
- To switch to the 24-hour standard
- If the clock display flashes when the unit is turned off
- Volume
- Super T-BASS
- Graphic equalizer
- To display the current equalization mode
- To cancel equalization
- CD OPERATIONS
- Playback
- Random/Repeat playback
- Programmed playback
- To check the program
- To clear the program
- To add tracks to the program
- To change the programmed tracks
- Notes on CDs
- RADIO OPERATIONS
- Manual tuning
- To search for a station automatically (Auto Search) Hold down ◀◀DOWN or ▶▶UP.
- Preset tuning
- Presetting stations
- Tuning in to preset stations
- On the unit
- On the remote control
- To clear a preset station
- Adjustments
- Antennas
- To switch to monaural FM reception
- To switch the AM tuning interval
- TAPE OPERATIONS
- Notes on cassettes
- Basic recording
- To stop recording
- To pause recording (only for TUNER or VIDEO/AUX source)
- To record a selected set of tracks from a CD
- To record a 4-second blank space (only for TUNER or VIDEO/AUX source)
- To erase a tape
- Whole tape dubbing
- To stop dubbing
- Edited CD recording
- AI Edit Recording
- Programmed Edit Recording
- To change the program of each side
- To clear the edit program
- To prevent accidental erasure
- TIMER OPERATIONS
- Sleep timer
- To cancel the sleep timer
- Timer playback
- Prepare the source.
- Press POWER ⬤STANDBY/ON to turn the unit off.
- To display the timer setting
- To change the timer setting
- To cancel the timer
- Timer recording
- REFERENCE
- Care and maintenance
- To clean the cabinet
- To clean the tape heads
- To demagnetize the tape heads
- Care of CDs
- Care of tapes
- Troubleshooting
- There is no sound.
- The unit shut off suddenly.
- The unit blacks out when the unit is turned off.
- Erroneous display.
- Poor radio reception.
- The tape does not run.
- Poor tape sound.
- Cannot record.
- The CD player works poorly.
- Resetting the unit
- COPYRIGHT
- NOTE
- CAUTION
Marke : AIWA
Modell : NSX-AJ203
Kategorie : CD-Player