
FMJ T21 - Tuner ARCAM - Kostenlose Bedienungsanleitung
Finden Sie kostenlos die Bedienungsanleitung des Geräts FMJ T21 ARCAM als PDF.


| Produkttyp | FM/AM Tuner |
| Marke | Arcam |
| Modell | FMJ T21 |
| Abmessungen (B x H x T) | 430 x 90 x 300 mm |
| Gewicht | 5,5 kg |
| Stromversorgung | 230 V ~ 50 Hz |
| Leistungsaufnahme | 15 W (Standby < 1 W) |
| FM-Frequenzbereich | 87,5 – 108 MHz |
| AM-Frequenzbereich | 522 – 1611 kHz |
| Empfindlichkeit FM | 0,5 µV (IHF) |
| RDS-Decodierung | Ja (RT, PS, PI) |
| Anzahl Senderspeicher | 40 (FM/AM teilbar) |
| Audioausgang | 1x Cinch (Festpegel), 1x Cinch (Regelpegel) |
| Fernbedienung | Ja (RC-5 kompatibel) |
| Gehäusefarbe | Schwarz (eloxiertes Aluminium) |
| Besonderheiten | Mithörton-Demodulator, Rauschunterdrückung |
| Reinigung | Staubtuch, keine aggressiven Reiniger |
| Sicherheit | Gerät vor Feuchtigkeit schützen, Netzstecker ziehen bei Gewitter |
| Reparatur | Nur durch autorisiertes Servicepersonal |
| Zubehör | Netzkabel, Fernbedienung, Antennenadapter |
Häufig gestellte Fragen - FMJ T21 ARCAM
Benutzerfragen zu FMJ T21 ARCAM
0 Frage zu diesem Gerät. Beantworten Sie die, die Sie kennen, oder stellen Sie Ihre eigene.
Eine neue Frage zu diesem Gerät stellen
Laden Sie die Anleitung für Ihr Tuner kostenlos im PDF-Format! Finden Sie Ihr Handbuch FMJ T21 - ARCAM und nehmen Sie Ihr elektronisches Gerät wieder in die Hand. Auf dieser Seite sind alle Dokumente veröffentlicht, die für die Verwendung Ihres Geräts notwendig sind. FMJ T21 von der Marke ARCAM.
BEDIENUNGSANLEITUNG FMJ T21 ARCAM
ARCAM (M)
AM/FM Tuner

natural_image
Completely blank white image with no visible content, text, or symbols.
natural_image
Completely blank white image with no visible content, text, or symbols.Thank you for choosing ARCAM
SECTIONS OF THE HANDBOOK
A This section contains installation information for the FMJ T21 Tuner.
B This section contains information on setting up the aerials.
C This section contains information on using the FMJ T21 Tuner.
D This section contains information on using the Remote Control handset.
SAFETY
There are 19 safety items, set out on page 9 of this handbook. For your own safety and to ensure that your tuner works properly, we strongly recommend that you read them.
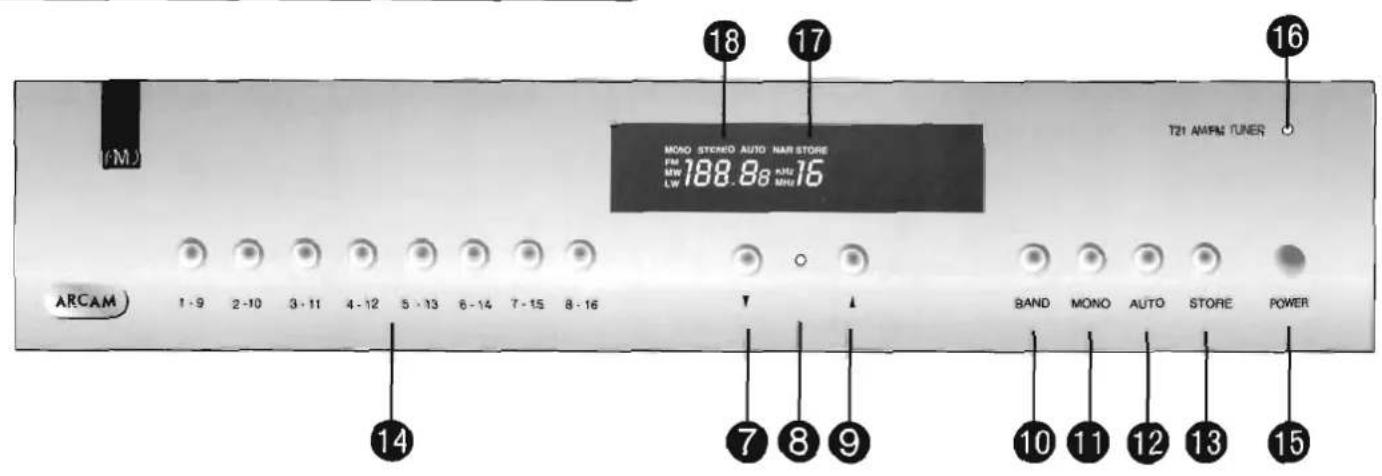
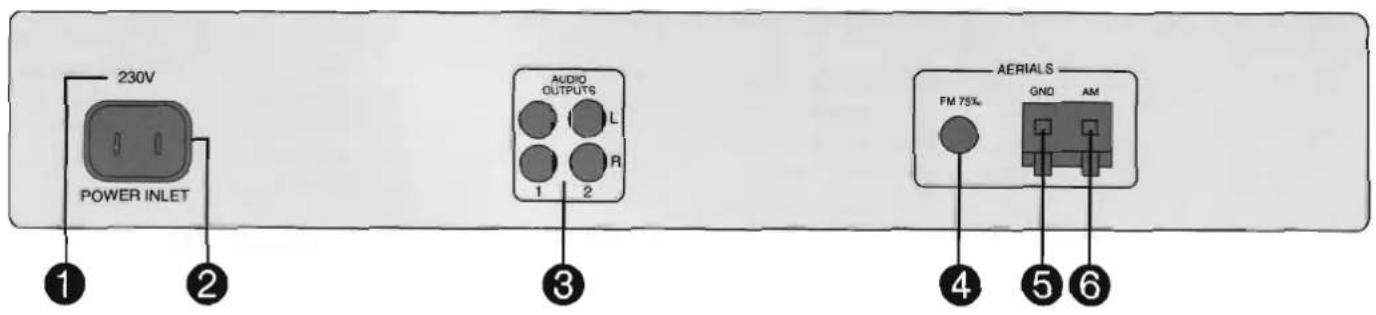
FMJ T21 - FRONT AND REAR VIEWS
CONNECTING TO A POWER SUPPLY
WRONG PLUG!
If the plug supplied with the tuner does not fit your power supply, see the inside back cover of this handbook for guidelines on changing a plug, or contact your dealer to obtain a suitable power cord.
Check that your mains supply voltage agrees with the voltage setting indicated on the rear panel of the 1 tuner:
If your mains supply voltage is different, consult your Arcam dealer or Arcam Customer Support on 01223 203203.
PLUGGING IN
Push the plug (IEC line socket) of the cable supplied with the tuner; into the socket ② (POWER INLET) in the back of the tuner. Make sure it is pushed in firmly.
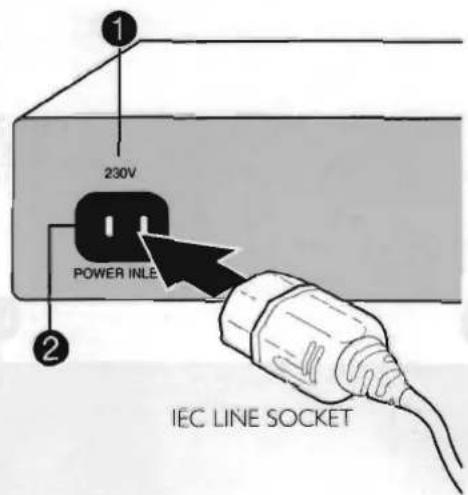
Push the plug on other end of the cable into your power supply socket.
The tuner is double insulated and does not require an earth. This is why there is no centre (Earth) pin in the socket (POWER INLET).
CONNECTING TO OTHER EQUIPMENT
The use of high quality interconnect cables to and from other hi-fi equipment is recommended to ensure the best sound quality (sonic performance).
Interconnect cables are not supplied with these tuners.
The left channel sockets are marked L. The right channel sockets are marked R.
CONNECTING YOUR TUNER TO YOUR AMPLIFIER
3 AUDIO OUTPUTS
There are two pairs of identical outputs provided. Connect one of these to your amplifier's tuner input using a suitable interconnect cable. Insert the red phono plug into the socket labelled 'R' for Right and the other phono plug into the socket labelled 'L' for Left.
The second set of audio outputs can be used to connect to a second amplifier set up for 'multi room' use or routed to a tape recorder for 'off air' recording.
Section B
Setting up the aerials
Your new Arcam Tuner is capable of superb reception...
but only if it is receiving a good quality transmission signal.
As the signal is so important for good reception we have created a quick reference guide to setting up the aerials.
You are recommended to fit an FM and an AM Aerial.
FM AERIAL
Required to receive VHF radio signals.
FOR BEST FM RADIO RECEPTION
A roof mounted aerial is essential. For your own safety it is recommend that a rooftop aerial is fitted by an experienced contractor. You can find these in your local telephone directory or Yellow Pages. Your contractor will tune and direct the aerial to your nearest FM transmitter. In blocks of flats, an aerial system may already be installed and connected to wall mounted sockets marked FM or VHF (not TV).
Alternatively, you may decide to install an aerial yourself. Use one designed for 'Band 2' (VHF/FM) reception. These are available from electrical accessories shops (e.g. TANDY). This should be put outside the building, mounted as high up as possible. Aerials can be fitted in lofts, but metal foil cladding used for heat insulation may make this option useless.
As a rough guide use the following table to indicate the type of aerial you may require.
Up to 40 miles (65 km) from a transmitter 3 element aerial
Over 60 miles (100 km) from a transmitter 6 or 8 element aerial
See 'Radio Transmitting Stations', mentioned later, for details of how to find the location of your nearest transmission station.
Alternatively a circular 'Omni-directional' aerial can be used, though this will not usually provide as much signal as the multi-element types of aerial mentioned above.
The coaxial cable from the aerial should be fitted with a coaxial plug and used with the adaptor provided. Plug it into the socket ④ in the back of your Arcam tuner.
FOR GOOD FM RADIO RECEPTION
If you will be using your tuner within a few miles of a major radio transmitter the T shaped wire aerial (dipole design) supplied should give a good reception. Use the aerial and the coaxial plug adaptor provided, to connect it to the socket ④. Mount the aerial as high as possible on a wall. Try each usable wall of the room to see which position gives best reception. The usual configuration is to use the aerial in a T shape, with the two ends (elements) forming the top cross-piece. Use tacks or tape to hold the aerial in a T shape. The tacks should not come into contact with the internal aerial wire.
VERTICALLY POLARISED SIGNALS
Some signals from radio transmitter are 'vertically polarised', (see 'Radio Transmitting Stations' mentioned later, for details) in which case the aerial needs to be located with its elements vertical. Most, but not all signals have a 'horizontal component', if all the stations you wish to receive have this, then aligning the aerial elements horizontally may help to avoid interference. It is best to try several positions.
AM AERIAL
Required for Medium Wave (MW) and Long Wave (LW) radio signals.
There is an AM loop aerial supplied. Connect one end of the loop aerial into socket ⑤ and the other end into ⑥. It does not matter which of the wires go to which socket. Rotate the aerial to see which position gives the best reception. Some interference of the signal may be experienced near a fluorescent light tube or a television. Each transmitting radio station may require the aerial to be adjusted slightly. Even on the same frequency, the best aerial orientation can vary with time.
In areas of weak reception or when the tuner is used inside a steel framed building (such as a block of flats) you can use a long wire approximately 3-5 metres long and mounted high up outside the building. Connect the end of the wire to ⑥ as well as the loop aerial supplied. Do not disconnect the loop aerial.
Radio signals are not transmitted in LW in the USA, Canada and some European countries.
FOR MORE INFORMATION
The BBC publishes a booklet entitled 'Radio Transmitting Stations' which contains details of all BBC transmitters in the UK together with other useful hints and tips. This booklet can be obtained on request by sending a large stamped addressed envelope to:-
Engineers Dept.
BBC Radio
201 Wood Lane
London W12 7TS
Telephone: 08700 100 123
Internet: http://www.bbc.co.uk/enginfo/fm_recep
The UK Radio Authority publishes 'The Radio Authority Pocket Book' which contains details of all independent radio stations. This booklet can be obtained on request by sending a large stamped addressed envelope to:-
Holbrook House,
14 Great Queen Street.
Holborn,
London,
WC2B 5DG
Telephone: 0171 430 2724
Fax: 0171 405 7062
e-mail: info@radioauthority.org.uk
Internet: http://www.radioauthority.org.uk.
A free booklet (number 004-000-00345-4) is available from the U.S. government called 'How to Identify and Resolve Radio-TV Interference Problems' by writing to:
The U.S. Government Printing Office
Washington, D.C.
20402.
TUNE
7.9 Press to tune up or down through the chosen frequency band. When pressed continuously, the selector will scroll continuously, when touched and released, the selector will scroll in fixed amounts.
ON TUNE INDICATOR
8 This will glow green when you are correctly tuned to a signal on any band. When you are off tune the indicator will be off.
BAND
10 Selects FM, AM (MW) or LW frequency band. The appropriate letters appear on the display.
MONO
11 Selects mono or stereo output. Stereo is only available on FM radio stations. The word MONO or STEREO will light on the display. If a weak station is received in stereo the background hiss can be reduced (and in most cases eliminated) by selecting MONO.
AUTO
12 When pressed, the word AUTO will illuminate in the display. When buttons ⑦, ⑨ are pressed the tuner will stop automatically at a station with any suitably strong signal. To continue searching press ⑦ or ⑨ again.
STORING RADIO STATIONS
You can store up to a total of 24 radio stations as presets in the memory buttons.14. There are two storage 'levels'.
FM 'level' where 16 stations can be stored.
AM 'level' where 8 stations can be stored. The 8 stations can be either MW,LW or a combination of the two.
Your first and ninth FM stations are stored using button 1-9, your second and tenth FM stations are stored using button 2-10 and so on.
TO STORE A RADIO STATION IN THE MEMORY
Select the BAND, (FM, AM or LW) using button 10 and tune into the radio station you wish to store.
Press the STORE button 13. You will see PI in the display at 18. Within 5 seconds, press the memory button (numbers 1 to 8) you wish to store the station under. The station is stored when a number appears in the right hand end of the display at 17.
To store stations 9-16 in FM, proceed as above but press the STORE button 13 twice.
You will see P2 in the display at 18.
This will access the buttons 9-16.
TO SELECT A STORED RADIO STATION
Select the BAND, FM, AM or LW using button 10. To select stations stored on presets 1 to 8, press the memory button number which stores the station you wish to select, for a 'split second' only.
To select stations 9 to 16 in FM, proceed as above, but press the memory button number which stores the station you wish to select, for a 'whole second'.
POWER
15 Switches the unit on and off.
POWER INDICATOR
16 This will glow green to show that the unit is switched on.
PRESET INDICATOR
17 Indicates the number of the preset currently selected.
18 FREQUENCY DISPLAY
Indicates the frequency of the selected station in MHz (FM) or kHz (AM).
PRESET MEMORY BACK-UP
The preset memory will be retained while the tuner is connected to the mains. If the mains supply is disconnected, the memory will be retained for approximately one week.
RADIO INTERFERENCE
The FMJ T21 Tuner is an audio device containing microprocessors and other digital electronics. It has been designed to very high standards of electromagnetic compatibility.
EC COUNTRIES
This product has been designed to comply with directive 89/336/EEC.
USA
This product complies with FCC requirements. If the equipment causes interference to radio/television reception, which can be determined by switching the equipment off and on, the following measures should be taken: Re-orientate the receiving antenna or route the antenna cable of the receiver as far as possible from this appliance and its cabling. Relocate the receiver with respect to this appliance. Connect the receiver and this appliance to different mains power outlets. If the problem persists contact your Arcam dealer or Arcam Customer Support on +44 (0)1223 203203.
SAFETY STANDARD
This product has been designed to meet the IEC 60065 international electrical safety standard.
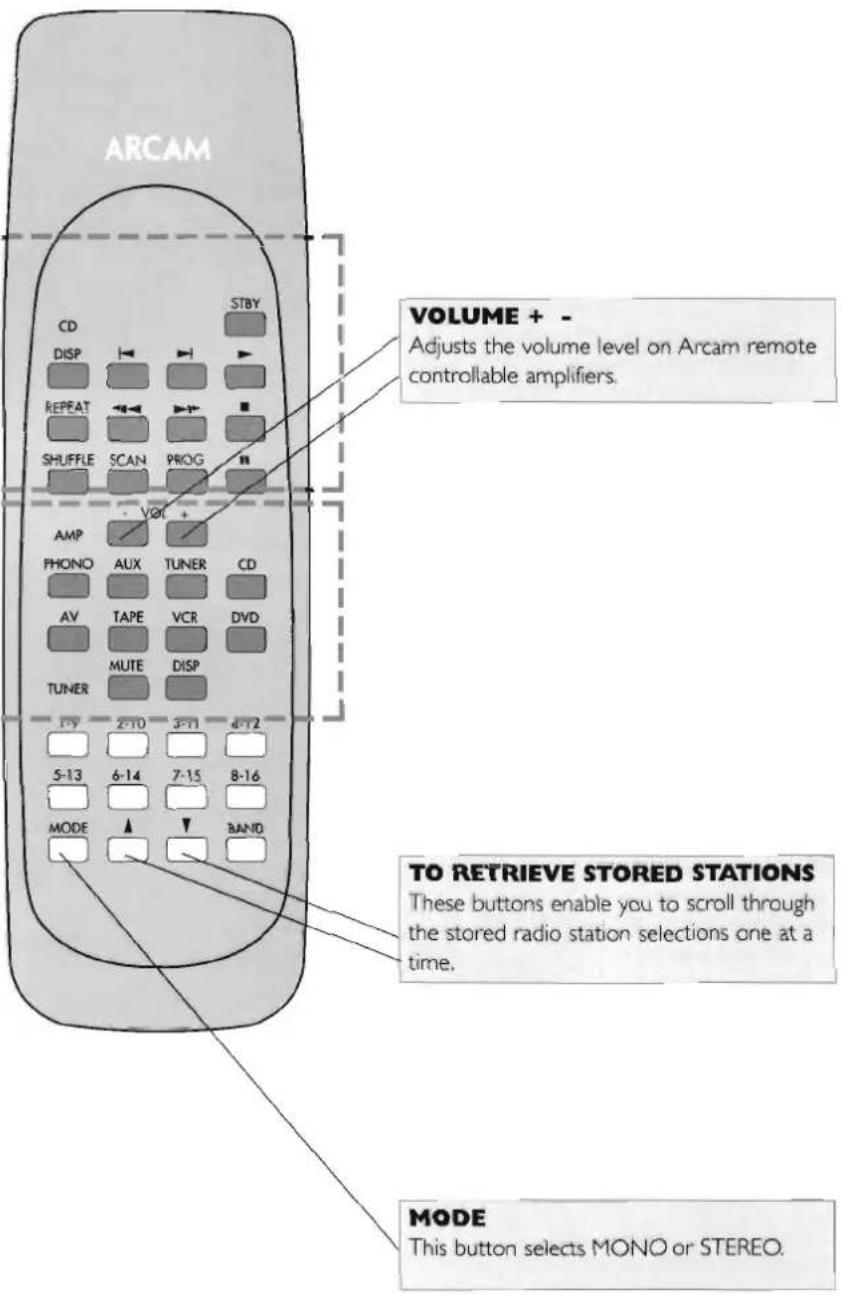
The buttons shown in white have the same functions as those on the front of the tuner.
Don't forget to fit the 2 AAA batteries supplied and ensure they are inserted correctly into the back of the Remote Control handset before using it.
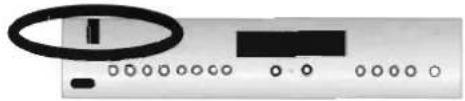
The Remote Control handset sends a message to an infra-red receiver which is located behind the FMJ badge on the front of the tuner:
natural_image
Pure electrical circuit lines without any symbolsDo not place anything in front of the badge or the Remote Control may not work.
CD FUNCTIONS
These buttons are CD player functions.
Refer to your CD Player handbook for a full description of their use. This Remote Control will control the basic functions of Arcam CD players (except the Alpha One).
AMPLIFIER FUNCTIONS
These buttons are Amplifier functions.
Refer to your Amplifier handbook for a full description of their use. This Remote Control will control the volume control and input selector (where appropriate) of all remote controllable Arcam amplifiers.
Guarantee
WORLDWIDE GUARANTEE
This entitles you to have the unit repaired free of charge, during the first two years after purchase, at any authorised Arcam distributor provided that it was originally purchased as new from an authorised ARCAM dealer or distributor. The manufacturer can accept no responsibility for defects arising from accident, misuse, abuse, wear and tear, neglect or through unauthorised adjustment and/or repair; neither can they accept responsibility for damage or loss occurring during transit to or from the person claiming under the guarantee.
The warranty covers:
Parts and labour costs for two years from the purchase date. After two years you must pay for both parts and labour costs. The warranty does not cover transportation costs at any time.
CLAIMS UNDER GUARANTEE
This equipment should be packed in the original packing and returned to the dealer from whom it was purchased, or failing this, directly to the Arcam distributor in your country of residence. It should be sent carriage prepaid by a reputable carrier - NOT by post. No responsibility can be accepted for the unit whilst in transit to the dealer or distributor and customers are therefore advised to insure the unit against loss or damage whilst in transit.
For further details contact Arcam at:
ARCAM Customer Support Department, Pembroke Avenue, Denny Industrial Centre, Waterbeach, Cambridge, CB5 9PB, England. Telephone: +44 (0)1223 203203 Fax: +44 (0)1223 863384 e-mail: support@arcam.co.uk
PROBLEMS?
If your dealer is unable to answer any query regarding this or any other Arcam product please contact Arcam Customer Support on +44 (0)1223 203203 or write to us at the above address and we will do our best to help you.
SAFETY GUIDELINES
SAFETY IN USE
This product was designed and manufactured to meet strict quality and safety standards. There are, however, some installation and operation precautions of which you should be particularly aware:
I. Read Instructions All the safety and operating instructions should be read before the appliance is operated.
2. Retain Instructions The safety and operating instructions should be retained for future reference.
3. Heed Warnings All warnings on the appliance and in this handbook should be adhered to.
4. Follow Instructions All operating and use instructions should be followed.
5. Water and Moisture The appliance should not be used near water - for example near a bathtub, washbowl, kitchen sink, laundry tub, in a wet basement or swimming pool, etc.
6. Racks and Stands The appliance should be used only with a rack or stand that is recommended for use with audio equipment.
If the equipment is on a portable rack it should be moved with care. Quick stops, excessive force, and uneven surfaces may cause the combination to overturn.
- Ventilation The appliance should be situated so that its location or position does not interfere with its proper ventilation. For example, the appliance should not be situated on a bed, sofa, rug or similar surface that may block the ventilation openings or placed in a built-in installation, such as a bookcase or cabinet that may impede the flow of air through the ventilation openings.
- Heat The appliance should be situated away from heat sources such as radiators, stoves or other appliances (including amplifiers) that produce heat.
- Power Sources The appliance should be connected to a power supply only of the type described in this handbook or as marked on the appliance.
- Grounding Precautions should be taken so that the grounding means of the appliance is not defeated.
- Power-Cord Protection Power supply cords should be routed so that they are not likely to be walked on or pinched by items placed upon or against them, paying particular attention to cords and plugs, and the point where they exit from the appliance.
- Cleaning Unplug the unit from the mains supply before cleaning. The appliance should normally only require a wipe over with a clean, dry, lint-free cloth. If it is heavily soiled then a cloth slightly dampened with a water/washing up liquid solution may be used. Dry the unit afterwards with a dry cloth.
We do not advise the use of furniture type cleaning sprays/polishes as this can cause white marks, which are very difficult to remove, if the unit is then wiped over with water.
-
Power Lines An outdoor antenna/aerial should be located away from power lines.
-
Non-use Periods The power cord of the appliance should be unplugged from the outlet when left unused for a long period of time.
- Object and Liquid Entry Care should be taken so that objects do not fall and liquids are not spilled into the enclosure through any openings.
- Abnormal Smell If an abnormal smell or smoke is detected from the appliance, immediately turn the power off and unplug the unit from the wall outlet.
Contact your dealer immediately.
- Damage Requiring Service The appliance should be serviced by qualified service personnel when:
A. The power-supply cord or the plug has been damaged or:
B. Objects have fallen, or liquid has spilled into the appliance or:
C. The appliance has been exposed to rain or:
D. The appliance does not appear to operate normally or exhibits a marked change in performance or:
E. The appliance has been dropped or the enclosure damaged.
- Servicing You should not attempt to service the appliance beyond that described in this handbook. All other servicing should be referred to qualified service personnel.
- Climate The appliance has been designed for use in moderate climates. This appliance is normally supplied with a moulded mains plug already fitted to the lead. If for any reason the plug needs to be removed, it must be disposed of immediately and securely, as it is a potential shock hazard when inserted into a mains socket.
ELECTRICAL CONNECTIONS
This appliance is normally supplied with a moulded mains plug already fitted to the lead. If for any reason the plug needs to be removed, it must be disposed of immediately and securely, as it is a potential shock hazard when inserted into a mains socket.
If the plug is removed then the remaining lead must be rewired as follows:
The blue wire must be connected to the terminal which is coloured blue or marked with the letter N.
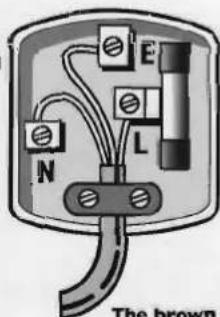
The green and yellow wire must be connected to the terminal which is coloured green and yellow, or marked with the letter E or the safety earth symbol.
The brown wire must be connected to the terminal which is coloured brown or marked with the letter L.
When replacing the fuse in the supplied moulded mains plug, the integral fuse holder/cover must always be refitted. Use a 5 amp fuse.
| TECHNICAL SPECIFICATIONS | FMJ T21 |
| FM Section | |
| Tuning range | 87.5 to 108.0MHz |
| Tuning system | Phase-locked-loop |
| Frequency steps | 50kHz |
| Presets | 16 |
| Sensitivity (IHF) for 50dB S/N ratio | typically 8μV |
| Alternate channel selectivity | better than 60dB |
| AM suppression ratio | better than 50dB |
| Capture ratio | typically 1.0dB |
| On-tune indicator | Lights at tuned frequency ±50kHz |
| Frequency response | 20Hz - 15kHz ±1dB |
| Ultimate S/N ratio (CCIR) Mono | better than -76dB |
| Stereo | better than -71dB |
| Total harmonic distortion | (96MHz reference, 22.5kHz deviation at 1kHz) |
| Mono | better than 0.1% |
| Stereo | better than 0.25% |
| Channel separation (1kHz) | better than 38dB |
| Pilot tone suppression | better than 30dB |
| Output level | 700mV at 75kHz deviation |
| AM Section | |
| Tuning range | 522 to 1611 kHz (AM-MW) |
| 146 to 290 kHz (AM-LW) | |
| Tuning system | Phase-locked-loop |
| Frequency steps | 9kHz (AM-MW) in Europe |
| 10 kHz (AM-MW) in USA & Canada | |
| 1 kHz (AM-LW) | |
| Presets | 8 |
| Usable sensitivity | typically 25μV |
| IF rejection | 20dB |
| S/N ratio (30% mod., 50mV I/P) | 50dB |
| Total harmonic distortion (30% mod., 50mV I/P) | 0.5% |
| Output level | 750mV at 70% modulation |
| General | |
| Output impedance | 100 ohms |
| Minimum recommended load | 5k ohms |
| Power consumption | 10VA |
| Size W/D/H mm. | 430 x 290 x 85 |
| Weight net | 4.7kg |
| Weight packed | 7.4kg |
| Supplied accessories | FM dipole aerial |
| AM loop aerial | |
| coaxial plug adaptor | |
| mains lead | |
| remote control handset inc. batteries | |
| E&OE | |
ARCAM
PEMBROKE AVENUE, DENNY INDUSTRIAL CENTRE, WATERBEACH, CAMBRIDGE CB5 9PB, ENGLAND
TELEPHONE: 44+(0) 1223 203203 FAX: 44+ (0) 1223 863384 e-mail: support@arcam.co.uk www.arcam.co.uk
- ARCAM (M)
- Thank you for choosing ARCAM
- SECTIONS OF THE HANDBOOK
- SAFETY
- CONNECTING TO A POWER SUPPLY
- WRONG PLUG!
- PLUGGING IN
- CONNECTING TO OTHER EQUIPMENT
- CONNECTING YOUR TUNER TO YOUR AMPLIFIER
- AUDIO OUTPUTS
- Section B
- Setting up the aerials
- FM AERIAL
- FOR BEST FM RADIO RECEPTION
- FOR GOOD FM RADIO RECEPTION
- VERTICALLY POLARISED SIGNALS
- AM AERIAL
- FOR MORE INFORMATION
- TUNE
- ON TUNE INDICATOR
- BAND
- MONO
- AUTO
- STORING RADIO STATIONS
- TO STORE A RADIO STATION IN THE MEMORY
- TO SELECT A STORED RADIO STATION
- POWER
- POWER INDICATOR
- PRESET INDICATOR
- FREQUENCY DISPLAY
- PRESET MEMORY BACK-UP
- RADIO INTERFERENCE
- EC COUNTRIES
- USA
- SAFETY STANDARD
- The buttons shown in white have the same functions as those on the front of the tuner.
- CD FUNCTIONS
- AMPLIFIER FUNCTIONS
- Guarantee
- WORLDWIDE GUARANTEE
- The warranty covers:
- CLAIMS UNDER GUARANTEE
- PROBLEMS?
- SAFETY GUIDELINES
- SAFETY IN USE
- ELECTRICAL CONNECTIONS
- ARCAM
Marke : ARCAM
Modell : FMJ T21
Kategorie : Tuner