3270-LED - Fernseher DUAL - Kostenlose Bedienungsanleitung
Finden Sie kostenlos die Bedienungsanleitung des Geräts 3270-LED DUAL als PDF.


Benutzerfragen zu 3270-LED DUAL
0 Frage zu diesem Gerät. Beantworten Sie die, die Sie kennen, oder stellen Sie Ihre eigene.
Eine neue Frage zu diesem Gerät stellen
Laden Sie die Anleitung für Ihr Fernseher kostenlos im PDF-Format! Finden Sie Ihr Handbuch 3270-LED - DUAL und nehmen Sie Ihr elektronisches Gerät wieder in die Hand. Auf dieser Seite sind alle Dokumente veröffentlicht, die für die Verwendung Ihres Geräts notwendig sind. 3270-LED von der Marke DUAL.
BEDIENUNGSANLEITUNG 3270-LED DUAL
Dual
32" SUPER SLIM LED DIGITAL TV WITH DVD
32" LED/DVD TELEVISION User's Manual
- Please observe all safety precautions when using this product.
- Please read this manual carefully before using this product.
Safety Precautions
- Installation And Safety Warnings....2
- Warnings....3
- Caution....4\~5
User Guidance Information
- Names of each part / Accessories....6
- Names of each part....7
• Installation the TV Stand / Installation Precautions....8 - Power Input Connections / Installing an Antenna....9
- Remote control....10
- Precautions / How to use the remote control....11
Connection
• VCR Connections / SCART Connections / Watching Video Tape....12
- Satellite/TV Set-Top Box Connections / Watching TV....13
• DVD Connections / Playing the DVD....14
- PC Connections / EARPHONE Connections / How to use as PC monitor....15
- USB Connections / Digital Amplifier Connections / Audio Receiver Connections....16
Basic Use
- Selecting input source....17
- Basic Operation....18
Application
TV Part
- Operating the Menu....19
- Customizing the TV SETTINGS Settings....20\~21
- Customizing the PICTURE Settings....22
- Customizing the SOUND Settings....23
- Customizing the EXTRAS Settings....24
- Customizing the OPTIONS Settings....25
- Customizing the LOCK Settings....26
- Customizing the PC Setup Settings....27
- Customizing the MEDIA Settings....28
DVD Part
• DVD Functions....29
- Customizing the General Setup Page Settings....30
- Customizing the Speaker Setup Page Settings....31
- Customizing the Dolby Digital Setup Settings....32
- Customizing the Preference Page Settings....33
Maintenance and Service
- Trouble shooting....34
- Specifications....35
- Energy label....36
- Notice about recycling / Notice about ROHS......
Installation and Safety Warnings
1) Position the unit on a flat surface avoiding anywhere which may be subject to vibration.
2) It is advisable to un-plug both the power and aerial during a storm to avoid damage.
Electrical surges causing damage to the TV are not covered under the manufacturer's warranty.
3) Avoid rapid changes in environmental or temperature conditions. Allow the TV to reach room temperature and avoid locating near heat sources, i.e radiators/fires.
4) Do not place naked flames, such as candles or night lights near to the TV.
5) Do not place ornaments or vases near the TV where liquid spillages could cause a danger.
6) Do not locate the TV directly against a wall where it could restrict ventilation to the rear of the TV.
7) Do not place the TV on or near appliances which may cause electromagnetic interference (such as TV or Hi-Fi Speakers) as these could cause a distorted picture or sound.
8) Batteries are a potential choking hazard. Do not allow young children to remove the battery compartment cover on the remote control.
9) There are no user serviceable parts inside this TV. Do not remove any of the covers, front or rear, which could expose high voltages within the TV set.
10) If you intend to leave the TV for long periods of time, in the interests of energy consumption, do not leave the TV in standby mode, instead, unplug the TV from the power supply.
11) Never display the same image on the TV for long periods of time as this could cause a permanent after-image to remain on the screen. This is could cause 'screen-burn'. This may also be caused by some channels displaying a static logo in the corner of the screen. Be sure that your chosen channels have constantly moving images to avoid this irreparable damage.
12) The mains plug is used as the disconnect device, the disconnect device shall remain readily operable.
Warnings

Warning
Risk of electric shock Do not open

Warning: To Avoid the risk of electric shock.
Do not remove cover (or back).
No user-serviceable parts inside.
Refer servicing to qualified service personnel.

This symbol is intended to alert the user to avoid the risk of electric shock, do not disassemble this equipment by anyone except a qualified service personnel.

This symbol is intended to alert the user to the presence of important operating and maintenance instructions in the literature accompanying the appliance.
Caution
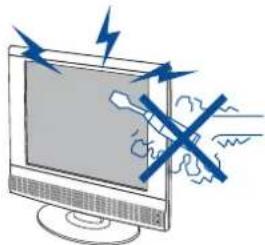
natural_image
Illustration of a computer monitor with a shield and lightning bolts, no text or symbols presentCaution
High voltages are used in the operation of this product. Do not remove the cabinet back from your set. Refer servicing to qualified service personnel.
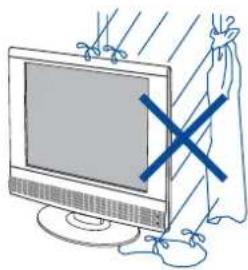
natural_image
Illustration of a computer monitor with a blue X symbol and a pair of curtains hanging from it (no text or symbols present)Caution
To prevent fire or electrical shock hazard, do not expose the main unit to moisture.
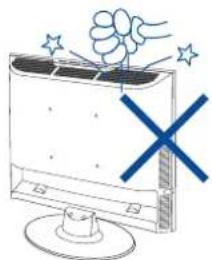
natural_image
Illustration of a computer monitor with a blue X symbol and stars above it, no text or symbols present.Caution
Do not drop or push objects into the television cabinet slots or openings. Never spill any kind of liquid on the television receiver.
natural_image
Simple line drawing of a steaming appliance with a cross mark on its side (no text or symbols)Caution
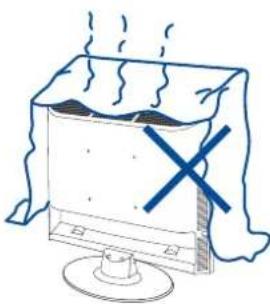
Avoid exposing the main unit to direct sunlight and other source of heat. Do not put the television receiver directly on other products that give off heat. E. g. video cassette players, Audio amplifiers. Do not block the ventilation holes in the back cover. Ventilation is essential to prevent failure of electrical components. Do not squash power supply cord under the main unit.
Caution
natural_image
Cartoon illustration of a person climbing a computer monitor with a 'X' symbol, surrounded by floating stars (no text or symbols present)Caution
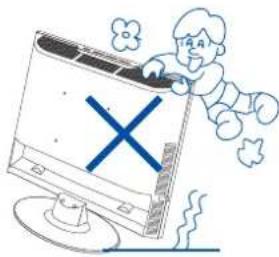
Never stand on, lean on, push suddenly the product or its stand. You should pay special attention to children.
natural_image
Illustration of a computer monitor with a blue X mark and a lightning bolt on a table (no text or symbols)Caution
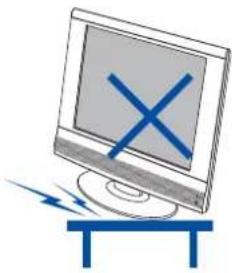
Do not place the main unit on an unstable cart stand, shelf or table. Serious injury to an individual, and damage to the television, may result if it should fall.
natural_image
Illustration of a person cleaning air conditioner unit with a magnifying glass showing a warning symbol (no text or symbols present)Caution
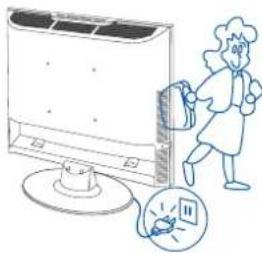
When the product is not used for an extended period of time, it is advisable to disconnect the AC power cord from the AC outlet.
natural_image
Line drawing of a front-mounted air conditioner unit with cooling fins and a base mount (no text or symbols)Caution
Length of screw for wall mount can not exceed 10MM.
Names of each part
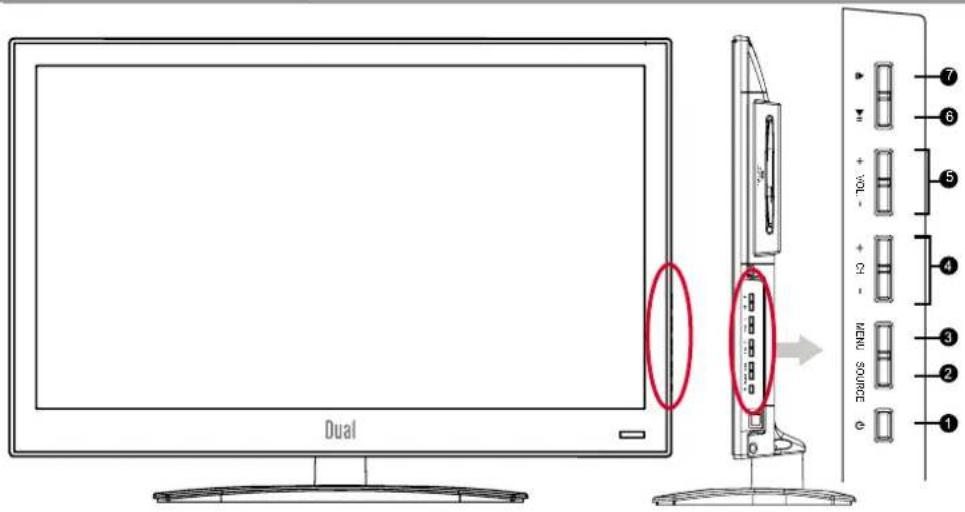
Front View
text_image
Dual 7 6 5 4 3 2 1 + - + - - 0.01 + - + - + - + - + - + - + - + - + - + - + - + - + - + - + - + - + - + - + - + - + - + - + - + - + - + - + - + - + - + - + - + - + - + - + - + - + - + - + - + - + - + - + - + - + - + - + - + - + - + - + - + -① Button
⑤ VOL.+/VOL.- Button
② SOURCE Button
⑥ ▶11 Button
③ MENU Button
7 ▲ Button
④ CH.+/CH.- Button
Accessories
* The configuration of the components may look different from the following illustration.
LED TV
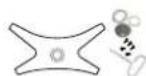
Bottom Stand/Screw
Driver and 5 Screws
User's Manual
Battery 1.5V(AAA x2)
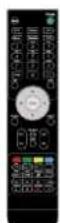
Remote Control

Quick Start Guide
Names of each part
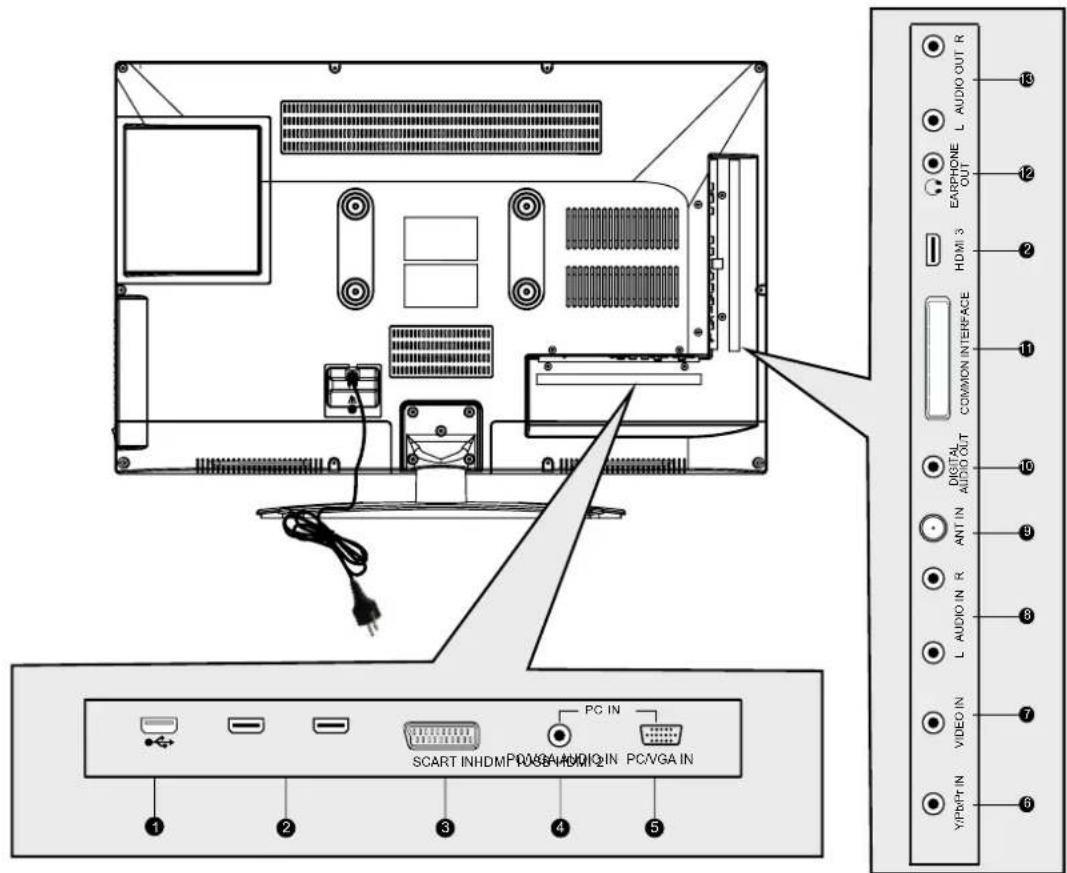
text_image
Diagram of a computer monitor rear panel with labeled ports and connectors, including PC, audio, and audio interface labels.① USB
⑥ Y/Pb/Pr jack
1 COMMON INTERFACE jack
② HDMI jack
? VIDEO IN jack
② EARPHONE OUT jack
③ SCART IN jack
⑧ AUDIO (L/R)IN jack
13 AUDIO (L/R) OUT jack
4 PC/VGA AUDIO IN jack
⑨ ANT IN jack
⑤ PC/VGA IN jack
ID DIGITAL AUDIO OUT jack
Installation the TV Stand
text_image
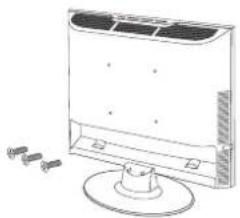
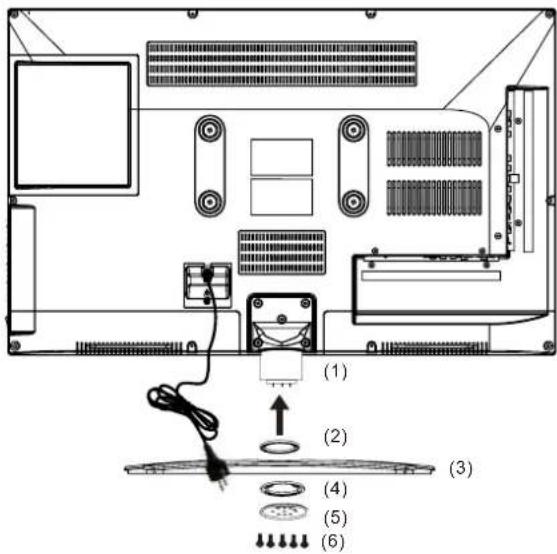
(1) (2) (3) (4) (5) (6)Place the TV face down on a protective surface. Insert the neck (1) onto the plastic ring (2) and position it onto the bottom stand (3).
Attach the further plastic ring (4) and the round metal plate (5) and secure all parts together by inserting the screws (6) and tightening them with the screwdriver provided.
Note: Attaching the stand requires two people.
Installation Precautions
Wall Mounting
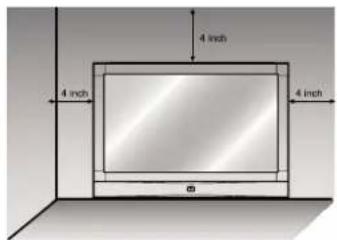
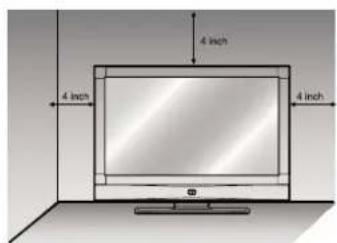
- Please secure enough space for safe use. (Please refer to A and B.)
- Installation of the LED TV in an improperly ventilated location can cause a fire or damage to the LED TV due to increased temperature.
text_image
4 inch 4 inch 4 inch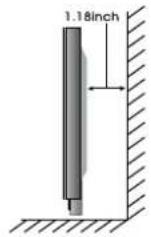
* Contact your dealer to purchase the "Adjustable-angle wall mount" required for wall-mounted installation.
TV Stand
- Do not install on an unstable location with support area smaller than the LED TV.
- Please refer to the desktop stand user's manual for details of installation.
text_image
4 inch 4 inch 4 inch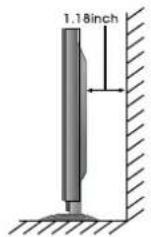
POWER INPUT Connections
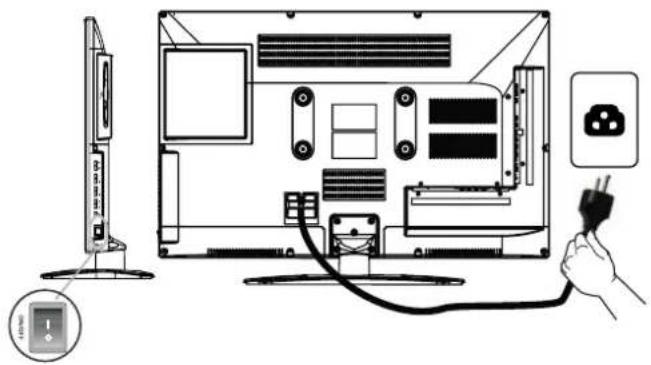
- Connecting to POWER INPUT
Connect the plug at the end of the power cord to the mains supply.
Turn on the ON/OFF switch, located on the right side of the TV (see diagram).
The LED lights up to indicate that the unit is in standby mode.
text_image
Diagram showing computer setup with monitor, cable, and plug, including a warning icon and power plug symbolInstalling an Antenna
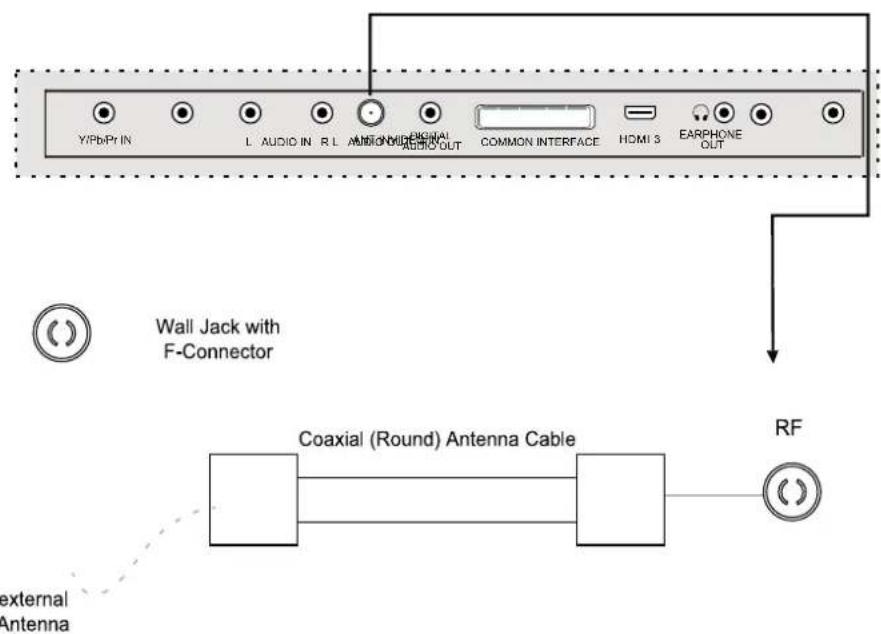
- For connecting to PAL broadcast
text_image
Y/Pb/Pr IN L AUDIO IN R L AUDIO AUDIO AUDIO OUT COMMON INTERFACE HOMI S EARPHONE OUT Wall Jack with F-Connector Coaxial (Round) Antenna Cable RF external AntennaPress SOURCE button to select ATV or DTV mode, then press OK.
Remote Control
- Functions of remote control buttons
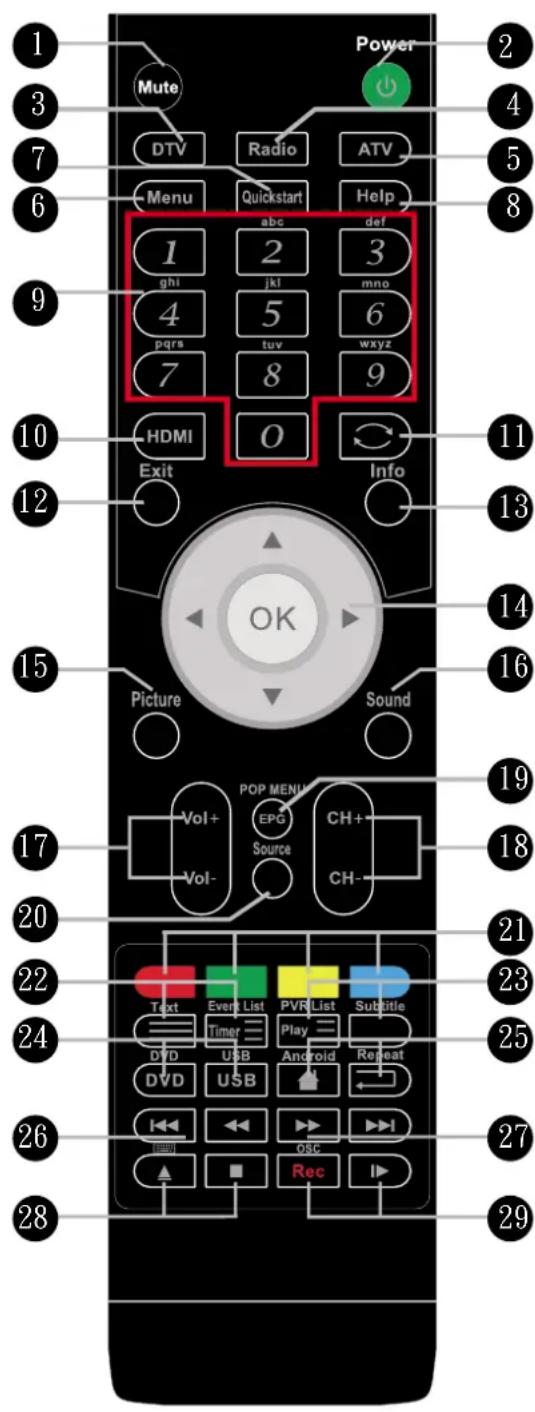
The remote control is using Infra-Red(IR). Point it towards the front of the LED TV. The remote control may not work correctly if it is operated out of range or out of angle.
text_image
1 3 7 6 9 10 12 15 Picture OK Power Mute DTV Radio ATV Menu Quickstart Help 1 ghi 2 jkl def 3 4 pqrs 5 tuv mno 6 7 8 wxyz 9 HDMI O Info 11 13 14 16 17 Pop MENU Vol+ EPG Source CH+ CH- 20 21 22 23 24 Text Event List PVR List Subtitle Timer Play USB Android Repeat DVD USB ASC Rec 25 26 27 28*Dependant on Model
| 1 Mute - Mute sound | |
| 2 | Turn on or standby |
| 3 DTV - Switch to freeview digital | |
| 4 Radio - Switch between TV and Radio | |
| 5 ATV - Switch to Analog TV | |
| 6 Menu - Display the OSD menu on the screen. | |
| 7 Quickstart - Searches all ATV and DTV channels | |
| 8 Help - This displays a page that gives telephone numbers for service. Press to enter, press again to exit. | |
| 9 0-9 - Select and switch to a channel using 0-9. | |
| 10 HDMI - Select the HDMI mode directly. | |
| 11 - Back to last channel. | |
| 12 Exit - Exit from any menu. | |
| 13 | Info key-In DTV mode-shows now/next. 2^nd press Extended program info.Whilst Recording Shows detail of recording and space available on the Card.TXT Mode_Index function |
| 14 | Thumb stick (▲▼▶◀/OK)- Allows you to navigate the on-screen menus and adjust the system settings to your preference. |
| 15 | Picture - Picture / Aspect key. |
| 16 | Sound - Sound / Nicam key. |
| 17 | VOL.+/- - Increase and decrease the volume. |
| 18 | CH.+/- - Increase and decrease the channel number. |
| 19 | POP MENU - POP MENU IN BLU-RAY DVD .*EPG - Press to enter the EPG, and press again to exit. |
| 20 | Source - Available input source selection |
| 21 | |
| 22 | Text / MHEG5 - You can not record this . |
| Timer - Show the Schedule list. ( DVD mode ) | |
| 23 | PVR List - Display List of recorded programmes.( DVD mode ) |
| Subtitle - DVD and DTV mode only. | |
| 24 | DVD - Switch to DVD mode DVD menu in DVD mode. |
| USB - Switch to USB mode. | |
| 25 | Android - Switch to Android homepage in Android mode. |
| Repeat - Select the repeat mode. | |
| 26 | ◀ - Prev Track, File, Day.(Media, PVR,EPG) |
| ▶ - Next Track, File, Day. (Media, PVR,EPG) | |
| 27 | ◀◀ - Use◀/▶buttons to reverse playback rapidly. (Media and DVD mode) |
| 28 | ▲ - Press▲button to open and close the disc tray. ( DVD mode ) |
| ■ - Press the button to stop playback. (Media mode and DVD mode) | |
| 29 | OSC - Shows the OSC menu in blu-ray DVD.*REC - Start recording. |
| Pause/ Play - PVR & Multimedia | |
Precautions
Avoiding Remote Control Problems
- Check the polarity (+,-) of the batteries in the remote control.
- Check that the batteries have power.
- Check that the LED TV is powered and that it is properly plugged in.
- Check if any three-wavelength lamp, special fluorescent or neon sign is turned on near the LED TV.
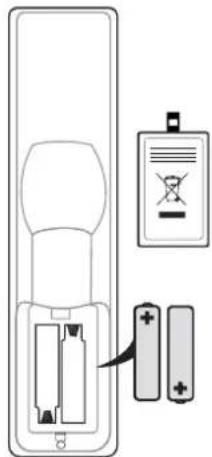
Inserting Batteries in the Remote Control
- Press and lift the back cover to open the battery compartment of the remote control.
- Insert two 1.5V AAA size batteries. Make sure to match the (+) and (-) ends of the batteries with the (+) and (-) ends indicated in the battery compartment.
- Close the battery compartment cover.
natural_image
Diagram of a remote control panel with battery and two batteries, showing no text or symbols
CAUTION: Risk of explosion if battery is replaced by an incorrect type.
Dispose of used batteries according to the national code (Recycling programmes).
How to Use the remote control
- The remote control should be operated within 30 feet (7m) and 30^ to the left and the right of the IR receiver at the front of the LED TV.
• Used batteries should be disposed properly.
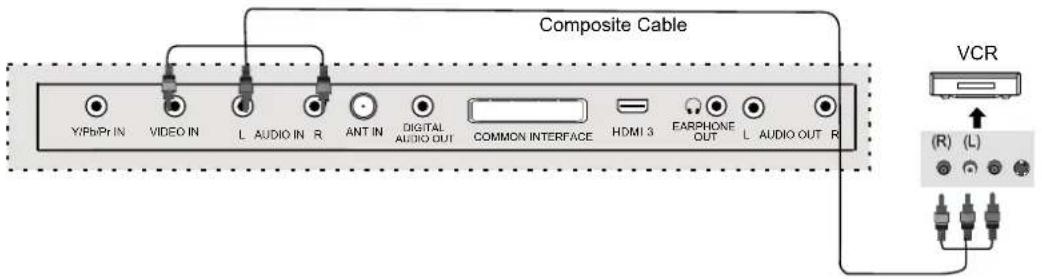
VCR Connections
- Connecting to the Composite terminal
* Connection terminals of other equipments differ by manufacturer and model.
text_image
Composite Cable YiPbPr IN VIDEO IN L AUDIO IN R ANT IN DIGITAL AUDIO OUT COMMON INTERFACE HDMI 3 EARPHONE OUT L AUDIO OUT R VCR (R) (L)- Connect the LED TV's Composite In terminal to the VCR's Composite Out terminal using the Composite cable. (Make sure the color of the terminals and the color of the cable are the same)
- Connecting to the SCART terminal
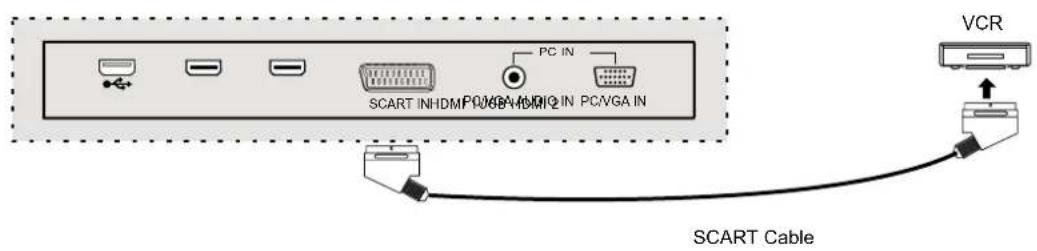
text_image
SCART INHDM PC/VGA IN PC/VGA IN PC IN VCR SCART CableWatching Video Tape
- Turn on the LED TV and press SOURCE button on the remote control.
- Use ▼ / ▲ buttons to select AV. If SCART has been connected, select "SCART"
- Turn on the VCR, insert the tape and press ▶ (Play) button.
Satellite/ TV Set-Top Box Connections
- Connecting to the Composite terminal
* In order to watch Cable TV, subscribe to your local Cable TV company and install a separate receiver(Set-Top-Box)
* Connection terminals of other equipments differ by manufacturer and model.
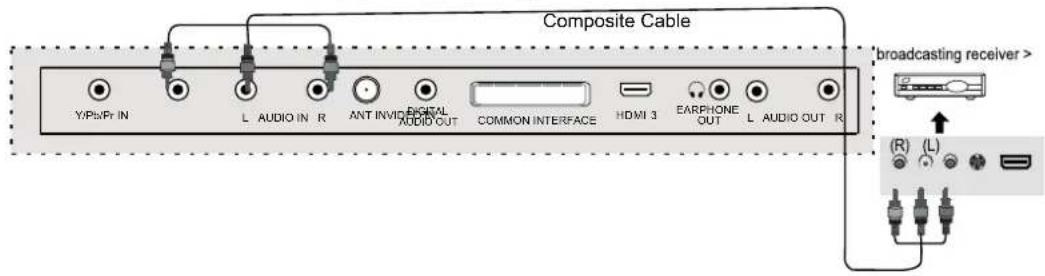
text_image
Composite Cable Y/Ps/Pr IN L AUDIO IN R ANT INVIC DIGITAL AUDIO OUT COMMON INTERFACE HDMI 3 EARPHONE OUT L AUDIO OUT R broadcasting receiver > (R) (L)Connect the LED TV's Composite In terminal to the cable broadcasting receiver Composite Out terminal using the Composite cable. (Make sure the color of the terminals and the color of cable are the same)
- Connecting to the HDMI terminal
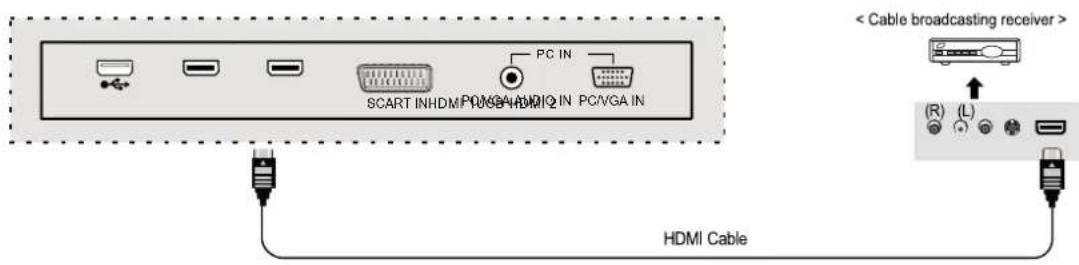
text_image
PC IN SCART INHDM PC/VGA HDM12 PC/VGA IN < Cable broadcasting receiver > (H) (L) HDMI CableWatching TV
- Turn on the LED TV and press SOURCE button on the remote control.
- Use ▼ / ▲ buttons to select AV. If HDMI has been connected, select "HDMI"
- Turn on the broadcasting receiver and select the channel you wish to view.
DVD Connections
- Connecting to the component terminal
* Connection terminals of other equipments differ by manufacturer and model.
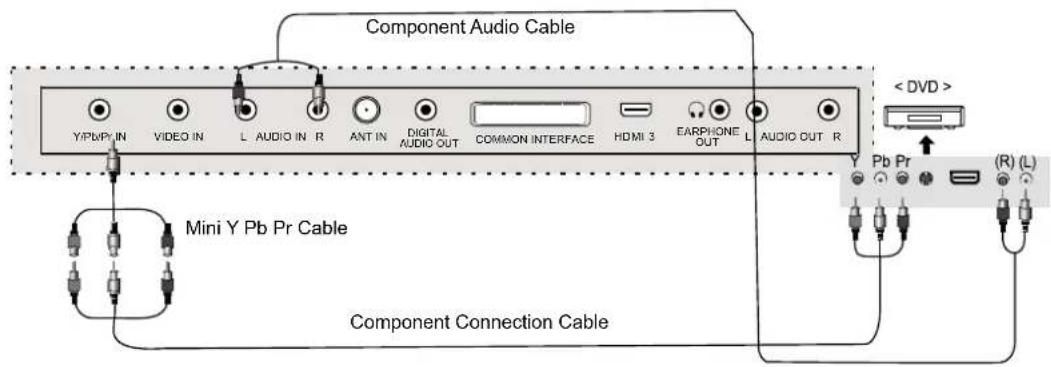
text_image
Component Audio Cable Y/PbPr IN VIDEO IN L AUDIO IN R ANT IN DIGITAL COMMUN INTERFACE HDMI 3 EARPHONE L AUDIO OUT R < DVD > Mini Y Pb Pr Cable Component Connection Cable Y Pb Pr (R) (L)- Connect LED TV's Y, Pb, Pr Terminal to DVD's Video Out terminal using the external cable.
- Connect LED TV's Audio terminals (left & right) in AV to DVD's Audio Out terminal using the Audio cable.
- It must match the component connection cable Y, Pb, Pr between the LED TV and DVD Player.
- Connecting to the HDMI terminal
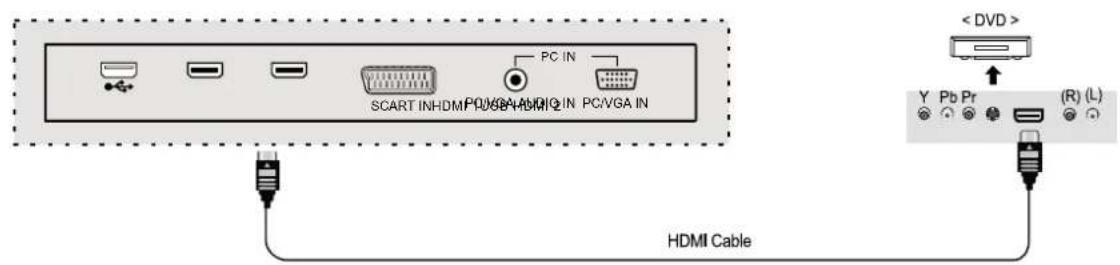
text_image
SCART IN-HDMI PC/VGA+HDMI2 PC/VGA IN PC IN HDMI Cable < DVD > Y Pb Pr (R) (L)Playing the DVD
- Turn on the LED TV and press SOURCE button on the remote control.
- Use ▼ / ▲ buttons to select "YPbPr". If HDMI has been connected, select "HDMI"
- Turn on the DVD, insert the DVD disc and press ▶ (Play) button.
PC Connections
* Connection terminals of other equipments differ by manufacturer and model.
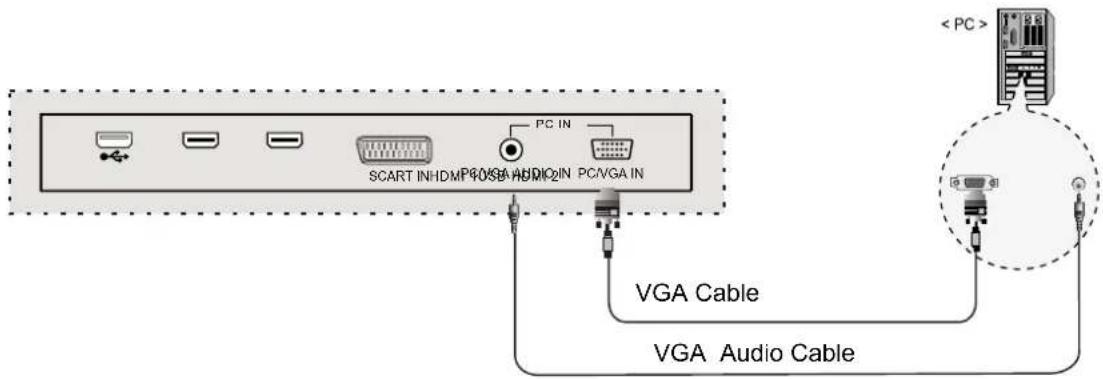
text_image
SCART INHDM VGA AUDIO2IN PC/VGA IN PC IN VGA Cable VGA Audio Cable < PC >- Connect LED TV's PC Input terminal to PC's VGA terminal using the VGA cable.
- Connect LED TV's PC Audio terminal to PC's Audio terminal using the Audio cable. (Only for PC's with Audio terminal)
EARPHONE Connections
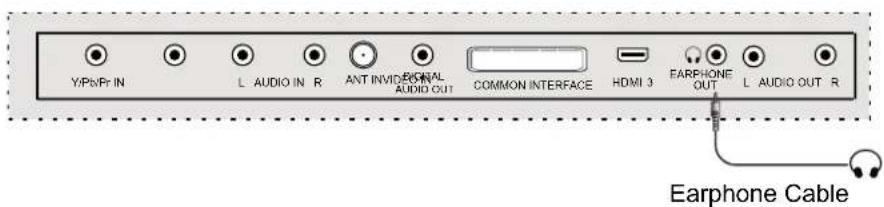
text_image
Y/Pb/Pr IN L AUDIO IN R ANT INVOCIAL AUDIO OUT COMMON INTERFACE HDMI 3 EARPHONE OUT L AUDIO OUT R Earphone CableHow to Use as PC monitor
- Turn on the LED TV and press SOURCE button on the remote control.
- Use ▼ / ▲ buttons to select "PC"
USB Connections
- Connecting to the USB
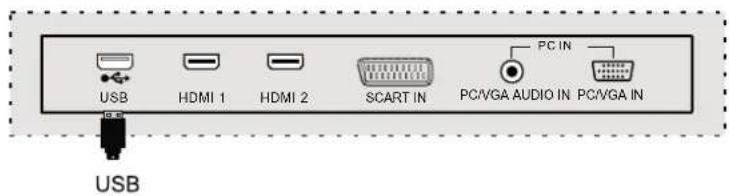
text_image
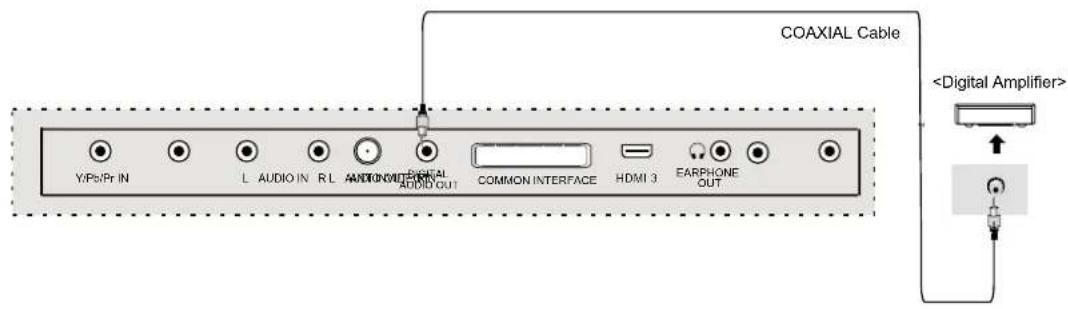
USB HDMI 1 HDMI 2 SCART IN PC/VA AUDIO IN PC/VA IN USBDigital Amplifier Connections
- Connecting to the Digital Amplifier
* Connection terminals of other equipments differ by manufacturer and model.
text_image
COAXIAL Cable Y/Ps/Pr IN L AUDIO IN R L AUDIO INTERNAL AUDIO OUT COMMON INTERFACE HDMI 3 EARPHONE OUTAudio Receiver Connections
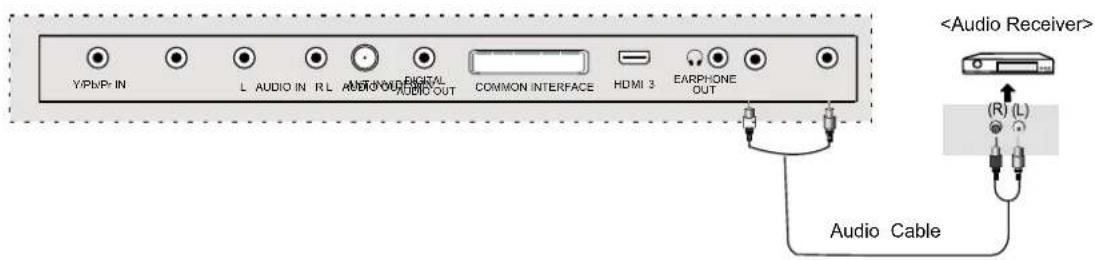
- Connecting to the Audio Receiver
* Connection terminals of other equipments differ by manufacturer and model.
text_image
Y/PnP+ IN L AUDIO IN R.L AUDIO OUT AUDIO OUT COMMON INTERFACE HDMI 3 EARPHONE OUT- Use an audio cable to connect the LED TV's AUDIO OUT jacks to audio receiver's audio LINE IN.
Selecting Input Source
- You can select between the TV signal and the input signal of other equipments connected to the TV.
-
Use this function to switch to the input source you wish to view.
-
Press SOURCE button on the remote control.
- Use ▼ / ▲ buttons to move to the desired input source.
- Press OK button to select.
| Input Source |
| DTV |
| ATV |
| SCART |
| YPBPR |
| DVD |
| PC |
| HDMI 1 |
| HDMI 2 |
| HDMI 3 |
| AV |
| USB |
Basic Operation
Select DTV or ATV for example. (Press SOURCE button to select DTV or ATV mode)
- Press the ⏻ button to turn the LED TV on.
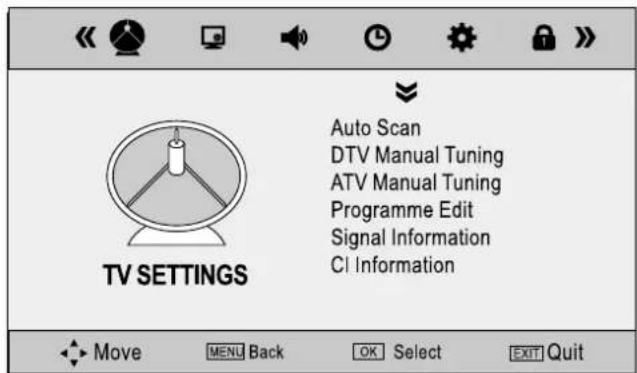
- Press MENU button to display the main menu, and press the ◀▶ button to select TV SETTINGS in the main menu, it will highlight the first option.
text_image
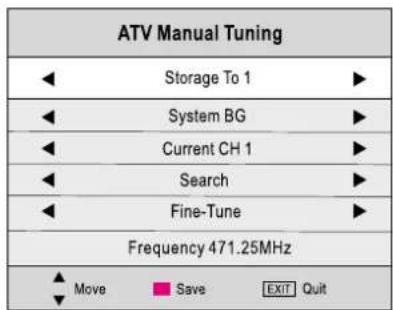
TV SETTINGS Auto Scan DTV Manual Tuning ATV Manual Tuning Programme Edit Signal Information CI Information Move MENU Back OK Select EXIT Quit- Press the ▼ button to select Auto Scan and press the OK button to start auto search, and use the ◀▶ buttons to select the country in which you will operate the TV (You need to select your current aerial if you wish to receive - all channels reliably). The Auto Scan automatically creates a list of receivable channels. Press the EXIT button at any time to interrupt the memorization process (The list cannot be created if interrupted)
text_image
ATV Manual Tuning ◀ Storage To 1 ▶ ◀ System BG ▶ ◀ Current CH 1 ▶ ◀ Search ▶ ◀ Fine-Tune ▶ Frequency 471.25MHz ▲ Move □ Save EXIT Quit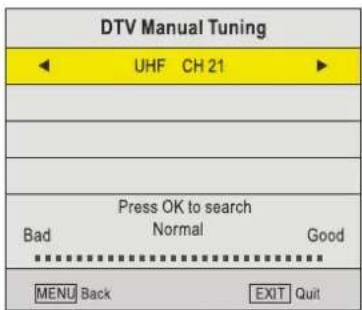
text_image
DTV Manual Tuning ◀ UHF CH 21 ▶ Press OK to search Bad Normal Good MENU Back EXIT Quit- Press the ⬆ button on the unit or on the remote control to switch on the TV. The power indicator will light up in green color. Press the ⬆ button again to switch to standby mode, the indicator will change to red.
- Press the VOL.- or VOL.+ button to adjust the volume level. Press the VOL.- button repeatedly to decrease the volume; press the VOL.+ button repeatedly to increase the volume from 0 to 100.
Operating the MENU
- Press the button to turn the LED TV on.
- Press the MENU button on the remote control, the on-screen menu will appear on the screen.
- Use ◀ / ▶ buttons to select your main menu option.
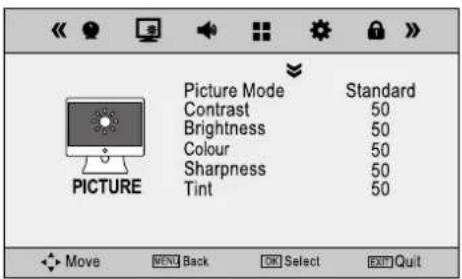
PICTURE MENU:
Allow you to set up a variety of picture options.
SOUND MENU:
Allow you to customize the sound options and effects.
text_image
Picture Mode Contrast Brightness Colour Sharpness Tint Standard 50 50 50 50 50 Move VENT Back OK Select EXIT Quit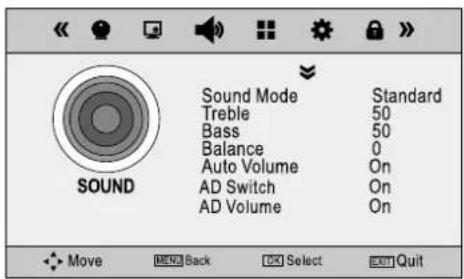
text_image
Sound Mode Treble Bass Balance Auto Volume AD Switch AD Volume Standard 50 50 0 On On On Move MENU Back OK Select EXIT QuitTIME MENU:
Allow you to set up a variety of time options.
OPTIONS MENU:
Allow you to set up a variety of OPTIONS options
text_image
Sleep Timer Auto Standby Start Recording Schedule List Recorded List Timer Record Off On EXTRAS Move MENU Back OK Select EXIT Quit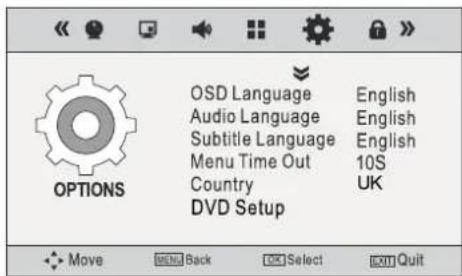
text_image
OPTIONS OSD Language Audio Language Subtitle Language Menu Time Out Country DVD Setup English English English 10S UK Move Back Select Exit QuitLOCK MENU:
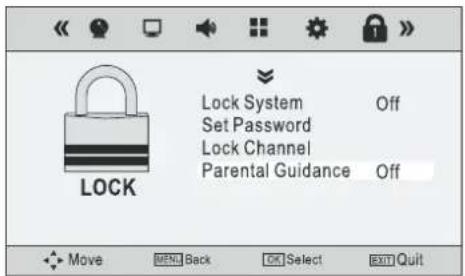
Allow you to set up a variety of lock options.
PC Setup MENU:
Allow you to set up a variety of PC Setup options. (Only for VGA mode)
text_image
Lock System Set Password Lock Channel Parental Guidance Off Move MEN Back OK Select EXIT Quit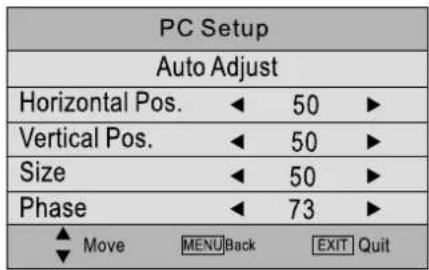
text_image
PC Setup Auto Adjust Horizontal Pos. ◀ 50 ▶ Vertical Pos. ◀ 50 ▶ Size ◀ 50 ▶ Phase ◀ 73 ▶ ▲ Move MENU Back EXIT Quit- Use the ▼ / ▲ buttons to select an option of the sub-menu, and press the ▶ button.
While in adjustment mode, use the ◀ / ▶ to change the value of the item.
- Press the MENU button to exit the menu.
Note:
Only when you input the suitable signal, the relevant items can be activated.
Customizing the TV SETTINGS Settings
Select DTV or ATV for example. (Press SOURCE button to select DTV or ATV mode)
- Press the ⏻ button to turn the LED TV on.
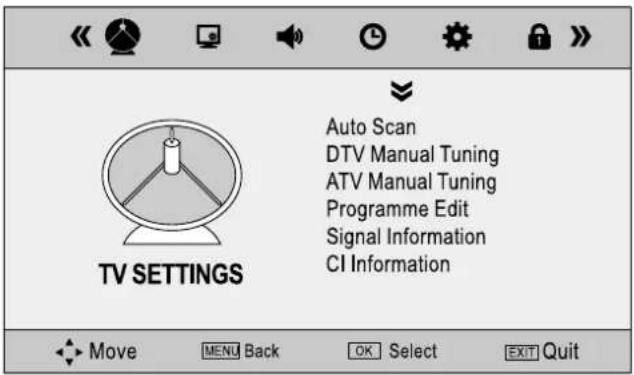
- Press the MENU button on the remote control to display the Main menu, and use the ◀ / ▶ buttons to select the TV SETTINGS.
- Use ▼ / ▲ buttons to highlight an individual TV SETTINGS option, use ◀ / ▶ buttons to change the setting, and press the MENU button to exit.
text_image
Auto Scan DTV Manual Tuning ATV Manual Tuning Programme Edit Signal Information CI Information TV SETTINGS Move MENU Back OK Select EXIT QuitThe TV SETTINGS menu includes the following options :
Auto Scan
Press the OK button, the Auto Scan automatically creates a list of channels.
DTV Manual Tuning Allow adjustment for the fine tune level by hand if signal is too weak or picture is blurry in DTV mode.
ATV Manual Tuning Allow adjustment for the fine tune level by hand if signal is too weak or picture is blurry in ATV mode.
Programme Edit Allow DELETE/SKIP/RENAME/MOVE of channels on the channel list.
Signal Information Press ▼/▲ button to select Signal Information, then press OK button to display signal details, including Channel, Quality and Strength.(Only for DTV)
CI Information Press ▼/▲ button to select CI Information, then press OK button to display details after you have inserted the CI card. (Only for DTV)
Software Update(USB) Allows you to update software using USB.
Customizing the TV SETTINGS Settings

text_image
Programme Edit CH. Name Skip LOCKED Type 811 Rai HD 8 DIV 812 Rai HD 9 DIV 813 Rai HD 10 DIV Move OK Select ONV Back Delete Skip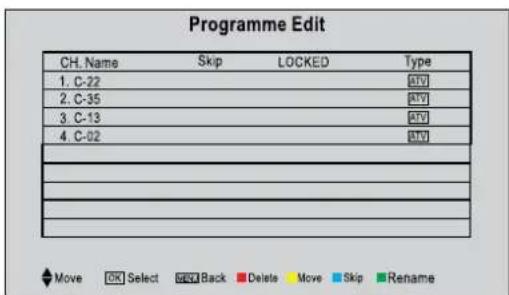
text_image
Programme Edit CH. Name Skip LOCKED Type 1. C-22 2. C-35 3. C-13 4. C-02 Move OK Select OK Back Delete Move Skip RenameInput source for the DTV Input source for the ATV
- Delete (red button)
Press the red button on the remote control with the selected channel, then press it again if you wish to delete it. To retrieve the deleted channel you must return the TV.
- Rename (green button)
Press the green button on the remote control with the selected channel, change the characters by pressing the ▲▼ buttons and move the cursor by ◀▶ buttons. Press the green button again when finished. (Only for ATV) NOTE: Only analogue TV channel names can be edited.
- Move (yellow button)
Press the yellow button on the remote control with the selected channel, move the channel by pressing the ▲▼ buttons then press the yellow button again. (Only for ATV)
- Skip (blue button)
Press the blue button on the remote control with the highlighted channel; press again to un-skip.
Customizing the PICTURE Settings
Select DTV or ATV for example. (Press SOURCE button to select DTV or ATV mode)
- Press the ⏻ button to turn the LED TV on.
- Press the MENU button on the remote control to display the Main menu, and use the ◀ / ▶ buttons to select the PICTURE.
- Use ▼ / ▲ buttons to highlight an individual PICTURE option, use ◀ / ▶ buttons to change the setting, and press the MENU button to exit.
text_image
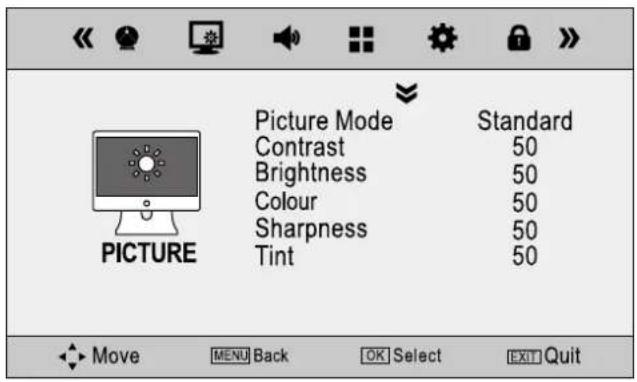
Picture Mode Contrast Brightness Colour Sharpness Tint Standard 50 50 50 50 50 PICTURE Move MENU Back OK Select EXIT QuitThe PICTURE menu includes the following options :
| Picture Mode Cycle among display types: Standard, Mild, User and Dynamic,.User: Allow to store your preferred settings. If you select the User mode,you can individually set the items shown. | |
| Contrast | Control the difference between the brightest and darkest regions of the picture. |
| Brightness | Control the overall brightness of the picture. |
| Colour | Control the colour. |
| Sharpness | Increase this setting to see crisp edges in the picture; decrease it for soft edges |
| Tint( Only for NTSC ) | Control the difference between the green and red regions of the picture. |
| Colour Temperature | Cycle among colour temperature display modes: User / Cool / Medium / Warm. |
| Aspect Ratio | Allows to select the option of Aspect Ratio: 4:3, 16:9, Zoom1, Zoom2, Panorama |
| Aspect Ratio | Allows to select the option of Aspect Ratio: 4:3, 16:9, Zoom1, Zoom2, Panorama |
| Noise Reduction | Select to reduce the noise level of connected equipment: Low/Middle/High /Off |
Customizing the SOUND Settings
Select DTV or ATV for example. (Press SOURCE button to select DTV or ATV mode)
- Press the ⏻ button to turn the LED TV on.
- Press the MENU button on the remote control to display the Main menu, and use ▶ / ▶ buttons to select the SOUND
- Use ▼ / ▲ buttons to highlight an individual SOUND option, use ◀ / ▶ buttons to change the setting, and press the MENU button to exit.
text_image
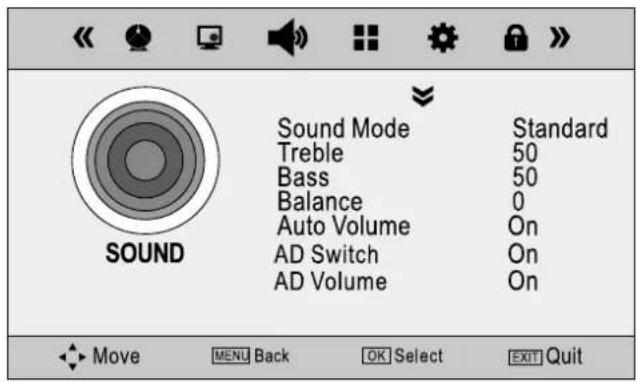
Sound Mode Treble Bass Balance Auto Volume AD Switch AD Volume Standard 50 50 0 On On On Move MENU Back OK Select EXIT QuitThe SOUND menu includes the following options :
| Sound Mode | Allow you to select among:Standard / Music / Movie / Sports / User |
| Treble | Control the relative intensity of higher pitched sounds. |
| Bass | Control the relative intensity of lower pitched sounds. |
| Balance | Adjusts the relative volume of the speakers in a multiple speaker system. |
| Auto Volume lowering the sound output when the modulation signal is high or by raising the sound output when the modulation signal is low. | |
| AD Switch | Set to “Off” for normal broadcasting sound coming out from speakers. Set to “On” to activate the description sound track if available. The availability of Audio Description sound track is indicated by visually impaired icon “V.I” in the information banner. |
| AD Volume | Once the AD Switch is set to ON the AD commentary Volume can be adjusted using the AD Volume option. (for DTV mode) |
Customizing the EXTRAS Settings
Select DTV or ATV for example. (Press SOURCE button to select DTV or ATV mode)
- Press the ⏻ button to turn the LED TV on.
- Press the MENU button on the remote control to display the Main menu, and use ◀ / ▶ buttons to select the EXTRAS.
- Use ▼ / ▲ buttons to highlight an individual EXTRAS option, use ◀ / ▶ buttons to change the setting, and press the MENU button to exit.
text_image
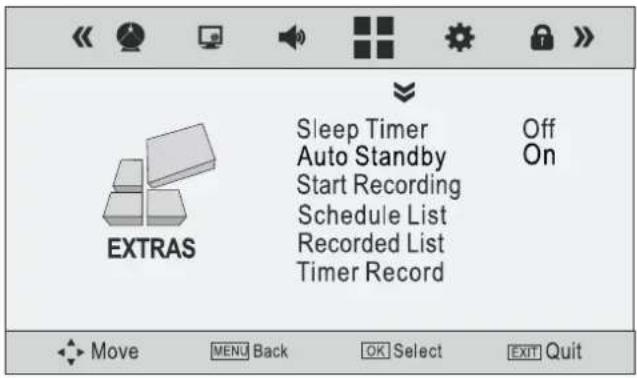
Sleep Timer Auto Standby Start Recording Schedule List Recorded List Timer Record Off On EXTRAS Move MENU Back OK Select EXIT QuitThe EXTRAS menu includes the following options :
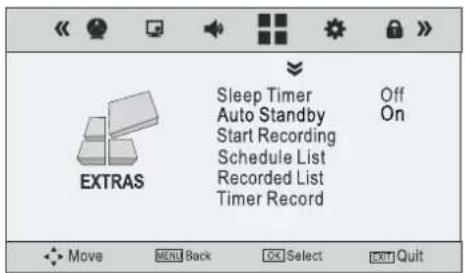
Sleep Timer Use ◀▶ buttons to select a period of time after which the TV automatically switches to standby mode: Off, 10, 20, 30, 60, 90, 120, 180, 240 (minutes)
Auto Standby Select on, the TV will be automatically turned off, in case of no signal in TV & input source or no remote control input. (Only for DTV)
Start Recording Press OK button to enter the recording menu and start record. Press ■ button on the remote control or select Stop to stop record. (Only for DTV)
Schedule List Press OK button to display the schedult list menu. Delete any scheduled recording s by pressing the RED button. (Only for DTV)
Recorded List Press OK button to enter the record list menu. Press red button to delete any program. Press Info button to display program information. (Only for DTV)
Timer Record The TV will record the programme automatically according to your settings. Press OK button to enter the timer record. (Only for DTV)
PVR File System Allows to display the PVR File System menu.
PC Setup Allows you to setting the PC Picture positions. (Only for VGA)
Customizing the OPTIONS Settings
Select DTV or ATV for example. (Press SOURCE button to select DTV or ATV mode)
- Press the ⏻ button to turn the LED TV on.
- Press the MENU button on the remote control to display the Main menu, and use ◀ / ▶ buttons to select the OPTIONS.
- Use ▼ / ▲ buttons to highlight an individual OPTIONS option, use ◀ / ▶ buttons to change the setting, and press the MENU button to exit.
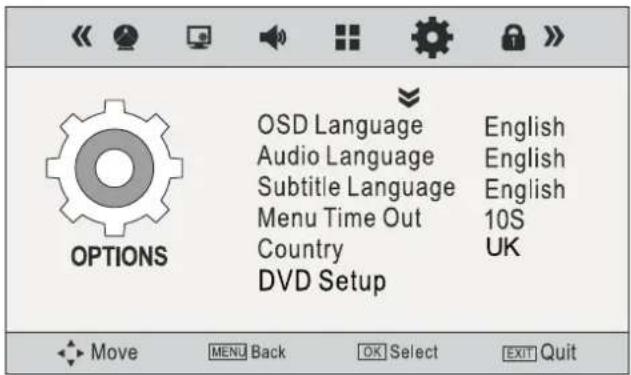
text_image
OPTIONS OSD Language English Audio Language English Subtitle Language English Menu Time Out 10S Country UK DVD Setup Move MENU Back OK Select EXIT QuitThe OPTIONS menu includes the following options :
| OSD Language The default language is Dutch. You can select other OSD languages: English / French / German / Italian / Spanish / Portuguese | Dutch / | |
| Audio Language | Allows to select the audio language. | |
| Subtile Language | Allows to display subtitle on the screen. | |
| Menu Time Out | Allows to set the menu display time on screen. | |
| Country | Select the country where you will operate the TV. (this option can be changed by using the Auto Tune function.) The default country is Holland. | |
| DVD Setup | Allows you to restore the factory settings. | |
| Restore Setting | Allows you to restore the factory settings. | |
Customizing the LOCK Settings
Select DTV or ATV for example. (Press SOURCE button to select DTV or ATV mode)
- Press the ⏻ button to turn the LED TV on.
- Press the MENU button on the remote control to display the Main menu, and use ◀ / ▶ buttons to select the LOCK.
- Use ▼ / ▲ buttons to highlight an individual LOCK option, use ◀ / ▶ buttons to change the setting, and press the MENU button to exit.
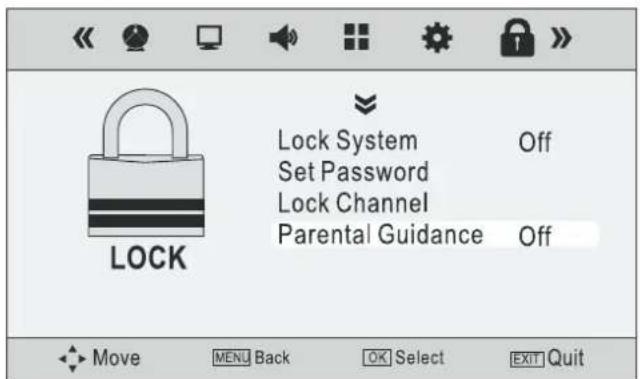
text_image
Lock System Set Password Lock Channel Parental Guidance OFF OFF Move MENU Back OK Select EXIT QuitThe LOCK menu includes the following options :
Lock System Press ▼/▲ button to select Lock System, then press OK button to make the following 3 options valid (Default password is '0000').
Set Password Press ▼/▲ button to select Set Password, then press OK button to enter sub-menu to set new password.
Lock Channel Lock Channel is designed to prevent children watching unsuitable programmes.
Parental Guidance Press ▼/▲ button to select Parental Guidance, then press OK. Enter sub-menu to select viewing settings, available options are: Off, 4-18.
Note: 1. Default password is '0000' 2. If you change the password, besure to remember the new password! If you forget the new password, press the master password "8899".
Customizing the SCREEN Settings
Press SOURCE button to select VGA mode
- Press the ⏻ button to turn the LED TV on.
- Press the MENU button on the remote control to display the Main menu, and use ◀ / ▶ buttons to select the PC Setup.
- Use ▼ / ▲ buttons to highlight an individual PC Setup option, use ◀ / ▶ buttons to change the setting, and press the MENU button to exit.
| PC Setup | |||
| Auto Adjust | |||
| Horizontal Pos. | ◀ | 50 | ▶ |
| Vertical Pos. | ◀ | 50 | ▶ |
| Size | ◀ | 50 | ▶ |
| Phase | ◀ | 73 | ▶ |
| Move | MENUBack | EXIT Quit | |
The PC Setup menu includes the following options :
Auto Adjust Adjust screen settings automatically for optimized picture position.
Horizontal Pos. Allow you to adjust the Horizontal Position of the picture
Vertical Pos. Allow you to adjust the Vertical Position of the picture
Size Allows you to adjust display size of the picture.
Phase Allows you to improve focus clarity and image stability.
Position Reset Allows you to adjust Position Reset of the picture.
Press SOURCE button to select Media mode.
Press USB button on the remote control can enter Media mode directly.
- Press the button to turn the LED TV on.
- Press the SOURCE button on the remote control to display the Source menu, and use the ▼ / ▲ buttons to select the Media.
- Use ◀ / ▶ buttons to highlight an individual Media option. The Media Menu will appear on the screen. Press ◀ / ▶ button to select the option( PHOTO, MUSIC, MOIVIES, TEXT) that you want to active in the Media menu, then press OK button.
Note:
USB support: Photo (.jpeg / .bmp / .png), Music (.mp3 / .ZPD II.wav ),
Movie (.avi/.mpg/.dat/.vob/.mov/.mkv/mp4).
The USB supported formats depend on license availability.
The USB equipment supported formats: NTFS / FAT32 / FAT16 (Not supported NTFS format compressed files.)
- Press ▲/▼ button to select the folder that you want to view, then press OK button to select the sub folder. Press OK button to play, press the exit button to return back. Press OK button to select the up folder, and return to the previous level menu, press ◀ / ▶ buttons to turn pages.
- Press ▶ or II button to start playback or pause. Press ■ button to stop playback.
- Press ◀ button to play to the last item. Press ➞ button to play to the next item.
DVD Functions
Information Functions
Information display
An On Screen Display (OSD) indicator will be displayed at the upper part TV screen when certain functions are executed, or when pressing the OSD button on the remote control.
The OSD indicator is a user friendly interface designed to display the status of playback type. When a different disc is loaded (DVD, CD, Music ready); the OSD indicator bar will be different.
Support formats
DVD support DVD / CD-DA / JPEG formats.
DVD Player Functions
▲ (Close / Open)
Press ▲ button on the front panel or the remote to open and close the disc tray.
▶ II (Play / Pause)
Press to start playback or pause
■ (Stop)
Press ■ button to stop.
◀◀
Press to skip to the beginning of the currently played chapter or track.
▶▶
Press to skip to the beginning of the next chapter or track.
◀ / ▶
Use to advance or reverse playback rapidly.
DVD MEMU.
Press DVD. button to display the DVD disc menu.
SUBTITLE
While play a DVD disc, press SUBTITLE button repeatedly to select the desired subtitle.
Customizing General Setup Page Settings
Press MENU button on the remote control and select OPTIONS menu as below, then select DVD Setup Press the OK button to enter the DVD main menu as below.
- Use the ◀ / ▶ buttons to select General Setup page option.
- Use the ▼ / ▲ ◀ / ▶ buttons to highlight an individual General Setup page option.
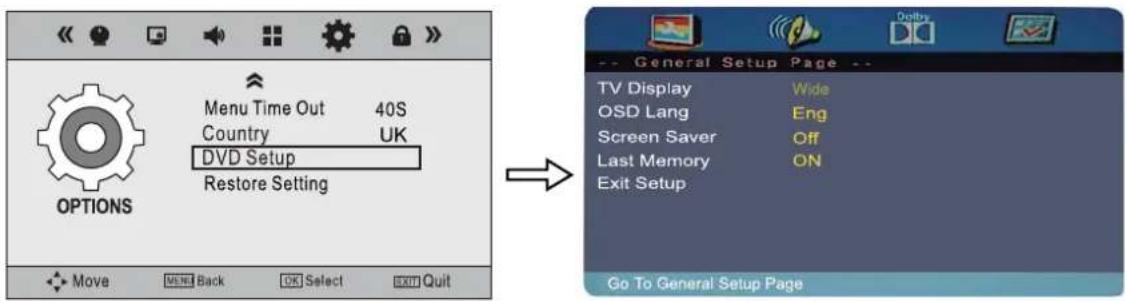
text_image
Menu Time Out 40S Country UK DVD Setup Restore Setting Move BACK OK Select EXIT Quit Go To General Setup Page General Setup Page -- TV Display Wide OSD Lang Eng Screen Saver Off Last Memory ON Exit Setup Go To General Setup PageThe General Setup Page Menu includes the following options :
TV Display 4:3 Pan Scan - Standard format
When viewing widescreen content in 4:3 PS mode, the on screen image will not be shown in full. Use this setting for standard format content.
4:3 Letter Box - Standard format
When viewing widescreen content in 4:3LB mode, the display will show black bars on the top and bottom of the screen. Use this setting for standard format content.
Wide - Widescreen picture viewing
Use this setting for viewing widescreen images.
OSD Lang The default language of the On Screen Display is Dutch. You can select other OSD languages: Dutch / English / French / German / Italian / Spanish / Portuguese
Screen Saver
ON: To activate the screen saver
OFF: To disable the screen saver
If the DVD player stops, or the screen is motionless for a period of time, the screen saver will appear to prevent damage to the LED screen.
Last Memory
ON: When the DVD player has been turned off and turned on again, the LAST function will resume playing of the content from the same point.
MEMORY function will resume playing of the content from the same point.
OFF: Disable the last memory function.
Exit Setup
Select Exit Setup to exit menu.
Customizing Speaker Setup Page Settings
Press MENU button on the remote control and select OPTIONS menu as below, then select DVD Setup Press the OK button to enter the DVD main menu as below.
- Use the ◀ / ▶ buttons to select Speaker Setup Page option.
- Use the ▼ / ▲ ◀ / ▶ buttons to highlight an individual Speaker Setup Page option.
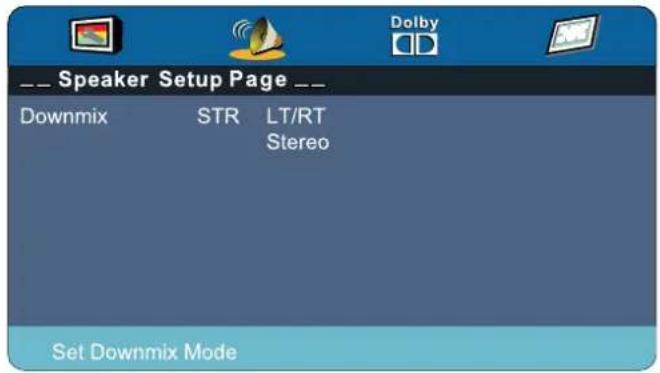
text_image
Speaker Setup Page -- Downmix STR LT/RT Stereo Set Downmix ModeThe Speaker Setup Page Page Menu includes the following options :
Downmix
LT/RT - A disc recorded multi channel soundtrack, the output signal will be left and right channel.
Stereo - A disc recorded multi channel soundtrack, the output signal will be incorporated to stereo.
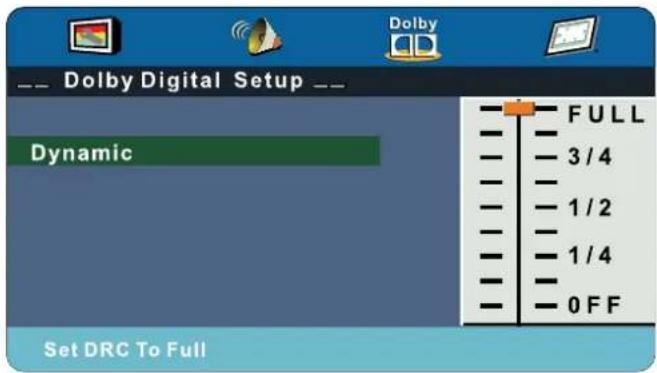
Customizing Dolby Digital Setup Settings
Press MENU button on the remote control and select OPTIONS menu as below, then select DVD Setup Press the OK button to enter the DVD main menu as below.
- Use the ◀ / ▶ buttons to select Dolby Digital Setup Page option.
- Use the ▼ / ▲ ◀ / ▶ buttons to highlight an individual Dolby Digital Setup option.
text_image
Dolby Digital Setup Dynamic Set DRC To FullThe Dolby Digital Setup Menu includes the following options :
Dynamic This option is used to set the compression ratio in order to control the sound (Volume) contrast.
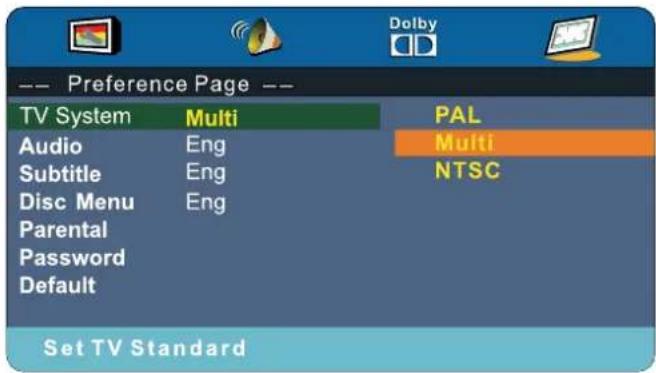
Customizing Preference Page Settings
Press MENU button on the remote control and select OPTIONS menu as below, then select DVD Setup Press the OK button to enter the DVD main menu as below.
-
Use the ◀ / ▶ buttons to select Dolby Digital Setup Page option.
-
Use the ▼ / ▲ ◀ / ▶ buttons to highlight an individual Dolby Digital Setup option.
text_image
-- Preference Page -- TV System Multi PAL Audio Eng Multi Subtitle Eng NTSC Disc Menu Eng Parental Password Default Set TV StandardThe Screen Setup Menu includes the following options :
TV System PAL
To be used when viewing PAL content. Multi
The player will set the TV system according to the disc in the tray. NTSC
To be used when viewing NTSC content.
Audio The following languages can be selected in the Audio option: Dutch / English / French / German / Italian / Spanish / Portuguese.
NOTE: Select this item, please exit DVD disc.
Subtitle The following languages are available in the Subtitle option: Dutch/English/French /German / Italian / Spanish / Portuguese.
NOTE: Not all DVD support multiple languages.
Select this item, please exit DVD disc.
Disc Menu Select the Disc Menu language: Dutch/English / French / German / Italian / Spanish / Portuguese.
NOTE: The default language is English.
Parental Allow the user to set a maximum rating of movie that can be played(e.g. PG rating). Movies rated higher than the level set will not be played. The parental lock can only be changed after input the correct password.
NOTE: This function is available only when the discs have rating encoded on.
Password The user can change the password that is required when the user wants to change the Age Control Guade in the Parental Lock function. NOTE: Default password is 123456.
Default To restore all setup parameters to the factory settings EXCEPT the password. This function available in stop state or when the tray is opened.
Trouble shooting
• . In case a problem occurs with your LED TV please refer to the list below for corrective action.
| Problem Action | |
| The screen does not appear. | Is the power plug pulled out? Insert the power plug.Press the ⏻ button of the remote control. |
| The screen appears too slowly after the power is turned on, | This problem occurs for a brief time in the process of image elimination processing in order to hide temporary screen noise that occurs when the power is turned on. But if the screen does not come after 1 minute please contact your dealer or an authorized service center. |
| Screen is too bright or too dark. Make adjustment for brightness or contrast. | |
| Screen is too large or too small. Adjust the screen size. | |
| Stripes appear on the screen and it shakes. | Stop using wireless telephones, hair driers and electric drills. |
| The screen does not move. | Press the PAUSE button. Check if the Pause button is pressed on external equipment. |
| Screen appears, Voice is not heard | 1. Press the “MUTE” button.2. Increase the sound level by pressing volume adjustment button.3. Check if sound terminal of external input is connected properly.4. Check if audio cables are connected properly.5. Select and check the other input.If the sound still does not work and the other channels are the same after you have done as the above, contact your dealer or an authorized service center. |
| Remote control does not work | 1. Check if main power is On.2. Check that the batteries of the remote controller were loaded properly.3. Check to see if any obstacle exists between the LED TV and the remote control, then remove it, if any.4. If the batteries have no power, replace them with two new batteries. |
Specifications
| Panel | Panel Size 32" TFT LED | |
| Brightness 300 cd/m | 2 | |
| Contrast Ratio 1000:1 | ||
| Viewing Angle 170°/160° | ||
| Max. Resolution 1360 x 768 | ||
| Input Connector | VIDEO/AUDIO (L/R) 1 | |
| SCART 1 | ||
| YPbPr(Component) 1 | ||
| PC VGA/PC VGA AUDIO IN 1 | ||
| HDMI 3 | ||
| ANT IN 1 | ||
| USB 1 | ||
| Output Connector | COMMON INTERFACE(CI) 1 | |
| DIGITAL AUDIO OUT | 1 | |
| Power Source | AC100-240V~, 50/60Hz, 2.5A | |
| Power Consumption | 57 W | |
| Dimension | 762.6(L) x 231.6(W) x 533.5(H) mm | |
| Weight (Net) | 10 Kg | |
- Specifications are subject to change without prior notice
Energy Label

ENERG
енергия · ενεργεια

Dual
3270-LED
A
B
C
D
E
F
G
ENERGIA · ЕНЕРГИЯ
ENEPΓEIA · ENERGIJA
ENERGY · ENERGIE
ENERGI

57
Watt

83
kWh/annum
81
cm
32
inch
2010/1062 - 2011
NOTICE ABOUT RECYCLING
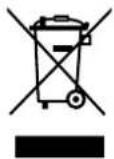
Your product is designed and manufactured with high quality materials and components which can be recycled and reused.
This symbol means that electrical and electronic equipment, at their end-of-life, should be disposed of separately from your household waste. Please dispose of this equipment at your local community waste collection/ recycling centre.
In the European Union there are separate collection systems for used electrical and electronic products. Please help us to conserve the environment we live in!
NOTICE ABOUT ROHS

This symbol means that in electrical and electronic equipment, restriction the use of certain harmful substances.