
21ST2731 - Fernseher PHILIPS - Kostenlose Bedienungsanleitung
Finden Sie kostenlos die Bedienungsanleitung des Geräts 21ST2731 PHILIPS als PDF.


Benutzerfragen zu 21ST2731 PHILIPS
0 Frage zu diesem Gerät. Beantworten Sie die, die Sie kennen, oder stellen Sie Ihre eigene.
Eine neue Frage zu diesem Gerät stellen
Laden Sie die Anleitung für Ihr Fernseher kostenlos im PDF-Format! Finden Sie Ihr Handbuch 21ST2731 - PHILIPS und nehmen Sie Ihr elektronisches Gerät wieder in die Hand. Auf dieser Seite sind alle Dokumente veröffentlicht, die für die Verwendung Ihres Geräts notwendig sind. 21ST2731 von der Marke PHILIPS.
BEDIENUNGSANLEITUNG 21ST2731 PHILIPS

text_image
PHILIPS 000000 002172 TV21ST2730 21ST2731
25ST2760 25ST2761
25ST1731 25ST1761
28ST1781 28ST2781
Introduction
This handbook will help you with the installation and operation of your TV set.
It is recommended that you first study its contents that you may derive full benefit from the features and optimum performance of your receiver.
This TV set is part of a new generation of sets. Consequently, it incorporates the latest advances in technology and offers you several possibilities of use some of them being accessed via menus.
Menus are displayed on the screen as a list of words in relation with the functions of your TV set.
These words shall be selected to access other menus or to perform some adjustments.
Menus are displayed on the screen whenever you require by pressing a special remote control key.
The use of menus enables the remote control to be simplified by reducing the number of keys and eases certain use or programming operations.
The stripe at the top of the page enables you to identify the chapter.
About this handbook
This handbook includes FIVE parts:
Installation, Operation, Connection of peripheral equipment, Tips and Index and Menus.
Installation
This chapter enables you to proceed with the installation of your TV set. All the adjustments listed in this chapter must be performed before you can use your TV set.
To this end, follow all instructions of the INSTALLATION MENU....
| INSTALLATION |
| A LANGUAGEB MANUAL STOREC AUTO STORED SORT |
Operation
Once all adjustments of the installation chapter have been performed, you may use your TV set.
Some adjustments as well as some functions are used with the MAIN MENU....
Other functions do not use the menus, but only one of the remote control keys.
| MAIN MENU |
| A PICTUREB SOUNDC SPECIAL FEATURESD CLOCK |
Connection of other peripheral equipment
This chapter enables you to connect, and to select various peripheral equipment such as video recorder, headphone, decoder... to your TV set.
Tips
This chapter will help you if you have difficulties in using your TV set.
Index and menus
This chapter will help you if you have difficulties in using this handbook.
Table of Contents
I - Installation
Installation of the TV set....4
Remote control....4-5
Switching TV on and off 6
Selecting your more language....6
Searching for and storing TV channels 7
Manual searching
Searching for a TV channel 8
Entering a program number....9
Storing TV channels....9
Automatic searching and store....10
Sorting....10
Use of
INSTALLATION MENU
II - Operation
Direct access with the remote control
Switching the TV on and off....11
Standby 11
Selecting TV channels ....11
Sound adjustment
Volume control....12
Mute key 12
Speech/Music....12
Bilingual broadcast 12
Personal preferences....12
Time 12
| Lock....15 Channel number display....15 Storage of your adjustments....15 | Use of SPECIAL FEATURES menu |
| Automatic switch-on....16 Automatic channel change....16 Automatic switch-off....17 | Use of CLOCK menu |
Teletext ....18 ⇌ 20
III - Connection of peripheral equipment
VHS or HI 8 videorecorder, portable video camera, satellite
receiver, decoder, audio or video compact disk, video games ...22
S-VHS videorecorder, amplifier, headset....23
Selection of peripheral equipment,
for reproduction 24
to record 25
IV - Tips 26-27
V - Index and menus....28 ♦ 30
I - INSTALLATION - Setting up -
1 - Installation of the TV set
Place the TV on a solid and steady surface.
For ventilation, leave a space of at least 5 cm free all around the set.
This TV requires a mains voltage of 220V - 240 V - 50 Hz.
Insert the aerial plug into the aerial socket on the back of the TV.
Warning! An aerial of poor quality, in poor condition or badly oriented in relation to the local transmitter is often the cause of picture or sound disturbances. A poor-quality sound or picture may also be due to an aerial cable in poor condition or of poor quality.

Warning
In case of storm, it is advisable to unplug the TV set from its external aerial in order to avoid any possible damage to certain sensitive components.
Never stand pot plants or flower vases on the TV. Water spillage may cause serious damage.
If you have to transport your TV set, it is advisable to use its original packing for optimum protection.
2 - Remote Control
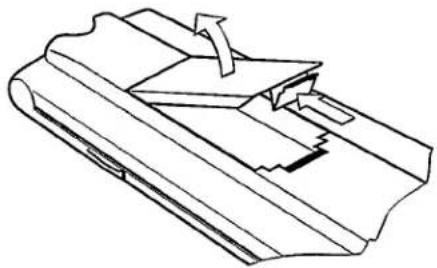
Remove the cover of the battery compartment on the back of the remote control. Insert the 2 batteries supplied.
Click the cover back into place. Go on to 3.
natural_image
Technical line drawing of a mechanical component with no visible text or symbolsThe two alkaline batteries used are the LR 03 - 1.5 V type.
Follow the direction of installation which is indicated on the bottom of the battery compartment.
Battery consumption depends upon remote control utilization.
Warning
Never leave run-down batteries in the compartment; remove them even if you are not going to use the remote control for some time.
When batteries are flat, do not throw them into a fire because they might explode. If you use batteries containing mercury, do not forget to return them to the supplier when they are flat: he has to take care of the recovery of these batteries in order to avoid any pollution hazards.
I - INSTALLATION - Setting up -
(contd.)
text_image
VCR and ● A = recording VCR and ◀ B = rewind VCR and ▶ C = wind VCR and ■ D = stop VCR and ▶ E = playback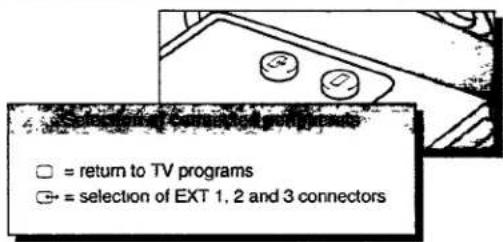
text_image
□ = return to TV programs ⊕ = selection of EXT 1, 2 and 3 connectors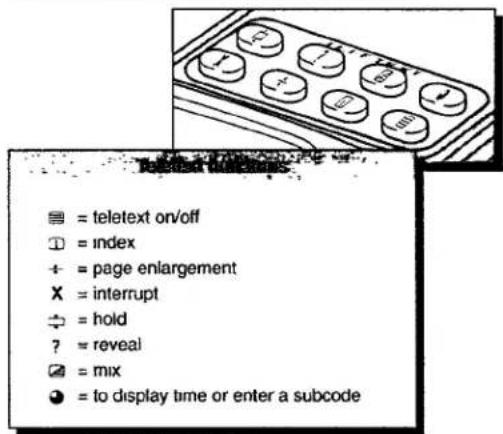
text_image
■ = teletext on/off ① = index ← = page enlargement X = interrupt → = hold ? = reveal ☑ = mix ● = to display time or enter a subcode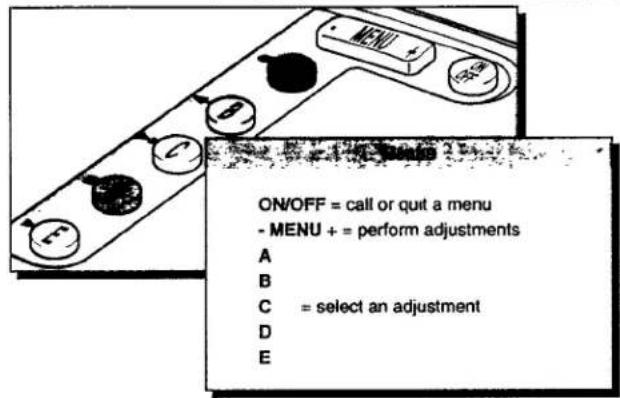
text_image
ON/OFF = call or quit a menu - MENU + = perform adjustments A B C = select an adjustment D E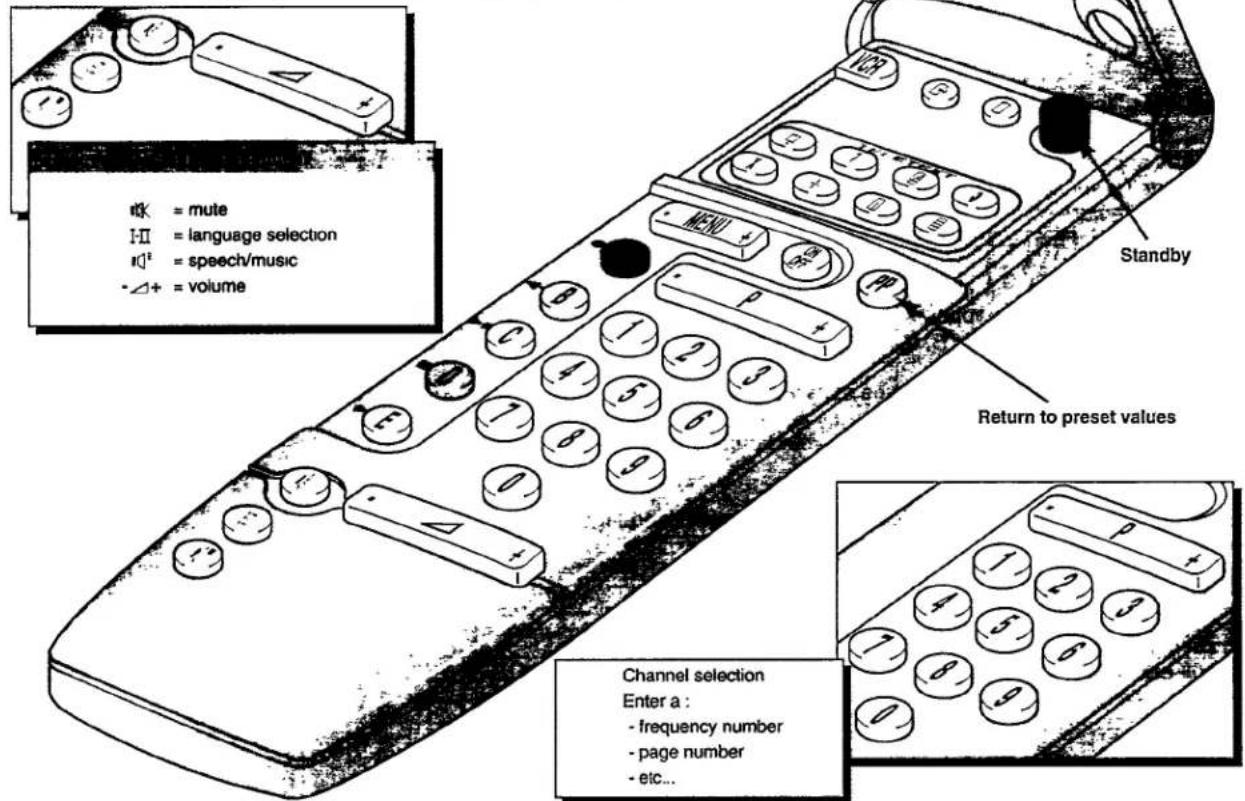
text_image
OK = mute HI = language selection ID² = speech/music -△+ = volume Standby Return to preset values Channel selection Enter a : - frequency number - page number - etc...I - INSTALLATION - Setting up -
(contd.)
3 - Switching the TV on and off
○ Press the switch ① on the front of your TV set.
▶ A green or red lamp lights up.
Green : The TV is switched on and the screen lights up. Go on to 4.
Red: The TV is switched on but the screen remains dark. Your TV is on standby.
- Press one of the numbered keys on the remote control.
The screen lights up.
Go on to 4.
The lamp on the TV becomes orange and flashes when you use the remote control, enabling you to check its operation as well as the battery condition.
4 - Selecting the menu language
With this TV set, you may choose between several languages for the various adjustment and operation menus to be called up on your screen.
You can select ENGLISH or any of the other languages from the language menus.
Open the panel which hides the television control switches.
text_image
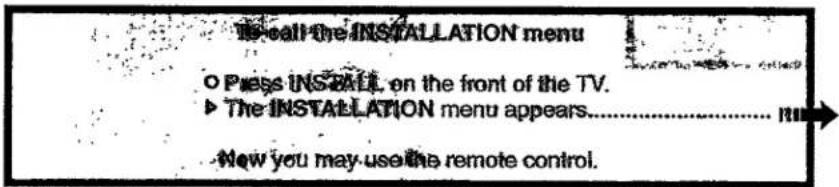
It's call the INSTALLATION menu ○ Press INSTALL on the front of the TV. ► The INSTALLATION menu appears.... RIN - Now you may use the remote control.If LOCK appears on the screen for a few moments, then your TV set has been programmed for exclusive use of the remote control. (See SPECIAL FEATURES)
○ Press the red key Ⓐ.
The first language menu appears.
○ Press the coloured key (A, B, C or D) corresponding to your language choice.
○ Press the white key Ⓔ if no language suits you.
▶ A second menu appears.
- Press the coloured key corresponding to your language choice.
From now on, all menus will be displayed in the chosen language.
Go on to 5.
In case of error or problem; switch your TV set off and on again and repeat paragraph 4 operations.
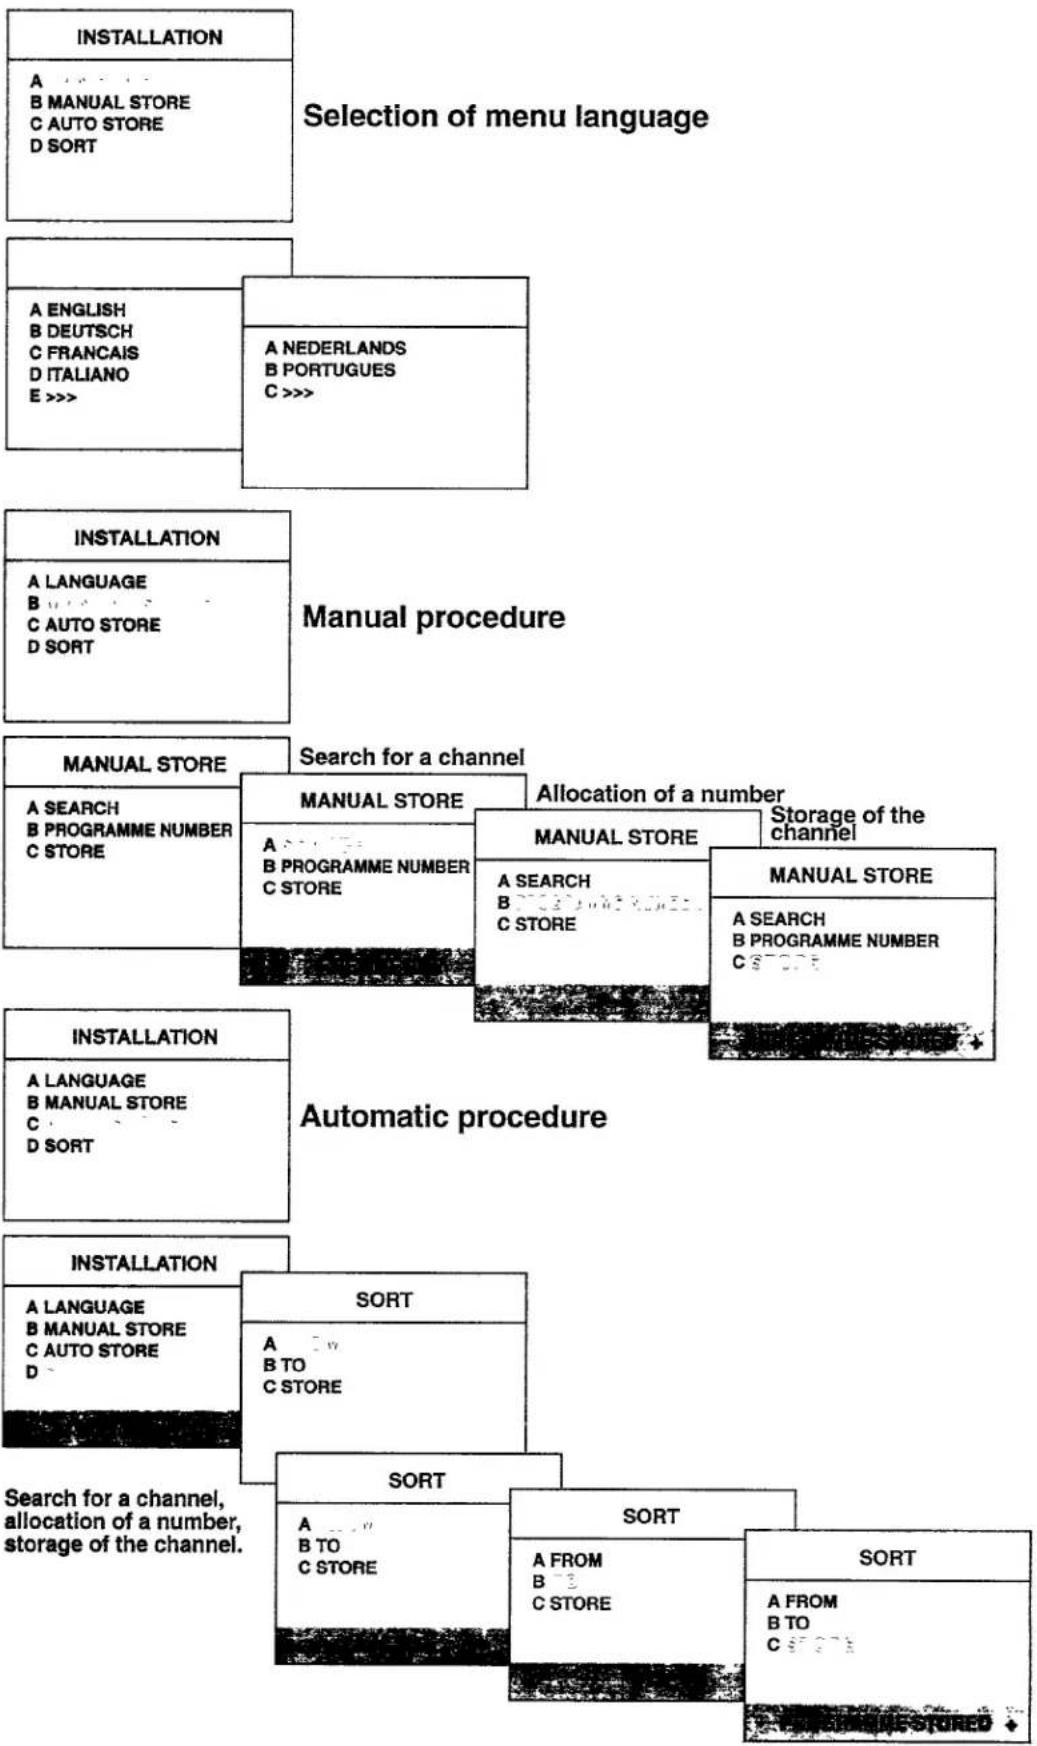
INSTALLATION
A LANGUAGE B MANUAL STORE C AUTO STORE D SORT
I - INSTALLATION - Setting up -
(contd.)
5 - Searching for and storing TV channels
After you have selected your menu language, you have to search for and store your TV channels.
The INSTALLATION menu offers the possibility to search for and store the TV channels in two different ways: Automatically or manually.
1 - Manual store :
for each program, perform the following steps
step b - searching for a TV channel step c - entering a program number step d - storing TV channels
Go on to page 8.
2 - Automatic store :
the operations described for the manual search are performed automatically, but you will have to perform a final sorting. If you want to use this option.
Go on to page 10.
I - INSTALLATION - Setting up -
(contd.)
1 - MANUAL SEARCH AND STORE
Now follow the instructions below
accurately and step by step.
You have to go through every step.
Repeat all the steps for each television channel.
○ Press the green key Ⓑ for MANUAL STORE.
The MANUAL STORE menu appears....
Go on to step b.
MANUAL STORE
A SEARCH
B PROGRAMME NUMBER
C STORE
step b - Searching for a TV channel
Automatic search
The TV itself searches for the channel.
○ Press the red keyⒶ.
The TV set is searching for a channel and stops when it is found. The frequency which is displayed on the screen indicates that the TV set is searching for a channel. When a channel is found, the picture becomes stable as well as the frequency number of this channel. You may then store the channel after having allocated any number you want for it.
Go on to steps c and d if you want to store the selected channel. If you want to search for another channel or if the picture is of poor quality:
○ Press again red keyⒶ.
Fine tuning:
You may improve the reception of a TV channel by adjusting the fine tuning with the -MENU+ key of the remote control.

Note: You also may enter the frequency number corresponding to the transmitter which broadcasts the channel you want to receive (see page 27 (Tips)).
I - INSTALLATION - Setting up -
(contd.)
step C - Entering a program number
With the number you have selected, you can call up again the TV program you are watching once installation is completed.
Identify the channel corresponding to the program you are watching in any "TV program guide".
Now you have to assign a number to the received television channel.
This way, you may decide upon the order of all your channels.
- Press green key⑧.
Enter the program number as follows:
Example 1: One-digit program number (eg.:5)
- Press once key number 5 on the remote control.
" P 5 - " appears.
▶ Wait a few moments, " P 5 - " becomes " P 5 ".
Example 2: Two-digit program number (eg.:55)
- Press twice on key number 5 on the remote control.
" P 55 " appears.
To obtain a program with two digits, you should add the second figure before the second hyphen disappears.
Program numbers may be entered directly as described above. Alternatively, pressing the -MENU+ key will make the number count up or down. Release the key when the required number appears.
step d - Storing TV channels
The channel found and selected channel number shall be stored.
- Press the yellow key©.
▶ PROGRAM STORED appears.
step e - Search for other channels
To search for and store other channels:
○ Repeat steps b, c, and d.
To quit the INSTALLATION menu
When you have finished locating TV channels, you have to exit from the INSTALLATION menu.
o Press ON.OFF twice on the remote control.
I - INSTALLATION - Setting up -
(contd.)
2 - AUTOMATIC SEARCH AND STORE
The selection of AUTO STORE enables you to automatically search for and store channels, thus avoiding steps a, b, c, d, e of the manual search menu, but you have to perform a final sorting.
To call of the INSTALLATION menu
○ Press INSTALL on the front of the TV.
The INSTALLATION menu appears.
Now you may use the remote control.
Press yellow key©.
The TV starts searching for all channels on the available system(s) of your TV set.
Your TV can store up to 60 channels (from 0 to 59 PROGRAM).
The channels are stored starting with number 59, then 58, 57, etc., until all channels of your region are found.
Sorting
According to the number of channels that your aerial can receive, the search will take more or less time (several minutes).
Wait until the sorting menu is displayed.

The SORTING menu enables you to modify the allocation of channel numbers which was determined during automatic search.
To modify a channel number, proceed as in the following example:
You wish to transfer channel 59 to the position of channel 1; proceed as follows:
○ Press red key Ⓐ
○ Enter 59
○ Press green key Ⓑ
○ Enter 1
○ Press yellow key ©
Repeat the sequence until all channels have the desired number.
You can directly enter channel numbers with the numbered keys, but also with the -MENU+ key of the remote control.
To quit the INSTALLATION menu
When you have finished locating TV channels, you have to exit from the INSTALLATION menu.
- Press ON.OFF twice on the remote control.
INSTALLATION
A LANGUAGE
B MANUAL STORE
C AUTO STORE
D SORT
SORT
A FROM
B TO
C STORE

text_image
control -After the installation is complete you can operate the TV with the remote control.
The TV lamp becomes orange and flashes every time you use the remote control, thus enabling you to check its operation and the condition of its batteries.
Switching the TV on and off
- Press ① key on the front of your TV to switch it on or off.
A green lamp lights up when the TV is on. A program number appears on the screen. If a red lamp lights up then your TV is on standby. - Press one of the numbered keys on the remote control.
The screen lights up.
Standby
With the standby key you can temporarily switch off the TV.
○ Press key ⏻ of the remote control.
▶ The red lamp lights up.
If the set is to be lest unattended for a long period switch off using the ① key on the TV.
If for a period of 15 minutes no aerial signal is received (end of broadcast), then your set automatically switches off. The red lamp indicates it is on standby.
Selecting TV channels
With the remote control
Enter the program number as follows:
Example 1: One-digit program number (eg.:5)
- Press once key number 5 on the remote control.
"5-" appears, the TV set switches over to program 5.
▷ Wait a few moments, "5 - " becomes "5".
Example 2: Two-digit program number (eg.:55)
- Press twice on key number 5 on the remote control.
▶ " 55 " appears.
To obtain a program with two digits, you should add the second figure before the second hyphen disappears.
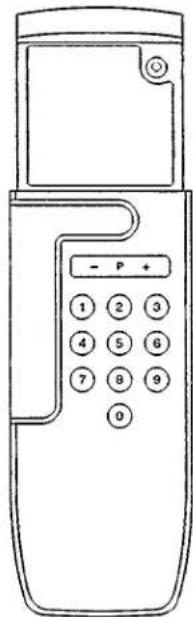
Program numbers may be entered directly as described above. Alternatively, pressing the -P+ key will make the number count up or down. Release the key when the required number appears.
On the TV
- Use the PROGRAM + or - keys of your TV to select another channel.
When the LOCK function is on, these keys are disabled.
On the other hand, the LOCK message will appear for a few moments when you use the television keys, but it will remain on standby (see SPECIAL FEATURES paragraph). If you want the program number to remain on the screen, see MAIN MENU, SPECIAL FEATURES, DISPLAY PROG NR.
text_image
- P + 1 2 3 4 5 6 7 8 9 0
text_image
II - OPERATION - Direct access to the whole control - (contd.)Sound adjustment
Volume control
With the remote control:
○ Press - ∠ +.
With the TV set:
○ The VOLUME + or - keys are used to adjust the volume.
When the LOCK function is on, these keys are disabled. On the other hand, the LOCK message will appear for a few moments when you use the television keys, but it will remain on standby (see SPECIAL FEATURES paragraph).
Mute key
o Press
appears on the screen and the sound is temporarily interrupted.
Do you want the sound back?, press again.
Speech/music
With this key you can :
- suppress the lower tones (speech position)
- restore the lower tones (music position)
Speech position :
○ Press the 10 ^2 key
Return to music position :
The ID^E indication appears for a moment.
o Press the 10 ^2 key
The ♪ indication appears for a moment.

Other sound adjustments may be performed by means of the MAIN MENU.
Bilingual Broadcast
If you are watching a TV channel which is being broadcast in two languages, then I or II appears.
You have the possibility of selecting the language you wish to hear.
- Press once or twice key III to select it.
Stereo/Mono Broadcast
If the STEREO sound quality is not satisfactory,
you can improve it by changing the listening mode from STEREO to MONO.
o Press the I-II key.
▷ STEREO appears in RED ≈ MONO
o Press the I-II key again.
▶ STEREO appears in GREEN → STEREO
Personal preferences
You may immediately return to the factory-preset picture and sound adjustments, or to the adjustments you have stored via the SPECIAL FEATURES menu,
o Press key PP of the remote control.
Time
The time can only be called up if the TV channel you are watching is also broadcasting teletext, and if your TV is equipped with Teletext option.
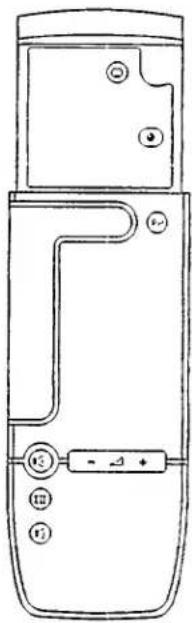
○ Lift the remote control flap
○ Press ④.
The time appears.
○ Press ● again in order to remove the time display.
text_image
Technical diagram of a door handle with labeled buttons and control buttons
text_image
1.2 2.3 3.4 4.5 5.6 6.7 7.8 8.9 9.0 10.1 11.2 12.3 13.4 14.5 15.6 16.7 17.8 18.9 19.0 20.1 21.2 22.3 23.4 24.5 25.6 26.7 27.8 28.9 29.0 30.1 31.2 32.3 33.4 34.5 35.6 36.7 37.8 38.9 39.0 40.1 41.2 42.3 43.4 44.5 45.6 46.7 47.8 48.9 49.0 50.1 51.2 52.3 53.4 54.5 55.6 56.7 57.8 58.9 59.0 60.1 61.2 62.3 63.4 64.5 65.6 66.7 67.8 68.9 69.0 70.1 71.2 72.3 73.4 74.5 75.6 76.7 77.8 78.9 79.0 80.1 81.2 82.3 83.4 84.5 85.6 86.7 87.8 88.9 89.0Use the keys shown in the drawing to operate the MAIN MENU.
With the MAIN MENU, you can:
- adjust picture and sound,
- store the picture and sound adjustments,
- select the channel number display,
- lock the TV set,
- select an automatic start-up time,
- select an automatic channel change time,
- select an operating time before automatic switch off (standby).
Adjusting the picture
text_image
Scanned text fragment with dense, pixelated characters and directional arrows on both sidesBrightness, Colour, Contrast
- Press one of the coloured keys to select the adjustment to be modified.
○ Press -MENU+ to modify the adjustment. - Press another coloured key for another adjustment.
Compression of the picture
In the future, films and other new programmes will be broadcast in a 16/9 wide screen format.

The D2Mac satellite programmes recorded on a video recorder in a wide screen format may be reproduced on a normal TV screen in a conventional format.
○ Press the blue key⑭.
The NORMAL or WIDE indication appears.
○ Press -MENU+ to obtain a correct picture.
When you change channel, the 16/9e format is unlocked and the picture returns to the conventional format.

text_image
Scanned text of contract clauses or legal document sectionsMAIN MENU
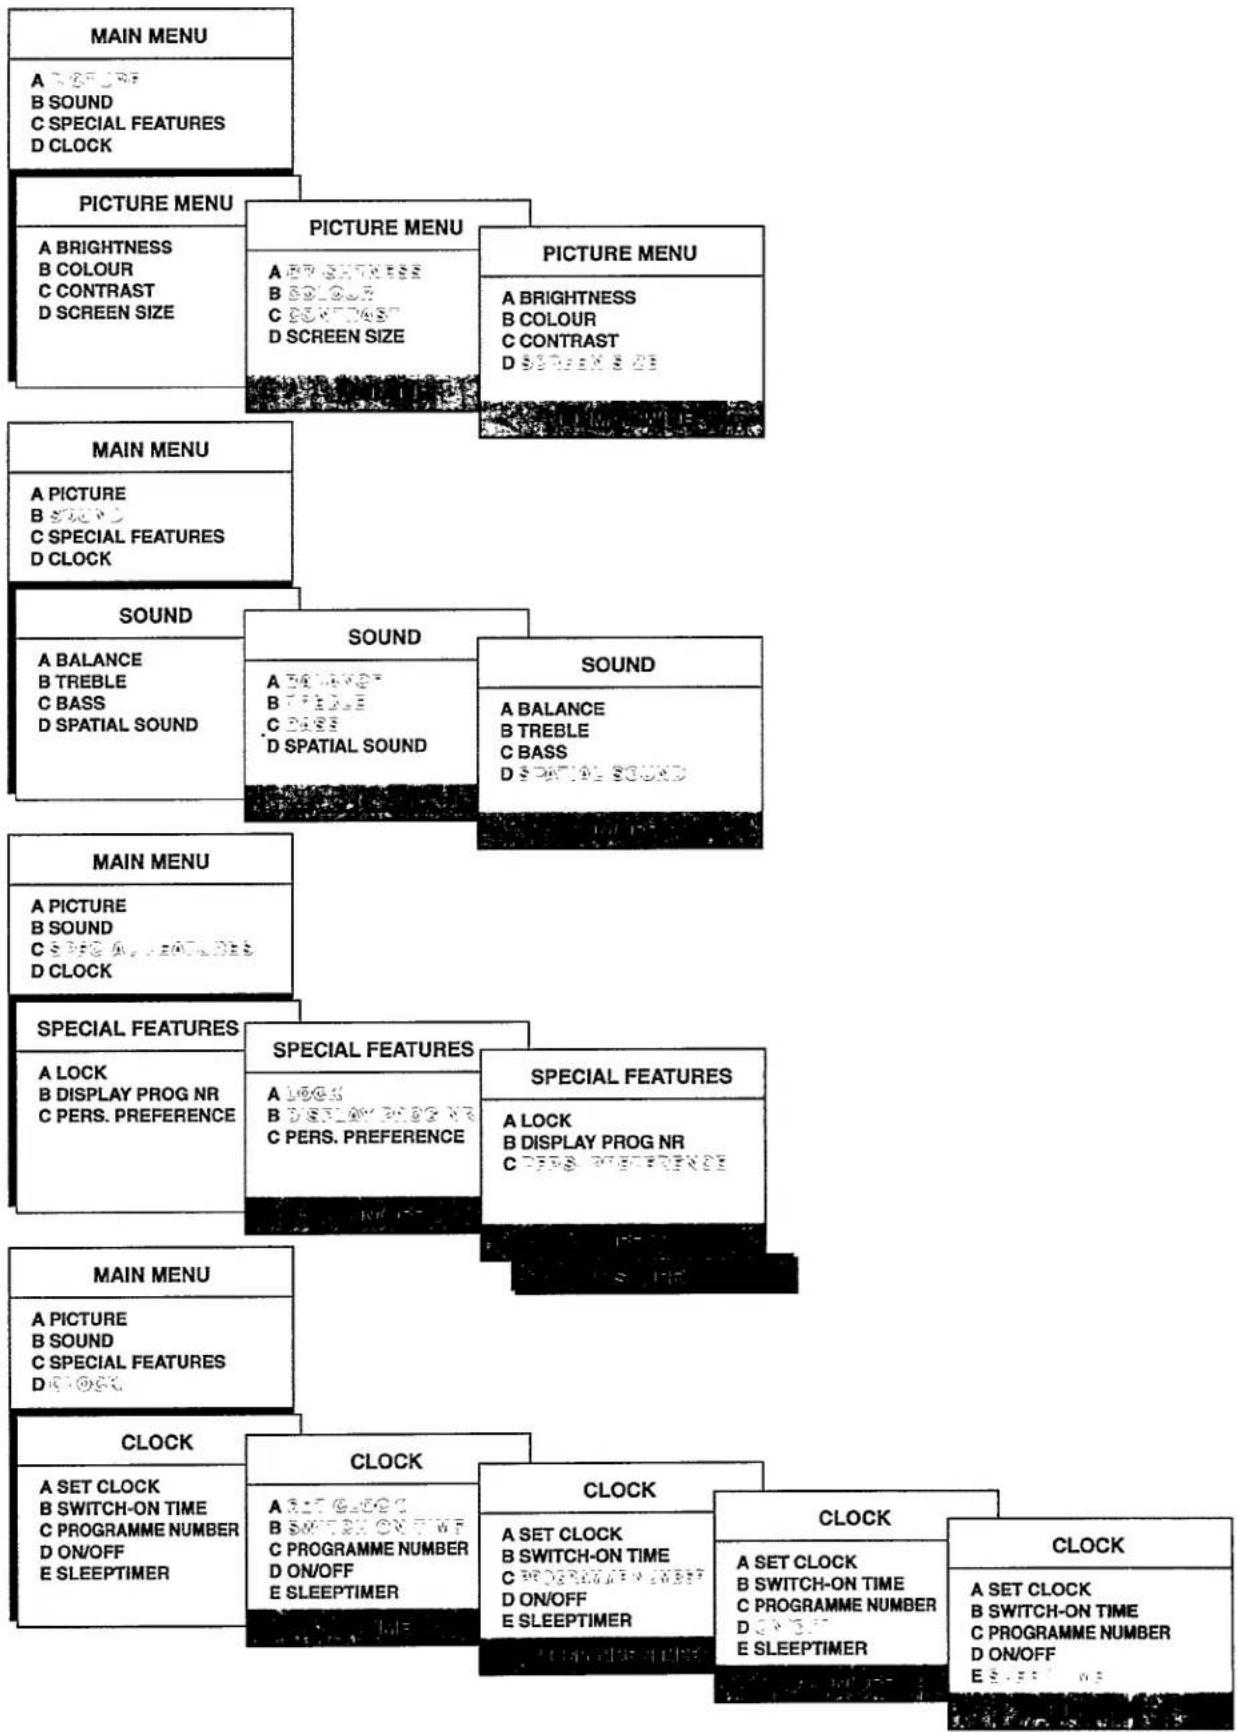
A PICTURE
B SOUND
C SPECIAL FEATURES
D CLOCK
PICTURE MENU
A BRIGHTNESS
B COLOUR
C CONTRAST
D SCREEN SIZE
text_image
- M A B C D E
text_image
H. CORPORATION (central)Adjusting the sound
natural_image
Black and white abstract pattern with no discernible text, symbols, or structured elementsMAIN MENU
A PICTURE
B SOUND
C SPECIAL FEATURES
D CLOCK
SOUND
A BALANCE
B TREBLE
C BASS
D SPATIAL SOUND
Balance, treble, bass adjustment
- Press one of the coloured keys to select the adjustment to be modified.
○ Press -MENU+ to adjust.
Spatial sound adjustment
When SPATIAL is ON, the loudspeakers seem to be further apart.
○ Press the blue key(D), OFF or ON appears.
○ Press [−MENU+] to switch the spatial sound on or off.
Do you want to store the picture and sound adjustments (except mode and spatial)?, go to SPECIAL FEATURES menu.

text_image
Scanned text of contract clauses or legal document with visible title and signature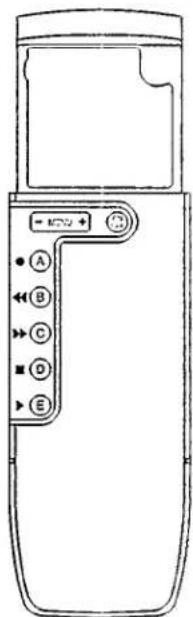
text_image
- MCV + A B C D E
text_image
(contd.)Special features
With this menu, you can:
- lock your TV set,
- select program number display,
- store picture and sound adjustments.
natural_image
Pure black rectangle with no visible text, symbols, or discernible featuresLock
The LOCK function may be selected to prevent unauthorised use of your TV (e.g. by children). When LOCK is ON, the keys on the TV set are disabled and the remote control becomes necessary to switch on, by pressing one of the digit keys.
○ Press the red keyⒶ.
Press -MENU+ to switch the LOCK mode ON or OFF.
If you have selected ON, you need only use the ⏻ key to switch your TV set off.
Program number display (DISPLAY PROG NR)
When the program number display is ON, it remains on the screen in the upper right-hand corner.
○ Press the green key(B).
○ Press [−MENU+] to enable or cancel number display.
- ON = display.
-OFF=no display.
Storage of your adjustments (PERS. PREFERENCE)
To store the sound and picture adjustments, press PERS. PREFERENCE.
○ Press the yellow key©.
The OFF message appears.
○ Press [−MENU+] to store your adjustments.
The STORED message appears.

natural_image
Completely black image with no visible content or text.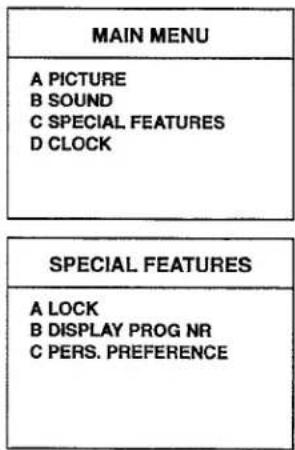
text_image
MAIN MENU A PICTURE B SOUND C SPECIAL FEATURES D CLOCK SPECIAL FEATURES A LOCK B DISPLAY PROG NR C PERS. PREFERENCE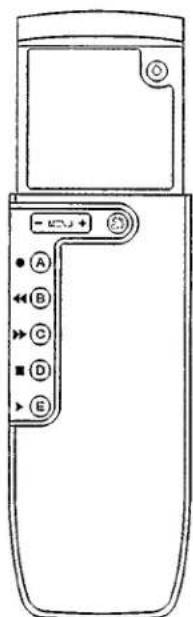
text_image
- M A B C D EII - OPERATION - Access the network
{contd.)
Clock
With the clock menu, you can:
- choose the automatic switch-on time;
- choose the automatic channel change time;
- select the operating time before automatic switch off.
1 - Automatic switch-on or automatic channel change
text_image
The MAIN is all for the Press. On the Press. On the The MAIN is all for the Press. On the Press. On the The MAIN is all for the Press. On the Press. On the The MAIN is all for the Press. On the Press. On the The MAIN is all for the Press. On the Press. On the The MAIN is all for the Press. On the Press. On the The MAIN is all for the Press. On the Press. On the The MAIN is the main key. The MAIN is the main key. The MAIN is the main key. The MAIN is the main key. The MAIN is the main key. The MAIN is the main key. The MAIN is the main key. The MAIN is the main key. The MAIN is the main key. The MAIN is the main key. The MAIN is the main key. The MAIN is the main key. The MAIN is the main key. The MAIN is the main key. The MAIN is the main key. The Main is the main key. The MAIN is the main key. The MAIN is the main key. The MAIN is the main key. The MAIN is the main key. The MAIN is the main key. The MAIN is the main key. The MAIN is the main key. The MAIN is the main key. The MAIN is the main key. The MAIN is the main key. The MAIN is the main key. The MAIN is the main key. The MAIN is the main key. The MAIN is also a major issue in this week. The MAIN is also a major issue in this week. The MAIN is also a major issue in this week. The MAIN is also a major issue in this week. The MAIN is also a major issue in this week. The MAIN is also a major issue in this week. The MAIN is also a major issue in this week. The MAIN is also a major issue in this week. The MAIN is also a major issue in this week. The MAIN is also a major issue in this week.Clock setting.
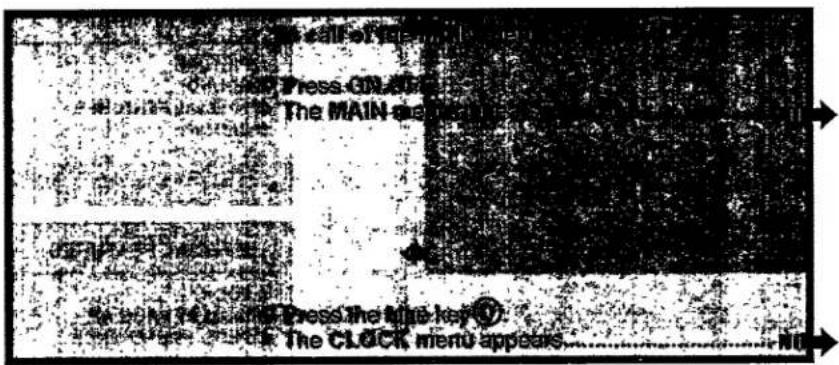
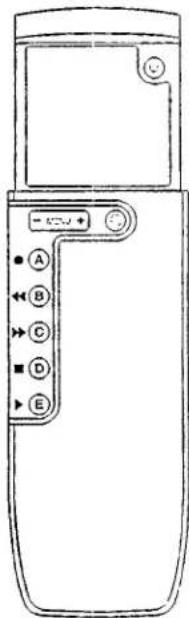
Press the red key(A). The setting is made by using the digit keys of the remote control, for instance: Enter 0915 for 9:15 am. With -MENU+ you can adjust the time minute by minute.
Selection of the switch-on or channel change time
Press the green key (B). The switch-on time setting is made by using the digit keys of the remote control for instance: Enter 1300 for 1:00 pm. With -MENU+ you can adjust the time minute by minute.
Program selection
○ Press the yellow key©.
- Enter the number of the channel with the numbered keys on the remote control.
Selection confirm
○ Press the blue key(D).
▶ ON or OFF appears.
If you wish to automatically change the channel
○ Confirm your selections by pressing -MENU+ so that ON appears.
If you wish to automatically switch on the TV
○ Confirm your selections by pressing (-MENU+) so that ON appears.
- Then press the ⏻ key on the remote control to put the TV set on standby.

text_image
To quit the image is too clear. o Press menu ON/OFF.MAIN MENU
A PICTURE
B SOUND C SPECIAL FEATURES D CLOCK
CLOCK
A SET CLOCK B SWITCH-ON TIME C PROGRAMME NUMBER D ON/OFF E SLEEPTIMER
text_image
Diagram of a device control panel with labeled buttons A through E and directional arrows
text_image
Diagram of a device control panel with labeled buttons A through E and directional arrows
text_image
ELENDATION - ACCESSIBLE MENU - (contd.)This function enables you to set your TV in automatic
standby after a time you select (maximum 90 minutes).
This function is very useful for persons who fall asleep watching TV.
2 - Automatic switch-off
text_image
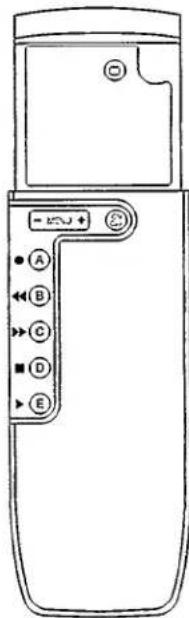
Scanned text of contract clauses with arrows pointing to specific document sectionsPress white key Ⓔ.
The indication 00 appears.
Press on -MENU+ to select the time before switch-off, in 15-minute steps.
You can check the remaining time before switch-off
by pressing the ☐ key of the remote control.
If you want to cancel automatic switch-off, you can switch off
and then switch on again your TV, or set the timer to 00.

natural_image
Black and white abstract pattern with no discernible text, symbols, or structured elementsMAIN MENU
A PICTURE
B SOUND
C SPECIAL FEATURES
D CLOCK
CLOCK
A SET CLOCK
B SWITCH-ON TIME
C PROGRAMME NUMBER
D ON/OFF
E SLEEPTIMER
text_image
- 50V A B C D E
text_image
Scanned text of contract clauses with partially visible Chinese characters and a horizontal lineThe description of the teletext functions only apply to TV sets equipped with a teletext decoder.
The teletext is an information system which can be consulted the same way as a newspaper or a magazine. Each newspaper or magazine is different, it is the same for the teletext whose screen display is different according to the channel broadcasting information. Yet the way you use the teletext is similar from one magazine to the other. You have to select a heading, a theme in a heading, or a page in a theme. The teletext contents are to be found most often on page 100.

flowchart
graph LR
    A["MAIN INDEX\nP 100\n.....150\n.....200\n.....300\n.....400\n.....500\n.....600"] --> B["SUBJECT INDEX\nP 200\n.....210\n.....220\n.....230\n.....240\n.....250\n.....260"]
    B --> C[SUB-PAGE\nP 220\n.....1/2\n.....2/2\n.....1/2\n.....2/2\n.....1/2\n.....2/2\n.....1/2\n.....2/2\n.....1/2\n.....2/2\n.....1/2\n.....2/2\n.....1/2\n.....2/2\n.....1/2\n.....2/2\n.....1/2\n.....2/2\n.....1/2\n.....2/2\n.....1/2\n.....2/4\n.....2/4\n.....1/2\n.....2/2\n.....1/2\n.....2/2\n.....1/2\n.....2/4\n.....2/4\n.....1/2\n.....2/4\n.....1/2\n.....2/4\n.....1/2\n.....2/4\n.....1/2\n.....2/4\n.....1/2\n.....2/4\n.....1/2\n.....2/4\n.....1/2\n.....2/4\n.....1/2\n.....2/4\n.....1/2\n.....2/4\n.....1/2\n.....2/4\n.....1/4\n.....2/4\n.....1/4\n.....2/4\n.....1/4\n.....2/4\n.....1/4\n.....2/4\n.....1/4\n.....2/4\n.....1/4\n.....2/4\n.....1/4\n.....2/4\n.....1/4\n.....2/4\n.....1/4\n.....2/4\n.....1/4\n.....2/4\n.....1/8
Switching Teletext On and Off
When the teletext is on, it is not possible to use the menus or change channel.
○ Select the TV channel for the desired teletext broadcast.
○ Lift the remote control flap.
Press key ☐ in order to switch on the teletext.
The contents appear on the screen together with an information line at the top and an options line at the bottom.
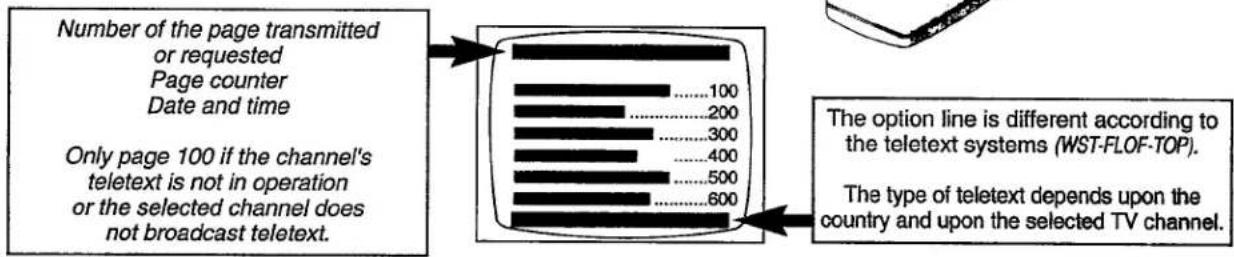
flowchart
graph LR
    A["Number of the page transmitted or requested"] --> B["Page counter"]
    B --> C["Date and time"]
    D["Only page 100 if the channel's teletext is not in operation or the selected channel does not broadcast teletext."] --> E["...100"]
    E --> F["200"]
    F --> G["300"]
    G --> H["400"]
    H --> I["500"]
    I --> J["600"]
    K["The option line is different according to the teletext systems (WST-FLOF-TOP)."]
    L["The type of teletext depends upon the country and upon the selected TV channel."]
○ Press ☐ again in order to switch off the teletext.

text_image
(contd.)Selecting a Teletext Page
Direct page selection
- Enter the desired page number with the remote control digit keys. The number of pages always includes 3 digits.
The page counter seeks the page. If the counter keeps searching, then the page is not available or does not exist.
If you have entered an incorrect number, P?.. appears. First fill out the number with random figures and then enter the correct page number.
Selection with the options line
Signs - and + of the options line enable you to browse the teletext by selecting the previous or next page with red key(A) or blue key(D) of the remote control. Certain teletext systems allow you to have a quicker access to some pages; in this case, the section names are displayed in the option lines. Select the desired subject, with the corresponding coloured key.
Return to the index
○ Press key ⓘ.
The index appears on the screen.
Hold
A teletext page sometimes consists of several rotating sub-pages which are automatically displayed in turn. The indication 2/4 enables you to know the total number of sub-pages (here: 4) and indicates the number of the sub-page displayed (here: 2).
- Press ✦ in order to hold a page.
- appears in the information line. The Information in this page is not being updated any more.
○ Press ◆ again.
The page rotation resumes.
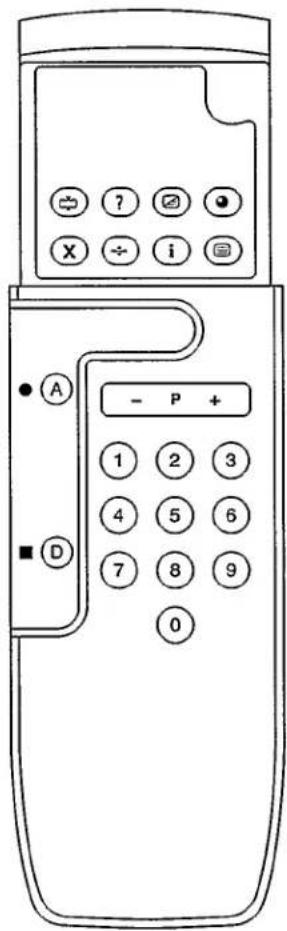
text_image
Diagram of a mobile phone control panel with labeled buttons and function keysII. OPERATION
(condl)
Special functions
To obtain and hold a sub-page
When a teletext page consists of several rotating sug-pages, you can obtain and hold one of them by proceeding as follows:
- First enter the number of the subject page.
○ Then press ●. - Enter the four digit number of the required sub-page. Example: 0002 for page 2/4.
In the meantime :
○ Press X.
The TV channel broadcasts reappear on the screen.
The indication indicates that you are still in teletext mode.
As soon as the sub-page is found, the information line appears.
- then press X to display the requested sub-page.
- Press ⬆ to return to normal teletext operation.
Reveal
Some pages contain concealed information, such as solutions to riddles and puzzles.
- Press ? to call up concealed information.
- Press 7 again in order to switch off the concealed information.
To temporary interrupt the teletext display
The search for a page may sometimes be quite long. In the meantime,
you may return to the TV broadcast.
○ Press X.
The TV broadcast reappears on the screen.
The indication ≡ means that you are still in teletext mode.
- You may choose a page number before going back to the broadcast in progress. As soon as the page is found,
▶ the information line reappears on top of the screen.
○ Press X.
The teletext page is entirely displayed.
Overlay of the teletext on the TV image (mix)
- Press ☑, when a teletext page is on the screen.
The teletext page is superimposed on the TV program on the screen.
o Press again ☑.
▶ Only the teletext page is displayed.
Enlarge
○ Press ÷ to enlarge the top half of the teletext page.
○ Press ÷ again to enlarge the bottom half of the teletext page.
- Press once more to return to normal page size.
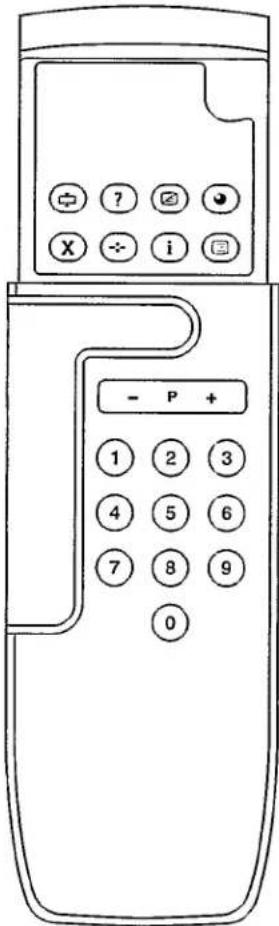
text_image
+ ? Ⓥ X ÷ i ☐ - P + 1 2 3 4 5 6 7 8 9 0
text_image
THE NEW PERSONAL EQUIPMENTAccording to the type of your TV set, a number of devices can be connected that depends on the connection inputs at the back of your TV set (EXT 1, 2 or 3).
The connection diagram shows you the type of device you may connect. It corresponds to the TV set equipped with all input sockets.
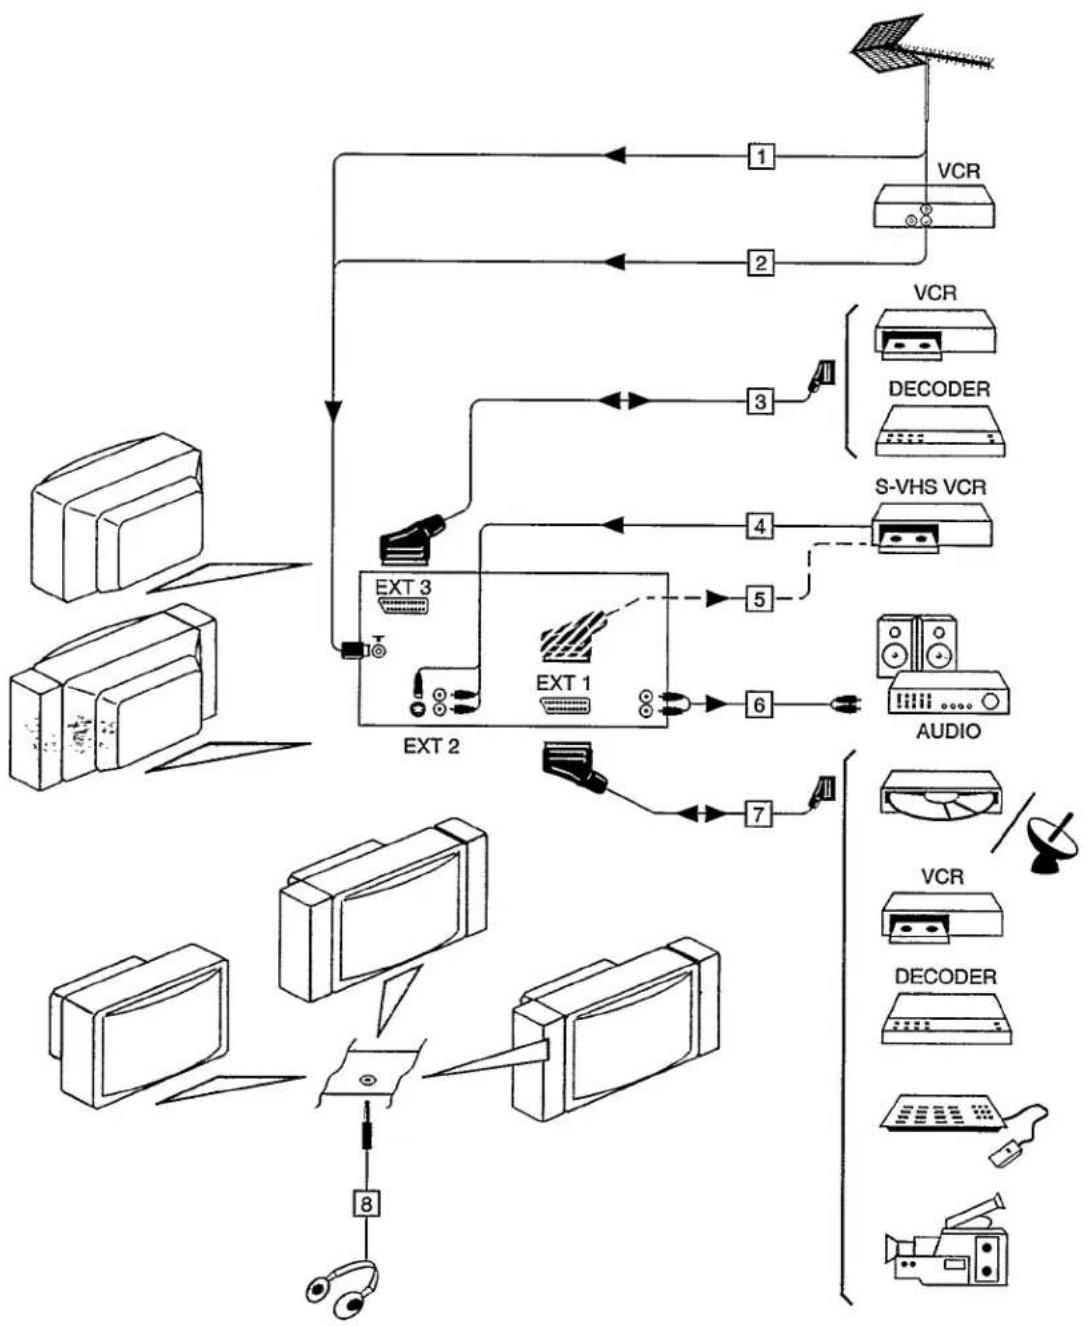
flowchart
graph TD
    A["Document"] --> B["Document 1"]
    A --> C["Document 2"]
    B --> D["EXT 1"]
    C --> E["EXT 2"]
    D --> F["Audio"]
    E --> G["XT 1"]
    F --> H["XT 3"]
    G --> I["XT 2"]
    H --> J["XT 3"]
    I --> K["XT 2"]
    J --> L["XT 3"]
    K --> M["Document 8"]
    L --> N["Document 8"]
    M --> O["Document 8"]
    N --> P["Document 8"]
    style A fill:#f9f,stroke:#333
    style B fill:#ccf,stroke:#333
    style C fill:#ccf,stroke:#333
    style D fill:#cfc,stroke:#333
    style E fill:#cfc,stroke:#333
    style F fill:#fcc,stroke:#333
    style G fill:#fcc,stroke:#333
    style H fill:#fcc,stroke:#333
    style I fill:#fcc,stroke:#333
    style J fill:#fcc,stroke:#333
    style K fill:#fcc,stroke:#333
    style L fill:#fcc,stroke:#333
    style M fill:#fcc,stroke:#333
    style N fill:#fcc,stroke:#333
    style O fill:#fcc,stroke:#333
    style P fill:#fcc,stroke:#333
    style_Q["VCR"] --> R["Document 1"]
    S["VCD"] --> T["Document 2"]
    U["S-VHS"] --> V["Document 3"]
    W["Decoder"] --> X["Document 4"]
    Y["Audio"] --> Z["Document 5"]
    AA["VCR"] --> AB["Document 6"]
    AC["Decoder"] --> AD["Document 7"]
Connection diagram
- Video recorder - video games -
Socket used ....Aerial
Linking cord....Aerial coaxial cable, 75 ohms
Connection diagram......Refer to idents 1 and 2 page 21

○ Unplug the aerial plug from the T socket on your TV, and insert it into the T input of your video recorder.
- Connect the aerial cable supplied with the video recorder to the output of the VCR, and to the input of your TV.
- Switch on your video recorder and set it as follows:
Look for the video recorder test channel in the operating manual. Now search tune for the test signal of your VCR on your TV and assign a program number to it. Refer to the INSTALLATION menu for searching and storing this signal.
- Record this number. You will need it when you use your video recorder.
- VHS or HI 8 video recorder - portable video camera - satellite receiver - decoder - audio CD or CDV player - video games
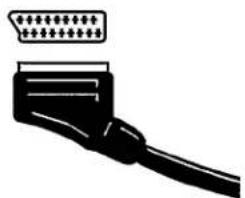
Socket used ....Euroconnector EXT 1 (RGB signals)
Linking cord....Eurocable
Connection diagram......Refer to idents 1 and 7 page 21
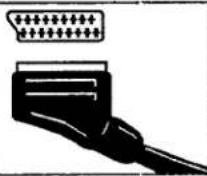
You can purchase a Eurocable at your retailer.
The hook, located on the right-hand side of the socket, is to secure the cable.
- Plug the Eurocable into the Euroconnector of your peripheral and the EXT 1 socket of the TV set.
If you have several devices of this type
Sockets used....Euroconnector EXT 1 and EXT 3 (video)
Linking cords....Eurocables
Connection diagram......Refer to idents 1, 3 and 7 page 21
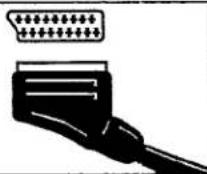
- Plug one of these devices into socket EXT 1 of the TV set: Video recorder, portable video camera, satellite receiver, descrambler, CDV player, games...
- Plug one of these devices into socket EXT 3 of the TV set: Video recorder, descrambler.
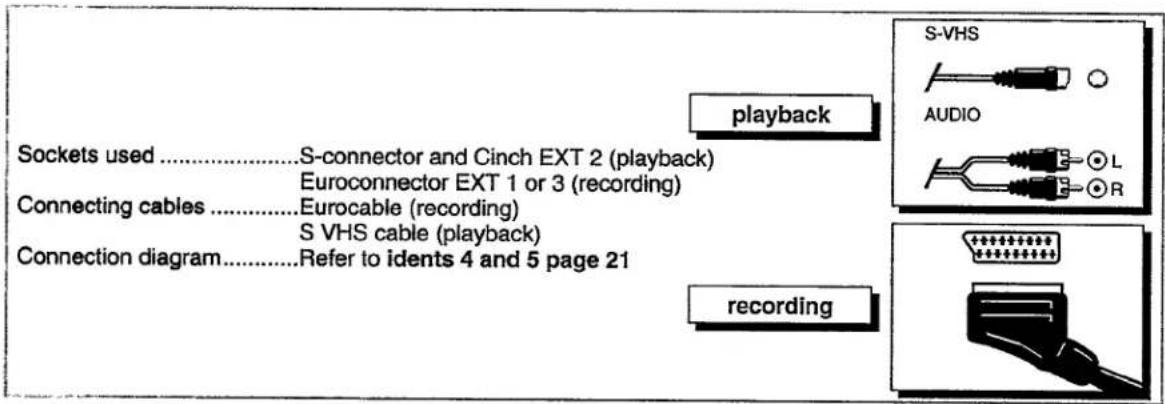
S-VHS video recorder
text_image
playback Sockets used ....S-connector and Cinch EXT 2 (playback) Euroconnector EXT 1 or 3 (recording) Connecting cables ....Eurocable (recording) S VHS cable (playback) Connection diagram....Refer to idents 4 and 5 page 21 recording S-VHS AUDIO L RRecording
- Plug the Eurocable into the Euroconnector socket of your video recorder and to EXT 1 or 3 socket of the TV set.
Playback
- Plug the S-VHS cable to S-VHS input (video - S-connector), and to inputs L and R (audio - Cinch socket) of your TV.
Audio amplifier
Sockets used......Cinch (audio outputs)
Connecting cables......Audio cable
Connection diagram......Refer to ident 6 page 21
AUDIO

○ Connect audio plugs into audio input of your system and audio outputs L and R of your TV set.
The sound of the selected channel from your TV is reproduced by your amplifier.
Headphones
Sockets used....Jack diameter 3.5 mm
Headphone....The Headphone shall have an impedance from 8 to 600 ohms
Connection diagram ......Refer to ident 8 page 21

- Open the panel which hides the control switches at the front of the TV set.
○ Insert the plug into the headphone socket ○.
The internal loudspeakers of your TV are switched off.
○ Control volume with the - ∠ + key.
To reproduce picture and sound
Equipment connected with an aerial cable
(ident 1 or 2)
- Switch on your TV and the connected peripheral equipment.
With the digit keys, select the channel you have assigned to the connected peripheral. This is the number under which you have stored the test signal of the equipment.
The picture from the equipment is reproduced.
To go back to the TV picture, press the desired channel key.

Equipment connected with a Eurocable
(EXT 1 or 3 connectors - ident 3 or 7)
- Switch on your TV and the connected peripheral equipment.
- Press key ☐ of the remote control several times in order to select the socket on which the equipment is connected.
The indication EXT 1 or EXT 3 will be displayed according to the selected socket.
The picture from the connected equipment is then reproduced.
natural_image
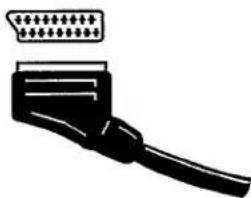
Black and white illustration of a VGA connector with pinout (no text or symbols)Most of the devices which are connected to sockets EXT 1 and EXT 3 will perform the selection themselves as soon as they are switched on. When the two connectors are used, connector EXT 1 has priority. This means that your TV set will reproduce the picture from the equipment connected to this socket. The selection of EXT 3 remains possible if you use key ☐ of the remote control.
To go back to the TV picture, press key □ of the remote control.
S-VHS video recorder connected with S-VHS cables
(connectors EXT 2 - idents 4 and 5)
Ident 4 for reproduction (see diagram page 21). Ident 5 for recording (see diagram page 21).
Switch on your TV set and your video recorder.
o Press key ↩ several times in order to select connector EXT 2.
The indication EXT 2 will appear when the connector is selected.
The recorded broadcast or film will appear on the screen when playback is selected on the video recorder.
S-VHS

AUDIO

To record
Video recorder and TV set only linked by aerial cables
- Select the channel number you wish to record on the videorecorder.
- Press the videorecorder record key.
In this case, you can record a program on a channel while watching another program on another channel.
Video recorder and TV set only linked with a Eurocable
- Select the channel number on your TV set.
○ Select the socket corresponding to the connection with the TV on the videorecorder (usually EXT). - Press the video recorder record key.
In case of a problem, refer to the operating manual of your video recorder.
In this case, the recorded program will be that of the selected TV channel.
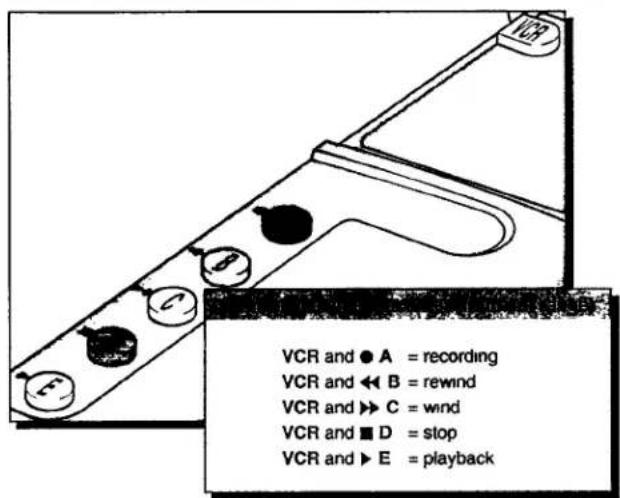
Using your Video recorder with the TV remote control
The TV set's remote control enables you to use some of the audio and video equipment which makes up our product range.
To use this remote control, proceed as follows :
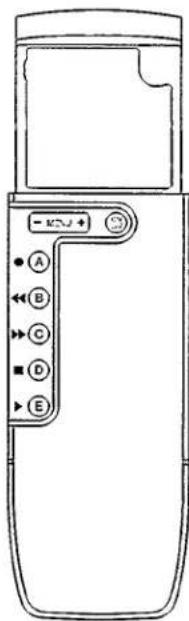
- Lift the remote control flap.
- Press simultaneously the VCR key and one of the following keys to:
Ⓐ : Record a program.
⑧ : Rewind a cassette, without display.
©: Wind a cassette, without display.
(D) : Stop a cassette.
E : Play back a cassette.

natural_image
Black and white illustration of a U88 connector with a cable (no text or symbols)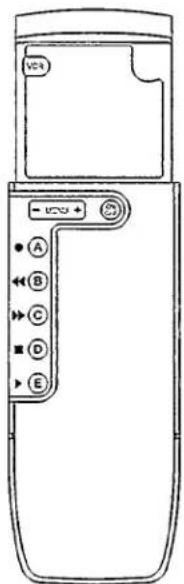
text_image
VCR - VCR + A B C D EIV - TIPS
Poor picture
The causes for a picture with a poor quality may be the following:
The aerial receives interference.
The aerial is misoriented with reference to the transmitter.
You are in the vicinity of buildings or mountains (ghost images).
Modify the orientation of the external aerial.
Check if the correct frequency has been set or improve the frequency adjustment.
Brightness or contrast are maladjusted.
→ Press green key PP.
No picture
The causes for no picture may be the following:
The aerial plug is disconnected from the aerial socket.
The equipment connected to the TV is not in operating order (Is there a cassette? Is it in operation?)
You did not select the right device with the remote control; repeat.
Did you press □ after having switched your teletext on?
The locking function is activated, and therefore TV keys can not be used.
(See main menu, special features).
No sound or poor sound
The mute key 📁 was used, the indication 📁 is displayed on the screen.
If you do not get any stereophonic effect (only one loudspeaker is in operation),
the balance is disadjusted (see the SOUND menu).
Locking
Use of the locking function associated to the programmed start-up function,
enables you to determine the time from which children are permitted to watch their program.
Remote control
The TV set does not react with the remote control, the orange light on the TV does not blink anymore: maybe the remote control batteries are flat.
Menu
Did you choose the menu you wanted?
Press ON.OFF in order to erase the displayed menu, then call up another menu by pressing ON.OFF.
Menus are automatically displayed one after the other:
the TV set is in "demonstration" mode, switch off, then switch on again.
Demonstration mode
If you wish to browse through all menus in order to get used to them:
Simultaneously press PROGRAM + and VOLUME - keys of the TV set.
The DEMO message appears, then the menus are displayed one after the other.
To stop menu scrolling, set the TV on standby.
IV - TIPS
(contd.)
Direct entry of a transmitter frequency
With this function, it is possible to enter the frequency number of the transmitter which broadcasts the channel you wish to receive.
In fact, each TV channel broadcasts its programs on a particular frequency and in a particular frequency band. If you know the frequency, you can directly key it in and thus call the corresponding TV channel. If you only know the channel, refer to the "Frequency-Channel" cross-reference table in the document appended to this manual of directions for use. Enter the three digits of the desired frequency with the digit keys of the remote control.
In order to enter the frequency number, you have to previously call the INSTALLATION menu (see page 6), then the MANUAL STORE menu.
For frequencies below 100 MHz, enter three digits: example: for 63 MHz, enter 063.
Go on to steps c and d if you want to store the selected channel.
Ask your retailer if you wish to obtain more detailed information.
Did you enter a wrong number? Complete the frequency number with any digits and repeat the operation.
Connections
Check the connections of associated equipment. Is the equipment you wish to use switched on?
Still no result?
Ask your retailer's after-sales service.
Warning: If one of the following symptoms appears, switch off your TV and call for the after-sales service.
a white horizontal line appears across the screen.
\~ the TV lamps blink without using the remote control.
a meaningless message appears in the lower left-hand corner of the screen.
In any case, never try to repair your TV set yourself.
V - INDEX
aerial 4-22
amplifier 23
automatic switching-off ....11-17
automatic switching-on ....16
battery 4-11-26
band 22-27
bilingual broadcast....12
channels - assignments .....22
- automatic change .....16
-number display .....15
- search......8
- selection......11
- sorting....10
connection 21 to 23
compression of the picture 16/9.4/3....13
demonstration mode 26
DIN (USHIDEN) 23
eurocable 22-23
EXT 1 22-23
EXT 1 priority ....24
EXT 2 23
EXT 3 22-23
fault 26
fine tuning 8-26
frequency 8-26-27
headphone 23
installation menu ....2 to 6
lamp 6-11
language - menu....6
- broadcast.....12
lock 15-26
main voltage 4
mute key 12-26
operation menu 2-13 to 17
personal adjustments....12
picture - brightness....13
- colour....13
- contrast....13
preferences adjustments....15
programmed start-up (CLOCK)......16
remote control 4-5-26
remote control (VCR fonctions)....25
selection of peripheral equipment.....24-25
- for reading .....24
- for recording .....25
setting-up 4 to 10
sound 12
sound - bass....14
- treble....14
- balance....14
- spatial ....14
special features 15
speech/music 12
standby 11-17
store - automatic....10
- manual....9
storing 9
storm 4
S-VHS 23
switching-off 11
switching-on 6-11
teletext 18 to 20
- enlarge....20
- overlay 20
- reveal....20
- switch-on/off......18
- teletext contents .....19
- temporary interrupt .....20
- teletext page......19-20
time 12
transmitter 26-27
ventilation 4
volume 12
Your TV's installation menus
flowchart
graph TD
    A["INSTALLATION"] --> B["A B MANUAL STORE C AUTO STORE D SORT"]
    A --> C["A ENGLISH B DEUTSCH C FRANCAIS D ITALIANO E >>>"]
    C --> D["A NEDERLANDS B PORTUGUES C >>>"]
    A --> E["INSTALLATION"]
    E --> F["A LANGUAGE B C AUTO STORE D SORT"]
    E --> G["MANUAL PROCEDURE"]
    G --> H["MANUAL STORE"]
    H --> I["A SEARCH B PROGRAMME NUMBER C STORE"]
    I --> J["MANUAL STORE"]
    J --> K["A SEARCH B C STORE"]
    K --> L["MANUAL STORE"]
    L --> M["A SEARCH B PROGRAMME NUMBER C STORE"]
    H --> N["MANUAL STORE"]
    N --> O["MANUAL STORE"]
    O --> P["MANUAL STORE"]
    P --> Q["MANUAL STORE"]
    Q --> R["MANUAL STORE"]
    R --> S["Automatic PROCEDURE"]
    S --> T["Automatic PROCEDURE"]
    T --> U["INSTALLATION"]
    U --> V["A LANGUAGE B MANUAL STORE C D SORT"]
    U --> W["INSTALLATION"]
    W --> X["A LANGUAGE B MANUAL STORE C AUTO STORE D"]
    W --> Y["SORT"]
    Y --> Z["A B TO C STORE"]
    Y --> AA["SORT"]
    AA --> AB["A FROM B C STORE"]
    AA --> AC["SORT"]
    AC --> AD["A FROM B TO C STORE"]
Your TV's operation menus
flowchart
graph TD
    A["MAIN MENU"] --> B["A CNTURE\nB SOUND\nC SPECIAL FEATURES\nD CLOCK"]
    B --> C["PICTURE MENU"]
    C --> D["A BRIGHTNESS\nB COLOUR\nC CONTRAST\nD SCREEN SIZE"]
    C --> E["PICTURE MENU"]
    E --> F["A BRIGHTNESS\nB COLOUR\nC CONTRAST\nD SCREEN SIZE"]
    E --> G["PICTURE MENU"]
    G --> H["A BRIGHTNESS\nB COLOUR\nC CONTRAST\nD SCREEN SIZE"]
    C --> I["MAIN MENU"]
    I --> J["A PICTURE\nB SPO\nC SPECIAL FEATURES\nD CLOCK"]
    J --> K["SOUND"]
    K --> L["A BALANCE\nB TREBLE\nC BASS\nD SPATIAL SOUND"]
    K --> M["SOUND"]
    M --> N["A BALANCE\nB TREBLE\nC BASS\nD SPATIAL SOUND"]
    M --> O["SOUND"]
    O --> P["A BALANCE\nB TREBLE\nC BASS\nD SPATIAL SOUND"]
    K --> Q["MAIN MENU"]
    Q --> R["A PICTURE\nB SOUND\nC SPSAL ON/OFF\nD CLOCK"]
    R --> S["SPECIAL FEATURES"]
    S --> T["A LOCK\nB DISPLAY PROG NR\nC PERS. PREFERENCE"]
    S --> U["SPECIAL FEATURES"]
    U --> V["A LOCK\nB DISPLAY PROG NR\nC PERS. PREFERENCE"]
    U --> W["SPECIAL FEATURES"]
    W --> X["A LOCK\nB DISPLAY PROG NR\nC PERS. PREFERENCE"]
    M --> Y["MAIN MENU"]
    Y --> Z["A PICTURE\nB SOUND\nC SPECIAL FEATURES\nD CLOCK"]
    Z --> AA["CLOCK"]
    AA --> AB["A SET CLOCK\nB SWITCH-ON TIME\nC PROGRAMME NUMBER\nD ON/OFF\nE SLEEP TIMER"]
    AA --> AC["CLOCK"]
    AC --> AD["A SET CLOCK\nB SWITCH-ON TIME\nC PROGRAMME NUMBER\nD ON/OFF\nE SLEEP TIMER"]
    AC --> AE["CLOCK"]
    AE --> AF["A SET CLOCK\nB SWITCH-ON TIME\nC PROGRAMME NUMBER\nD ON/OFF\nE SLEEP TIMER"]
    AE --> AG["CLOCK"]
    AG --> AH["A SET CLOCK\nB SWITCH-ON TIME\nC PROGRAMME NUMBER\nD ON/OFF\nE SLEEP TIMER"]