
CE20F10 - Fernseher TOSHIBA - Kostenlose Bedienungsanleitung
Finden Sie kostenlos die Bedienungsanleitung des Geräts CE20F10 TOSHIBA als PDF.


Benutzerfragen zu CE20F10 TOSHIBA
0 Frage zu diesem Gerät. Beantworten Sie die, die Sie kennen, oder stellen Sie Ihre eigene.
Eine neue Frage zu diesem Gerät stellen
Laden Sie die Anleitung für Ihr Fernseher kostenlos im PDF-Format! Finden Sie Ihr Handbuch CE20F10 - TOSHIBA und nehmen Sie Ihr elektronisches Gerät wieder in die Hand. Auf dieser Seite sind alle Dokumente veröffentlicht, die für die Verwendung Ihres Geräts notwendig sind. CE20F10 von der Marke TOSHIBA.
BEDIENUNGSANLEITUNG CE20F10 TOSHIBA
Color Television
OWNER'S MANUAL
CE20F10
natural_image
Abstract geometric shape with sharp white lines on black background, no text or symbols presentDear Customer
Congratulations! You have purchased one of the finest Color TV's on the market!
This manual will help you use the many exciting and useful features to make your TV viewing more enjoyable than ever before.
Before operating your TV set, please read all these safety and operating instructions completely and then retain for future reference.
Customer's Record
You will find the model number and serial number on the back of your TV set.
Record these numbers in the spaces provided below. Refer to them whenever you call upon your TOSHIBA dealer regarding this product.
Model Number
Serial Number
Safety Precautions
WARNING:
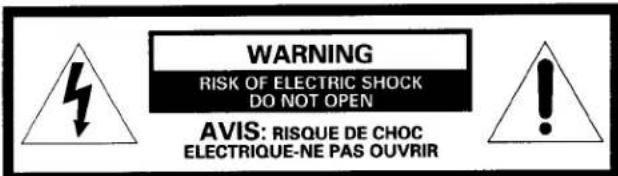
TO REDUCE THE RISK OF FIRE OR ELECTRIC SHOCK, DO NOT EXPOSE THIS APPLIANCE TO RAIN OR MOISTURE.
text_image
WARNING RISK OF ELECTRIC SHOCK DO NOT OPEN AVIS: RISQUE DE CHOC ELECTRIQUE-NE PAS OUvrirWARNING: TO REDUCE THE RISK OF ELECTRIC SHOCK, DO NOT REMOVE COVER (OR BACK). NO USER-SERVICEABLE PARTS INSIDE. REFER SERVICING TO QUALIFIED SERVICE PERSONNEL.
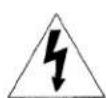
The lightning symbol in the triangle tells you that the voltage inside this product may be strong enough to cause an electric shock. DO NOT TRY TO SERVICE THIS PRODUCT YOURSELF.

The exclamation point in the triangle tells you that important operating and maintenance instructions follow this symbol.
CAUTIONS:
TO PREVENT ELECTRIC SHOCK, DO NOT USE THIS POLARIZED PLUG WITH AN EXTENSION CORD RECEPTACLE OR OTHER OUTLET UNLESS THE PRONGS CAN BE FULLY INSERTED INTO THE OUTLET TO PREVENT ANY EXPOSURE OF THE PRONGS ON THE POLARIZED PLUG.
ATTENTION:
POUR PRÉVENIR LES CHOCS ÉLECTRIQUES, NE PAS UTILISER CETTE FICHE POLARISÉE AVEC UN PROLONGATEUR, UNE PRISE DE COURANT OU UNE AUTRE SORTIE DE COURANT, SAUF SI LES LAMES PEUVENT ÊTRE INSÉRÉS À FOND SANS EN LAISSER AUCUNE PARTIE À DÉCOUVERT.
Avoid displaying stationary images on your TV screen for extended periods of time. Stationary patterns generated by computer displays, video games, stock market reports, etc. can become permanently engrained on the picture tube. This damage is not protected by your warranty as it is the result of misuse. Should you wish to use your TOSHIBA Television to display still images, it is always advisable to reduce brightness and contrast settings. Never leave a computer or video game display unattended.
NOTE TO CATV SYSTEM INSTALLER IN THE USA:
This reminder is provided to call the CATV system installer's attention to Article 820-40 of the NEC that provides guidelines for proper grounding and, in particular, specifies that the cable ground shall be connected to the grounding system of the building, as close to the point of cable entry as practical.
Table of Contents
Set Up
Installing Your TV Set 3
Antenna/Cable TV Connection 4
Preparation
Location of Controls (TV Set) 5
Location of Controls (Remote Control) ...... 6
Menu Function (General Instructions) ...... 7
Programming Channel Memory 8
Basic Operation
Watching TV Programs 10
Convenient Remote Functions .... 11
Selecting Stereo or Monaural Sound ..... 12
Advanced Operation
Setting the Off-Timer (Sleep Timer).... 13
Adjusting the Picture 14
Adjusting the Sound 15
Locking Channels 16
Using Closed-Captioned Function.... 18
Equipment Connections
Connecting Video Equipment 20
Reference Section
Cleaning and Care 21
Specifications 21
Before Calling Service Personnel 22
Limited United States Warranty 23
Installing Your TV Set
Where to install
Place the TV on the floor or on a sturdy platform. The mounting surface should be flat and steady.
Lighting
Do not place the TV in a room where direct lighting strikes the screen. Use soft and indirect lighting.
Air circulation
Place the TV far enough from the walls to allow proper ventilation. This will prevent the TV from overheating and avoid possible damage to the TV. Avoid dusty places too.
Power supply
Plug into an electrical outlet with standard household power (120 volt AC, 60Hz). Do not change the plug's safety prong. See the right column.
WARNING : TO AVOID PERSONAL INJURY
- Do not stand or climb on the TV.
- Do not put a VCR or any heavy object on top of the TV.
CAUTION :
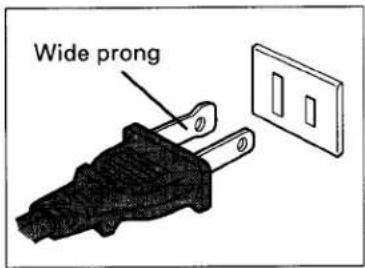
As a safety feature, the plug has one prong wider than the other. It will fit only one way into a standard electrical outlet. If the plug will not fit into the outlet, try turning it around. If the plug will not fit either way, the outlet is probably old and non-standard.
You will need to have a new outlet installed by an electrician. DO NOT CHANGE THE SAFETY FEATURE OF THE PLUG.
text_image
Wide prongYou can use either an indoor or outdoor antenna to receive VHF and/or UHF channels.
Channels 2 - 13 are VHF channels, and channels 14 - 69 are UHF channels.
We recommend using an outdoor antenna for better picture quality.
You can receive Cable TV by connecting a cable supplied by your local cable company.
Connecting an antenna or Cable without a decoder box
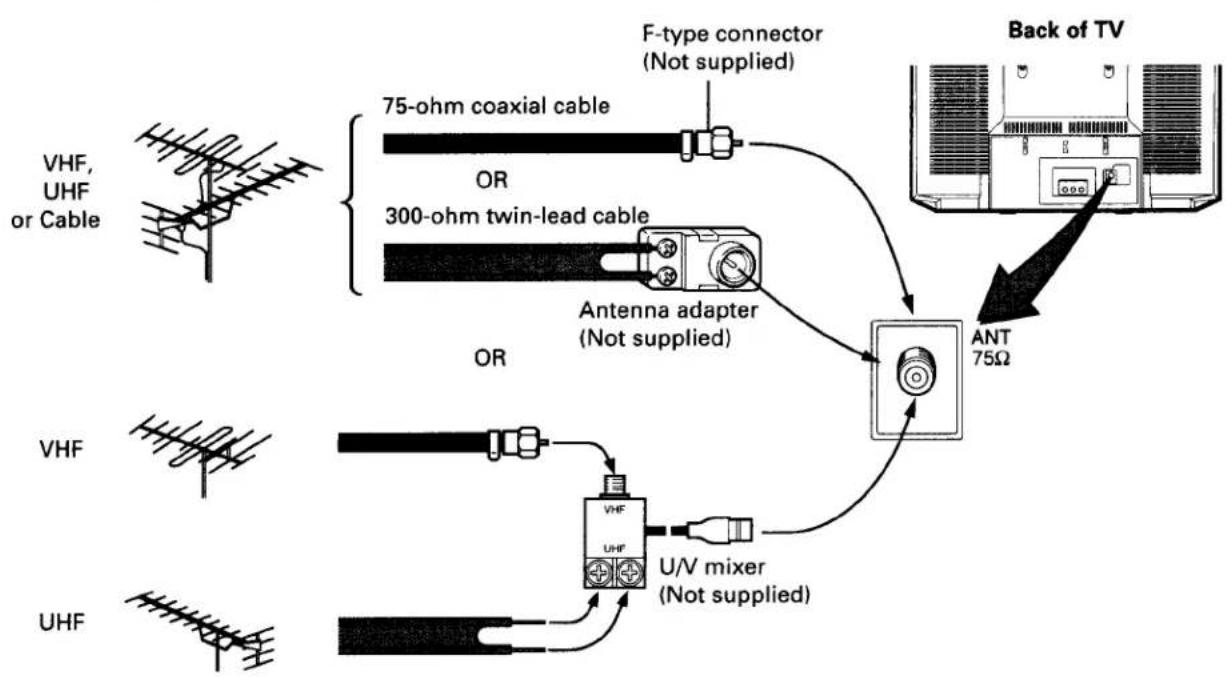
flowchart
graph TD
    A["VHF, UHF or Cable"] --> B["75-ohm coaxial cable"]
    B --> C["OR"]
    C --> D["300-ohm twin-lead cable"]
    D --> E["Antenna adapter (Not supplied)"]
    E --> F["ANT 75Ω"]
    F --> G["Back of TV"]
    H["UHF"] --> I["U/V mixer (Not supplied)"]
    I --> J["VHF"]
    J --> K["OR"]
    K --> L["Antenna adapter (Not supplied)"]
    L --> M["ANT 75Ω"]
Connecting Cable with a decoder box
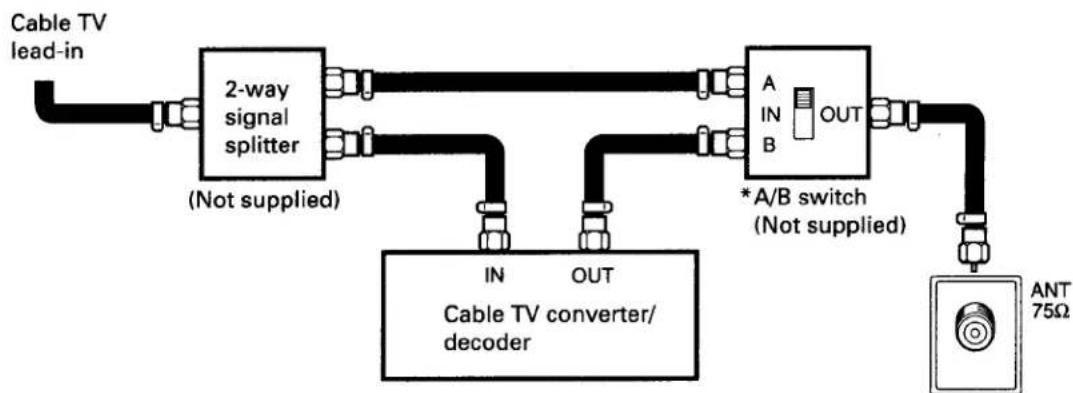
flowchart
graph LR
    A["Cable TV lead-in"] --> B["2-way signal splitter (Not supplied)"]
    B --> C["A IN B OUT"]
    C --> D["*A/B switch (Not supplied)"]
    D --> E["Cable TV converter/decoder"]
    E --> F["ANT 75Ω"]
    G["Cable TV"] --> H["IN"]
    G --> I["OUT"]
Notes:
* "A" position on the A/B switch allows you to select unscrambled channels using the TV's channel keys.
"B" position allows you to select scrambled channels via the converter/decoder box using the converter's channel keys. Place your TV on channel 3 or 4 to match the converter's output channel.
- If you use a VCR, connect its antenna in/out between the decoder box and A/B switch.
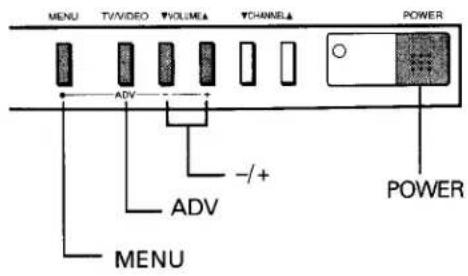
For specific use of each control, consult the corresponding page numbers in brackets.
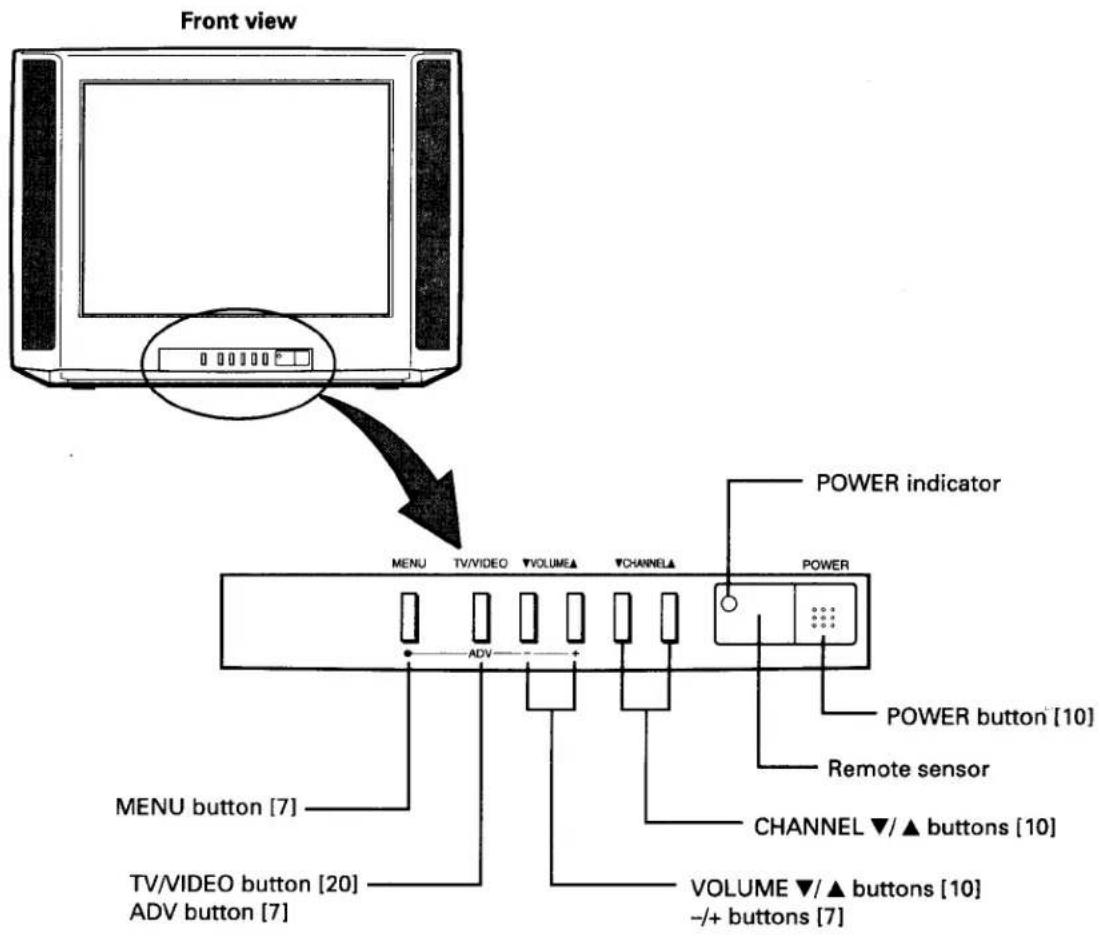
text_image
Front view MENU TV/VIDEO VOLUME▲ CHANNEL▲ POWER indicator POWER button [10] Remote sensor CHANNEL ▼/▲ buttons [10] VOLUME ▼/▲ buttons [10] -/+ buttons [7] MENU button [7] TV/VIDEO button [20] ADV button [7]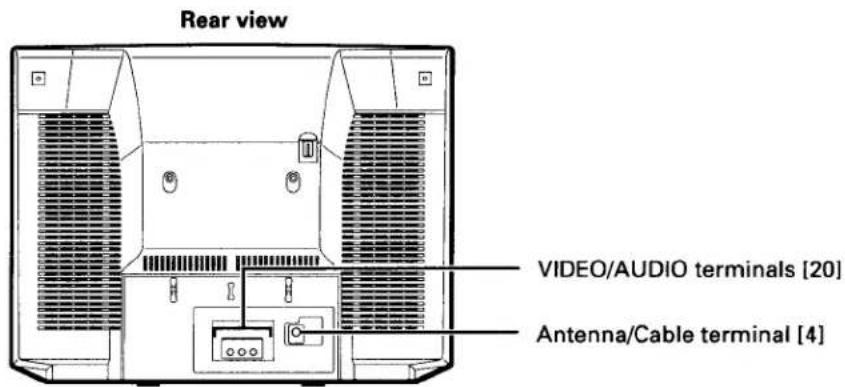
text_image
Rear view VIDEO/AUDIO terminals [20] Antenna/Cable terminal [4]
text_image
POTATO WALOAntenna/Cable TV Connection Location of Controls (TV Set)
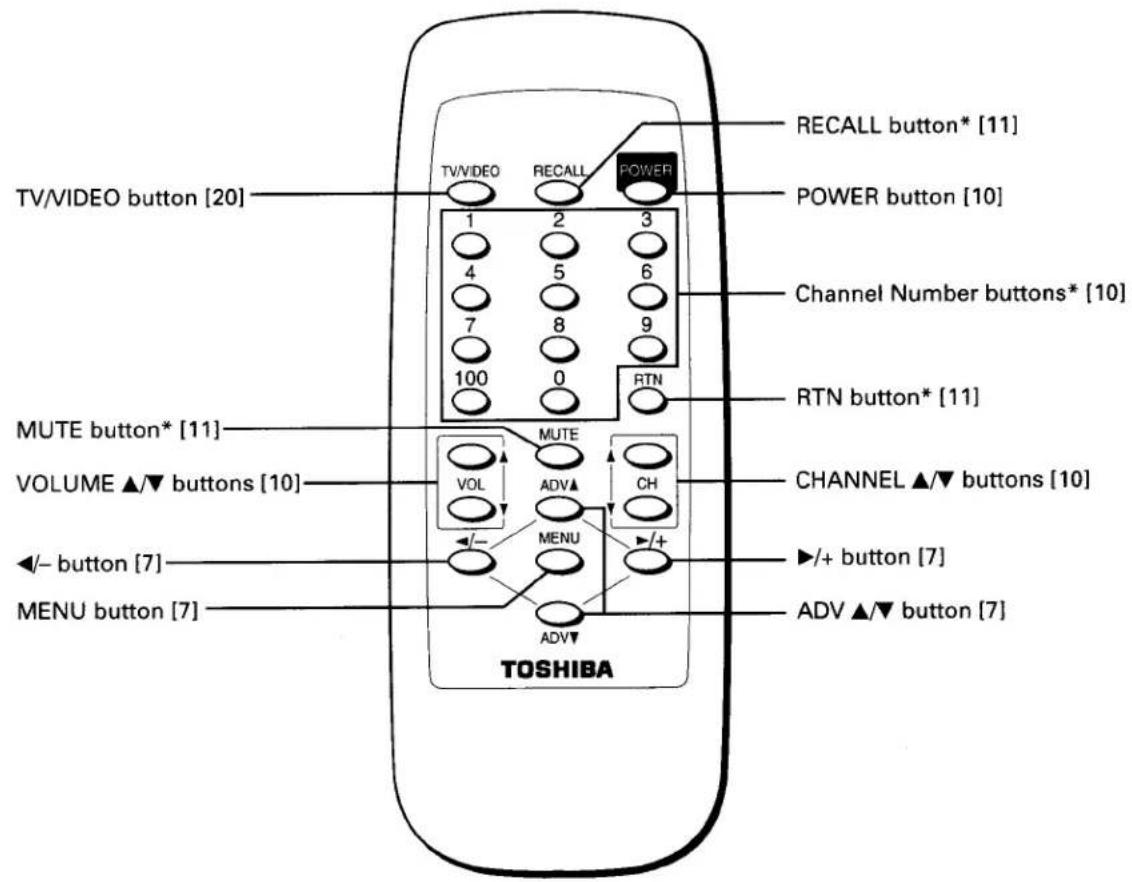
This Remote Control allows you to control the functions of your TV set from 16 feet (5m) away. The “*” marked function buttons do not have duplicate locations on your TV set. They can be controlled only by the Remote Control. For the use of each control, refer to pages in brackets.
text_image
TV/VIDEO button [20] TVVIDEO RECALL POWER 1 2 3 4 5 6 7 8 9 100 0 RTN RECALL button* [11] POWER button [10] Channel Number buttons* [10] RTN button* [11] MUTE button* [11] VOLUME ▲▼ buttons [10] VOL MUTE CH CHANNEL ▲▼ buttons [10] ◄− button [7] ►+/+ button [7] MENU button [7] ADV ▲▼ button [7] TOSHIBAInstalling and replacing batteries
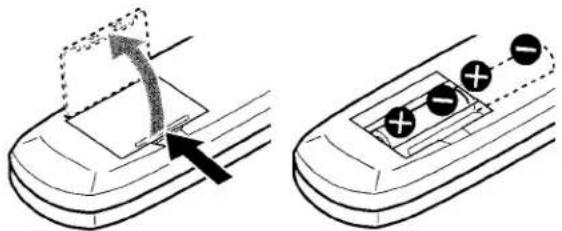
1 Place the Remote Control with the face down, and remove the battery cover as shown.
natural_image
Diagram showing two states of a device with arrows indicating rotation and charge distribution (no text or symbols)2 Place the two "AA" size batteries, matching the + and - signs on each battery to the + and - signs of the battery compartment.
3 Replace the battery cover until the lock snaps.
CAUTIONS:
- Do not throw your batteries into a fire. Dispose of your batteries in a designated disposal area.
- Do not combine used old batteries with new ones.
- Do not mix battery types.
Notes:
- If your Remote Control does not always adjust the set as you wish, you probably need to replace the batteries. The life expectancy of the battery is about one year.
- Remove dead batteries immediately to prevent battery acid from leaking into the battery compartment.
- If you do not intend to use the Remote Control for a long period, remove the batteries.
Menu Function (General Instructions)
We suggest you familiarize yourself with the procedure before using the Menu function.
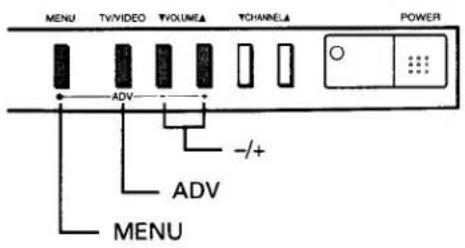
To adjust any TV feature, the use of the Menu function is required. The adjustments that can be made to the TV appear on the screen.
text_image
MENU TVVIDEO TVOLUME CHANNEL POWER ADV -/+ ADV MENU
text_image
TVVIDEO 1 4 7 100 VOL MENU TOSHIBA RECALL 2 5 8 0 MUTE ADV▲ CH MENU ADV▼ RETURN 3 6 9 RTN +/-+ ADV ▲ +/+ ADV ▼Notes:
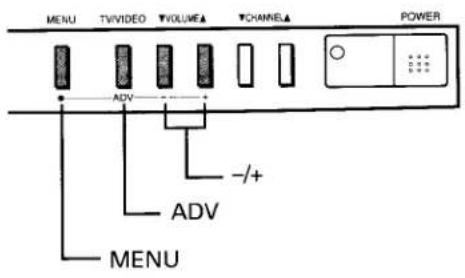
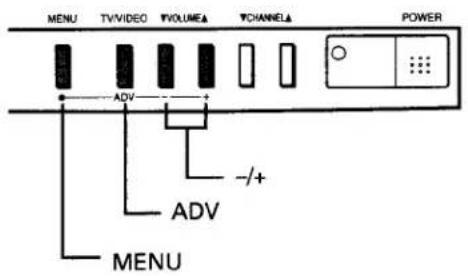
● The ADV button on the TV will function as the TV/VIDEO button when no menu display is on the screen.
- The - / + buttons on the TV will function as the VOLUME ▼/▲ buttons when no menu display is on the screen.
MENU button (on TV and on Remote)
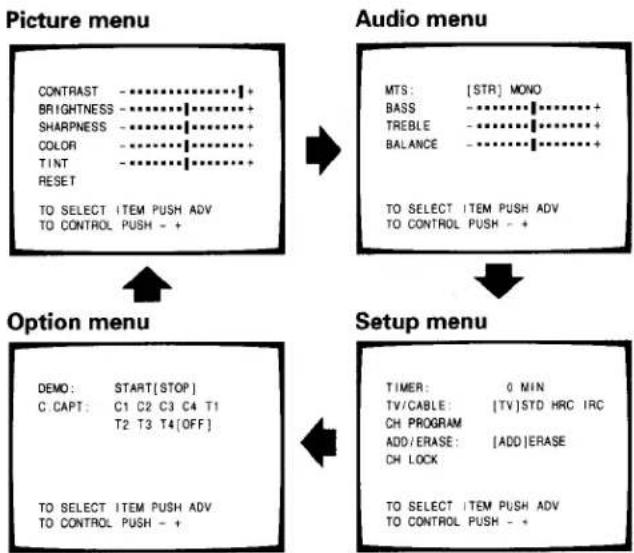
Each time you press MENU, the Picture, Audio, Setup or Option menu on-screen display is selected in order, then press ADV.
flowchart
graph TD
    A["Picture menu"] --> B["Option menu"]
    B --> C["Audio menu"]
    C --> D["Setup menu"]

    subgraph Picture menu
        A1["CONTRAST"] --> A2["BRIGHTNESS"] --> A3["SHARPNESS"] --> A4["COLOR"] --> A5["TINT"] --> A6["RESET"]
        A7["TO SELECT ITEM PUSH ADV TO CONTROL PUSH - +"] --> B
    end

    subgraph Audio menu
        C1["MTS: [STR"] MONO] --> C2["BASS"] --> C3["TREBLE"] --> C4["BALANCE"] --> C5["TO SELECT ITEM PUSH ADV TO CONTROL PUSH - +"]
        C6["TO SELECT ITEM PUSH ADV TO CONTROL PUSH - +"] --> D
    end

    subgraph Setup menu
        D1["TIMER: 0 MIN TV/CABLE: [TV"] STD HRC IRC CH PROGRAM ADD/ERASE: [ADD]ERASE CH LOCK TO SELECT ITEM PUSH ADV TO CONTROL PUSH - +] --> D
    end
The above four menu displays will automatically disappear from the screen if no control has been operated for about 15 seconds.
ADV button (on TV and on Remote)
Use ADV after you have selected the on-screen menu you want to adjust with the MENU button.
Each time you press ADV, the function to be adjusted will be selected in order.
ADV ▲ button...... from bottom to top
ADV, ADV ▼ button .... from top to bottom
The selected function will be displayed in magenta.
◀/−,▶/+ buttons (on TV and on Remote)
Use ◀/- or ▶/+ to adjust the function you have selected with the ADV button.
RECALL button (on Remote)
The above four menu displays will automatically disappear from the screen if no control has been operated for about 15 seconds. If you want to clear the Menu on-screen displays instantly, press RECALL.
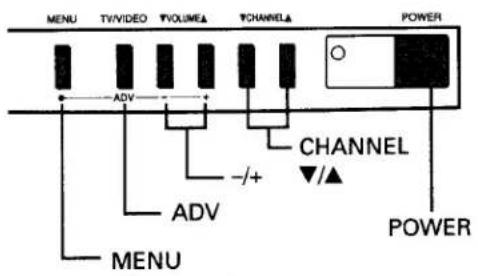
The channel memory is the list of TV channel numbers your TV will stop on when you press the CHANNEL ▲ or ▼ button. First, use the TV/CABLE and CH PROGRAM functions to preset all active channels in your area. If necessary, arrange the preset channels with the ADD/ERASE function so that you can tune into only desired channels.
text_image
MENU TV/VIDEO TVOLUME CHANNEL POWER ADV CHANNEL -/+ ADV MENU POWERTV/CABLE function
1 Press POWER to turn on the TV.
2 Press MENU repeatedly until the Setup menu is displayed on the screen.
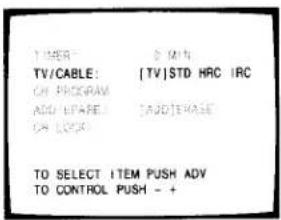
3 Press ADV repeatedly until "TV/CABLE" is displayed in magenta.
text_image
TIMER: 8 MIN TV/CABLE: [TV]STD HRC IRC OR PROGRAM ADD/ERASE: [ADD]ERASE OR LOCK TO SELECT ITEM PUSH ADV TO CONTROL PUSH - +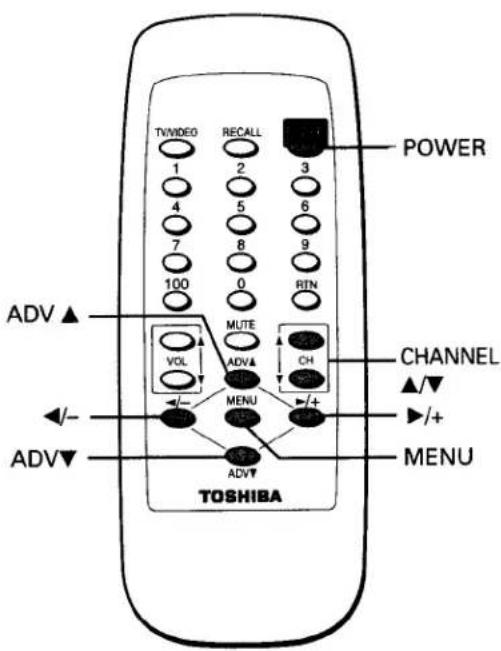
text_image
TV/VIDEO 1 2 3 4 5 6 7 8 9 100 0 RIN POWER ADV▲ VOL MUTE CH CHANNEL +/- MENU +/+ ADV▼ TOSHIBA MENU4 Press ◀/- or ▶/+ until the mode that corresponds to your TV signal system is displayed in magenta.
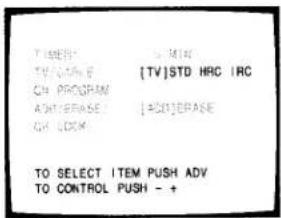
Each time you press the button, the TV*, STD*, HRC * or IRC* mode will be selected in order.
text_image
TIMES TV NAME CH PROGRAM ADJTERASE CH LOCK MIN [TV]STD HRC IRC [ACO]ERASE TO SELECT ITEM PUSH ADV TO CONTROL PUSH - +CH PROGRAM function
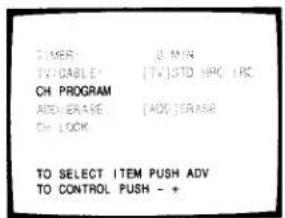
1 Press MENU repeatedly until the Setup menu is displayed on the screen.
2 Press ADV repeatedly until "CH PROGRAM" is displayed in magenta.
text_image
TIMER TV/DABLE: CH PROGRAM ADVERSE CH LOCK TO SELECT ITEM PUSH ADV TO CONTROL PUSH - +3 Press ◀/− or ▶/+ to start channel programming.
The TV will automatically cycle through all the TV or CABLE channels depending on the mode selected, and store active channels in the channel memory.
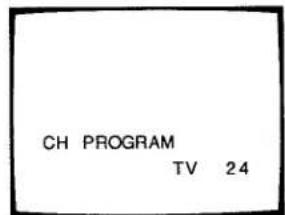
text_image
CH PROGRAM TV 244 When channel programming is complete, you will see the message at the right.
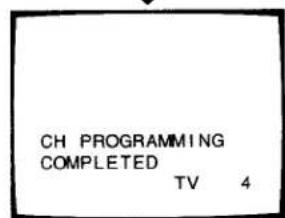
text_image
CH PROGRAMMING COMPLETED TV 4* This TV receives the following TV signals:
- TV: TV broadcasts signals. (VHF channels 2 through 13 and UHF channels 14 through 69)
- STD CABLE: Standard cable TV signals.
- HRC CABLE: Harmonic Related Carrier cable TV signals.
- IRC CABLE: Incremental Related Carrier cable TV signals.
If you are not sure what CABLE system they are using, consult your local cable company.
5 Press CHANNEL ▲ or ▼ to make sure the channel programming has been done properly.
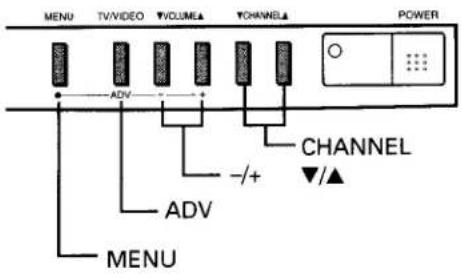
text_image
MENU TV/VIDEO VOLUME▲ CHANNEL▲ POWER ADV CHANNEL -/+ ▼/▲ ADV MENU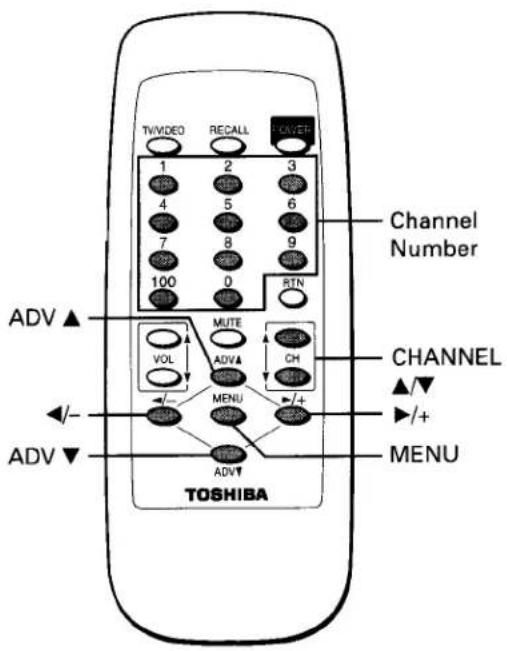
text_image
TWVIDEO RECALL TOMBER 1 2 3 4 5 6 7 8 9 100 0 RTN Channel Number ADV▲ VOL MUTE CH CHANNEL ▲/▼ +/+ ADV▼ MENU ADV▼ TOSHIBA MENUADD/ERASE function
After performing the CH PROGRAM function, you can add or erase specific channels.
1 Select the channel you want to erase using the CHANNEL ▲ or ▼ button, or select the channel you want to add using the Channel Number buttons.
2 Press MENU repeatedly until the Setup menu is displayed on the screen.
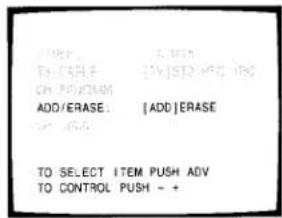
3 Press ADV repeatedly until "ADD/ERASE" is displayed in magenta.
4 Press ◀/- or ▶/+: To erase the channel
Press the button until "ERASE" is displayed in magenta indicating that the channel has been erased from the memory.
To add the channel
Press the button until "ADD" is displayed in magenta indicating that the channel has been memorized.
text_image
ORDER: 5.000 TYPE: [STOCK, MSCI, INCH, PUBLICS] ON FORM: ADD/ERASE: [ADD]ERASE ON SIGN: TO SELECT ITEM PUSH ADV TO CONTROL PUSH = +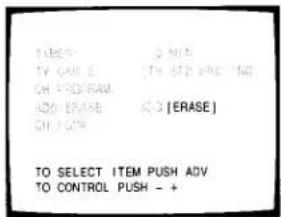
text_image
1.150 2.400 3.700 4.900 6.100 7.200 8.300 9.400 TO SELECT ITEM PUSH ADV. TO CONTROL PUSH - +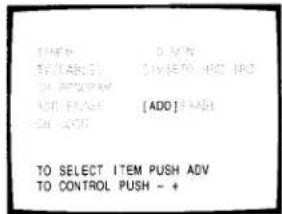
text_image
ITEMS EVEABLE ON APPROPAN ADD PROCES ON LOOP AID [ADD] PUSH TO SELECT ITEM PUSH ADV TO CONTROL PUSH - +5 Repeat steps 1 to 4 for other channels.
You have now completed the channel programming.
CABLE channel reference chart
| Number on this TV | 1 | 5 | 6 | 14 | 15 | 16 | 34 | 35 | 36 | 37 | 38 | 60 | 61 | 62 | 63 | 64 | 65 | 66 |
| Corresponding CABLE channel | A-8 | 5(A-7) | 6(A-6) | A | B | C | U | V | W | AA | BB | XX | YY | ZZ | AAA | BBB | 65 | 66 |
| Number on this TV | 67 | 68 | 69 | 92 | 93 | 94 | 95 | 96 | 97 | 98 | 99 | 100 | 101 | 102 | 123 | 124 | 125 | |
| Corresponding CABLE channel | 67 | 68 | 69 | 92 | 93 | 94 | A-5 | A-4 | A-3 | A-2 | A-1 | 100 | 101 | 102 | 123 | 124 | 125 |
The above chart is typical of many cable system channel allocations. If in doubt, consult your cable company.
text_image
MENU TV/VIDEO TVOLUME TCHANNEL POWER ADV 3 2 1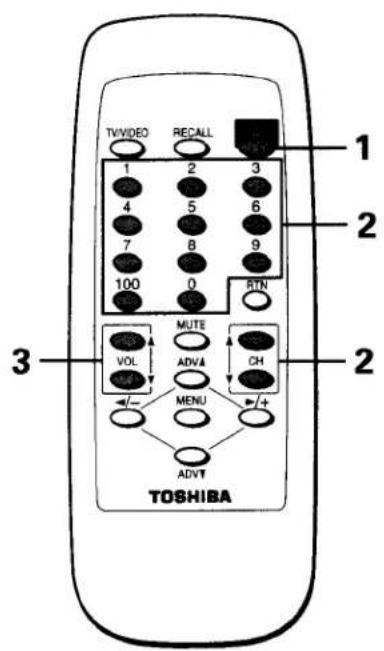
text_image
TVVIDEO RECALL 1 2 3 4 5 6 7 8 9 100 0 STN MUTE VOL ADVA CH MENU + ADV TOSHIBAWatching Video Input
The TV/VIDEO button is used to view the signals coming from other devices like VCR's or Laserdisc Players connected to this TV.
Details are on page 20.
Note:
The VOLUME ▼/▲ buttons on the TV function as the -/+ buttons while any of the menu displays (Picture, Audio, Setup or Option) are on the screen.
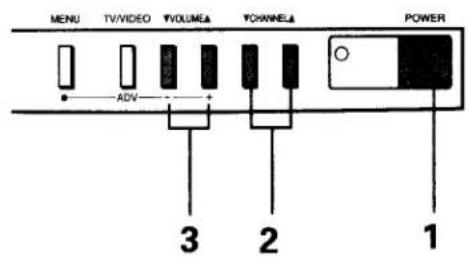
1 Press POWER to turn on the TV.
To turn off the TV, press POWER again.
text_image
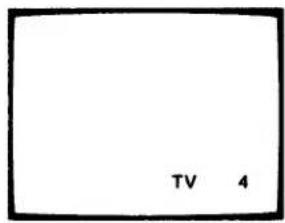
TV 42 Select a channel in one of the following two ways.
- To scan the memorized channels in numerical sequence Press CHANNEL ▲ to select the next higher channel. Press CHANNEL ▼ to select the next lower channel. Press the button again to select the next memorized channel.
● To select a channel directly
Press the Channel Number buttons (0-9 and 100). To select channel 4, press "4" (or press "0", "4"). To select channel 38, press "3", "8". To select channel 125, press "100", "2", "5" in sequence.
If you cannot select certain channels, either TV (off the air) or CABLE channels
Check if the TV/CABLE function is properly set. See page 8.
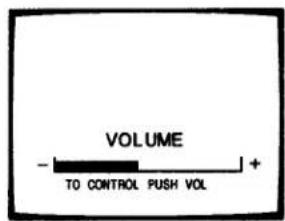
3 Press VOLUME ▲/▼ to adjust the volume.
To increase the volume, press ▲. To decrease the volume, press ▼.
text_image
VOLUME - TO CONTROL PUSH VOL + +Auto-Power-Off
If a vacant channel is tuned or TV broadcast for a day is finished, the TV will automatically turn off after about 15 minutes. This feature does not operate in the VIDEO mode.
Last Mode Memory
If the power is cut off while you are viewing the TV and the power is resupplied, the TV is turned on automatically by the Last Mode Memory feature. If the power is going to be off or when you leave home for a long time, remove the power plug from the wall outlet to prevent the TV from turning on in your absence.
Demonstration Mode
When this function is activated, your TV will automatically display a variety of its on-screen menus and special features, this function is provided for demonstration purpose only.
To start the demonstration, select "DEMO [START]" in the Option menu. (See page 7.) To stop, select "DEMO [STOP]" or press POWER.
TOSHIBA COLOR TV
- TECHNOLOGY - PERFORMANCE - EXCITEMENT
text_image
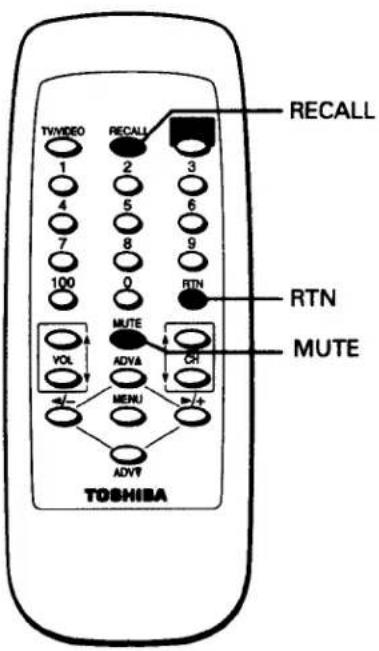
TV/VIDEO 1 2 3 4 5 6 7 8 9 100 0 RTN VOL MUTE ADVA CH MENU ADV ADVY TOSHIBA RECALL RTN MUTETo display on-screen information
Press RECALL to display the following on-screen information.
- Channel number
• VIDEO mode selected - Stereo status
● Closed Caption or Text program status
STEREO
CAPTION TEXT
TV 4
To mute the sound
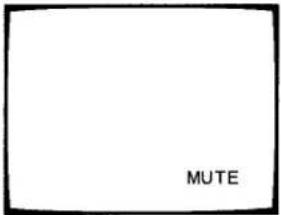
Press MUTE to mute the sound. The word "MUTE" will be displayed on the screen as shown. This is useful during telephone calls or other interruptions.
To restore the sound, press MUTE again.
Note: When the MUTE button is pressed, the Closed-Captioned feature "C1" is activated. ("MUTE" on the screen display will disappear.) To deactivate, press the MUTE button again. (This feature only functions when the Closed Caption mode is set to "OFF".)
text_image
MUTEMUTE
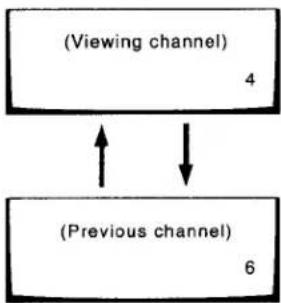
To change quickly between two channels
Press RTN to return to the last channel viewed.
This is useful should you want to view two channels. This allows you to view two programs without entering an actual channel number each time.
To operate this function
1 Select the first channel you want to view.
2 Select the other channel with the Channel Number buttons.
3 Press RTN.
The previous channel will return.
Each time you press RTN, the TV will switch back and forth between the two channels.
flowchart
graph TD
    A["(Viewing channel)\n4"] --> B["(Previous channel)\n6"]
    B <--> A
Selecting Stereo or Monaural Sounds
The MTS (Multi-channel TV Sound) feature allows you to improve your TV viewing with high fidelity stereo sound. This TV also allows you to activate or deactivate the stereo sound effect.
text_image
MENU TVVIDEO TVOLUME▲ CHANNEL▲ POWER ADV -/+ ADV MENU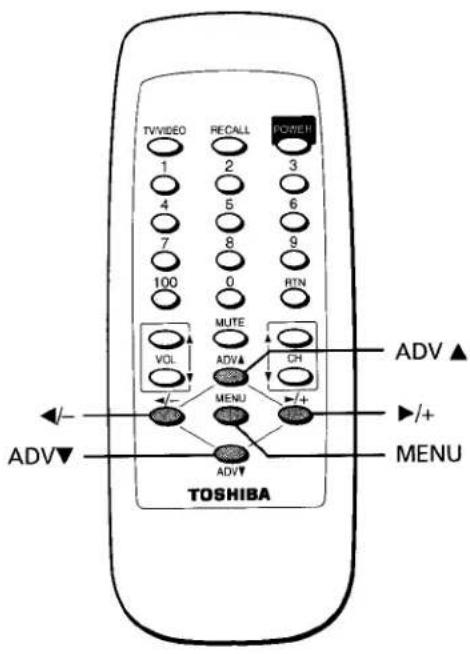
text_image
TVVIDEO 1 2 3 4 5 6 7 8 9 100 0 RTN VOL MUTE ADV▲ CH MENU +/+ ADV▼ TOSHIBA ADV▼ MENU ADV▲To listen to stereo sound
text_image
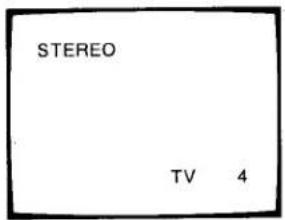
STEREO TV 41 When the TV receives a stereo broadcast, the word "STEREO" is displayed on the screen whenever the TV is turned on, a channel is selected, or the RECALL button is pressed.
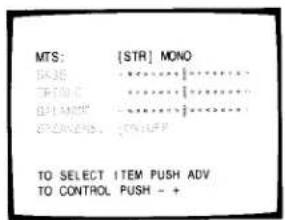
2 Press MENU repeatedly until the Audio menu is displayed on the screen.
3 Press ADV repeatedly until "MTS" is displayed in magenta. If a stereo broadcast is received, "STR" will be displayed in yellow.
4 Press ◀/- or ▶/+ until "STR" (stereo) is displayed in magenta.
Normally this function can be left in the STR mode. Your TV will then automatically reproduce either stereo or monaural sound, whichever is broadcast.
text_image
MTS: [STR] MONO BASE : ...... FIND C : ...... DIMANCE : ...... GREENERS : ..../UPP TO SELECT ITEM PUSH ADV TO CONTROL PUSH - +If the stereo sound is noisy
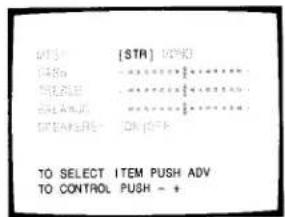
Be sure you have selected the STR mode if broadcast is in stereo. However, if a broadcast signal is not strong enough, and noise-free stereo sound is not available, select "MONO" (monaural) mode. The noise should be reduced.
text_image
DTSI [STR] (STRI) [486] ······· [5012] ······· [5013] ······· [5014] ······· [5015] ······· [5016] ······· TO SELECT ITEM PUSH ADV TO CONTROL PUSH - +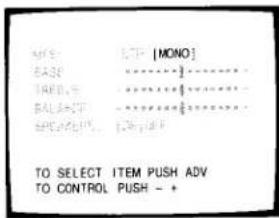
text_image
MFS: LTP [MONO] BASE : ······ TRED: ······ BALANCE : ······ SPRINGLY: [25% P/S] TO SELECT ITEM PUSH ADV TO CONTROL PUSH - +Setting the Off-Timer (Sleep Timer)
With the off-timer, you can set the TV to turn off automatically after a pre-determined period of time (up to 180 minutes in 10 minute units).
text_image
MENU TV/VIDEO VOLUME CHANNEL POWER ADV -/+ ADV MENU POWER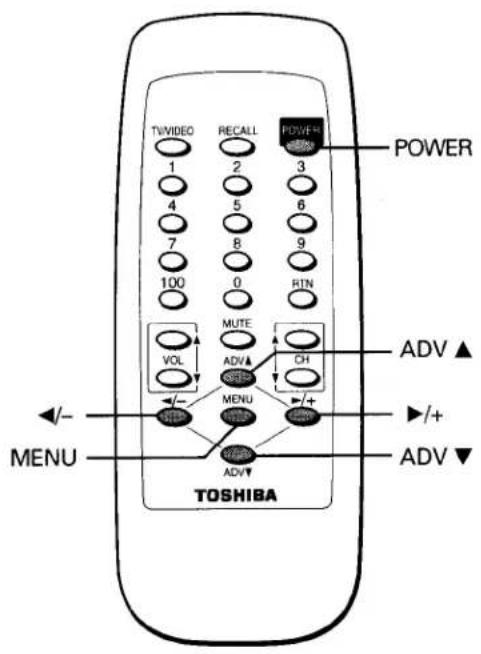
text_image
TVVIDEO 1 2 3 4 5 6 7 8 9 100 0 RTN POWER MUTE VOL ADV▲ CH MENU +/+ TOSHIBA ADV▼ MENU ADV▲ +/+To set the off-timer
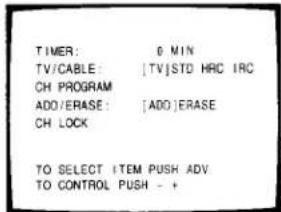
1 Press MENU repeatedly until the Setup menu is displayed on the screen.
2 Press ADV repeatedly until "TIMER" is displayed in magenta.
3 Press ◀/- or ▶/+ to enter the length of time you want the TV to stay on. Each time you press the button, the time display will increase (▶/+) or decrease (◀/-) by 10 minutes.

text_image
TIMER: 0 MIN TV/CABLE: [TV]STD HRC IRC CH PROGRAM ADD/ERASE: [ADO]ERASE CH LOCK TO SELECT ITEM PUSH ADV. TO CONTROL PUSH - +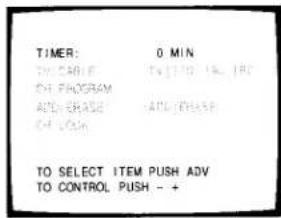
text_image
TIMER: 0 MIN TWI CABLE TWI TITLO, INC. IRC CHI PROGRAM ADLE GRASS ADLE CHASE CHI PUSH TO SELECT ITEM PUSH ADV TO CONTROL PUSH - +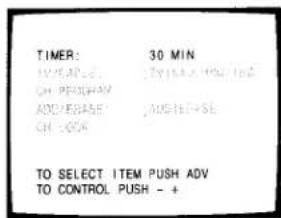
text_image
TIMER: 30 MIN TO SELECT ITEM PUSH ADV TO CONTROL PUSH - +To cancel the setting
Press POWER twice, once to turn the TV off and once to turn it on again.
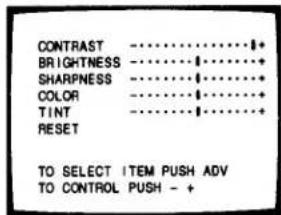
You can adjust the picture quality (CONTRAST, BRIGHTNESS, SHARPNESS, COLOR and TINT) to suit your taste.
text_image
MENU TVVIDEO VOLUME▲ VCHANNEL▲ POWER ADV -/+ ADV MENU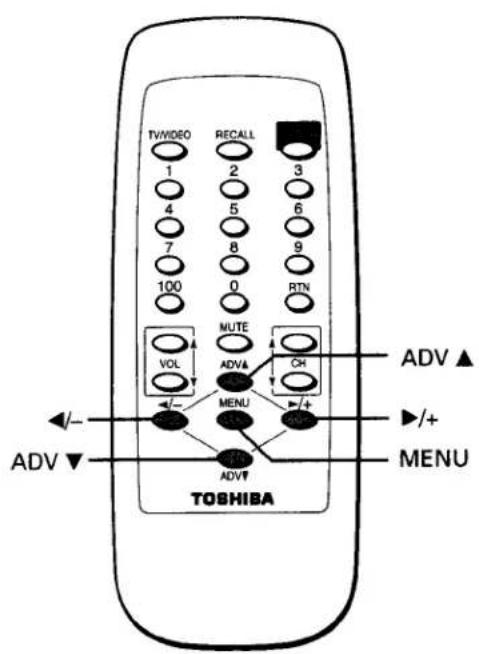
text_image
TVVIDEO 1 2 3 4 5 6 7 8 9 100 0 RTN VOL MUTE ADV▲ CH MENU ADV▼ TOSHIBA ADV▲ +/+ MENUTo adjust the picture quality
1 Press MENU repeatedly until the Picture menu is displayed on the screen.
2 Press ADV repeatedly until the item you want to adjust is displayed in magenta.
3 Press ◀/- or ▶/+ to adjust the level.
Example: CONTRAST adjustment mode display
text_image
CONTRAST BRIGHTNESS SHARPNESS COLOR TINT RESET TO SELECT ITEM PUSH ADV TO CONTROL PUSH - +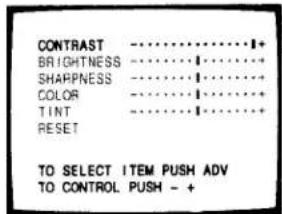
text_image
CONTRAST BRIGHTNESS SHAPNESS COLOR TINT RESET TO SELECT ITEM PUSH ADV TO CONTROL PUSH - +| Selection | ||
| CONTRAST | lower | higher |
| BRIGHTNESS | darker | lighter |
| SHARPNESS | softer | sharper |
| COLOR | paler | deeper |
| TINT | reddish | greenish |
RESET function
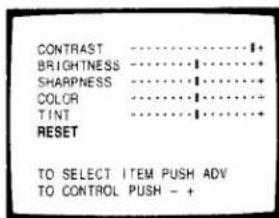
To reset the picture and sound adjustments to the factory-preset level (maximum CONTRAST and all other adjustments centered)
1 Press MENU repeatedly until the Picture menu is displayed on the screen.
2 Press ADV repeatedly until "RESET" is displayed in magenta.
3 Press ◀/- or ▶/+
text_image
CONTRAST ....+ BRIGHTNESS ....+ SHARPNESS ....+ COLOR ....+ TINT ....+ RESET TO SELECT ITEM PUSH ADV TO CONTROL PUSH - +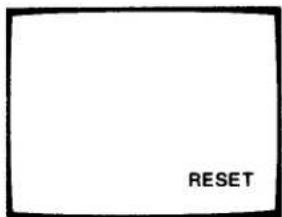
text_image
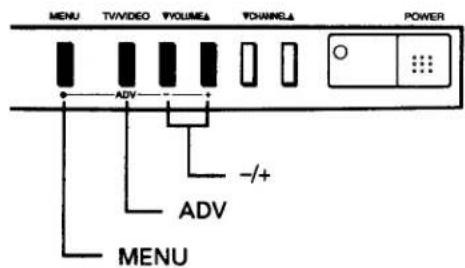
RESETYou can adjust the sound quality (BASS, TREBLE and BALANCE) to suit your taste.
text_image
MENU TV/VIDEO VOLUME VCHANNEL POWER ADV -/+ ADV MENU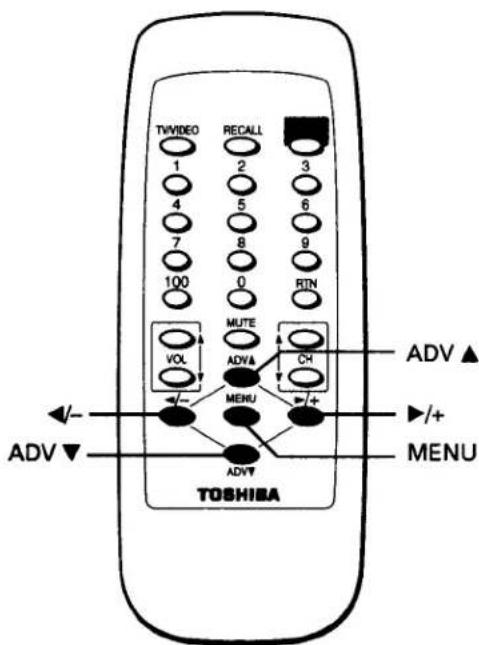
text_image
TVVIDEO 1 2 3 4 5 6 7 8 9 100 0 RTN VOL MUTE ADVA CH MENU ADV▲ ADV▼ TOSHIBA MENUTo adjust the sound quality
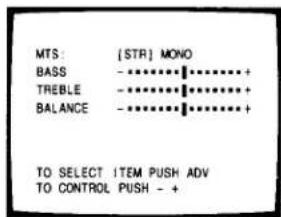
1 Press MENU repeatedly until the Audio menu is displayed on the screen.
2 Press ADV repeatedly until the item you want to adjust is displayed in magenta.
3 Press ◀/- or ▶/+ to adjust the level. Example: BASS adjustment mode display
text_image
MTS: [STR] MONO BASS -********+ TREBLE -********+ BALANCE -********+ TO SELECT ITEM PUSH ADV TO CONTROL PUSH - +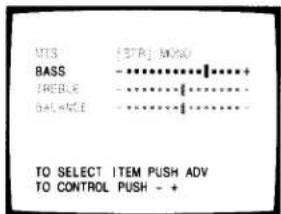
text_image
MTS BASS FREELC BALANCE [STR] MAND -********+----+ -********-- -********-- TO SELECT ITEM PUSH ADV TO CONTROL PUSH - +| Selection | Preasing | |
| BASS | weaker | stronger |
| TREBLE | weaker | stronger |
| BALANCE | decreases the right channel | decreases the left channel |
To reset the sound adjustments to the factory-preset level Activate the RESET function. (See page 14.) (maximum CONTRAST and all other adjustments centered)
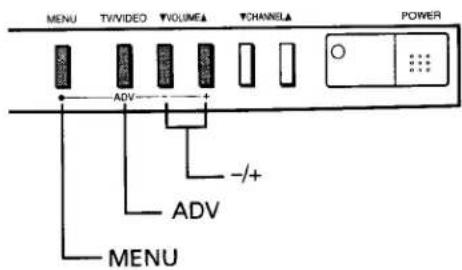
With this function you can lock out specific channels (for example a channel that you do not want your children to watch) by entering your own 4-digit code. The TV will not be able to tune them for the next 24 hours, unless you cancel the locked out channels. This TV has 4 memory spaces total for the TV mode and CABLE mode respectively.
text_image
MENU TVVIDEO VOLUME▲ CHANNEL▲ POWER ADV +/+ ADV MENU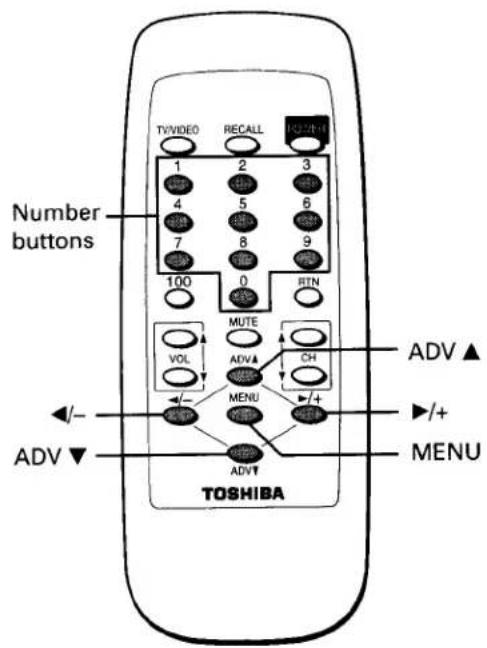
text_image
Number buttons TVVIDEO RECALL 1 2 3 4 5 6 7 8 9 100 0 RTN MUTE VOL ADV▲ CH MENU +/+ ADV▼ TOSHIBA ADV▲ +/+ MENUTo lock out channels
1 Select a channel you want to lock out.
Example: channel 4
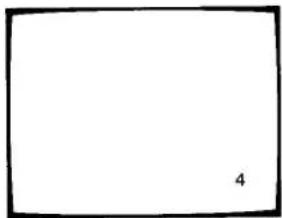
text_image
42 Press MENU repeatedly until the Setup menu is displayed on the screen.
3 Press ADV repeatedly until "CH LOCK" is displayed in magenta.
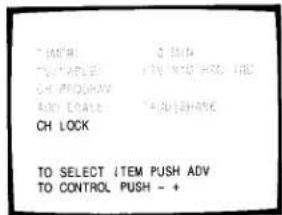
text_image
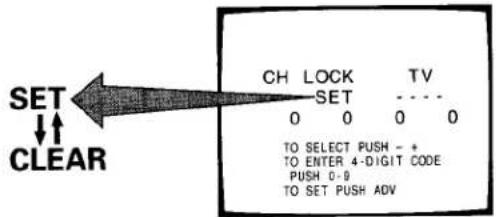
TIMMTRI TOMHAPLES CH PROGROW ADD ENLLE CH LOCK TO SELECT ITEM PUSH ADV TO CONTROL PUSH - +4 Press ◀/- or ▶/+ to call up the channel lock adjustment display shown below. Each time you press the button, you are guided between "SET" and "CLEAR".
Select "SET"
text_image
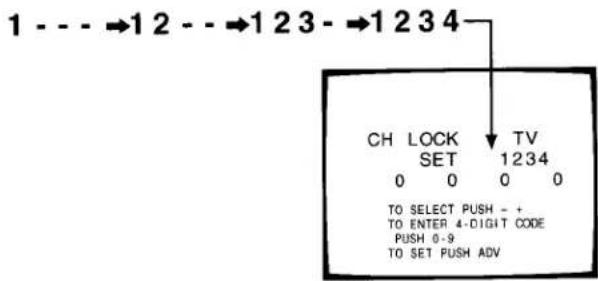
SET ↓ CLEAR CH LOCK TV SET 0 0 0 0 TO SELECT PUSH - + TO ENTER 4-DIGIT CODE PUSH 0-9 TO SET PUSH ADV5 Press Number buttons (0 - 9) to enter a 4-digit code. The numbers you enter will replace the dashes in the display. Pick a number that is easy to remember.
Example: To enter "1234"
Press 1, 2, 3 and 4 in order.
text_image
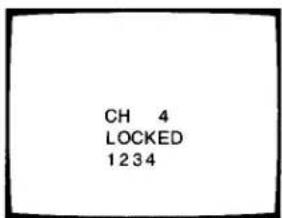
1 --- →1 2 --- →1 23 --- →1 234 CH LOCK TV SET 1234 0 0 0 0 TO SELECT PUSH - + TO ENTER 4-DIGIT CODE PUSH 0-9 TO SET PUSH ADV6 Press ADV to lock out the channel. The display at the right will appear on the screen for about 4 seconds.
text_image
CH 4 LOCKED 12347 Repeat steps 1 to 6 for other channels. This TV has 4 memory spaces total for the TV mode and CABLE mode respectively.
Note: If a different code number is used whenever you lock out a channel, the last one has priority over the preceding ones.
8 Select another channel.
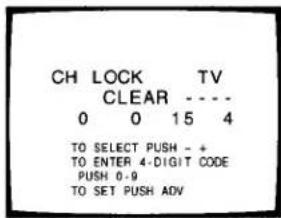
To restore channels
1 Select "CLEAR" following the steps 2 to 4 on the previous page.
text_image
CH LOCK TV CLEAR ---- 0 0 15 4 TO SELECT PUSH - + TO ENTER 4-DIGIT CODE PUSH 0-9 TO SET PUSH ADV2 Press the 4-digit code used to lock out the channels with the Number buttons.
3 Press ADV. If you have entered the correct code The display shown at the right appears.
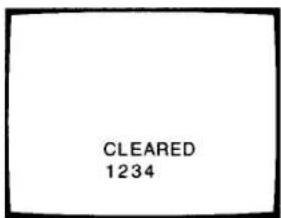
text_image
CLEARED 1234If a wrong code has been entered These messages appear. Try to enter the correct code again.
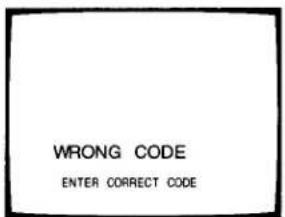
text_image
WRONG CODE ENTER CORRECT CODEIf you want to know the channels you have locked out Call up the channel lock adjustment mode using the Setup menu.
Using Closed-Captioned Function
text_image
The top of the mountain is covered with snow all the year round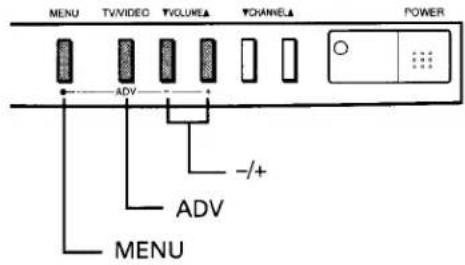
text_image
MENU TVVIDEO TVOLUME CHANNEL POWER ADV -/+ ADV MENU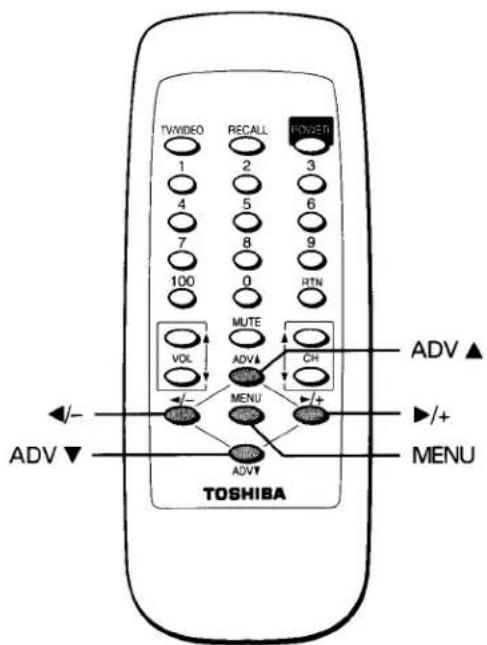
text_image
TVVIDEO 1 2 3 4 5 6 7 8 9 100 0 RTN MUTE VOL ADV▲ CH MENU +/-+ ADV▼ TOSHIBA MENU▲ +/+ ADV▼To view captions
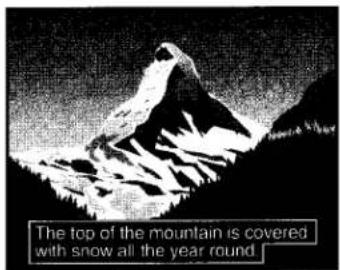
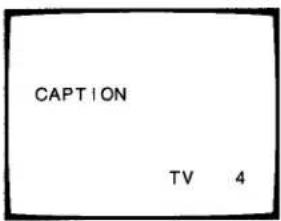
Closed-captioning is a printed version of the dialogue, narration, and/or sound effects of a TV program.
Captions will appear at either the top or bottom of the screen during captioned broadcasts as shown.
Captioning is especially helpful for hearing impaired individuals.
1 Select the desired program.
2 Press RECALL to check if the program is being captioned. If it is, the word "CAPTION" is displayed on the screen. The captioned programs are usually notated on your local TV listings by its service marks such as "CC".
3 Press MENU repeatedly until the Option menu is displayed on the screen.
4 Press ADV repeatedly until "C.CAPT" is displayed in magenta.
5 Press ◀/- or ▶/+ to select "C1", "C2", "C3" or "C4".
text_image
CAPTION TV 4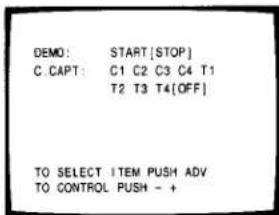
text_image
DEMO: START[STOP] C CAPT: C1 C2 C3 C4 T1 T2 T3 T4[OFF] TO SELECT ITEM PUSH ADV TO CONTROL PUSH - +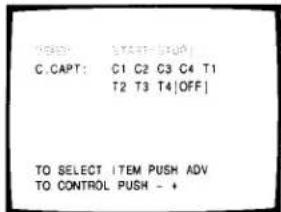
text_image
C.CAPT: C1 C2 C3 C4 T1 T2 T3 T4|OFF| TO SELECT ITEM PUSH ADV TO CONTROL PUSH - +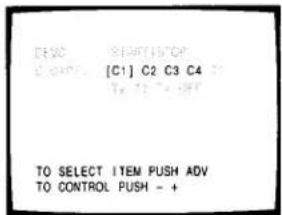
text_image
CESC START/STOP C:\WINDOWS [C1] C2 C3 C4 To SELECT ITEM PUSH ADV TO CONTROL PUSH - +To deactivate this feature
Select "OFF" in step 3 above.
Note:
A closed-captioned signal may not be decoded in the following situations.
- When a video tape has been dubbed.
- When the signal reception is weak.
- When the signal reception is non-standard.
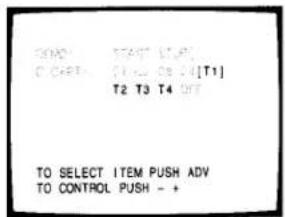
To view text
Text is information that is presented using from one half to full television screen. It is usually not related to the program.
For example, it could be a listing of the closed-captioned programs, news, weather information or stock market reports.
1 Select the desired program.
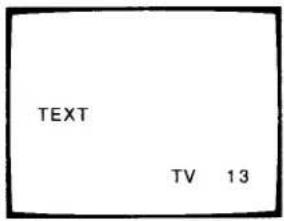
2 Press RECALL to check if the program includes text information. If it is, the word "TEXT" is displayed on the screen.
text_image
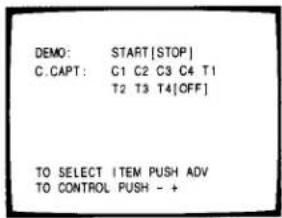
TEXT TV 133 Press MENU repeatedly until the Option menu is displayed on the screen.
text_image
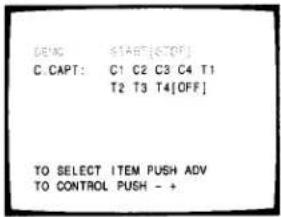
DEMO: START[STOP] C.CAPT: C1 C2 C3 C4 T1 T2 T3 T4[OFF] TO SELECT ITEM PUSH ADV TO CONTROL PUSH - +4 Press ADV repeatedly until "C.CAPT" is displayed in magenta.
text_image
[GENC START][STOP] C.CAPT: C1 C2 C3 C4 T1 T2 T3 T4[OFF] TO SELECT ITEM PUSH ADV TO CONTROL PUSH - +5 Press ◀/- or ▶/+ to select "T1", "T2", "T3" or "T4".
text_image
C:\ADD\TST\TST\C:\CAPT\ (1) = 03 - [T1] T2 T3 T4 ORT TO SELECT ITEM PUSH ADV TO CONTROL PUSH - +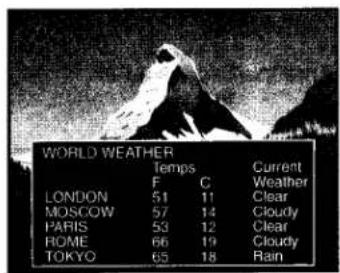
text_image
WORLD WEATHER Temps Current Weather F C Clear LONDON 51 11 MOSCOW 57 14 PARIS 53 12 HOME 66 19 TOKYO 65 18 RainTo deactivate this feature
Select "OFF" in step 3 above.
Note: If you select a closed-captioned channel and the "TEXT" mode, the text screen always appears.
However, text characters are not displayed when no signal is aired.
Connecting Video Equipment
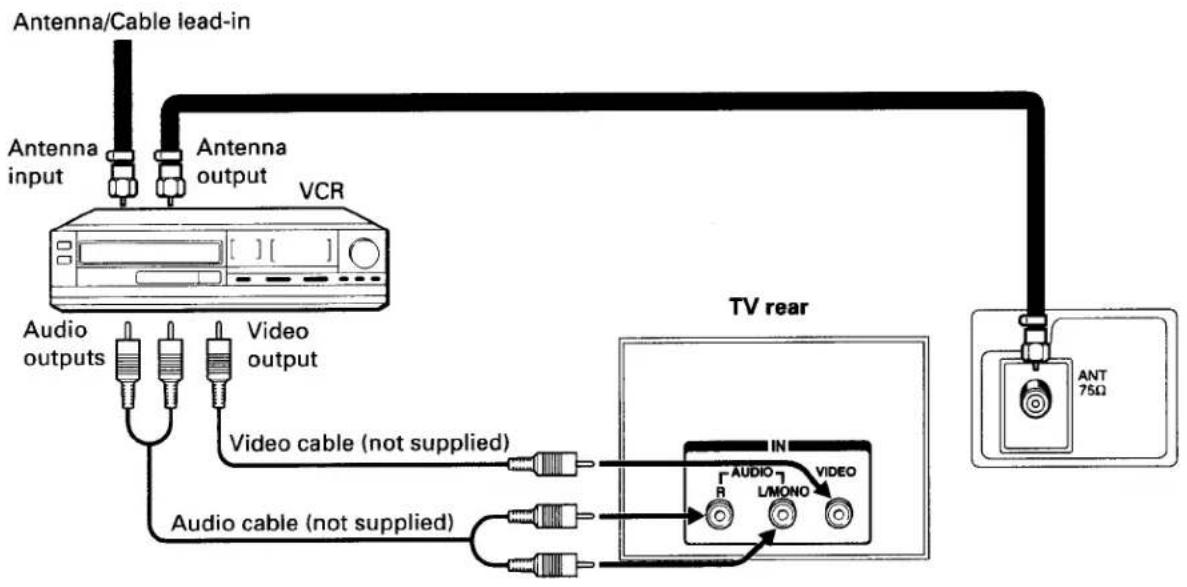
Connect VIDEO/AUDIO IN jacks on the rear of the TV to the video/audio output jacks of a VCR, Laserdisc player, etc. for playback of video material.
flowchart
graph TD
    A["Antenna/Cable lead-in"] --> B["VCR"]
    C["Antenna input"] --> B
    D["Antenna output"] --> B
    E["Audio outputs"] --> F["Video cable (not supplied)"]
    G["Video output"] --> F
    H["Audio cable (not supplied)"] --> I["TV rear"]
    J["ANT 75Ω"] --> K["IN"]
    L["L/MONO"] --> K
    K --> M["VIDEO"]
    style A fill:#f9f,stroke:#333
    style C fill:#f9f,stroke:#333
    style D fill:#f9f,stroke:#333
    style E fill:#f9f,stroke:#333
    style F fill:#ccf,stroke:#333
    style G fill:#ccf,stroke:#333
    style H fill:#ccf,stroke:#333
    style I fill:#ccf,stroke:#333
    style J fill:#ccf,stroke:#333
    style K fill:#ccf,stroke:#333
    style L fill:#ccf,stroke:#333
Selecting video input source
To operate your TV and video equipment properly, refer to the instructions furnished with the video equipment.
text_image
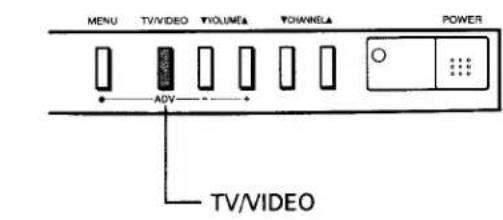
MENU TV/VIDEO VOLUME VCHANNEL POWER ADV TV/VIDEO1 Turn the TV and the video equipment ON.
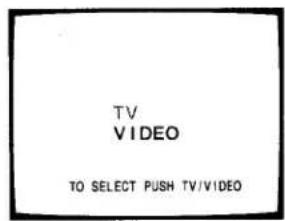
2 Press TV/VIDEO on the Remote Control or on the TV to select "VIDEO". Each time you press the button, TV or VIDEO source will be selected alternately. The selected source will be displayed in magenta.
3 Operate the video equipment normally.
text_image
TV VIDEO TO SELECT PUSH TV/VIDEO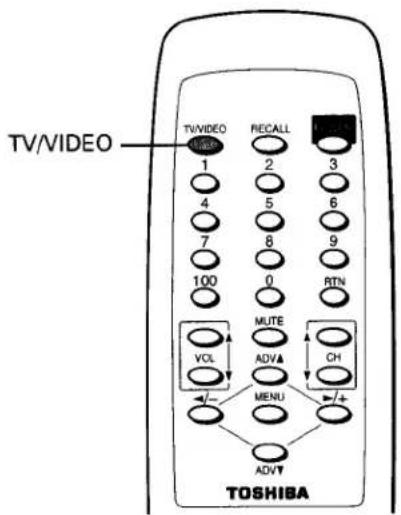
text_image
TV/VIDEO TV/VIDEO 1 2 3 4 5 6 7 8 9 100 0 RTN VOL MUTE ADV▲ CH MENU + ADV▼ TOSHIBANote: If you connect a monaural video equipment, connect the audio output of the video equipment to the L/MONO jack on the TV.
WARNING: TV sets use High Voltage. Do not try to remove the cabinet back. Refer servicing to qualified service personnel.
■ To clean the TV screen:
- First remove the plug from the power outlet to avoid possible shock hazard.
- Use a clean cellulose sponge or chamois cloth dampened with a solution of mild detergent and warm water to clean TV screen and trim. Do not use too much water on the TV screen. Water spills into the cabinet and may cause damage to the TV. Avoid excess water.
- Remove any extra moisture with the same cloth or a dry one.
■ To maintain the finish and appearance of the cabinet, polish it from time to time with a quality furniture polish.
Caution: Never use strong solvents such as thinner, benzene or other chemicals on or near cabinet, as they might damage the finish of the cabinet.
Specifications
| TELEVISION SYSTEM: | NTSC standard |
| CHANNEL COVERAGE: | VHF; 2 through 13UHF; 14 through 69Cable TV; mid band (A-8 through A-1, A through I)super band (J through W)hyper band (AA through ZZ, AAA, BBB)ultra band (65 through 94, 100 through 125) |
| POWER SOURCE: | 120V AC, 60Hz |
| POWER CONSUMPTION: | 56W (average) |
| AUDIO POWER: | 2W + 2W |
| SPEAKER TYPE: | Two 2 x 3-1/2 inches (5 x 9 cm) oval |
| VIDEO/AUDIO INPUTS: | VIDEO: 1V(p-p), 75 ohm, negative sync.AUDIO: 150mV(rms) (30% modulation equivalent, 47k ohm) |
| DIMENSIONS: | Width ...... 23-13/16 inches (605mm)Height ...... 18-17/64 inches (464mm)Depth ...... 18-7/16 inches (468mm) |
| MASS: | 44.1 lbs. (20.0 kg) |
| SUPPLIED ACCESSORIES: | Remote Control with 2 size “AA” batteries |
Design and specifications are subject to change without notice.
Before Calling Service Personnel
Before calling service personnel, please check the following chart for a possible cause of the problem you are experiencing. A minor adjustment on your part may eliminate the problem and restore your TV reception.
| Symptoms | Check | Adjustments |
| No picture, no sound | Be sure power cord is plugged in.May be station trouble.Check antenna connections.Check antenna for broken wires. | Press POWER button.Try another channel. |
| No sound, picture OK | May be station trouble. | Try another channel.Adjust VOLUME. |
| Poor sound, picture OK | May be station trouble.Check antenna connections.May be local interference from appliance. | Try another channel.Adjust VOLUME.Adjust BASS, TREBLE, or BALANCE control.Re-orient antenna. |
| Poor picture, sound OKSnowy pictureLines in pictureDistorted pictureWeak picture | May be local interference from appliance.Check antenna connections.Check antenna for broken wires.May be station trouble. | Try another channel.Adjust BRIGHTNESS.Adjust CONTRAST.Adjust SHARPNESS.Re-orient antenna. |
| Poor reception of broadcast channels | Check antenna connections.Check antenna for broken wires.If VCR is connected, check TV/VCR switch. | Try another channel.Re-orient antenna. |
| No UHF, VHF OK | Be sure TV/CABLE function (page 8) is in "TV" mode. | |
| Unable to select a certain channel | That channel may be locked out with CH LOCK function (page 16), or erased with the ADD/ERASE function (page 9). | |
| Multiple images (ghosts) | May be station trouble.Check antenna connections. | Try another channel.Re-orient antenna. |
| Poor color or No color | May be station trouble.Check antenna connections.Check antenna for broken wires.May be local interference from appliance.Check if station is broadcasting in color.If you change the direction of the TV while the TV is activated, the picture may suffer from color shading. If so, turn off the TV and allow to cool for about 30 minutes, then turn on the TV again.The picture should improve. | Try another channel.Re-orient antenna.Adjust TINT.Adjust COLOR. |
| No stereo sound from a known MTS broadcast | Be sure MTS function is in "STR" mode. | |
| Remote Control does not work | Be sure power cord is plugged in.Check battery in Remote Control. | Change batteries. |
Limited United States Warranty
Toshiba America Consumer Products, Inc. ("TACP") and Toshiba Hawaii Inc. ("THI") make the following limited warranties. These limited warranties extend to the original consumer purchaser or any person receiving this set as a gift from the original consumer purchaser and to no other purchaser or transferee.
Limited Ninety (90) Day Warranty
TACP and THI warrant this product and its parts against defects in materials or workmanship for a period of ninety (90) days after the date of original retail purchase. During this period, TACP and THI will repair a defective product or part, without charge to you. You must deliver the entire set to an Authorized TACP/THI Service Station. You pay for all transportation and insurance charges for the set to and from the Service Station.
Limited One (1) Year Warranty
TACP / THI further warrant the parts in this product against defects in materials or workmanship for a period of one year after the date of original retail purchase. During this period TACP/THI will replace a defective part without charge to you, except that if a defective part is replaced after ninety (90) days from the date of original retail purchase you pay labor charges involved in the replacement. You must also deliver the entire product to a TACP/THI Authorized Service Station. You are responsible for all transportation for the set to and from the Service Station.
Limited Two (2) Year Warranty of Picture Tube
TACP and THI further warrant the picture tube in this product against defects in materials or workmanship for a period of two (2) years after the date of original retail purchase. During this period, TACP/THI will replace a defective picture tube without charge to you, except that if a defective picture tube is replaced after ninety (90) days from the date of original retail purchase, you pay labor charges involved in the replacement. You are responsible for all transportation and insurance charges for the set to and from the Service Station.
Rental Units
The warranty for rental units begins with the first rental or thirty (30) days from the date of shipment to the rental firm, whichever comes first.
Commercial Units
Products sold and used for commercial use have a limited ninety (90) day warranty for all parts, labor and picture tube.
Owner's Manual and Demographic Card
You should read this owner's manual thoroughly before operating this product. You should complete and mail the enclosed Demographic card within ten days after you, or the person who has given you this product as a gift, purchased this product. This is one way to enable TACP/THI to provide you with better customer service and improved products. Failure to return the Demographic card will not affect your rights under the manufacturer's limited warranty.
Your Responsibility
The above warranties are subject to the following conditions:
(1) You must retain your bill of sale or provide other proof of purchase.
(2) All warranty servicing of this product must be made by an Authorized TACP/THI Service Station.
(3) These warranties are effective only if the product is purchased and operated in the U.S.A. or Puerto Rico.
(4) Labor service charges for set installation, set up, adjustment of customer controls and installation or repair of antenna systems are not covered by this warranty. Reception problems caused by inadequate antenna systems are your responsibility.
(5) Warranties extend only to defects in materials or workmanship as limited above and do not extend to any product or parts which have been lost or discarded by you or to damage to products or parts caused by misuse, accident, damage caused by Acts of God, such as lightning or fluctuations in electric power, improper installation, improper maintenance or use in violation of instructions furnished by us; or to units which have been altered or modified without authorization of TACP/THI.
How to Obtain Warranty Service
If after following all of the operating instructions in this manual and checking the section "BEFORE CALLING SERVICE PERSONNEL", you find that service is needed; In the Continental United States call:
(1) In the U.S.A. call the TACP toll free number 1-800-631-3811 after you find a defective product or part to locate the nearest Toshiba Authorized Service Station.
(2) Arrange for the delivery of the product to the Authorized TACP/THI Service Station. Products shipped to the Authorized Service Station must be insured and safely and securely packed, preferably in the original carton, and a letter explaining the problem must be enclosed. You are responsible for all transportation and insurance charges to and from the Authorized Service Station.
In the Continental United States call:
text_image
Toll Free 1-800-631-3811 BHAWAII, 327 Kamakee Street, Honolulu, HA 96814 (808) 521-5377
All warranties implied by state law, including the implied warranties of merchantability and fitness for a particular purpose, are expressly limited to the durations of the limited warranties set forth above. With the exception of any warranties implied by state law as hereby limited, the foregoing warranty is exclusive and in lieu of all other warranties, guarantees, agreements and similar obligations of manufacturer or seller with respect to the repair or replacement of any parts. In no event shall TACP or THI be liable for consequential or incidental damages.
No person, agent, distributor, dealer or company is authorized to change, modify or extend the terms of these warranties in any manner whatsoever. The time within which action must be commenced to enforce any obligation of TACP or THI arising under this warranty or under any statute, or law of the United States or any state thereof, is hereby limited to 90 days from the date you discover or should have discovered, the defect. This limitation does not apply to implied warranties arising under state law.
This warranty gives you specific legal rights and you may also have other rights which may vary from state to state. Some states do not allow limitation on how long an implied warranty lasts, when an action may be brought, or the exclusion or limitation of incidental or consequential damages, so the above provisions may not apply to you.
ATTENTION CANADIAN CONSUMERS:
Canadian consumers are requested to complete the special Canadian "Warranty Registration Form" enclosed, and forward this completed form with a copy of bill of sale to TOSHIBA OF CANADA to "Register and Validate" their warranty. Product must be purchased from an Authorized Canadian Dealer.
Products purchased in the U.S.A. and used in Canada are not covered by these warranties.
Products purchased in Canada and used in the U.S.A. are not covered by these warranties.
TOSHIBA AMERICA CONSUMER PRODUCTS, INC.
HEAD OFFICE/82 TOTOWA ROAD, WAYNE, NEW JERSEY 07470
FACTORY SERVICE CENTERS/NORTHEAST: 82 TOTOWA ROAD, WAYNE, NEW JERSEY 07470
MIDWEST: 1010 JOHNSON DRIVE, BUFFALO GROVE, ILLINOIS 60089-6900
WEST: 5490 E. FRANCIS ST., ONTARIO, CA 91761
SOUTHWEST: 1421 CHAMPION DRIVE, SUITE 304 CARROLLTON, TEXAS 75006
SOUTHEAST: 6115 JIMMY CARTER BLVD., SUITE C2, NORCROSS, GA 30071-4607
TOSHIBA HAWAII, INC.
HEAD OFFICE/327 KAMAKEE STREET, HONOLULU, HAWAII 96814, U.S.A.
TOSHIBA OF CANADA LTD.
HEAD OFFICE/191 McNABB STREET, MARKHAM, ONTARIO, L3R 8H2, CANADA TEL: (905) 470-5400
SERVICE CENTERS/TORONTO: 191 McNABB STREET, MARKHAM, ONTARIO, L3R 8H2, CANADA TEL: (905) 470-5400
MONTREAL: 1643, NORTH SERVICE RD., TRANS-CANADA HIGHWAY, DORVAL QUEBEC, H9P 1J1, CANADA
TEL: (514) 332-6860
VANCOUVER: 3870 JACOMBS ROAD, RICHMOND, B.C., V6V 1Y6, CANADA TEL: (604) 270-8481
MANUFACTURED BY
TOSHIBA AMERICA CONSUMER PRODUCTS, INC.
PRINTED IN USA
(96-08) L
TOSHIBA
23562853A