
KH 526 BLENDER - Mixer BIFINETT - Kostenlose Bedienungsanleitung
Finden Sie kostenlos die Bedienungsanleitung des Geräts KH 526 BLENDER BIFINETT als PDF.

| Produkttyp | Mixer |
| Marke | BIFINETT |
| Modell | KH 526 |
| Nennspannung | 220-240 V ~ 50 Hz |
| Nennleistung | 600 W |
| Behälterkapazität | 1,75 L (max. 1,5 L) |
| Anzahl der Geschwindigkeiten | 5 Stufen + Ice-Crush-Stufe |
| Dauerbetriebszeit (C.O.) | 2 Minuten |
| Funktionen | Mixen, pürieren, kneten/mischen, emulgieren, Eis zerkleinern |
| Behältermaterial | Glas |
| Klingen | Edelstahl, sehr scharf |
| Behälterreinigung | Spülmaschinengeeignet |
| Motorblockreinigung | Mit feuchtem Tuch abwischen, nicht eintauchen |
| Klingendemontage | Möglich für gründliche Reinigung |
| Mitgeliefertes Zubehör | Mixbehälter, Deckel, Messbecher, Motorblock |
| Sicherheit | Wasserdichter Motorblock, scharfe Klingen, Überhitzungsschutz |
| Verwendung | Nur für Haushaltsgebrauch |
| Importeur | KOMPERNASS GMBH, Burgstrasse 21, D-44867 Bochum, Deutschland |
Häufig gestellte Fragen - KH 526 BLENDER BIFINETT
Benutzerfragen zu KH 526 BLENDER BIFINETT
0 Frage zu diesem Gerät. Beantworten Sie die, die Sie kennen, oder stellen Sie Ihre eigene.
Eine neue Frage zu diesem Gerät stellen
Laden Sie die Anleitung für Ihr Mixer kostenlos im PDF-Format! Finden Sie Ihr Handbuch KH 526 BLENDER - BIFINETT und nehmen Sie Ihr elektronisches Gerät wieder in die Hand. Auf dieser Seite sind alle Dokumente veröffentlicht, die für die Verwendung Ihres Geräts notwendig sind. KH 526 BLENDER von der Marke BIFINETT.
BEDIENUNGSANLEITUNG KH 526 BLENDER BIFINETT
bifinett


Theorem 1.2. (A) Let be a finite field and let (x) be the set of all elements of such that x (x) . Then (x) is a prime ideal of .
Theorem 1.2. (A) Let be a finite field and let (x) be the set of all elements of such that x (x) . Then (x) is a prime ideal of .
Theorem 1.2. (A) Let be a finite field and let (x) be the set of all elements of such that x (x) . Then (x) is a prime ideal of .
Theorem 1.2. (A) Let be a finite field and let (x) be the set of all elements of such that x (x) . Then (x) is a prime ideal of .
Theorem 1.2. (A) Let be a finite field and let (x) be the set of all elements of such that x (x) . Then (x) is a prime ideal of .
Theorem 1.2. (A) Let be a finite field and let (x) be the set of all elements of such that x (x) . Then (x) is a prime ideal of .
Theorem 1.2. (A) Let be a finite field and let (x) be the set of all elements of such that x (x) . Then (x) is a prime ideal of .
Theorem 1.2. (A) Let be a finite field and let (x) be the set of all elements of such that x (x) . Then (x) is a prime ideal of .
Theorem 1.2. (A) Let be a finite field and let (x) be the set of all elements of such that x (x) . Then (x) is a prime ideal of .
Theorem 1.2. (A) Let be a finite field and let (x) be the set of all elements of such that x (x) . Then (x) is a prime ideal of .
Theorem 1.2. (A) Let be a finite field and let (x) be the set of all elements of such that x (x) . Then (x) is a prime ideal of .
Theorem 1.2. (A) Let be a finite field and let (x) be the set of all elements of such that x (x) . Then (x) is a prime ideal of .
Theorem 1.2. (A) Let be a finite field and let (x) be the set of all elements of such that x (x) . Then (x) is a prime ideal of .
Theorem 1.2. (A) Let be a finite field and let (x) be the set of all elements of such that x (x) . Then (x) is a prime ideal of .
Theorem 1.2. (A) Let be a finite field and let (x) be the set of all elements of such that x (x) . Then (x) is a prime ideal of .
Theorem 1.2. (A) Let be a finite field and let (x) be the set of all elements of such that x (x) . Then (x) is a prime ideal of .
Theorem 1.2. (A) Let be a finite field and let (x) be the set of all elements of such that x (x) . Then (x) is a prime ideal of .
Theorem 1.2. (A) Let be a finite field and let (x) be the set of all elements of such that x (x) . Then (x) is a prime ideal of .
Theorem 1.2. (A) Let be a finite field and let (x) be the set of all elements of such that x (x) . Then (x) is a prime ideal of .
Theorem 1.2. (A) Let be a finite field and let (x) be the set of all elements of such that x (x) . Then (x) is a prime ideal of .
Theorem 1.2. (A) Let be a finite field and let (x) be the set of all elements of such that x (x) . Then (x) is a prime ideal of .
Theorem 1.2. (A) Let be a finite field and let (x) be the set of all elements of such that x (x) . Then (x) is a prime ideal of .
Theorem 1.2. (A) Let be a finite field and let (x) be the set of all elements of such that x (x) . Then (x) is a prime ideal of .
Theorem 1.2. (A) Let be a finite field and let (x) be the set of all elements of such that x (x) . Then (x) is a prime ideal of .
Theorem 1.2. (A) Let be a finite field and let (x) be the set of all elements of such that x (x) . Then (x) is a prime ideal of .
Theorem 1.2. (A) Let be a finite field and let (x) be the set of all elements of such that x (x) . Then (x) is a prime ideal of .
Theorem 1.2. (A) Let be a finite field and let (x) be the set of all elements of such that x (x) . Then (x) is a prime ideal of .
Theorem 1.2. (A) Let be a finite field and let (x) be the set of all elements of such that x (x) . Then (x) is a prime ideal of .
Theorem 1.2. (A) Let be a finite field and let (x) be the set of all elements of such that x (x) . Then (x) is a prime ideal of .
Theorem 1.2. (A) Let be a finite field and let (x) be the set of all elements of such that x (x) . Then (x) is a prime ideal of .
Theorem 1.2. (A) Let be a finite field and let (x) be the set of all elements of such that x (x) . Then (x) is a prime ideal of .
Theorem 1.2. (A) Let be a finite field and let (x) be the set of all elements of such that x (x) . Then (x) is a prime ideal of .
Theorem 1.2. (A) Let be a finite field and let (x) be the set of all elements of such that x (x) . Then (x) is a prime ideal of .
Theorem 1.2. (A) Let be a finite field and let (x) be the set of all elements of such that x (x) . Then (x) is a prime ideal of .
Theorem 1.2. (A) Let be a finite field and let (x) be the set of all elements of such that x (x) . Then (x) is a prime ideal of .
Theorem 1.2. (A) Let be a finite field and let (x) be the set of all elements of such that x (x) . Then (x) is a prime ideal of .
Theorem 1.2. (A) Let be a finite field and let (x) be the set of all elements of such that x (x) . Then (x) is a prime ideal of .
Theorem 1.2. (A) Let be a finite field and let (x) be the set of all elements of such that x (x) . Then (x) is a prime ideal of .
Theorem 1.2. (A) Let be a finite field and let (x) be the set of all elements of such that x (x) . Then (x) is a prime ideal of .
Theorem 1.2. (A) Let be a finite field and let (x) be the set of all elements of such that x (x) . Then (x) is a prime ideal of .
Theorem 1.2. (A) Let be a finite field and let (x) be the set of all elements of such that x (x) . Then (x) is a prime ideal of .
Theorem 1.2. (A) Let be a finite field and let (x) be the set of all elements of such that x (x) . Then (x) is a prime ideal of .
Theorem 1.2. (A) Let be a finite field and let (x) be the set of all elements of such that x (x) . Then (x) is a prime ideal of .
Theorem 1.2. (A) Let be a finite field and let (x) be the set of all elements of such that x (x) . Then (x) is a prime ideal of .
Theorem 1.2. (A) Let be a finite field and let (x) be the set of all elements of such that x (x) . Then (x) is a prime ideal of .
Theorem 1.2. (A) Let be a finite field and let (x) be the set of all elements of such that x (x) . Then (x) is a prime ideal of .
Theorem 1.2. (A) Let be a finite field and let (x) be the set of all elements of such that x (x) . Then (x) is a prime ideal of .
Theorem 1.2. (A) Let be a finite field and let (x) be the set of all elements of such that x (x) . Then (x) is a prime ideal of .
Theorem 1.2. (A) Let be a finite field and let (x) be the set of all elements of such that x (x) . Then (x) is a prime ideal of .
Theorem 1.2. (A) Let be a finite field and let (x) be the set of all elements of such that x (x) . Then (x) is a prime ideal of .
Theorem 1.2. (A) Let be a finite field and let (x) be the set of all elements of such that x (x) . Then (x) is a prime ideal of .
Theorem 1.2. (A) Let be a finite field and let (x) be the set of all elements of such that x (x) . Then (x) is a prime ideal of .
Theorem 1.2. (A) Let be a finite field and let (x) be the set of all elements of such that x (x) . Then (x) is a prime ideal of .
Theorem 1.2. (A) Let be a finite field and let (x) be the set of all elements of such that x (x) . Then (x) is a prime ideal of .
Theorem 1.2. (A) Let be a finite field and let (x) be the set of all elements of such that x (x) . Then (x) is a prime ideal of .
Theorem 1.2. (A) Let be a finite field and let (x) be the set of all elements of such that x (x) . Then (x) is a prime ideal of .
| Content | Page |
| Introduction | 4 |
| Proper use | 4 |
| Technical data | 4 |
| Description | 4 |
| Before start-up | 4 |
| Safety | 5 |
| Operation | 6 |
| Installing the mixing unit | 6 |
| Food processing | 6 |
| Selecting the suitable speed level. | 6 |
| Utilizing the whole range of applications | 7 |
| Useful tips | 8 |
| Cleaning | 8 |
| Rinsing out the installed mixing unit | 8 |
| Thorough cleaning of the cutters | 8 |
| After Cleaning | 9 |
| Disposal | 9 |
| Warranty and Service | 9 |
| Importer | 9 |
Keep this manual for future reference and pass it on with the equipment to any future users.
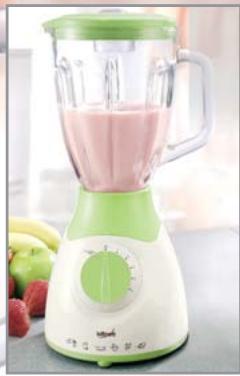
Blender KH 526
Introduction
Estmeemed Customer,
Our products are designed to fulfil the highest requirements of quality, functionality, and design. We hope that you will enjoy using your new "BIFINETT" appliance.
Proper use
The appliance is suitable for mixing, pureeing, kneading/ stirring and emulsifying various types of foodstuffs. This appliance can be used even to cut and crush ice.
You will find the exact procedures and corresponding output levels in the section entitled "Food processing".
Cores, large seeds and stems/ stalks must be removed before feeding the food-stuffs into the appliance.
Only original attachments and accessories, as described, may be used.
Any other usage or changes count as contrary to instructions and harbour great danger of accidents. The manufacturer takes no responsibility for damage(s) arising out of usage that is contrary to the instructions laid down.
Not for commercial use.
Technical data
Rated voltage: 220-240 V ~ 50 Hz
Rated output: 600 Watt
KB time: 2 Minutes
Capacity of the
mixing unit: 1.75 I
Max. capacity: 1.5 l
C.O. Time: 2 Minutes
C.O. Time
The C.O. Time (Continuous Operation) details how long an appliance may be used without the motor overheating and being damaged. When the given C.O. Time has been reached, the appliance must be switched off until the motor has cooled itself down.
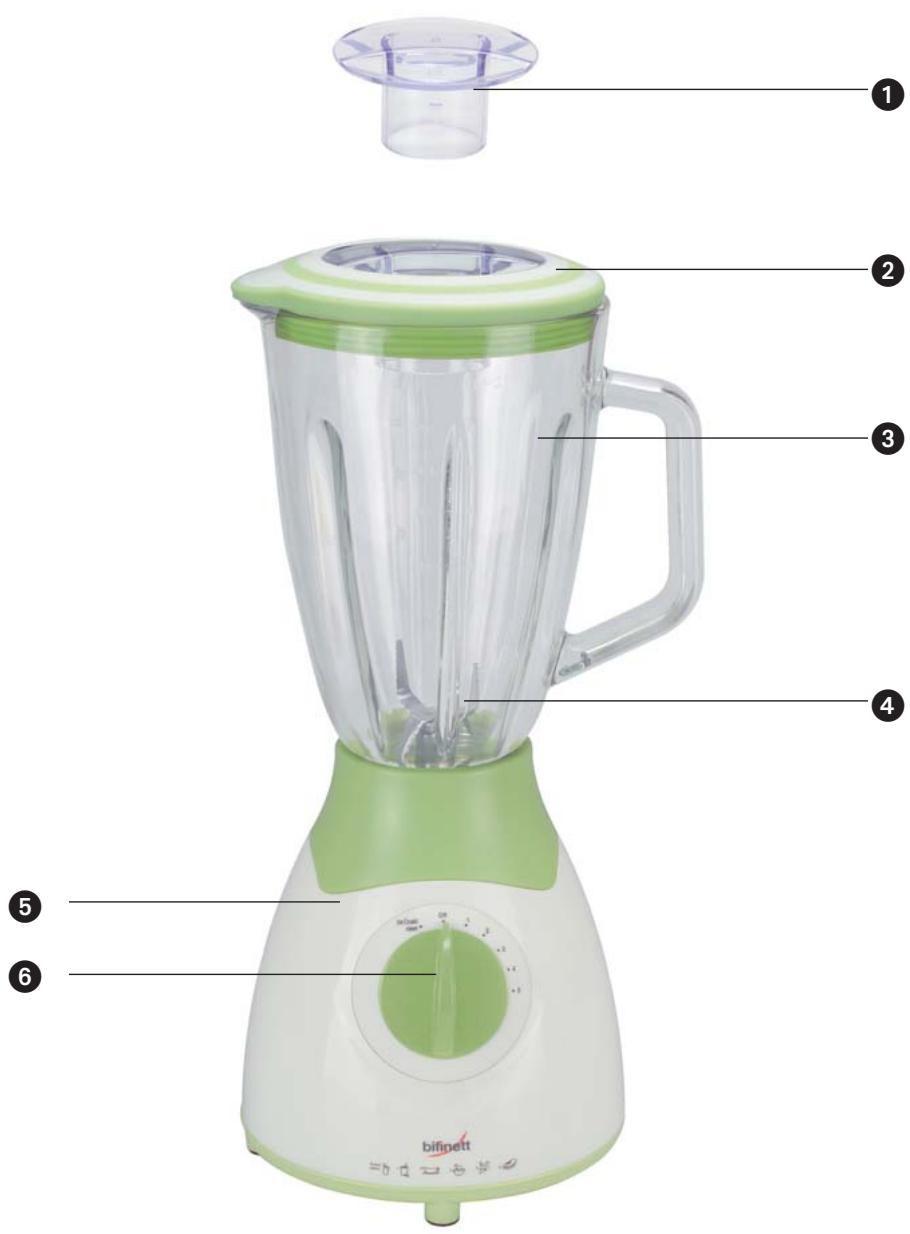
Description
Measuring cup
Lid
3 Mixing unit
Cutting blade
5 Mounted motor unit
Switch
Before start-up
Carefully clean all the component parts before using the blender for the first time. (see section: Cleaning).
Connect the appliance to the power source.
Safety
Important safety instructions
The following safety instructions must always be adhered to when using electrical appliances:
These directions will help you avoid severe injuries and/or heavy damage(s), and enable you to achieve better results and/or output.
Please read the following information regarding safety measures and appropriate usage carefully. Open the page with the illustrations before you begin reading and make yourself familiar with all the functions of the appliance.
Preserve these directions carefully and pass them on, if and when necessary, to others too.
To avoid life-threatening electric shocks:
- The voltage of the power source must match the stipulations given on the plate with the details of the model affixed to the appliance. Appliances requiring 220-240 V.
- Never immerse the mounted motor unit in water. Wipe it instead with a damp cloth to clean it.
- To avoid the risk of electric shock, arrange for a damaged power cable or plug to be exchanged as soon as possible by authorised specialists or Customer Services.
-
Arrange for appliances that are damaged or do not function properly to be inspected and repaired by Customer Services as soon as possible.
-
Do not expose the appliance to the rain and never use it in a humid or wet environment. Make sure that the cable never gets damp or wet while the appliance is in use.
In order to avoid the danger of fire and/or injuries:
- Never leave the appliance unattended whilst in use.
- Caution! Keep children away from the connecting cable and the appliance. Children frequently underestimate the danger from electrical appliances. Ensure a safe location for the appliance.
- Ensure that the power plug is quickly reachable in case of danger, and also that there is no danger of tripping over the cable.
- In order to avoid injuries, make sure that all the component parts are properly connected and installed.
- Ensure that the lid is properly secured before switching on the appliance.
- Never use the appliance with an empty mixing unit.
- Never remove the lid while the appliance is in use.
- Danger of injury! The cutting blade is very sharp. Handle it with extreme caution.
- Do not touch any rotating parts.
- Turn the appliance off after use and pull out the power plug. Only when the motor has come to a complete stop may the appliance be disassembled.
-
Never use the appliance: - if individual components, the connecting cable or the power plug are damaged,
-
in case of malfunctioning of the appliance, or if it has been otherwise damaged or has fallen down.
-
Give the appliance for examination and/or repair only to an authorized service outlet.
- The use of attachments and accessories that are not recommended or sold by the manufacturer can cause fire, electric shocks and/or injuries.
A safe approach:
- In case of danger, immediately pull out the power plug from the power point.
- Never use the appliance for purposes other than those for which it was designed.
- Always stay attentive! Always pay attention to what you are doing and act rationally. Never use the appliance when you are distracted or don't feel well.
- Make sure that the appliance is correctly and completely assembled before you use it.
- The appliance may be used only after it has been assembled as per the instructions, and when the cover is firmly fitted on and closed.
Each time you have finished using the appliance, make sure that the switch is in the "Off" position. - Remove the detachable parts only when the motor has come completely to rest.
- Detach the power plug and cable from the appliance when it is not in use, when you detach parts or before cleaning the appliance.
-
Do not use the appliance in the open.
-
Allow hot liquids to cool to a lukewarm temperature (approx. 30 - 40^ ) before you pour them into the mixing unit. You thus avoid the risk of burns.
Operation
Installing the mixing unit
- Make sure that the appliance is switched off (Switch in the "Off" position).
- Place the mixing unit on the mounted motor unit and press it down till it is securely engaged. If the mixing unit is not properly positioned, the appliance does not allow itself to be switched on.
Food processing
Fill the mixing unit with the foodstuffs, which are to be processed.
Place the lid on the mixing unit and close it firmly. Ensure that the protrusion on the lid lies over the pourer on the mixing unit. To firmly secure the measuring cap, place it in the lid opening and turn it in a clockwise direction.
Turn on the motor.
Note: This appliance works only when the mixing unit is attached to the motor unit.
Selecting the suitable speed level.
Level 1-3
for light usage with liquids
Level 3-5
for a firmer consistency – for the mixing of liquids and solid foods.
- Position "Ice Crush/Clean"
for use in short, powerful bursts. (The switch does not stay in the "Ice Crush" position. Hold the switch down in the "Ice Crush" position or turn it repeatedly to the "Ice Crush" position.)
After using the appliance turn the switch to the "Off" position and pull out the power plug.
In order to remove the mixing unit, pull it straight up. It does not need to be turned.
Notice: After every use check the cutters for their functionality.
Utilizing the whole range of applications
Application:
Mixing:
All kinds of
liquids, (1)
beverages, (2)
Level: 1-3
max. quantity:
(1) 1.5 litres
(2) 1.25 litres
Time: 40-60 seconds
Application:
Pureeing:
Vegetables, fruit, gravies, baby food
Level: 5
max. quantity:
1.3 kg
Time: 1.5 - 2 Min.
Application:
Kneading and stirring (1)
pancake dough
(2) yoghurt,
beverages and
desserts
Level:
(1)5
(2) 4-5
max. quantity:
(1) 1.3 kg
(2) 650g
Time:
(1) 1 Min.
(2) 1.5 - 2Min
Application:
Emulsifying
Level:
5
max. quantity:
2 eggs
30g-400g oil
Time:
1-2 Min.
Application:
Cutting and crushing ice
Level
Ice Crush
max. quantity:
180g ice cubes
(=approx.7 cubes)
Time:
as required
Directions:
Feed the ice cubes into the mixing unit whilst the motor is off; secure the cover and then switch the motor on.
Useful tips
In order to get the best results while pureeing solid ingredients, gradually feed only small portions into the mixing unit instead of filling it at once with a large quantity.
- When you want to process solid foods, cut them into small pieces (2-3 cm).
While mixing with solid foods, begin with a small quantity of liquid. Gradually add more liquid through the cover opening to the mixed mass.
Always place your hand only on top of the mixer while using it.
NEVER pour hot fluids into the appliance. This could cause irreparable damage to the appliance.
For the kneading of solid or semi-solid foods we recommend that the appliance be used in the Ice Crush/Clean mode in order to prevent the cutting blade from seizing.
Cleaning
Rinsing out the installed mixing unit
○ Empty the mixing unit and fill it with water. Place it on the motor unit and turn the switch repeatedly to the Ice Crush/Clean position. Empty the mixing unit and rinse it out till it is clean. Possible residues on the walls of the mixing unit can be removed with a dishwashing brush.
Important: In most cases, the mixing unit is now already hygienically clean.
With stubborn/dried on soiling the mix container can be cleaned in the dishwasher. The mix container is suitable for dishwashers
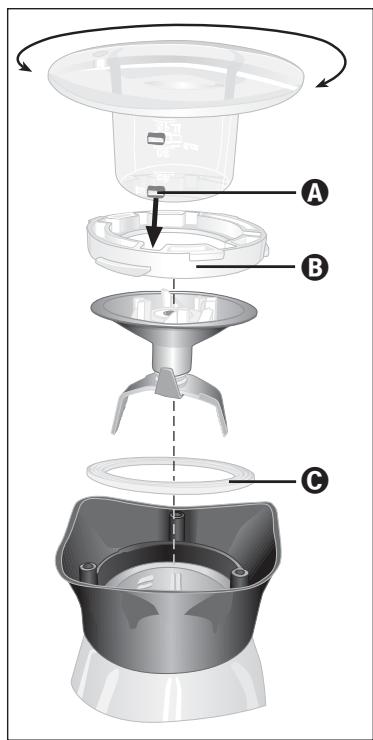
Thorough cleaning of the cutters
Should the cutters not be clean despite having been in the dishwasher, you can dismantle the mixing unit and clean the cutters individually.
- Ensure that the mixing unit is completely empty before removing the cutters. Take care in the handling of the cutters.
Make sure that the appliance is switched off and that the power plug is removed from the power socket. First remove the mixing unit from the mounting on the motor unit.
Warning: Risk of injury! Due to the sharp cutting blades and the glass mixing unit proceed with great care.
○ Remove the measuring cap from the lid opening and place the mixing unit on the lid, so that the underside is facing upwards.
Insert the tenons A of the measuring cap in the slots of the locking ring B on the underside of the mixing unit.
Turn the measuring cap counterclockwise, so that the locking ring 3 can be removed.
○ Remove the locking ring ⑥.
- With great care remove the cutters and the sealing washer .
Danger of Injuries: Clean the cutters very carefully. They are very sharp.
After Cleaning
○ Replace the sealing washer G , the cutters and the locking ring B into their positions.
Insert the tenons A on the measuring cap into the slots of the locking ring B on the underside of the mixing unit.
Turn the measuring cap clockwise, so that the locking ring once again sits firmly on the mixing unit.
The mixing unit can now be upturned and the measuring cap placed onto the lid.
Disposal

Do not dispose of the device in normal domestic waste.
Dispose of the device over a registered waste disposal firm or through your communal waste disposal facility.
Observe the currently valid regulations. In case of doubt, consult your waste disposal facility.

Dispose of the packaging materials in an environmentally responsible manner.
Warranty and Service
The warranty conditions and service centre address can be found in the enclosed warranty slip.
Importer
KOMPERNASS GMBH
BURGSTRASSE 21
D-44867 BOCHUM
www.kompernass.com
Subject to technical changes.
- bifinett
- Blender KH 526
- Introduction
- Estmeemed Customer,
- Proper use
- Technical data
- C.O. Time
- Description
- Before start-up
- Safety
- Important safety instructions
- To avoid life-threatening electric shocks:
- In order to avoid the danger of fire and/or injuries:
- A safe approach:
- Operation
- Installing the mixing unit
- Food processing
- Selecting the suitable speed level.
- Level 1-3
- Level 3-5
- - Position "Ice Crush/Clean"
- Utilizing the whole range of applications
- Directions:
- Useful tips
- Cleaning
- Rinsing out the installed mixing unit
- Thorough cleaning of the cutters
- After Cleaning
- Disposal
- Warranty and Service
- Importer
Marke : BIFINETT
Modell : KH 526 BLENDER
Kategorie : Mixer