
Micromat 328 - Mikrowellen AEG - Kostenlose Bedienungsanleitung
Finden Sie kostenlos die Bedienungsanleitung des Geräts Micromat 328 AEG als PDF.

| Produkttyp | Mikrowellenherd |
| Marke | AEG |
| Modell | Micromat 328 / 328Z |
| Versorgungsspannung | 240 V / 50 Hz |
| Leistungsaufnahme | 1400 W |
| Mikrowellenleistung (voll) | 755 W (nach IEC 59H) |
| Mikrowellenleistung (Auftaustufe) | ca. 245 W |
| Sicherung | 13 A |
| Timer | 0–60 Minuten, Zweigeschwindigkeit |
| Abmessungen (H×B×T) | 395 × 500 × 410 mm |
| Garraum (H×B×T) | 190 × 498 × 340 mm |
| Nettogewicht | 21 kg |
| Leistungsstufen | Stufenlos einstellbar: 100 % (voll), 75 %, 50 %, Auftauen (ca. 15 %), 15 % |
| Auftaufunktion | Ja, spezielle Auftaustufe |
| Starttaste | Ja, mit Kochkontrollleuchte |
| Kochunterbrechung | Durch Türöffnen; Fortsetzung durch Schließen und Starttaste |
| Zubehör (optional) | Einbauset EBR 32, Bräunungsschale |
| Geeignetes Geschirr | Porzellan, Keramik, Glas, hitzebeständiger Kunststoff (≥100 °C), kein Metall |
| Reinigung | Mildes Reinigungsmittel, weiches Tuch; Bodenplatte regelmäßig reinigen |
| Sicherheitshinweise | Nicht leer betreiben; keine ganzen Eier; kein Frittieren; keine versiegelten Behälter; Siedeverzug vermeiden |
| Garantie | Siehe beiliegende Garantiebedingungen |
Häufig gestellte Fragen - Micromat 328 AEG
Benutzerfragen zu Micromat 328 AEG
0 Frage zu diesem Gerät. Beantworten Sie die, die Sie kennen, oder stellen Sie Ihre eigene.
Eine neue Frage zu diesem Gerät stellen
Laden Sie die Anleitung für Ihr Mikrowellen kostenlos im PDF-Format! Finden Sie Ihr Handbuch Micromat 328 - AEG und nehmen Sie Ihr elektronisches Gerät wieder in die Hand. Auf dieser Seite sind alle Dokumente veröffentlicht, die für die Verwendung Ihres Geräts notwendig sind. Micromat 328 von der Marke AEG.
BEDIENUNGSANLEITUNG Micromat 328 AEG
Mikrowellenherd
MICROMAT 328Z
Microwave oven
Four à micro-ondes
Magnetronoven
Forno a microonde
Horno microondas
Mikrovågsugn
Mikrobølgeovn
Mikrobølgeovn
Mikroaaltouuni
Gebrauchsanweisung
Instructions for use
Notice d'emploi
Gebruiksaanwijzing
Istruzioni per l'uso
Instrucciones para el uso
Bruksanvisning
Brugsanvisning
Bruksanvisning
Käyttöohje
natural_image
Line drawing of a cabinet or storage unit with open doors and metal brackets (no text or symbols)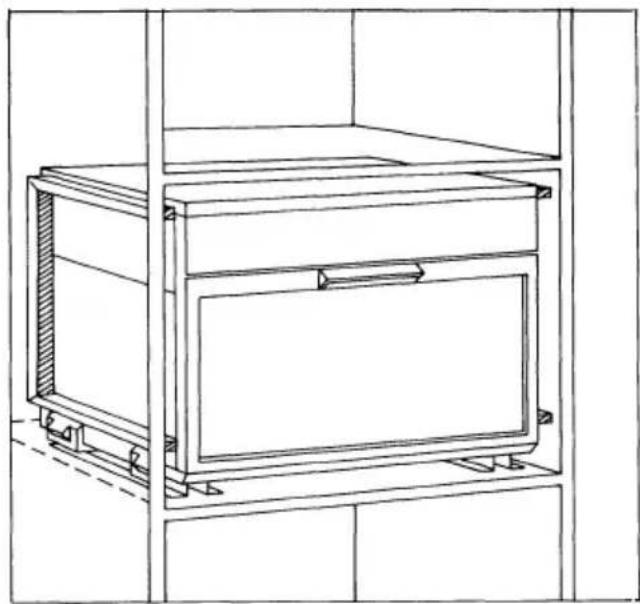
natural_image
Line drawing of a cabinet with two doors, one open and one closed, mounted on shelves (no text or symbols)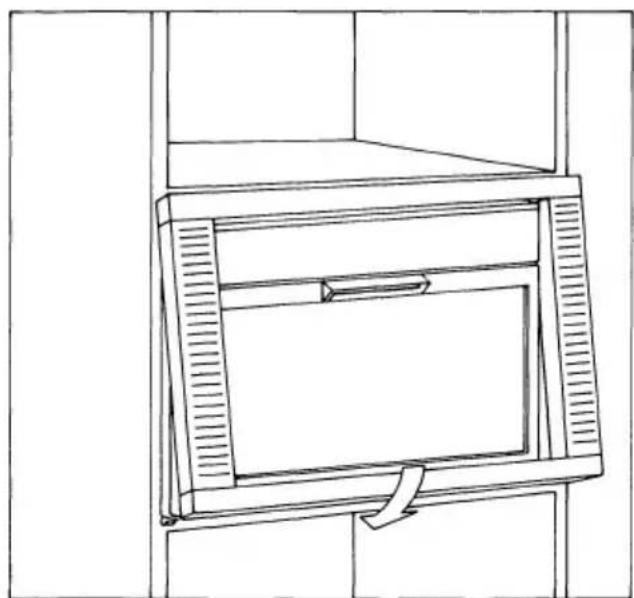
natural_image
Line drawing of a cabinet or rack unit with a handle and ventilation grilles (no text or symbols)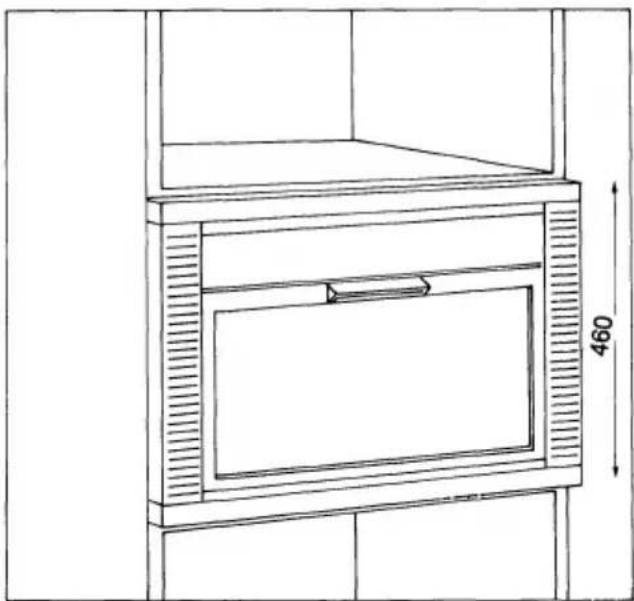
natural_image
Line drawing of a cabinet or storage unit with a 460mm height dimension label (no text or symbols on the diagram itself)Before you operate the oven
- Please read carefully and keep the instructions for use.
- Please read the information about the guarantee and keep also the guarantee documents. Make sure that the guarantee card is completely filled in and sent to our service dept.
• After unpacking, place the bottom shelf in the cavity. - Make sure that the appliance is not damaged. Check especially that the oven door closes firmly against the door support and that the internal door seal is not damaged.
- Place the oven on a stable, even surface, at a distance from other heating sources. The cooling air, which is taken in by the ventilation grids at the sides of the oven, must not exceed +35°C temperature. For sufficient ventilation there must be a space of at least 2 cm between the nearest wall and the ventilation grids on the sides of the oven and a space of at least 3 cm above the oven.
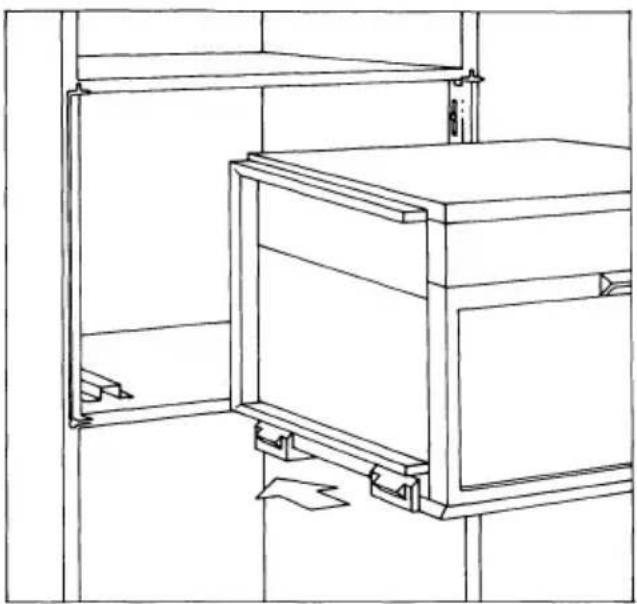
- A kit is available to enable this oven to be built-in, see last page.
The kit, type number EBR 32, can be purchased via your dealer. - The oven can be operated only if the oven door is firmly closed.
- Poor television reception and radio interference may result if the oven is located close to a TV, radio or aerial.
Warning: The appliance should not be operated without food in the oven, operation in this manner is likely to damage the appliance.
Electrical connection
Check that the voltage on the rating plate corresponds to the voltage in your home. The rating plate is on the back panel of the appliance. The earthing of this appliance is compulsory by law. The manufacturer will accept no liability for damage to persons or objects arising from the non-observance of this requirement.
A suitable plug should be fitted to the mains cable. If a 13 Amp plug is to be fitted then a 13 Amp fuse should be used in the plug.
"Warning – this appliance must be earthed" Important: The wires of the mains lead fitted to this appliance are coloured in accordance with the following code:
GREEN AND YELLOW – EARTH BLUE – NEUTRAL BROWN – LIVE
As the colours of the wires in the mains lead fitted to this appliance may not correspond with the coloured markings identifying the terminals in the plug, proceed as follows:
The wire which is coloured GREEN AND YELLOW must be connected to the terminal in the plug which is marked with the letter 'E' or by the earth symbol 12 or coloured GREEN or GREEN AND YELLOW.
The wire which is coloured BLUE must be connected to the terminal which is marked with the letter 'N' or coloured BLACK. The wire which is coloured BROWN must be connected to the terminal which is marked with the letter 'L' or coloured RED. If the terminals in the plug are unmarked or you are in any doubt as to the correct connections, consult a qualified electrician.
N.B. We recommend the use of a good quality plug.
For the Republic of Ireland only
The information given in respect of Great Britain will frequently apply, but a third type of plug and socket is also used, the 2-pin, side earth type. In this case, the wire which is coloured GREEN AND YELLOW must be connected to the EARTH contact, and the other two wires to the pins, irrespective of colour. The supply to the socket must be fitted with a 16 Amp fuse.
Microwaves – what are they?
Microwaves are a kind of electromagnetic energy. Ordinary daylight and radiowaves are two other examples. The wavelength is the only difference between these three types of energy. Microwave energy heats up certain materials, while some other materials are not affected at all. Water, being an important food component, is heated effectively, while e.g. china of good quality is not heated at all by microwaves. In those cases it is the food that makes the utensils warm.
Important
Your microwave appliance must not be used for:
• Cooking or reheating whole eggs with or without shell.
- Deep-frying, because you cannot control the oil temperature.
• Heating liquids in airtight sealed containers.
- When cooking, especially when re-heating liquids (water) in microwave ovens it is possible that the boiling point is reached without any bubbles being visible.
The liquid does not cook regularly. This so called cooking retardation can lead to, when taking out the vessel, for example cups or mugs, the liquid boils over and there is a risk of scalding oneself. To avoid this, put a teaspoon in the cup or mug with liquid before starting the cooking process. In this case there is no risk of damage from the metal to the microwave oven.
- One of the major advantages of microwave ovens is the short cooking time. Therefore do not exceed recommended times for cooking and for re-heating food.
Always refer to a microwave cook-book for details. Espacially, if cooking or reheating food that contains alcohol.
To reduce the risk of fire in the oven cavity:
- Do not overcook food. Always add the alcohol after cooking (if required!). Care should be taken when using paper, plastic or other combustible materials in the cooking process.
- Remove wire twist-ties from paper or plastic bags before placing bag in oven.
- If material inside the oven should ignite, keep oven door closed, turn oven off, and remove the plug from the supply socket.
Which utensils can be used in the oven?
Utensils made of china and ceramic are excellent to use in the microwave oven. Most types of glass are also very good.
Plastics and paper can also be used, provided that they withstand the temperature of the heated food.
Use only plastics, which withstand at least
+100°C e.g. polypropene and polyamide.
Some plastic materials, e.g. carbamide, will be
heated by microwaves, especially when cooking small amounts of food, and could be damaged. Do not allow food, food supports or coverings to come into contact with any of the internal walls or the plastic cover in the ceiling of the cavity as discolouration may take place.
Information about testing of utensils can be obtained in the microwave cookbook.
Lead crystal glass can crack and should therefore not be used. Never use metal utensils e.g. aluminium foil containers, unless they are specially made for heating by microwaves. Metal reflects the microwave energy and the food will remain cool. They may also cause a "sparking effect". Never use decorated plates or utensils if the decoration could contain metal, (e.g. a gold-rim), as such decorations may be damaged.
Small pieces of aluminium foil can be used, but only to shield thin areas that would overcook (e.g. to cover chicken wing and leg tips).
For shallow frying in the microwave oven you need a special browning dish, which is available from your dealer as an accessory.
CAUTION: There are a number of accessories available on the market. These should be used with great care unless they are recommended by the manufacturer of your microwave oven.
Recommendations can be given by your dealer.
Cooking, and defrosting with microwaves
Retention of taste and nutritional qualities of the food are improved by microwave cooking than by conventional cooking as cooking times are shorter and smaller amounts of liquid are added.
As the cooking utensils are normally heated by the hot food only, you do not need the cooking fat, which by conventional cooking would prevent the food from sticking to the pan. Defrosting by microwaves only takes a fraction of the time needed for conventional means.
Reheating of pre-cooked food, e.g. a portion on a plate for a late guest, is accomplished in 1–2 minutes. If the food has been refrigerated after cooking, it will be as fresh and nutrients by reheating in the microwave oven as if it was just readymade. In most microwave cookbooks there are chapters describing food qualities, which are important in microwave cooking. They also describe microwave cooking techniques. Make sure you read these chapters.
IMPORTANT: Do not exceed the recommended times for cooking and/or reheating food. Please always refer to the cookbook for details. When cooking food with high moisture content, condensation may appear on the inner door glass. This will normally disappear after a short time when the process is finished. If present at the end of the cooking process, wipe with a damp cloth.
How to operate the oven
Never operate the oven empty!
- Open the oven door and put the vessel with the food to be cooked in the oven and close the door.
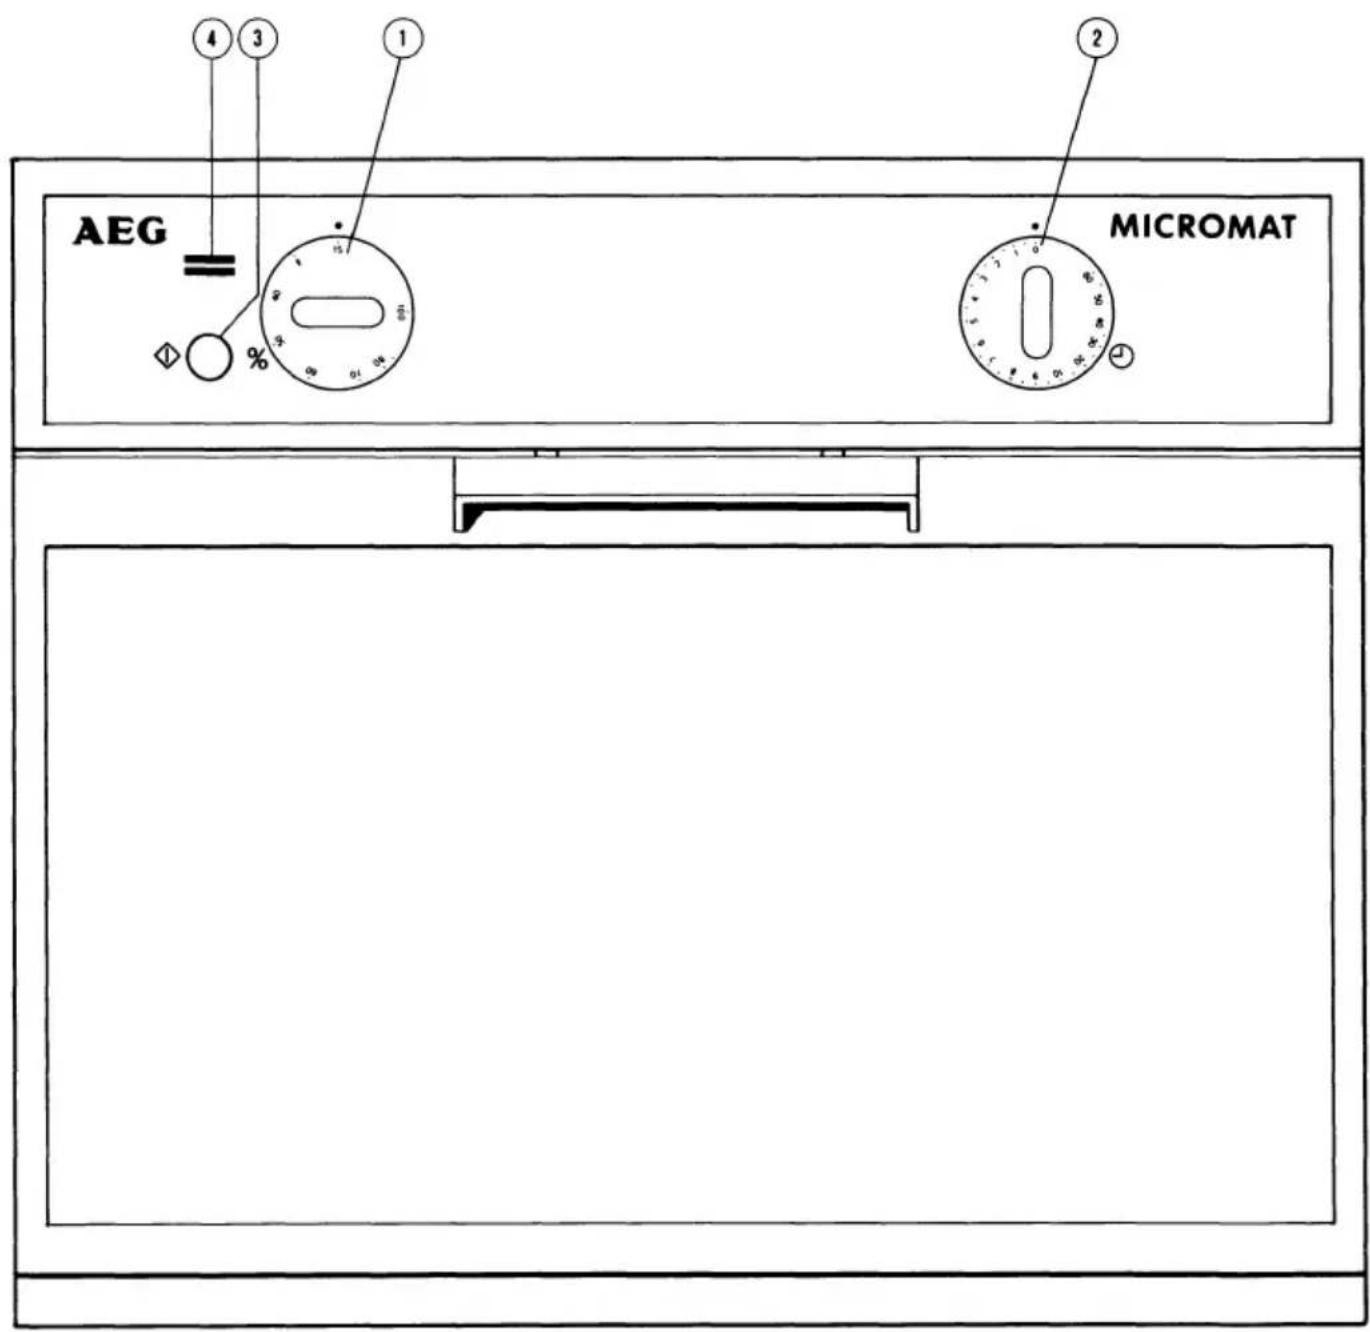
- Set the desired power level by means of the knob ①. (see fig 1). Level 100 is full power. Level ✕ is for defrosting.
-
Set the cooking time by turning the knob ②. The cavity lamp lights up and the fan starts. The timer scale is graded in minutes. To improve the accuracy of time setting your microwave oven is equipped with a dual speed timer. However, when selecting an operating time of less than 2 minutes we recommend that the timer knob is turned beyond the 2 minutes mark and then back to the desired time.
-
Press the start button ③
• the cooking indicator lamp ④ lights up
• the cooking process begins
- When the set time has elapsed an acoustic signal sounds and the cooking stops.
• the indicator lamp goes out
• the cavity lamp goes out
- the fan stops
- Open the oven door and take out the food.
Cooking interruption
- Open the oven door during operation:
• the cooking indicator lamp will go out
• the cooking process is switched off
- the timer stops
- Check, stir or turn the food if needed.
If you want to continue cooking:
- Close the oven door and press the start button
• the cooking indicator lamp will light up
• the cooking process will continue
- the timer continues from where it was stopped.
How to select power level
The variable power facility makes the cooking more flexible, just as by conventional cooking. This appliance is equipped with continuous power control.
Level 100% = full power. To be used for cooking and heating of vegetables, fish, meat etc., where the microwave cookbook recommends full power or a high power level.
Level = 34 of full power. These levels are to be used when more careful cooking is required e.g. for high protein sauces, cheese- and eggdishes and to finish cooking of casseroles.
Level = medium power, to be used when 40–60% simmering e.g. stews and for reheating of pastry.
Level is the defrost level. To be used especially for raw ingredients. You can also choose level 15%.
Level 15% is the low power level. Can be used for defrosting but also for softening of butter, cheese and icecream.
Remember...
- The larger the quantity or the higher the weight you cook or defrost, the more time it takes. The lower the initial food temperature, the more time it takes. Porous substances are heated more quickly than denser ones.
- It is better to set a shorter time and then, if needed after checking, add a minute or two than to set a too long time from the beginning.
- The best result is achieved if the food is evenly distributed on the plate. Standing time before serving always improves the cooking/heating result, as the temperature of the food will then be more even.
• Covering food helps:
- to reduce spattering
- to shorten cooking time
- to retain food moisture
All coverings which will allow microwaves to pass through are suitable, e.g. china – see above "Which utensils can be used in the oven".
above "Which utensils can be used in the oven".
If the food is undercooked
Check if:
- you have pressed the start button again after having opened the door to check the food.
- you have selected the correct power level.
- the selected time is sufficient – the times given in the recipes are approximate. They depend on initial temperature, weight and density of the food etc.
• the container is appropriate.
If the food is overcooked, i.e. dried out or burnt
Before you cook again, consider whether:
• the power level was too high
- the set time was too long – the times in the recipes are approximate. They depend on initial temperature, weight and density of the food etc.
Maintenance
Cleaning is the only maintenance normally required. It must be carried out with the microwave oven switched off. Use a mild detergent, water and a soft cloth to clean the interior surfaces, the front and rear of the door and the seal.
Do not use chemical or abrasive compounds to clean any part of the microwave oven.
Do not allow grease or food particles to build up around the door seal. Odours inside the oven can be eliminated by placing a cup of water in it with lemon juice added, and boiling the mixture.
Note: The doorseals and the doorseal areas must be regularly inspected for damage. If these areas are damaged the appliance should not be operated until it has been repaired by a service technician trained by the manufacturer.
At regular intervals especially if spillages have occurred remove the bottom plate and wipe clean the base of the oven. Replace the plate. Do not use the oven without bottom plate.
Service
For service contact the nearest local branch of AEG Service.
If the cooker doesn't work check to see if:
– the plug is properly inserted in the wall socket;
- the door is properly closed;
– the cooking time has been programmed;
- check your fuses and make sure that there is power available;
- wait for ten minutes and then try to operate the cooker once more.
This is to avoid unnecessary calls for which you will be charged. When calling for Service, please give the serial number and type number of the cooker (see rating plate at the rear side).
Warning:
Service only to be carried out by a service technician trained by AEG. It is dangerous for anyone other than a service technician trained by the manufacturer to perform repair service.
Guarantee
See the guarantee conditions leaflet supplied with the oven.
Technical specifications
| ModelSupply voltagePower consumptionMicrowave output power(Full, according toIEC 59H,1000 g water)Microwave output power(Defrost level)FuseTimerDimensionscabinetcavityWeight (net) | 328Z240 V/50 Hz1400 W755 WAppr. 245 W13 Amps.0–60 minutesH×W×D395×500×410 mm190×498×340 mm21 kg |
This product is manufactured to comply with the radio interference requirements of the council directive 82/499/EEC.
Data for test of heating performance in accordance with IEC SC 59H
The International Electrotechnical Commission, SC 59H, has developed a standard for comparative testing of heating performance of different microwave ovens. We recommend the following for this oven:
| Test | Approx. time | Power level | Container |
| A | 12 min | Full (100%) | Pyrex 3.226 |
| B | 5 min | Full (100%) | Pyrex 3.827.80 |
| C | 14 min | Full (100%) | Pyrex 3.838.80 |
| Defrosting, minced meat | 9 min | Defrost | Pyrex 3.838.80 defrost on a 3 mm plastic plate |
- Mikrowellenherd
- MICROMAT 328Z
- Before you operate the oven
- Electrical connection
- GREEN AND YELLOW – EARTH BLUE – NEUTRAL BROWN – LIVE
- For the Republic of Ireland only
- Microwaves – what are they?
- Important
- Which utensils can be used in the oven?
- Cooking, and defrosting with microwaves
- How to operate the oven
- Never operate the oven empty!
- Cooking interruption
- How to select power level
- Remember...
- If the food is undercooked
- Check if:
- If the food is overcooked, i.e. dried out or burnt
- Maintenance
- Service
- Warning:
- Guarantee
- Technical specifications
- Data for test of heating performance in accordance with IEC SC 59H
Marke : AEG
Modell : Micromat 328
Kategorie : Mikrowellen