ARG 342 - Kühlschrank WHIRLPOOL - Kostenlose Bedienungsanleitung
Finden Sie kostenlos die Bedienungsanleitung des Geräts ARG 342 WHIRLPOOL als PDF.

Benutzerfragen zu ARG 342 WHIRLPOOL
0 Frage zu diesem Gerät. Beantworten Sie die, die Sie kennen, oder stellen Sie Ihre eigene.
Eine neue Frage zu diesem Gerät stellen
Laden Sie die Anleitung für Ihr Kühlschrank kostenlos im PDF-Format! Finden Sie Ihr Handbuch ARG 342 - WHIRLPOOL und nehmen Sie Ihr elektronisches Gerät wieder in die Hand. Auf dieser Seite sind alle Dokumente veröffentlicht, die für die Verwendung Ihres Geräts notwendig sind. ARG 342 von der Marke WHIRLPOOL.
BEDIENUNGSANLEITUNG ARG 342 WHIRLPOOL
INSTRUCTIONS FOR USE
DESCRIPTION OF THE REFRIGERATOR
SAFETY WARNINGS
SAFEGUARDING THE ENVIRONMENT
INSTALLATION
USING THE APPLIANCE
MAINTENANCE
AFTER-SALES SERVICE
ELECTRICAL CONNECTION
natural_image
Three geometric diagrams with crosshairs and central dots, no text or symbols present
Thank you for buying our refrigerator. To get the most of your new appliance, please read this manual carefully. It contains a description of your appliance as well as useful tips and safety warnings.
We are certain that you will enjoy the outstanding long life and reliability of our product.
DESCRIPTION OF THE REFRIGERATOR
The refrigerator compartment of your new appliance is designed for storing fresh food and the freezer compartment (if provided) for storing frozen food and freezing small amounts of fresh food. The appliance must be installed in an area where the room temperature corresponds to the relative climatic class. Refer to the rating plate inside the appliance.
| Climatic class | Ambient temperature |
| SN between +10°C and +32°C | |
| N | b e and +32°C |
| ST between +18°C and +38°C | |
This appliance does not contain HFCs (replaced with R600a – Isobutane). For more information, refer to the identification data plate affixed to the appliance.
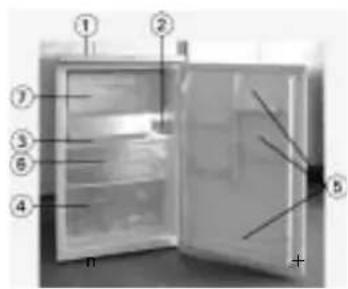
Description of the appliance with freezer compartment (Fig. 1)
- Front panel
- Light unit with thermostat knob
3.Shelves
4.Crisper drawers - Door trays
- Defrost water drain
7.Freezer compartment door
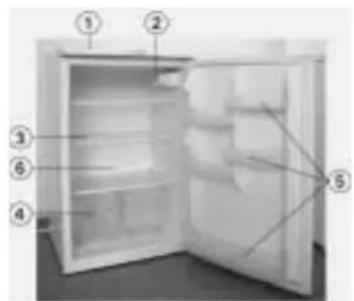
Description of the appliance without freezer compartment (Fig. 2)
- Front panel
- Light unit with thermostat knob
3.Shelves
4.Crisper drawers - Door trays
- Defrost water drain
text_image
Diagram of an open refrigerator with numbered labels pointing to different interior compartmentsFig. I
text_image
Diagram of an open refrigerator with numbered labels pointing to different compartmentsFig. 2
SAFETY WARNINGS
- It is absolutely forbidden to use the following items inside or near the appliance:
•electrical appliances with electrical motor (e.g. blenders, hair driers to speed up defrosting); - open flame;
•elements that can give off sparks;
•inflammable materials.
• Particular care must be taken to ensure that the refrigerant pipelines at the rear of the appliance are not damaged. - Before any cleaning or maintenance operation, unplug the appliance from the mains or disconnect the electrical power supply.
•The appliance must be installed in a well-ventilated place.
- Do not allow children to play with the packaging materials - risk of suffocating.
- In the event that the refrigerant pipelines are damaged and gas is released, the room where the appliance is installed must be aerated for a few minutes.
- Do not store gas or inflammable liquids inside the appliance - risk of explosion.
SAFEGUARDING THE ENVIRONMENT
I. Packing
The packaging material is entirely recyclable, and marked with the recycling symbol. Follow local regulations for scrapping. Keep the packaging materials (plastic bags, polystyrene parts, etc.) out of reach of children, as they are potentially dangerous.
2. Appliance
The appliance is made using recyclable materials. Disposal must be carried out in accordance with local environmental regulations for waste disposal. Make the appliance unusable by cutting off the power cord. The appliance must be delivered to an authorised collection centre for the recovery of refrigerant gas.
Declaration of conformity
This appliance is intended to come into contact with foodstuffs and conforms to D.L. 108 of 25.01.1992 (European Directive 89/109/EEC).

natural_image
Simple black-and-white sketch of a four-leaf clover (no text or symbols)INSTALLATION
Door reversibility
To change the direction of door opening proceed as follows:
•unscrew the bottom hinge;
- remove the door from the top hinge pin;
•unscrew the top hinge;
- screw the hinges on the other side of the appliance;
•fit the door on the top hinge pin and close it;
- screw the bottom hinge.
After changing the direction of door opening, check the door seal and adjust it if necessary. To adjust the door seal loosen the screws of the hinges and adjust them.
Electrical Connection
Electrical connections must be made in accordance with local regulations. Ensure that the voltage indicated on the appliance data plate corresponds to the domestic supply voltage. Regulations require that the appliance is earthed. The Manufacturer declines all liabilities for injury to persons or damage to property resulting from failure to observe these regulations. If the plug and socket are not of the same type, have the socket replaced by a qualified electrician. After installation, make sure that the refrigerator is not standing on the power supply cable.
Do not use extensions leads. The manufacturer declines all liability for damages resulting from a faulty electrical connection.
USING THE APPLIANCE
Switching on the refrigerator and adjusting the temperature. Switching off the appliance
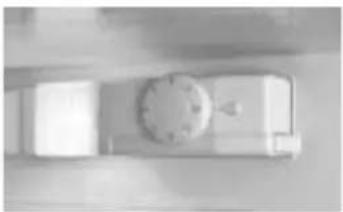
Do not switch on the refrigerator until it is in operating position. Wait about 3 hours.
The appliance switches on when the thermostat knob is turned to a position between 1 and 7 (Fig. 3).
For daily use we recommend to set the thermostat to an intermediate position. There is no need to change the setting when the room temperature changes.
In the event of prolonged disuse, it will be necessary to:
•turn the thermostat knob to "0";
- unplug the appliance from the mains power supply;
•empty, clean and dry both compartments;
- leave the door open.
Energy saving
• Install the appliance away from heat sources;
• do not leave the door open for any longer than strictly necessary;
- the thickness of frost or ice on the walls of the freezer must not exceed 5 mm;
- do not place pots without lids or hot pots in the refrigerator.
When the room temperature is low, also electrical consumption is low.
Storing fresh food in the refrigerator
Fresh food compartment
The refrigerator compartment can be used to store fresh food.
- Food must be cooled at room temperature before placing it in the refrigerator. Wrap and seal food in polythene bags, aluminium foil, closed containers or pots to prevent it from absorbing and transferring odours and humidity.
- The recommended maximum storage time for frozen foods is indicated on the package. The longer one goes beyond the 'best before date', the greater chance of food deterioration.
natural_image
Top-down view of a white car with a circular emblem on the windshield (no visible text or symbols)Fig. 3
Frozen food compartment
The temperature in this compartment is -18°C or lower.
Freezer compartment marked \*\*\*\*
This compartment can be used for storing frozen food or freezing up to 2 kg of fresh food in 24 hours. To freeze fresh food it is advisable to set the thermostat to "5 - 6". After 24 hours set the thermostat back to its previous position.
Freezer compartment marked \*\*\*
This compartment can be used for storing frozen food.
Making ice cubes
The freezer compartment can be used for making ice cubes. To speed up the ice making process, set the thermostat to "7". After approximately two hours ice is made.
Do not eat ice cubes or ice lollies immediately after taking them out of the freezer compartment - risk of "cold" burns.
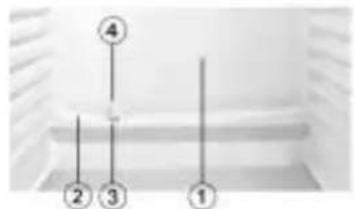
Defrosting the appliance
The frost that forms on the rear wall of the compartment is automatically eliminated each time the compressor stops. The droplets of water are routed to a drain outlet (2) and into a collection container located on the compressor from which they evaporate.
During operation impurities can form and obstruct the drain outlet, thus preventing the water from draining.
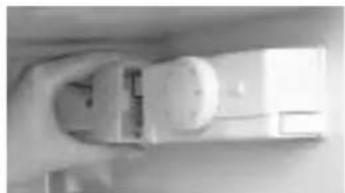
Any impurities must be removed from the water outlet using the specific device (4) (Fig. 4).
The freezer compartment requires manual defrosting. To defrost, proceed as follows:
•turn the thermostat knob to "0";
- disconnect the appliance from the power supply by unplugging it;
- open the freezer compartment door to allow the frost to melt;
- remove the defrost water, and clean and dry the compartment;
- switch on the appliance again.
Do not use sharp objects or metal instruments to remove ice.
text_image
① ② ③ ④Fig. 4
MAINTENANCE
Replacing the bulb
To change the bulb, proceed as follows:
•turn the thermostat knob to "0";
•unplug the appliance from the mains.
- remove the light cover (see Fig. 5);
- replace the bulb;
•refit the light cover;
- switch on the appliance again.
Use the following bulb:
-220–240 [V]
-max. 15W
-thread E14
-max. dimensions of bulb:
•length 55 mm
•diameter 26 mm
Observe the indications and warnings contained in this manual for correct and safe installation of the appliance, in order to avoid damages resulting from improper use and to ensure long life of our product.
natural_image
Top-down view of a white robotic arm or robotic device with no visible text or symbolsFig. 5
AFTER-SALES SERVICE
Before contacting After-Sales Service:
- See if you can solve the problem yourself.
- Switch the appliance on again to see if the problem has been solved. If it has not, disconnect the appliance from the power supply and wait for about an hour before switching on again.
- If the problem persists after this course of action, contact After-sales Service.
Specify:
• the nature of the problem,
• the model,
• the Service number (the number after the word SERVICE on the data plate on the inside of the appliance),
- your full address,
- your telephone number and area code.
SERVICE
0000 000 00000
Note: The direction of door opening can be changed. If this operation is performed by After-sales Service it is not covered by the warranty.
ELECTRICAL CONNECTION
I) For Great Britain only
Warning - this appliance must be earthed
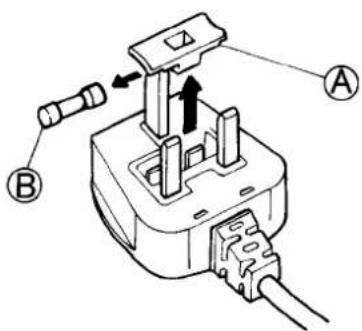
Fuse replacement
If the mains lead of this appliance is fitted with a BS 1363A 13amp fused plug, to change a fuse in this type of plug use an A.S.T.A. approved fuse to BS 1362 type and proceed as follows:
- Remove the fuse cover (A) and fuse (B).
- Fit replacement 13A fuse into fuse cover.
- Refit both into plug.
Important:
The fuse cover must be refitted when changing a fuse and if the fuse cover is lost the plug must not be used until a correct replacement is fitted.
Correct replacement are identified by the colour insert or the colour embossed in words on the base of the plug.
Replacement fuse covers are available from your local electrical store.
text_image
Technical diagram of a plug electrical socket with labeled components A and B2) For the Republic of Ireland only
The information given in respect of Great Britain will frequently apply, but a third type of plug and socket is also used, the
2-pin, side earth type.
3) Socket outlet / plug (valid for both countries)
If the fitted plug is not suitable for your socket outlet, please contact Whirlpool Service for further instruction. Please do not attempt to change plug yourself. This procedure needs to be carried out by a qualified Whirlpool technician in compliance with the manufactures instructions and current standard safety regulations.