EL-6050 - Taschenrechner SHARP - Kostenlose Bedienungsanleitung
Finden Sie kostenlos die Bedienungsanleitung des Geräts EL-6050 SHARP als PDF.

| Produkttyp | Taschenrechner |
| Modell | EL-6050 |
| Marke | Sharp |
| Anzeige | 10-stelliges LCD |
| Zeichenhöhe | 15 mm |
| Stromversorgung | Batterie (LR54) und Solarzelle |
| Batterielebensdauer | ca. 2 Jahre (bei täglicher Nutzung) |
| Abmessungen (B x T x H) | 150 x 80 x 20 mm |
| Gewicht | 150 g |
| Farbe | Schwarz/Grau |
| Tastenanzahl | 30 |
| Grundrechenarten | Addition, Subtraktion, Multiplikation, Division |
| Prozentrechnung | Ja |
| Quadratwurzel | Ja |
| Speicher | Ein Speicher (M+/M-/MR) |
| Automatische Abschaltung | Nach ca. 7 Minuten |
| Betriebstemperatur | 0°C bis 40°C |
| Lagertemperatur | -20°C bis 60°C |
| Wartung | Mit leicht feuchtem Tuch reinigen, keine Lösungsmittel |
| Sicherheit | Vor Feuchtigkeit und direkter Sonneneinstrahlung schützen |
| Reparierbarkeit | Keine reparaturfähigen Teile im Inneren |
| Garantie | 2 Jahre (Standard) |
Häufig gestellte Fragen - EL-6050 SHARP
Benutzerfragen zu EL-6050 SHARP
0 Frage zu diesem Gerät. Beantworten Sie die, die Sie kennen, oder stellen Sie Ihre eigene.
Eine neue Frage zu diesem Gerät stellen
Laden Sie die Anleitung für Ihr Taschenrechner kostenlos im PDF-Format! Finden Sie Ihr Handbuch EL-6050 - SHARP und nehmen Sie Ihr elektronisches Gerät wieder in die Hand. Auf dieser Seite sind alle Dokumente veröffentlicht, die für die Verwendung Ihres Geräts notwendig sind. EL-6050 von der Marke SHARP.
BEDIENUNGSANLEITUNG EL-6050 SHARP
SHARP®
EL-6050
ELECTRONIC ORGANIZER
OPERATION MANUAL
NOTICE
SHARP strongly recommends that separate permanent written records be kept of all important data. Data may be lost or altered in virtually any electric memory product under certain circumstances. Therefore, SHARP assumes no responsibility for data lost or otherwise rendered unusable whether as a result of improper use, repairs, defects, battery replacement, use after the specified battery life has expired, or any other cause. SHARP assumes no responsibility, directly or indirectly, for financial losses or claims from third persons resulting from the use of this product and any of its functions, the loss of or alternation of stored data, etc. The information provided in this manual is subject to change without notice.
CAUTIONS
- Do not carry the Organizer in the back pocket of slacks or trousers.
- Do not drop the Organizer or apply excessive force to it.
- Do not subject the Organizer to extreme temperatures.
- Clean only with a soft, dry cloth.
- Use only a SHARP approved service facility.
Contents
Part Names ...... E2
Display Symbols E3
Using the Organizer for the First Time E3
When Abnormal Conditions Cause a Malfunction ... E4
Entering Characters ...... E5
Making Corrections E5
Telephone Mode E6
- Storing Telephone Listings ...... E6
- Recalling Telephone Listings ...... E8
- Editing Telephone Listings ....E10
- Deleting Telephone Listings .... E11
Calculator Mode E13
Currency/Unit Conversion ...... E15
Memory Storage....E19
Secret Function E20
- Password Registration E20
- Turning the Secret Function On and Off ... E21
- Designating Listings as Secret ...... E22
- Changing Secret Listings to Non-Secret .... E23
- Changing the Password ...... E24
- Deleting the Password and Secret Listings ..... E24
Replacing Batteries E25
- Precautions E25
- Battery Replacement E26
Specifications E27
Part Names
① RESET switch
② Cursor movement keys
③ MODE keys
④ Power OFF key
⑤ Power ON/Clear/Clear entry key
⑥ SEARCH keys
The following notations are used for key operations.

flowchart
graph TD
    A["CM"] --> B["Q"]
    B --> C["CM : Clear memory"]
    B --> D["Q : Letter "Q""]

flowchart
graph TD
    A["1"] --> B["2nd"]
    B --> C[": Symbol "→""]
    B --> D[": Number "1""]
E2
The blue colored keys are operated by pressing 2nd and appropriate key.
Display Symbols
■: Secret listings can be accessed.
←→ : More information exists in the direction indicated by the symbol. (Press ▶, ◀, ▲, or ▼ to display the information).
*: Indicates that the recalled listing is secret.
2nd: Indicates that 2nd has been pressed.
- In this manual, only the symbols necessary for explanation will be shown.
Using the Organizer for the First Time
Be sure to perform the following operations before using the Organizer for the first time.
- Press the RESET switch twice.
- Press the RESET switch with a ball-point pen or similar object.
Do not use an object with a breakable or sharp tip.
2. Press 2nd ENT.
• The Telephone mode entry prompt will appear to allow you to enter a telephone listing.
TEL1:NAME?
When Abnormal Conditions Cause a Malfunction
If the Organizer is subjected to strong, extraneous electrical noises or shocks during use, an abnormal condition may occur in which no keys (including ON C-CE) will respond. If this happens, press the RESET switch on the left side.
If an error occurs internally, "DATA PROBLEM" and "PRESS RESET!" are displayed alternately. Clear all memories by performing the above steps.
Entering Characters
1. Entering Numbers and Letters
Press the desired number or letter key.
2. Entering Symbols
A total of 10 symbols, →, ←, (, ), *, #, :, \$, ¥ and £, can be entered. To enter the symbol, press 2nd and then the desired symbol key.
Making Corrections
Move the cursor to the number or letter to be corrected. Enter the correct number or letter to replace the previous one.
Cursor
The cursor (_ or ■) indicates the position for entry of a character or a number. Move the cursor with ▶◀ ▲ or ▼.
- Inserting characters
Each time 2nd INS are pressed, a space is inserted at the cursor position to allow you to enter a character.
- Deleting characters
Press 2nd DEL to delete the character at the cursor position.
Telephone Mode
The telephone listing is composed of two files, TEL1 and TEL2. Press TEL to select the Telephone mode. Pressing TEL switches between TEL1 and TEL2 alternately.
A maximum of 36 characters can be entered in the name field and a maximum of 60 characters can be entered in the number field. Additionally, characters, "F" and "C" representing: Fax and Cellular, respectively, can also be entered.
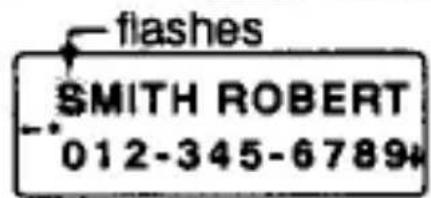
1. Storing Telephone Listings
Example:
Enter the following example into TEL1. SMITH ROBERT, 012-345-6789, F 345-6790
- Press TEL to display the Telephone mode (TEL1) screen.
TEL1:NAME?
- Enter the name. SMITH SPC ROBERT
• MITH ROBERT
- Press ☐ENT to allow you to enter a phone number.
NUMBER?
- Enter the phone number.
012-345-6789
012-345-6789 ^+ —
- Use ☑ to enter "-".
- Enter the fax number.
F SPC SPC SPC 345-6790.
F 345-6790 ^* —
- If the number of digits for a phone number is less than 12, insert additional spaces up to a total of 12 digits to make the telephone listing more easily read.
- Press ENT.
The name and number will be displayed briefly, then the next entry prompt will be displayed. The telephone listing is now stored.
- If the memory is full, "FULL! NOT IN" will be displayed and the telephone listing cannot be stored. If this happens, press C-CE to clear the error message.
- When entering a symbol, such as “(” or “#”, press 2nd and the desired symbol key.
- When arrow symbols, →, ←, ↓, and ↑, are displayed, the hidden information can be displayed. Press ⏻, ⏱, ▲, or ▼ to display the information.
- To enter a telephone listing for the next person, continue to enter the name and phone number in the same manner. If the other data is displayed, press C-CE to return to the Telephone mode entry prompt and enter the name and phone number.
- To skip entry of a phone number, press ENT while "NUMBER?" is displayed. However, entry of a person's name cannot be skipped.
2. Recalling Telephone Listings
Select TEL1 or TEL2 and recall telephone listings. There are three ways to recall telephone listings, (1) Sequential search, (2) Direct search, and (3) Keyword search. Regardless of the entry order, telephone listings are stored by the first character of the person's names in the following order.
Space → Symbols (\$, ¥, £, →, ←, (, ), #, *, -, ) → Numbers (0 to 9) → Colon (:) → Letters (A to Z)
(1) Sequential search
Press Ⓥ or Ⓐ on the Telephone mode screen to recall the telephone listing in order. Keep the key pressed to display the telephone listings at high speed.
☑ : Recalls the telephone listing in forward order.
Ⓐ: Recalls the telephone listing in reverse order.
- When the symbols, , , , and , are displayed, more information exists. Pressing ▶ or ◀ scrolls the name by 12 characters and pressing ▲ or ▼ scrolls the phone number one line.
- If there is no more telephone listing to be recalled (end of the telephone listing is reached), the display returns to the Telephone mode screen.
(2) Direct search
-
Enter the initial character of the person's name.
-
Press Ⓥ (△) to recall the desired telephone listing.
- If there is no telephone listing beginning the entered character, "■NOT FOUND!■" will be displayed briefly and the display returns to the Telephone mode screen.
- Subsequently, press ⬇ or Ⓐ to perform a direct search.
(3) Keyword search
To recall the telephone listing containing the entered character(s) (word), press C-CE, enter the character(s), and press 2nd ▼ (△).
Example:
Recall the telephone listing containing the word "ROB" in the TEL1 mode.
-
Press TEL several times to select the TEL1 mode.
-
Enter "ROB".
- Press 2nd to recall the telephone listing.
SMITH ROBERT 012-345-6789↓
• Each time 2nd are pressed, successive telephone listings containing the word "ROB" are displayed.
- If there is no telephone listing containing the entered word, "NOT FOUND!" will be displayed briefly and the display returns to the Telephone mode screen.
3. Editing Telephone Listings
- Recall the telephone listing to be edited.
- Press 2nd EDIT to enter the Edit mode and the cursor will flash.
- Move the cursor to the character to be edited with ▶, ◀, ▼, or ▲ and enter the correct character.
- Press 2nd INS to insert a space at the cursor position to allow you to enter a character. Press 2nd DEL to delete the character at the cursor position.
- Press ENT to finish editing.
- Pressing 2nd ENT creates a new listing without erasing the old listing.
4. Deleting Telephone Listings
- Recall the telephone listing to be deleted.
- Press 2nd DEL . "DELETE OK?" will appear.
- Press ☐ENT to delete the currently displayed telephone listing.
To keep the telephone listing, press C-CE. Deleting all the telephone listings in the TEL1 or TEL2 file
- Press 2nd DEL on the Telephone mode screen (TEL1 or TEL2).
"TEL1 DELETE?" or "TEL2 DELETE?" will appear.
- Press 2nd ENT to delete all the telephone listings in the selected file simultaneously.
To keep the telephone listings in the file, press C-CE.
Deleting all the telephone listings in the Telephone mode
Press 2nd DEL in step 3, registered record display of the checked memory storage procedure (on page E19). "RESET OK?" will appear. Subsequently, press 2nd ENT to delete all the telephone listings and the display returns to the Telephone mode screen. To keep the telephone listings, press C-CE.
Note:
When deleting all the telephone listings, "SECRET ON!" will appear briefly and the display returns to the Telephone mode screen after 2nd DEL are pressed if the secret function is turned on. In this case, turn off the secret function while referring to page E22 and perform the above procedures again.
Calculator Mode
The Organizer can calculate numbers of up to 12 digits.
Calculation
Press CALC/CONV to select the Calculator mode. Press CALC/CONV in the Calculator mode to enter the Currency/Unit conversion mode. Pressing CALC/CONV switches between the Calculator and Conversion/Unit modes alternately. Before performing a calculation, press C-CE, C-CE and CM to clear the memory and display.
Note:
When ⊕, ⊖, ⊗, or ⊖ is pressed, the respective symbol, +, -, x, or ÷ is displayed. When ⊖ or Ⓧ is pressed, the symbol, ⊖, is displayed. (In the examples on the following pages, these symbols are not described in this manual).
Errors
If the calculation result or the integer section in the numerical value in the memory exceeds 12 digits or if a number is divided by zero (0), an error occurs (E is displayed). If an error occurs, press C-CE to clear it.
| Example | Operation | Display |
| (-24+2)÷ 4=-5.5 | C-CE-24+2÷4= | -5.5 |
| 34+57=91 | 34+57= | 91. |
| 45+57=102 | 45= | 102. |
| 68×25=1700 | 68×25= | 1'700. |
| 68×40=2720 | 40= | 2'720. |
| 200×10%=20 | 200×10% | 20. |
| 9÷36=25% | 9÷36% | 25. |
| 200+(200×10%)=220 | 200+10% | 220. |
| 500-(500×20%)=400 | 500-20% | 400. |
| 4^6=(4^3)^2=4096 | 4×=×= | 4'096. |
| 1/8=0.125 | 8÷= | 0.125 |
| 25× 5=125 | CM25×5M+ | M125. |
| -)84÷ 3= 28 | 84÷3M- | M28. |
| +)68+17= 85 | 68+17M+ | M85. |
| 182 | RM | M182. |
| 25-9=4 | 25-9=√ | 4. |
| 123456789098×145=17901234419210 | 123456789098×145=17901234419210 | 17.9012344192 |
| C-CE 17.9012344192 | ||
| (17.9012344192×1012=17901234419200) | ||
Currency/Unit Conversion
Currency conversion, such as from \to £ and from ¥ to \ can be performed. Unit conversions, such as from centimeters to inches, are also possible. The following currencies and units in the Organizer are present at the factory.
Press CALC/CONV twice to select Currency/Unit conversion mode. Press CALC/CONV again to select the Calculator mode.
| No. | Currency/Unit | Conversion Rate | |
| A | B | ||
| 1 | ¥ | 0 | |
| 2 | £ | 0 | |
| 3 | $ | DM | 0 |
| 4 | inch | cm | 2.54 |
| 5 | oz | g | 28.35 |
| 6 | °F | °C | 5/9 (F-32) |
- The rate in the above table shows the value of B when A equals 1. Conversion from B to A (for example, from ¥ to \$) is also possible.
- Currencies No. 1 to No. 3 can be changed. Set the correct rate before using the conversion function.
- Units and rates for items No. 4 to No. 6 cannot be changed.
Setting a Rate
Example:
Set the rate so that one dollar equals 103 yen.
- Press CALC/CONV to select the Currency/Unit conversion mode.
![[1] $ → ¥ 0.](/content/2026/05/1035509/images/d5d357d05b38142b5e83793f35adbbce7293e8acabdaffe33559a9b62d0b8c57.jpg)
- Select the currency or unit for which the rate is to be set.
- Press ⬇ (Ⓐ) to select the currency or unit for which the rate is to be set. (This example uses No. 1. Therefore, this selection is not needed).
- Enter the rate.
![103 2nd RATE SET [1] $ → ¥ 103.](/content/2026/05/1035509/images/b73366e6f3c91b19097390397a997d56bb43fcb1ea6a95ace25d1d4dca1339d9.jpg)
- "SETTING RATE" will appear briefly and the rate is now registered. The rate is retained until the new rate is entered.
• The rate can be entered in up to 12 digits.
Converting Currency/Unit
To convert unit A to unit B, press ▶.
To convert unit B to unit A, press ↙.
Example:
Convert \$119.8 to yen.
-
Press Ⓥ (Ⓐ) to select the unit. (In this example, select No. 1).
-
Enter the value to be converted.
-
Press ▶ to convert it.
![[1] $ ▶ ¥ 12339.4](/content/2026/05/1035509/images/a462c2077e79178d1a7eddb541d7b729242b629705decefa5312be73b6372fa3.jpg)
The symbol, “→”, is changed to “▶” and the conversion result is displayed.
Example:
Convert 25°C to °F.
-
Press Ⓥ (Ⓐ) to select the unit. (In this example, select No. 6. For No. 6, the rate is not displayed).
-
Enter the value to be converted. 25
-
Press ◀ to convert it.
![[6] °F ← °C 77.](/content/2026/05/1035509/images/5c7365acef42776e92ed021302a0317958dae04c40463a4b03d47f3d3e38f7ca.jpg)
- The conversion result may have a slight calculation error as a result of rounding off the number. Use the conversion result for reference.
Changing the Unit Name
Only items No. 1 to No. 3 can be changed.
- Select the currency or unit to be changed and press 2nd EDIT.
The cursor will flash.
- Enter the new name to replace the previous one.
Up to four characters can be entered in A and B. After the new unit name is entered in A, press ▶ to move the cursor to B and enter the new unit name in B. To set the rate subsequently, press ▼ and enter the new rate.
- After the new names and rate have been entered, press ENT.
Memory Storage
Checking Memory Storage
-
Press TEL to check memory storage.
-
Press 2nd M-CK.
USED REMAIN 447 416
The number of bytes in use and remaining are displayed.
- Press M-CK.
TEL1 TEL2 17 11
The numbers of registered records in TEL1 and TEL2 are displayed.
- Press C-CE or TEL to return to the Telephone mode screen.
The Organizer can store up to 863 bytes in memory (excluding the calculator mode memory).
One byte is required per character in the name entries, and one byte is required for two digits in the telephone number entry. When there is an odd number of digits in a number entry, the last digit occupies one byte. In addition two bytes are needed to divide each telephone listing.
Secret Function
1. Password Registration
Up to seven characters can be registered as the password. Spaces are valid only if they are followed by other characters.
If the password is forgotten, it will be necessary to clear the password and all secret listings from memory (see page E24). As a safeguard, make a written record of the password.
Example:
Register the password "1234567".
- Press TEL to select the Telephone mode.
- Select either TEL1 or TEL2. One password is valid for both TEL1 and TEL2.
- Press 2nd SECRET.
SET PASSWORD
- Enter the password.
1234567
1234567
4. Press ENT.
- "☐" is displayed and the password is now registered. The display returns to the entry prompt.
- If "PASSWORD?" is displayed, a password is already registered. To change or delete the password, see page E24.
2. Turning the Secret Function On and Off
When the Secret function is off, "☐" is displayed (secret listings can be accessed). When the Secret function is on, "☐" is cleared even after the password is registered (secret listings cannot be accessed).
(1) Turning the Secret function on
- Press 2nd SECRET when the Telephone (TEL1 or TEL2) mode entry prompt appears.
The password will be displayed.
2. Press ENT.
The secret function is now on. "→" is cleared and the display returns to the entry prompt.
- Even if the power is turned off, the Secret function is always on.
(2) Turning the Secret function off
-
Press 2nd SECRET when the Telephone (TEL1 or TEL2) mode entry prompt appears.
-
Enter the password and press ENT. (Press "1234567" in this case).
The Secret function is now off. "→" is displayed and the display returns to the entry prompt.
- When searching for the telephone listing while the Secret function is off, the secret listing is searched first, and then non-secret listing is searched.
- When a telephone listing is entered while the Secret function is off ("■" on the display), it is registered as the secret listing.
3. Designating Listings as Secret
"*" next to a listing indicates it is secret. Secret listings will not be recalled unless the Secret function is off.
(1) Storing listings as secret Turn off the Secret function, then enter the listing. All the listings entered while secret function is off are designated as secret listings.
(2) Designating stored listings as secret
Example:
Designate the listing for SMITH ROBERT as secret.
- Recall the listing.
- Press 2nd EDIT.
The cursor will flash.
- Press 2nd SECRET.
“*” is displayed.
- Press ENT.
The listing for SMITH ROBERT is now designated as secret.
4. Changing Secret Listings to Non-Secret
-
Turn the Secret function off (see page E22).
-
Recall the desired secret listing.
-
Press 2nd EDIT.
The cursor will flash.
- Press 2nd SECRET.
"*" disappears.
- Press ENT.
The secret listing is now changed to non-secret.
Note:
To edit the secret listing while keeping it secret, edit the listing after 2nd EDIT are pressed in step 3 and press ENT to store the secret listing again.
5. Changing the Password
- Turn the Secret function off ("→" is displayed).
- Press C-CE 2nd SECRET.
- Press 2nd EDIT . The initial character of the password will flash.
- Enter a new password.
- Press ENT.
The new password is now registered.
Note:
If the incorrect password is entered when turning the Secret function off,
"■PW. ERROR!■" will appear. In this case, press C-CE and enter the correct password.
6. Deleting the Password and Secret Listings
Delete only the secret listings and its password.
- Press C-CE 2nd SECRET.
- Press 2nd DEL .
- Press 2nd ENT.
• To cancel, press C-CE.
Replacing Batteries
Battery used
| Type | Model | Quantity |
| Lithium battery | CR2016 | 1 |
- When the battery is replaced, all the memory contents will be cleared.
- Be sure to write down any important information stored in memory before replacing the battery.
1. Precautions
Since improper use of batteries may cause leakage or explosion, strictly observe the following instructions.
- Insert the battery with its positive side (+) correctly positioned, as indicated, in the holder.
- Never throw batteries into a fire because they might explode.
- Keep batteries out of the reach of children. Because the batteries in the Organizer were installed at the factory, they may become depleted before the specified expiration time is reached.
2. Battery Replacement
(1) Battery replacement time
If the display becomes dim and difficult to read, immediately replace the battery with a new one. Continued use of the Organizer with an exhausted battery can alter or clear the memory contents.
• Make sure the power is turned off before replacing the batteries.
- Do not press ON C-CE until the battery replacement procedure is completed.
(2) Replacing the battery
- Press OFF to turn the power off.
- Loosen the screw and remove the battery holder cover on the back of the unit.
- As illustrated, remove the used battery
by prying it out with a ball-point pen.
- Install a new battery with the (+) side facing up.

natural_image
Simple line drawing of a medical or scientific diagram with a central plus sign and a curved arrow (no text or symbols)- Replace the holder cover and secure it with the screw.
- Press ON to turn the power on. If nothing appears on the screen, press the RESET switch and press ON again.
To minimize battery consumption, the Organizer is designed to automatically turn off when no key has been pressed for approximately seven minutes.
Specifications
Model: EL-6050
Product name: Electronic Organizer
Display: 2 lines of 12 digits
Memory capacity: 863 bytes
Telephone mode:
Name: max. 36 characters
Number: max. 60 digits (12 digits × 5 lines)
Calculator mode:
12 digits (with calculation status symbols)
arithmetic calculations, percentage, square
root, memory calculation
Currency/unit conversion:
up to 6 kinds of currencies and units
Power consumption: 0.0002 W
E27
Operating temperature:
0 to 40°C
Power supply:
3V ... (DC)
(Lithium battery CR2016; 1)
Auto-power off:
Approx. 7 minutes
Battery life:
Approx. 2000 hours (continuous display)
Weight:
Approx. 50g (0.11lb) (including batteries, excluding wallet)
Dimensions:
108 mm (W) × 68 mm (D) × 7.6 mm (H)
(4-1/4" (W) × 2-11/16" (D) × 5/16"(H))
(excluding wallet)
Accessories:
1 lithium battery (installed), operation manual
LIMITED WARRANTY
SHARP ELECTRONICS CORPORATION warrants to the first consumer purchaser that this Sharp brand product (the 'Product'), when shipped in its original container, will be free from defective workmanship and materials and agrees that it will, at its option, either repair the defect or replace the defective Product or part thereof at no charge to the purchaser for parts or labor for the time period(s) set forth below.
This warranty does not apply to any appearance items of the Product nor to the additional excluded item(s) set forth below nor to any product the exterior of which has been damaged or defaced, which has been subjected to misuse, abnormal service or handling or which has been altered or modified in design or construction.
In order to enforce the rights under this limited warranty, the purchaser should follow the steps set forth below and provide proof of purchase to the servicer.
The limited warranty described herein is in addition to whatever implied warranties may be granted to purchasers by law. ALL IMPLIED WARRANTIES INCLUDING THE WARRANTIES OF MERCHANTABILITY AND FITNESS FOR USE ARE LIMITED TO THE PERIOD(S) FROM THE DATE OF PURCHASE SET FORTH BELOW. Some states do not allow limitations on how long an implied warranty lasts, so the above limitation may not apply to you.
Neither the sales personnel of the seller nor any other person is authorized to make any warranties other than those described herein or to extend the duration of any warranties beyond the time period described herein on behalf of Sharp.
The warranties described herein shall be the sole and exclusive warranties granted by Sharp and shall be the sole and exclusive remedy available to the purchaser. Correction of defects, in the manner and for the period of time described herein, shall constitute complete fulfilment of all liabilities and responsibilities of Sharp to the purchaser with respect to the Product and shall constitute full satisfaction of all claims, whether based on contract, negligence, strict liability or otherwise. In no event shall Sharp be liable, or in any way responsible, for any damages or defects in the Product which were caused by repairs or attempted repairs performed by anyone other than an authorized servicer. Nor shall Sharp be liable, or in any way responsible, for any incidental or consequential economic or property damage. Some states do not allow the exclusion of incidental or consequential damages, so the above exclusion may not apply to you.
THE WARRANTY GIVES YOU SPECIFIC LEGAL RIGHTS, YOU MAY ALSO HAVE OTHER RIGHTS WHICH VARY FROM STATE TO STATE.
Your Product
Warranty Period for this Product
Additional items excluded from warranty coverage.
Where to obtain service:
What to do to obtain service:
Electronic Calculator
One (1) year parts and labor from date of purchase.
Any consumable items such as paper, maintenance cartridge, ink cartridges supplied with the Product or to any equipment or any hardware, software, firmware, fluorescent lamp, power cords, covers, rubber parts, or peripherals other than the Product.
At a Sharp Authorized Servicer located in the United States. To find out the location of the nearest Sharp Authorized Servicer, call Sharp toll free at 800-BE-SHARP.
Ship (prepaid) or carry in your Product to a Sharp Authorized Servicer. Be sure to have proof of purchase available. If you ship or mail the Product, be sure it is packaged carefully.
SHARP
SHARP CORPORATION
96DUP (Z0131T)①
PRINTED IN CHINA /
IMPRIMÉ EN CHINE / IMPRESO EN CHINA
OLG42195201011