
EL-6082 - Taschenrechner SHARP - Kostenlose Bedienungsanleitung
Finden Sie kostenlos die Bedienungsanleitung des Geräts EL-6082 SHARP als PDF.

| Produkttyp | Taschenrechner |
| Marke | Sharp |
| Modell | EL-6082 |
| Display | 8-stelliges LCD |
| Stromversorgung | Batterie (LR1130) und Solarzelle |
| Tastenanzahl | 48 Tasten |
| Gewicht | Ca. 100 g |
| Abmessungen (B x H x T) | 120 x 70 x 10 mm |
| Grundrechenarten | Addition, Subtraktion, Multiplikation, Division |
| Zusätzliche Funktionen | Prozent, Speicher (M+, M-, MR, MC), Quadratwurzel, Vorzeichenwechsel |
| Speicher | 1 Speicherplatz |
| Gehäusematerial | Kunststoff |
| Farbe | Schwarz/Weiß (je nach Ausführung) |
| Reinigung | Mit einem weichen, trockenen Tuch abwischen |
| Sicherheit | Nicht wasserdicht, vor Feuchtigkeit schützen |
| Batteriewechsel | Knopfzelle LR1130, Zugang über Batteriefach an der Rückseite |
| Reparierbarkeit | Kann vom autorisierten Kundendienst repariert werden |
| Garantie | 2 Jahre (abhängig vom Händler) |
Häufig gestellte Fragen - EL-6082 SHARP
Benutzerfragen zu EL-6082 SHARP
0 Frage zu diesem Gerät. Beantworten Sie die, die Sie kennen, oder stellen Sie Ihre eigene.
Eine neue Frage zu diesem Gerät stellen
Laden Sie die Anleitung für Ihr Taschenrechner kostenlos im PDF-Format! Finden Sie Ihr Handbuch EL-6082 - SHARP und nehmen Sie Ihr elektronisches Gerät wieder in die Hand. Auf dieser Seite sind alle Dokumente veröffentlicht, die für die Verwendung Ihres Geräts notwendig sind. EL-6082 von der Marke SHARP.
BEDIENUNGSANLEITUNG EL-6082 SHARP
SHARP®
ELECTRONIC ORGANIZER
MEMO MASTER ALARM
MODEL
EL-6082
OPERATION MANUAL
natural_image
Abstract black-and-white pattern with layered chevron shapes (no text or symbols)NOTICE
- Sharp strongly recommends that separate permanent written records be kept of all important data. Data may be lost or altered in virtually any electronic memory product under certain circumstances. Therefore, Sharp assumes no responsibility for data lost or otherwise rendered unusable whether as a result of improper use, repairs, defects, battery replacement, use after the specified battery life has expired, or any other cause.
- Sharp assumes no responsibility, directly or indirectly, for financial losses or claims from third persons resulting from the use of this product and all of its functions, such as stolen credit card numbers, the loss of or alteration of stored data, etc.
Using the EL-6082 for the First Time
Be sure to perform the following operation before using the EL-6082 for the first time.
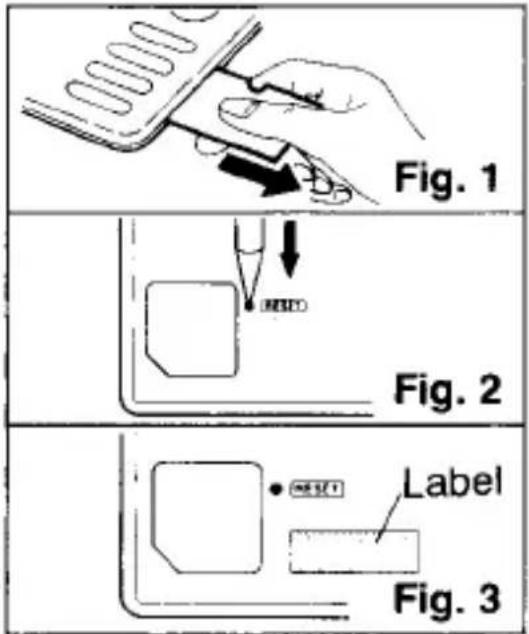
1 Pull out the insulation sheet. (Fig. 1)
(This sheet was inserted at the factory to prevent battery wear. Operation of the EL-6082 begins when it is pulled out.)
2 Press the RESET switch on the back. (Fig. 2)
3 Press ENTER.
4 Repeat steps 2 and 3 once more.
5 On the battery replacement date label on the back of the EL-6082 record the date of removal of the insulation sheet. (Fig. 3)
(Use this as a reminder when to replace the battery next time.)
6 Set the date and time of the clock. (Refer to page 8.)
Cautions
- Do not carry the EL-6082 in the pocket of your slacks or trousers.
- Do not drop it or apply excessive force.
- Do not subject the EL-6082 to extreme temperatures.
- Clean only with a soft, dry cloth.
- At times, 加 and 英 may appear faintly on the screen. This, however, will not affect the operation of the EL-6082.
- Use only a SHARP approved service facility.
When Abnormal Conditions Cause a Malfunction
If the EL-6082 is subjected to strong, extraneous electrical noises or shocks during use, an abnormal condition may occur in which no keys (including ONC) will respond. If this happens, press the RESET switch on the back of the EL-6082 and any key other than ENTER.
2 Note The above operation may clear all memory and reset the clock.
Page
Using the EL-6082 for the First Time 1
Cautions 2
When Abnormal Conditions Cause a Malfunction 2
-
Part Names 4
-
Changing Operation Modes 6
-
Turning the Key Touch Tone On and Off 7
-
Clock Mode 7
-
Telephone Mode 14
-
Schedule Mode 21
-
Secret Function 30
-
Calculator Mode 34
-
Memory 37
-
Battery Replacement 40
-
Specifications 43
1 Part Names
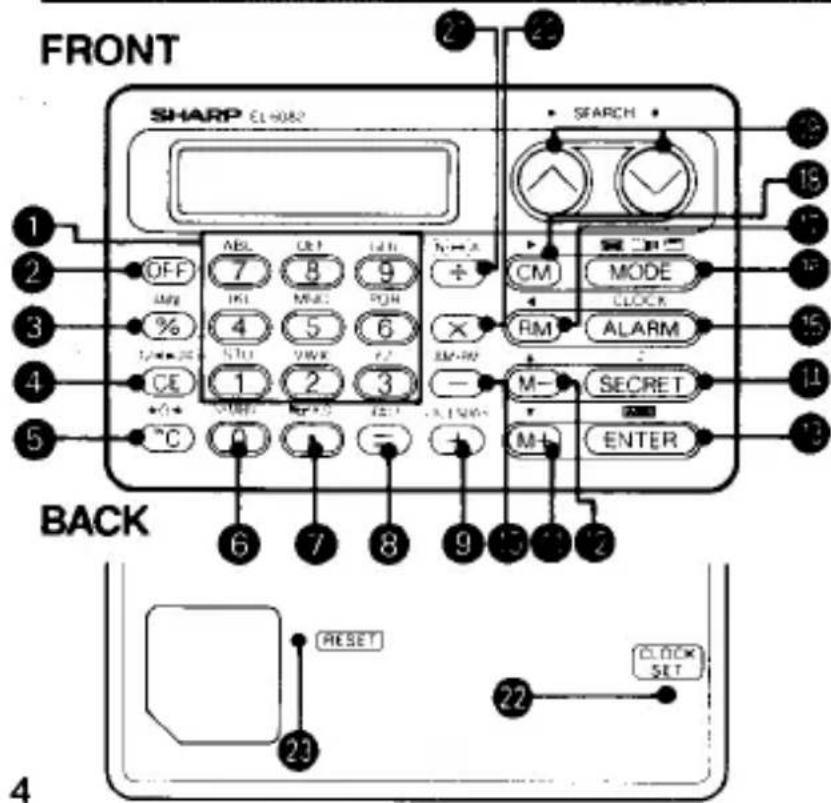
① Alphanumeric keys

② Power OFF key OFF
③ Percent/ANNiversary key

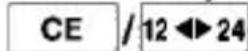
④ Clear Entry/12-24 Hour key
⑤ Power ON-Clear/Seconds

⑥ Zero/SYMBOL Key 0 / SYMBOL
⑦ Decimal Point/Daily Alarm-
Hourly Alarms ON-OFF key
⑧ Equals/SPACE key = /SPACE
⑨ Addition/CALENDAR key
+ / CALENDAR
Subtraction/AM-PM key
— / AM·PM
① Memory Plus/Cursor Down key
M + / ▼
⑫ Memory Minus/Cursor Up key
M - / ▲
13 ENTER/Memory Check key
ENTER / M·CK
19 SECRET/Touch Tone key
SECRET/
⑤ CLOCK/ALARM key CLOCK / ALARM
MODE key MODE
● Recall Memory/Cursor Left key
RM /
B Clear Memory/Cursor Right key
CM / ▶
19 SEARCH keys ∨ • ∧
20 Multiplication key ×
② Division/Number-Alphabet key
÷ / [N] ↔ [A]
21 CLOCK SET switch (on the back)
CLOCK
SET
② RESET switch (on the back)
•RESET
In this manual, the keys are represented by simplified symbols according to the function.
Press the CLOCK SET and RESET switches with a ball-point pen or similar object. Do not use an object with a breakable or sharp tip.
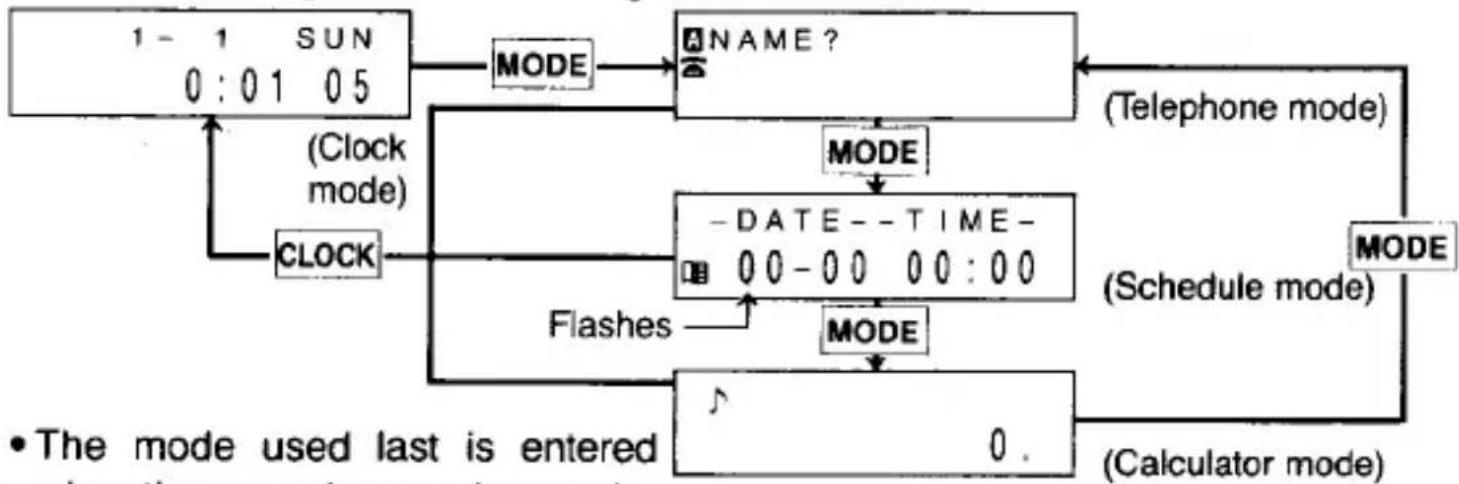
2 Changing Operation Modes
The EL-6082 is equipped with four operation modes: clock, telephone, schedule, and calculator.
- Press CLOCK to select the clock mode.
- Press MODE to select the telephone, schedule, or calculator mode.
The mode changes in the following order:
flowchart
graph TD
    A["1 - 1 SUN\n0 : 01 05"] --> B["MODE"]
    B --> C["NAME ?"]
    C --> D["(Telephone mode)"]
    D --> E["Schedule mode"]
    E --> F["MODE"]
    F --> G["0."]
    G --> H["(Calculator mode)"]
    H --> I["Flashes"]
    I --> J["-DATE--TIME-\n00-00 00:00"]
    J --> K["CLOCK"]
    K --> L["(Clock mode)"]
    L --> A
6 when the power is turned on again.
3 Turning the Key Touch Tone On and Off
The EL-6082 can beep each time a key is pressed. This tone is switched on and off by pressing ▶ when the EL-6082 is in the calculator mode.
♪ appears or disappears every time □ is pressed.
The key touch tone will sound when ♩ is displayed.
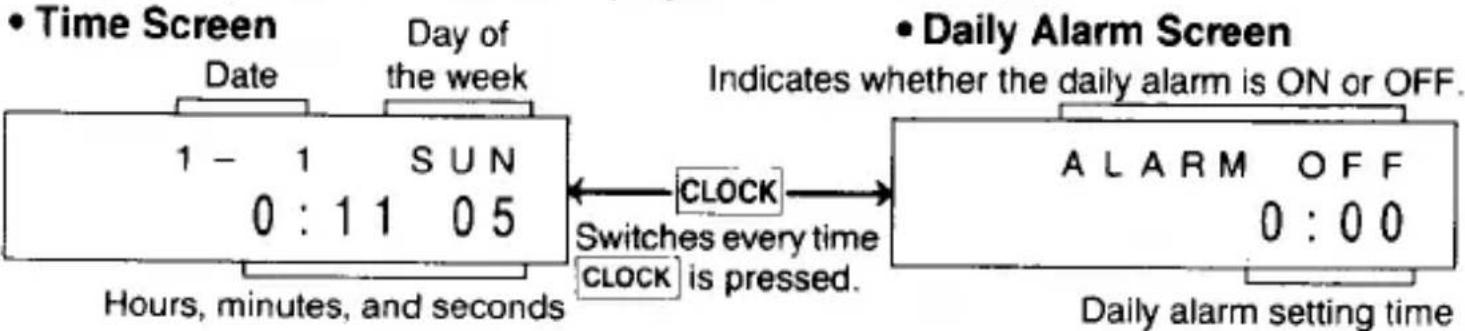
4 Clock Mode
The following two screens are displayed in the clock mode:
flowchart
graph LR
    A["Time Screen"] --> B["Date"]
    B --> C["Day of the week"]
    C --> D["1 - 1 SUN 0:11 05"]
    D --> E["Clock"]
    E --> F["Switches every time CLOCK is pressed."]
    F --> G["Daily Alarm Screen"]
    G --> H["ALARM OFF 0:00"]
    H --> I["Daily alarm setting time"]
    style A fill:#f9f,stroke:#333
    style G fill:#ccf,stroke:#333
1. Setting the time
The time and date are set at the same time.
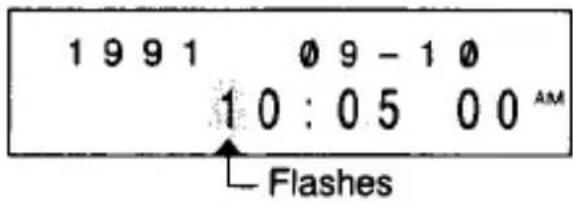
Example: Setting the date and time to September 10th, 1991, and 10:05 AM
1 Press CLOCK to display the time screen.
2 Press the CLOCK SET switch on the back.
Hours, minutes, and seconds
3 Press 12▶24 to set the 12-hour or 24-hour clock.
The display switches between the 12-hour and 24-hour clocks every time is pressed. AM or PM is displayed for the 12-hour clock.
(The 12-hour clock is set here.)
4 Enter the hours and minutes, respectively. ★1

(Enter two digits each for the hours and minutes.)
5 Enter the year, month, and date, respectively.

(Enter two digits each for the month and date.)
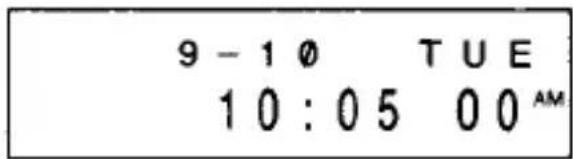
6 Press ENTER in unison with an external time signal.
The clock begins to count the seconds. ★3
- If an impossible year, month, date, or time is entered, "ERROR!" will be displayed momentarily when ENTER is pressed.
Enter the proper time and press ENTER again.
★1: Time can be entered either by the 12-hour or 24-hour clock, regardless of the clock system set at 3.
★2: Pressing AM·PM displays, in the following order: AM → PM → no symbol (24-hour clock) → AM ...
★3: The day of the week is displayed as the seconds begin to count. The EL-6082 automatically determines the proper day of the week when the year, month, and date are set. The built-in calendar extends between January 1st, 1901, and December 31st, 2098.
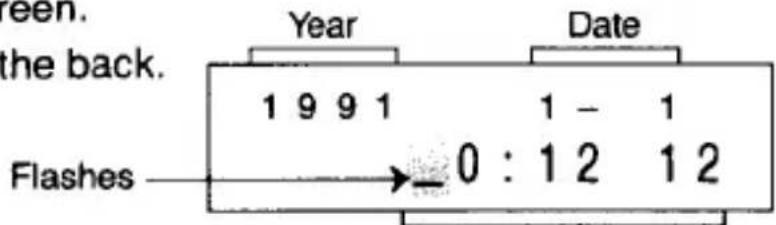
2. Checking the year
Press CALENDAR to display the year when the time screen is displayed. Press CALENDAR to return to the original display.
3. Correction
(1) Resetting the time
1 Press CLOCK to display the time screen.
2 Press the CLOCK SET switch on the back.
3 Press ▶, ◀, ▲ or ▼ to move the cursor over the number to be corrected. This number then flashes.
4 Enter the correct number.
5 Press ENTER.
(2) Adjusting the seconds
The EL-6082 will always function with the correct time if the seconds are adjusted periodically (about once a month) after the time has been set. This function corrects the time without setting the entire time entry again.
1 Press CLOCK to display the time screen.
2 Press the CLOCK SET switch on the back.
3 Press ▶0◀.
Pressing ▶0◀ sets the seconds to 00 if it is pressed between 00 and 29 seconds, and advances to 00 of the next minute if it is pressed between 30 and 59 seconds.
4. Switching the 12-24 hour clock
1 Press CLOCK to display the time screen.
2 Press the CLOCK SET switch on the back.
3 Press 12▶24.
The clock system switches between the 12-hour and 24-hour clocks every time is pressed.
4 Press ENTER.
5. Turning the hourly alarms on and off
When ① is displayed, a beep will sound every hour on the hour.
appears or disappears every time is pressed while the time screen is displayed.
6. Daily alarm
When the clock reaches the set time, it beeps for one minute.
Press either ALARM, ONC, CE or OFF to turn off the alarm sound.
(1) Setting the daily alarm time
1 Press CLOCK to display the daily alarm screen.
2 Press the CLOCK SET switch on the back.
3 Enter the time.
4 Press ENTER.
The daily alarm time is set. The daily alarm is also automatically switched on.
- The clock system for the daily alarm time is the same as that being used for the clock.
5 Press CLOCK after setting is completed. The time screen will be displayed again.
(2) Turning the daily alarm on and off
The daily alarm will sound when is displayed.
appears or disappears every time is pressed while the daily alarm screen is displayed.
(3) Changing the daily alarm time
The daily alarm time is changed by setting a new time. (Refer to “(1) Setting the daily alarm time”.)
5 Telephone Mode
Telephone numbers are stored in this mode. It can also be used to store a brief timetable, etc.
In this mode, up to 6 lines (72 columns) can be entered for each item. Each line consists of 12 columns. The first line is called the alphanumeric line, and can contain letters, symbols, and numbers. The remaining 5 lines (60 columns) are called the number lines, and can contain only numbers.
1. Entering characters in the alphanumeric line
Press MODE to select the telephone mode, and then press ONC to display the item entry prompt.
(1) Entering letters
Letters can be entered while A is displayed.
A appears or disappears every time is pressed.
Example: Entering "TU"
1 Press STU twice. "T" will be displayed.
- As \1 is pressed repeatedly, the displayed letter changes in the following order: S T U S ·s
2 Press ▶. The cursor moves to the next column.
- This step can be omitted if the same key is not used to enter successive letters.
3 Press STU three times. "U" will be displayed.
(2) Entering symbols
Symbols can be entered while A is displayed.
- Press SYMBOL. As SYMBOL is pressed repeatedly, the displayed symbol changes in the following order: \→ ¥ → ⇒ → \ ...
2 To enter consecutive symbols, press ▶.
(3) Entering numbers
Numbers can be entered while A is not displayed.
Press 0 through to enter numbers.
(4) Entering hyphens (-) , dots (·) , or spaces ( )
Press - , • , or SPACE.
2. Storing in memory
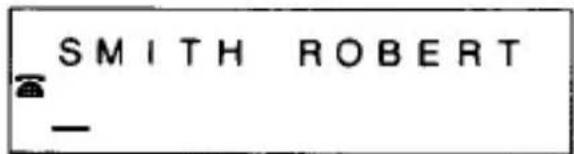
Example: Storing SMITH ROBERT 212-555-1212, 212-555-4321
1 Press MODE to select the telephone mode, and then press ONC.
2 Enter the name in the alphanumeric line.
| STU1 | MNO5 | GHI9 | GHI9 | GHI9 | STU1 | STU1 | GHI9 | GHI9 | SPACE | POR6 | POR6 |
| POR6 | MNO5 | MNO5 | MNO5 | ABC7 | ABC7 | DEF8 | DEF8 | POR6 | POR6 | POR6 | STU1 |
| STU1 | |||||||||||
3 Press ▼ or ▶ to move the cursor to the next line.
4 Enter the telephone numbers in the number lines.

5 Press ENTER to store in memory.
- Telephone items stored are internally sorted in the following order:
Spaces → letters → numbers → - → • → symbols (\$ → ¥ → →)
If “↑” or “↓” is displayed, this indicates that more information exists above or below the current display. Press ▲ or ▼ to display the contents.
3. Recall
Items can be recalled even in the clock or calculator modes.
(1) Sequential search
Press ∨ or ∧ . Hold down these keys for rapid recall.
∨ : Recalls items in forward order. ∧ : Recalls items in reverse order.
(2) Direct search
Enter the first character(s) of the item and press ∨ or ∧ to recall that item directly.
If no appropriate item is found in the memory after a direct search, "NOT FOUND!" is displayed momentarily and the display returns to the item entry prompt.
4. Correction
1 Press ▶, ◀, ▲, or ▼ to move the cursor to the character to be corrected.
2 Enter the correct character.
3 Press ENTER.
- Or re-enter the item after pressing ONC.
1 Press ∨ or ∧ to recall the item to be corrected.
2 Press ▶ or ◀. The cursor will flash.
3 Follow the correction procedure described under "Correcting during an entry" above.
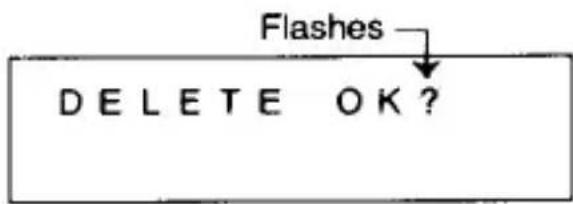
5. Deletion
1 Recall the item to be deleted.
2 Press CE.
3 Press ENTER.
- To cancel the deletion, press any key other than ENTER.
6. Calculation using data stored in the memory (data memo calculation)
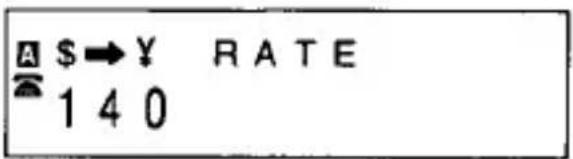
Currency conversions and other calculations can be performed using data stored in the telephone mode.
Example: Converting \2.75 to yen when \1 = ¥140
First, “\$→¥ RATE” is stored in the alphanumeric line and “140” is stored in the number line.
- The number used for calculation is stored on the second line (13th through 24th columns), including the decimal point. Data memo calculation cannot be performed if numbers are entered beyond the 3rd line.
- The cursor will not move past the 2nd line if a decimal point is entered in the 2nd line.
Press ▼ or ∧ to recall the conversion item.

\$2.75 equals ¥385.
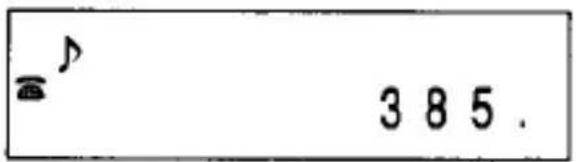
If the number used for calculation is a telephone number or if it exceeds 10 digits, an error will occur ("E" will be displayed).
Perform the correct operation after pressing ONC.
6 Schedule Mode
The schedule mode is used for storing schedule information (month, date, hour, minutes, and schedule details) in the memory.
In this mode, up to 2 lines can be entered for each item. The upper line is called the alphanumeric line and is used for entering schedule details (12 columns). The lower line is called the number line, and 2 digits each can be entered for the month, date, hour, and minutes.
Letters, symbols, and numbers can be entered in the alphanumeric line. Only numbers can be entered in the number line.
1. Storing in memory
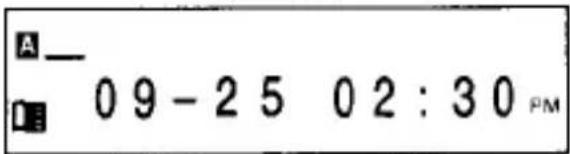
Example: Storing a schedule item (e.g., MEETING at 2:30 PM on September 25th)
1 Press MODE to select the schedule mode, and then press ONC.
2 Begin entry from the lower (number) line.

minutes should each consist of two digits.)
• After entry of the minutes, the cursor moves to the upper line.
- Time can be entered either by the 12-hour or 24-hour clock. However, when the item is recalled, the clock system for the schedule mode is the same as that of the clock mode.
- When not entering the time, press ▲ after entering the month and date. The time will be entered as 00:00, and the cursor will move to the upper line.
- Pressing AM·PM displays, in the following order:
AM → PM → no symbol → AM ...
Changing symbols with AM·PM can be performed when the cursor is on the lower (number) line.
3 Enter the schedule details on the upper (alphanumeric) line.
| MNO5 | DEF8 | DEF8 | DEF8 | DEF8 | STU1 | |
| STU1 | GHI9 | GHI9 | GHI9 | MNO5 | MNO5 | GHI9 |
| AMEETING09-25 02:30PM |
4 Press ENTER to store in memory.
- If the user attempts to store an impossible date or time, "ERROR!" is displayed. Enter the correct date and time and press ENTER.
- The EL-6082 assigns a year to each date input on the assumption that it is in the future, compared to the date of the clock mode.
(Example: If an entry is made for August 20th when the current clock mode date is September 10th, 1991, the entry will be stored under August 20th, 1992.) - Schedule items stored are sorted chronologically from the current clock mode date.
2. Recall
(1) Sequential search
Press ∨ or ∧. Hold down these keys for rapid recall.
∨ : Recalls items in forward order. ∧ : Recalls items in reverse order.
(2) Detail search
Press ▲ to move the cursor to the upper line, enter the first character(s) of the schedule details and press ∨ or ∧ to recall that item directly.
(3) Date search
Enter the date and press ∨ or ∧ to recall that item directly.
If no appropriate item is found in the memory after a detail search or a date search, "NOT FOUND!" is displayed momentarily and the display returns to the item entry prompt.
3. Correction
Correction is performed by the same procedure used for the telephone mode (page 18).
4. Deletion
Schedule items can be deleted by the following two methods:
(1) Deletion by recall
This is performed by the same procedure used for the telephone mode (page 19).
(2) Automatic deletion using the auto-delete function
With each passing day, according to the clock mode, items from previous days are automatically deleted.
- If the date of the clock mode is changed, items of an earlier date than the new date will be considered as past items, and will be deleted by the auto-delete function.
5. Schedule lists (weekly schedule display function)
The EL-6082 can display the number of schedule items for up to 10 or 9 days in the future from the current clock mode date.
1 Press MODE to select the schedule mode, and then press ONC.
2 Press CALENDAR.
The days of the week will be displayed in the upper line and the number of items for each day in the lower line.
3 Press ONC after checking the weekly schedule.
The display returns to the item entry prompt.
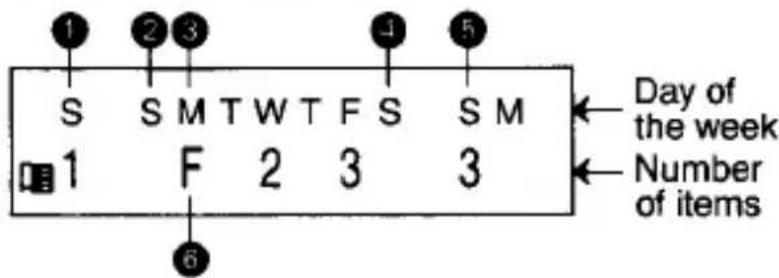
Saturday (Current day is shown first.)
② Sunday
③ Monday
Saturday of next week
5 Sunday one week after 2
6 "F" is displayed when there are 10 or more stored items for that day.
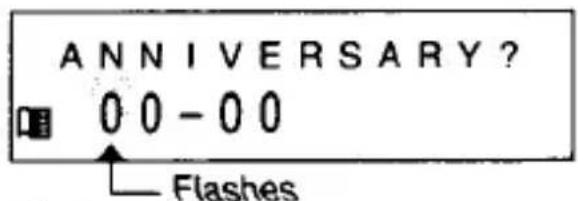
6. Anniversaries
The schedule mode is equipped with an anniversary function which allows the storage of 10 anniversaries in addition to ordinary schedule data. Each item consists of an anniversary detail (12 columns), and the month and date.
(1) Entry
Example: Storing of an anniversary (April 30 WEDDING)
1 Press MODE to select the schedule mode.
2 Press ANNI.
③ Begin entry from the lower line.
Enter the month and date, using two digits each, respectively.
| 0 | JKL4 | YZ3 | 0 |
4 Enter the details.
| VWX2 | VWX2 | DEF8 | DEF8 | DEF8 | ||
| DEF8 | GHI9 | GHI9 | QHI9 | MNÖ5 | MNÖ5 | GHI9 |
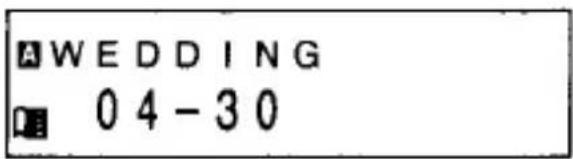
5 Press ENTER to store in memory.
- Up to 10 anniversaries can be stored in the memory.
If ENTER is pressed to store items when the ten-item capacity is insufficient, "FULL! NOT IN" will be displayed and the item will not be stored in the memory. If this occurs, delete unnecessary or less important anniversary items, and repeat the operation.
• The stored items will be sorted in chronological order from January 1st to December 31st.
(2) Recall·Correction·Deletion
Press ANNI. to display the anniversary item entry prompt after selecting the schedule mode.
Items can be recalled, corrected, or deleted by the same procedure used for ordinary schedule items.
- There is no auto-delete function (refer to page 24) for items entered using the anniversary function.
7. Checking the day of the week (day of the week confirmation function)
There are three ways to check the day of the week.
This can be performed in the schedule mode.
(1) Day confirmation by recalling schedule items
Recall that day's schedule to confirm the day of the week, then press and hold CALENDAR.
(2) Day confirmation by designating the month and date
Enter the date in the lower line, then press and hold CALENDAR.
(3) Day confirmation by designating the year, month, and date
Enter the month, date, and year in the lower line, then press and hold CALENDAR.
The year is entered in the hours and minutes column of the schedule item.
8. Alarms for schedule mode
The schedule mode is equipped with the following three alarms:
(1) Advance alarm
There is slow beeping for 20 seconds, 10 minutes before the designated schedule item.
(2) Schedule alarm
There is rapid beeping for 20 seconds when the time set for a schedule item is reached.
(3) Anniversary alarm
There is rapid beeping for approximately 5 seconds on every hour from 9:00 AM to 3:00 PM during a designated anniversary.
The items are displayed when the alarm sounds. ("SECRET DATA" is displayed if the item is secret. Refer to page 30 regarding secret data.)
Press either ALARM, ONC, CE, or OFF to turn off the alarm sound. The alarm cannot be turned off for items in the schedule mode. It will always sound for the designated stores.
• The schedule and anniversary alarms will not sound in the following cases: When the advance alarm is stopped the schedule alarm for that item will not sound.
Once the anniversary alarm is stopped, there will be no more alarms during that anniversary.
- Multiple alarms set for the same time will sound in the following order of priority:
① Schedule alarm ② Advance alarm ③ Daily alarm
④ Anniversary alarm ⑤ Hourly alarms
7 Secret Function
This function is used to prevent other people from gaining access to items stored in the telephone or schedule mode. This function requires a password registration.
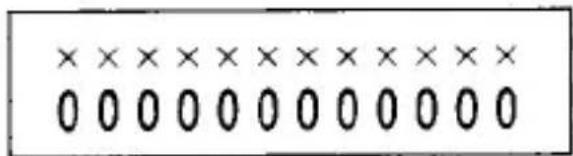
1. Registering the password (Setting up the secret function) Example: Registering "ADG"
1 Press MODE to select the telephone (or schedule) mode, and then press ONC.
2 Press SECRET. "PASS. W SET?" will be displayed and will flash.
- If "PASSWORD?" is displayed, a password has already been registered. To register "ADG" as the new password, delete the current password. (Refer to page 38 for the deletion procedure.)
3 Enter the password "ADG" and press SECRET.

will stop flashing and the password will be registered.
- If the password is forgotten, it will be necessary to clear both the password and the secret items. Be sure to jot the password down somewhere safe.
- Only one password can be registered, but many secret items can be entered. Up to 6 characters (letters, symbols, numbers, hyphens, dots, or spaces) can be entered as a password. Spaces entered in the password must be followed by some other character.
2. Closing and opening the secret function
(1) Closing the secret function
1 Press MODE to select the telephone (or schedule) mode, and then press ONC.
2 Press SECRET when is displayed.
The password will be displayed and the entire display will flash.
3 Press SECRET again.
will disappear to indicate that the secret function has been closed.
- The secret function can also be closed by pressing OFF to turn off the power, or by pressing SECRET while recalling stored items.
(2) Opening the secret function
1 Press MODE to select the telephone (or schedule) mode, and then press ONC.
2 Press SECRET. "PASSWORD?" will be displayed.
③ Enter the password and press SECRET.
will be displayed to indicate that the secret function is open.
- The secret function can also be opened by entering the password and pressing SECRET after pressing ONC.
(In the schedule mode, enter the password and press SECRET after pressing ONC and moving the cursor to the upper line with ▲.)
3. Storing secret items
Items stored while the secret function is open become secret.
Items stored while the secret function is closed become non-secret even after registering a password.
1 Open the secret function. (Refer to page 32.)
2 Store the item using the same procedure used for non-secret items.
- It will no longer be possible to recall secret items after the secret function has been closed. (Refer to page 31.)
4. Recalling, correcting or deleting secret items
After opening the secret function, secret items can be recalled, corrected or deleted using the same procedures used for non-secret items.
1 Open the secret function. (Refer to page 32.)
② Recall, correct or delete the secret items using the same procedures used for non-secret items.
- During recall, items for which ➕ flashes are secret. In the telephone mode, secret items are recalled before non-secret items.
5. Changing the password
1 Open the secret function. (Refer to page 32.)
2 Press ONC SECRET. The password will be displayed and the entire display will flash.
3 Press ▶. ▶ and the first character of the password will flash.
4 Enter the new password.
5 Press SECRET. ■ will stop flashing and the password will be changed.

If an incorrect password is used when opening the secret function, the display will appear as shown. Press ONC and repeat the procedure using the correct password.
8 Calculator Mode
1. Calculation
Press MODE to select the calculator mode.
Before performing a calculation, press ONC CM to clear the memory and display.
| Example | Operation | Display | |||||||
| (-24+2)÷4=-5.5 | ONC | - | 24 | + | 2 | ÷ | 4 | = | -5.5 |
| 34+57=91 | 34 | + | 57 | = | 91. | ||||
| 45+57=102 | 45 | = | 102. | ||||||
| 68×25=1700 | 68 | × | 25 | = | 1700. | ||||
| 68×40=2720 | 40 | = | 2720. | ||||||
| 200×10%=20 | 200 | × | 10 | % | 20. | ||||
| 9÷36=25(%) | 9 | ÷ | 36 | % | 25. | ||||
| 200+(200×10%)=220 | 200 | + | 10 | % | 220. | ||||
| 500-(500×20%)=400 | 500 | - | 20 | % | 400. | ||||
| 4^6=(4^3)^2=4096 | 4 | × | = | = | × | = | 4096. | ||
| 1/8=0.125 | 8 | ÷ | = | 0.125 | |||||
| 25×5=125- )84÷3=28+ )68+17=85182 | CM 25 × 5 M+84 ÷ 3 M-68 + 17 M+RM | M 125.M 28.M 85.M 182. |
| 1234567891×145=179012344195 | E1234567891 × 145 = 17.90123441CE 17.90123441(17.90123441×1010=179012344100) | |
2. Errors
When the integer part of a calculation result or any integer in the memory exceeds 10 digits, or other impossible operations are attempted, an ERROR will occur.
("E" will appear in the upper line.)
Press ONC to clear the error.
Overflow errors can be cleared with CE.
9 Memory
1. Memory check
1 Press MODE to select the telephone (or schedule) mode, and then press ONC.
2 Press M·CK.
The number of characters that can still be stored is displayed.
3 Press M·CK again.
The number of items stored in the telephone and schedule modes is displayed.
- The two displays described above (remaining characters and number of items) alternate every time M·CK is pressed.
Press any key other than M·CK to return the display to the item entry prompt.
Note
The EL-6082 can store up to 1752 characters in its memory (excluding memories of the anniversary function and the calculator mode).
If ENTER is pressed in an attempt to store items when the remaining memory capacity is insufficient, "FULL! NOT IN" will be displayed and the item will not be stored. In this case, press ONC, and either delete previously stored items or change the item to be stored so that it will not exceed the memory capacity. Repeat the storing procedure once again.
When storing characters, one column in the alphanumeric line is counted as one character, and two columns in the number lines are counted as one character. If there is an odd number of columns in the number lines, the leftover digit is counted as one character. In addition to the space taken up by visible characters, four characters are used as separators for each item.
If nothing is entered in an alphanumeric line, one space character will be stored in the memory.
2. Clearing the memory (Reset operation)
The data stored in the EL-6082 contains secret items and non-secret items.
When clearing all items, first clear the secret items and then the non-secret items.
1 Press ONC.
2 Press the RESET switch on the back.
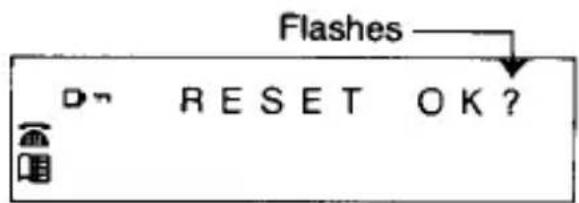
3 Press ENTER.
This clears only the password and secret items.
4 Press the RESET switch again.
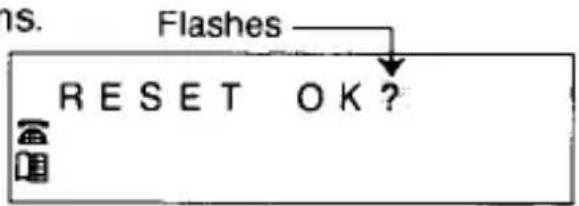
5 Press ENTER.
The non-secret items has been cleared.
The clock is also reset by this operation and starts from 0:00, January 1, 1989.
- To cancel the deletion, press any key other than ENTER after pressing the RESET switch.
- If there is no password registration, steps [1], [4], and [5] will clear all the data in the EL-6082.
10 Battery Replacement
Battery used: 1 lithium battery (CR2016)
- When to replace the battery:
Replace the battery immediately if the display is hard to read even when viewed straight on. (Also if the battery is exhausted, the alarm or key touch tone may not sound.) - Replace the battery once a year. (The battery will become exhausted due to clock operation.)
Note
Loss or alteration of stored data may occur if the exhausted battery is used or if the battery is replaced improperly.
Be sure to keep a written record of all important data.
Data may also be lost or altered if the following are not performed:
- Before replacement, press OFF to turn the power off.
- Complete steps 3 and 4 within one minute.
• Install the battery with the plus (⊕) side up.
- Do not press ONC until the replacement battery has been installed.
1 Press OFF to turn the power off.
2 Remove the screw from the battery cover on the back of the EL-6082 and remove the battery cover. (Fig. 1)
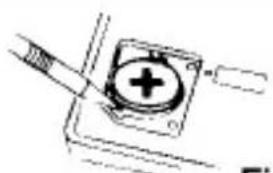
3 Remove the old battery with a ball-point pen or similar object. (Fig. 2)
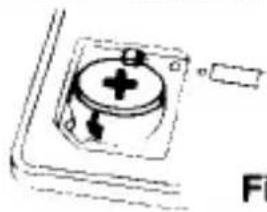
4 Install the new battery with the plus (⊕) side up, first hooking it under the tab. (Fig. 3)
5 Replace the battery cover and secure the screw.
6 Press ONC to turn the power on.
If nothing is displayed, press the RESET switch and press ONC again.

natural_image
Simple line drawing of a pipette dispensing liquid into a square container (no text or symbols)Fig. 1
natural_image
Simple line drawing of a mechanical component with a plus sign and a tool (no text or symbols)Fig. 2
natural_image
Simple line drawing of a mechanical component with no text or symbolsFig. 3
7 Press MODE to select the mode, and press v to check all data.
(Correct or re-enter data if it has been lost or altered.)
8 Set the clock.
If steps 6 to 8 cannot be performed properly, perform the reset operation. (Refer to page 38.) However, this will clear all data.
Precautions
- Keep the battery out of the reach of children.
- A worn battery left in the EL-6082 may leak and damage the EL-6082.
- Explosion risk may be caused by incorrect handling.
- It is only allowed to replace with the same type of this battery.
Automatic Power-Off Function
If no keys are pressed for approximately 7 minutes, the power will automatically turn off to conserve the battery. The memory contents will remain intact. (The actual time may vary depending upon the conditions of use.)
11 Specifications
Model: EL-6082
Display: Upper line: 12 columns (characters), 2 columns (symbols) Lower line: 12 columns (characters), 2 columns (symbols)
Memory capacity: 1752 bytes (excluding the anniversary function) 10 items (anniversary function)
Accuracy: ±30 seconds/month (at 25°C (77°F))
Displayed information: Year, month, date, day of the week, hour, minutes, seconds, AM/PM
Clock system: Switchable from a 12-hour clock to a 24-hour clock
Functions: Entry and recall of names and numbers, data memo calculation
Functions: Entry and recall of schedule (details, date, time) and anniversaries (details and date), day of the week confirmation, weekly schedule display 4
Digits: 10
Functions: Key touch tone on/off, addition, subtraction, multiplication, division, percent, memory calculations, etc.
Power supply: 3V—(DC) (lithium battery CR2016; 1)
Power consumption: 0.003 W
Battery life: Approx. 1 year (when alarm sounds 20 seconds, the key touch tones sound 100 times, and the display is on 30 minutes, each per day at 25°C (77°F)).
Operating temperature: 0°C — 40°C (32°F — 104°F)
Dimensions: 108 (W) × 68 (D) × 7.2 (H) mm (excluding the wallet)
$$ (4 - 1 / 4 ^ {\prime \prime} (W) \times 2 - 1 1 / 1 6 ^ {\prime \prime} (D) \times 9 / 3 2 ^ {\prime \prime} (H)) $$
Weight: 71g (0.16lb.) (including the battery and wallet)
Accessories: 1 lithium battery (installed), Operation Manual, Battery replacement caution card
EL-6082
LIMITED WARRANTY:
SHARP ELECTRONICS CORPORATION warrants this product to the first consumer purchaser to be free from defective materials and workmanship. Under this warranty the product will be repaired or replaced, at our option, without charge for parts or labor, with the exception of batteries, when returned to a SHARP CONSUMER FACTORY SERVICE CENTER listed in the instruction booklet supplied with your unit.
This warranty does not apply to any appearance items not to any product whose exterior has been damaged or defaced, nor to any product subjected to misuse, abnormal service or handling, nor to any products altered or repaired by other than a SHARP CONSUMER FACTORY SERVICE CENTER. This warranty does not apply to any product purchased outside the United States, its territories, or possessions.
The period of this warranty covers one (1) year on parts and one (1) year on labor from date of purchase.
This warranty entitles the first consumer purchaser to have the warranted parts and labor rendered at no cost for the period of the warranty described above when the unit is carried or shipped, prepaid, to a SHARP CONSUMER FACTORY SERVICE CENTER together with proof of purchase.
THIS SHALL BE THE EXCLUSIVE WRITTEN WARRANTY OF THE FIRST CONSUMER PURCHASER AND NEITHER THIS WARRANTY NOR ANY OTHER WARRANTY, EXPRESSED OR IMPLIED, SHALL EXTEND BEYOND THE PERIOD OF THE TIME LISTED ABOVE. IN NO EVENT SHALL SHARP BE LIABLE FOR CONSEQUENTIAL ECONOMIC DAMAGE OR CONSEQUENTIAL DAMAGE TO PROPERTY. SOME STATES DO NOT ALLOW A LIMITATION ON HOW LONG AN IMPLIED WARRANTY LASTS OR AN EXCLUSION OF CONSEQUENTIAL DAMAGE, SO THE ABOVE LIMITATION AND EXCLUSION MAY NOT APPLY TO YOU. IN ADDITION, THIS WARRANTY GIVES SPECIFIC LEGAL RIGHTS, AND YOU MAY HAVE OTHER RIGHTS WHICH VARY FROM STATE TO STATE.
SHARP SERVICE CENTER ADDRESS
Sharp Electronics Corporation
1300 Naperville Drive, Romeoville, IL 60441
(708) 759-8555
REGIONAL SALES OFFICES AND DISTRIBUTION CENTERS.
Eastern: Sharp Plaza, Mahwah, New Jersey, 07430-2135
Phone:(201)529-8200
Midwest: 1300 Naperville Drive, Romeoville, IL 60441
Phone:(708)759-8555
Western: Sharp Plaza, 20600 South Alameda St., Carson, California 90810
Phone:(213)637-9488
SHARP
SHARP ELECTRONICS CORPORATION
Sharp Plaza, Mahwah, New Jersey, 07430-2135
SHARP CORPORATION
© 1990 SHARP CORPORATION
PRINTED IN HONG KONG/IMPRIME A HONG KONG
KS(E0014T)
- SHARP®
- NOTICE
- Using the EL-6082 for the First Time
- Cautions
- When Abnormal Conditions Cause a Malfunction
- Part Names
- Changing Operation Modes
- Turning the Key Touch Tone On and Off
- Clock Mode
- Setting the time
- Checking the year
- Correction
- Adjusting the seconds
- Switching the 12-24 hour clock
- Turning the hourly alarms on and off
- Daily alarm
- Telephone Mode
- Entering characters in the alphanumeric line
- Entering letters
- Example: Entering "TU"
- Entering numbers
- Entering hyphens (-) , dots (·) , or spaces ( )
- Storing in memory
- Recall
- Sequential search
- Direct search
- Correction
- Deletion
- Calculation using data stored in the memory (data memo calculation)
- Schedule Mode
- Storing in memory
- Recall
- Detail search
- Date search
- Deletion
- Deletion by recall
- Automatic deletion using the auto-delete function
- Schedule lists (weekly schedule display function)
- Anniversaries
- Entry
- Checking the day of the week (day of the week confirmation function)
- Alarms for schedule mode
- Advance alarm
- Schedule alarm
- Anniversary alarm
- Secret Function
- Registering the password (Setting up the secret function) Example: Registering "ADG"
- Closing and opening the secret function
- Opening the secret function
- Storing secret items
- Recalling, correcting or deleting secret items
- Changing the password
- Calculator Mode
- Calculation
- Errors
- Memory
- Memory check
- Note
- Clearing the memory (Reset operation)
- Battery Replacement
- Battery used: 1 lithium battery (CR2016)
- Precautions
- Automatic Power-Off Function
- Specifications
- EL-6082
- LIMITED WARRANTY:
Marke : SHARP
Modell : EL-6082
Kategorie : Taschenrechner