
Electone D-3 - Tastatur YAMAHA - Kostenlose Bedienungsanleitung
Finden Sie kostenlos die Bedienungsanleitung des Geräts Electone D-3 YAMAHA als PDF.

| Produkttyp | Elektronische Orgel / Tastatur |
| Marke | Yamaha |
| Modell | Electone D-3 |
| Anzahl der Tasten | 44 (Obermanual) + 44 (Untermanual) + 13 Pedal |
| Abmessungen (B x H x T) | Ca. 1200 x 900 x 500 mm |
| Gewicht | Ca. 50 kg |
| Stromversorgung | 220-240 V, 50/60 Hz |
| Leistungsaufnahme | 30 W |
| Klangfarben | 10 (Orgel, Flöte, Streicher, etc.) |
| Rhythmusprogramme | 12 eingebaute Rhythmen |
| Lautsprecher | 2x 10 cm, 2x 5 cm |
| Anschlüsse | Kopfhörer (6,35 mm), Line Out, Pedal |
| Besondere Funktionen | Begleitautomatik, Sustain, Vibrato |
| Reinigung und Pflege | Staubsauger mit weicher Bürste, trockenes Tuch für Oberflächen |
| Sicherheitshinweise | Gerät vor Feuchtigkeit schützen, nur trockenes Tuch verwenden |
| Ersatzteile und Reparatur | Nur durch autorisiertes Fachpersonal; Ersatzteile über Yamaha-Händler |
| Benötigte Batterien | Keine (Netzbetrieb) |
| Mitgeliefertes Zubehör | Notenständer, Bedienungsanleitung |
Häufig gestellte Fragen - Electone D-3 YAMAHA
Benutzerfragen zu Electone D-3 YAMAHA
0 Frage zu diesem Gerät. Beantworten Sie die, die Sie kennen, oder stellen Sie Ihre eigene.
Eine neue Frage zu diesem Gerät stellen
Laden Sie die Anleitung für Ihr Tastatur kostenlos im PDF-Format! Finden Sie Ihr Handbuch Electone D-3 - YAMAHA und nehmen Sie Ihr elektronisches Gerät wieder in die Hand. Auf dieser Seite sind alle Dokumente veröffentlicht, die für die Verwendung Ihres Geräts notwendig sind. Electone D-3 von der Marke YAMAHA.
BEDIENUNGSANLEITUNG Electone D-3 YAMAHA
GUIDE
图①
YOUR
YAMALIA
ELECTONE
MODEL D-3
natural_image
Black-and-white illustration of a classroom scene with students at desks and a framed picture on the wall (no visible text or symbols)ELECTONE
D-3
PLAYING
GUIDE
CONTENTS
Page
Introduction 2
Here is your Yamaha Electone D-3 4
Keyboards 6
Tone levers 8
Effect levers 11
Touch vibrato 12
Effect controls 13
Auto Rhythm Section 15
Effect selectors 16
Singing vibrato 17
Sound in motion 18
Percussion section 20
Other controls 22
To fully enjoy your Electone 23
A word about Yamaha's exclusive Natural Sound speaker .... 25
Care of your Electone 26
Do not be alarmed if 27
Specifications of model D-3....28
We of Yamaha wish to thank you for selecting the D-3 Electone. We feel sure that you will realize many happy years of playing enjoyment with this instrument. Please read this guidebook for more complete enjoyment of all of the D-3's special characteristics. We would suggest that you occasionally re-read it from time to time as you progress.
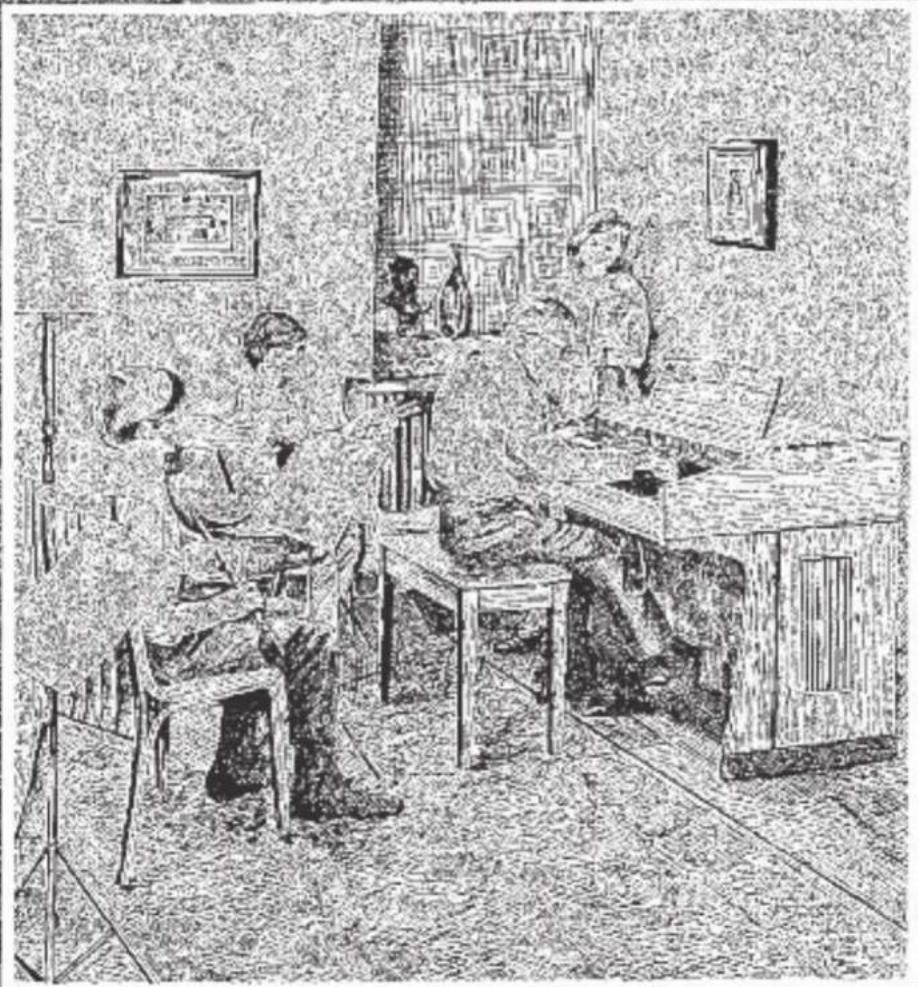
natural_image
Black-and-white illustration of people gathered around a desk in an office setting, with bookshelves and framed pictures in the background (no visible text or symbols)New voices for any age
There's a new sound around, and music-lovers young and old are with it. So's the all-new Electone D-3. With the brilliant tonal quality Electones are famous for and a list of lively extras like a driving 4' and 2½' percussive for all upper manual tones plus its own length control, seven snappy percussion sounds and even repeat speed, plus fantastic response from the Yamaha Natural Sound speaker, the world's most advanced.
If the mood changes to one of passion, transmit it directly through your fingers just like a violinist, thanks to the exclusive Yamaha Touch Vibrato, or call on the amazing sound-in-motion tremolo. It comes from a speaker that actually spins and not only features its own unique continuous speed control, but also a stately Chorus effect. The D-3 is everything a home organ should be, and then some: generous 49-key range on both manuals, all solid state circuitry including ICs and FET, the famous Yamaha Tone Lever system that lets even a toddler really play from the very first day, plus a sleek modern cabinet that adds a distinctive touch to any decor.
For any type of selection, for music-lovers of any age, in any surrounding, the Electone D-3 offers so much more, plus durability for generations of thrilling expression and musical togetherness.
natural_image
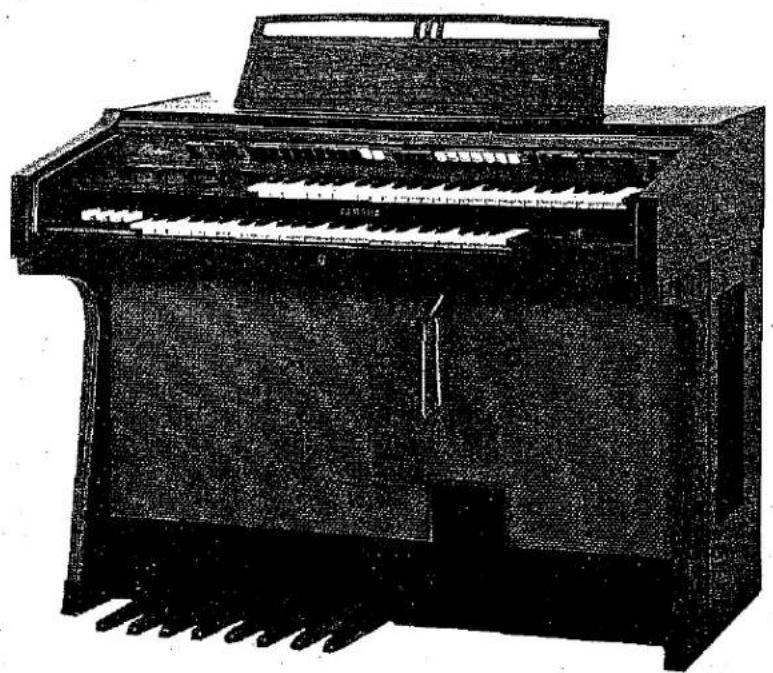
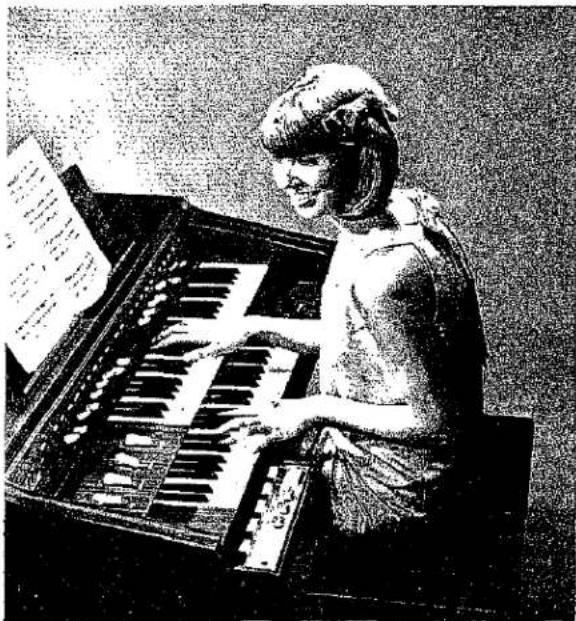
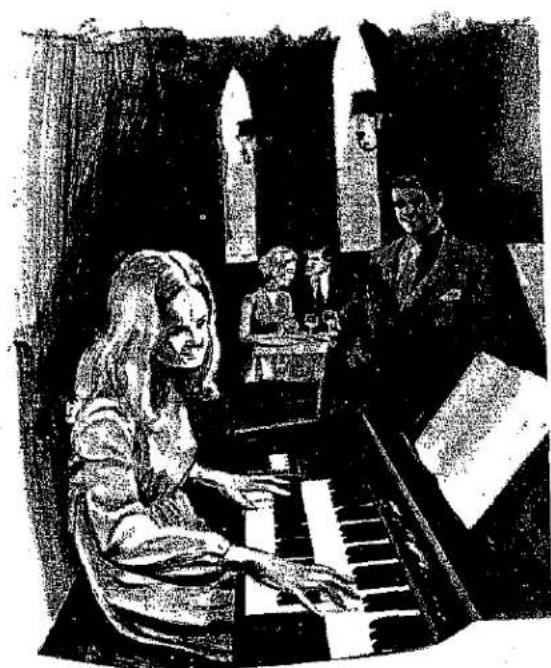
Black-and-white illustration of a vintage piano with visible keys and wood shavings (no text or symbols)Here is your Yamaha Electone D-3
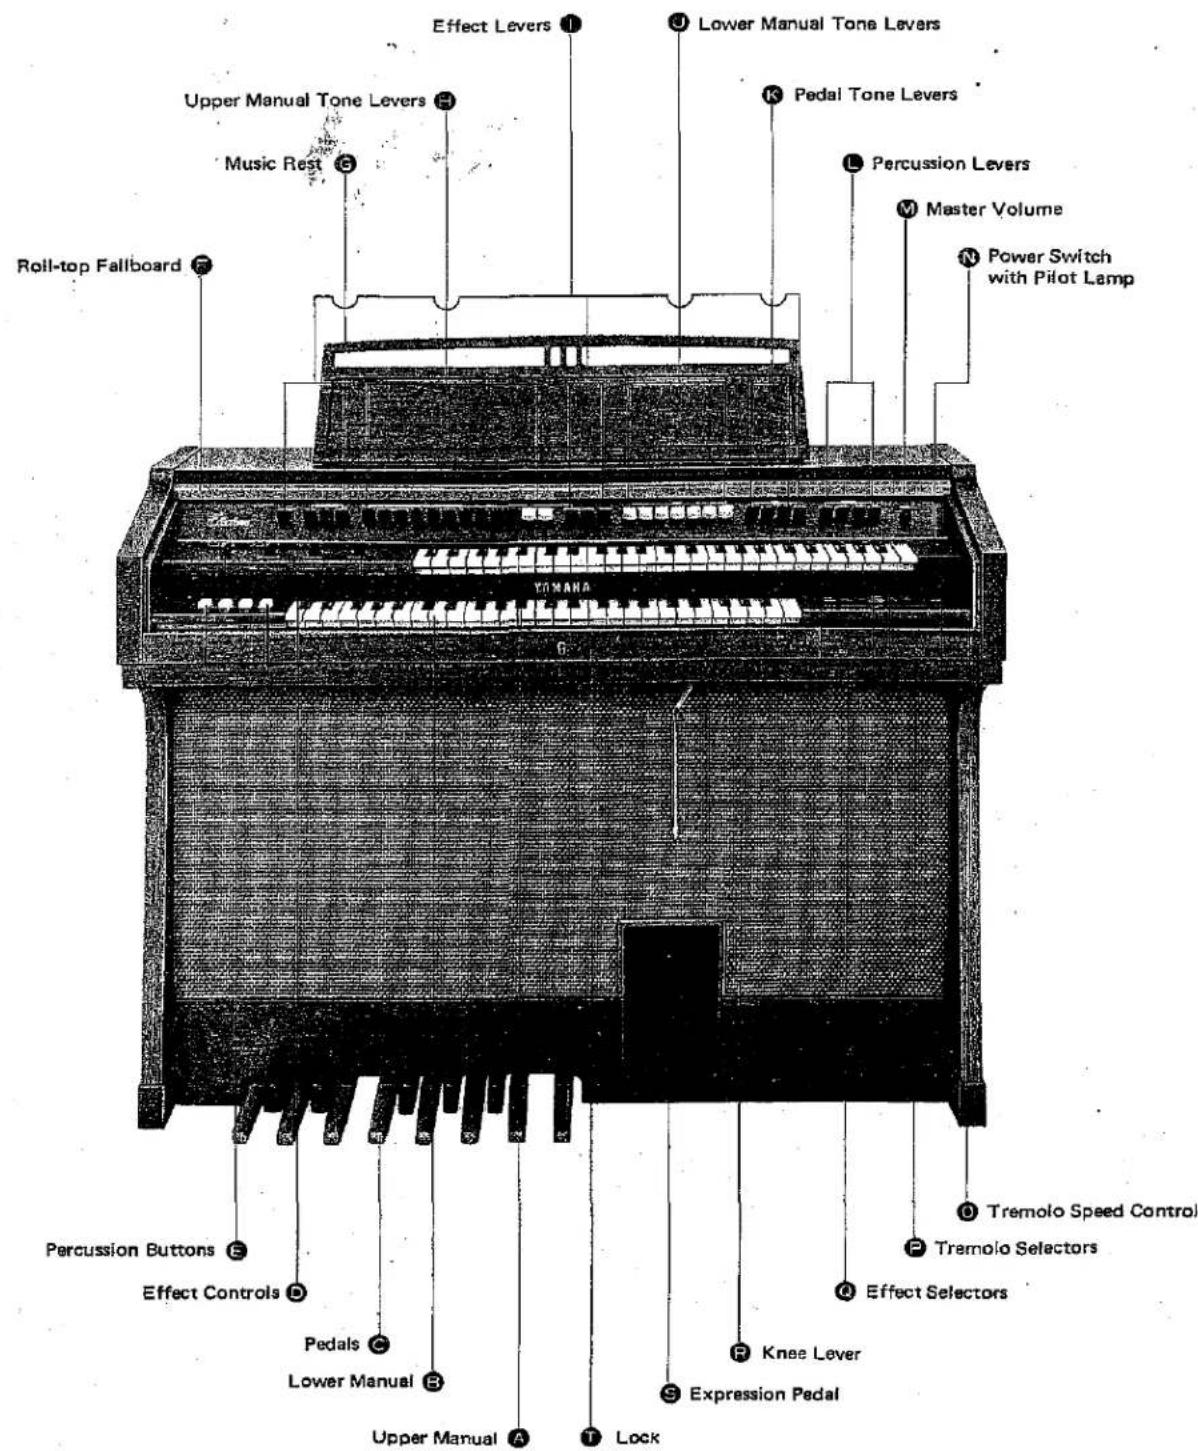
![Brilliance ① Percussive Length ② Percussive 4' ③ Percussive 2½ ④ Trombone 16' ⑤ Flute 16' ⑥ Bassoon 16' ⑦ Flute 8' ⑧ Oboe 8' ⑨ String 8' ⑩ Oboe 8' ⑪ String 2½ ⑫ String 4' ⑬ String 2½ ⑭ String 4' ⑮ String 2½ ⑯ String 4' ⑰ String 2½ ⑱ String 4' ⑲ String 4' ⑳ String 4' ㉑ String 4' ㉒ String 4' ㉓ String 4' ㉔ String 4' ㉕ String 4' ㉖ String 4' ㉗ String 4' ㉘ String 4' ㉙ String 4' ㉚ String 4' ㉛ String 4' ㉜ String 4' ㉝ String 4' ㉟ String 4' ㉳ String 4' ㉟ String 4' ㉟ String 4' ㉟ String 4' ㉟ String 4' ㉟ String 4' ㉟ String 4' ㉟ String 4' ㉟ String 4' ㉟ String 4' ㉟ String 4' ㉟ String 4' ㉟ String 4' ㉟ String 16'3" SUSTAIN SINGING VIBRATO I SINGING VIBRATO II NORMAL UPPER 16'8"4" ATTACK FAST MAIN LOWER VOICE TREMOLO MAIN UPPER VOICE TREMOLO TREMOLO CHORUS Tramolo Selectors Tramolo Selectors Tramolo Selectors Tramolo Selectors Tramolo Selectors Tramolo Selectors Tramolo Selectors Tramolo Selectors Tramolo Selectors Tramolo Selectors Tramolo Selectors Tramolo Selectors Tramolo Selectors Tramolo Selectors Tramolo Selectors Tramolo Selectors Tramolo Selectors Tramoloides (see page 15) Tramoloides (see page 15) Tramoloides (see page 15) Tramoloides (see page 15) Tramoloides (see page 15) Tramoloides (see page 15) Tramoloides (see page 15) Tramoloides (see page 15) Tramoloides (see page 15) Tramoloids (see page 15) Tramoloids (see page 15) Tramoloids (see page 15) Tramoloids (see page 15) Tramoloids (see page 15) Tramoloids (see page 15) Tramoloids (see page 15) Tramoloids (see page 15) Tramoloids (see page 15) Tramoloids(see page 15) Tramoloids(see page 15) Tramoloids(see page 15) Tramoloids(see page 15) Tramoloids(see page 15) Tramoloids(see page 15) Tramoloids(see page 15) Tramoloids(see page 15) Tramoloids(see page 15) Tramoloids(See Page) [IMAGE] Auto Rhythm Section (see page 15) Effect Selectors [IMAGE] Tramolo Selectors [IMAGE]](/content/2026/05/1033012/images/fa8080087ec0c5d0828c5757e59e3ab6b8f776d7bdb79d3989160dbdf656d13d.jpg)
NOTE : The circled numbers refer to explanatory section in the text to follow.
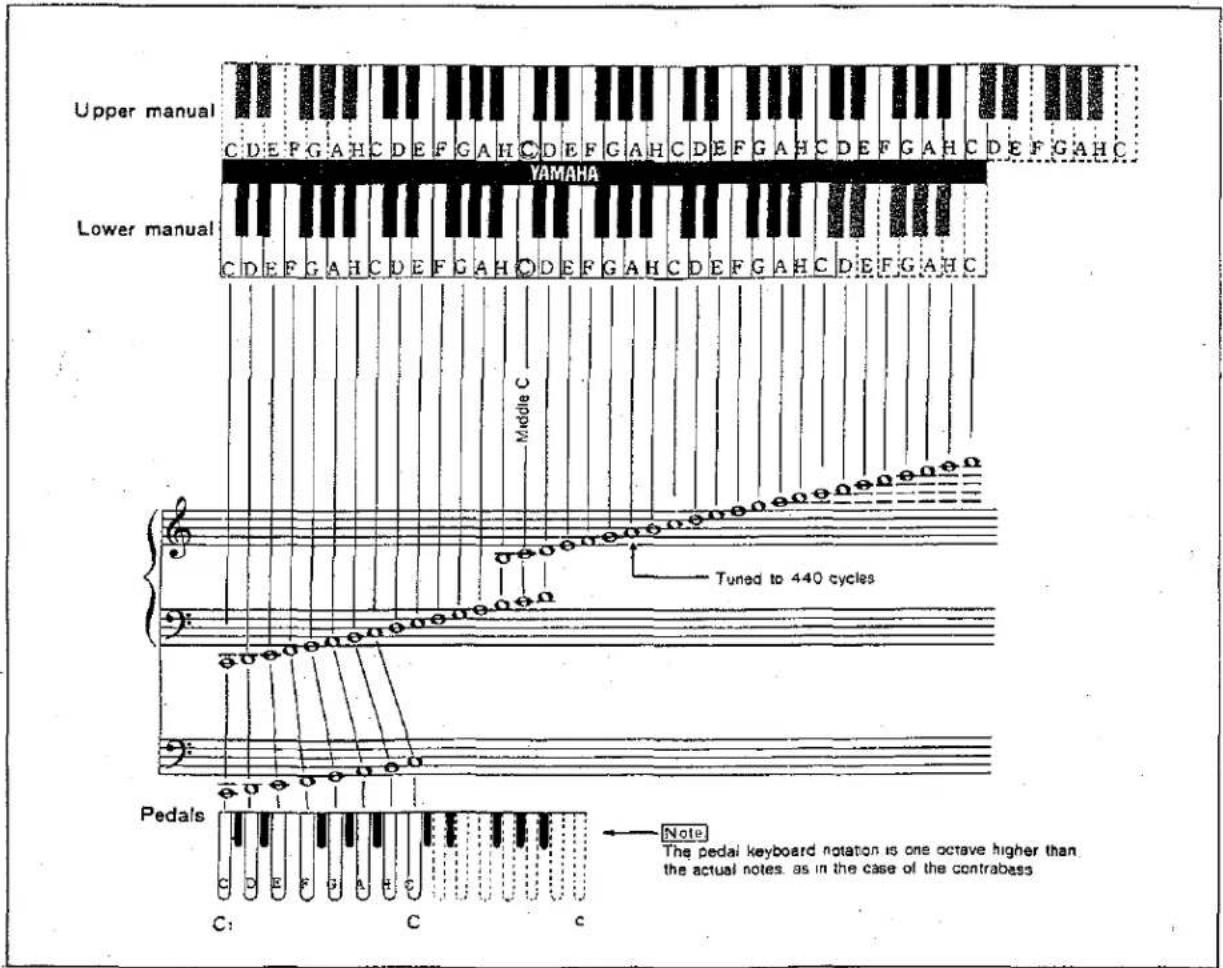
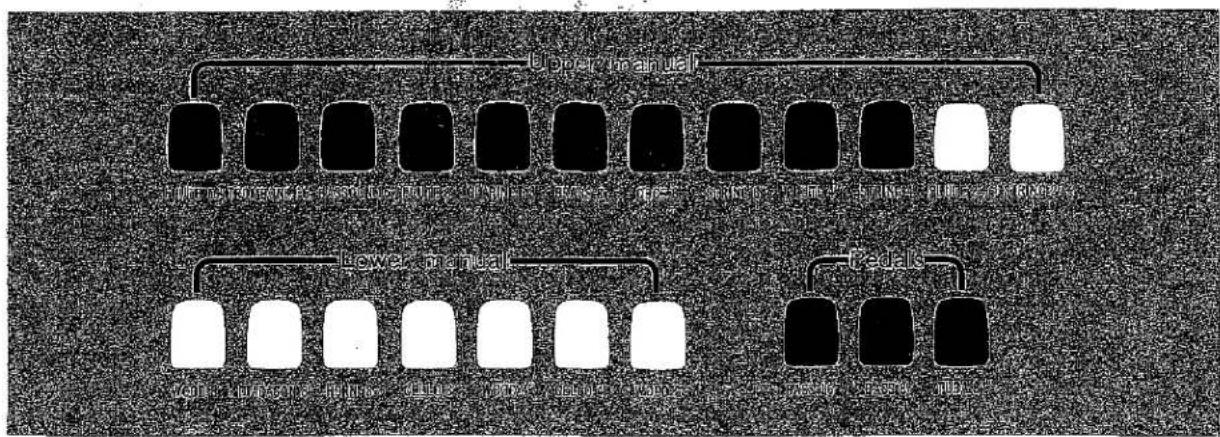
The Electone D-3 has THREE KEYBOARDS. Two of them are called "MANUALS" and the rest is called "PEDALS".
Upper Manual Ⓐ 49 Keys c -c4
Lower Manual Ⓑ 49 Keys C -c3
Pedals © 13 Keys C1-C
So, you can play the tune on the upper manual with your right hand, the chords on the lower manual with your left hand, and the bass notes on the pedals with your left foot.
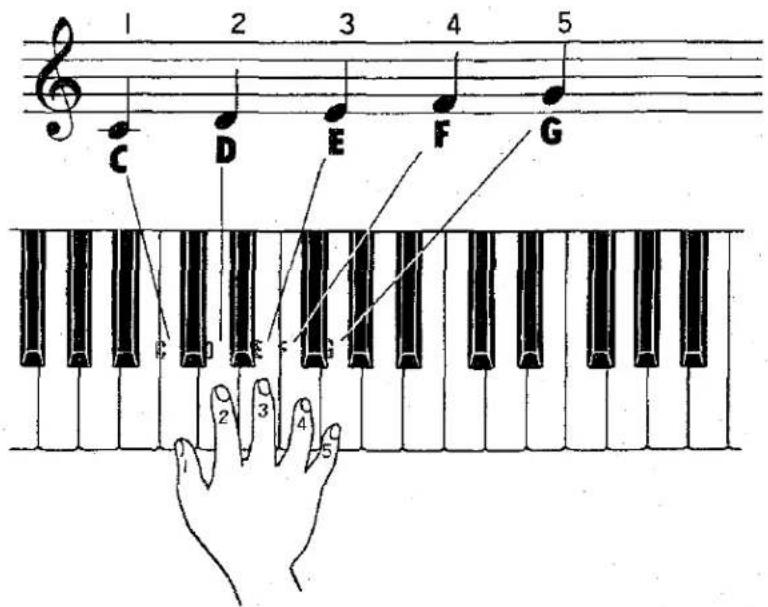
The keyboard has the same pattern of keys (two black keys and three black keys) repeated over and over. A note is a tone on the organ. Each note has a name. We use the first seven letters of the alphabet:
A H C D E F G
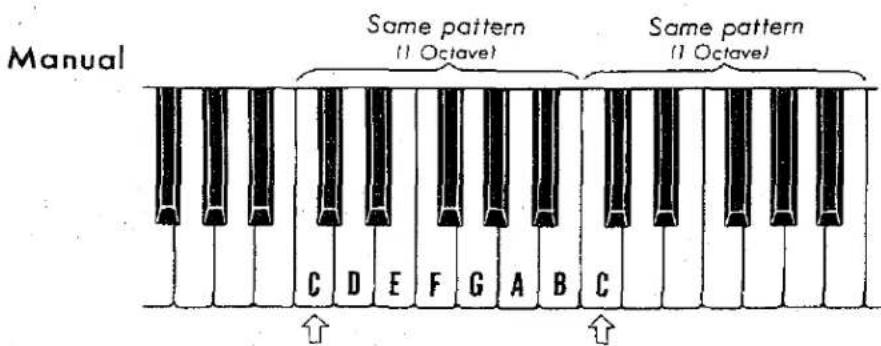
"C" is always at the bottom of the group of two black keys.
Let's see how the letter name of the notes match the letters on the keys.
Pedals
The pedal keyboard (pedals) is an enlarged manual keyboard for the foot-containing one octave of notes.
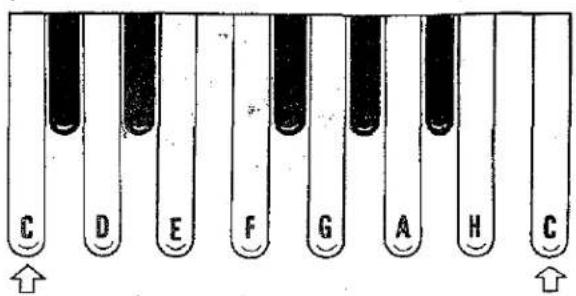
Both ends of the pedals are "C"
The Compass of The Electone D-3
Tone Levers
On the control panel above the Upper Manual of the Electone are arrayed the tone levers. They are divided into three groups:
(1) Upper Manual Tone Levers Ⓗ : 12 voices
(2) Lower Manual Tone Levers Ⓙ: 7 voices
(3) Pedal Tone Levers Ⓜ : 3 voices
flowchart
graph TD
    A["Top/Down manual"] --> B["Top Section"]
    A --> C["Bottom Section"]
    D["Lower manual"] --> E["Lower Section"]
    D --> F["Bottom Section"]
    G["Top Section"] --> H["Top Section"]
    G --> I["Bottom Section"]
    J["Bottom Section"] --> K["Bottom Section"]
Yamaha's Exclusive Tone Lever System
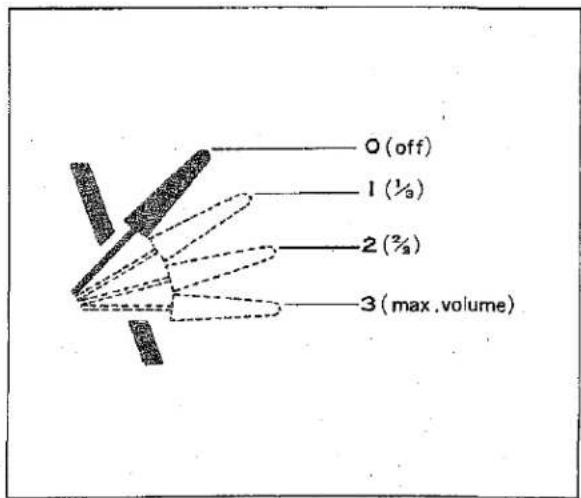
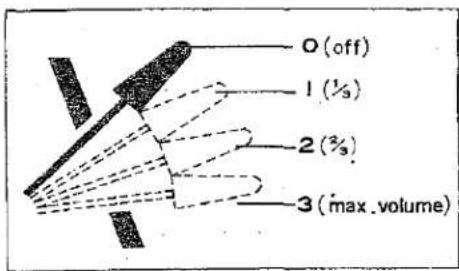
Each tone lever serves to impart a distinctive tonal quality to each note played. Instead of the usual simple on-off action of other systems, however, the Yamaha tone lever offers the unique advantage of continuously variable control from off to full. This means that even the finest shadings of volume control can be obtained from each and every lever, surely an amazing advantage in breadth of expression and ease of playing.
In addition, as the tone lever is depressed, two 'click-stop' positions are felt, where the lever catches slightly. These indicate 1/3 and 2/3 of the maximum setting attained when the lever is fully depressed. These handy click-stops provide mathematically accurate formulas the beginner can use with assurance, but they do not affect the subtle adjustments required by the keyboard master.
This exclusive Yamaha tone lever system allows the combination of these tones, giving a virtually limitless range of tone, with a full spectrum of rich harmonics. The Electone D-3 is thus able to satisfy even the most demanding professional organist. The most important point in developing good tone registration is the early mastery of the tone levers.
Make it a practice to listen to good music and build your "taste" for sounds so that you can use the tone levers in combination. Experiment in the creation of tone colors to suit your own taste.
This use of the tone levers for volume control also serves to adjust the balance among the three keyboards.
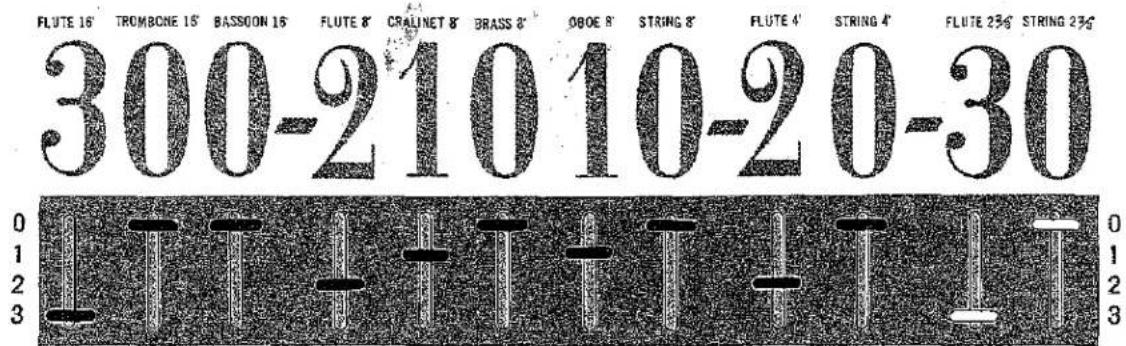
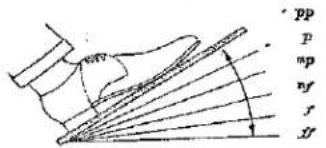
Tone Lever Registration
Tone lever registration is given by numerical indications which show the click-stop position of each lever, as illustrated below. The indications are in the order in which the levers appear on the control panel, with hyphens separating harmonic groups.
natural_image
Black-and-white sketch of a traditional Chinese sword (no text or symbols)Harmonics
Tone levers are of several varieties: 8', 16', 2 ^3/4 , etc., each variety having a different pitch. The 8' tone levers are 'fundamentals', that is, they have the same pitch as the written note (see the Compass Chart, page 7). The others, called 'harmonics', are pitched a certain interval above or below the fundamental. Harmonics can be further subdivided into consonants, at octave intervals from the fundamental, and dissonants, separated by a third or a fifth from the fundamental.
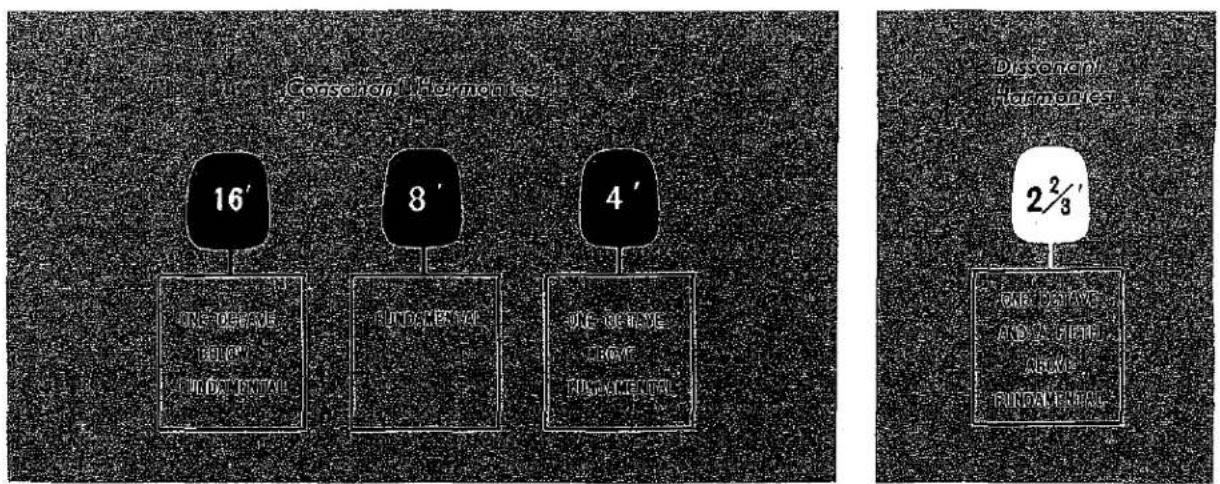
As an example of what this means when you play, let us see which note can be produced by using one of the tone levers and pressing the key of middle C (c1). Pressing middle C and using the 4" tone lever, for example, will result in the same note as would be produced by pressing c2(using the 8' tone lever i.e., its fundamental).
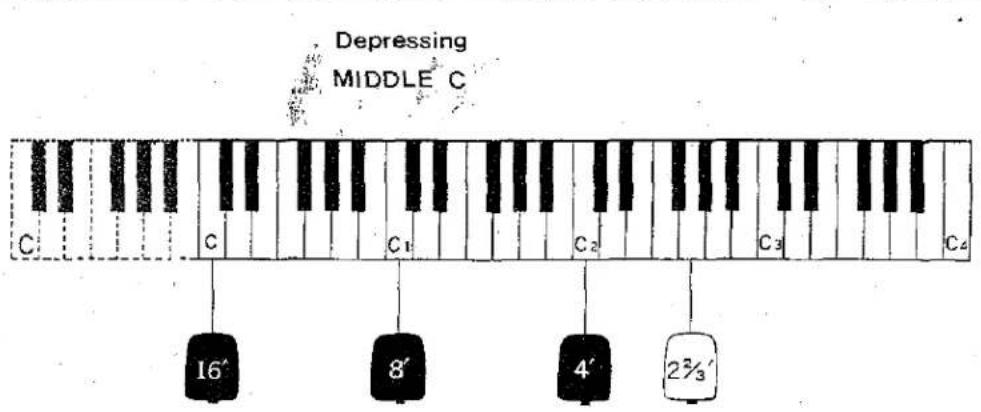
It can thus be seen that the use of these harmonic levers actually results in increasing the Electone's compass above and below that which is indicated by the keys and pedals alone.
The use of the 16' lever, for example, will extend the manuals down a further octave to C1, (see dotted line above). Similarly the 2¾' lever raises the tone one octave and a fifth.
The major use of the harmonic levers, however, is to increase the richness of tone—they are the spices that, when applied to the fundamental, will make a rich and savory performance. Let your ear be your guide to the creatoin of good music, always remembering not to overuse this effect as it may weaken its effectiveness. Use it primarily only for special effect.
natural_image
Black-and-white illustration of three people gathered around a piano keyboard, no visible text or symbolsEffect levers ① of the Electone D-3 provide a wide range of tonal effects which add to the breadth and variety of possible interpretations. These levers have the same operation as the tone levers and allow the organist to vary the degree of their effects according to their stop positions, as illustrated.
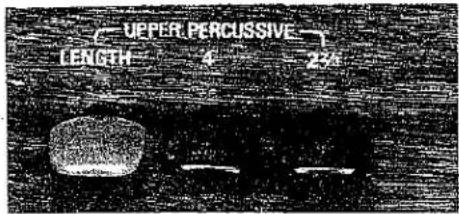
Upper Percussive : ②, ③, ④
Changing the beginning of some or all notes can do wonders for lively selections. This is where the D-3 really shines, thanks to a variety of percussive effects that provide subtle but important shading at the moment each note is heard.
The special popping 4' and/or 2 ^2/8 ' percussive drive can be smoothly blended into all upper tones with two variable levers ⑧ and ④, and a separate lever ② regulates the length of decay for these effects.
When using percussive effects, use a staccato fingering. Each note should be played cleanly; slurred notes will diminish the percussive effects.
Brilliance : ①
Set the overall clarity or softness to match your mood or that of the music. This stop-free adjustment provides sensitivity for the most discriminating ear.
Repeat Speed : ⑰
Everyone will enjoy the fun fo the many thrilling and exciting sounds that are possible with repeat percussion. Use of this lever 'chops up', so to speak, notes played on the upper manual, deriving a double-strummed effect similar in sound to the mandolin.
The lever gives a continuous spectrum of speed adjustment.
What's more, this effect can be combined with Sustain for many life-like instrumental sounds (marimba, banjo, etc.).
Touch Vibrato : ⑱
The explanation of this lever is given under Touch Vibrato, page 12.
Vibrato : ⑲
The use of vibrato increases the emotional quality of the tone and adds a brisk and lively air to passages of relative simplicity. Its depth is controlled by this lever. The sensational Touch Vibrato, a Yamaha exclusive, is a considerably more sophisticated effect. (See page 12).
Pedal Attack : ③0
By accenting the initial portion of each note, this lever provides an effective rhythmical element, reminiscent of the string bass played pizzicato. This effect is particularly effective in rhythmic works. Depressing the lever gradually increases the strength of the effect.
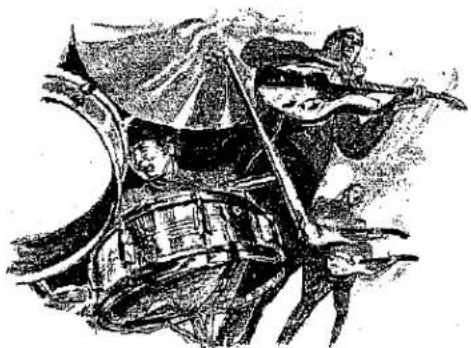
natural_image
Illustration of a dynamic scene with two figures in motion, one holding a violin (no text or symbols visible)
natural_image
Black-and-white illustration of a stringed musical instrument resembling a pipa or flute, positioned on a circular surface (no text or symbols)
natural_image
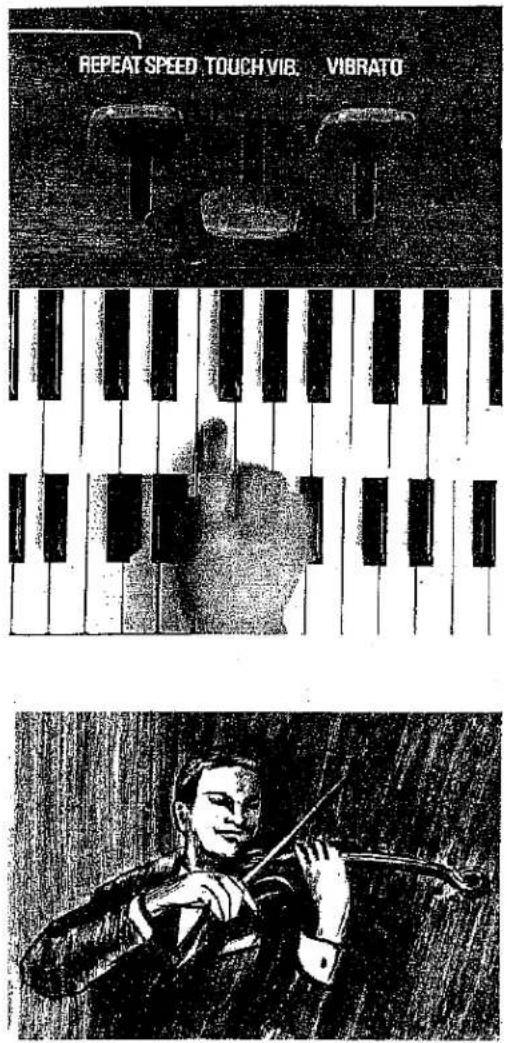
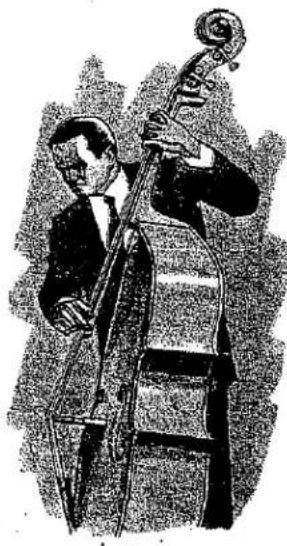
Illustration of a person playing a cello (no text or symbols visible)Touch Vibrato
Play with True Feeling
Vibrato to a violinist is the language of his heart speaking through his fingers. Why should this expression be denied the organist?
It's yours in the Electone, the world's only organ which provides a vibrato controlled by the vibration of the fingers on the keys. What's more, the intensity of this dramatic technique can be tailored to any selection because it is controlled by its own Variable Control Lever.
The result; a level of response to your every musical whim and passion, impossible in conventional electronic organs.
The middle of the three effect levers ① shown in the above photo is the Touch Vibrato control lever ⑩ When this lever is depressed, vibrato can be applied to any upper manual key by the lateral vibration of the hand, and its speed will correspond exactly to the hand's vibration. This is the Touch Vibrato, which is exclusive in the Yamaha Electone. Through it, the organist obtains the vital personal touch which has always been characteristic of the violinist, and can communicate emotional nuance to the audience as never before.
Using this variable control lever, the player can adjust the Touch Vibrato to the desired intensity. The touch vibrato can really shine in passages where a single note forms the melodic line.

-
Please note that Touch Vibrato does not supersede the regular vibrato with Vibrato Lever ⑲ unless Touch Vibrato Lever ⑩ is fully depressed (to position 3). Slight regular Vibrato with Lever ⑲ may sometimes bring better musical results when used with Touch Vibrato.
-
Too heavy a touch may cause fluctuation in the pitch of the note to which vibarto is applied. Try always for a light, natural fingering.
-
Touch vibrato playing will be easier if the rhythm from the left hand and foot is kept as simple as possible. For example:

The four black knobs situated to the left of the upper manual are the effect controls ⑥ These controls are all continuously variable for the maximum in expressive freedom as shown below.
REVERB 43
PED SUSTAIN 44
UPPER SUSTAIN 45
MAN BALANCE 45
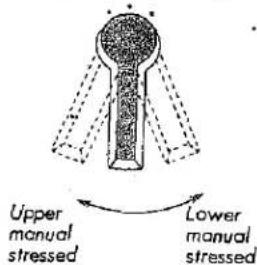
Manual Balance : ④6
The manual balance control governs the relative strength of the upper and lower manuals, and is normally left in the center position. But when it is desired to strengthen one manual—for example, when the upper manual plays the melody and the lower its accompaniment—the control may be turned (in this case to the right) to emphasize the upper manual. Similarly, the balance control is turned to the left when a strongly played accompaniment is required or when the melody is played on the lower manual and requires greater emphasis.
Upper Sustain : ④5
Upper sustain effect, the prolonging of notes on the upper manual, is so essential in effective legato performance. It permits sharp tones to be produced simultaneously with smoother treatment, thereby further increasing the expressive range.
The upper manual sustain effect is in the form of a three-way control with the control ④ linked to the sustain selector ⑤ and the knee lever ⑥. Their respective functions may be outlined as follows:
Sustain Control : ④5
This control is used to set the maximum possible sustain, and may be set before or during the performance. It is turned fully to the left for no sustain, and progressively to the right to lengthen the effect.
Sustain Selector : ③5
This selector is used before or during the performance to choose the sustain effect. (See page 16.)
Knee Lever : Ⓡ
This lever is operated with the right knee for instantaneous implementation or stop of the sustain effect preset by the sustain control and selector, allowing passage-by-passage or even phrase-by-phrase sustain control precision.
natural_image
Illustration of a person playing a violin (no text or symbols visible)
natural_image
Black-and-white sketch of a circular object with internal geometric lines and small protrusions (no text or symbols)In producing the sustian, set the sustain control first to the desired effect length, turn on the sustain selector, and then open the knee lever to the right. Sustain can be switched on and off with a slight pressure of the knee.
In passages where sustain is not required, the sustain selector can be left on, since no sustain will be produced unless there is pressure on the knee lever. Also, pressure on the knee lever alone will not produce the sustain unless the sustain control is set to the right and the sustain selector turned on.
Upper manual sustain can be applied to all upper voices governed by black (16', 8' and 4') tone levers, over the full 49-key range of upper manual.
Pedal Sustain : ④④
The pedal sustain control provides a sustain effect for all the voices of the pedalboard. The length of the effect can be controlled as illustrated. If used together with the pedal attack lever ⑧, it produces a real bass tone played pizzicato.
Reverb : ④3
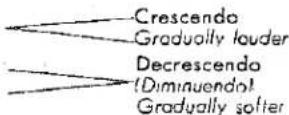
Reverberation is the quality that is imparted to musical sound as a result of the acoustical properties of a large auditorium or hall. The use of this effect, therefore, allows you to attain this grandeur at will, evoking the aura of professional performance in your own living room. The control serves to regulate the strength of the reverberatory effect, softer or louder as the music requires.

natural_image
Schematic diagram of a large arched structure with triangular lattice pattern, no text or symbols present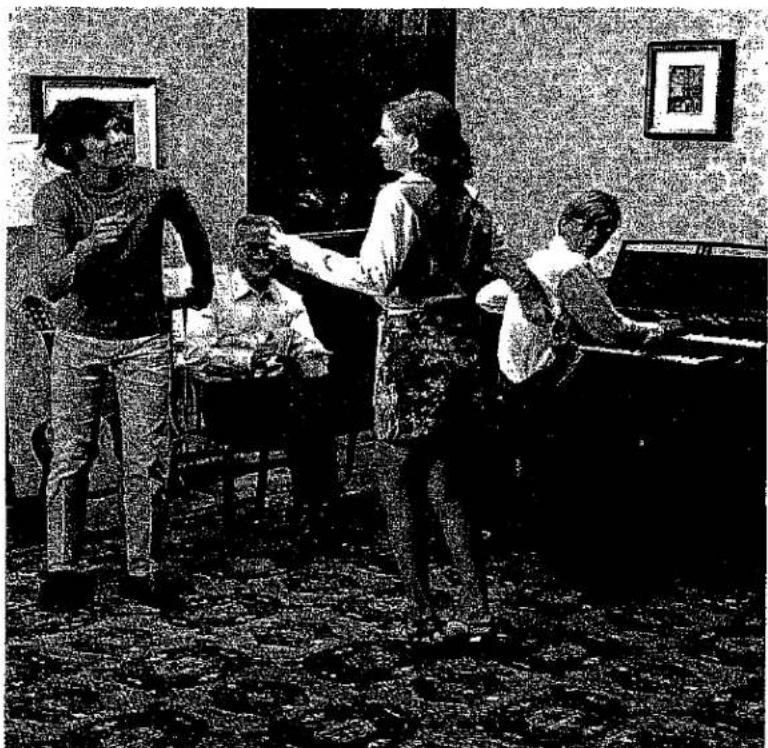
natural_image
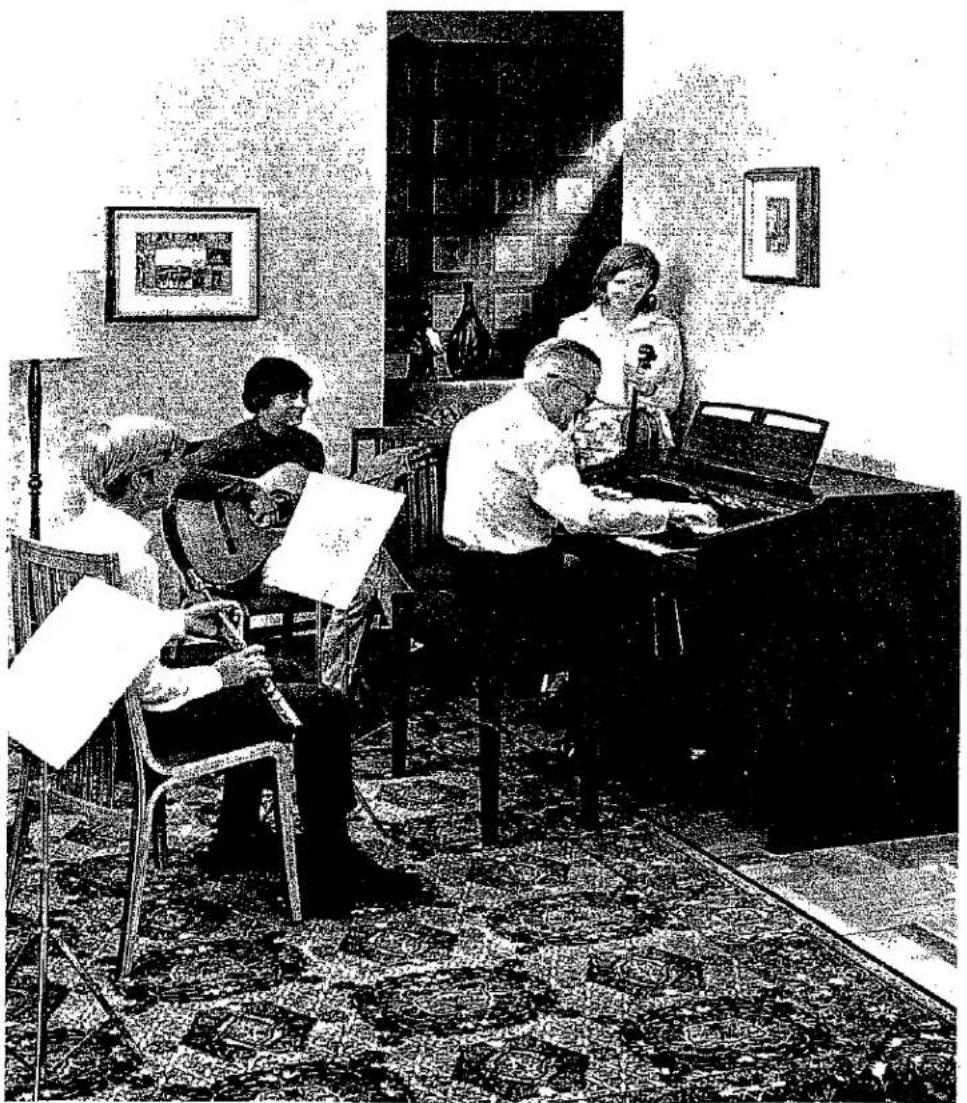
Black-and-white photo of a group of people in a room, one standing and gesturing while others sit at a table (no visible text or symbols)Auto Rhythm Section (D-3 Series)
Yamaha Electone models D-3 series incorporate an auto rhythm section. This section provides a variety of rhythm accompaniments, from Latin beats to today's popular rock rhythms, at the simple push of a selector button.
In addition, the system employs the exclusive Yamaha Synchro-start, which automatically begins the rhythm accompaniment when the first lower manual or pedal note is struck. These features assure extra versatility from a virtual built-in rhythm band.
natural_image
Illustration of a multi-part electronic guitar with drum, receiver, and slippers (no text or symbols)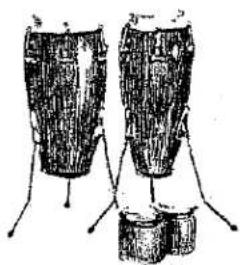
natural_image
Illustration of two cylindrical objects with attached legs and a small container, no visible text or symbolsHow to Use the Auto Rhythm Section
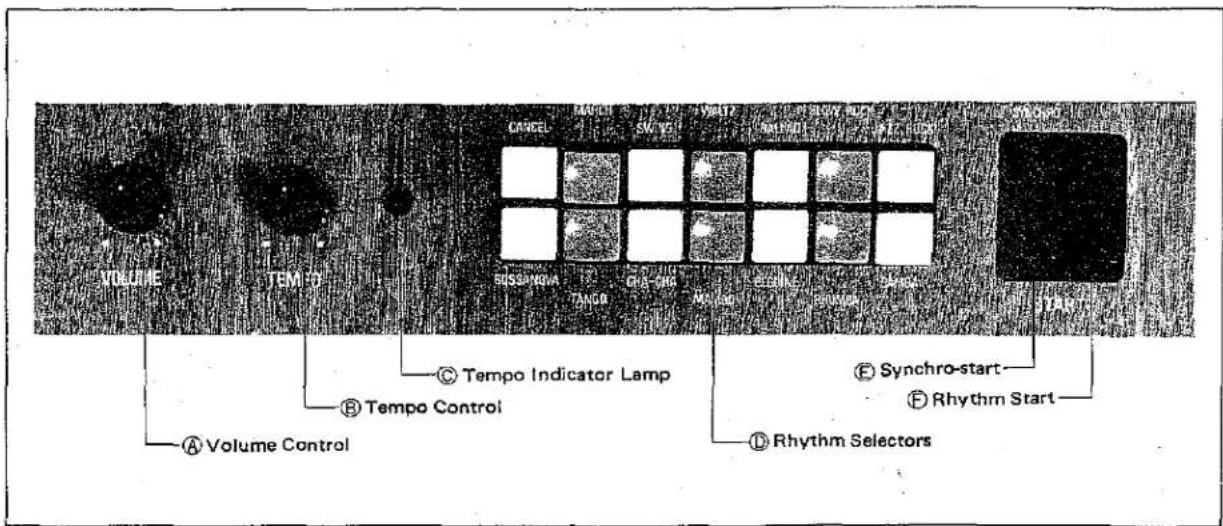
1) Push the rhythm selector ① of your choice. To change rhythms, just push another button; if no rhythm is desired, push the Cancel button.
2) Press the Rhythm Start tablet Ⓔ and the rhythm will immediately begin. Then use the Volume Ⓐ and Tempo Ⓑ controls to regulate. The tempo indicator lamp Ⓑ flashes the first beat of every rhythm.
3) Then, when ready to paly, switch on the Rhythm Start tablet ⑤ and begin your selection after the beat is fixed in your mind. Use the tempo indicator lamp as a guide.
4) For more advanced players, use the Synchro-start tablet ⑤ instead. This permits the selection to begin first, providing a more impressive performance that can begin with a beat-free upper melody. This Yamaha exclusive is the world's first of its kind, and will assure more professional-sounding selections for any advanced player.
5) At the end of the selection, turn the Rhythm Start or Synchro-start tablet off.
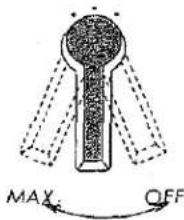
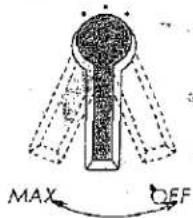
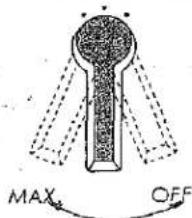
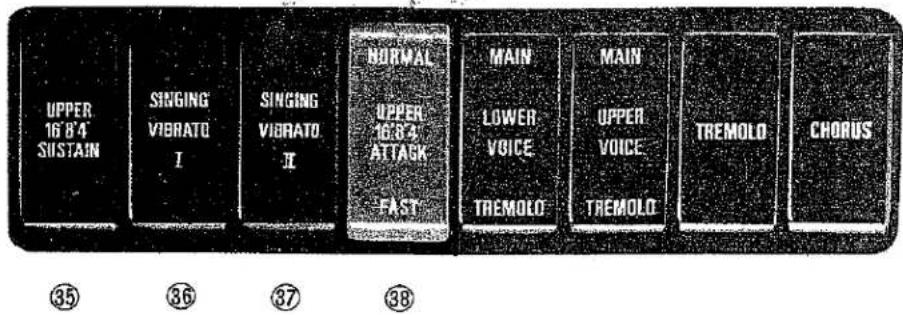
The three tablet controls situated to the right of the lower manual are called Effect Selectors. They are all of a two-position design for easy selection while playing.
natural_image
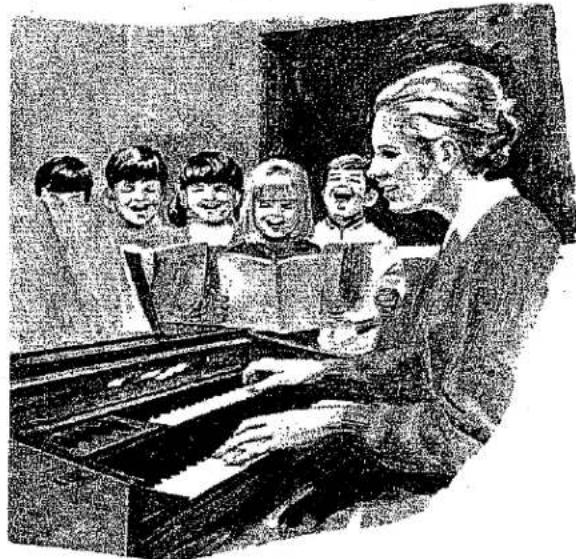
Illustration of a woman reading a piano to a group of children, no text or symbols presentUpper Sustain : ③5
The explanation of this selector is given under Upper Sustain, page 13.
Singing Vibrato I & II : ③6, ③7
The explanation of this selector is given under Singing Vibrato, page 17.
Upper Attack : ③8
Controlled by the red tablet, this effect gives greater definition to the beginning and end of notes played on the 4', 8' and 16' voices of the upper manual, imparting new clarity and vigor to jazz and other lively pieces. Please note that this attack effect cannot be obtained when the upper sustain is used.
In addition to the Touch Vibrato, model D-3 features another vibrato control which, like the touch vibrato, enables the organist to project the complete depth of the music's emotional feeling directly to his audience. This Singing Vibrato effect comes from innovations which enable you to vary both the intensity of the vibrato and its speed in combination.
When the Singing Vibrato I selector is selected, it cancels the Vibrato Lever control 19 on the control panel and no vibrato effect is produced. Then, as the Knee Lever 8 is opened to the right, a progressively faster and deeper vibrato is produced. When the Singing Vibrato II selector is selected, it also cancels the vibrato lever control 19, and pressure on the knee lever increases intensity of vibrato only. When both selectors are used together, a slow, shallow vibrato is produced without any pressure on the knee lever, and as the knee lever is applied, it sweeps into a full, rich vibrato as in the case of VIBRATO I. A slow, shallow vibrato thus produced is similar to the chorus effect given by the tremolo speaker, and useful for religious or slow tempo music. Subtle knee pressure on the lever enables you to implement these singing vibrato effects smoothly and naturally mid-way in a piece, and to provide instant, effortless response of the singing vibrato to any variety of musical mood.
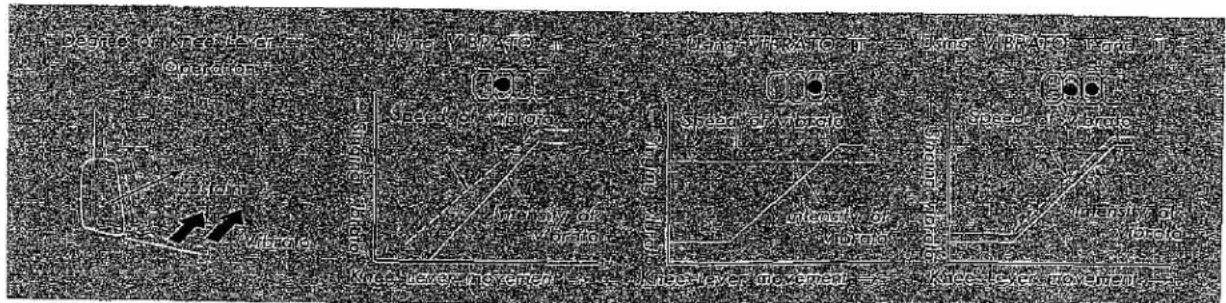
Combined with the String voice and Sustain on the upper manual, for example, it imparts a true violin tone, closing the knee lever for staccato notes and opening the lever for sustained notes. This also can be applied to oboe, cello, clarinet and flute solo sounds. It also enables you, with the movement of the knee, to change from a staccato, non-vibrato organ into a beautiful, sustained, vibrant, melodious one.
2) Although the overall end result of both the singing vibrato and touch vibarto effects are very similar, the method of application is different. Singing vibrato is applied with the knee lever while, on the other hand, touch vibrato is effected by the orgainst's finger movement on the key. This permits the organist to exercise a more delicate control over the exact nuance of the effect and to project a deeper "feeling" into the performance.
3) On the other hand, singing vibrato is somewhat easier to use, especially for the beginner. In addition, when chords are played on the upper manual, it is particularly difficult, even for the experienced player, to use touch vibrato. It is suggested, therefore, that the singing vibrato be used in this instance. And, in the fast-moving passages of jazz and other types of music, it is easier to control the vibrato with the knee lever.
Mellow, throbbing harmony that sings from every corner of your room or hall—that's the unique Yamaha Tremolo. A true moving sound source, the rotary speaker itself actually spins for exciting richness no mere moving baffle could equal.
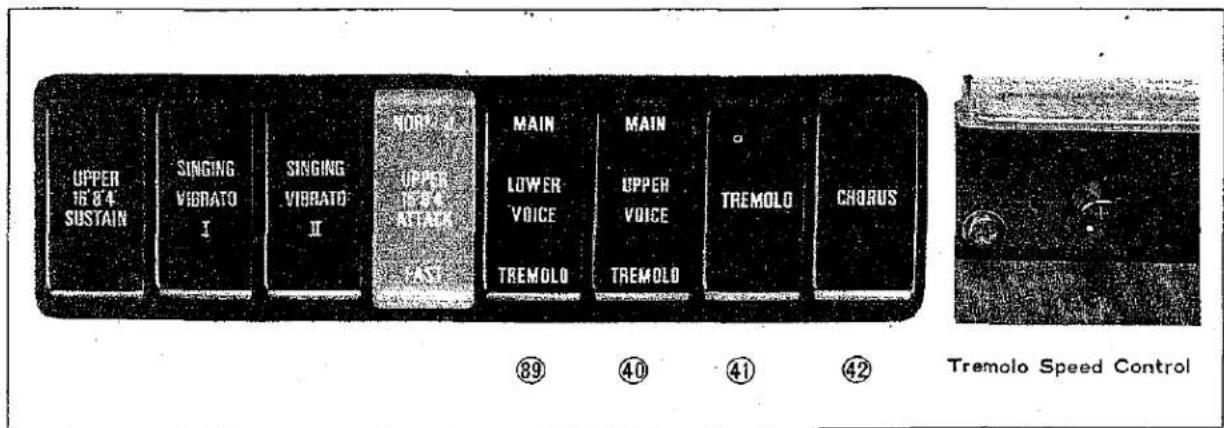
The Tremolo selectors Ⓐ which accomplish this are five black tablets to the right of the effect selectors. Each has a simple ON-OFF type action which allows quick operation while playing.
Tailor any of Tremolo or Chorus effect to an individual selection by choosing the upper or lower manual only, or both together.
For extra-sensitive expressive possibilities use the Yamaha-only continuous Tremolo speed control Ⓞ to match any mood or selection.
natural_image
Historical illustration of a grand piano with ornate drapery and a central podium (no visible text or symbols)Lower Voice : ③9 & Upper Voice : ④0
These selectors channel the sound from the two manuals into the main speakers or the tremolo speaker, as desired.
Tremolo : ④1
Turning this selector on turns the tremolo speaker at seven revolutions per second producing Tremolo effect.
Chorus : ④2
This selector turns the tremolo speaker at one revolution per second producing Chorus effect.
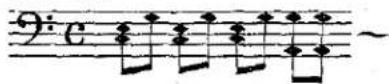
Producing the Tremolo Effect
Set the selectors as shown in the figure (voice and tremolo tablets all on). The use of two voice selectors will apply the tremolo effect to the whole organ. Moving and natural pulsations of sound lend greater depth, fuller meaning to serious passages, and a touch of genius to pieces which have perhaps lost some of their original freshness. This effect is especially useful for rich, tremulant work.
flowchart
graph TD
    A["TREMOLO"] --> B["MAIN"]
    A --> C["UPPER VOICE"]
    A --> D["TREMOLO"]
    A --> E["TREMOLO"]
    A --> F["CHORUS"]
    B --> G["LOWER VOICE"]
    C --> H["Upper VOICE"]
    D --> I["Lower VOICE"]
    E --> J["Upper VOICE"]
    F --> K["Lower VOICE"]
    G --> L["TREMOLO"]
    H --> M["TREMOLO"]
    I --> N["TREMOLO"]
    J --> O["TREMOLO"]
    K --> P["TREMOLO"]
    L --> Q["Upper VOICE"]
    M --> R["Upper VOICE"]
    N --> S["Upper VOICE"]
    O --> T["Upper VOICE"]
Producing the Chorus Effect
Set the voice and chorus selectors as in the figure. The use of two voice selectors will apply the Chorus effect to the whole organ, providing the dignity and solemnity of choral voices which is so effective in the performance of sacred music or other works of slow tempo.
flowchart
graph TD
    A["MAIN LOWER VOICE TREMOLO"] --> B["CHORUS"]
    C["MAIN UPPER VOICE TREMOLO"] --> D["TREMOLD"]
    E["Lower"] --> F["Chorus"]
    G["Upper"] --> H["Chorus"]
    I["Lower"] --> J["Chorus"]
    K["Upper"] --> L["Chorus"]
    M["Lower"] --> N["Chorus"]
    O["Upper"] --> P["Chorus"]

1. Slower pieces:
Play melody on the upper manual without tremolo.
Play chords on the lower manual with tremolo.
2. A softer treatment of slow pieces indicates the reverse:
Melody on the upper manual with tremolo.
Chords on the lower manual without tremolo.
3. In pieces of ordinary tempo:
Melody on the upper manual with tremolo.
Counter-back on the lower manual without tremolo.
4. Up-tempo pieces:
Chop notes—i.e., play with strong staccato—or block chords on the upper manual with tremolo.
Rhythm and chords on the lower manual without tremolo.
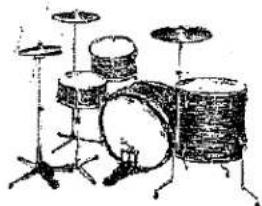
Percussion Section
Startling percussive effects are simple to create, but the Yamaha Electone D-3 has carefully selected their tones and methods of control to create the perfect complement to a wide range of light music selections. The pedal percussion lever overlays notes on the pedals with a clear, stirring cymbal effect, while the Lower I and Lower II levers provide for pinched and brushed cymbal effects on lower manual notes. The button percussion lever can be used with four percussion buttons ④ to apply a wide range of instrumental effects, entirely independent of the manuals and pedals.
Percussion Buttons
natural_image
Four vertical white bars on a black background, no text or symbols presentPercussion Levers

Per cussion levers
LOWER L 80%
power
Pedal
Burton
Porcussive sounds
Pinchpouvymbar (on mala gas).
Bruch symbol
Pedal Gym Bal
Congo
ExpoClaves
rush share
What is most useful is that the volume of the percussion effects can be varied independent of the melody according to the click-stop position of each lever, bringing a new dimension of your interpretation.
It can easily be seen that in accenting martial music or in playing up-tempo jazz or Latin music, the presence of these percussion effects is essential to the achievement of a natural rendition.
The percussion buttons allow you to make and accentuate rhythms with the left hand by striking two or more buttons in sequence. This will mean that the left hand is unavailable for chording and, if only the bass sound is used, the harmony will be insufficient. The right hand is therefore used to compensate. When playing in an ensemble or accompanying other melodic instruments, use the left hand with the percussion buttons for rhythm and the right hand on the upper or lower manual for chords. The following are a few of the many possible effects which may be practiced to add to your musical enjoyment. The numbered references to the buttons follow the table on page 23.
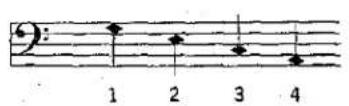
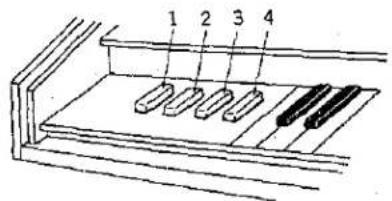
1—fourth space
2—third space
3-second space
4—first space
Using the 'Button' lever
Rumba

Beguine

Samba

Bossa nova

Cha-cha
Baion

Latin rhythms
①
②

Latin swing
①
②
③

Rock beat

Teen beat

Other Controls
Master Volume : Ⓜ
This control determines the maximum volume obtained from the Electone and can be varied as desired.
Expression Pedal : Ⓢ
Expressive shading within each phrase, and accenting of individual notes can be achieved with this pedal, within the overall range set by the Master Volume.
Knee Lever : Ⓡ
The metal lever folded horizontally underneath the key-bed is the knee lever. It allows passage by passage precision control of the following (Note that the latter two can be used in combination.):
* Singing vibrato in conjunction with the Singing Vibrato selectors 30 & 37 (page 17).
* Upper sustain in conjunction with the Upper Sustain control ④§ (page 19).
natural_image
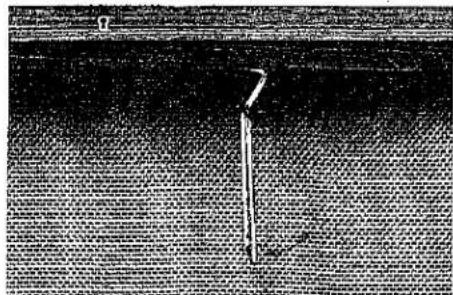
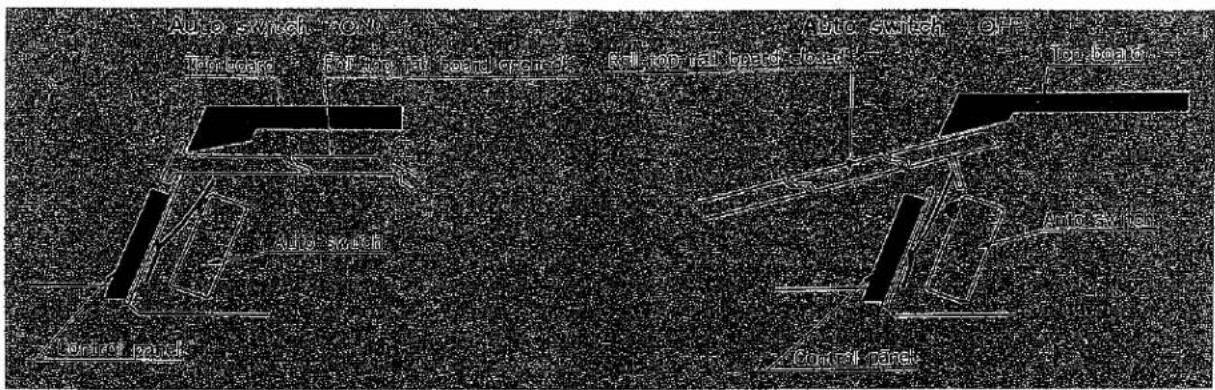
Close-up of a textured surface with a vertical white line and arrow pointing to a small object (no text or symbols visible)Automatic Power Switch
The automatic power switch is linked to the roll-top fallboard. When the fallboard is closed, it automatically switches off the Electone and on again when reopened. There is thus no danger of the organ being left on inadvertently. This is however designed as a safeguard, and power should normally be turned on and off using the main switch.
To Fully Enjoy Your Electone
Besides the many tone and effect controls through which almost infinite varieties of voice and expression can be obtained, the Yamaha Electone D-3 offers you a number of additional features to further enhance your playing pleasure.
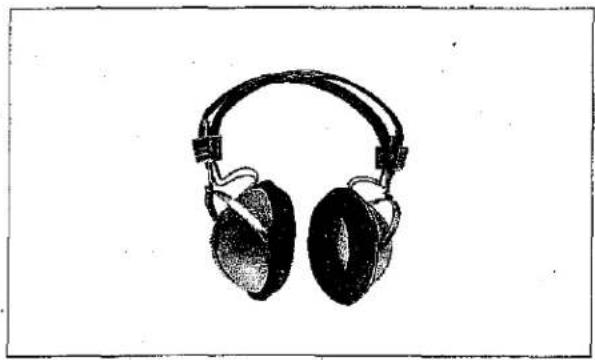
Headphone Jack
Plug a Yamaha headphone set (optional accessory) into the jack under the keypad and you can play with the volume as high as you like without disturbing anyone, even in the middle of the night.
natural_image
Illustration of a pair of black-and-white headphones (no text or symbols visible)Tone Cabinet Sockets
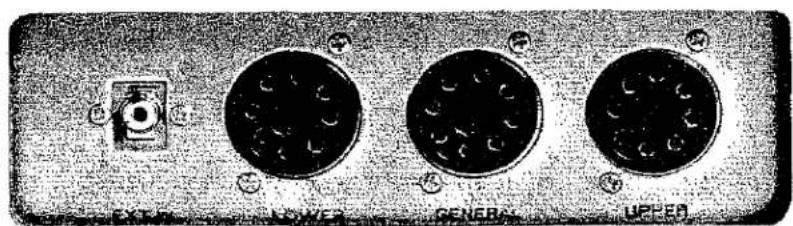
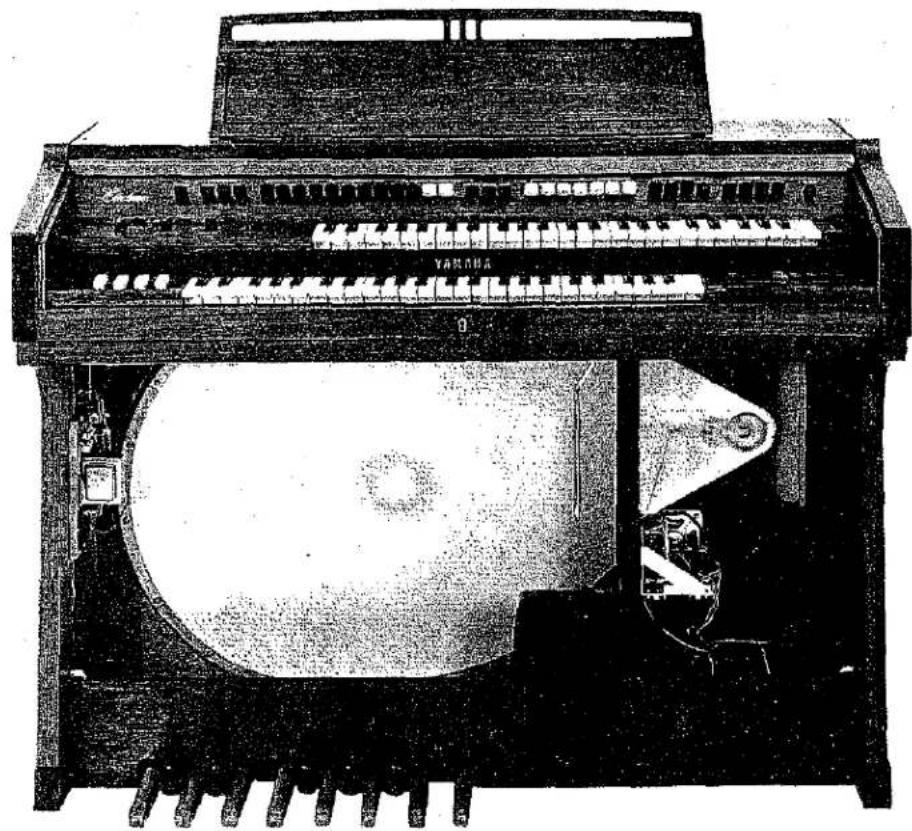
Three sockets are located at the lower left-hand corner of the back of the Elecotne (see the photo above). Thus when you are playing in a stage situation or require gerater tonal power, you can connect Yamaha Tone Cabinets without the necessity of rewiring the amplifier.
All of them are US-type tone cabinet sockets: UPPER, GENERAL, and LOWER.
UPPER: This socket isolates the voice from the upper manual for separate transmission to a tone cabinet.
LOWER: Isolates the voice of the lower manual. Thus the use of two Yamaha Tone Cabinets, one connected to the upper socket and one to the lower, will combine the augmented tonal power with an authentic stereo effect.
GENERAL: When only one tone cabinet is to be used, it should be connected to this socket to secure a balanced mix of upper manual, lower manual and pedal tones.
In addition to the above three main Tone Cab. sockets there is a sub-socket in the D-3 located to the left of the main sockets (see photo above). This socket can be used as an extra "GENERAL".
Recording
When it is desired to record your performance, the use of the tone cabinet sockets will provide a much clearer, higher fidelity tape than will a microphone. To connect a tape recorder to the US-type socket (see Fig. 1), obtain a US-type plug and connect the signal terminal of the tape recorder 'record' plug to terminal # 6 and the ground terminal to # 5.
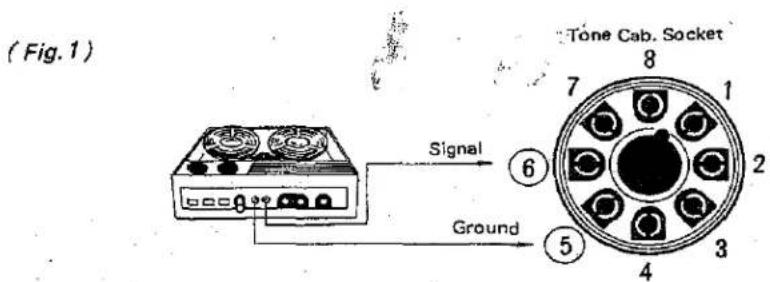
Note: Be sure to adjust the recording level of the tape recorder to the most suitable level before recording.
External Input Jack
This jack is located to the right of the tone cabinet sockets. It allows you to connect a tape recorder, record player or radio directly, using the amplifier and Natural Sound speaker of the Electone. Thus these external inputs will come to life under Natural Sound reproduction and give you an opportunity to broaden your musical experience.
Since their tones are not controlled by the expression pedal, you can play a tape recording or record of an orchestral concert and 'sit in' yourself on the Electone.
Alternatively, you can record yourself playing a piano or the Electone, replay the tape, and be your own duet partner.
In addition, the 'Mini-Pops', a rhythm cabinet distributed by Yamaha, may be connected here for even more advanced percussion effects.
natural_image
Black-and-white photo of a person playing piano keys, holding papers (no visible text or symbols)Note:
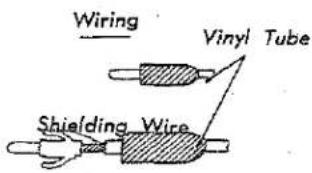
- Connect the EXT. IN Jack and the output jack of a tape recorder with shielding wire. Use a spare plug inserted in the EXT. IN Jack.
- Volume setting for playback tends to differ with the make or model of tape recorder.
- Adjust the volume of the Electone and the tape recorder to avoid distortion of the sound quality.
- Make absolutely sure never to touch or otherwise interfere with the circuits or internal elements of the Electone.
A Word about Yamaha's Exclusive Natural Sound Speaker
natural_image
Illustration of a vintage Yaman radio receiver with visible sound waves and control panel (no text or symbols)In this age of electronic marvels, we are accustomed to speakers which offer 'only X% distortion' or 'high fidelity throughout the range: One almost gets the feeling that human perception is left out in the search for technical perfection.
And if you examine the 'tonal characteristics curve' of a violin, or of a cello, or piano or organ, you will realize that this is exactly what has happened. The natural imperfections which are the emotion and the power of live performance will obviously elude the scientists' intent on mathematical exactness and symmetry.
We at Yamaha believe that music must satisfy the man, not the equation. This is why we have built the Natural Sound speaker.
Here is a speaker which is not symmetrical. It is not a cone, nor a horn nor any other conventional shape. It consists, in essence, of a diaphragm with a fixed edge, the whole surface of which vibrates according to the principle of multi-dimensional flexion.
The shape is derived from that of the piano soundboard, and like the soundboard of any other musical instrument, it is 'imperfect'. Like your ear and like everything else in nature, it follows no pat formula, it obeys no regular rule. It is not a Hi-Fi speaker, for what musician wishes to be faithful to someone else's concept of sound?
Surely the musician, as a creative artist, deserves a sound system which is designed for the human ear; designed for Nature; designed not for reproduction but for creative musicianship. We believe the Natural Sound speaker fulfills this aim.
Care of Your Electone
In general you should treat your Electone with the same care you would give any fine musical instrument. However, the following points are suggested to assure optimum enjoyment.
- Be sure to use your Electone only on the correct voltage. If it is necessary to change the voltage of the Electone, please consult your Yamaha Electone service agent.
- If any trouble develops, contact your Yamaha Electone service agent. In any case make absolutely sure never to touch or otherwise interfere with the circuits or the internal elements of the Electone.
- When you have finished playing, be sure to turn off the power switch.
- In order to clean the plastic keys, tabs, etc., use a damp cloth. Never apply organic solvents such as alcohol as it may result in damage to the plastic materials used.
- Do not expose the Electone cabinet to the direct rays of the sun, as this may result in bleaching of the finish of separation along the joints of the wood.
- Be absolutely sure never to strike or scratch the surface of the organ cabinet with a hard stuff.
- It is also advisable to place the Electone in such a way that it is not exposed to excessive humidity or currents of heated air.
- In opening and closing the fallboard, grasp the handle with both hands and slide the fallboard gently in its groove. Never attempt to raise the fallboard directly upwards and do not place heavy objects on it.
- During a thunderstorm turn off the Electone power switch by all means. Unplug the unit if possible.
natural_image
Black-and-white illustration of a piano with two women, one playing and the other observing, in a dimly lit room with abstract lighting (no text or symbols visible)Do not Be Alarmed If...
- A note should sound the instant you turn on the switch.
This merely indicates normal operation consequent to a flow of electricity in the main amplifier.
- Only one note is produced even when two pedals are depressed simultaneously.
When the pedal sustain effect is used, notes overlap following notes. In order to achieve tonal clarity, the Electone is designed so that a note is electronically suppressed the instant the next note is struck. If two pedals are struck simultaneously, only the higher one sounds.
- 2% voices are not obtainable from keys above F in the highest octave.
This means that the highest note which the Electone D-3 can produce is cs. (See the Compass chart on page 7.)
- Neighboring objects resonate.
Since the Electone produces a continuous stream of sound, windows, china or other such objects may be found to resonate. To prevent this, reduce the volume of the Electone or take steps to remove resonance.
- Occasional unpleasant static.
In the majority of such cases, the cause can be traced to the turning on or off of refrigerators, washing machines, electric pumps or other household appliances. Electrical fault in a neighboring outdoor neon sign may also be to blame.
When the cause is a home appliance, connect the Electone to an outlet as far as possible away from the offending appliance. This phenomenon, although perhaps annoying, poses no danger to the Electone's circuitry.
If the cause is a fault in neon or fluorescnet lighting fixtures, the fault should be repaired. When the cause is unknown, or in case of doubt, contact your Yamaha dealer.
- The Electone reproduces radio or TV sound signals.
This kind of phenomenon can occur when there is a powerful radio or TV transmitter, or an amateur radio operator located in the vicinity. If this situation is distracting, contact your Yamaha dealer.
HOW TO SET UP THE BENCH
Specifications of Model D-3
KEYBOARDS
Upper Manual 49 keys c\~c4 (4 octaves)
Lower Manual 49 keys C\~c3 (4 octaves)
Pedals 13 keys C1\~C (1 octave)
TONE LEVERS
Upper Manual Flute 16'
Trombone 16'
Bassoon 16'
Flute 8'
Clarinet 8'
Brass 8'
Oboe 8'
String 8'
Flute 4'
String 4'
Flute 2 ^2 / _3
String 2 ^2 / _3
Lower Manual Wood 8'
Diapason 8'
Hom 8'
Cello 8'
Wood 4'
Cello 4'
Wood 2'
Pedals Bass 16'
Bass 8'
Tuba 8'
EFFECT LEVERS
Brilliance
Percussive Length (Upper)
Percussive 4' (Upper)
Percussive 2 ^3/8 (Upper)
Repeat Speed (Upper)
Touch Vibrato (Upper)
Vibrato
Pedal Attack
EFFECT CONTROLS
Reverb
Pedal Sustain
Upper Sustain
Manual Balance
EFFECT SELECTORS
Upper Sustain (16', 8', 4')
Singing Vibrato I
Singing Vibrato II
Upper Attack (16', 8', 4')
TREMOLO SELECTORS
Upper Voice (Main/Tremolo)
Lower Voice (Main/Tremolo)
Tremolo
Chorus
PERCUSSION SECTION
Percussion Levers
Lower I
Lower II
Pedal
Button
Percussion Buttons (Four)
OTHER CONTROLS
Master Volume
Expression Pedal
Knee Lever
Power Switch with Pilot Lamp
OTHER FITTINGS
Headphone Jack
External Input Jack
Tone Cabinet Sockets (Upper/Lower/Gen.)
Roll-top Fallboard with Auto Switch and Lock
Music Rest
Matching Bench with Music Storage Space
NATURAL SOUND SPEAKERS
Main: JA-5101 59 x 48 cm (23¼ x 14½")
Tremolo: JA-1701 16 x 23 cm (6½ x 9")
Elector-control 2-speed
with continuous tremolo speed control
CIRCUITRY
Solid State (Incl. ICs and FET)
Main Amplifier: Dual-channel (OCL System)
Total Output Power: 75 Watts
Power Consumption: 150 Watts
10/117/125/220/240V AC
50/60Hz
DIMENTIONS
Width: 114 cm (45")
Depth: 70 cm (27½")
Height: 94 cm (37")
WEIGHT
110 kg (220 lbs.)
Specifications subject to change without notice.

natural_image
Aerial black-and-white photograph of a dense urban area with buildings and roads (no visible text or signage)YAMAHA — where quality craftsmanship is always first
Yamaha, as the world's largest producer of musical instruments, has a long and proud heritage extending over 80 years in which painstaking care has been devoted to Yamaha's tradition of creation of unmatched beauty of sound. Exciting features, advanced engineering and the ultimate in design and craftsmanship have made the Yamaha name synonymous with perfection in these products.
The Yamaha Electone organs encompass the complete range from compact home types, regular home console, larger professional types for hotels, restaurants and clubs, to those very large types for churches, theaters and the like.
Each Electone model is different in certain respects: the line includes a model to meet the widest variety of requirements, however particular they might be.
Furthermore, every organ bearing the name of Yamaha Electone is, as you would of course expect, manufactured to the most exacting specifications to meet the high quality standards which have made Yamaha a world leader. Years of experience and research in both musical instruments and electronics have given Yamaha the unique, and very necessary combination of skills required for electronic organ perfection. Carefully-skilled craftsmen, workers who have spent their working life with musical instruments and whose family for generations before has, in many instances, been part of Yamaha's proud heritage, oversee and blend their artistic skills into every crucial step of the production. And from this proud lineage has come the unsurpassed tone and superb quality that are the hallmark of every Yamaha Electone organ.
- GUIDE
- YOUR
- YAMALIA
- ELECTONE
- MODEL D-3
- D-3
- PLAYING
- CONTENTS
- New voices for any age
- Here is your Yamaha Electone D-3
- Pedals
- Tone Levers
- Yamaha's Exclusive Tone Lever System
- Tone Lever Registration
- Harmonics
- Upper Percussive : ②, ③, ④
- Brilliance : ①
- Repeat Speed : ⑰
- Touch Vibrato : ⑱
- Vibrato : ⑲
- Pedal Attack : ③0
- Touch Vibrato
- Play with True Feeling
- Manual Balance : ④6
- Upper Sustain : ④5
- Sustain Control : ④5
- Sustain Selector : ③5
- Knee Lever : Ⓡ
- Pedal Sustain : ④④
- Reverb : ④3
- Auto Rhythm Section (D-3 Series)
- How to Use the Auto Rhythm Section
- Producing the Tremolo Effect
- Producing the Chorus Effect
- Slower pieces:
- A softer treatment of slow pieces indicates the reverse:
- In pieces of ordinary tempo:
- Up-tempo pieces:
- Percussion Section
- Per cussion levers
- Porcussive sounds
- Using the 'Button' lever
- Other Controls
- Automatic Power Switch
- To Fully Enjoy Your Electone
- Headphone Jack
- Recording
- External Input Jack
- Note:
- A Word about Yamaha's Exclusive Natural Sound Speaker
- Care of Your Electone
- Do not Be Alarmed If...
- HOW TO SET UP THE BENCH
- Specifications of Model D-3
- KEYBOARDS
- EFFECT LEVERS
- EFFECT CONTROLS
- EFFECT SELECTORS
- TREMOLO SELECTORS
- OTHER FITTINGS
- NATURAL SOUND SPEAKERS
- CIRCUITRY
- DIMENTIONS
- WEIGHT
- YAMAHA — where quality craftsmanship is always first
Marke : YAMAHA
Modell : Electone D-3
Kategorie : Tastatur