Electone BK-4B - Tastatur YAMAHA - Kostenlose Bedienungsanleitung
Finden Sie kostenlos die Bedienungsanleitung des Geräts Electone BK-4B YAMAHA als PDF.

| Produkttyp | Elektronische Orgel / Keyboard |
| Marke | Yamaha |
| Modell | Electone BK-4B |
| Kategorie | Tastatur (Orgel) |
| Abmessungen (ca.) | 1200 x 500 x 850 mm |
| Gewicht (ca.) | 50 kg |
| Stromversorgung | AC 220-240 V, 50/60 Hz |
| Leistungsaufnahme | 50 W |
| Klaviaturen | 2 Manuale mit je 49 Tasten, 13 Pedale |
| Klanggenerierung | FM-Klangerzeugung |
| Polyphonie | 20 Stimmen |
| Begleitautomatik | Ja, mit Rhythmus- und Begleitpatterns |
| Anschlüsse | Kopfhörer (6,3 mm), Audioausgang, MIDI (optional) |
| Zubehör | Notenständer, Pedalboard, Bedienungsanleitung |
| Reinigung | Mit einem weichen, trockenen Tuch abwischen; keine Lösungsmittel |
| Sicherheitshinweise | Netzstecker bei Gewitter oder Nichtgebrauch ziehen; keine Flüssigkeiten in der Nähe |
| Reparatur | Nur von autorisiertem Fachpersonal durchführen lassen |
| Herkunftsland | Japan |
| Garantie | 2 Jahre |
Häufig gestellte Fragen - Electone BK-4B YAMAHA
Benutzerfragen zu Electone BK-4B YAMAHA
0 Frage zu diesem Gerät. Beantworten Sie die, die Sie kennen, oder stellen Sie Ihre eigene.
Eine neue Frage zu diesem Gerät stellen
Laden Sie die Anleitung für Ihr Tastatur kostenlos im PDF-Format! Finden Sie Ihr Handbuch Electone BK-4B - YAMAHA und nehmen Sie Ihr elektronisches Gerät wieder in die Hand. Auf dieser Seite sind alle Dokumente veröffentlicht, die für die Verwendung Ihres Geräts notwendig sind. Electone BK-4B von der Marke YAMAHA.
BEDIENUNGSANLEITUNG Electone BK-4B YAMAHA
GUIDE TO YOUR YAMAHA Electone BK-4B
natural_image
Abstract geometric pattern with concentric and curved lines forming a stylized 'D' shape (no text or symbols)Welcome to the musical world of Yamaha. We at Yamaha appreciate your confidence in Yamaha products, and we will do everything we can to make sure your new purchase, the Yamaha Electone BK-4B, provides a lifetime of enjoyment.
Please read this manual thoroughly to be sure you are familiar with every feature, and with all the many ways you can use each one. With proper care and a little time together, you and your Electone can become lifelong partners in musical creativity.
Contents
Page
Keyboards 2
This is Your Yamaha Electone BK-4B 3
The Tone Levers 4
Vibrato 5
Pedal Sustain 5
Reverb 5
Spacious Sound 6
Auto Rhythm Section 7
Auto Bass/Chord Fun Blocks 8
Expression Pedal 10
Headphone Jack 10
Ext. In Jack 10
Care of Your Electone 11
Do not Be Alarmed If 12
Playing the Electone 13
Specifications 14
Keyboards
The BK-4B has three keyboards. The upper two are called "manuals" and the lower one, played with the feet, "pedals." They have keys and octaves as follows:
| Upper Manual | 44 keys ( 323 octaves) |
| Lower Manual | 44 keys ( 323 octaves) |
| Pedals | 13 keys (1 octave) |
The Electone is designed to permit playing the melody on the upper manual with the right hand, the chords on the lower manual with the left hand, and bass notes on the pedals with the left or right foot. All keys are arranged in the traditional keyboard method: two black keys, three black keys. Each white key has a name (from A to G), and the blacks are sharps or flats. "C" is always the white key just below the left black key in the two-black-key group. Any complete set of seven white keys and five black keys is called an "octave."
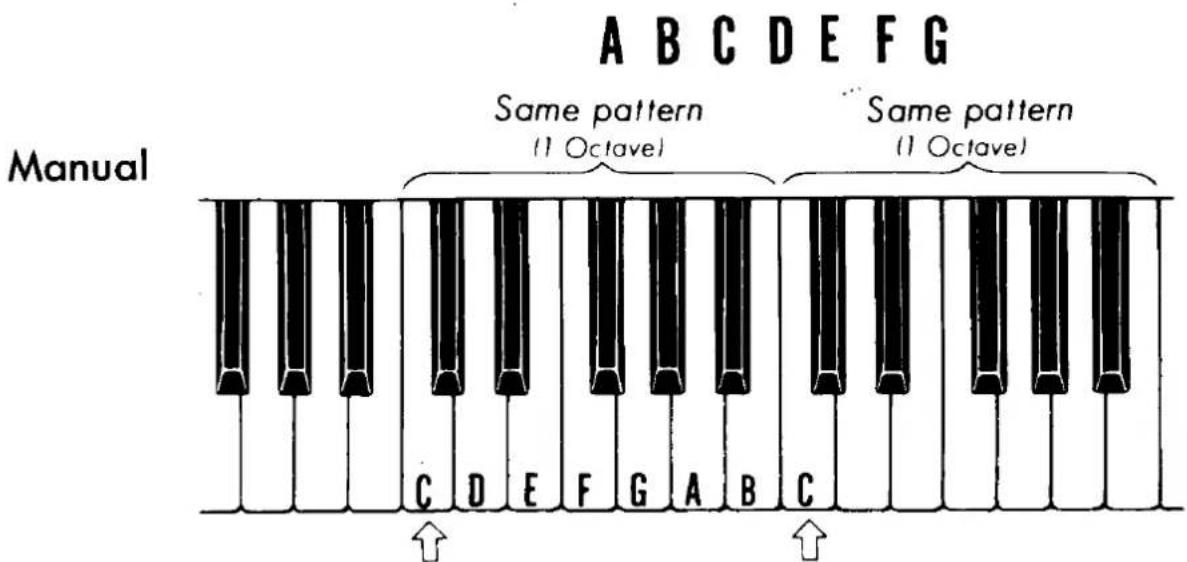
"C" is always at the bottom of the group of two black keys.
Pedals The pedals follow the same pattern; only their shape is different.
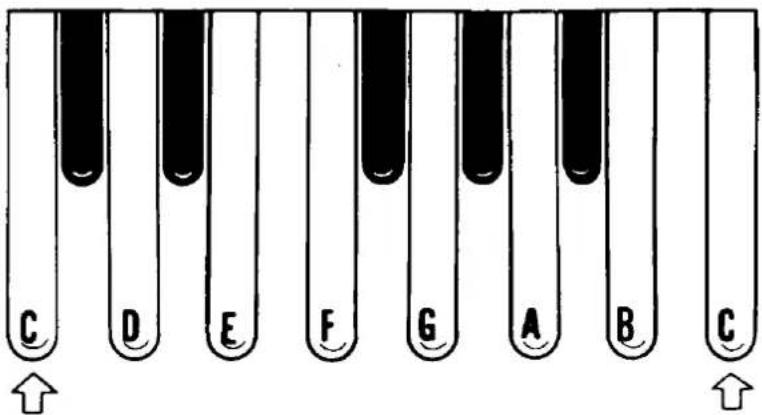
Both end pedals are "C".
This is Your Yamaha
Electone BK-4B
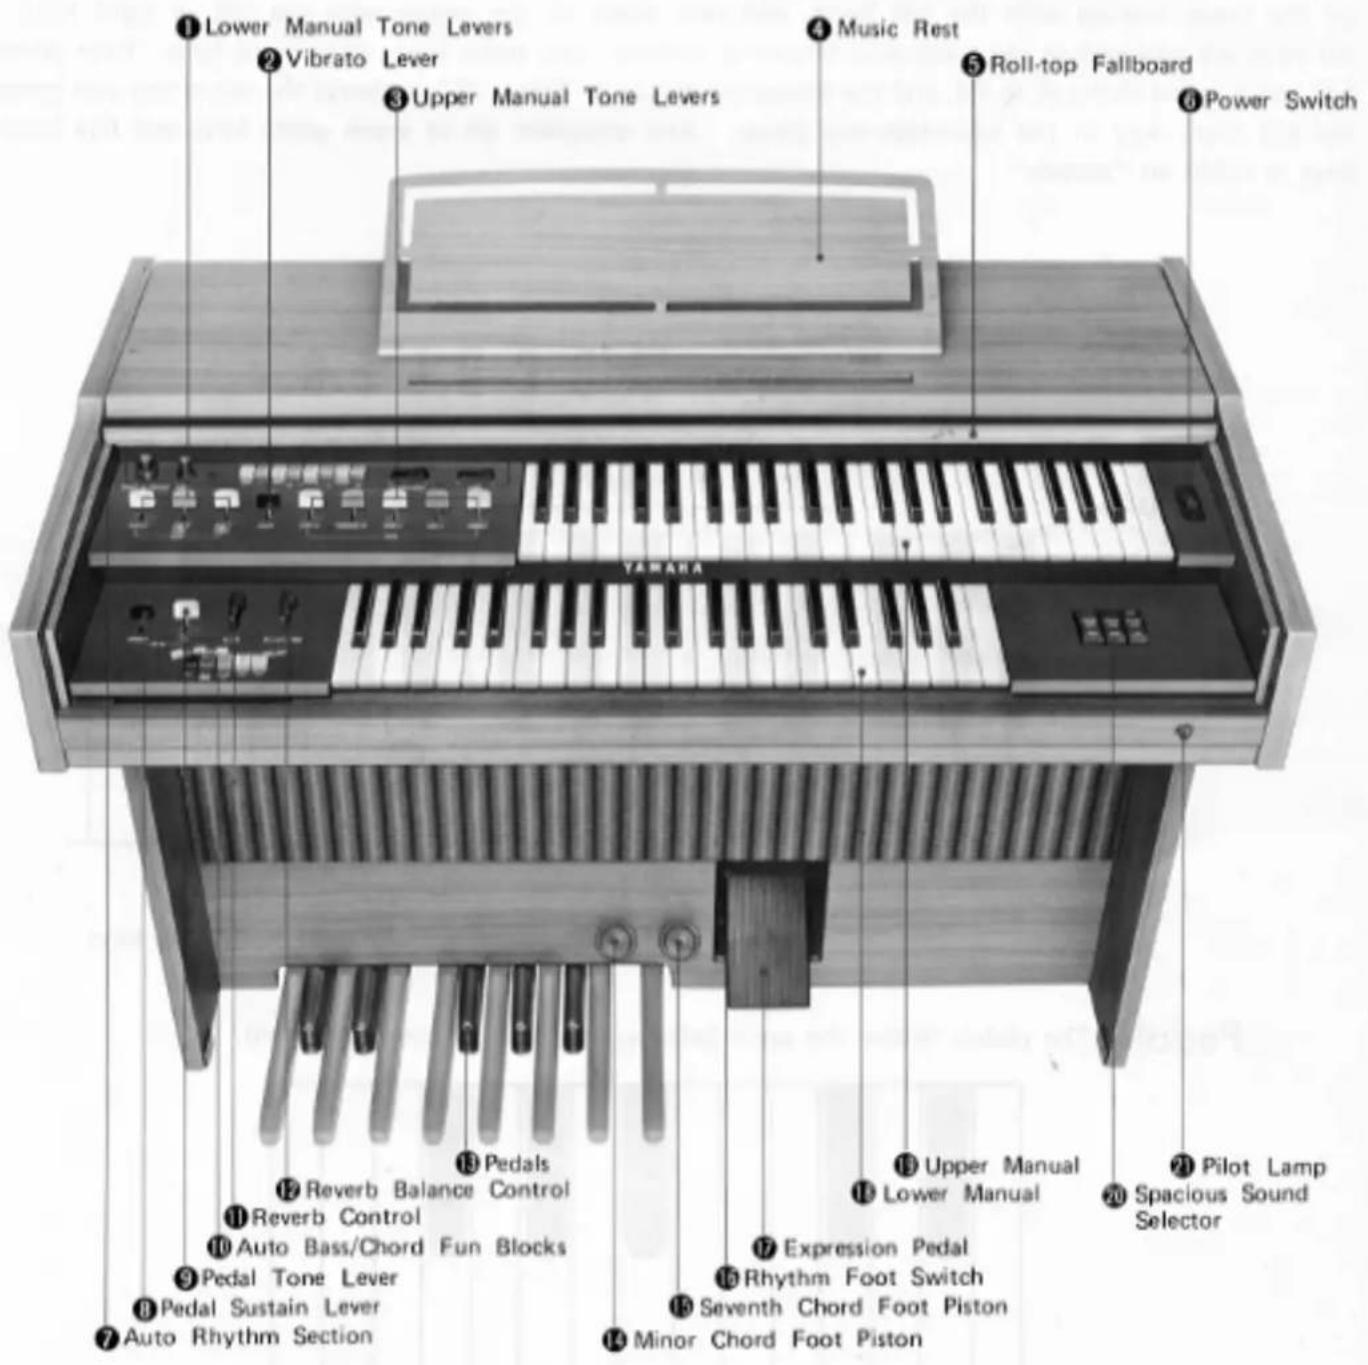
The Tone Levers
To the left of the upper and lower manuals are series of tone levers which control the Electone voices which will sound when the keys are depressed. They are divided into groups for upper, lower and pedals, so that different registrations can be set for each.
Upper Manual Levers ③ 5 voices
Lower Manual Levers ① 3 voices
Pedal Lever ⑨ 1 voice
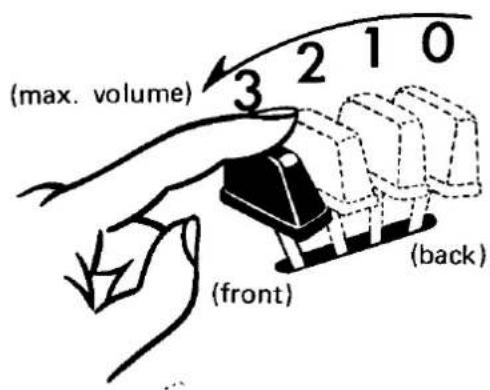
Each lever provides two methods of control. One is by continuously moving the lever from off to full, to achieve the exact setting for that tone, and thus balancing the overall tone setting with perfect precision. Each lever also has two easy-to-feel click stops, at 1/3 and 2/3 positions. This lets you refind any setting with mathematical precision and no guesswork in a matter of seconds.
PITCHES OR FOOTAGES
The BK-4B has two different pitch levels, indicated by the numbers 16' and 8'. These are standard organ abbreviations showing the tone's pitch in relation to the fundamental (written note). An 8' tone will sound just as it has been written. A 16' tone (meaning that the wave length of the vibrations are twice as long as 8', or half as fast) will provide a tone exactly one octave lower than the written note.

NOTE: When the Auto Bass/Chord section is used, the tone color of the lower manual voices will change from Horn to Piano, and from Cello to Guitar.
Vibrato
Vibrato is a waving of the tone. You will see violin and cello players use it freely by an oscillating motion of the left hand. It increases the emotional quality of the violin tone. This vibrato lever ② produces the same vibrato effect.

natural_image
Illustration of a male violinist playing violin (no text or symbols)Pedal Sustain
This control ⑧ provides continuous adjustment of the sustain effect on the pedals and allows the pedal note to continue to sound a few seconds after you have released it.
Reverb
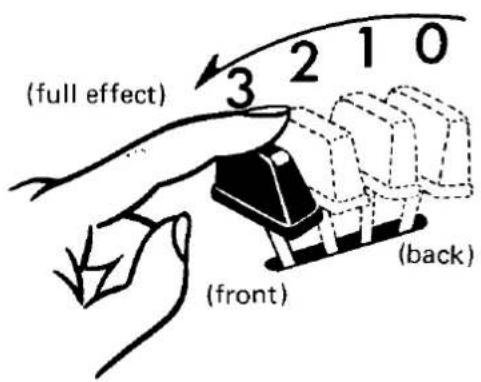
These continuous controls ⑪ ⑫ let you add a fullness to your playing much like the acoustics of a concert hall. Use Reverb to compensate for deadend dull acoustics (due to furniture, rugs, drapes, etc.).
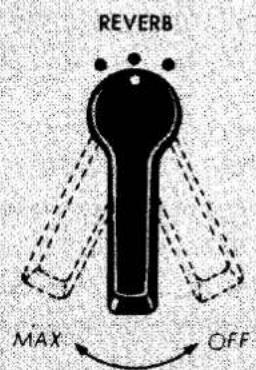
Continuously increases the strength of reverb effect
Strengthen the upper manual
Strengthen the lower manual
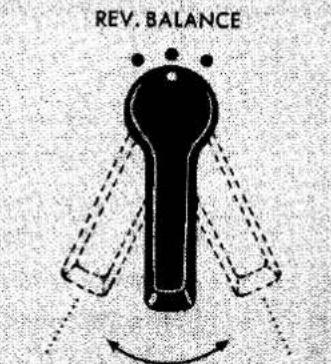
Spacious Sound
This function produces the same feeling as a revolving speaker. The Yamaha exclusive Spacious Sound. A world's first, this new system is an exclusive development of the outstanding Yamaha electro-acoustic technology, incorporated in the Electone BK-4B. Successfully incorporating the essential sound quality of the Yamaha rotary speaker tremolo effect, this new effect is achieved solely through special electronic circuitry, adding full, rich musical expression to your music.
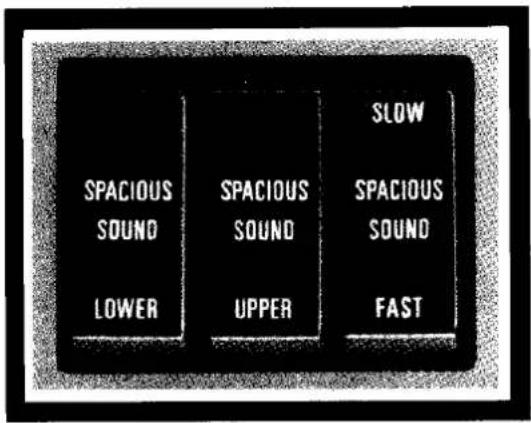
Spacious Sound is available in two speeds. Use SLOW for stately, liturgical selections, FAST for popular numbers. Works on Upper, Lower or both manuals, according to which of the three selectors you choose.
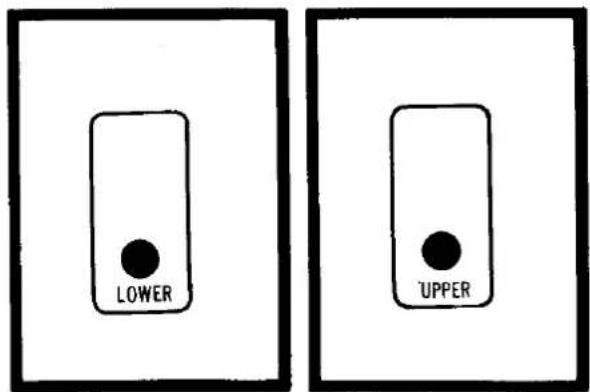
LOWER SELECTOR
Use this selector to apply the Spacious Sound to the lower manual tones.
UPPER SELECTOR
Use this selector to apply the Spacious Sound to the upper manual tones. The use of upper and lower selectors together will apply the Spacious Sound to the whole organ.
SPEED SELECTOR
Combined with either or both selectors, this selector determines the speed of the Spacious Sound. Set on FAST for (tremolo effect), SLOW for (chorus effect).

Auto Rhythm Section
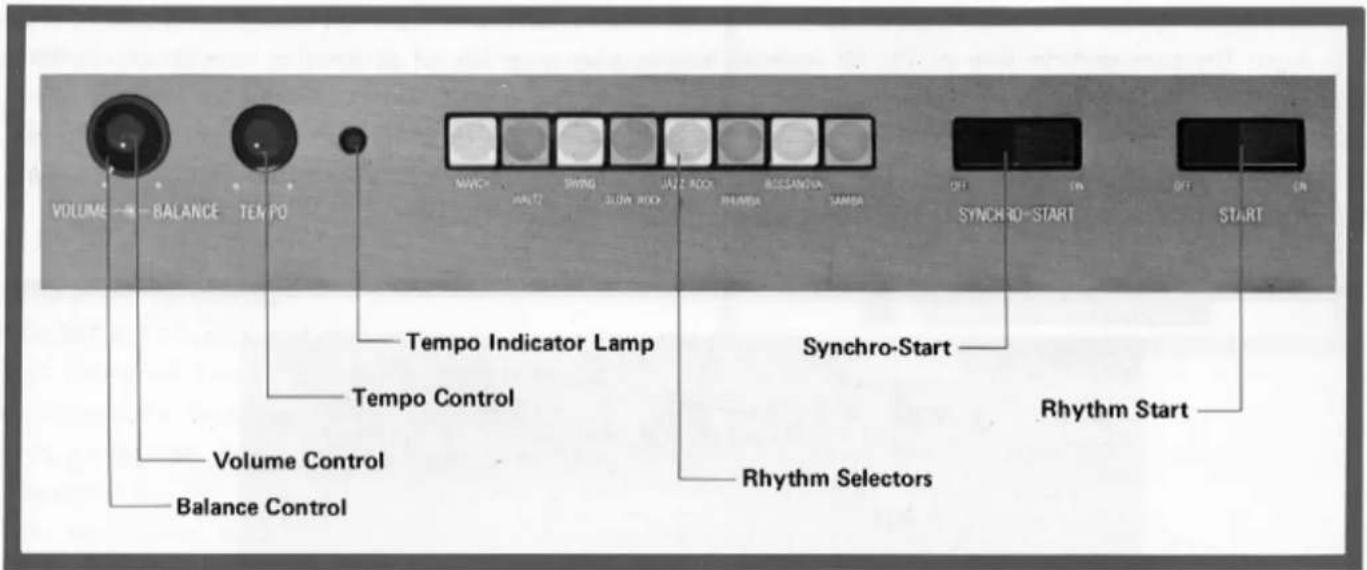
This section has 8 different rhythm accompaniments, each with its own selector button. There are also rhythm Volume, Tempo and Tone Balance controls, a tempo indicator lamp and two start switches. To use the rhythm section, first push the desired selector button (or buttons — you can combine rhythms). Then switch on normal Start. The rhythm will begin and you can adjust the tempo, volume and tone balance. Now switch the Start button back off and you are ready. If the Start button is switched on, the rhythm will begin immediately. You can also leave it off and switch on Synchro-Start instead. This will automatically begin the rhythm the instant a lower manual note or a pedal note is played, letting you lead in with a melody or introductory notes on the upper manual first.
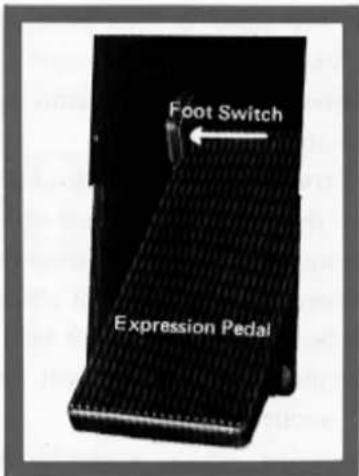
RHYTHM STOP (FOOT SWITCH) 16
This switch is located in the expression pedal housing to the left of the pedal. Once the rhythm is on, push this switch once to instantly stop it, once again to restart. It lets you stop and restart the rhythm in the middle of a selection without using your hand.
NOTE: After the foot switch has been used, be sure it is reset to normal after you finish playing your selection, and then make sure both Start and Synchro-Start switches are off. Otherwise you may turn on one of the switches in the middle of a new number only to find the rhythm still canceled.
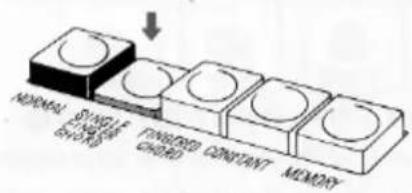
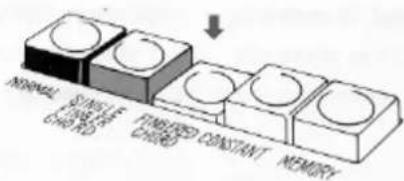
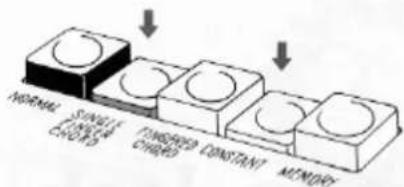
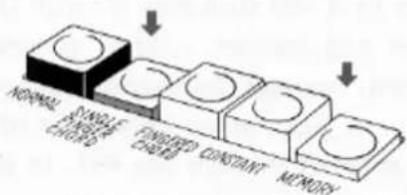
Auto Bass/Chord Fun Blocks
The BK-4B is equipped with a "Fun Block" section of five buttons which can be used in conjunction with the Auto Rhythm section (see p. 7). It enables you to play a variety of alternating bass chord rhythms and implies that the pedal and chords automatically match the melody notes, simply by holding down either a single lower manual key or a lower manual chord, according to which fun block button you press. From your very first keyboard attempt, the auto bass chord feature will let you sound like a pro, making full rhythmic use of the lower manual and pedals. Here is how it works.
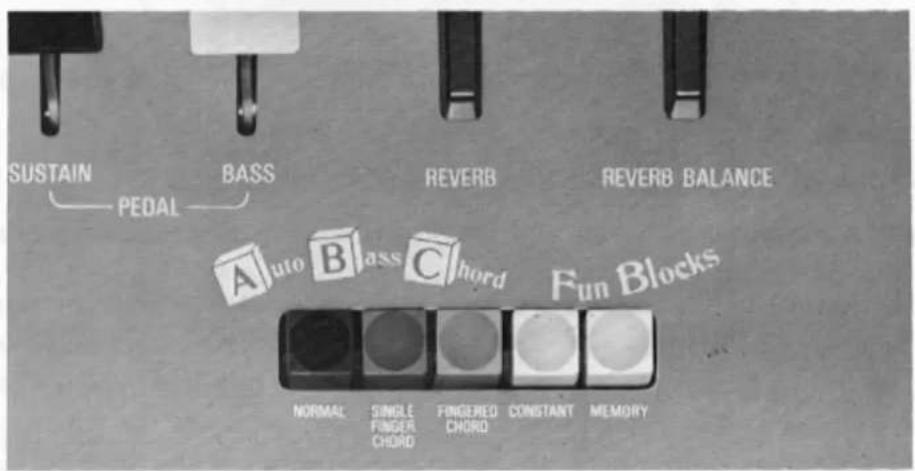
SINGLE FINGER CHORDS (THE EASY PLAY WAY)
- Set the tone levers for the tones you want on the lower manual both Piano and Guitar sounds are available); use either or both levers to adjust the Auto Bass Chord tone color and volume in the normal way.
- Match the setting of the Pedal tone lever to the lower manual tones.
- Select a rhythm pattern and push the corresponding button down until it clicks and stays down.
- Set the Rhythm Start switch on.
- Adjust the rhythm tempo and volume.
- Press the Single Finger Chord button.
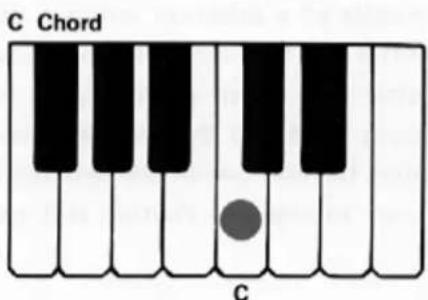
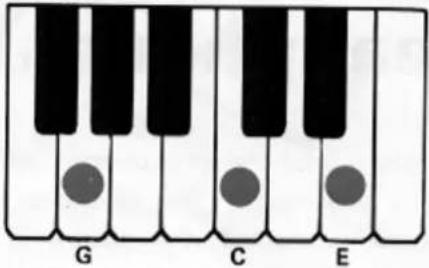
Now, if you press a C key on the lower manual, a C major chord will play in an alternating pattern which matches the rhythm pattern and tempo set.
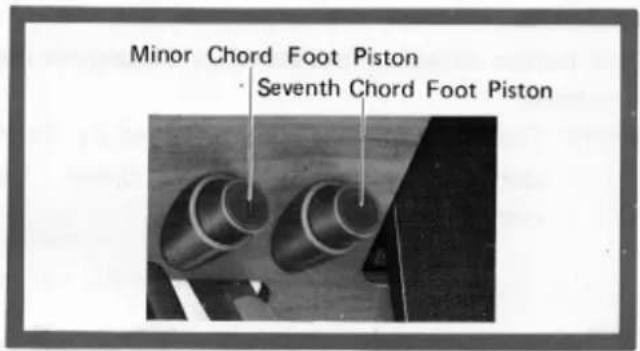
As long as the key is held down the bass chord rhythm will continue, but will stop as soon as the key is released. If the Minor Chord (left) foot piston is depressed at this time, the chord will change to a minor (i.e., from C major to C minor). Releasing the Minor Chord foot piston will change the chord back to major.
If the Seventh Chord (right) foot piston ⑤ is depressed at this time, the chord will change to a seventh (i.e., from C major to C seventh). Releasing the Seventh Chord foot piston will change the chord back to major. If both foot pistons are held down at the same time, a minor seventh chord will result (i.e., from C major to C minor seventh).
In other words, a combination of one lower manual
key and the two foot pistons permits the creation of either major, minor, seventh or minor seventh chords.
NOTE: The bass note will play the root and fifth of any chord pressed, except when the Jazz Rock rhythm is used; in that case the bass sounds the root only.
FINGERED CHORDS
- Select the rhythm and set both its tempo and volume as explained above.
- Depress the Fingered Chord button.
- Play a desired chord (major, minor, seventh or minor seventh) on the lower manual.
Now as long as you hold that chord it will play according to the rhythm and tempo you have set. The foot pistons have no effect when the Fingered Chord button is pressed. If the Single Finger Chord and Fingered Chord buttons are both pressed, the Single Finger Chord takes precedence.
CONSTANT
- Select the rhythm and set both its tempo and volume as explained above.
- Depress the Constant button and either Single Finger Chord button or the Fingered Chord button.
- Press the desired key on the lower manual. As long as this key is held down, the chord, as well as a pedal note the same as the root of the chord, will sound as if they were held down during normal play (i.e., without any rhythm pattern). As soon as this key is released the chord stops.
MEMORY
This button can be used in conjunction with the Single Finger Chord button only. Press both buttons and set the rhythm (including tempo and volume) as explained above. Now, when a lower manual key is held down the bass chord rhythm will play according to the rhythm set, but will also continue to play even when the key is released.
The memory function also has another use. When this button is depressed along with both the Single Finger Chord and Constant buttons, it provides a continuing bass chord just as when the latter two buttons are used alone. In this case, however, the bass chord will continue to sound even after the key is released.
As with Single Finger Chord play, the Minor and Seventh Chord foot pistons can be used to temporarily alter the chord.
C Major Chord
flowchart
graph LR
    A["NORMAL"] --> B["SNOWLIC CHINA"]
    B --> C["FINISHED CHINA"]
    C --> D["CONSTANT"]
    D --> E["MEMORY"]
NORMAL
This button cancels the other Fun Blocks, returning the lower manual and the pedals to normal playing functions.
NOTE: The Flute 8' voice is not affected by the Auto Rhythm rhythm pattern. If it is set on it will sound continuously for any key held down. Use it to soften the mood of the Auto Bass Chord accompaniment.
Expression Pedal
This pedal is extremely important for adding emotion to your playing. The pedal is balanced to stay in any position once set. Rest the entire right foot on the pedal and relax it, pressing with the toe to increase volume, with the heel to decrease it.
Headphone Jack
A Yamaha headphone set (optional) can be plugged into the jack under the keyboard. With the headphone connected, the speaker is automatically shut off, allowing you to play or practice at any volume level without disturbing anyone.
natural_image
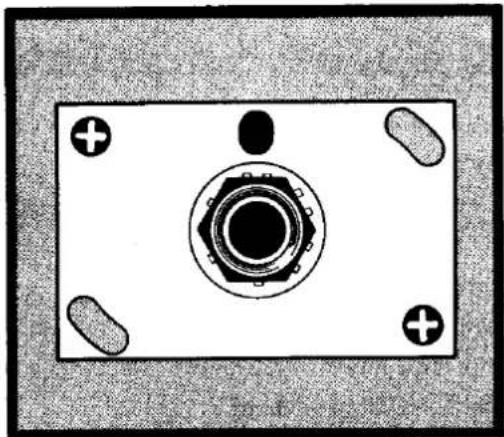
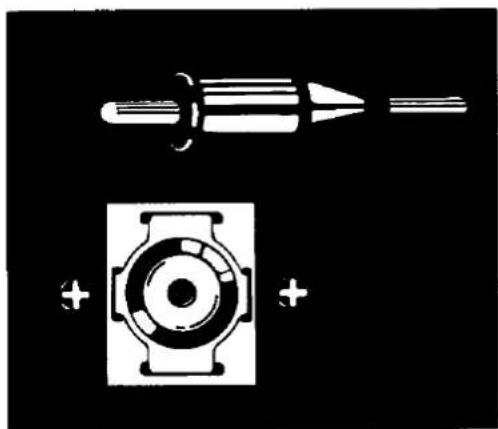
Top-down view of a mechanical component with central hub and four mounting holes (no text or symbols)Ext. In Jack
You can connect a tape recorder, record player or radio to it and then play through the Electone amplifier and speaker. When connecting other equipment, however, be sure to match impedances; the Ext. In jack has an impedance of 30Kohms. Signals entering through the Ext. In jack are not regulated by the expression pedal.
natural_image
Pure electrical circuit lines without any symbolsCare of Your Electone
In general you should treat your Electone with the same care you would give any fine musical instrument. However, the following points are suggested to assure optimum enjoyment.
-
Be sure to use your Electone only on the correct voltage. If any changes are required, please consult your Yamaha Electone service agent.
-
If any trouble develops, contact your service agent. Never touch the circuits or the internal elements of the Electone yourself.
-
When you have finished playing, be sure to turn off the power switch.

-
In order to clean the keys, tabs, etc., use a damp cloth. Never apply organic solvents such as alcohol, for they will damage the materials.
-
Do not expose the Electone cabinet to the direct rays of the sun. This can bleach the finish and lead to separation along the joints. It is also best to choose a location free of humidity and currents of heated air.
natural_image
Cartoon illustration of a printer emitting a smiling sun (no text or symbols)-
Be careful not to strike or scratch the cabinet with a hard object.
-
In opening and closing the fallboard, grasp the front lip with both hands and slide it gently in its groove. Never attempt to raise the fallboard directly upwards. Do not place heavy objects on it.
Do not Be Alarmed If...
-
The Electone does not operate when the power switch is turned on; check the following:
-
Is the plug fully inserted into an AC outlet (the same as you use for a lamp, etc.)? Reinsert it to be sure.
- Is there power coming from that outlet? Unplug the Electone and plug in a lamp; then see if the lamp will light. If it does not, the problem is probably in your home's electrical system. Check your fuses or circuit breakers.
-
If you find that there is power in the outlet, but the Electone does not play, unplug the cord and call your nearest Yamaha dealer. There are NO USER-SERVICEABLE PARTS in the Electone.
-
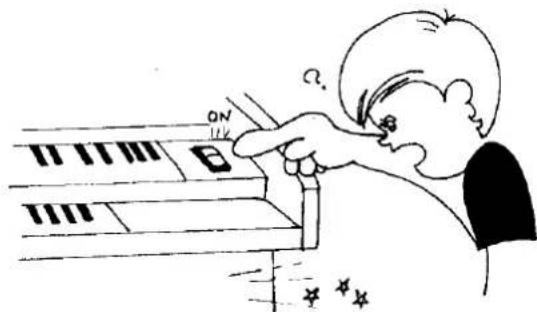
A note should sound the instant you turn on the switch.
This merely indicates normal operation consequent to a surge of electricity in the main amplifier.
- Only one note is produced even when two pedals are depressed simultaneously.
In order to achieve tonal clarity, the Electone is designed so that a note is electronically suppressed the instant the next note is struck. If two pedals are struck simultaneously, only the higher one sounds.
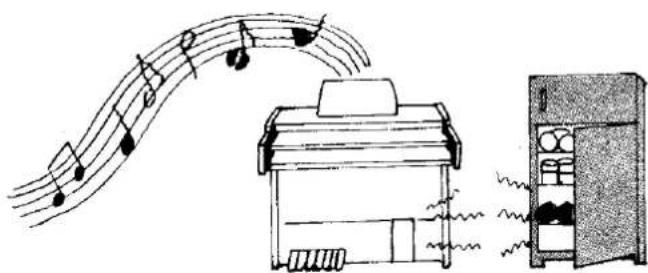
- Occasional unpleasant static occurs.
In the majority of such cases, the cause can be traced to the turning on or off of refrigerators, washing machines, electric pumps or other household appliances. Electrical fault in a neighboring outdoor neon sign may also be to blame.
When the cause is a home appliance, connect the Electone to an outlet as far as possible away from the offending appliance. This phenomenon, although annoying, poses no danger to the Electone circuitry. If the cause is a fault in a neon or fluorescent lighting fixture, it should be repaired. When the cause is unknown, or in case of doubt, contact your Yamaha dealer.
- The Electone at times reproduces radio or TV sound signals.
This can occur when there is a powerful radio or TV transmitter, or an amateur radio operator located in the vicinity. If the situation is distracting, contact your Yamaha dealer.
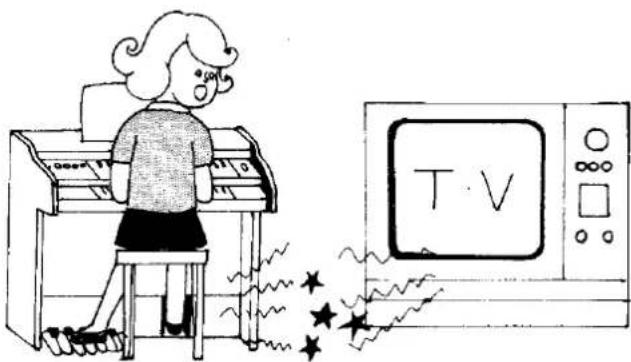
natural_image
Illustration of a girl playing piano next to a TV set with stars (no text or symbols)- Sound rattling (sympathetic vibration) occurs.
All materials have critical resonance frequencies at which they vibrate. Since the Electone produces continuous tones, it is normal that some will cause windows, shelves, etc. to rattle.
- Pedal notes sound too high, and upper manual notes too low.
This feeling may be especially strong for players who switch from the piano, because of the difference in tonal construction. Each piano note is a combination of complicated harmonics, and can be heard only in its interaction with the surroundings. But Electone harmonics are multiples of the integral (base) tone, and the instrument cannot be tuned in the same way as a piano.
Playing the Electone
First turn on the power switch. No warm-up period is required. The power is on when the pilot lamp is on; the Electone operates quietly. This lamp also indicates whether the Electone is on when not in use.
Next, set up a registration (set all the levers and controls you wish to use for the upper and lower manuals and the pedals). Select tone combinations according to suggestions in the music you are going to play, or experiment with your own combinations. Remember that the registration noted on any sheet of music is no more than a suggestion, and your idea may well be even more suitable.
By the same token, do not be alarmed if you have a piece of music with no registration for your organ. With a bit of imagination you can approximate the registration for a different organ, going on to improvise on your own. This will be an ever-new source of creative enjoyment as you become more and more familiar with the various Electone controls and effects.
Specifications
KEYBOARDS
| Upper Manual | 44 keys f ~ c4(3 23 octaves) |
| Lower Manual | 44 keys F~ c3 |
| (3 23 octaves) |
| Pedals | 13 keys C_1 C |
| (1 octave) |
TONE LEVERS
| Upper Manual | Flute | 16' |
| Trombone 16' |
| Flute | 8' |
| Oboe | 8' |
| String | 8' |
| Lower Manual | Flute | 8' |
| Horn | 8' |
| (or Piano*) |
| Cello | 8' |
| (or Guitar*) |
| Pedals | Bass |
| * It becomes so with ABC. |
EFFECT LEVERS
Vibrato
Pedal Sustain
EFFECT CONTROLS
Reverb
Reverb Balance (Upper/Lower)
EFFECT SELECTORS
Spacious Sound Upper
Spacious Sound Lower
Spacious Sound Slow/Fast
ABC FUN BLOCKS
ABC Selectors
Normal
Single Finger Chord
Fingered Chord
Constant
Memory
Minor Chord Foot Piston
Seventh Chord Foot Piston
AUTO RHYTHM SECTION
Rhythm Selectors
March Jazz Rock
Waltz Rhumba
Swing Bossanova
Slow Rock Samba
Rhythm Controls
Rhythm Start
Synchro-Start
Rhythm Stop (Foot control)
Tempo
Volume
Tone Balance
Tempo Indicator Lamp
OTHER CONTROLS
Expression Pedal
Power Switch
OTHER FITTINGS
Pilot Lamp
Headphone Jack
External Input Jack
Roll-top Fallboard
Music Rest
Matching Bench
SPEAKER
Yamaha JA-3055A 30cm (12")
CIRCUITRY
Solid State (Incl. ICs and FETs)
Output Power: 15 Watts (RMS)
Power Consumption: 40 Watts
Power Source: AC, 50/60Hz
DIMENSIONS
Width: 111cm (43½")
Depth: 56cm (22")
Height: 90cm (35½")
WEIGHT 55kg (121 lbs.)
FINISH American Walnut Grain
Specifications subject to change without notice.
SINCE 1887

YAMAHA
NIPPON GAKKI CO., LTD. HAMAMATSU, JAPAN