Electone B-4B - Tastatur YAMAHA - Kostenlose Bedienungsanleitung
Finden Sie kostenlos die Bedienungsanleitung des Geräts Electone B-4B YAMAHA als PDF.

Benutzerfragen zu Electone B-4B YAMAHA
0 Frage zu diesem Gerät. Beantworten Sie die, die Sie kennen, oder stellen Sie Ihre eigene.
Eine neue Frage zu diesem Gerät stellen
Laden Sie die Anleitung für Ihr Tastatur kostenlos im PDF-Format! Finden Sie Ihr Handbuch Electone B-4B - YAMAHA und nehmen Sie Ihr elektronisches Gerät wieder in die Hand. Auf dieser Seite sind alle Dokumente veröffentlicht, die für die Verwendung Ihres Geräts notwendig sind. Electone B-4B von der Marke YAMAHA.
BEDIENUNGSANLEITUNG Electone B-4B YAMAHA
YAMAHA ELECTONE
natural_image
Illustration of two children playing piano in a room with framed artworks on the wall (no text or symbols)FIGURE
B=4E SERIES
PLAYING
GUIDE
CONTENTS
page
Introduction 2
Here is Your Yamaha Electone B-4B 4
Keyboards 6
Tone Levers 8
Effect Lever and Controls 10
Spacious Sound 11
Other Controls....12
To Fully Enjoy Your Electone 12
Care of Your Electone 13
Specifications of Model B-4B 13
Do not Be Alarmed If 14
Playing the Yamaha Electone 15
Posture 16
Technique 17
Auto Rhythm Section (B-4BR only) 21
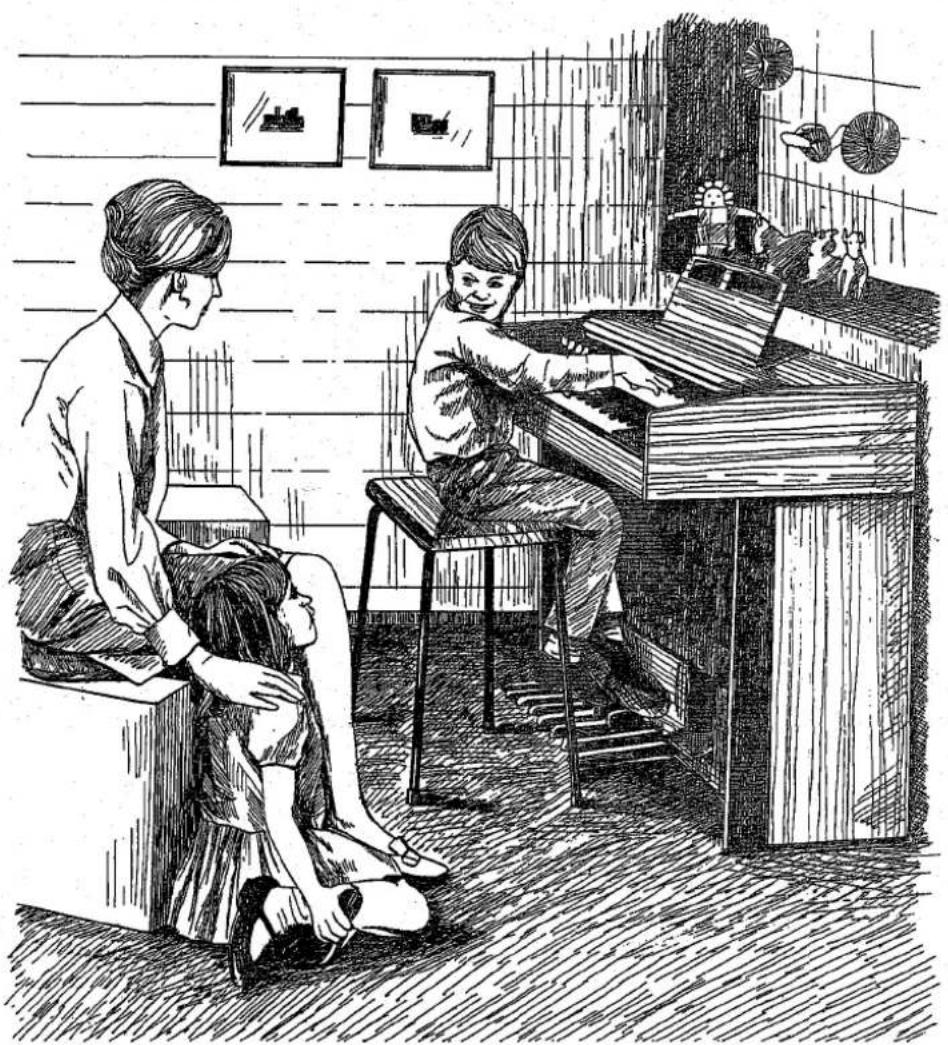
We of Yamaha wish to thank you for selecting one of the Electone B-4B series. We feel sure that you will realize many happy years of playing enjoyment with this instrument. Please read this guidebook for more complete enjoyment of all of the B-4B's special characteristics. We would suggest that you occasionally re-read it from time to time as you progress.
natural_image
Black-and-white photo of two people working at a piano in front of a brick wall with framed artworks (no visible text or symbols)The priceless family gift
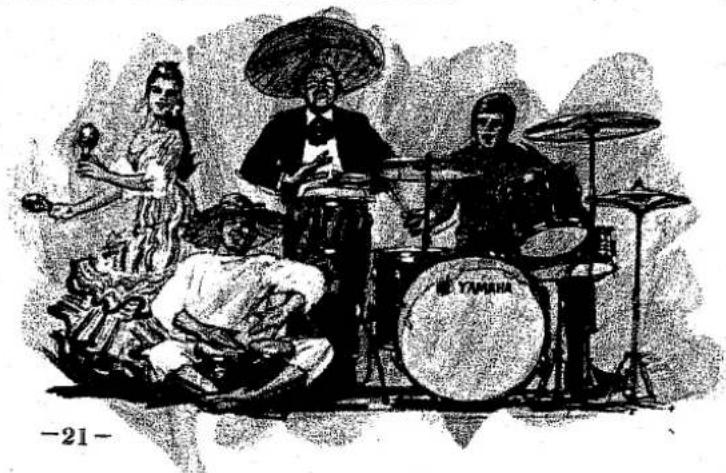
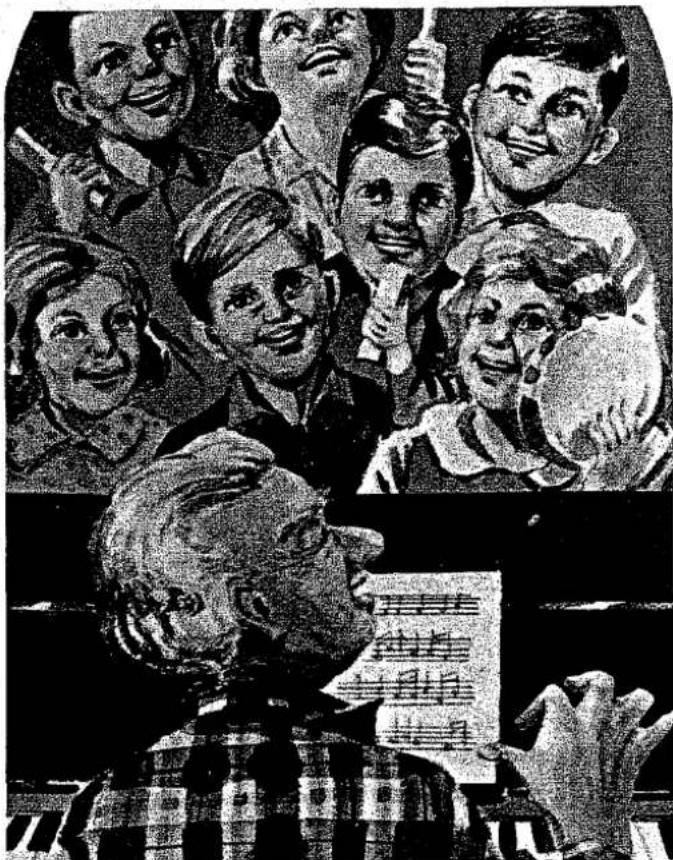
Gone are the days when the gift of music was costly and difficult. Today the brilliant Electone B-4B, amazingly inexpensive and just as easy to play, brings a rich range of expression to hands of any size, and even offers its own built-in rhythm band if you like.
From the first note, anyone in your family can feel a keyboard and musical assurance, quickly mastering the envelopping beauty of the exclusive Yamaha Spacious Sound Tremolo, using the reverb and vibrato effects, two generous 44-key manuals and 13 bass pedals, plus the famous Yamaha Tone Lever system that provides both professional-type continuous control and three easy-to-feel click-stop settings to let even beginners refind favourite tone combinations with ease. Variable Tone Levers also control two 16' tones, providing full rich harmonic beauty.
Have a taste for rhythm? Choose the B-4BR with seven exciting beats offered in its Auto-rhythm section. For the man of the family: trouble-free solid state circuitry, employing decades-durable integrated circuits, making the B-4B an excellent investment in spite of its low cost.
Extra features: headphone jack for private practice, smart furniture-type roll-top fallboard and comfortable matching bench. Everything to make it the perfect instrument to provide your family years of education and togetherness.
natural_image
Black-and-white illustration of a group of smiling children in a classroom setting, with an elderly man at the foreground holding a paper (no visible text or symbols)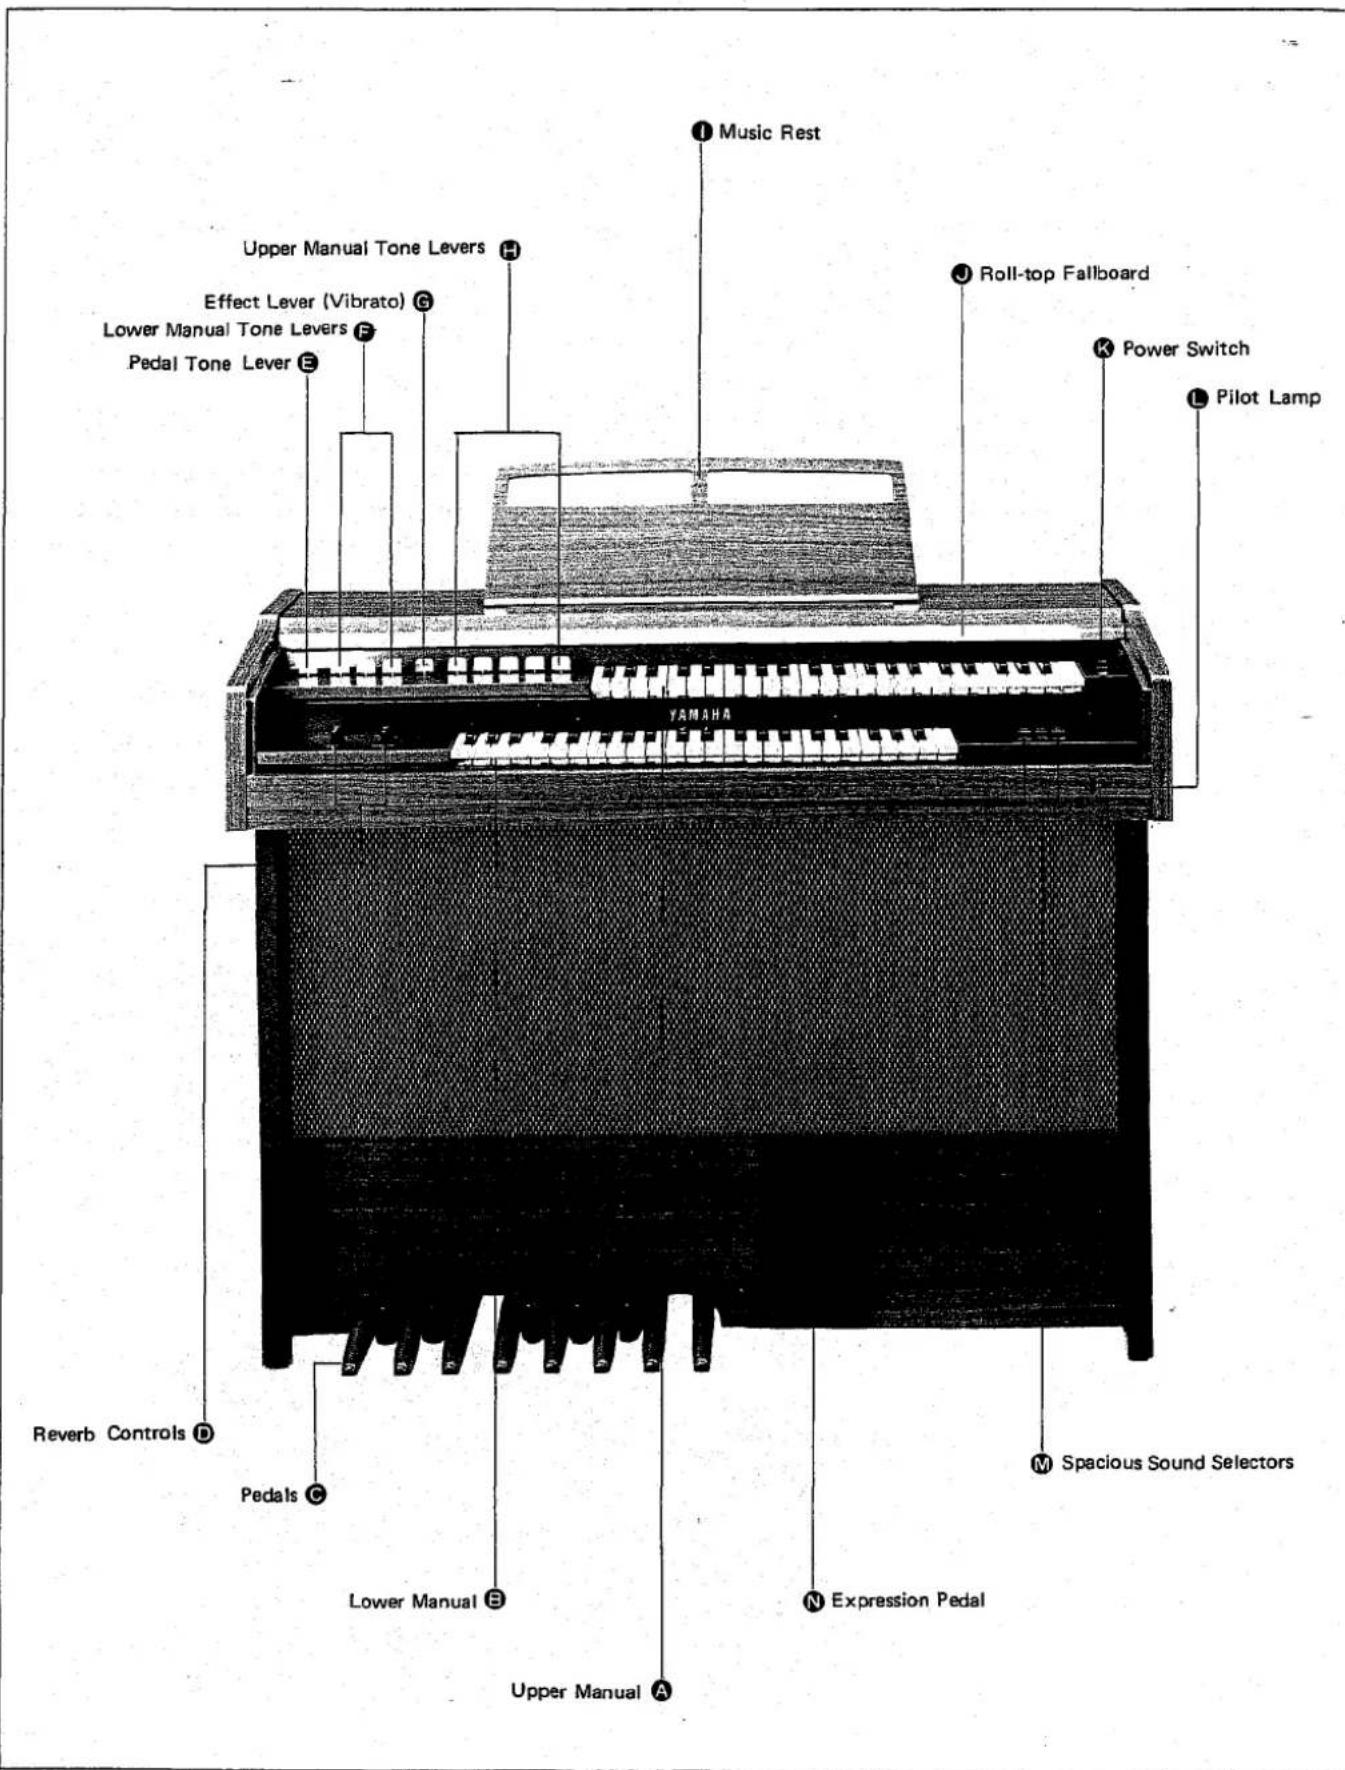
Auto Rhythm Section (B-4BR only)
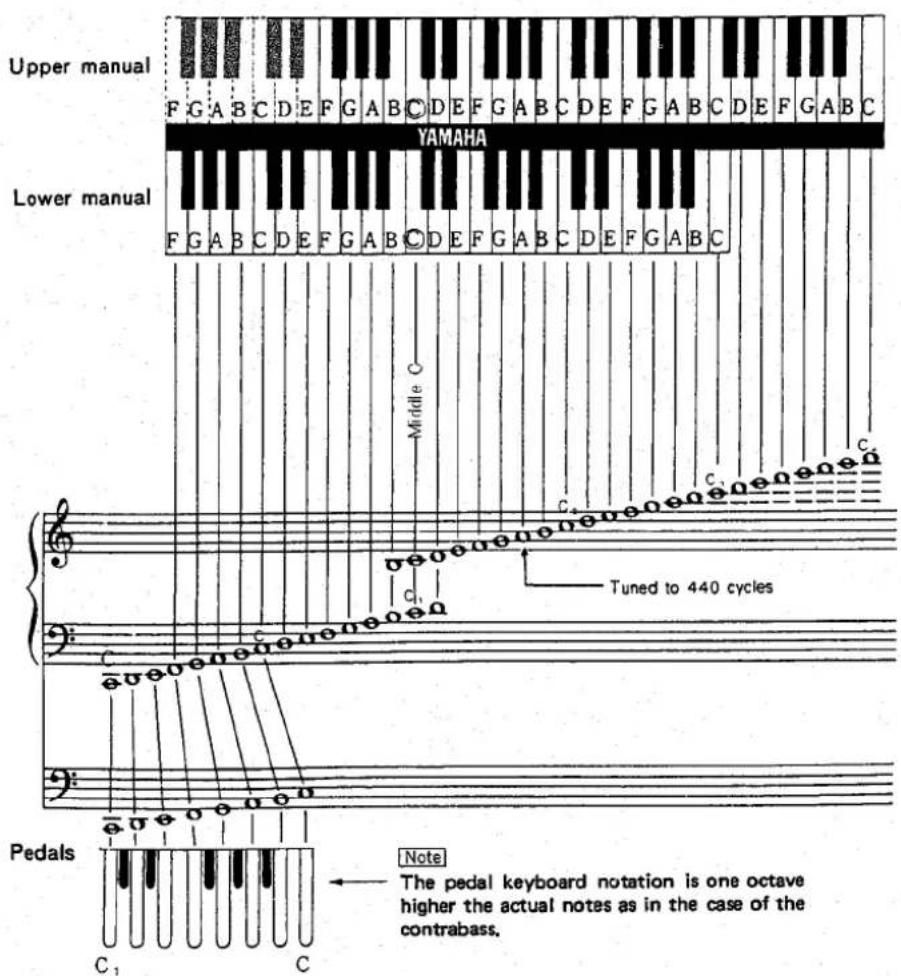
The Electone B-4B has THREE KEYBOARDS. Two of them are called "MANUALS" and the rest is called "PEDALS".
Upper Manual Ⓐ 44 Keys 3 ^2 / _3 octaves
Lower Manual Ⓑ 44 Keys 3 ^2 / _3 octaves
Pedals © 13 Keys 1 octave
So, you can play the tune on the upper manual with your right hand, the chords on the lower manual with your left hand, and the bass notes on the pedals with your left foot.
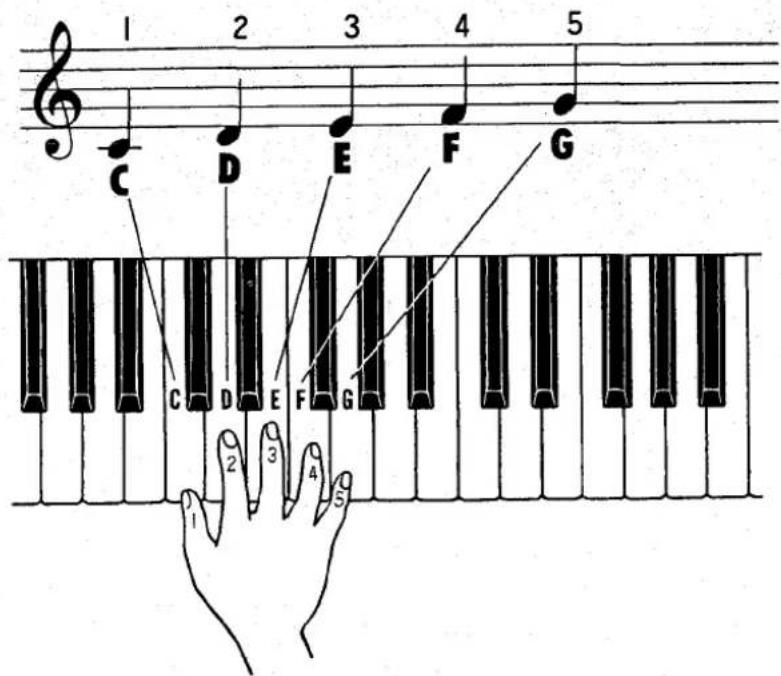
The keyboard has the same pattern of keys (two black keys and three black keys) repeated over and over. A note is a tone on the organ. Each note has a name. We use the first seven letters of the alphabet.
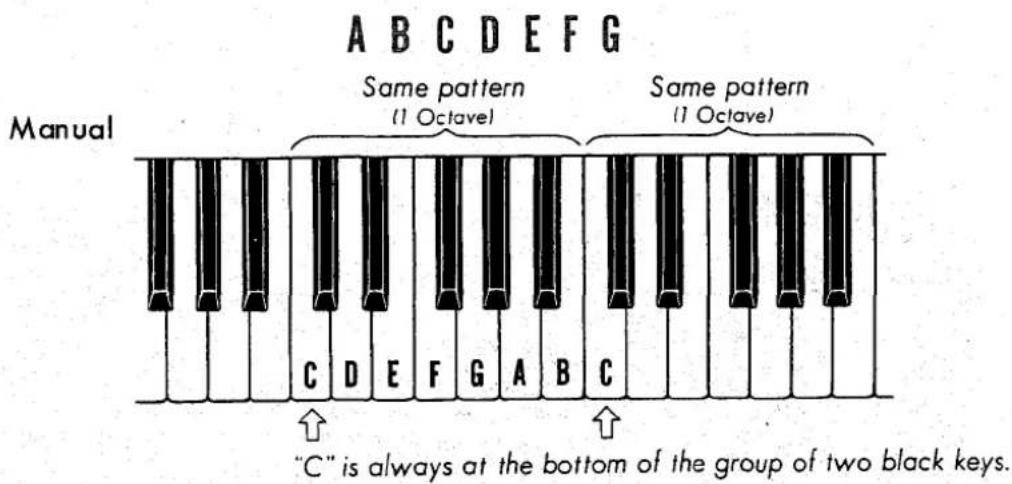
Let's see how the letter name of the notes match the letters on the keys.
Pedals
The pedal keyboard-(pedals) is an enlarged manual keyboard for the foot containing one octave of notes.
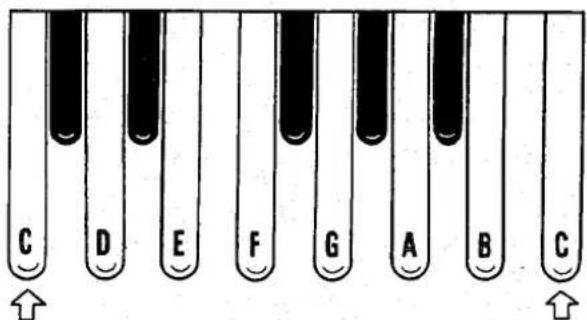
Both ends of the pedals are "C".
The Compass of the Electone B-4B Series
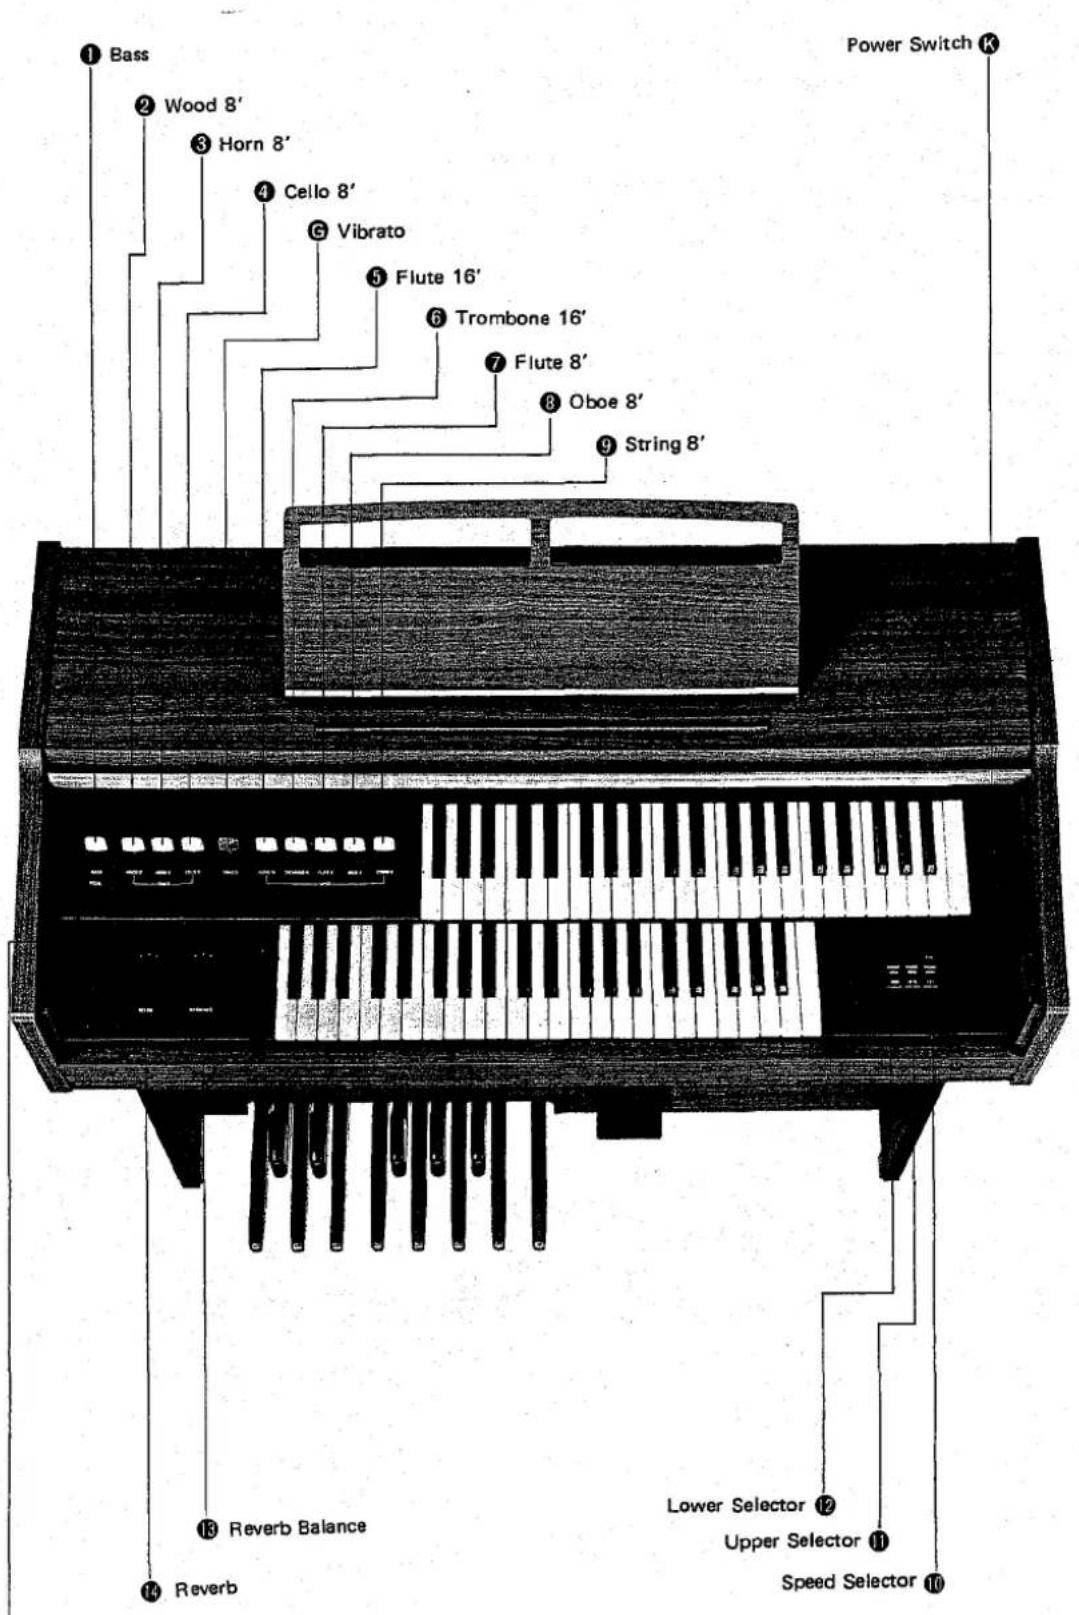
On the control panel to the left of the Upper Manual Ⓐ are arrayed the tone levers. They are divided into three groups:
(1) Upper Manual Tone Levers Ⓗ : 5 voices
(2) Lower Manual Tone Levers Ⓕ: 3 voices
(3) Pedal Tone Lever Ⓔ: 1 voice

Yamaha's exclusive Tone Lever System
Tone Levers impart the distinctive tonal qualities of each voice of the Electone. When pulled forward, singly or in combination, they determine the tone color of the Electone. Each tone lever has a variable Tone Volume Control which provides an increasingly stronger tone as the lever is pulled forward. On the way down, you will find two intermediate "click-stop" positions intended to make lever setting easy. Thus, each lever can give a total of three degrees of effect. The wonderfully expressive tone variations are virtually unlimited because of this Yamaha's exclusive variable tone lever system.
How does each Tone Lever sound?
Upper Manual Tone Levers Ⓗ
Flute 6':⑤, Trombone 16':⑥
In the Electone B-4B an even greater richness and vibrancy has been added to the 16' voices. A new harmony and beauty can also be achieved with other voices, as the result of the unstinted use of Integrated Circuitry (IC) in designing a completely new tone generator. When a 16' tone lever is pulled together with any 8' voice, a tone one octave lower will be added to the fundamental 8' tone (i.e., the note as played on the manual). This lower note will give added harmonic breadth, and provide great depth to a selection of music.
Flute 8':⑦
The eight-foot voice has the fundamental pitch of tone of the organ. This flute 8' produces the clear, pure tone of the flute. It gives a simple yet darkened feeling to the mood of the music.
Oboe 8':⑧
The plaintive, haunting sound of the oboe. It adds a melancholy color to quiet passages and when combined with the string tone, produces an extremely clear but penetrating effect.
String 8':⑨
The wealth of harmonic color which can only be achieved by such a higher stringed instrument as the violin.
Lower Manual Tone Levers Ⓗ
Wood 8':②
The tone similar to the flute sound, but has a slightly stronger harmonics to produce a brighter tone.
Horn 8':③
The rich, smooth texture of the horn.
Cello 8' : ④
The soft, mellow tone of the cello.
Pedal Tone Lever Ⓔ
Bass : ①
A low and deep tone with greater penetrating power like the contrabass of an orchestra. This tone covers the lowest reach of the B-4B's compass and supports the chords.
* Balance of the tone volume among three keyboards
For the best result of your performance you should always take into consideration the correlative tone volume balance among the three keyboards i.e., upper manual, lower manual and pedals. When you wish to emphasize the melody played on the upper manual, for example, the volume of the lower manual and pedals should be kept under that of the upper manual. On the contrary, if you want to stress the accompaniment part on the lower manual or pedals, the volume of that particular keyboard should be adjusted relatively larger than the others.
Yamaha's unique variable volume control tone lever system enables you to control this tone volume adjustment. Judge by your own ears and adjust the position of tone levers before you play to attain the best result.
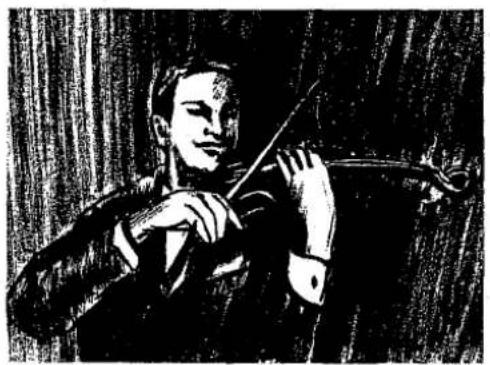
Vibrato : Ⓖ
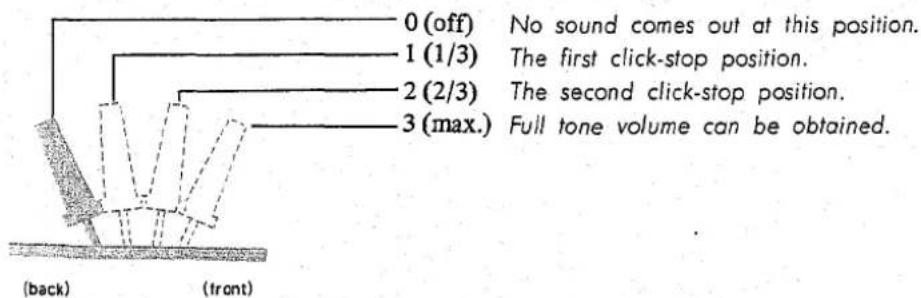
Vibrato is a scarcely noticeable waving of the tone. You will see violin and cello players use it freely by an oscillating motion of the left hand. It increases the emotional quality of the violin tone. Electone B-4B has a vibrato lever (red) which produces the same vibrato effect. Use of this lever will add a charming and lively air to the tone of the Electone. This lever has continuously variable operation like the tone levers. The intensity of the vibrato effect can be varied according to the lever position as illustrated below.
natural_image
Black-and-white illustration of a person playing violin (no text or symbols)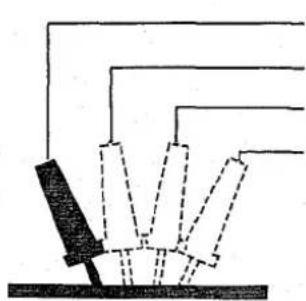
natural_image
Pure diagram of a mechanical or electrical component with no text, numbers, or symbols(back)
0 (off) No vibrato comes out at this position.
1 (1/3) The first click-stop position.
2(2/3) The second click-stop position.
3 (max.) Full vibrato can be obtained.
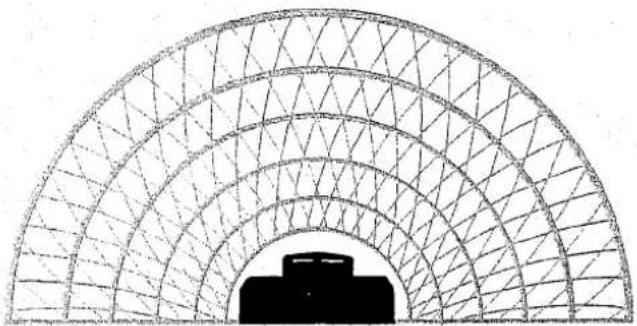
Reverb Controls : Ⓓ
natural_image
Diagram of a semi-circular arched structure with internal triangular lattice pattern and a small vehicle at the bottom (no text or symbols)REV. BALANCE
Strengthen the upper manual
REVERB
MAX. OFF
Continuously increases the strength of reverb effect
Reverb : ⑭
The reverberation effect, which makes your playing sound full and rich as if you were playing in a large hall, can be adjusted continuously and smoothly to suit your interpretation.
Reverb Balance : ⑬
To balance the Reverb effect between the Upper and Lower Manuals; when used to strengthen the Upper Manual, it brings an effect similar to Sustain on more expensive models.
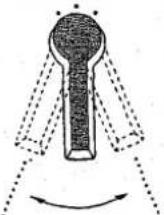
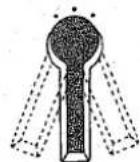
A brilliant sound source that surrounds you with lively tones, with the same feeling as a revolving speaker. That's the Yamaha exclusive Spacious Sound. A world's first, this new system is an exclusive development of the outstanding Yamaha electro-acoustic technology, incorporated in the newest of the Electone series: the B-4B.
Successfully incorporating the essential sound quality of the famous Yamaha rotary speaker tremolo effect, this new effect is achieved solely through special electronic circuitry, assuring the same full, rich musical expression and liveliness that have made the Electone famous.
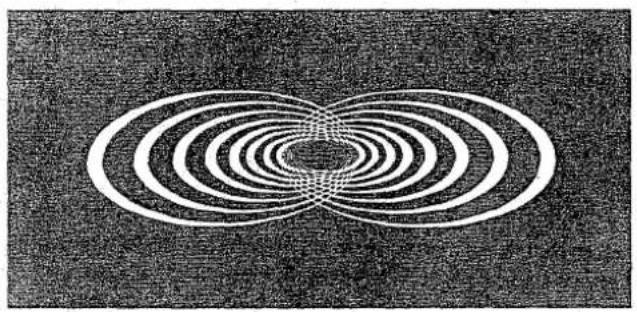
natural_image
Abstract pattern of concentric white circles on a dark textured background, resembling a stylized eye or vortex (no text or symbols)Spacious Sound Selectors
⑯
⑮
⑭
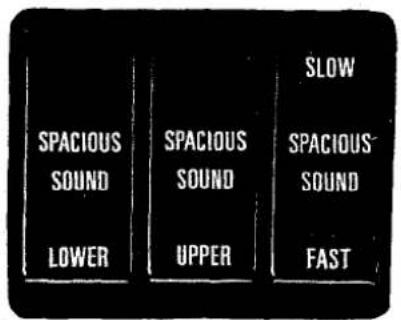
Spacious Sound is available in two speeds. Use SLOW for stately, liturgical selections, FAST for popular numbers. Works on Upper, Lower or both manuals, according to which of the three selectors you choose.
Lower Selector : ⑯ Use this selector to apply the Spacious Sound to the lower manual tones.
Upper Selector : ⑮ Use this selector to apply the Spacious Sound to the upper manual tones. The use of upper and lower selectors together will apply the Spacious Sound to the whole organ.
Speed Selector : ⑭ Combined with either or both selectors ⑮⑯, this selector determines the speed of the Spacious Sound. Set to FAST for waves of emotion (like tremolo effect), SLOW for a stately, liturgical mood (like chorus effect)
Expression Pedal : Ⓝ
Expressive shading within each phrase, and accenting of individual notes can be achieved with this pedal. See page 19 for full explanation.
Power Switch and Pilot Lamp : Ⓚ
Pilot lamp lights immediately when unit is switched on.
Roll-top Fallboard : ⏻
The unique slide-away design disappears completely when the Electone is in use, closes at other times to protect the manuals against dust and scratches.
To Fully Enjoy Your Electone ...
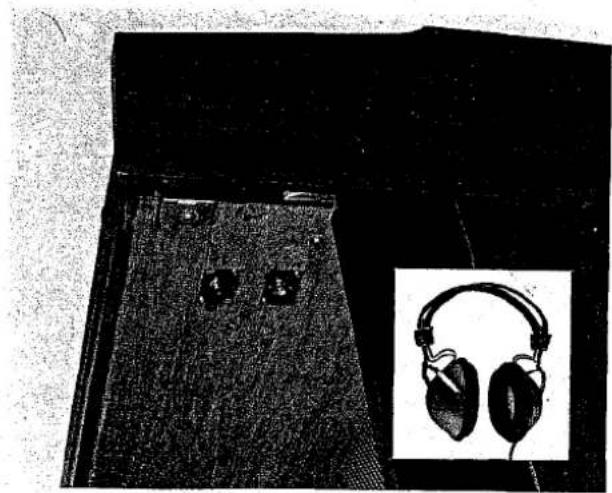
Headphone Jack
Plug a headphone set (optional accessory) into the jack under the keyboard and you can play with the volume as high as you like without disturbing anyone, even in the middle of the night.
External Input Jack
A feature not often seen even on many expensive organs. The external input jack allows you to play records or tapes over the Electone speaker as you play. It also permits you to connect Yamaha's exclusive Mini Pops auto-rhythm cabinet which, in turn, brings an even more exciting dimension to your playing enjoyment.
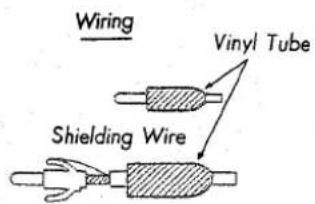
Note : CONNECTION
- Connect the Ext. In Jack and the output jack of a tape recorder or any other source with a shielding wire. Use a spare plug inserted in the Ext. In Jack.
- Volume setting for replaying tends to differ with the make or model of tape recorder you use.
- Adjust the volume of the Electone and the tape recorder in order to avoid distortion of the sound quality.
- Make absolutely sure never to touch or otherwise interfere with the circuits or the internal elements of the Electone.
natural_image
Black-and-white photo of a dark fabric or leather jacket with two earphones and a small inset image of headphones (no text or symbols visible)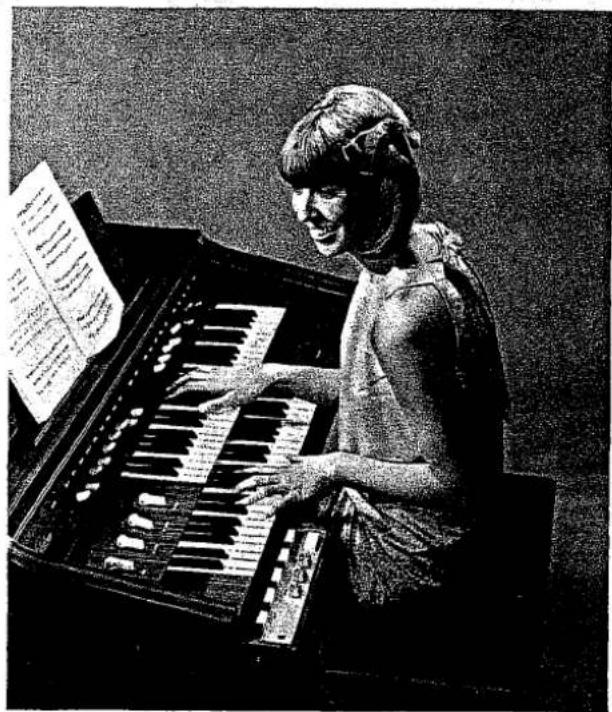
natural_image
Black-and-white photo of a woman playing an electronic keyboard, with a sheet of printed materials nearby (no visible text or symbols)In general you should treat your Electone with the same care you would give any fine musical instrument. However, the following points are suggested to assure optimum enjoyment.
- Be sure to use your Electone only on the correct voltage. If it is necessary to change the voltage of the Electone, please consult your Yamaha Electone service agent.
- If any trouble develops, contact your Yamaha Electone service agent. In any case make absolutely sure never to touch or otherwise interfere with the circuits or the internal elements of the Electone.
- When you have finished playing, be sure to turn off the power switch.
- In order to clean the plastic keys, tabs, etc., use a damp cloth. Never apply organic solvents such as alcohol as it may result in damage to the plastic materials used.
- Do not expose the Electone cabinet to the direct rays of the sun, as this may result in bleaching of the finish of separation along the joints of the wood.
- Be absolutely sure never to strike or scratch the surface of the organ cabinet with a hard stuff.
- It is also advisable to place the Electone in such a way that it is not exposed to excessive humidity or currents of heated air.
- In opening and closing the fallboard, grasp the handle with both hands and slide the fallboard gently in its groove. Never attempt to raise the fallboard directly upwards and do not place heavy objects on it.
- During a thunderstorm turn off the Electone power switch by all means. Unplug the unit if possible.
SPECIFICATIONS OF B-4B SERIES
| KEYBOARDS | EFFECT LEVER, CONTROLS & SELECTORS | SPEAKER | ||
| Upper Manual | 44 keys (3 12 octaves) | Vibrato | Yamaha JA-3055 | |
| Lower Manual | 44 keys (3 12 octaves) | Reverb, Reverb Balance (Upper/Lower) | CIRCUITRY | |
| Spacious Sound (Upper, Lower; Slow/Fast) | ||||
| Pedals | 13 keys (1 octave) | OTHER CONTROLS | Solid State (Incl. ICs) | |
| TONE LEVERS | Expression Pedal | Output Power: 15 Watts | ||
| Upper Manual | Flute | 16', 8' | Power Switch & Pilot Lamp | Power Consumption: 40 Watts |
| Trombone | 16' | AUTO RHYTHM SECTION (B-4BR only) | 100/110/117/125/220/240V AC, | |
| Oboe | 8' | Rhythm Selectors | 50/60Hz | |
| String | 8' | Swing Bossanova Waltz | DIMENSIONS (W x D x H) | |
| Lower Manual | Wood | 8' | Rhumba Slow Rock Beguine | 111(43 14 ") x 56(22") x 90cm(35 14 ") |
| Horn | 8' | Jazz Rock Cancel | WEIGHT 55kg (121 lbs.) | |
| Cello | 8' | Rhythm Controls | FINISH | |
| Pedals | Bass | Tempo, Volume | American Walnut Grain | |
| Tempo Indicator Lamp | ||||
- A note should sound the instant you turn on the switch.
This merely indicates normal operation consequent to a flow of electricity in the main amplifier.
- Only one note is produced even when two pedals are depressed simultaneously.
When the pedal sustain effect is used, notes overlap following notes. In order to achieve tonal clarity, the Electone is designed so that a note is electronically suppressed the instant the next note is struck. If two pedals are struck simultaneously, only the higher one sounds.
- Neighboring objects resonate.
Since the Electone produces a continuous stream of sound, windows, china or other such objects may be found to resonate. To prevent this, reduce the volume of the Electone or take steps to remove resonance.
- Occasional unpleasant static.
In the majority of such cases, the cause can be traced to the turning on or off of refrigerators, washing machines, electric pumps or other household appliances. Electrical fault in a neighboring outdoor neon sign may also be to blame.
When the cause is a home appliance, connect the Electone to an outlet as far as possible away from the offending appliance. This phenomenon, although perhaps annoying, poses no danger to the Electone's circuitry.
If the cause is a fault in neon or fluorescent lighting fixtures, the fault should be repaired. When the cause is unknown, or in case of doubt, contact your Yamaha dealer.
- The Electone reproduces radio or TV sound signals.
This kind of phenomenon can occur when there is a powerful radio or TV transmitter, or an amateur radio operator located in the vicinity. If this situation is distracting, contact your Yamaha dealer.
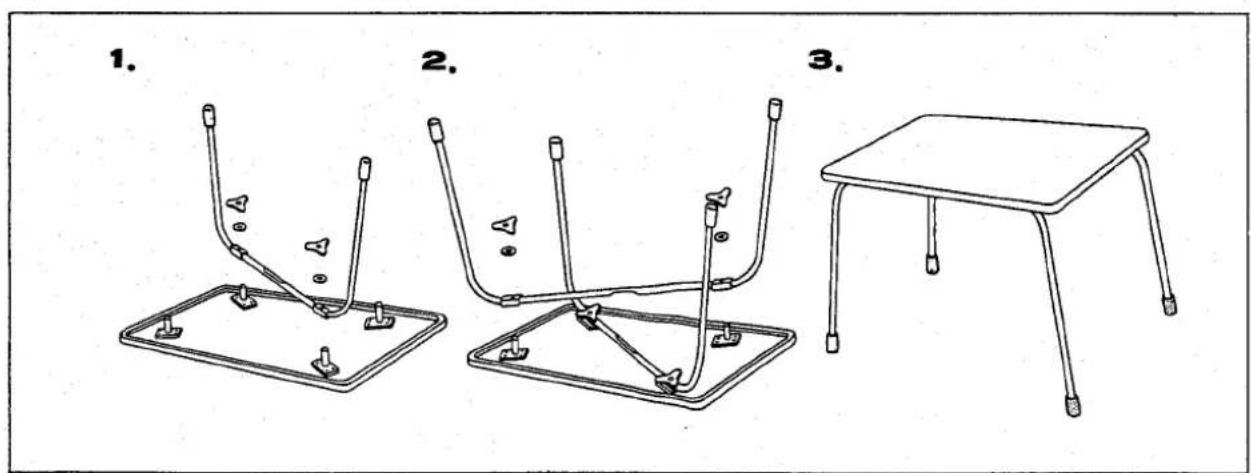
HOW TO SET UP THE BENCH
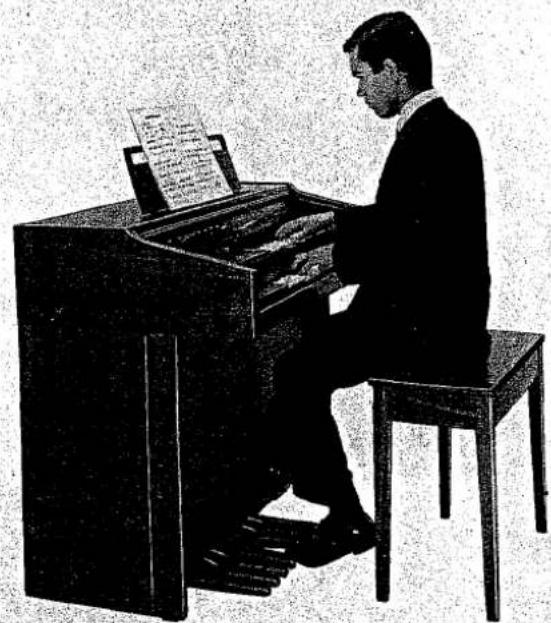
Playing the Yamaha Electone
natural_image
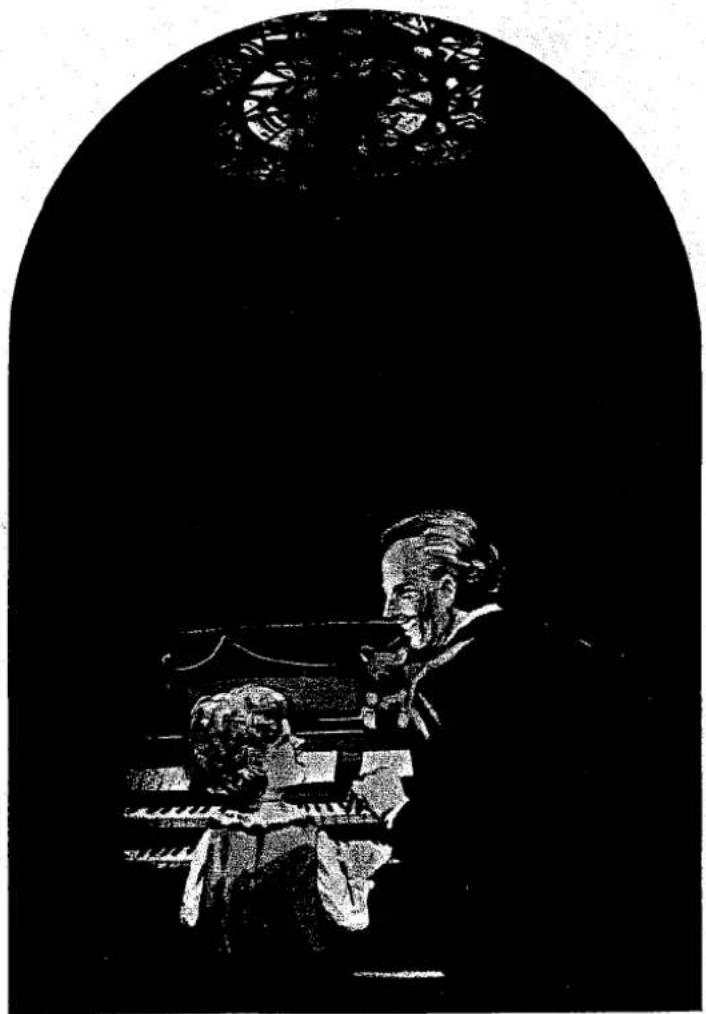
Black-and-white illustration of two figures under an arched window, one seated and one standing, with no visible text or symbols.- Sit in the middle of the seat somewhat towards the front. The weight should be shifted slightly to the right in order to allow the left leg greater freedom of movement.
- The right hand generally fingers the upper manual (melody) and the left hand fingers the lower manual (harmony) while the pedals (rhythm) are played with the left foot. Check that you can reach all the keys on the three keyboard conveniently.
natural_image
Silhouette of a person sitting at a desk with a piano (no text or symbols visible)- Relax the muscles of the left leg, and with the knee joint loose, move the foot left and right. Keeping the ankle loose, push the pedals just short of the black pedals.
- Relax the right ankle and place the full length of the foot onto the Expression pedal. Check that you can push the pedal down fully with comfort, and that you are equally comfortable at all positions of the Expression pedal.
natural_image
Silhouette of a person sitting at a piano with a sheet of paper, no visible text or symbols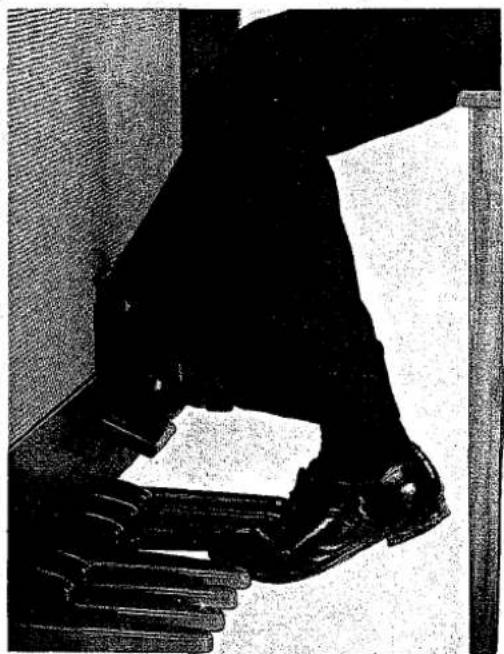
natural_image
Black-and-white photo of a person's legs and feet in a dimly lit room, no visible text or symbolsHow to Play the Manuals
Clench both fists and then relax extending the fingers naturally. This form allows the fingers to move more quickly and easily, and is therefore applicable to all keyboard instruments.
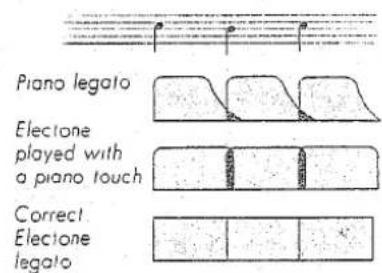
Correct use of the fingers is essential to play a beautiful Electone music. The melody part should in general be played with the organ legato touch. In order to achieve the legato playing it is necessary to poise the finger in readiness above the key to be struck next. Many rules may be applied to the correct fingering, but in any case a most economical and rationalized use of the fingers is desirable.
Legato
- It is important to practice to achieve the organ touch that will produce a smoothly continued legato without distracting overlap.
- The melody part should in general be played legato. But in order to emphasize the legato it is necessary to take "breaths" at the ends of phrases.
- Passages involving duet harmony often require difficult modification of legato fingering. In this case it will be useful to practice these parts separately.
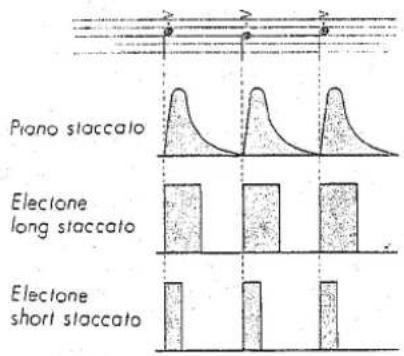
Staccato
- Since the duration of the note can be regulated very easily by the length of time the key is depressed, it is possible to obtain a wide variation in staccato treatment.
- Generally a rhythm accompaniment with the left hand should be played staccato. A shorter staccato will generally be suited to rhythmical compositions while longer one to slow pieces. You should always try to choose the precise length that fits the work best.
Note: The habit should be formed early of holding the hands correctly, and striking the keys to the bottom of their travel.
* In order to play Legato and Staccato, the following techniques are often used and should be learned.
Exercise No.1 Legato (normal fingering)

Exercise No.2 Legato (finger substitution)
While depressing a key, you keep one key activated without stopping by quickly substituting the finger on the key with another finger.

Exercise No.3 Legato (finger passing)
With one finger on a key, bring another finger over or under the first and depress the next key.

Exercise No.4 Depressing the same key successively several times
When you strike the same key repeatedly, don't remove your finger completely from the key, but practice striking it repeatedly as soon as the sound stops.

Exercise No.5 Staccato

How to play the Pedals
- Sitting always in the right and same position will enable you to play the correct pedal notes without looking at the pedals. (See 'Posture' on page 16).
- The best approach to the pedals is to allow the lower leg to swing freely from the knee.
- Pedals should be struck with the light movement of the ankle.
Be careful not to beat them with unnatural movement of your whole leg.
- Do your best to achieve pedal playing without looking at the pedals as soon as possible.
- Before commencing actual performance, it will be very effective to practise rhythm and scale on the pedals. In pedal exercises, it will be helpful to give slightly greater tone lever emphasis to the pedals.
- Flat and light shoes are desirable. It is not good to play pedals with high-heel.
How to use the Expression Pedal
The Expression Pedal controls the volume of the Electone during performance within the overall range set by the Master Volume Control. It should be depressed gently for crescendo released gradually. For diminuendo. Please be careful to use this pedal with discretion. The expression should follow the natural course of the work, and should never be intrusive.
natural_image
Black-and-white photo of a traditional piano with wooden legs and a central screen (no visible text or symbols)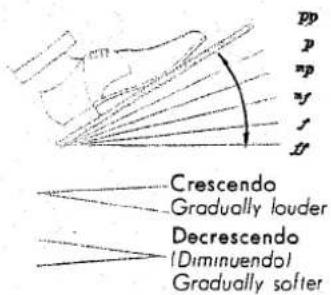
In Phrasing
- Natural phrasing usually indicates a soft entry to a passage and a subsequent softening at the end.
- Variety of phrasing is attained with gradual, not sudden, movements of the Expression pedal.
- The melody requires a 'songful' expression which can best be judged by paying close attention to the melodic line.
- It is relatively easy to achieve a gradual crescendo, but the gentle release of the Expression pedal in diminuendo requires more care.
Exercise No.6

Throughout a Composition
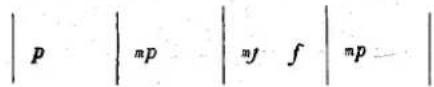
-
Each musical composition is composed of a number of phrases. A phrase marked f would be played somewhat more loudly; one marked p more softly. It is important to keep the overall balance in mind.
-
The full range of the Expression pedal should be used, but not so excessively that it becomes intrusive or unnatural.
1st phrase 2nd phrase 3rd phrase 4th phrase
Note: Unnatural sounds are the result of not using the right foot smoothly enough. Listen closely as you progress to eliminate these undesirable distractions.
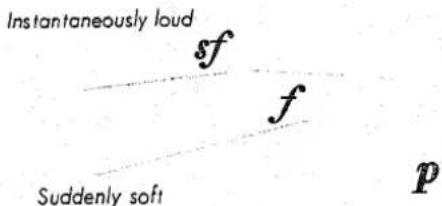
Accent
- Suddenly depressing the Expression pedal and them partially releasing it will add accent.
- If accent is used too freely, its effectiveness will be diminished.
- The pedal should be released smartly.
- In the beginning, it is better to master the nuances of phrasing before attempting accent.
Note:
- It is easy to achieve the proper crescendo when depressing the pedal, but it has a tendency to return too quickly unless this is prevented by careful use of the foot.
- Do not give in to the temptation to accent one beat in every bar.
- Crescendo passages should peak at the point where notation indicates.
- At first, it is necessary to give conscious attention to expression, but practice is not sufficient until this aspect is entirely automatic and instinctive.
- Even the same composition may require differing expressive treatment depending on the tempo at which it is played.
- Rhythmical works will be enhanced with a little accent.
- Expressive treatment can be truly effective only when the organist has truly grasped the essence of the composer's musical intention.
How to reset Levers, Controls and Selectors
When the notation calls for resetting the tone levers, effect elvers, effect controls, etc. midway through a piece, this should be accomplished with either hand as convenient, in such a way as not to interrupt the melodic line.
Changes in tone lever settings may influence the relative volume of the upper and lower manuals. This can be corrected using the Manual Balance Control.
Auto Rhythm Section (B-4BR only)
Yamaha Electone model B-4BR incorporates an auto rhythm section Ⓔ. This section provides a variety of rhythm accompaniments, from latin beats to today's popular rock rhythms, at the simple push of a selector button.
In addition, the system employs the exclusive Yamaha Synchro-start, which automatically begins the rhythm accompaniment when the first lower manual or pedal note is struck. These features assure extra versatility from a virtual built-in rhythm band.
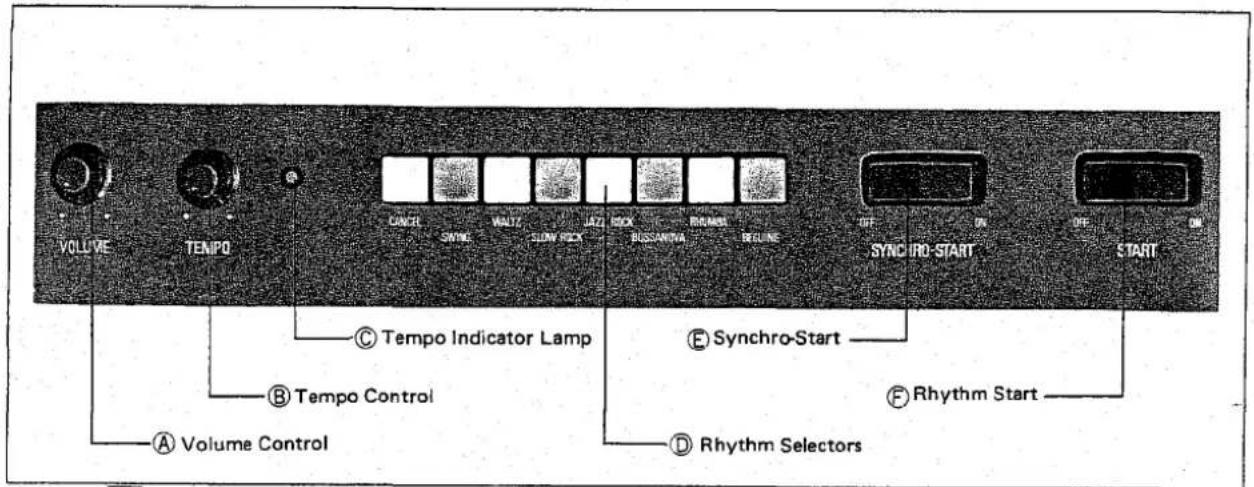
How to Use the Auto Rhythm Section
1) Push the rhythm selector ① of your choice. To change rhythms, just push another button; if no rhythm is desired, push the Cancel button.
2) Press the Rhythm Start tablet Ⓕ and the rhythm will immediately begin. Then use the Volume A and Tempo B controls to regulate. The tempo indicator lamp © flashes the first beat of every rhythm.
3) Then, when ready to play, switch on the Rhythm Start tablet Ⓔ and begin your selection after the beat is fixed in your mind. Use the tempo indicator lamp as a guide.
4) For more advanced players, use the Synchro-start tablet ⑤ instead. This permits the selection to begin first, providing a more impressive performance that can begin with a beat-free upper melody. This Yamaha exclusive is the world's first of its kind, and will assure more professional-sounding selections for any advanced player.
5) At the end of the selection, turn the Rhythm Start or Synchro-start tablet off.