Electone 215D - Tastatur YAMAHA - Kostenlose Bedienungsanleitung
Finden Sie kostenlos die Bedienungsanleitung des Geräts Electone 215D YAMAHA als PDF.

| Produkttyp | Elektronisches Keyboard / Orgel |
| Marke | Yamaha |
| Modell | Electone 215D |
| Abmessungen (B x T x H) | ca. 1200 x 450 x 150 mm |
| Gewicht | ca. 20 kg |
| Stromversorgung | Netzteil 220-240 V, 50/60 Hz |
| Leistungsaufnahme | 30 W |
| Anzahl der Tasten | 61 (5 Oktaven) |
| Polyphonie | 8-stimmig |
| Klangfarben | Orgelklänge, Streicher, Blechbläser, Holzbläser, Tasteninstrumente |
| Rhythmus-Begleitung | Integrierte Rhythmen (z. B. Pop, Rock, Walzer) |
| Bedienfeld | Drehregler für Lautstärke, Klangfarbe, Begleitung; Taster für Rhythmus und Effekte |
| Anschlüsse | Kopfhörerausgang (6,3 mm Klinke), Line-Out, Fußschalteranschluss |
| Lautsprecher | Integrierte Lautsprecher (2 x 15 W) |
| Zubehör | Bedienungsanleitung, Notenständer, Netzteil |
| Reinigung und Pflege | Mit einem weichen, trockenen Tuch abwischen; kein Wasser oder Reinigungsmittel verwenden |
| Sicherheitshinweise | Nicht in der Nähe von Wasser oder Wärmequellen verwenden; Gerät vom Netz trennen bei Gewitter oder längerer Nichtnutzung |
| Ersatzteile und Reparierbarkeit | Nur durch autorisiertes Fachpersonal; Ersatzteile beim Yamaha-Kundendienst erhältlich |
| Herstellungsjahr (ca.) | 1980er Jahre |
Häufig gestellte Fragen - Electone 215D YAMAHA
Benutzerfragen zu Electone 215D YAMAHA
0 Frage zu diesem Gerät. Beantworten Sie die, die Sie kennen, oder stellen Sie Ihre eigene.
Eine neue Frage zu diesem Gerät stellen
Laden Sie die Anleitung für Ihr Tastatur kostenlos im PDF-Format! Finden Sie Ihr Handbuch Electone 215D - YAMAHA und nehmen Sie Ihr elektronisches Gerät wieder in die Hand. Auf dieser Seite sind alle Dokumente veröffentlicht, die für die Verwendung Ihres Geräts notwendig sind. Electone 215D von der Marke YAMAHA.
BEDIENUNGSANLEITUNG Electone 215D YAMAHA
GUIDE TO YOUR
YAMAHA ELECTONE ORGAN
205D/215D
Welcome to the YAMAHA world of music.
You are now a member of the select group of proud YAMAHA ELECTONE® owners. We are confident that your selection of the 205D/215D Electone organ marks the beginning of a lifelong partnership in musical creativity.
Please read this manual carefully to familiarize yourself with all of the unique features of this instrument and thus realize the Electone organ's full potential.
This manual has been carefully prepared in order that you may become acquainted with the various functions and effects found in your New YAMAHA ELECTONE. Many of these functions are totally new and many interact with each other. Improper operation or lack of knowledge relating to how a function works when the unit is functioning as designed is not covered by the manufacturer's warranty. Please study the manual carefully before you request that a service technician check the unit.
Contents
Caution (To be Read before You Playing) .... 1
Your YAMAHA 205D Electona 2
Your YAMAHA 215D Electona 3
Keyboards and Pedals 4
Tone Levers 5
Upper Special Presets (216D only) 6
Upper Presets (205D only), Vibrato, Upper 16' 8' 4' Sustain,
Pedal Sustain 7
Reverb (215D only), Manual Balance, Expression Pedal,
Master Volume, Tremolo/Symphonic Chorus ..... 8
Auto Rhythm
Auto Arpeggio 10
Auto Bass/Chord Fun Blocks 12
To Obtain Maximum Enjoyment From Your 205D
and 215D 18
Important Advice (Electone is not out of order if . . .) . . . . 16
Specifications 17
Caution (To be Read before You Start Playing)
Always treat your Electone Organ with the same care you would any fine musical instrument. The following points are suggested to ensure the best performance of the Electone Organ.
1 Check for correct power voltage. Consult your Yamaha serviceman regarding any changes.
natural_image
Simple line drawing of a hand holding a small object connected to a box with smoke rising (no text or symbols)2 Your Electone contains no user serviceable components. Refer all service to qualified service technicians only.
natural_image
Cartoon illustration of a smiling face emerging from a computer screen (no text or symbols)3 Always turn the power switch OFF after playing.
4 Clean the Electone Organ cabinet with a damp cloth containing a neutral cleaning agent. Use only soft and dry cloth on the keyboards. Never use paint thinner, alcohol or other chemicals on either the keys or the cabinet.
natural_image
Cartoon illustration of a person falling from a bottle while watching or reacting (no text or symbols)5 Keep the Electone Organ in a position away from direct sunlight, excess humidity and heat to protect the cabinet finish.
natural_image
Simple line drawing of a house with smoke and steam rising (no text or symbols)6 Do not hit or scratch the cabinet with a hard object.

natural_image
Cartoon drawing of a person sitting at a desk with arms outstretched and eyes closed, no text or symbols present7 The finish on your Electone Organ may undergo a chemical reaction if placed in direct contact with polyvinyl products. Do no set vinyl items on the surface or use polyvinyl material to cover the organ for any extended period of time.
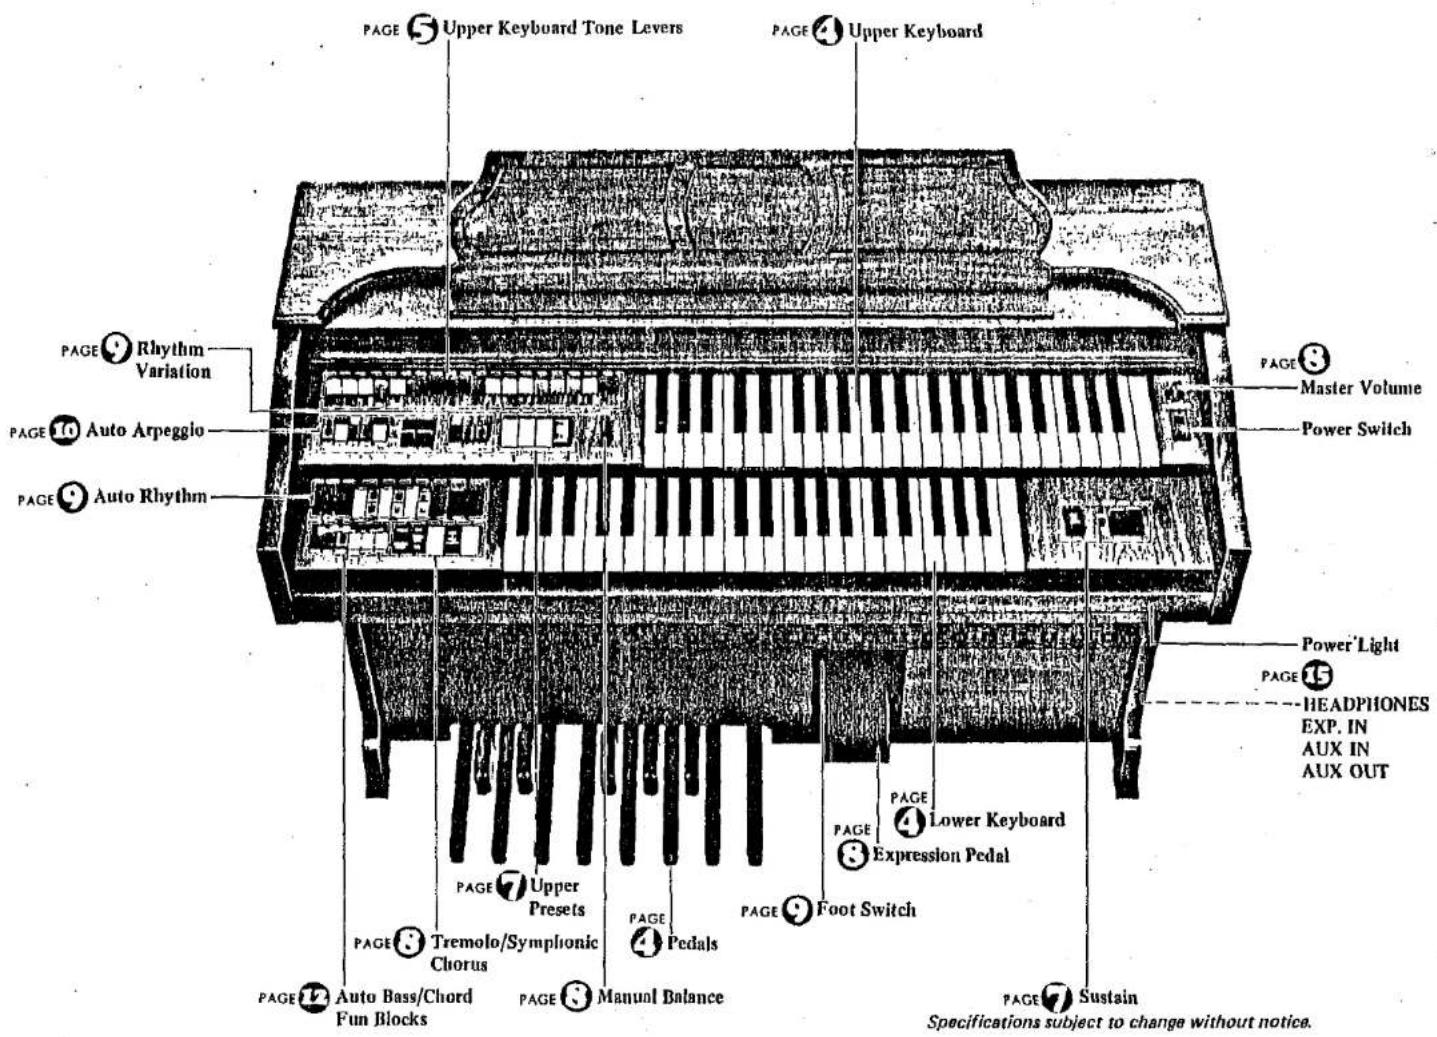
Your YAMAHA 205D Electone
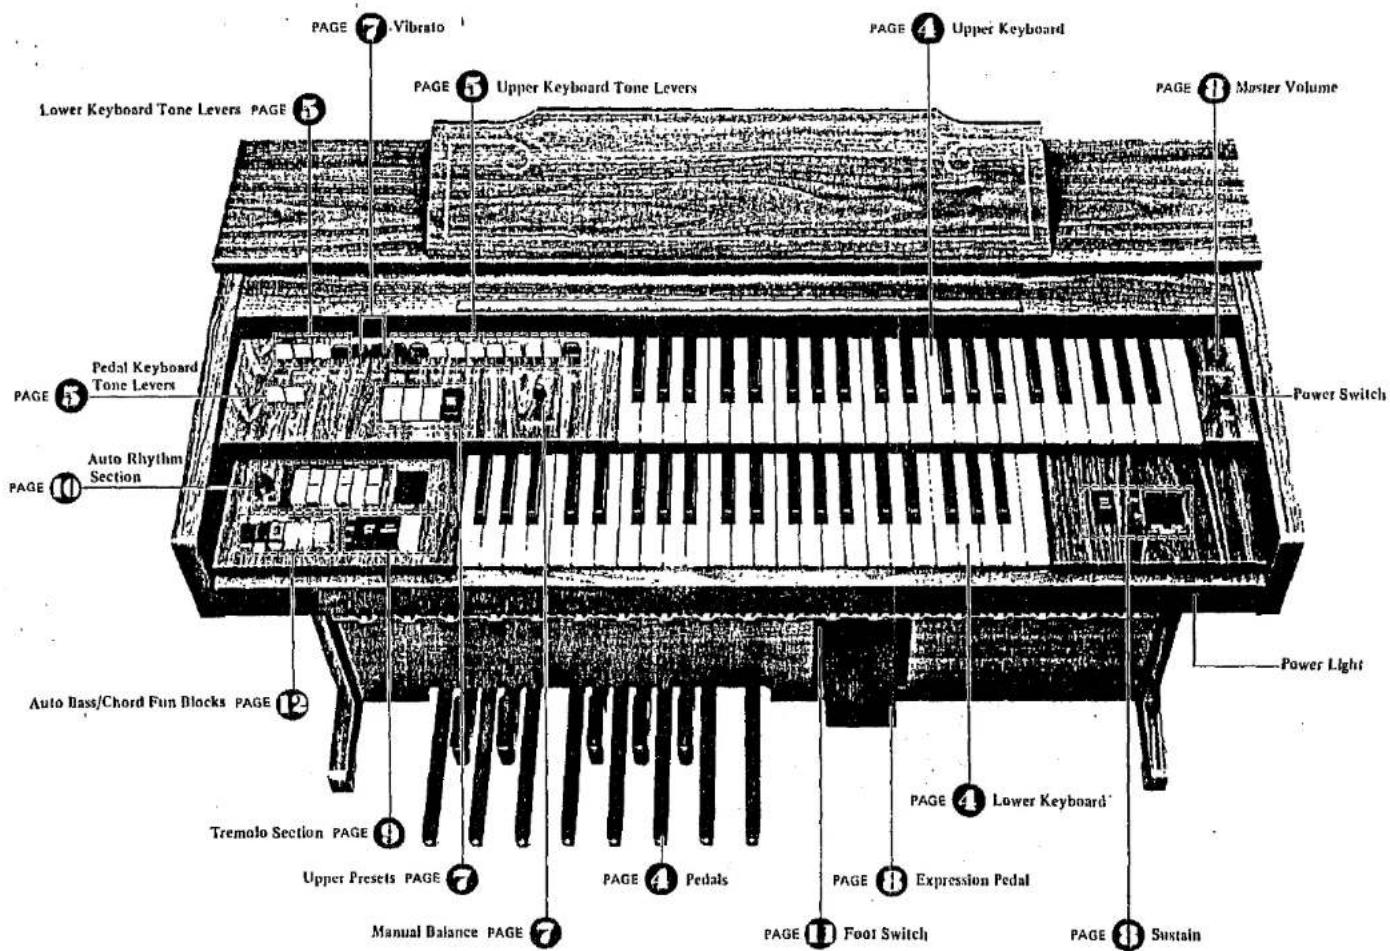
Your YAMAHA 215D Electone

Your YAMAHA 205U Electone
Specifications subject to change without notice. Cabinet shown not available in U.S.
Keyboards and Pedals
These Electones have two sets of keys, the upper keyboard and lower keyboard and a set of pedals.
The keys and octaves are as follows:
Upper Keyboard 44 keys (3-2/3 octaves)
Lower Keyboard 44 keys (3-2/3 octaves)
Pedals 13 keys (1 octave)
The upper keyboard is for the melody played with the right hand, the lower keyboard is for chords with the left hand and the pedals are for producing bass notes with the left foot.
Note: A maximum of seven sounds may be produced on both the upper and lower keyboards at one time, but only one sound may be produced at a time with the bass pedals. Precedence is given to the higher note if two or more pedals are pressed simultaneously. This assures tonal clarity.
Tone Levers
There are tone levers to control various sounds of the keyboards and pedals. They are divided into three groups, the upper keyboard, the lower keyboard and pedals, so that different tones can be set for each.
| 205D | Upper Tone Levers | 9 | 215D | Upper Tone Levers | 10 |
| Lower Tone Levers | 4 | Lower Tone Levers | 5 | ||
| Pedal Tone Levers | 2 | Pedal Tone Levers | 3 |
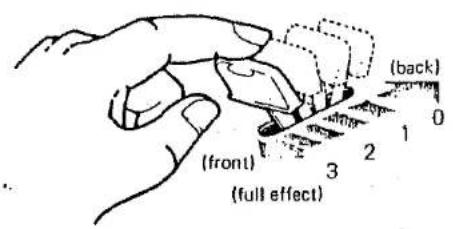
Each lever can be controlled by two methods.
One is by continuously moving the lever from "off" to "full" to obtain the exact setting for that tone, thus balancing the overall tone setting with perfect precision. The other method is to use the two easy-to-feel click stops, at the 1/3 and 2/3 positions of each lever. This enables you to obtain exactly the right tonal balance, mathematically speaking, without the need for calculation.
ATTACK 4': This lever gives sharper definition to the beginning of notes played on the upper keyboard. The Length lever regulates the length of decay for this effect.
The effect is not obtained with a new key if you are still pressing the one before. Think in terms of one key for one sound at a time.
WAH-BRASS: This blends a Wah Wah sound with the Trombone 16' tone.
DIAPASON B' (215D only): A rich, resonant traditional organ sound is produced this effect.
RHYTHMIC WAH: The Rhythmic Wah can be teamed with the Auto Rhythm (to be explained later) so as to produce an even more interesting effect.
Note: This effect cannot be obtained with Waltz.
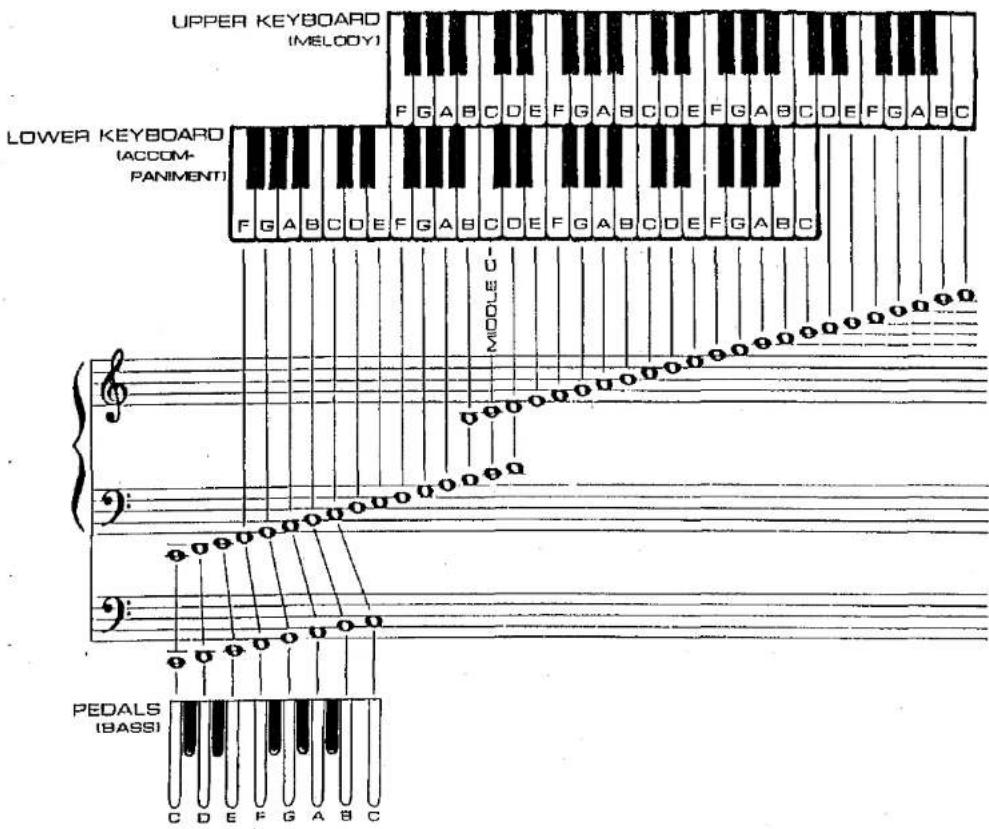
PITCHES OR FOOTAGE
Several different pitch levels are generated by the tone levers. These are designated with the numbers 16', 8' and 4' for example. These are standard organ abbreviations showing the tone's pitch in relation to the fundamental (written) note. An B' tone will sound just as it has been written. A 16' tone will provide a tone exactly one octave lower than the written note. Similarly, 4' tones are one octave higher than the written note. By combining these tone values, you can obtain the effect of several keyboards by simply pressing the notes on one keyboard (i.e., the coupler effect). The result is a full, deep organ sound.
Note: Refer to the previous page for the relationship between 8' tones and the notes.
Upper Special Presets (215Donly)
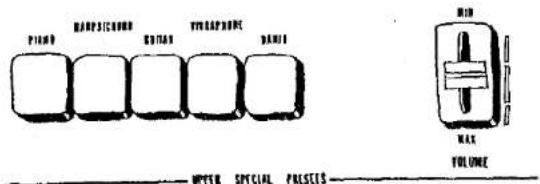
On the panel above the upper keyboard you will find five Special Presets Tone selectors. With the Special Presets tablet on, you can flick on a selector switch for the following tonal blends: Piano, Harpsichord, Guitar, Vibraphone, Banjo.
If two buttons are pressed at the same time, only the one on the right takes effect. If the Special Presets tablet on the left panel of the upper keyboard is put on, the upper tone lever settings are canceled; but if the tablet is switched off, the tone lever settings immediately take effect once more, allowing you to switch back and forth smoothly and easily.
UPPER SPECIAL PRESETS VOLUME
You can adjust the volume of the Upper Special Presets Tones independently.
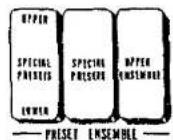
UPPER ENSEMBLE
If the Special Presets tablet is left on and you put on the Upper Ensemble tablet, you can enjoy a blend of the preset tones and upper tones in a striking ensemble effect.
Note: This effect is canceled when you use the Upper Special Presets Lower tablet for the feature hereinafter explained.
UPPER SPECIAL PRESETS LOWER
If the Special Presets tablet is left on and you put on the Upper Special Presets Lower tablet (Lower), you can obtain the Special Presets tones on the lower keyboard one octave higher. And the ensemble effect can be used on either keyboard at the same time, since the tone lever settings can be cut back in. The ensemble effect can also be enjoyed by combining the lower keyboard Special Presets tones with its tone lever settings.
Note: The Upper Special Presets Lower effect is canceled whenever you use the Auto Bass/Chord.
Upper Presets (205D only)

On the left panel of the upper keyboard are four Upper Presets Tone Selectors. The on-off switches offer Piano, Harpsichord, Guitar, and Vibraphone tones.
If two buttons are pressed at the same time, only the righthand one will take effect. By pressing any one of these buttons, all the Upper Tone Lever settings will be cancelled; if the button is put "off", you can immediately restore the tone lever settlings for quick and easy switching from one to another.
Vibrato
Vibrato is a waving of the tone. Violinists and cello players produce this effect frequently by an oscillating motion of the left hand. It enhances the emotional and tonal "feeling" of the instrument.
DEPTH
Vibrato effect can be produced by moving the lever towards you. It provides continuous adjustment of the vibrato depth,
DELAY VIBRATO (Upper Keyboard only)
With Depth lever ON, this lever regulates the length of time between the very beginning of the note sound and the moment when the actual vibrato cuts in. The more you pull the lever toward you, the longer it takes for the vibrato to cut in.
Upper 16'8'4' Sustain
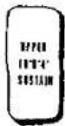
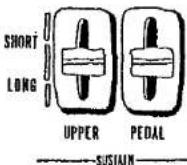
When the Upper 16', 8', 4' Sustain tab is put on, a natural-fadeout of the 16', 8' and 4' tones is heard after a key is released on the upper keyboard. Even when the Upper Sustain control lever is on SHORT, there is some sustain effect. Setting the control lever to LONG produces a longer sustain effect, of course.
Note: Among the Upper Presets Tones (205D) and the Upper Special Presets Tones (215D), the Vibraphone Sustain effect can be achieved irrespective of whether the tablet is switched on or off. The sustain effect is not possible with the Banjo (215D). With the other tones, however, the Sustain effect can be obtained only when the respective tablet is switched on. The length of the sustain effect may not be regulated by the lever in any of these cases.
Pedal Sustain
Pulling this lever toward you produces a sustain effect in the note played on the bass pedals. The time during which the sustain effect works can be continuously adjusted.
Reverb (215D only)
The reverberation effect, which makes the unit sound as if you were playing in a concert hall, can be adjusted continuously to suit your taste.
Manual Balance
This control governs the relative strength of the upper and lower keyboards. It is normally left in the center position, but can be shifted to stress the melody or accompaniment in a selection or passage.
Expression Pedal
This affects the emotional mood of every passage by letting you vary the volume continuously with your right foot. It works within the range set by the master volume control.
Master Volume
The master volume control adjusts the overall volume of the whole function of the Electone voices, rhythm section voice and Auto Bass Chord voices.
Tremolo/Symphonic Chorus
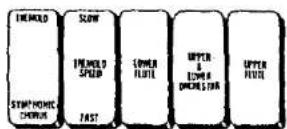
Your Electone Organ can electronically produce both a Tremolo effect (vibrations in the volume of the sound) and a Symphonic Chorus effect (an increase in the breadth and richness of the sound texture). Use these effects to add a new dimension of enjoyment to your playing.
SELECTING TREMOLO AND SYMPHONIC CHORUS EFFECTS
Selection is made by the tablet on the extreme left marked TREMOLO/SYMPHONIC CHORUS.
UPPER FLUTE/LOWER FLUTE
Use these tablets to give the Electronic Tremolo or Symphonic Chorus to the Flute tone on the upper or the lower keyboard.
UPPER & LOWER ORCHESTRA
Use this tablet to produce the Electronic Tremolo or Symphonic Chorus effect with the Orchestra tone on the upper & lower keyboards.
SLOW/FAST
Combined with the above tablets, this tablet determines the speed of the Tremolo. It is usually on SLOW (Chorus effect), but the tab can be switched to FAST for the Tremolo effect.
• Speed selection is inoperative for the Symphonic effect.
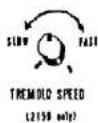
TREMOLO SPEED
With Tremolo tab ON and Tremolo Speed tab ON, subtle speed variations are possible with the continuously variable Tremolo Speed control knob.
Auto Rhythm
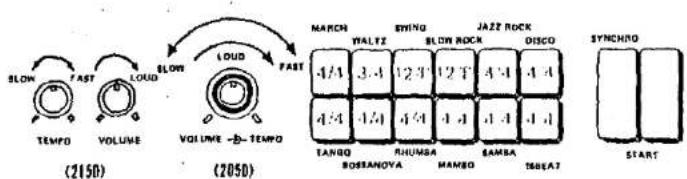
(Figures written on the buttons show the rhythm time.)
©
(Tampa Light)

This section provides a selection of 12 rhythms, which can be produced at the press of a button. By combining more than two of the buttons on the two rows, you can create more complex rhythms. However, the rhythms in the upper row have counterparts with those directly beneath in the lower row. Thus, a rhythm in the upper row is cancelled if you combine it with the one just below in the lower row. In addition to the combined Tempo/Volume control knob, there are two other switches: ordinary START and the Yamaha SYNCHRO-START which begins the rhythm accompaniment on the first beat of a bar, when the first lower keyboard or pedal key is depressed. The special expression pedal foot switch is to cut and restart the rhythm at any point during your play.
RHYTHM-START
For rhythm independent of keyboard play, push the rhythm selection button desired, then flick the START switch on.
The Auto Rhythm can be switched off with the foot switch. To restart the Auto Rhythm, switch on with the foot switch.
SYNCHRO-START
Select the rhythm switch on the SYNCHRO-START and begin to play once you have established the beat. The rhythm will begin as soon as you strike a lower keyboard or pedal note. This switch permits you to lead in with a rhythm-free melody on the upper keyboard if so desired.
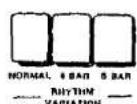
RHYTHM VARIATION
These are used to add variation to the rhythm patterns selected by the rhythm selectors. The selector switch selection of the rhythm variation has NORMAL, 4-BAR and 8-BAR variation buttons.
When the 4-BAR button is depressed, the rhythm pattern is automatically added every 4 bars. The same effect is produced every 8 bars when the 8-BAR button is depressed.
When the NORMAL button is depressed, the selected rhythm returns to the normal Auto Rhythm without switching to the rhythm variation pattern.
RHYTHM FOOT SWITCH
The foot switch equipped on the expression pedal enables you to stop and restart the rhythm instantly at any point in your playing, without using your hands. When the rhythm is on, push this switch once to instantly stop it and once more to restart it.
TEMPO
The rhythm tempo can be adjusted with the Tempo knob, while you are playing or before you start by setting the rhythm volume and flicking the Start switch on. For better effect, select your rhythm first, then switch on the SYNCHRO-START. No sounds will be produced, but the Tempo Light will flash each quarter note to provide a visual check of the tempo adjustment.
VOLUME
Use this to balance the volume of the rhythm section and the keyboards. The volume is then varied during playing by the expression pedal, just like that of the other tones.
Auto Arpeggio
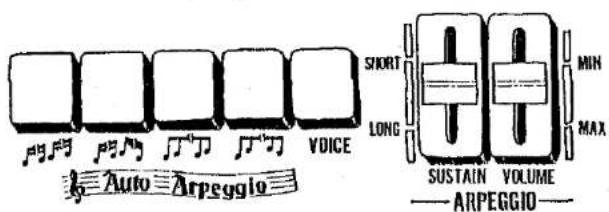
| UP(16th notes)Changes withevery note | TURN(16th notes)Changes withevery note | VARIATION 1Changes withevery note | VARIATION 2Changes withevery note |
This function involves detecting the notes of the keys depressed on the lower keyboard and sounding the notes automatically in succession from the lowest to the highest in accordance with the auto rhythm.
There are 4 different types of auto arpeggio note-sounding patterns. (Refer to table on this page.)
HOW TO USE THE AUTO ARPEGGIO FUNCTION
(1) Select any one of the four arpeggio buttons.
(2) Push the Voice switch ON.
(3) To add a sustaining effect to the arpeggio sound, adjust the SUSTAIN control.
Set the Volume knob to a proper position.
(4) Start the rhythm and depress the keys on the lower keyboard. The auto arpeggio function is now actuated.
■ If the SYNCHRO start switch is used, the rhythm and the auto arpeggio can be made to start simultaneously.
■ The foot switch can be used to start and stop the effect just as for the rhythm.
PATTERN SELECT SWITCH
These switches enable you to play any of 4 different arpeggio patterns.
From left to right: Up Mode (sixteenth), Turn Mode (sixteenth), and Variation 1 and 2, in combination with The Auto Rhythm. If all of the Pattern Select switches are up, the Turn Mode sixteenth arpeggio plays automatically. Variation 1 and 2 are used after mixing.
■ Variation 1 switch allows to select 2' tone and others to select 4' tone.
VOLUME
This control regulates only the volume of the Auto Arpeggio. No arpeggio sound is heard when it is at the lowest setting.
SUSTAIN
By adjusting the Arpeggio Sustain lever, a sustain effect can be produced in the arpeggio. The sustain effect can be adjusted at any time.
How to combine the Auto Arpeggio and Auto Bass/Chord functions.
The Auto Arpeggio and Auto Bass/Chord functions can be used simultaneously.
1) SINGLE FINGER CHORD mode As soon as a single note is sounded with a lower keyboard key, the chord is detected, and in line with this detected chord, the arpeggio effect is sounded automatically in succession. If a pedal keyboard key is not depressed, the arpeggio effect is sounded as a major chord. The relationship between the pedals and the arpeggio effect is outlined below.
• No pedal key is depressed: Major chord
● White pedal key is depressed: Seventh chord
- Black pedal key is depressed: Minor chord
- White and black pedal keys are depressed simultaneously: Minor seventh chord
2) FINGERED CHORD mode
As soon as the chords are struck on the lower keyboard, the arpeggio effect is sounded automatically in succession with the chords on the keys.
3) CUSTOM A.B.C. mode Operation is the same as that for the fingered chord mode but the sound of the pedal keyboard must be played manually.
■ The Auto-Arpeggio Changes with the Rhythm Patterns are been provided that enable the auto arpeggio to adopt 3/4, 12/8 and 4/4 time rhythms. If more than one rhythm has been selected, the 12/8 pattern takes precedence, followed by 3/4 and 4/4 time in that order.
Auto Bass/Chord Fun Blocks
These Electones are equipped with a "Fun Block" section of six buttons which can be used in conjunction with the Auto Rhythm section (see p. 9). It enables you to play a variety of alternating bass notes and chords, depending upon which fun block button you press. The fun block feature will let you sound like a pro, making full rhythmic use of the lower keyboard and pedals. Here is how it works.
Note: When the Auto Bass/Chord section is used, the tone color of the lower keyboard's voices will change from Diapason B' to Piano 1 (215D), from Horn B' to Piano (205D) (Piano 2 (215D)) and from Cello B' to Guitar. The Flute tones are maintained as a chord or single sound irrespective of the rhythm pattern.
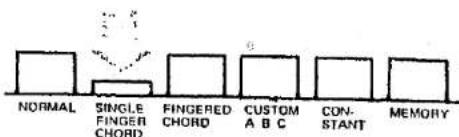
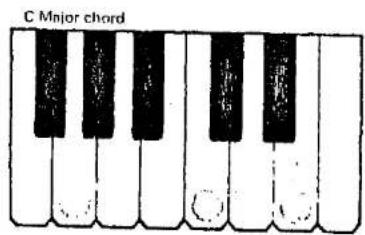
SINGLE FINGER CHORD (THE EASY PLAY WAY)
- Set the tone levers for the tone you want on the lower keyboard and pedals. Use one or more levers to adjust the Auto Bass Chord tone color and volume as in the normal way.
- Push the button for whatever rhythm you wish.
- Set the Rhythm Start switch on.
- Adjust the rhythm tempo and volume.
- Push the Single Finger Chord button.
Now, if you press a C key on the lower keyboard, a C major chord and bass note will play in an alternating pattern which matches the rhythm pattern and tempo set.
As long as the key is held down, the bass chord rhythm continues. When the Black-key pedal is pressed, the chord changes from major to minor, and when released, the chord returns to major. When the White-key pedal is pressed, the chord changes from major to seventh, and when released, the chord returns to major. When both Black and White-key pedals are pressed, a minor seventh results.
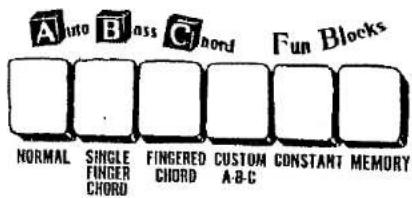
FINGERED CHORD
- Select the rhythm and set both its tempo and volume as explained earlier.
- Depress the Fingered Chord button.
- Play a desired chord (major, minor, seventh, minor-seventh) on the lower keyboard.
Now as long as you hold that chord it will play according to the rhythm and tempo you have set. The pedal note sound automatically for the chord you play on the lower keyboard.
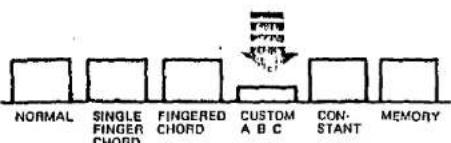
CUSTOM A.B.C.
- Push a desired rhythm button and set both tempo and volume as explained earlier.
- Push the Custom A.B.C. button. The pedal note are independent of the chord notes on the lower keyboard. They will both be played automatically in terms of the Auto Rhythm selected.
Note: Bass sound depends on the pedal key, while chord depends on the Lower key.
CONSTANT
- Push the Constant button and either the Single Finger Chord or the Fingered Chord button.
- Press the desired key or chord on the Lower Keyboard. As long as the keys are held down, the chord, as well as a pedal note will sound as if they were held down during normal play without any rhythm pattern. As soon as the key or keys are released the chord stops.
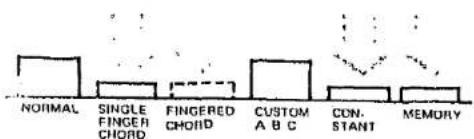
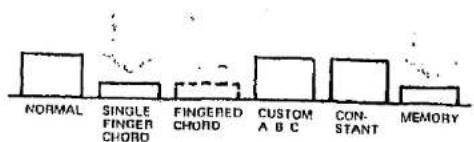
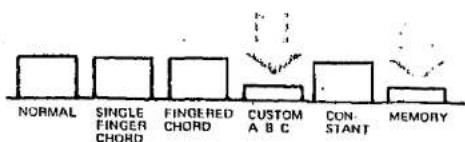
MEMORY
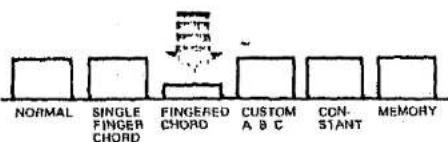
This feature permits chords and or pedal note to continue to play after the pedal or chord has been released. The Memory Fun Block will function with the Normal, Single Finger, Fingered, Custom A.B.C. and Constant Fun Blocks, as illustrated.
Normal/Memory
The chord notes can be played continuously on the lower keyboard as long as the Auto Rhythm is on.
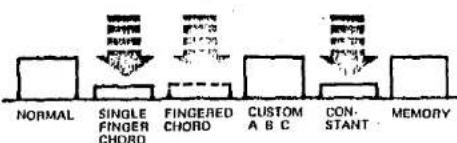
Constant/Single Finger (Fingered)/Memory
Bass and Chord will play continuously with or without Auto Rhythm.
Single Finger (Fingered)/Memory
Bass and Chord will alternate continuously, according to your preselected Rhythm pattern, until another Single Finger (or Fingered Chord) is selected.
Custom A.B.C./Memory
This feature permits to continue to alternate chords or pedal note after you have released the pedal or chord, until another pedal key or chord is selected. This enables you to expand the capabilities of the Fun Block system to your level of musical ability.
Note: Custom A.B.C./Constant/Memory or Fingered Chord/Constant/Memory ... Bass and, or chord will play continuously with or without Auto Rhythm, until another pedal key or chord is selected.
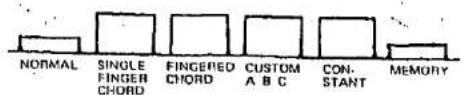
NORMAL
This button cancels the other Fun Blocks, returning the lower keyboard and the pedals to normal playing functions.
To Obtain Maximum Enjoyment From Your 205D and 215D
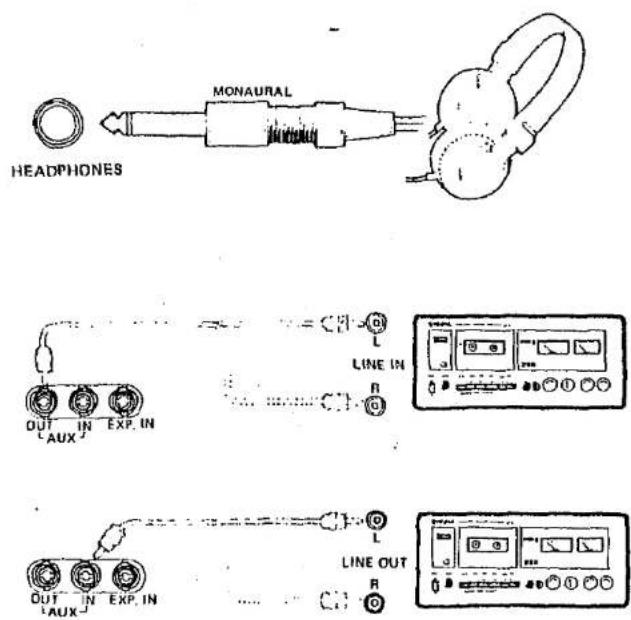
HEADPHONES (390Ω)
Yamaha headphones (optional) can be plugged into the HEADPHONES under the keyboard. With the headphones connected, the speakers are automatically shut off, allowing you to play or practice at any volume level without disturbing anyone.
EXP.IN (32kΩ)
This jack will accept out side sound source (Guitar, Synthesizer, etc.) and reproduces it through the Electone speakers.
Note: The output level of the sound source can be controlled by the expression panel.
AUX OUT (470Ω)
For recording, connect the AUX OUT jack with the tape deck's LINE IN Jack Control the recording levels on the tape deck.
AUX IN (23kΩ)
For playback, connect the AUX IN Jack with the tape deck's LINE OUT Jack. Control the playback levels on the tape deck:
Note: These sound sources (tepe recorder etc.) are not affected by the expression pedal.
* These jacks were designed to accommodate the most commonly used impedance. Dramatic deviation from these specification will result in inadequate drive, distortion, noise and poor performance in general.
* Simultaneous connection of AUX-OUT and AUX-IN terminals with a tape recorder causes an oscillation. Therefore, connect only one at a time.
Important Advice (Electone is not out of order if...)
1 the unit does not go on when the power switch is turned on.
Check the following. Is the AC plug fully inserted into the wall power outlet? Reinsert it to make sure. Is there power coming from that outlet?
If the outlet is live but the Electone does not work, unplug the cord and contact your Yamaha dealer.
2 occasional unpleasant static occurs. In the majority of such cases, the cause can be traced to the turning on or off of refrigerators, washing machines, electric pumps or other household appliances. Electrical faults in a neighboring outdoor neon sign may also be a cause.
If the cause is a fault in a neon or fluorescent lighting fixture, it should be repaired. When the cause cannot be determined, or in case of doubt, contact your Yamaha dealer.
3 the Electone reproduces radio or TV signals. If there is a powerful transmitter such as a radio station in the vicinity this can occur. Contact your Yamaha dealer.
4 pedal note sound too high, upper keyboard's notes too low.
This is especially noticeable when comparing the Electone and piano. Piano notes are combinations of harmonics which are influenced by the surroundings, while Electone harmonics are simpler (multiples of the fundamental tone) requiring the Electone to be adjusted in a different manner at the assembly stage.
5 rattling (sympathetic vibration) occurs. All materials have critical resonance frequencies at which they vibrate. The Electone's continuous tones will naturally cause other objects (windows, objects on shelves, etc.) to vibrate. Change the place of installation whenever such difficulty occurs.
natural_image
Illustration of a person using a computer with musical notes nearby (no text or symbols)Specifications
Italics: 215D only
KEYBOARDS
| Upper | 44 keys 1~c4 | (3-2/3 octaves) |
| Lower | 44 keys F~c3 | (3-2/3 octaves) |
| Pedals | 13 keys C1~C | (1 octave) |
TONE LEVERS
| Upper | Flute 16', Flute 8', Flute 4''Trombone 16', Clarinet 16',Trumpet 8', Oboe 8', String 8',Wah-Brass, Attack 4' |
| Lower | Flute 8', Diapeson 3' or Piano 1Horn 8' or Piano, Piano 2,Cello 8' or Guitar, Rhythmic-Wah |
| Pedols | Bass 10', Bass 8', Bass Guitar |
EFFECT LEVERS
| Vibrato Delay (Upper) |
| Vibrato Depth |
| Attack Length (Upper) |
EFFECT CONTROLS
| Manual Balance |
| Upper Sustain |
| Pedal Sustain |
| Reverb |
EFFECT TABLETS
| Upper 16' 8' 4' Sustain |
| Special Presets |
| Upper Ensemble |
| Upper Special Presets Lower |
UPPER PRESETS SELECTORS (90D only)
| Piano, Herpsichord, Guitar, Vibrephone |
UPPER SPECIAL PRESETS SELECTORS (215D only)
| Plano, Harpsichord |
| Guitar, Vibraphone |
| Banjo, |
| Upper Special Presets Volumes |
TREMOLO/SYMPHONIC CHORUS SELECTORS
| Tremolo/Symphonic Chorus |
| Tremolo Speed (Slow/Fast) |
| Lower Flute |
| U & L Orchestra |
| Upper Flute |
AUTO RHYTHM SECTION
| Rhythm Selectors |
| March, Waltz, Swing, Slow Rock, Jazz Rock, Disco, Tango, Bossanova, Rhumba, Mambo, Samba, 16 Beat |
| Rhythm Variation |
| Normal, 4 Bar, 8 Bar |
| Rhythm Controls |
| Rhythm Start, Rhythm Synchro Start, Rhythm Stop (Foot Switch), Tempo Control, Rhythm Volume |
| Tempo Light |
AUTO ARPEGGIO SECTION
| Pattern Selectors |
| Up , Turn , Variation 1, Variation 2 |
| Arpeggio Controls |
| Arpeggio Voice, Sustain Control, Arpeggio Volume |
ABC FUN BLOCKS
| Normal |
| Single Finger Chord |
| Fingered Chord |
| Custom ABC |
| Constant |
| Memory |
OTHER CONTROLS
| Master Volume |
| Expression Peds |
| Power Switch |
| Tremola Speed |
OTHER FITTINGS
| HEADPHONES Jack (390 Ω Imp.) | |
| EXP. IN Jack | (32 kΩ Imp.) |
| AUX-IN Jack | (23 kΩ Imp.) |
| AUX-OUT Jack | (470 Ω Imp.) |
| Power Light | |
| Music Rest | |
| Matching Bench | |
SPEAKERS
| 12" (30 cm) × 1 |
| 2" (5 cm) × 1 |
CIRCUITRY
| Solid State (incl. LSIs and ICs) |
| Output Power: 30 Watts (RMS) |
| Power Consumption: See Electons nameplate |
| Power Source: 50/60 Hz AC |
DIMENSIONS
| POD | 215D-I, TR | |
| Width | 44-1/4" (112 cm) | 44-1/4" (112 cm) |
| Depth | 21" ( 63 cm) | 22-3/4" ( 58 cm) |
| Height | 36-3/4" ( 93 cm) | 38-1/8" ( 97 cm) |
| Weight | 130 lb (57 kg) | 215D-I 141 lb (64 kg) |
| 215D-TR 136 lb (62 kg) |
FINISH
| 205D | American Walnut Veneer Lacquer Finish. |
| 215D-J | American Walnut Veneer Lacquer Finish. |
| 215D-TR | Pecan Veneer Lacquer Finish. |
Specifications subject to change without notice.
SINCE 1887

YAMAHA
YAMAHA INTERNATIONAL CORP., BUENA PARK, CALIF.