
Electone 405 - Tastatur YAMAHA - Kostenlose Bedienungsanleitung
Finden Sie kostenlos die Bedienungsanleitung des Geräts Electone 405 YAMAHA als PDF.

| Produkttyp | Elektronische Orgel (Tastatur) |
| Marke | Yamaha |
| Modell | Electone 405 |
| Anzahl der Tasten (Upper Keyboard) | 49 (4 Oktaven) |
| Anzahl der Tasten (Lower Keyboard) | 49 (4 Oktaven) |
| Anzahl der Pedaltasten | 13 (1 Oktave) |
| Tonumfang (Tonerzeugung) | Zugriegel (Flöte, Blech, Streicher, etc.), Special Presets (Klavier, Cembalo, etc.), Custom Voices (Vokal, Piccolo, Sax, etc.) |
| Anzahl Rhythmusmuster | 16 (Marsch, Walzer, Ballade, Swing, etc.) plus Variationen und Break Variationen |
| Rhythm Sequence Programmer | Ja, speicherbar bis zu 64 Takte |
| Auto-Begleitung | Auto Bass/Chord (Single Finger, Fingered, Custom) und Auto Arpeggio |
| Effekte | Vibrato (Verzögerung, Tiefe, Geschwindigkeit), Tremolo (schnell/langsam), Symphonic Chorus, Reverb, Sustain (Upper, Lower, Pedal) |
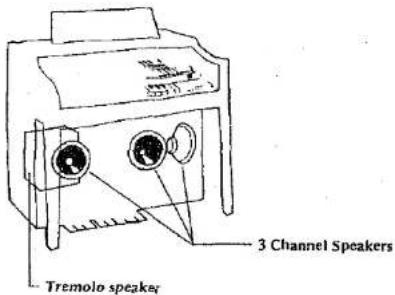
| Lautsprechersystem | 3-Kanal: Center 60W (12", 8", 2"), Tremolo 60W (8"), Rechts/Links je 30W (8") |
| Anschlüsse | Kopfhörer (390Ω), AUX IN, AUX OUT, EXP IN, Tone Cabinet (11/13-polig) |
| Stromversorgung | Netzstrom 50/60 Hz AC, Leistungsaufnahme ca. 180 W |
| Abmessungen (B x T x H) | 119,5 x 70 x 103 cm |
| Gewicht | 119 kg |
| Gehäusematerial | American Walnut / Pecan & Ash (je nach Modell), Lackoberfläche |
| Reinigung | Gehäuse mit feuchtem Tuch und mildem Reinigungsmittel, Tasten nur mit weichem, trockenem Tuch; keine Lösungsmittel |
| Sicherheitshinweise | Netzspannung prüfen, nur Fachpersonal reparieren, nach Spielen ausschalten (Rolltop schaltet automatisch aus), direkte Sonneneinstrahlung und Feuchtigkeit vermeiden |
| Besonderheiten | Rolltop-Abdeckung mit automatischer Ausschaltfunktion, Panel-Beleuchtung (Schalter unter unterer Tastatur) |
Häufig gestellte Fragen - Electone 405 YAMAHA
Benutzerfragen zu Electone 405 YAMAHA
0 Frage zu diesem Gerät. Beantworten Sie die, die Sie kennen, oder stellen Sie Ihre eigene.
Eine neue Frage zu diesem Gerät stellen
Laden Sie die Anleitung für Ihr Tastatur kostenlos im PDF-Format! Finden Sie Ihr Handbuch Electone 405 - YAMAHA und nehmen Sie Ihr elektronisches Gerät wieder in die Hand. Auf dieser Seite sind alle Dokumente veröffentlicht, die für die Verwendung Ihres Geräts notwendig sind. Electone 405 von der Marke YAMAHA.
BEDIENUNGSANLEITUNG Electone 405 YAMAHA
GUIDE TO YOUR YAMAHA ELECTOME ORGAN
405
Contents
Welcome to the YAMAHA world of music.
You are now a member of the select group of proud YAMAHA ELECTONE® owners. We are confident that your selection of the 405 Electone organ marks the beginning of a lifelong partnership in musical creativity.
Please read this manual carefully to familiarize yourself with all of the unique features of this instrument and thus realize the Electone organ's full potential.
Cautions (To be Read before You Start Playing). 1
Your YAMAHA 405 Electone Organ ..... 2
Keyboards and Pedals 3
Preparing to Play 4
Setting the Tone Levers 5
Effects and Functions 8
How to use the Auto Rhythm Functions ..... 13
Digital Display 15
Rhythm Sequence Programmer ..... 16
Rhythmic Chords 19
Auto Bass/Chord 19
Auto Arpeggio 23
Symphonic Chorus and Tremolo 25
Foot Switch, Reverb and Sustain Controls ..... 26
To obtain Maximum Enjoyment from
Your 405 29
Trouble Shootings 30
Specifications 32
This manual has been carefully prepared in order that you may become acquainted with the various functions and effects found in your New YAMAHA ELECTONE. Many of these functions are totally new and many interact with each other. Improper operation or lack of knowledge relating to how a function works when the unit is functioning as designed is not covered by the manufacturer's warranty. Please study the manual carefully (especially pages 30 and 31) before you request that a service technician check the unit.
Caution (To be Read before You Start Playing)
Always treat your Electone Organ with the same care you would any fine musical instrument. The following points are suggested to ensure the best performance of the Electone Organ.
Check for correct power voltage. Consult your Yamaha serviceman regarding any changes.
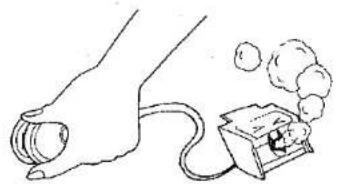
natural_image
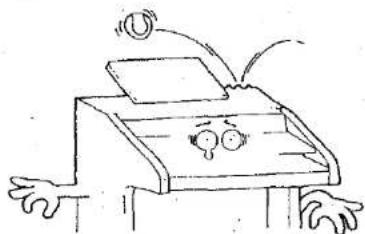
Simple line drawing of a hand holding a bulb connected to a small electronic device with smoke bubbles (no text or symbols)2 Your Electone contains no user serviceable components. Refer all service to qualified service technicians only.
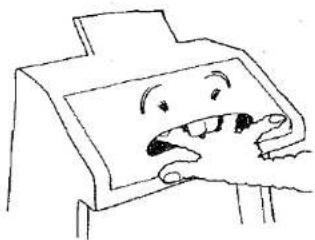
natural_image
Cartoon illustration of a person holding a smiling face with open mouth (no text or symbols)3 Always turn the power switch OFF after playing. This Electone Organ sliding lid contains a switch. Even if you forget to turn off the power switch, just close the lid and the power is automatically switched off.
4 Clean the Electone Organ cabinet with a damp cloth containing a neutral cleaning agent. Use only soft and dry cloth on the keyboards. Never use paint thinner, alcohol or other chemicals on either the keys or the cabinet.
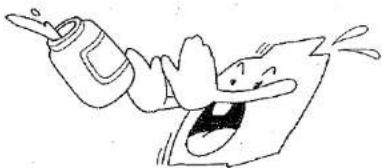
natural_image
Cartoon illustration of a person pouring liquid from a bottle into a document (no text or symbols)5 Keep the Electone Organ in a position away from direct sunlight, excess humidity and heat to protect the cabinet finish.
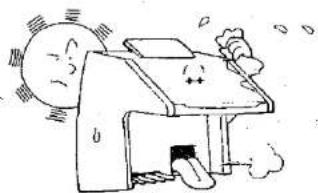
natural_image
Cartoon illustration of a sun-drowning machine with smoke and exhaust (no text or symbols)6 Do not hit or scratch the cabinet with a hard object.
natural_image
Cartoon illustration of a person sitting at a desk with arms and legs, showing a face with eyes and a mouth (no text or symbols)7 Do not set heavy objects on the rolltop failboard.
natural_image
Simple line drawing of a bed with chairs and a tray, no text or symbols present8 The finish on your Electone Organ may undergo a chemical reaction if placed in direct contact with polyvinyl products. Do not set vinyl items on the surface or use polyvinyl material to cover the organ for any extended period of time.
Your YAMAHA 405 Electone Organ
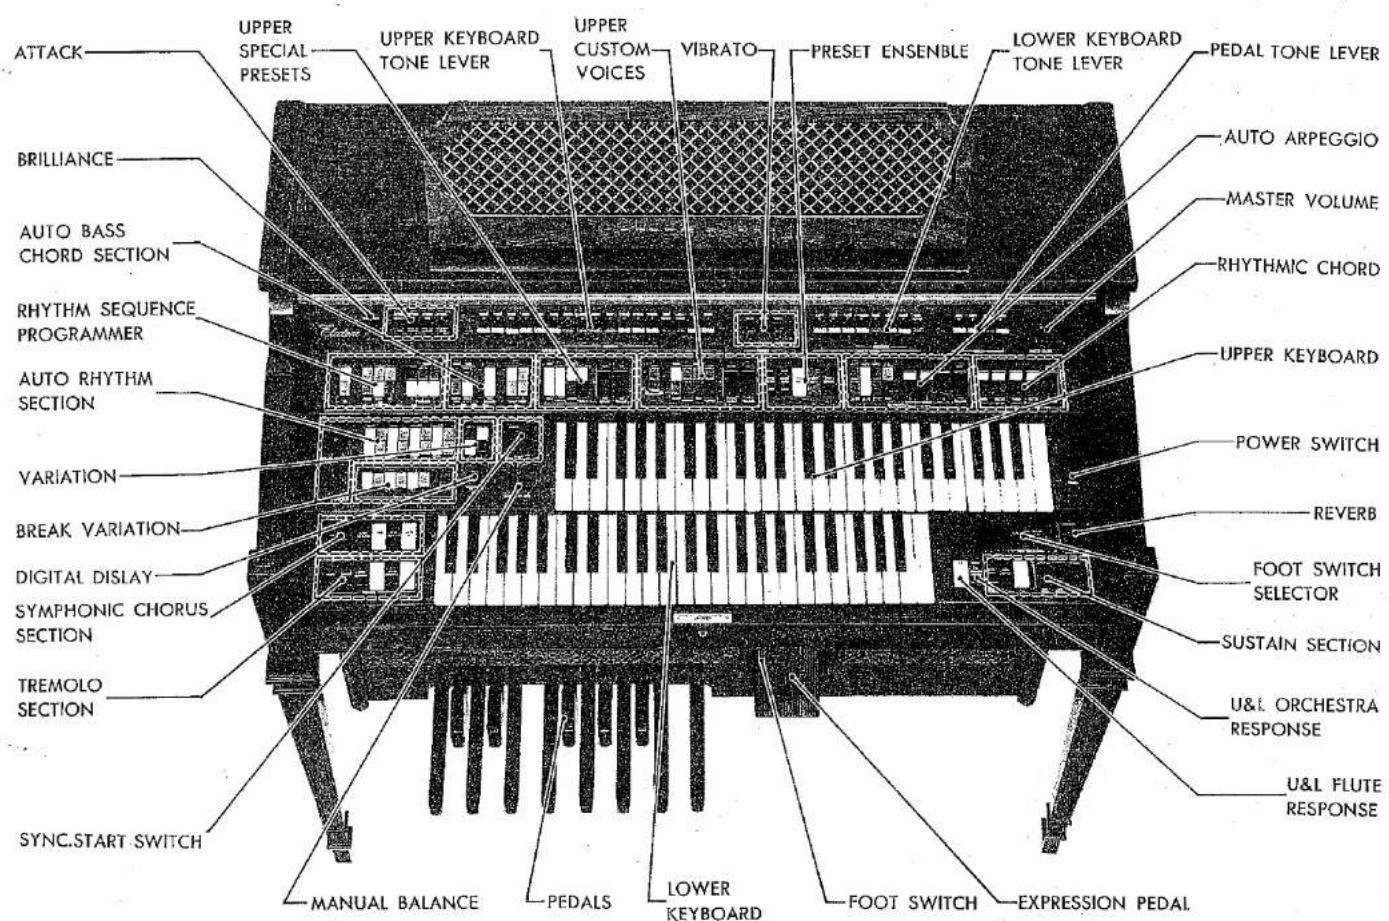
Specifications subject to change without notice. Cabinet shown model 405 I.
Keyboards and Pedals
Keyboards
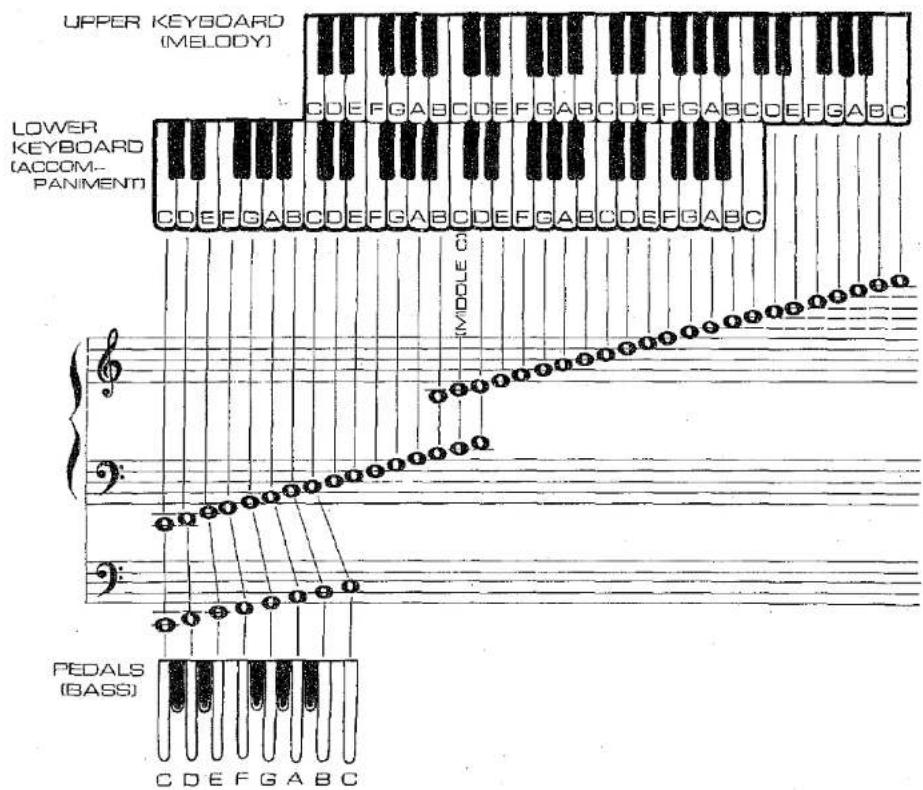
This Electone Organ has two sets of keyboards, the upper keyboard, lower keyboard, a set of pedals.
Upper Keyboard 49 keys (4 octaves)
Lower Keyboard 49 keys (4 octaves)
Pedals 13 keys (1 octave)
The upper keyboard is for the melody played with the right hand, the lower keyboard is for accompaniment with the left hand and the pedals are for producing bass notes with the left foot.
Upper keyboard: Up to 7 notes can be sounded simultaneously.
Lower keyboard: Up to 7 notes and 3 auto arpeggio notes can be sounded simultaneously.
Pedals: Even when a number of keys have been stepped on simultaneously, the highest note key depressed will have priority (the key to the right sounds).
Preparing to play
First, have a go at making the sound of the flute on the upper keyboard.
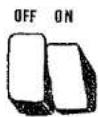
Set all the tone levers, push switches, tablets and sliding controls to the OFF or normal position, as illustrated in the figure.

MAX
4 Push down the white flute 8' lever which is the seventh from the left.
5 Depress the keys on the upper keyboard with your fingers.
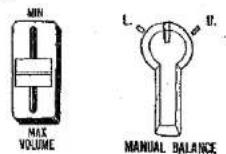
Use your right foot to depress the expression pedal slightly.
You will note that the farther you push the pedal down, the louder the sound becomes.
Rotate the MASTER VOLUME control to the right (clockwise).
This control sets the maximum sound level that will be available from the organ.
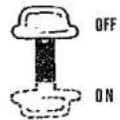
2 Turn on the power switch. The lamp now lights.
Note: It takes about 5 seconds for the lamp to light after the power has been switched on. This is a normal design function.
Can you hear the sound?
If you can't hear any sound, refer to page 30.
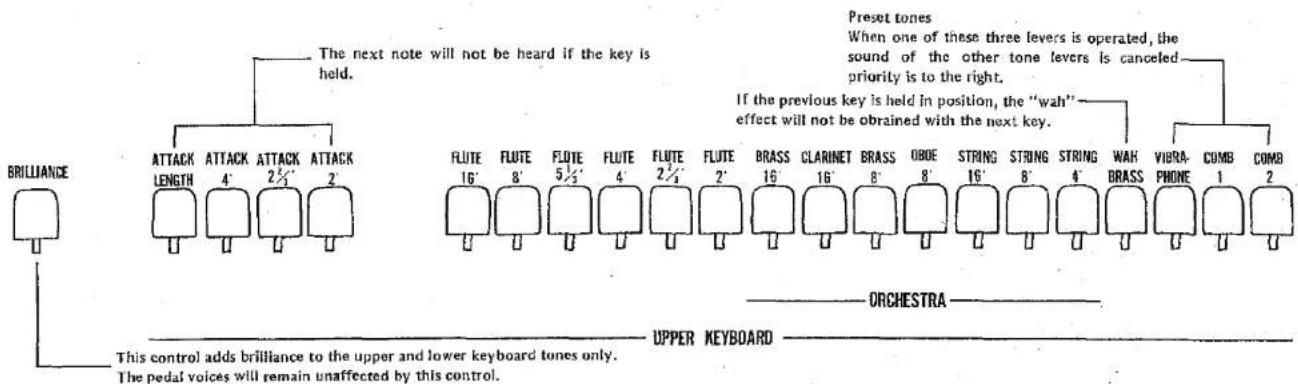
Setting the Tone Levers
The tone levers are located at the very top. They are used to produce the tone color of your preference. The sound level can be adjusted as required with these tone levers and to facilitate adjustment, each lever has three click-stop positions. You can add greater expression to tunes by combining a number of these levers, rather than producing a tone color with just one lever. Try out a number of combinations and see for yourself.
What's 16', 8', 4' . . . all about?
16', 8', 4' and so on indicate musical intervals. The Electone's musical scale is based on an 8' tone which corresponds to the musical intervals in the score.
16' is the tone of one octave below 8'.
4' is the tone of one octave above 8'.
(Refer to page 3)
| Upper, lower keyboards | Footage | Actual sound | Example of use |
| 16' | Notes one octave below | This enriches the sound. | |
| 8' | Interval identical to that of depressed keyboard | Basic sound. | |
| 5-1/3' | Notes 5 tones above these depressed on the keyboard | This adds brightness. | |
| 4' | Notes one octave above | This adds brightness, force. | |
| 2-2/3' | One octave and 5 tones above | This makes the sound harsher. | |
| Pedals | 16' | Interval identical to that of depressed keyboard | Basic fundamental sound. |
| 8' | One octave above | This adds pitch definition, brightness and a faster, more forceful attack characteristic. |
- In addition, the 2' stop provides notes two octaves above the basis 8' range.
- As indicated in the above table, the 16' note corresponds to the musical interval in the score for the pedal keyboard.
For instance, when 16', 8', and 4' are struck simultaneously, three notes, each of a different octave, will be sounded at the same time despite the fact that only one key is depressed. (This is known as the coupler effect.)
You can give your music a great deal of expression if you use this effect to advantage. Take a look at the table and familiarize yourself with it.
Tone Levers
Make a sound with the upper keyboard
A total of 17 different tone colors, as listed in the table below, can be produced by the tone levers which are used with the upper keyboard.
Preset tones
By operating one of these three levers, it is possible to produce a preset tone color.
■ Vibrapnone: The tone color resembles that of a vibraphone.
■ Combination 1: A well-modulated contemporary jazz type tone is produced.
■ Combination 2: A traditional, classic type set of tones is produced.
Note: When one of these three levers is operated, the sound of the other tone levers is canceled out. If more than one of the preset tone levers are on, the control farthest to the right will have priority.
Make a sound with the lower keyboard
A total of 8 different tone colors, as listed below, can be produced by the tone levers which are used with the lower keyboard.

Make a sound with the pedals
A total of 4 different tone colors, as listed below, can be produced by the tone levers which are used with the pedals.
The pedal sound can be played automatically by striking the Auto Bass/Chord (A-B-C) buttons. (For details, refer to page 19.)

- Priority is given to the high note. The bass guitar notes are decay after being struck.
■ Manual balance control
The manual balance control is located at the bottom right of the auto rhythm section panel. This may be used to attain a balance between the volume of the upper keyboard and the volume of the lower keyboard.
■ The sound of the upper keyboard increases when the control is rotated clockwise.
■ The sound of the lower keyboard increases when the control is rotated counterclockwise.

MANUAL BALANCE
Note: Unusually heavy registrations on either manual may exceed the range of this control.
What's "Brilliance" all about?
As this lever is pulled downward, the sound takes on more and more brilliance. This is particularly effective with reed instruments (clarinet, tenor saxophone, etc.) and with stringed instruments (violin, viola, etc.) when added to their tone color.
The pedal keys, the tremolo have are unaffected by the brilliance lever.
What's "attack length" all about?
The decay time of the attack sound becomes longer as this lever is pulled down when you are playing one or more of the upper keyboard's attack voices (i.e., 4', 2-2/3' or 2').
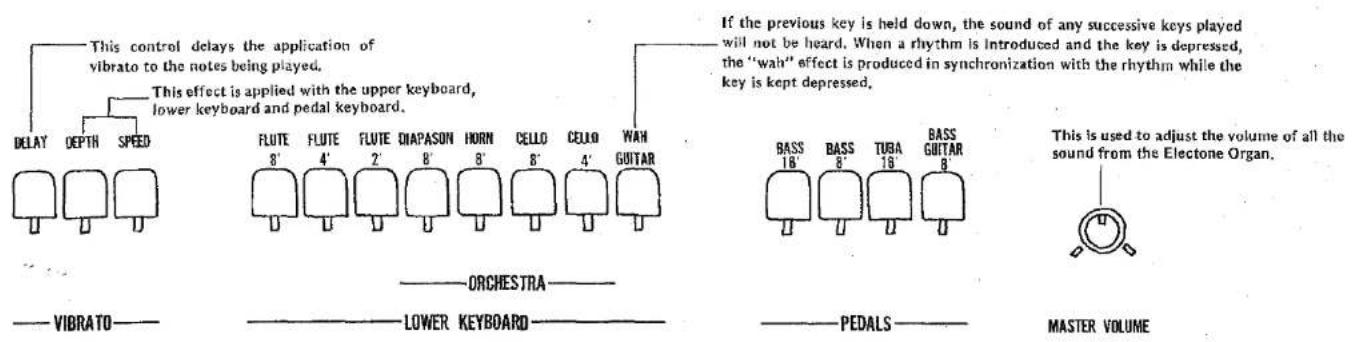
What's "vibrato" all about?
This is an effect which makes the sound vibrate by moving the pitch of the sound by a fraction. With stringed instruments, this rapid regular fluctuation can be produced by the fingers and with wind instruments by the lips. The vibrato function allows the Electone Organ to yield exactly the same effect. In fact, this Electone organ can produce two types of vibrato effect with the delay and depth levers.
(1) Ordinary vibrato
The vibrato effect is produced by pulling the depth lever down. The variation in the sound can be controlled with this lever.
- There will no vibrato effect unless the depth lever is pulled down.
- The speed of the vibrato can be controlled with the speed lever. As this lever is pulled down, the vibrato speed increases.
(2) Delay vibrato
When keys on the upper keyboard are depressed, the vibrato effect is produced after a short delay instead of immediately.
The delay effect is produced when the depth lever is pulled down, the delay lever is moved downward and the keys on the upper keyboard are depressed. The delay time increases (time until the vibrato effect is produced) as the delay lever is moved downward.
- The delay effect produced by the upper keyboard keys affects the lower keyboard and pedal keyboard vibrato.
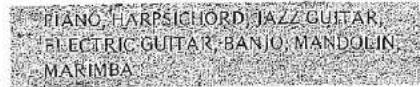
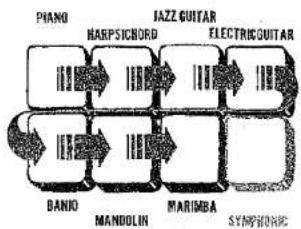
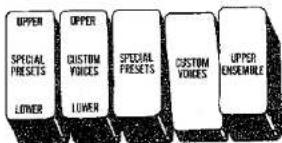
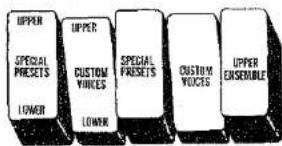
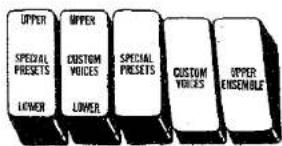
Effects and Functions Special Presets
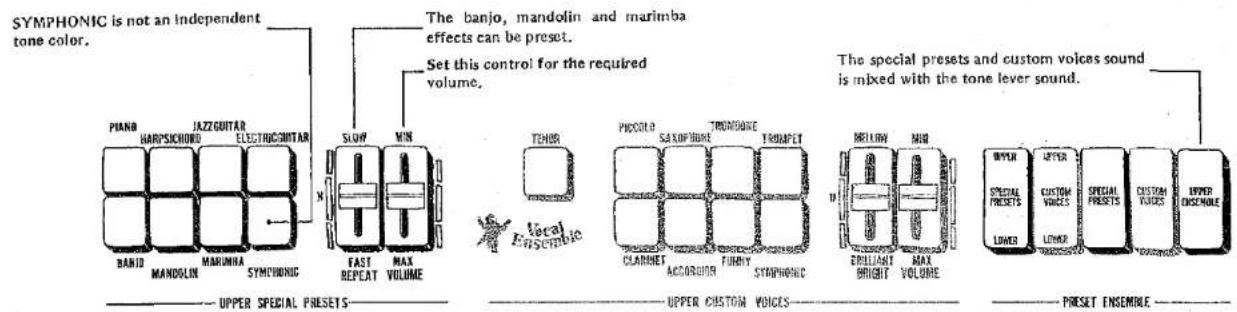
What are the upper special presets controls?
When the tone colors of up to seven different instruments have been set and then the preset ensemble's special preset tablets are operated, it is possible to produce the tone colors of your preference selected from the upper or lower keyboard with the selector button.
Tone colors for setting
- Unless the yellow tablet at the center of the five preset ensemble tablets is set to ON, there will be no special preset tone colors.
Only one tone color with the special preset function
Depress just one of the tone color selector buttons. If you depress two or more buttons, the button on the right or below takes priority and only one tone color is obtained. (Refer to the illustration.)
flowchart
graph TD
    A["Piano"] --> B["HAEPSICBORD"]
    B --> C["JAZZ GUITAR"]
    C --> D["ELECTRICGUITAR"]
    D --> E["SYMPHONIC"]
    E --> F["MANDOLIN"]
    F --> G["BANIO"]
    G --> H["Symphonic"]
    H --> I["MARIIMA"]
    I --> J["Symphonic"]
    J --> K["BANIO"]
    K --> L["Symphonic"]
    L --> M["MANDOLIN"]
    M --> N["BANIO"]
    N --> O["Symphonic"]
    O --> P["MARIIMA"]
    P --> Q["BANIO"]
    Q --> R["Symphonic"]
    R --> S["MANDOLIN"]
    S --> T["BANIO"]
    T --> U["Symphonic"]
    U --> V["MARIIMA"]
    V --> W["BANIO"]
    W --> X["Symphonic"]
    X --> Y["MANDOLIN"]
    Y --> Z["BANIO"]
    Z --> AA["Symphonic"]
    AA --> AB["MARIIMA"]
    AB --> AC["BANIO"]
    AC --> AD["Symphonic"]
    AD --> AE["MANDOLIN"]
    AE --> AF["BANIO"]
    AF --> AG["Symphonic"]
    AG --> AH["MARIIMA"]
    AH --> AI["BANIO"]
    AI --> AJ["Symphonic"]
    AJ --> AK["MANDOLIN"]
    AK --> AL["BANIO"]
    AL --> AM["Symphonic"]
    AM --> AN["MARIIMA"]
    AN --> AO["BANIO"]
    AO --> AP["Symphonic"]
    AP --> AQ["MANDOLIN"]
    AQ --> AR["BANIO"]
    AR --> AS["Symphonic"]
    AS --> AT["MARIIMA"]
    AT --> AU["BANIO"]
    AU --> AV["Symphonic"]
    AV --> AW["MANDOLIN"]
    AW --> AX["BANIO"]
    AX --> AY["Symphonic"]
The special preset controls come with special functions.
■ If the SYMPHONIC button is depressed:
The special preset sound can be delivered simultaneously through the 3-channel speakers and the sound is given greater ambience and dimension. (Refer to "symphonic chorus" on page 25.)
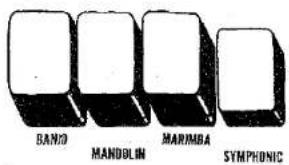
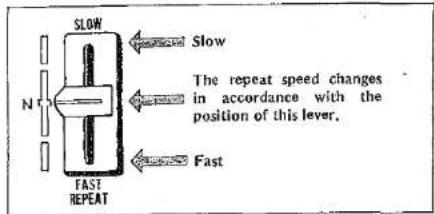
■ If the REPEAT lever is operated:
a) The repeat speed can be varied with the banjo, mandolin and marimba tone colors only and play can be made to suit the expression of the music. (Repeat effect)
b) When a key has been depressed for just one note with mandolin or marimba tone colors, the repeat effect is produced. However, when keys are depressed for two or more notes, the highest note and the other note(s) are struck alternately. (Twin mallet effect)
Special presets can be transferred to the lower keyboard.
Set the UPPER/LOWER special presets tablet at the far left to ON together with the SPECIAL PRESETS preset ensemble tablet. The special preset sound can now be obtained with the keys of the lower keyboard. In this case, however, notes of one octave above are struck when a key with the same musical pitch as the lower keyboard key is depressed.
- The special preset sound will not be heard if the FINGERED CHORD, SINGLE FINGER CHORD or CUSTOM A-B-C Auto Bass Chord function switches are set to ON. (Refer to the table on page 12.)
●The sound is mixed (ensemble) with the sound of the lower keyboard tone levers.
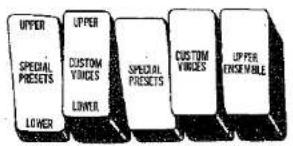
The special preset sound can be combined with the sound of other tone levers.
Set the UPPER ENSEMBLE tablet at the far right of all the preset ensemble tablets to ON. You can now combine the tone colors of the upper or keyboard tone levers with the special preset tone colors. (Refer to the table on page 12.)
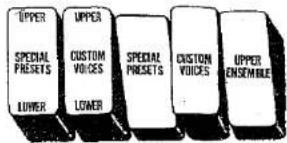
There's a special volume control, too.
This control can be used to adjust the volume of the tone colors selected with the special preset tablets. Attain a balance in the volume with the other tone colors.
- When the special preset sound is produced from the upper keyboard, the volume will be at its maximum when the manual balance volume control is rotated to the upper keyboard side as far as it will go. The maximum volume is obtained with sound from the lower keyboard when this control is rotated to the lower keyboard side as far as it will go.
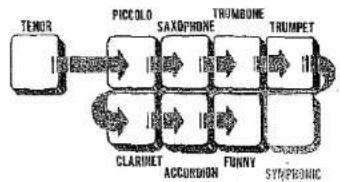
Custom Voices
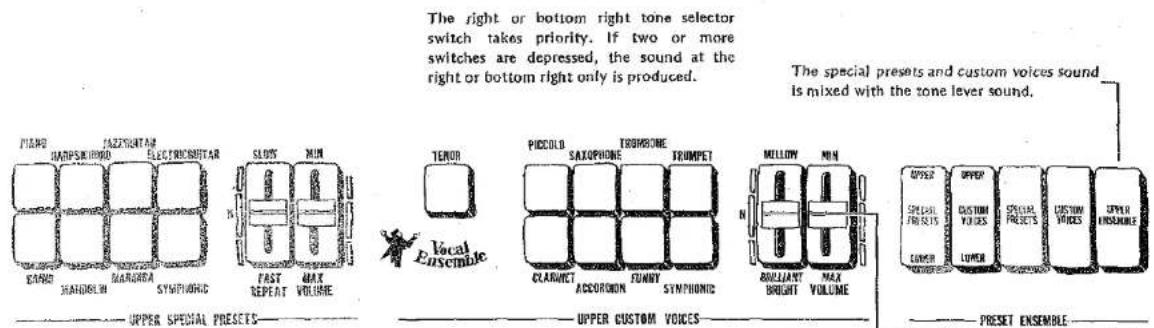
What's custom voices all about?
Once the CUSTOM VOICES preset ensemble tablet is set to ON, it is possible to produce seven types of tone colors and one of vocal ensemble tone colors in a one-touch operation by depressing the keys on the upper or lower keyboard.
Tone colors for setting
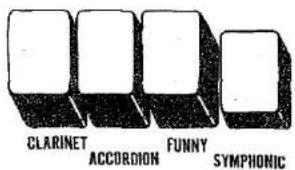
VOCAL ENSEMBLE (Tenor), PICCOLO, SAXOPHONE, TROMBONE, TRUMPET, CLARINET, ACCORDION, FUNNY.
Only one custom voice tone color can be produced at a time
Depress just one selector button corresponding to the tone color which you want reproduced. If two or more buttons are depressed, the right-hand or bottom button inclusive of the vocal ensemble buttons takes priority and only one tone color will be produced. (Refer to the illustration.)
The custom voice controls come with special functions
■ When the SYMPHONIC button is depressed:
The custom voice sound can be delivered through the 3-channel speaker system, adding ambience and dimension to the effect.
(Refer to "symphonic chorus" on page 25.)
flowchart
graph LR
    A["Tenor"] --> B["Piccolo"]
    B --> C["Saxophone"]
    C --> D["Trombone"]
    D --> E["TRUMPET"]
    E --> F["Funny"]
    F --> G["SYMPHONIC"]
    G --> H["ACCORDON"]
    H --> I["CLARDET"]
    I --> J["THYPOLE"]
UPPER CUSTOM VOICES-
■ BRIGHT control:
This can be used to make the tone color mellow or brilliant. This control does not modify the harmonic content of the vocal ensemble voice (tenor).

■ The custom voice tones can be produced with the keys on the upper or lower keyboards.
a) To produce the sound from the upper keyboard: Set the CUSTOM VOICES preset ensemble tablet to ON. The custom voice tone color can now be produced by playing the upper keyboard.
b) To produce the sound from the lower keyboard: Set the CUSTOM VOICES and UPPER/LOWER CUSTOM VOICES preset ensemble tablets to ON. The custom voice tone color can now be produced by playing the lower keyboard. In cases like this, however, the sound of one octave above is produced when the key in the same position as the upper keyboard.
- The custom voice sound when the lower keyboard keys are depressed even if the A-B-C function switches are operated. (Refer to the table on page 12.)
- The sound of the lower keyboard's tone levers is mixed.
■ The sound of other tone levers on the upper keyboard can be mixed with the custom voice tone colors.
Set the rightmost UPPER ENSEMBLE preset ensemble tablet to ON.
You can now mix the upper keyboard tone levers' tone colors with the custom voice tone colors.
(Refer to the table on page 12.)
■ There's a special volume control, too.
This control can be used to adjust the volume of the tone colors selected with the custom voice tablets. Attain a balance in the volume with the other tone colors.
- When the custom voice sound is produced from the upper keyboard, the volume will be at its maximum when the manual balance volume control is rotated to the upper keyboard side as far as it will go. The maximum volume is obtained with sound from the lower keyboard when this control is rotated to the lower keyboard side as far as it will go.
Relationship between preset ensemble Tablets & A-B-C function switches,.
Relationship between preset ensemble tablets and A-B-C function switches, and upper keyboard tone lever, lower keyboard tone lever, special preset and custom voice tone colors.
| Special U to L | Custom U to L | Special Presets | Custom Voices | Ensemble | A-B-C | Sound produced by Upper keyboard keys. | Sound produced by Lower keyboard keys |
| - | - | ON | - | - | - | Special Presets | Tone Lever |
| - | - | - | ON | - | - | Custom Voices | Tone Lever |
| - | - | ON | ON | - | - | Special Presets Custom Voices | Tone Lever |
| ON | - | - | - | - | - | Tone Lever | Tone Lever |
| - | ON | - | - | - | - | Tone Lever | Tone Lever |
| ON | - | ON | - | - | - | Tone Lever | Special Presets Tone Lever |
| - | ON | - | ON | - | - | Tone Lever | Custom Voices Tone Lever |
| ON | - | ON | - | - | ON | Tone Lever | Tone Lever |
| - | ON | - | ON | - | ON | Tone Lever | Custom Voices Tone Lever |
| - | - | ON | - | ON | - | Special Presets Tone Lever | Tone Lever |
| - | - | - | ON | ON | - | Custom Voices Tone Lever | Tone Lever |
| - | - | ON | ON | ON | - | Custom Voices Special Presets Tone Lever | Tone Lever |
How to use the Auto Rhythm Functions
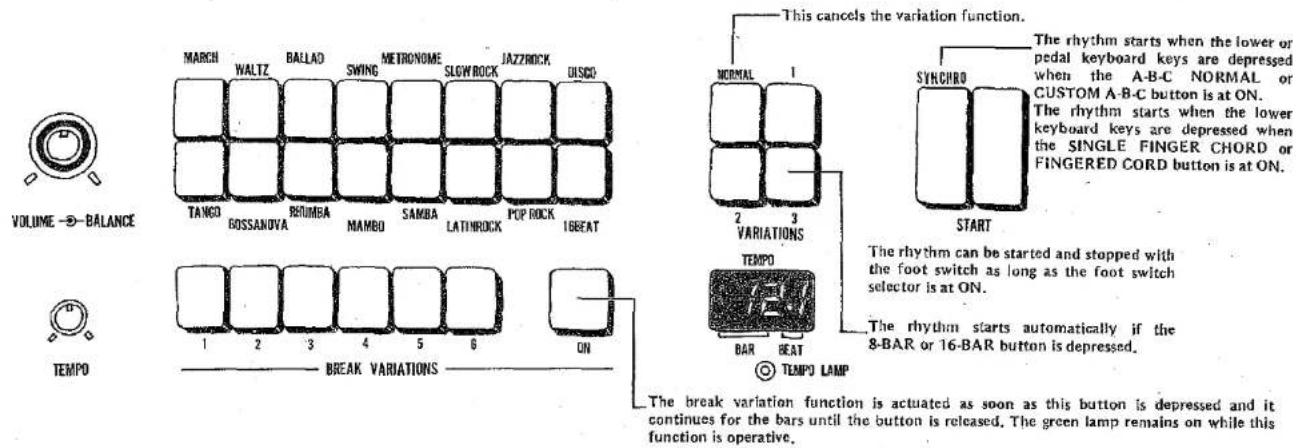
Description of functions
a) Rhythm selectors
These selectors can deliver a total of 16 different rhythm patterns. If two or more buttons are depressed together, you can create combinations of rhythms or rhythms with that "something different."
b) Variations
These are used to add variation to the rhythm patterns selected by the rhythm selectors. Three types of variation are available, and it is also possible to combine variations 1 through 3.
- The selector switch section of the rhythm sequence programmer has 8-BAR and 16-BAR variation buttons.
When the 8-BAR button is depressed, the rhythm pattern of the rhythm variation is automatically added at every eighth bar. The same effect is produced at every 16th bar when the 16-BAR button is depressed.
c) Break variation buttons
A total of 6 different types of irregular rhythm are available for adding accent to the rhythm. When the break variation switch is set to ON, the break variation rhythm pattern breaks in at the moment when the switch was depressed.
The break variation effect is obtained simply by depressing the ON button without the use of break variation buttons.
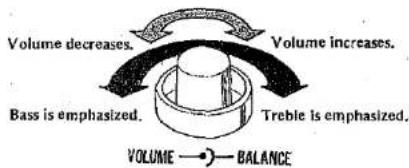
d) Volume, balance controls
■ The rhythm volume control is for adjusting the volume only. Attain.a balance with the keyboard sound volume.
The balance control is for attaining a balance in the treble and bass sound in the rhythm. When rotated to the left, the bass sound of the double bass and drums, etc. is emphasized while when rotated to the right, the treble sound of the cymbals and high-hat cymbals is emphasized.
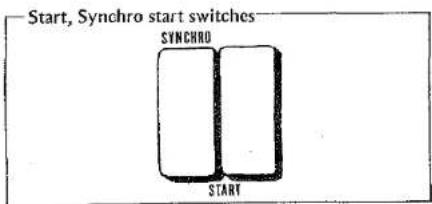
e) Start, Synchro start switches
■ Right-side START switch: As soon as this is depressed, the rhythm starts from the first beat. The rhythm continues until the button is set to OFF.
■ Left-side SYNCHRO start switch: When this is kept in the depressed position, the rhythm starts from the first beat only when the lower or pedal keyboard keys are depressed.
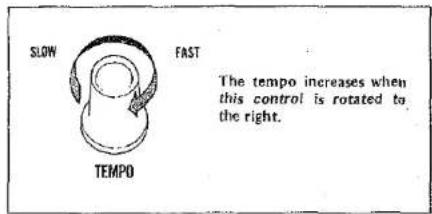
f) Tempo control, tempo lamp
■ The TEMPO control is used to control the speed of the rhythm. The tempo increases as the control is rotated clockwise.
■ The tempo lamp lights in synchronization with every quarter note or bar of the rhythm. This is useful as a timing guide during play.
(1) When the START switch is at ON, the lamp lights in synchronization with the first beat of the rhythm of each bar.
(2) When the SYNCHRO start switch is at ON, the lamp lights at every quarter note if the rhythm has not started, and while the rhythm is starting, it lights in synchronization with the first beat of each bar.
(3) When the START and SYNCHRO start switches are both at ON, the lamp lights in synchronization with the first beat of each bar when the rhythm is starting, and it lights at every quarter note when the rhythm is stopped with the foot switch.
Try out the break variation function!
How to operate the BREAK VARIATION buttons.
(1) Set the rhythm START switch to ON. (The rhythm which has been selected by the rhythm selector button now starts.)
(2) Select one of the BREAK VARIATION buttons (1 through 6).
(3) Depress the green button on the right. The break variation rhythm results as soon as the button is depressed.
●While the break variation function is operative, the green ON button remains lighted.
(4) While the green button is depressed, the break variation rhythm continues. Once the button is released, the break variation continues up to the end of the bar and then the original rhythm is resumed from the next bar.
- If the button is depressed in the middle of a bar and then released immediately, the break variation rhythm continues only from the instant the button was depressed until the end of the bar.
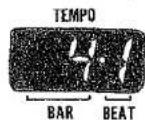
TEMPO CONTROL

TEMPO

BREAK VARIATIONS

BAR BEAT
TEMPO LAMP
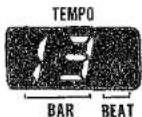
Digital Display
What's the Digital Display all about?
This indicator shows the tempo speed and the beat of the rhythm. It tells you the bar and beat at a glance. It features the following five indications.
(1) Tempo
The quarter note tempo is indicated when the auto rhythm has not started. The value indicated varies with the tempo control.
(2) Bar, beat
Once the auto rhythm function is actuated, the bar and beat of the rhythm from the start are indicated.
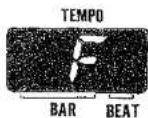
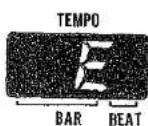
(3) Memory display, check display
When a rhythm has been programmed with the Rhythm Sequence Programmer or when checking, the actual bar stored in the memory or the bar of the rhythm being checked is indicated.
(4) Memory full display
[F] indicates that the rhythm has been stored up to the predetermined bar in the memory by the Rhythm Sequence Programmer. Up to 32 bars can be stored with programs 1 and 2 and up to 64 bars can be stored with program 3.
(5) Program end display
[E] indicates that the checking of the program stored in the memory of the Rhythm Sequence Programmer has been completed.
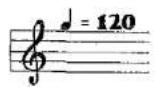
This indicates that quarter notes are being struck 120 times in the space of a minute.

BAR BEAT
TEMPO LAMP
Rhythm Sequence Programmer
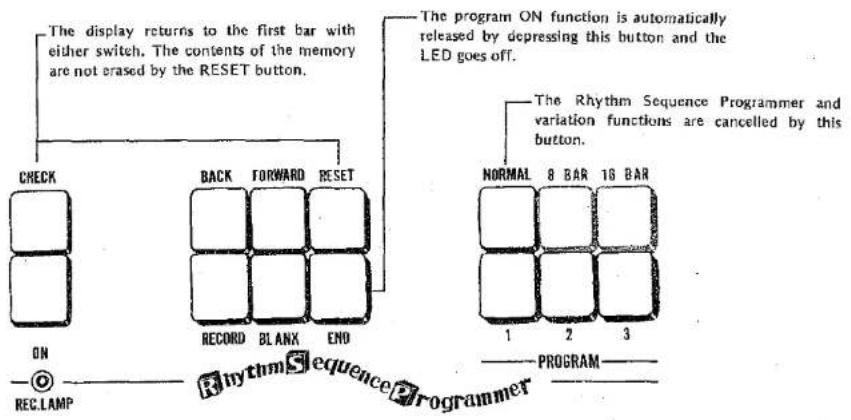
What's the Rhythm Sequence Programmer all about?
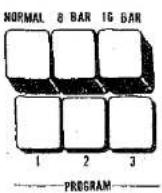
The Rhythm Sequence Programmer can program the rhythms of tunes which will be played and store them in the memory. When the program has been completed and play starts, the various rhythms which have been programmed can be called out automatically without operating the rhythm selector switches. A program of three different rhythms corresponding to PROGRAM selectors 1 through 3 can be stored in the memory. Up to 32 bars can be stored in programs 1 and 2, and up to 64 bars can be stored in program 3.
It is also possible to store auto rhythm patterns, variation, and break variation rhythm patterns in the memory.
How to use the Rhythm Sequence Programmer
(1) When the far left bottom ON button is depressed, the REC LAMP lights and bar number [√] is shown on the Digital Display.
(2) Depress PROGRAM selector 1,2 or 3. (32 bars are stored in programs 1 and 2, and 64 bars are stored in program 3.)
(3) Select the rhythm which is to be stored in the memory. Once the rhythm START pushbutton is set to ON, the sound of the actual rhythm can be monitored and stored in the memory at the same time.
- Rhythm variations 1 through 3 and break variations can also be stored in the memory.
- A mixture of normal rhythms cannot be memorized. If a mixture is attempted, 3/4 time, 12/8 time or 4/4 alone is preferentially stored (in that order) in the rhythm memory.

(4) Depress the red RECORD button. As soon as this button is depressed, the rhythm is stored in the memory and the number of the next bar is shown on the Digital Display.
- When continuing the same rhythm and storing it in the memory, depress the RECORD button for the relevant bars.
(5) Repeat steps (3) and (4) as required.
- Once the 32 bars for program 1 and 2 and the 64 bars for program 3 have been stored, [F] is shown on the Digital Display and no more bars can be stored.
(6) If there are some bars in the rhythm which you do not want stored in the memory, depress the RECORD button with the white BLANK button depressed position. The corresponding bars will not be stored in the memory.
(7) When adding accent to the rhythm, store a break variation in the memory. Select one of the six variations and, with the break variation ON button depressed, simply depress the RECORD button and the break.variation is stored in the memory.
- Only the break variation is memorized at this time. Other rhythms and variations will not be memorized.
- The pattern of the break variation will follow the pattern of the rhythm being pushed.
(8) Depress the END button once all the required bars have been stored. This now completes the rhythm memory operation. If the rhythm is now started, all the bars from the first are automatically played in the sequence in which they were stored in the memory. At the end of the sequence, the rhythm starts again at the first bar and this operation is repeated until the rhythm is stopped.
■ Continuous program play is possible. The program play can be made continuous by depressing two or more of the program 1, 2 and 3 buttons and starting the rhythm.
The order of play starts with the lowest program number. If program selectors 1, 2 and 3 are all depressed at the same time and play started, a total of 128 bars (32 + 32 + 64 = 128) in the program will be played through continuously.
- The Digital Display does not show the cumulative bar count. It will count up to 32 or 64 and then once the program is switched over, it will return immediately to "1".
Break Variations While Playing Your Program
While playing your program, if you press the break variation ON button the rhythm of the phrase in the memory will be cancelled and replaced by the break variation.
The break variation pattern at this time will change, according to the type of rhythm you have memorized, to 3/4, 12/8 or 4/4 time.
Checking the contents of the program
(1) Depress the PROGRAM button (1, 2 or 3) corresponding to the program which is to be checked.
(2) Depress the CHECK button at the top left. The Ditigal Display display remains fixed at [1]. If the rhythm is now started the first bar stored in the memory is played.
(3) If the FORWARD button is now depressed, the next bars can be checked in sequence.
- Once all the bars which have been stored have been played, [E] appears on the Digital Display indicating that no more bars can be checked.
(4) Depress the BACK button to return to the bar before during checking. It is possible to return to any previous bar by depressing the button for the required number of times. Depress the RESET button upon return to the first bar.
Note: The program stored in the memory is not erased even when the CHECK and RESET buttons are depressed. When a new program is stored in the memory, the previous program is automatically erased and replaced by the new program. A program stored in the memory is not erased when the power is switched off.
Dealing with program errors
(1) Depress the BACK button and monitor the bars on the Digital Display until the error bar is reached.
(2) Select the correct rhythm and then simply depress the RECORD button.
(3) Upon completion of the correction depress the FORWARD button to advance the rhythm to the correctly stored bar and then continue the memory operation.
Changing programs in the memory
(1) Locate the bar which is to be changed following the program check procedure.
(2) Now depress the program ON button.
(3) Select and set the new rhythm and the change is completed as soon as the RECORD button is depressed. For continuous changes, repeat the recording procedure. To change other bars, locate them with the FORWARD and BACK buttons and repeat the recording procedure.
(4) Once the changes have been made, set the Program ON and CHECK buttons to OFF. (Check that the RECORD lamp goes off.)
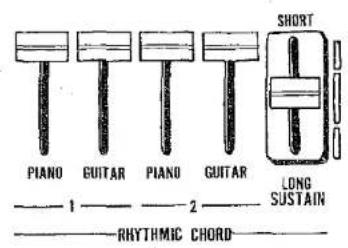
Rhythmic Chords
Auto Bass/Chord
What exactly are rhythmic chords?
This is a function which is coupled with the auto rhythm and which plays automatically. (Auto chord function.)
Piano and guitar tone colors can be produced in two types of sound.
Adjust these four tone controls and create rhythmic chord tone colors which mirror the expression of the tune.
The right-hand SUSTAIN control is used with the rhythmic chord function exclusively. It can prolong the sound of the chords.
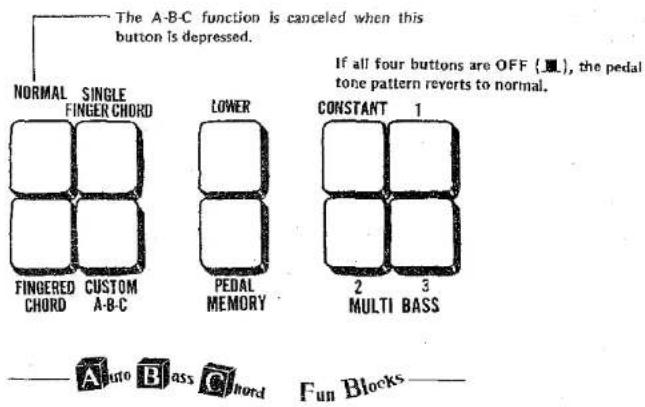
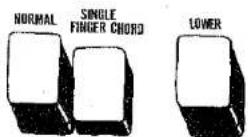
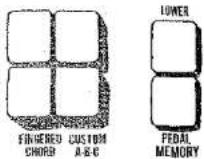
What's Auto Bass/Chord all about?
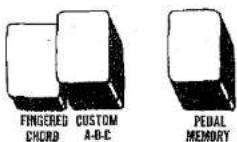
The Auto Bass/Chord is an automatic accompaniment function which is coupled to the rhythm pattern and gives chord accompaniment to the sound from the lower keyboard and to the sound from the pedal keyboard just by depressing the lower keyboard keys. The SINGLE FINGER CHORD button permits automatic accompaniment with the touch of your finger. The FINGERED CHORD button allows sound from the lower keyboard to be made into the chords of your own personal preference. The CUSTOM A-B-C button applies the Auto Bass/Chord effect to the lower keyboard and pedal keyboarded sound separately.
How to use the Auto Bass/Chord function
[Accompaniment with one finger]
(1) Select the desired rhythm with the auto rhythm controls.
(2) Depress the SINGLE FINGER CHORD button.
(3) Depress one lower keyboard key only. The sound of the depressed key becomes the basic sound, and automatic chord accompaniment in the form of the rhythmic chord sound is superimposed onto the auto rhythm. (Auto chord function)
- The tone colors of the lower keyboard's tone levers are heard as the automatic chord play with the sustaining sound of the flute, cello, etc. However, in the case of the 'wah guitar,' chords are superimposed by a rhythm pattern which is separate from the rhythmic chord.
(4) When the tone levers of the pedal keyboard are operated, automatic accompaniment is available with the pedal sound in accordance with the rhythm and chords detected by the lower keyboard, even when the pedal keys are not depressed.
When the pedal keyboard is not depressed, automatic accompaniment of the major chords is available in the Auto Bass/Chord mode. However, this can be changed to seventh chord, minor chord or minor seventh.
- No pedal keyboard keys are depressed: Major chord
- White pedal keyboard key is depressed: Seventh chord
- Black pedal keyboard key is depressed: Minor chord - White and black pedal keyboard keys are depressed simultaneously: Minor seventh chord
(5) When the MEMORY button is set to ON, automatic accompaniment continues even when the lower keyboard keys are released.
Depress both the LOWER and PEDAL memory buttons. Automatic accompaniment will continue even when you release the lower keyboard keys.
To change the accompaniment chords, depress another lower keyboard key again. This operation brings a change to automatic accompaniment with the new chords, with the sound from the newly depressed key as the basic sound. If only the LOWER or PEDAL memory button is set to ON, the sound of the keyboard whose corresponding memory button is not depressed
(LOWER: tone color of lower keyboard, rhythmic chords; PEDAL: tone color of pedal keyboard) is no longer heard when that button is released, and the automatic accompaniment of the rhythm and tone colors of the keyboard whose corresponding memory button is set to ON continues.
- When the SINGLE FINGER CHORD button is depressed, the musical intervals of the detected chords do not vary no matter which musical interval basic note keys on the lower keyboard are depressed.
Accompaniment with the chords struck when the lower keyboard keys are depressed
(1) Select the desired rhythm with the auto rhythm controls.
(2) Depress the FINGERED CHORD button.
(3) Depress the keys on the lower keyboard so that chords are struck. The chords now created by depressing the keys are superimposed onto the rhythm for automatic accompaniment.
- Try making your own major, minor and seventh chords.
- The tone colors of the lower keyboard's tone levers form chord play with the sustaining sound of the flute and cello, etc.
However, in the case of the 'wah guitar', chords are superimposed by a rhythm pattern which is separate from the rhythmic chords.
(4) When the tone levers of the pedal keyboard are operated, automatic accompaniment is available with the pedal sound in accordance with the rhythm and chords on the lower keyboard which have been depressed, without the pedal keys having to be depressed. (Auto bass function)
(S) When the MEMORY button is set to ON, automatic accompaniment continues even when the lower keyboard keys are released.
Depress both the LOWER and PEDAL memory buttons. Automatic accompaniment will continue even when you release the lower keyboard keys with the chords struck by the lower keyboard keys.
To change the accompaniment chords, depress another lower keyboard key again. Automatic
accompaniment will continue with the new chord.
If only the LOWER or PEDAL memory button is set to ON, the sound of the keyboard whose corresponding memory button is not depressed is no longer heard when that button is released, and the automatic accompaniment of the rhythm and tone colors of the keyboard whose corresponding memory button is set to ON continues.
- When the FINGERED CHORD button is depressed, the musical intervals of the automatic chords change in accordance with the position of the keys on the lower keyboard which have been depressed.
Applying the A-B-C function separately for the lower keyboard and pedal keyboard
(1) Select the desired rhythm with the auto rhythm controls.
(2) Depress the CUSTOM A-B-C button.

FINGERED CHORD CUSTOM A-B-C
PERAL
(3) Depress the lower keyboard keys to create a chord and also depress the pedal keyboard key.
The lower keyboard chord and the pedal keyboard sound are isolated from each other, and so the auto chord sound is automatically accompanied with the chord, as created by depressing the lower keyboard keys, and the auto bass sound is automatically accompanied based on the sound produced by the depressed pedal keyboard key.
(4) When the MEMORY button is set to ON, automatic accompaniment continues even when the lower keyboard and pedal keyboard keys are released. If only the LOWER or PEDAL memory button is set to ON, the sound of the keyboard whose corresponding memory button is not depressed is no longer heard when that button is released, and the automatic accompaniment of the rhythm and sound of the keyboard whose corresponding memory is set to ON continues.
Changing the bass pattern of the MULTI-BASS
There are three types of bass patterns for the auto bass. Select the desired bass pattern with MULTI-BASS button 1, 2 or 3. A sustaining sound is produced when the CONSTANT button is depressed. The WAH-GUITAR operates normally but rhythmic chords do not sound. The string bass sound will decay.
- When none of the MULTI-BASS buttons are depressed, the auto bass function is actuated with Normal Pattern.
- MULTI-BASS button 1, 2 or 3 can be used simultaneously.
Starting and stopping the Auto Bass/Chord
The starting and stopping of the Auto Bass/Chord function can be controlled by the auto rhythm START and SYNCHRO start switches as well as by these buttons and the foot switch.
(1) START switch
As soon as this is set to ON, the rhythm starts, and when the lower keyboard keys are depressed, the A-B-C function is actuated. Once the keys are released, this function is canceled and only the sound of the original rhythm is heard.
- When the MEMORY button is at ON, the A-B-C function remains operative even when the keys are released.
(2) SYNCHRO start switch
When this is set to ON and then a key on the lower keyboard is depressed, the A-B-C function is actuated at the same time the auto rhythm is heard, and it is canceled as soon as the key is released.
- When the MEMORY button is at ON, the A-B-C function remains operative even when the key is released.
(3) Foot switch
When the RHYTHM STOP switch on the foot switch selector (on the right-hand side of the lower keyboard) is set to ON in the A-B-C operative mode, and then the foot switch is depressed, the rhythm and rhythmic chords are stopped and the auto bass sound is sustained. When the foot switch is depressed again, the A-B-C function becomes operative again.
Note: The A-B-C function does not work with auto rhythm break variations.

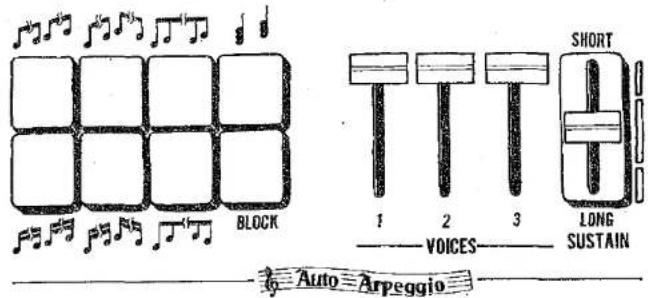
Auto Arpeggio
Select a rhythm pattern and also a VOICE lever.
All three VOICE levers can be used for a mixed effect.
What's auto arpeggio all about?
This function involves detecting the notes of the keys depressed on the lower keyboard and sounding the notes automatically in succession from the lowest to the highest in accordance with the auto rhythm.
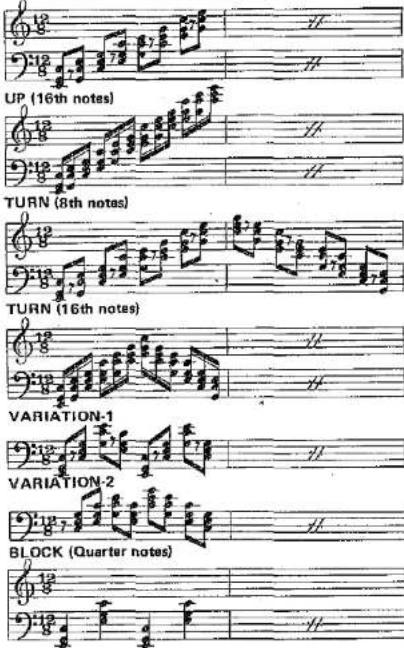
There are 7 different types of auto arpeggio note-sounding patterns. (Refer to table on next page.) The BLOCK VARIATION button at the bottom right superimposes the arpeggio effect with 3-note chords automatically even with note-sounding patterns in the above table. (BLOCK quarter notes do not change.)
How to use the auto arpeggio function
(1) Select any one of the seven arpeggio buttons.
(2) Three tone colors are available with the arpeggio effect. Adjust VOICE 1, 2 or 3 controls and set the tone color with the arpeggio effect superimposed.
(3) To add a sustaining effect to the arpeggio sound, adjust the SUSTAIN control.
(4) Start the rhythm and depress the keys on the lower keyboard. The auto arpeggio function is now activated.
■ The foot switch can be used to start and stop the effect just as for the rhythm.
■ When the LOWER memory button is set to ON, the auto arpeggio effect continues to sound even when the keys on the lower keyboard are released.
How to combine the auto arpeggio and auto bass/chord functions
The auto arpeggio and auto bass/chord functions can be used simultaneously.
(1) SINGLE FINGER CHORD mode
As soon as a single note is sounded with a lower keyboard key, the chord is detected, and in line with this detected chord, the arpeggio effect is sounded automatically in succession.
If a pedal keyboard key is not depressed, the arpeggio effect is sounded as a major chord. The
relationship between the pedal keyboard keys and the arpeggio effect is outlined below.
- No pedal keyboard keys are depressed: Major chord
- White pedal keyboard key is depressed: Seventh chord
- Black pedal keyboard key is depressed: Minor chord
- White and black pedal keyboard keys are depressed simultaneously: Minor seventh chord
(2) FINGERED CHORD mode
As soon as the chords are struck on the lower keyboard, the arpeggio effect is sounded automatically in succession with the chords on the keys.
(3) CUSTOM A-B-C mode
Operation is the same as that for the finger chord mode but the sound of the pedal keyboard must be played manually.
The Auto-Arpeggio Changes with the Rhythm Patterns have been provided that enable the auto-arpeggio to adopt 3/4, 12/8 and 4/4 rhythms. If more than one rhythm has been selected, the 3/4 pattern takes precedence, followed by 12/8 and 4/4 time in that order.
Auto Arpeggio Pattern
A group (3/4 time)....WALTZ
B group (12/8 time)....BALLAD, SWING, SLOW ROCK
C group (4/4 time)....MARCH, METRONOME, JAZZ ROCK, DISCO, TANGO, BOSSANOVA, RHUMBA, MAMBO, SAMBA, LATIN ROCK, POP ROCK, 16 BEAT
| UP (8th notes)Changes withevery note | TURN(8th notes)Changes withevery note | VARIATION 1Changes withevery note | BLOCK(Quarter notes)A change takes place in every octave. |
| BLOCK(variation) | |||
| UP(16th notes)Changes withevery note | TURN(16th notes)Changes withevery note | VARIATION 2Changes withevery note | The changes atevery note arechanged by 3-note chords. |
A group, 3/4 time, with C, E and G-key-notes depressed.
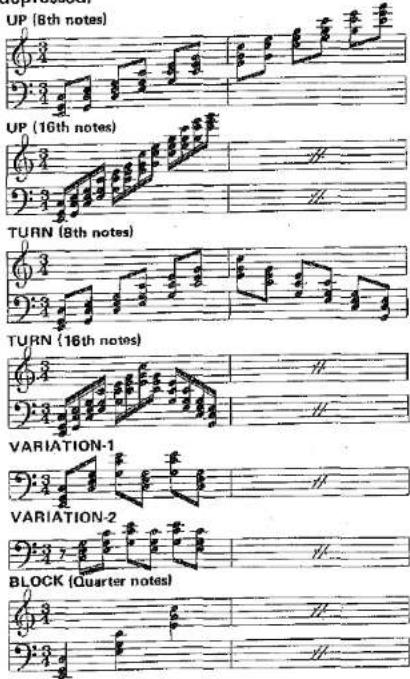
B group, 12/8 time, with C, E and G key-notes depressed.
UP (8th notes)
C group, 4/4 time, with C, E and G key-notes depressed.
UP (8th notes)
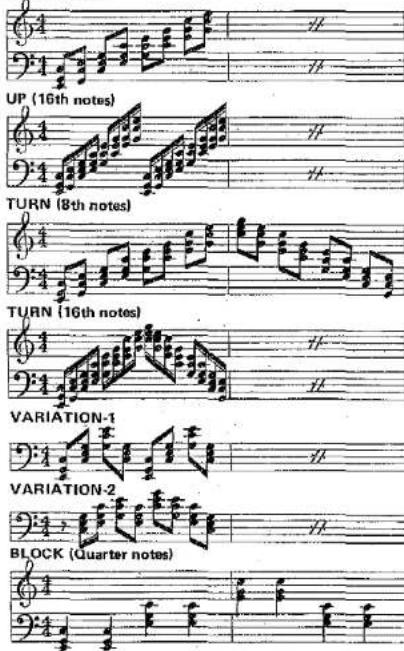
(Note: the notes indicate the sound added with BLOCK VARIATION ON.)
Symphonic Chorus and Tremolo
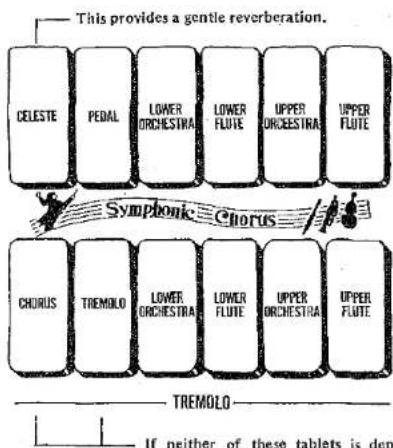
The SYMPHONIC CHORUS tablets take priority over the TREMOLO tablets.
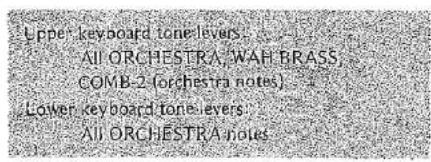
The tremolo effect cannot be applied to 'wah-brass,' 'vibraphone' and 'wah guitar' sound. The effect is produced with COMB-1 and COMB-2.
If neither of these tablets is depressed, the tremolo effect will not be produced. If they are depressed together, the TREMOLO tablet takes priority.
What does symphonic chorus mean?
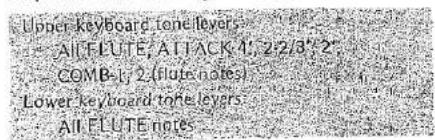
This function, when added to any upper, lower or pedal flute, orchestra or bass tone levers, will produce a massed effect. For example, when used with an 8' string, the sound produced will be that of many strings or violins. When used with flute tone levers, a cathedral pipe organ is simulated.
- UPPER FLUTE: The effect applies only to the flute sounds of the upper keyboard tone levers.
-
UPPER ORCHESTRA: The effect applies only to the orchestra sounds of the upper keyboard tone levers.
-
LOWER FLUTE: The effect applies only to the flute sounds of the lower keyboard tone levers.
- LOWER ORCHESTRA: The effect applies only to the orchestra sounds of the lower keyboard tone levers.
- PEDAL: The effect applies to all the sounds of the pedal keyboard tone levers.
When the CELESTE tablet is set to ON, the sound reverberates slowly and this gives the music a settled and 'picturesque' effect.
What does tremolo mean?
Tremolo is a variation in volume as opposed to vibrato (which is a variation in pitch). This effect is achieved by placing a rotating drum in front of a stationary speaker. As the drum rotates fast (TREMOLG) or slow (CHORUS) the sound is only permitted to escape from an opening on one side of the drum, which results in a change in the volume heard by the ear.
To produce the desired effect, simply select the voice or voices that are desired, for example the upper flutes to rotary, then select the mode of tremolo, either fast (TREMOLO) or slow (CHORUS).
Generally, the fast speed is used for popular music and the slow for church or classical selections.
(If the TREMOLO and CHORUS tablet are depressed together, the TREMOLO tablet takes precedence.)
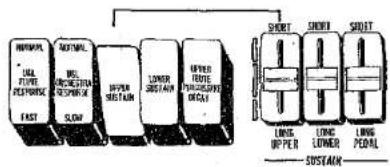
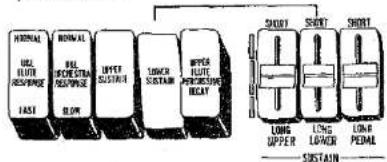
Foot Switch, Reverb and Sustain Controls
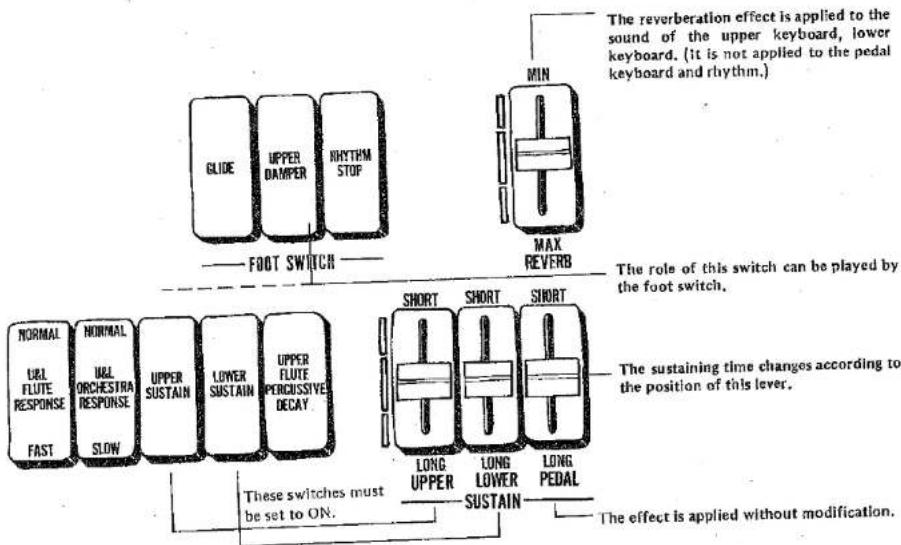
flowchart
graph TD
    A["FOOT SWITCH"] --> B["GLIDE"]
    A --> C["UPPER DAMPER"]
    A --> D["NRhythm STOP"]
    A --> E["MAX REVERB"]
    F["NORMAL FLUTE RESPONSE FAST"] --> G["NORMAL FLUTE RESPONSE SLOW"]
    F --> H["UPPER SUSTAIN"]
    F --> I["LOWER SUSTAIN"]
    F --> J["UPPER FLUTE PERCUSSIVE DECAY"]
    K["SHORT"] --> L["LONG UPPER"]
    K --> M["LONG LOWER SUSTAIN"]
    K --> N["LONG PEDAL"]
    O["The reverberation effect is applied to the sound of the upper keyboard, lower keyboard. (it is not applied to the pedal keyboard and rhythm.)"]
    P["The role of this switch can be played by the foot switch."] --> Q["Short"]
    R["The sustaining time changes according to the position of this lever."] --> S["Short"]
    T["These switches must be set to ON."] --> U["Short"]
    V["The effect is applied without modification."] --> W["Short"]
What are the foot switch selectors for?
These are the three tablets on the right of the lower keyboard. They determine the workings of the foot switch which is located on the left of the expression pedal.
(1) Glide
While the foot switch is depressed, all the musical pitches being played are reduced by a half tone.
- This function is released if the foot switch is released.
- The vibrato effect is canceled while the foot switch is depressed.
(2) Upper damper
This tablet can be made to play the role of the upper sustain tablet in front of the foot switch selectors but bear in mind the following special conditions.
a) When a vibraphone sound is produced with the upper keyboard's preset tone levers, the tone colors are naturally sustained, but if the UPPER DAMPER tablet is set to ON and then the key is released, a short decay effect is produced. If the foot switch is activated, the tone will be naturally sustained again.
b) When notes are produced by the upper key-
board's COMB-1 and COMB-2 tone levers and by the special preset piano, harpsichord, jazz guitar and electric guitar controls, a short decay effect is obtained when your finger is removed from the keys. However, if the UPPER DAMPER tablet is at ON and then the foot switch is pressed ON, a sustaining effect is provided.
(3) Rhythm stop
When the RHYTHM START switch is at ON, the rhythm can be stopped and started with the foot switch (just depress the foot switch once). However, if the RHYTHM STOP tablet is set to OFF when the rhythm has been stopped with the foot switch, the rhythm will start again.
What's reverb all about?
Reverberation is an effect which makes the sound reverberate to give the impression that the sound is being heard in a large concert hall. This effect can be applied to the sound from the upper keyboard and lower keyboard.
What's the flute response function for?
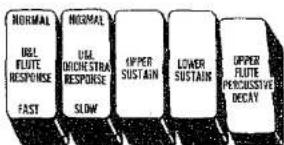
When the FLUTE RESPONSE tablet is set to ON, the crispness of the following tone is improved.
What's the orchestra response function for?
When the ORCHESTRA RESPONSE tablet is ON, the attack in the following tone becomes slower.
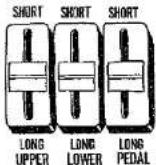
What's upper sustain all about?
When the UPPER sustain button is set to ON, a sustaining effect can be added to the following tones by adjusting the upper sustain control. When this control is set to the LONG position, the sustaining time is increased.
- The sustaining time is predetermined with special presets sound.
flowchart
graph LR
    A["INFORMATION"] --> B["ULFURE PERFORMANCE"]
    B --> C["FAST"]
    D["ACRONYL"] --> E["ULFURE PERFORMANCE"]
    E --> F["SLOW"]
    G["UPPER SWITCH"] --> H["LUMBER SWITCH"]
    I["UPPER ROUTE SWITCH"] --> J["PURRICUT SWITCH"]
    K["SHORT"] --> L["SHORT"]
    M["SOUTH"] --> N["LUNG UPPER"]
    O["SOUTH"] --> P["LUNG LOWER"]
    Q["SOUTH"] --> R["LUNG PQUAL"]
    S["SOUTH"] --> T["SUSTAIN"]
Tone for upper sustain
All upper keyboard tone levers (including preset tones).
Special preset piano harpsichord, jazz guitar, electric guitar.
Sustaining effect
Sustaining is an effect which gives the sound a lingering resonance. With piano and other keyboard instruments, this resonance remains normally even after the keys have been released.
With an ordinary organ the sound fades away as soon as the keys are released but the SUSTAIN levers make it possible to give the sound a lingering effect.
What's lower sustain all about?
When the LOWER SUSTAIN tablet is set to ON, a sustaining effect can be added to the following tones by adjusting the lower sustain control. When this control is set to the LONG position, the sustaining time is increased.
- The sustaining time is predetermined with special presets sound.
Tone for lower sustain
All lower keyboard tone levers (except "wah guitar") Special preset piano, harpsichord, jazz guitar, electric guitar
Adding a sustaining effect to the pedal keyboard sound
Pull the rightmost PEDAL sustain lever toward you. This applies the sustaining effect to the pedal keyboard sound. When this lever is set to LONG, the sustaining time is increased and when set to SHORT, there is no sustaining time at all.
What is the UPPER FLUTE PERCUSSIVE DECAY function for?
While the usual keys are depressed, a constant flute sound is produced.
When the UPPER FLUTE PERCUSSIVE DECAY tablet is set to ON, the sound fades away naturally even though the keys are being depressed. Once the keys are released, the sound fades immediately. (Percussive decay effect)
- When the UPPER SUSTAIN tablet is at ON. The sound will naturally fade even when the keys sare released.
■ The percussive decay effect is applied to the following sounds.
Sounds of the upper keyboard flute tone levers Sounds of the COMB 1-2 flute tones
- With the ATTACK 4', 2-2/3' and 2' tone levers, an effect is produced whereby the decay time is reduced.
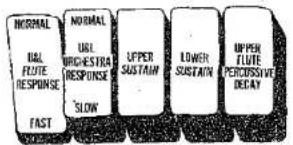
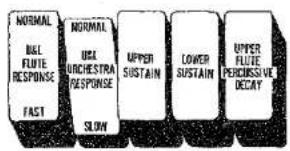
- The order of priority among the FLUTE RESPONSE, ORCHESTRA RESPONSE, UPPER SUSTAIN, LOWER SUSTAIN and UPPER FLUTE PERCUSSIVE DECAY tablet is shown in the figure below.
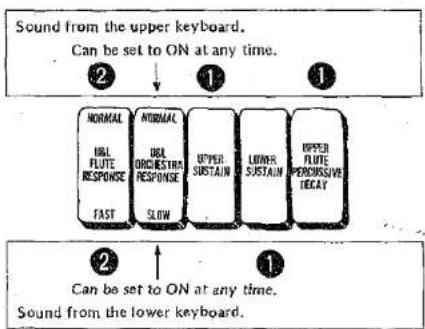
flowchart
graph TD
    A["Sound from the upper keyboard. Can be set to ON at any time."] --> B["NORMAL INFL FUTE RESPONSE FAST"]
    B --> C["NORMAL INFL ORCHESTRA RESPONSE SLOW"]
    C --> D["UPPER SUSTAIN"]
    D --> E["LOWER SUSTAIN"]
    E --> F["UPPER FLUTE PERCOSSIVE DECAY"]
    F --> G["Can be set to ON at any time. Sound from the lower keyboard."]
To Obtain Maximum Enjoyment from Your 405
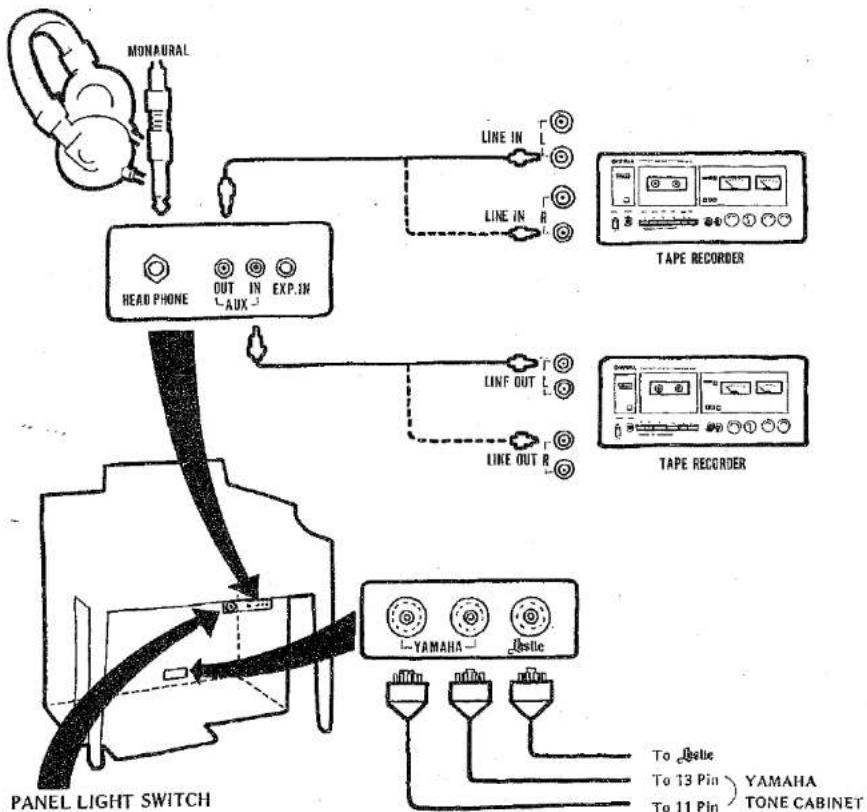
flowchart
graph TD
    A["MONAURAL"] --> B["HEAD PHONE"]
    B --> C["OUT IN AUX EXP.IN"]
    C --> D["TAPE RECORDER"]
    D --> E["LINF OUT"]
    D --> F["LINE OUT R"]
    E --> G["PAPE LIGHT SWITCH"]
    F --> G
    G --> H["YAMAHA TONE CABINET"]
    H --> I["To 13 Pin"]
    H --> J["To 11 Pin"]
There is switch on the underside of the Lower Keyboard. When this is ON, the lights for the panel can be turned on.
HEADPHONES (390Ω Imp Monaural)
A set of Yamaha headphones (optional) can be plugged into the HEADPHONE jack under the keyboard. With the headphones connected, the speakers are automatically shut off, allowing you to play or practice at any volume level without disturbing anyone.
EXP. IN (47kΩ Imp)
This jack accepts any other sound sources (i.e., Guitar, Synthesizer, etc.) and reproduces them through the Electone speakers.
Note: The output lever of the sound source will be controlled by the expression pedal.
Input signal levers should be approximately 2Vp-p.
AUX OUT (470Ω Imp)
For recording, connect the AUX OUT jack with the tape deck's LINE IN jack. Control the recording levels on the tape deck.
AUX IN (18kΩ Imp)
For playback, connect the AUX IN jack with the tape deck's LINE OUT jack. Control the playback levels on the tape deck.
Note: Signal sources routed via the AUX IN jack are not affected by the expression pedal.
TONE CABINET CONNECTORS
If additional dynamic range or sound dispersion is found to be desirable, amplified tone cabinets can be connected. The 13-pin and 11-pin connectors are used exclusively for YAMAHA Tone Cabinets. The new type tone cabinet has an electronic tremolo-effect device built in. It can deliver a tremolo/chorus effect respectively to the flute and orchestra tones on the upper/lower keyboards.
Jestic (11-pin socket): This connector is used when employing a Jestic tone cabinet.
Trouble Shootings
| “Trouble” | Cause | Remedy |
Electrical "trouble"
| No sound heard immediately after the power switch is turned on. | In takes about 5 seconds for the Electone Organ to become fully operational. | The Electone Organ is working properly and therefore is not a cause for concern. |
| Frequent noise. | (1) Noise is caused when home electrical appliances such as refrigerators and washing machines are switched on and off.(2) Failure in neon sign in your neighborhood or electric drill, etc. | (1) Use a power outlet which is located the furthest from the appliance which you suspect to be the origin of the noise.(2) Have the neon sign repaired.(3) If you cannot locate the origin of the noise, get in touch with your dealer. |
| TV or radio reception quality is degraded when the Electone is turned on. | The radio or TV set is being used in the immediate vicinity of the Electone Organ. | Move the radio or TV set as far away from the Electone Organ as possible. Upgrade TV or radio antenna system. |
| Occasional interference from radio or TV broadcasts. | A broadcasting station with a high signal strength or an amateur radio station is located nearby. | Try to identify the type of station: TV, FM radio, AM radio, "Ham" operator, CB operator, etc. |
| Fluctuations in the sound volume, depending on the position of the organ. Varies somewhat depending on the voices selected. | Since one of the foremost features of an electronic musical instrument is the capacity to change the tone color, it is extremely difficult to even out the fluctuations in the sound volumes of each keyboard caused by the tone colors. However, the Electone Organ is designed and adjusted to preclude any such problems during actual performances whatever the tone color. | The sound level and the tonal character will vary according to the installation location of the Electone Organ and the listening position. Try various locations within the room. |
| Only one note is heard even when two pedal keyboard keys have been depressed.Only seven notes are heard even when more than seven keys on the upper or lower keyboards are depressed. | The Electone Organ is designed so that only one note from the pedal keyboard and seven notes each from the lower and upper keyboards can be sounded.This is because of performance and design considerations. | The high notes are given priority with the pedal keyboard while the keyboard whose key has been depressed first is given priority with the upper and lower keyboards, lower keyboards. |
Handling "trouble"
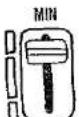
| Noise is heard when the Electone Organ is subjected to vibration or shock. | The built-in reverberation unit employs a soft spring and so vibration is transmitted. | (1) Take care not to subject the Electone Organ to strong vibration or shock.(2) Install the Electone Organ so that it does not shake.(3) When moving the Electone Organ, switch off the power or rotate the reverberation control to MIN, that the reverberation effect is not produced and then move the Electone Organ. |
| “Trouble” | Cause | Remedy |
| Auto Bass/Chord function does not work even when SINGLE FINGER CHORD or FINGERED CORD button is set to ON. | There is no Auto Bass/Chord sound unless the lower keyboard rhythmic chord and pedal keyboard tone levers have been set. When the auto rhythm function is not made operative, a sustaining sound without the rhythm superimposed is produced. | Make absolutely sure that the lower keyboard rhythmic chord and pedal keyboard tone levers are ON, and that the auto rhythm function is set to ON. |
| There is no change in the musical intervals even if the high note key on the lower keyboard or the low note key is depressed and held in the single finger chord mode. | The Electone Organ is designed to deliver the prescribed sound in 1 octave in the single finger chord mode. If the pitch name is the same, a chord will be struck in the same musical interval no matter which key on the lower keyboard is depressed and held. | |
| Special preset tone colors are not heard when the Auto Bass/Chord function is used even when the special preset function is moved to the lower keyboard. | The Electone Organ is designed to deliver the tone colors of the tone levers on the lower keyboard/rhythmic chords and custom voice sound when the Auto Bass/Chord function is used. | |
| A chord, different from that which should have been produced when the FINGER CHORD and MEMORY buttons were depressed in the Auto Bass/Chord mode, is obtained. | When changing the chord, you may have momentarily touched an unrelated key and the Electone Organ acted on the command promptly. | (1) Follow the chord change procedure properly.(2) Set the MEMORY button to OFF. |
| The sound from the lower keyboard is continuous and will not stop. | (1) The MEMORY button is set to ON, with the Auto Bass/Chord CONSTANT button at ON.(2) The auto rhythm is superimposed and the MEMORY butotn is set to ON. | Set the Auto Bass/Chord's MEMORY button to OFF. |
| “Trouble” in the actual instrument | ||
| The sound appears broken (it resonates or vibrates) | Since the Electone Organ produces a sustained sound, there is often resonance in the surrounding cupboards, window panes and other objects. | (1) Turn down the sound volume.(2) Remove the resonating objects. |
| The pitch feels high with the pedal keyboard and low with the upper keyboard's treble section. | This is often felt particularly on comparison with a piano. However, the overtone construction of a piano is complex (especially in the treble and bass)-It is not possible to form melodies with the actual sounds but they are formed when the overtones are heard. With the Electone Organ, the formation of melodies is the exact reverse and so that piano and Electone Organ do differ intrinsically in this respect. | |
Specifications
KEYBOARDS
Upper 49 keys (c \~ cq)
Lower 49 keys (C c_3)
Pedal 13 keys (C_1 C)
TONE LEVERS
Upper
Flute 16'-8'-5-1/3-4'-2-2/3'-2'
Brass 16'-8', String 16'-8'-4'
Clarinet 16', Oboe 8'
Wah Brass
Vibraphone, Combination 1-2
Lower
Flute 8'-4'-2', Cello 8'-4', Horn 8',
Diapason 8', Wah Guitar
Pedal
Bass 16'8', Tuba 16', Bass Guitar 8'
UPPER SPECIAL PRESET SECTION
Selectors
Piano, Harpsichord, Jazz Guitar, Electric Guitar,
Banjo, Mandolin, Marimba
Effect
Symphonic Chorus
Controls
Repeat Speed, Volume
UPPER CUSTOM VOICE SECTION
Selectors
Vocal Ensemble (Tenor), Piccolo,
Saxphone, Trombone, Trumpet, Clarinet,
Accordion, Funny,
Effect
Symphonic Chorus
Controls
Bright, Volume
PRESET ENSEMBLE SELECTORS
Special Presets
Custom Voices
Upper to Lower (Special Presets)
Upper to Lower (Custom Voices)
Upper Ensemble
EFFECT LEVERS
Brilliance
Attack 4'-2-2/3'-2' (Upper)
Attack Length (Upper)
Delay Vibrato (Controlled by Upper)
Vibrato Depth
Vibrato Speed
EFFECT CONTROLS
Manual Balance
Reverb
Upper Sustain
Lower Sustain
Pedal Sustain
EFFECT SELECTORS
U&L Flute Response
U&L Orchestra Response
Upper Sustain
Lower Sustain
Upper Flute Percussive Decay
Glide (Foot Switch)
Upper Damper (Foot Switch)
TREMOLO SECTION
Tremolo, Chorus, Upper Flute, Upper Orchestra
Lower Flute, Lower Orchestra
SYMPHONIC CHORUS SELECTORS
Celeste
Upper Flute
Upper Orchestra
Lower Flute
Lower Orchestra
Pedal
AUTO RHYTHM SECTION
Rhythm Selectors
March, Waltz, Ballad, Swing, Metronome, Slow Rock,
Jazz Rock, Disco, Tango, Bossanova, Rhumba, Manbo,
Samba, Latin Rock, Pop Rock, 16 Beat
Rhythm Variation Selectors
Normal, Variation 1·2·3
Break Variation Selectors
ON (with Light)
Break Variation 1·2·3·4·5·6
Controls
Start, Synchro-Start
Tempo, Volume, Balance,
Rhythm-Stop (Foot Switch)
Others
Digital Display (Tempo/Bar-Beat)
Tempo Light
RHYTHM SEQUENCE PROGRAMMER
Program ON (with Light), Check, Back, Forward, Reset,
Record, Blank, End
Program 1·2·3, Normal
8 Bar Variation, 16 Bar Variation
Digital Display (Bar/Full/End)
ABC FUN BLOCKS
Normal, Single Finger Chord, Fingered Chord
Custom ABC
Lower Memory, Pedal Memory
Constant, Multi-Bass 1·2·3
RHYTHMIC CHORD SECTION
Tone Controls
Piano 1-2, Guitar 1-2
Effect Control
Sustain
AUTO ARPEGGIO SECTION
Functions
Up 8th note · 16th note, Turn 8th note · 16th note,
Variation 1, Variation 2, Block-Quater, Block Variation
Tone Controls
Voice 1-2-3
Effect Control
Sustain
FOOT SWITCH SELECTORS
Glide
Upper Damper
Rhythm Stop
OTHER CONTROLS
Master Volume
Expression Pedal
Power Switch (with Pilot Light)
OTHER FITTINGS
Headphone Jack (390Ω1mp)
AUX-1N Jack (18xΩ Imp)
AUX-OUT Jack (470ΩImp)
EXP-IN Jack (47kΩImp)
YAMÀHA Tone Cabinet Connectors (11 pin - 13 pin)
Leslie Tone Cabinet Connector (11 pin)
Panel Light and Switch
Music Rest
Roll-top Fallboard (with Lock & Auto Power Switch)
Matching Bench (with Music Storage Space)
AMPLIFICATION SYSTEM
Output (RMS) Speakers
Center Channel: 60W 12" (30cm), 8" (20cm), 2" (5cm)
Tremolo Channel: 60W 8" (20cm)
Right Channel: 30W 8" (20cm)
Left Channel: 30W 8" (20cm)
ELECTRICAL DATA
Power Consumption: See Electone nameplate
Power Source: 50/60Hz AC
DIMENSIONS
Italian Model Spanish Model
Width 47" (119.5cm) 47" (119.5cm)
Depth 27-1/2" (70cm) 27-1/2" (70cm)
Height 40-1/2" (103cm) 40-1/2" (103cm)
WEIGHT
260 lb (119 kg) 260 lb (119 kg)
FINISH
American Walnut Pecan & ASH
& Poplar Lacquire Finish
Lacquire Finish
Specifications subject to change without notice.
SINCE 1887

YAMAHA
International Corp., Box 6600, Buena Park, Calif. 90620.
- GUIDE TO YOUR YAMAHA ELECTOME ORGAN
- 405
- Contents
- Caution (To be Read before You Start Playing)
- Keyboards and Pedals
- Keyboards
- Preparing to play
- Setting the Tone Levers
- Tone Levers
- Make a sound with the upper keyboard
- Preset tones
- Make a sound with the lower keyboard
- Make a sound with the pedals
- What's "Brilliance" all about?
- What's "attack length" all about?
- What's "vibrato" all about?
- Ordinary vibrato
- Delay vibrato
- Effects and Functions Special Presets
- What are the upper special presets controls?
- Tone colors for setting
- Only one tone color with the special preset function
- The special preset controls come with special functions.
- Custom Voices
- What's custom voices all about?
- Only one custom voice tone color can be produced at a time
- The custom voice controls come with special functions
- Relationship between preset ensemble Tablets & A-B-C function switches,.
- How to use the Auto Rhythm Functions
- Description of functions
- a) Rhythm selectors
- b) Variations
- c) Break variation buttons
- d) Volume, balance controls
- Try out the break variation function!
- Digital Display
- What's the Digital Display all about?
- Tempo
- Bar, beat
- Memory display, check display
- Memory full display
- Program end display
- Rhythm Sequence Programmer
- What's the Rhythm Sequence Programmer all about?
- How to use the Rhythm Sequence Programmer
- Break Variations While Playing Your Program
- Checking the contents of the program
- Dealing with program errors
- Changing programs in the memory
- Rhythmic Chords
- Auto Bass/Chord
- What exactly are rhythmic chords?
- What's Auto Bass/Chord all about?
- How to use the Auto Bass/Chord function
- Accompaniment with the chords struck when the lower keyboard keys are depressed
- Applying the A-B-C function separately for the lower keyboard and pedal keyboard
- Changing the bass pattern of the MULTI-BASS
- Starting and stopping the Auto Bass/Chord
- Auto Arpeggio
- What's auto arpeggio all about?
- How to use the auto arpeggio function
- How to combine the auto arpeggio and auto bass/chord functions
- Auto Arpeggio Pattern
- Symphonic Chorus and Tremolo
- What does symphonic chorus mean?
- What does tremolo mean?
- Foot Switch, Reverb and Sustain Controls
- What are the foot switch selectors for?
- Glide
- Upper damper
- Rhythm stop
- What's reverb all about?
- What's the flute response function for?
- What's the orchestra response function for?
- What's upper sustain all about?
- Sustaining effect
- What's lower sustain all about?
- Adding a sustaining effect to the pedal keyboard sound
- What is the UPPER FLUTE PERCUSSIVE DECAY function for?
- To Obtain Maximum Enjoyment from Your 405
- HEADPHONES (390Ω Imp Monaural)
- IN (47kΩ Imp)
- AUX OUT (470Ω Imp)
- AUX IN (18kΩ Imp)
- TONE CABINET CONNECTORS
- Trouble Shootings
- Specifications
- UPPER SPECIAL PRESET SECTION
- UPPER CUSTOM VOICE SECTION
- PRESET ENSEMBLE SELECTORS
- EFFECT CONTROLS
- EFFECT SELECTORS
- TREMOLO SECTION
- SYMPHONIC CHORUS SELECTORS
- AUTO RHYTHM SECTION
- ABC FUN BLOCKS
- AUTO ARPEGGIO SECTION
- FOOT SWITCH SELECTORS
- OTHER CONTROLS
- AMPLIFICATION SYSTEM
- ELECTRICAL DATA
- DIMENSIONS
- WEIGHT
- FINISH
- YAMAHA
Marke : YAMAHA
Modell : Electone 405
Kategorie : Tastatur