AP390 - Zugangspunkt Aerohive - Kostenlose Bedienungsanleitung
Finden Sie kostenlos die Bedienungsanleitung des Geräts AP390 Aerohive als PDF.

| Produkttyp | Zugangspunkt |
| Marke | Aerohive |
| Modell | AP390 |
| WLAN-Standard | 802.11ac Wave 2 |
| MIMO | 2x2 |
| Frequenzbänder | 2,4 GHz und 5 GHz |
| Maximale Datenrate (5 GHz) | 866 Mbit/s |
| Maximale Datenrate (2,4 GHz) | 300 Mbit/s |
| Antennen | 2 integrierte Antennen |
| Ethernet-Schnittstellen | 2x Gigabit Ethernet (1x PoE+) |
| Stromversorgung | PoE+ (802.3at) oder 12V DC |
| Leistungsaufnahme (max.) | 12,95 W |
| Betriebssystem | Aerohive HiveOS |
| Verwaltung | Cloud-basiert (HiveManager) oder lokal |
| Sicherheit | WPA2, WPA3, 802.1X, RADIUS |
| Montage | Decke oder Wand (mit Halterung) |
| Abmessungen (B x T x H) | 24,6 x 24,6 x 5,1 cm |
| Gewicht | 1,2 kg |
| Betriebstemperatur | 0°C bis 50°C |
| Luftfeuchtigkeit | 5% bis 95% (nicht kondensierend) |
| Zertifizierungen | FCC, CE, RoHS |
| Lieferumfang | AP390, Montagehalterung, Kurzanleitung |
| Pflege und Reinigung | Mit trockenem, fusselfreiem Tuch reinigen; keine Flüssigkeiten verwenden. |
| Reparierbarkeit | Keine vom Benutzer austauschbaren Teile; Reparatur nur durch Fachpersonal. |
Häufig gestellte Fragen - AP390 Aerohive
Benutzerfragen zu AP390 Aerohive
0 Frage zu diesem Gerät. Beantworten Sie die, die Sie kennen, oder stellen Sie Ihre eigene.
Eine neue Frage zu diesem Gerät stellen
Laden Sie die Anleitung für Ihr Zugangspunkt kostenlos im PDF-Format! Finden Sie Ihr Handbuch AP390 - Aerohive und nehmen Sie Ihr elektronisches Gerät wieder in die Hand. Auf dieser Seite sind alle Dokumente veröffentlicht, die für die Verwendung Ihres Geräts notwendig sind. AP390 von der Marke Aerohive.
BEDIENUNGSANLEITUNG AP390 Aerohive
Aerohive QuickStart for the AP370 and AP390
This guide explains how to install Automotive AP370 or AP390 access points and connect to HiveManager. The instructions in this document apply to both models. To register, get the latest product documentation, (including translations of select documents), see compliance information, and download software updates. Visit www.namingpartners
AP370 Kit Contents
• AP370 device with USB slot cover
• 2 security screw
- 2 dotted screws
- 3 wall mount screws and anchors
• 1 security bracket
- 4 adhesive feet
+ QuickStart Guide
(二) 本次股东大会的召集和召开程序
AP390 KII Contents
+ AP390 device with USB slot cover
• 2 security screws
• 2 dotted screws
+ 3 wall mount screws and anchors
• 1 security brackets
• 4 adhesive feet
• QuickStar Guide
(Antennas ordered separately)
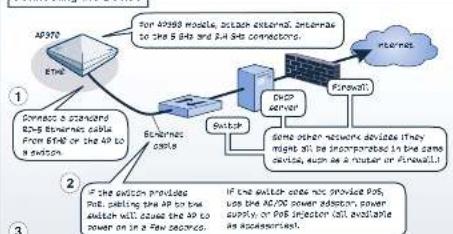
Connecting the Device
flowchart
graph TD
    A["AP370"] --> B["Ethernet"]
    B --> C["Switch"]
    C --> D["IP/O server"]
    D --> E["Firewall"]
    E --> F["Other network devices"]
    F --> G["IP/O switches for AP370 module, attach external, interfaces to the 6.4s and 2.4.4S connectors"]
    C --> H["Connect a command 8.5x thermal cable from 6.4s or the AP to a switch"]
    C --> I["IF the switch provides IP/O, setting the AP to two switches will cause the AP to power on in a few seconds"]
    C --> J["IF the switch does not provide P/S, use the AP/2C power addition, power supply, or P/S injector, all available as accessories"]
After you power on the AP, it automatically tries to get network settings and contact HiveManager. This process takes about five minutes. When you see the AP listed on the AI Devices page in the Montersection of the HiveManager GUI, the initial setup is complete and you can begin managing the AP with HiveManager.
If the AP does not appear after about ten minutes, see the Aerohive product documentation and computer-based training modules to learn what you can do to help establish the connection. These resources are available for free at www.aerohive.com/support/tech-docs-and-online-training.
Mounting the AP370 and AP390
You can mount the AP370 or AP390 on a dust-free surface, on a wall, or to the tracks of a dropped ceiling grid that will support its weight. The wall and ceiling mounting options are explained below and on the next panel.
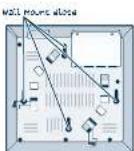
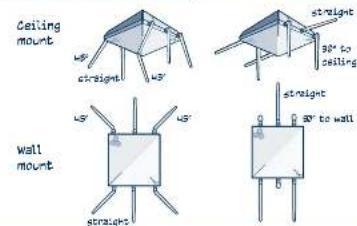
Wall Mount
Attach the AP to any surface that supports its weight (less than 1 lb or 45 kg for either device), and to which you can install the wall mount screws. There are four wall mount slots on the back of the device. Measure the distances between the centers of the large ends of those slots and drill corresponding holes in the wall. Install the 3 wall mount screws and plastic anchors that this with the device. If you are connecting to cables from inside the wall, drill a hole in the wall so that you can pass the cables through to the AP. Finally, connect the cables to the device.

WARNING: FOR INDOOR USE ONLY. The AP370 and AP390 devices, 5G power adapter and all connected cables are designed for indoor use only.
©2013 Aerospace Networks, Inc.
Aerohive® is a U.S. registered trademark of Aerohive Networks Inc. R/N 630-102-08 Feb. A

Ceiling Mount
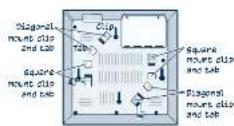
You can mount the AP370 or AP590 on a flat surface using the rubber feet that ship with the device. You can also mount these devices to the tracks of a dropped ceiling grid using the mounting tabs and clips on the back of the device. The tabs slip over the edge of the ceiling track and the clips click into place to secure the device.
The ceiling mounting options are shown below. The mounting hardware on the device allows you to mount it diagonally, or square to the track.
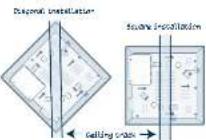
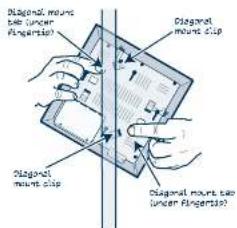
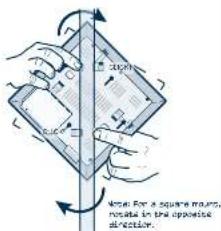
To mount the device on a ceiling track in either the diagonal or square position, hold the device so that you are touching the appropriate tabs (as shown in the previous illustrations). Hold the device upside down and press it gently against the ceiling track. Use your fingers to guide one of the tabs over the edge of the track. Then rotate the device until the clips click into place.
To remove the device, press the clips toward the device until they disengage from the track, then rotate the device gently and pull it away from the track. The illustrations below show how to install the device on a ceiling track in the diagonal position. To mount the device the square position, use the square-mount tabs and clips and follow the same steps (except for the rotation, which will be in the opposite direction).
① Use your fingertips to align the tabs with the track.
② Rotate the device until the clips click into place.
Cut a small hole in the ceiling tie to accommodate the cables. Connect the cables and, for optimal reception, align external antennas for the AP390 as shown in the next section.
Power Specifications
Power specifications for the AP370 and AP390 • Power adapter: DC 12V, 2A • PoE: DC 55V, 0.6A, Class II
Aligning AP390 External Antennas
Locking the Device
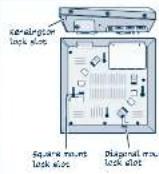
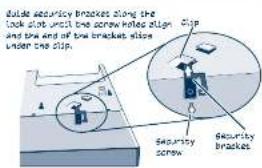
You can secure the AP using a Kensington lock, or you can use the security bracket and screw that ships with the device to secure it to a ceiling track or to a wall, as shown in the illustrations below. To use a Kensington lock, loop the lock cable around a secure object, insert the Tbar component of the lock into the lock slot on the AP and then turn the key to engage the lock.
To secure the AP to a ceiling track or a wall using the security bracket and screw, you will need a spanner bit for size #6 security screws, and a driver that will accept the bit. Bits are available from Aerohive in sets of three (AH-ACC-SEC-BIT-300-100-3PK). To use the security screw, refer to the illustrations below. If you use the cross-head screw, you will need a cross-head screwdriver.
Aerohive recommends a variety of Kensington locks. For more information, contact your sales representative.
Status LED
The status LED on the lap of the device displays the following activity states:
- Dark: Power is off, or the indicator has been disabled.
- Amber (flashing). The device is performing a firmware upgrade. Do not power off the device during this process.
- Amber (solid): This indicates that the CAPWAP connection has not been successfully established, or the device is booting or shutting down.
- White: The device is powered on and operating properly, and has made a successful CAPWAP connection through the E-H0 interface.
Optional Accessories
You can order a wide variety of accessories for APS70 and AP390 devices. For specific information about the accessories that are available, contact your sales representative.