BDC643W - Herd BEKO - Kostenlose Bedienungsanleitung
Finden Sie kostenlos die Bedienungsanleitung des Geräts BDC643W BEKO als PDF.

| Produkttyp | Freistehender Elektroherd |
| Marke | Beko |
| Modell | BDC643W |
| Breite | 60 cm |
| Höhe | 85 cm |
| Tiefe | 60 cm |
| Gewicht | ca. 48 kg |
| Energieversorgung | Elektro (230 V / 50 Hz) |
| Anschlussleistung | ca. 9,5 kW |
| Backofen-Volumen | 65 Liter |
| Heizarten | Ober-/Unterhitze, Heißluft, Grill, Umluft |
| Temperaturbereich Backofen | 50 °C – 275 °C |
| Kochfeld | Cerankochfeld mit 4 Kochzonen |
| Steuerung | Drehknöpfe und elektronischer Timer |
| Timer | Ja, mit Abschaltfunktion |
| Innenbeleuchtung | Ja (Glühlampe) |
| Reinigungshilfe | EasyClean-Versiegelung |
| Kühlsystem | Kühlgebläse |
| Sicherheit | Kindersicherung, Temperaturfühler |
| Zubehör | 1 Backblech, 1 Grillrost |
| Energieeffizienzklasse | A (Backofen) |
| Farbe | Weiß |
Häufig gestellte Fragen - BDC643W BEKO
Benutzerfragen zu BDC643W BEKO
0 Frage zu diesem Gerät. Beantworten Sie die, die Sie kennen, oder stellen Sie Ihre eigene.
Eine neue Frage zu diesem Gerät stellen
Laden Sie die Anleitung für Ihr Herd kostenlos im PDF-Format! Finden Sie Ihr Handbuch BDC643W - BEKO und nehmen Sie Ihr elektronisches Gerät wieder in die Hand. Auf dieser Seite sind alle Dokumente veröffentlicht, die für die Verwendung Ihres Geräts notwendig sind. BDC643W von der Marke BEKO.
BEDIENUNGSANLEITUNG BDC643W BEKO
DOUBLE OVEN
User Manual
In order to obtain the best performance from your product we advise that you read through this user manual carefully. Please keep these instructions for future use and pass them on to any future users of the product.
The User Manual will help you use the product in a fast and safe way.
- Read the User Manual before installing and operating the product.
• You must strictly observe the safety instructions. - Keep this User Manual within easy reach for future reference.
• Also read other documents supplied with the product.
Remember that this User Manual may also be applicable for several other models.
Differences between models are explicitly identified in the manual.
Explanation of symbols
Throughout this User Manual the following symbols are used:
i Important information or useful hints about usage.
⚠ Warning for hazardous situations with regard to life and property.
⚠ Warning for electric shock.
Warning for risk of fire.
Warning for hot surfaces.
Table of Contents
1 General information...... 4
Overview....4
Technical specifications .... 5
Accessories supplied with the unit......6
2 Safety instructions...... 8
General safety....8
Safety when working with electricity .9
Intended use 9
Safety for children....9
3 Installation.... 10
Before installation....10
Installation and connection.... 10
Disposal 12
Disposing of packaging material .....12
Disposing of the old product .....12
Future Transportation ....13
4 Preparation 14
Tips for saving energy 14
Initial operation 14
First cleaning of the appliance.....14
Initial heating....14
5 How to use the hob ...... 16
General information on cooking......16
How to use hobs....17
6 How to operate the oven ..... 18
General information on baking, roasting and grilling ....18
How to use the electric oven ....19
How to operate the top oven part.....21
How to operate the grill -Top oven .....21
Top oven cooking times table for grilling....22
7 Maintenance and care ...... 23
General information 23
How to clean the hob....23
Cleaning the control panel....23
Cleaning the oven....23
Removal top oven door 24
Removing the door inner glass .....25
Replacing the oven lamp 25
8 Troubleshooting...... 26
9 Guarantee and Service ...... 27
1 General information
Overview
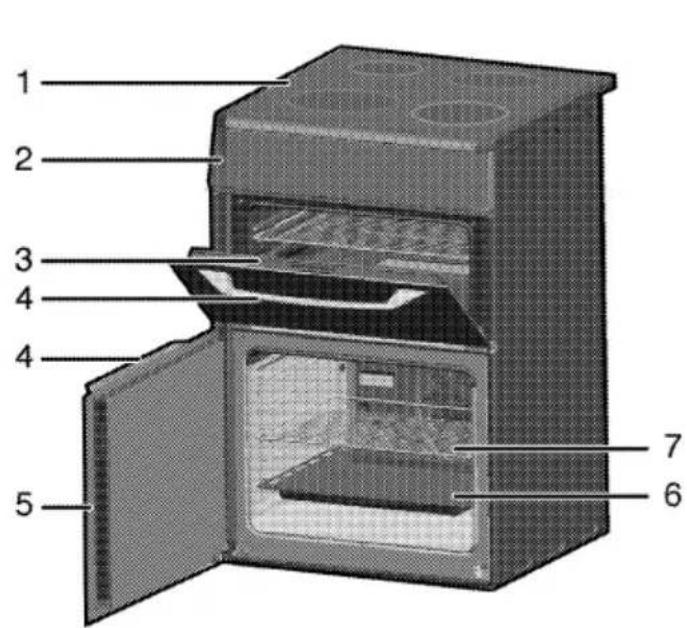
1 Burners' plate
2 Control panel
3 Top oven door
4 Handle
5 Main oven door
6 Tray
7 Wire shelf
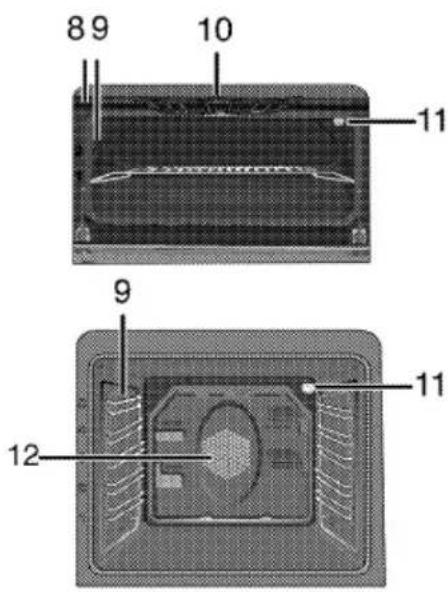
8 Door switch
9 Shelf positions
10 Grill heating element
11 Lamp
12 Fan motor (behind steel plate)
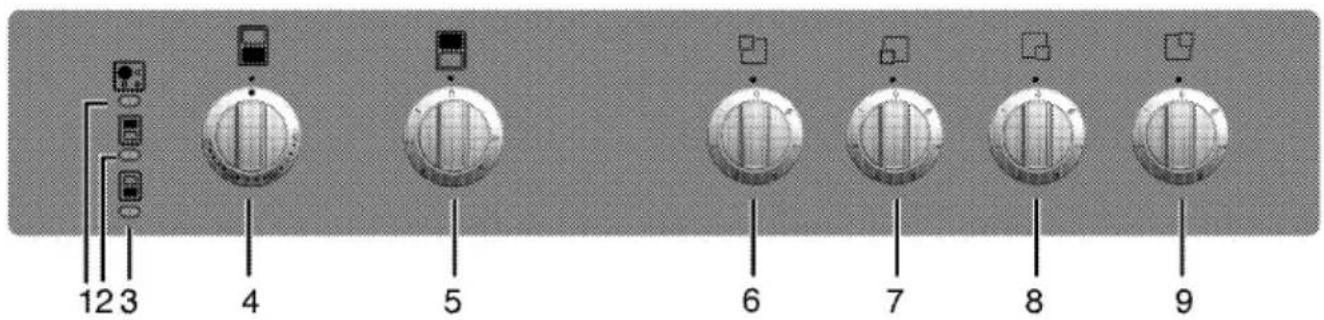
1 Warning lamp
2 Thermostat lamp for top oven
3 Thermostat lamp for main oven
4 Main oven function knob
5 Top oven grill knob
6 Single-circuit cooking plate Rear left
7 Single-circuit cooking plate Front left
8 Single-circuit cooking plate Front right
9 Single-circuit cooking plate Rear right
Technical specifications
| GENERAL | |
| External dimensions (height / width / depth) | 900 mm/600 mm/600 mm |
| Voltage / frequency | 220-240 V ~ 50 Hz |
| Total power consumption | 9.9 kW |
| Fuse | min. 32 A / 16 A x 3 |
| Cable type / section | H05VV-FG 5 x 1,5 mm^2 /3 x 2,5 mm^2 or equivalent |
| Cable length | max. 2 m |
| HOB | |
| Burners | |
| Rear left | Single-circuit cooking plate |
| Dimension | 140 mm |
| Power | 1200 W |
| Front left | Single-circuit cooking plate |
| Dimension | 180 mm |
| Power | 1700 W |
| Front right | Single-circuit cooking plate |
| Dimension | 140 mm |
| Power | 1200 W |
| Rear right | Single-circuit cooking plate |
| Dimension | 180 mm |
| Power | 1700 W |
| OVEN/GRILL | |
| Top oven | Grill oven |
| Grill power consumption | 2.2 kW |
| Main oven | Fan oven |
| Energy efficiency class# | A |
| Inner lamp | 15-25 W |
Basics: Information on the energy label of electrical ovens is given in accordance with the EN 50304 standard. Those values are determined under standard load with bottom-top heater or fan assisted heating (if any) functions.
Energy efficiency class is determined in accordance with the following prioritization depending on whether the relevant functions exist on the product or not. 1-Cooking with eco-fan, 2-Turbo slow cooking, 3-Turbo cooking, 4-Fan assisted bottom/top heating, 5-Top and bottom heating.
** See. Installation, page 10.
i Technical specifications may be changed without prior notice to improve the quality of the product.
Figures in this manual are schematic and may not exactly match your product.
Values stated on the product labels or in the documentation accompanying it are obtained in laboratory conditions in accordance with relevant standards. Depending on operational and environmental conditions of the product, these values may vary.
Accessories supplied with the unit
i Accessories supplied can vary depending on the product model. All the accessories described in the user manual may not exist on your product.
Baking tray
Can be used for pastries, frozen foods and big roasts.
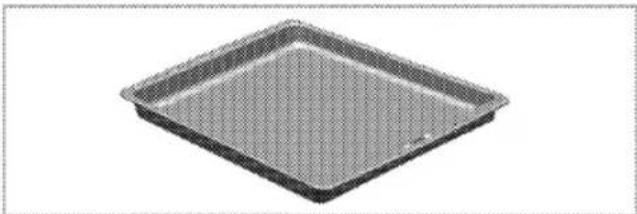
natural_image
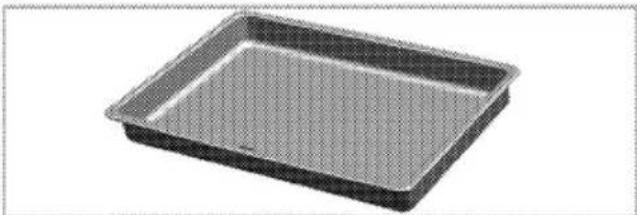
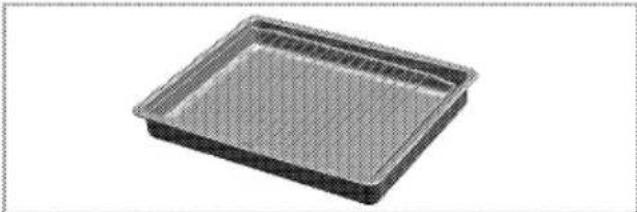
Exterior view of a square baking tray (no text or symbols)Deep roasting tray
Can be used for pastries, big roasts, foods with liquid content and during grilling as dripping pan.
natural_image
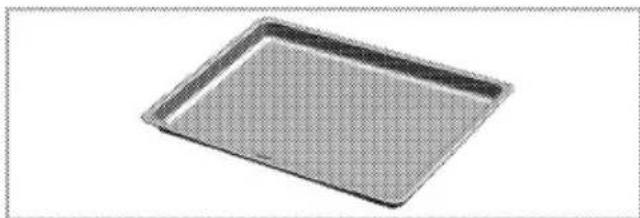
3D rendering of a rectangular baking tray with a textured interior (no text or symbols)Pastry tray
It is recommended for pastries such as cookies and biscuits.
natural_image
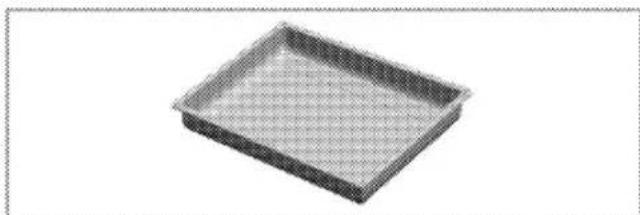
3D rendering of a rectangular baking tray with a grid pattern (no text or symbols)Small baking tray
Can be used for small portions. This baking tray is placed onto the wire shelf.
natural_image
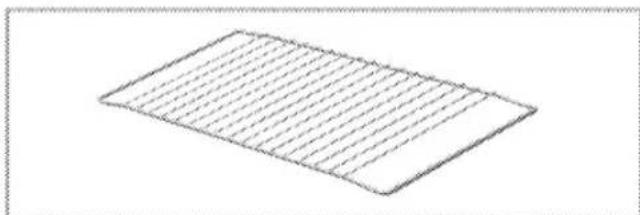
3D rendering of a rectangular tray with a grid pattern (no text or symbols)Wire shelf
Can be used for roasting and as deposit for baking, roasting and casserole dishes.
natural_image
Isometric view of a rectangular sheet with horizontal lines, no text or symbols present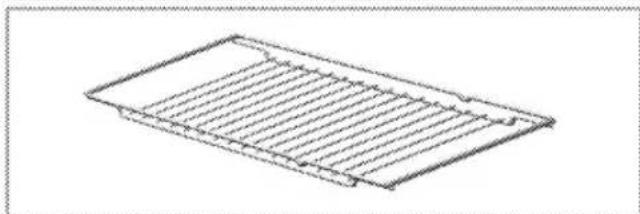
natural_image
Isometric line drawing of a rectangular metal grate or rack structure (no text or symbols)Proper positioning of the wire shelf and tray on sliding shelves
Trays and wire shelves used with the sliding shelf (model dependant) must be positioned correctly with the inner edges of the shelf placed over the pins on the sliding shelf. This holds the shelf firmly in place".
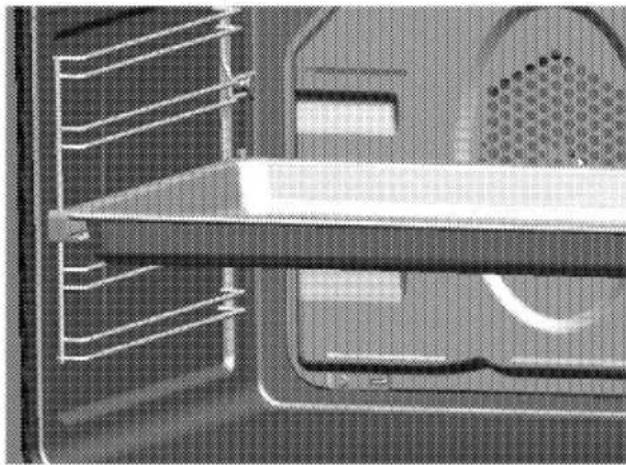
natural_image
Close-up of a mechanical component with internal channels and a textured surface (no visible text or symbols)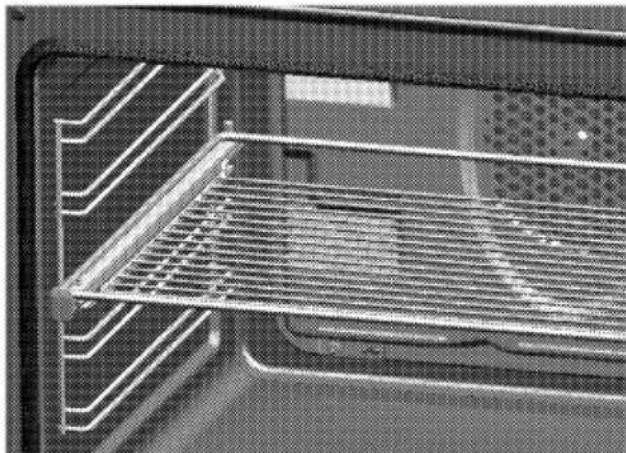
natural_image
Interior view of an oven with metal grating and ventilation grilles (no text or symbols visible)Small wire shelf and fat pan with handle
Can be used for both grilling and fat collection. The fat pan is placed onto the large wire shelf.
natural_image
3D rendering of a rectangular baking tray with a perforated interior (no text or symbols)- Attach handle in the middle of the pan edge as shown in the diagram.
- Remove handle for grilling.
natural_image
Illustration showing two steps of a tool application: cutting and holding a pen, with no visible text or symbols.2 Safety instructions
General safety
- This product is not intended to be used by persons with physical, sensory or mental disorders or unlearned or inexperienced people (including children) unless they are attended by a person who will be responsible for their safety or who will instruct them accordingly for use of the product. Children must be supervised to prevent them from tampering with the product.
- Connect the product to a grounded outlet/line protected by a fuse of suitable capacity as stated in the "Technical specifications" table. Have the grounding installation made by a qualified electrician while using the product with or without a transformer. Our company shall not be liable for any damages that will arise due to using the product without a grounding installation in accordance with the local regulations.
- Do not operate the product if the power cable or plug is damaged. Call Authorised Service Agent.
- Do not operate the product if it is defective or has any visible damage.
- Do not carry out any repairs or modifications on the product. However, you may remedy some troubles that do not require any repairs or modifications. See Troubleshooting, page 26.
- Never wash down the product with water! There is the risk of electric shock!
- Never use the product when your judgement or coordination is impaired by the use of alcohol and/or drugs.
- Product must be disconnected from the mains during installation, maintenance, cleaning and repair procedures.
• Installation and repair procedures must always be performed by Authorised Service Agents. Manufacturer shall not be held responsible for damages arising from procedures carried out by unauthorised persons.
- Be careful when using alcoholic drinks in your dishes. Alcohol evaporates at high temperatures and may cause fire since it can ignite when it comes into contact with hot surfaces.
- Do not heat closed tins and glass jars in the oven. The pressure that would build-up in the tin/jar may cause it to burst.
- Do not place any flammable materials close to the product as the sides become hot during use.
- Do not place baking trays, dishes or aluminium foil directly onto the bottom of the oven. The heat accumulation might damage the bottom of the oven.
- Keep all ventilation slots clear of obstructions.
• Product may be hot when it is in use. Never touch the hot burners,
inner sections of the oven, heaters and etc.
• Always use heat resistant oven gloves when putting and removing dishes into/from the hot oven.
- Do not use the product with front door glass removed or cracked.
- Rear surface of the oven gets hot when it is in use. Make sure that the gas/electrical connection do not contact the rear surface; otherwise, connections can get damaged.
- Do not trap the mains cable between the oven door and frame and do not route it over the hot surfaces. Otherwise, cable insulation may melt and cause fire as a result of short circuit.
• Make sure that the function control knobs are switched off after every use.
- Vapour pressure that build up due to the moisture on the hob surface or at the bottom of the pot can cause the pot to move. Therefore, make sure that the oven surface and bottom of the pots are always dry.
i Product must be installed by a qualified person in accordance with the regulations in force. Otherwise, the warranty shall become void.
Safety when working with electricity
- Any work on electric equipment and systems may only be carried out by authorized qualified persons.
- In case of any damage, switch off the appliance and disconnect it from the mains supply by removing the fuse or switching off the circuit breaker.
- Ensure that the fuse rating is correct.
Intended use
This product is designed for domestic use. Commercial use is not admissible. This product should not be used for warming the plates under the grill, drying towels, dish cloths etc, by hanging them on the oven door handles. This product should also not be used for room heating purposes. The manufacturer shall not be liable for any damage caused by improper use or handling errors.
The oven can be used for defrosting, baking, roasting and grilling food.
Safety for children
- Accessible parts of the appliance will become hot whilst the appliance is in use and until the appliance has cooled, children should be kept away.
- "CAUTION: Accessible parts may be hot when the grill is in use. Young children should be kept away."
- Do not store any items above the appliance that children may reach.
- The packaging materials will be dangerous for children. Keep the packaging materials away from children. Please dispose of all parts of the packaging according to environmental standards.
- When the door is open, do not load any heavy object on it and do not allow children to sit on it. It may overturn or door hinges may get damaged.
Before installation
To ensure that critical air gaps are maintained under the appliance, we recommend that this appliance is mounted on a solid base and that the feet do not sink into any carpet or soft flooring.
The kitchen floor must be able to carry the weight of the appliance plus the additional weight of cookware and bakeware and food.
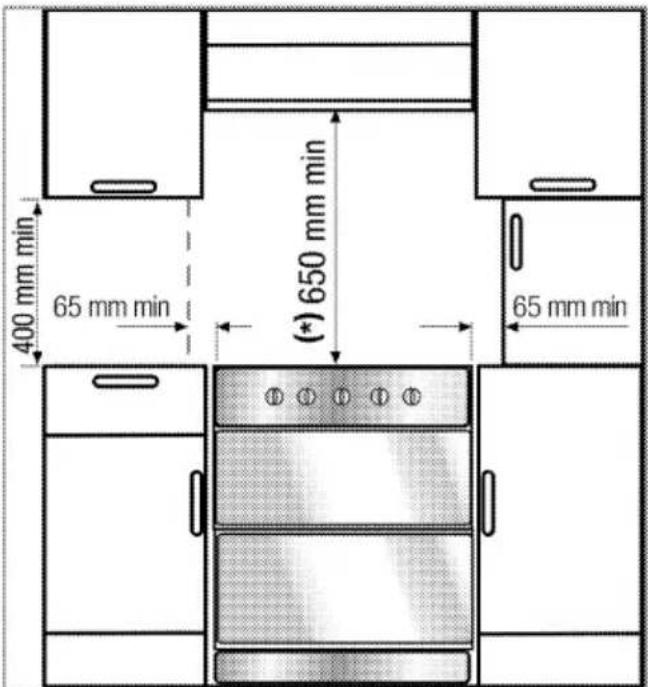
A safety distance must be left between the appliance and the kitchen walls and furniture. See figure (values in mm).
- It can be used with cabinets on either side but in order to have a minimum distance of 400 mm above hotplate level allow a side clearance of 65 mm between the appliance and any wall, partition or tall cupboard.
- It can also be used in a free standing position. Allow a
minimum distance of 650 mm above the hob surface.
- (*) If a cooker hood is to be installed above the cooker, refer to cooker hood manufacturer' instructions regarding installation height (Min 65cm).
- Movement of your appliance is most easily achieved by lifting the front as follows and pulling towards. Open the top oven door and the bottom oven door sufficiently to allow a comfortable grip on the underside front edge of the oven roofs. While gripping, it should be avoided to damage any grill elements or oven interior furniture.
- The appliance corresponds to device class 1, i.e. it may be placed with the rear and one side to kitchen walls, kitchen furniture or equipment of any size. The kitchen furniture or equipment on the other side may only be of the same size or smaller.
- Any kitchen furniture next to the appliance must be heat-resistant (100 °C min.).
Installation and connection
Do not install the appliance next to refrigerators or freezers. The heat emitted by the appliance will lead to an increased energy consumption of cooling appliances.
- Product can only be installed and connected in accordance with the statutory installation rules.
- Carry the product with at least two persons.
Material damage!
The door and/or handle must not be used for lifting or moving the appliance.
- Product must be placed directly on the floor. It must not be placed onto a base or a pedestal.
Electrical connection
Connect the product to a grounded outlet/line protected by a fuse of suitable capacity as stated in the "Technical specifications" table. Have the grounding installation made by a qualified electrician while using the product with or without a transformer. Our company shall not be liable for any damages that will arise due to using the product without a grounding installation in accordance with the local regulations.
⚠️ Risk of electric shock, short circuit or fire by unprofessional installation!
The appliance may be connected to the mains supply only by an authorized qualified person and the appliance is only guaranteed after correct installation.
⚠️ Risk of electric shock, short circuit or fire by damage of the mains lead!
The mains lead must not be clamped, bent or trapped or come into contact with hot parts of the appliance.
If the mains lead is damaged, it must be replaced by a qualified electrician.
The mains supply data must correspond to the data specified on the type label of the product. The rating plate is either seen when the door or the lower cover is opened or it is located at the rear wall of the unit depending on the unit type.
Power cable of your product must comply with the values in "Technical specifications" table.
Risk of electric shock!
Before starting any work on the electrical installation, please disconnect the appliance from the mains supply.
Connecting the power cable
- A mains cable is not supplied with the product. The mains cable must be connected by an authorised person and be of the type mentioned in the Technical specifications, page 5
This product must only be installed by a qualified electrician eg local electricity company or NICEIC registered contractor to a suitable double-pole control unit with a minimum contact clearance of 3mm in all poles and with a minimum rating please consider technical data table, Technical specifications, page 5 which should be fitted adjacent to (but not above) the cooker in accordance with IEE regulations. Failure to observe this instruction may result in operational problems and invalidation of the product warranty.
i Additional protection by a residual current circuit breaker is recommended.
- The cable must have conductors of sufficiently high cross sectional area to prevent overheating and deterioration.
The mains cable must conform to BS6004. This appliance must be earthed.
The mains cable must pass through the cable clamp.
The mains cable should be routed away from the appliance and in particular ventilation slots, the vent outlet and should not be obstructed when pushed in to position between the appliance and the wall and/or cabinets.
- Open the terminal block cover with a screwdriver.
- Insert the power cable through the cable clamp below the terminal and secure it to the main body with the integrated screw on cable clamping component.
- Connect the cables according to the supplied diagram.
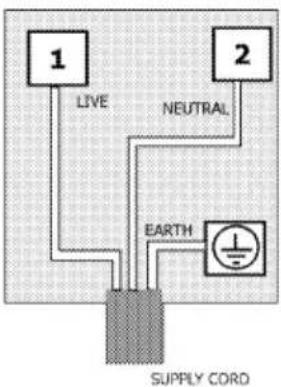
- After completing the wire connections, close the terminal block cover.
- Route the power cable so that it will not contact the product and get squeezed between the product and the wall.
Power cable must not be longer than 2 m because of safety reasons.
- Push the product towards the kitchen wall.
Adjusting the legs of oven
Vibrations during use may cause cooking vessels to move. This dangerous situation can be avoided if the product is level and balanced.
For your own safety please ensure the product is level by adjusting the four feet at the bottom by turning left or right and align level with the work top.
Final check
- Reconnect the product to the mains.
- Check electrical functions.
Disposal
Disposing of packaging material
Packaging materials are dangerous to children. Keep packaging materials in a safe place out of reach of children. Packaging materials of the product are manufactured from recyclable materials. Dispose of them properly and sort in accordance with recycled waste instructions. Do not dispose of them with normal domestic waste.
Disposing of the old product
Dispose of the old product in an environmentally friendly manner. This equipment bears the selective sorting symbol for waste electrical and electronic equipment (WEEE). This
means that this equipment must be handled pursuant to European Directive 2002/96/EC in order to be recycled or dismantled to minimize its impact on the environment. For further information, please contact local or regional authorities.
Electronic equipments not included in the selective sorting process are potentially dangerous for the environment and human health due to the presence of hazardous substances. Refer to your local dealer or solid waste collection centre in your area to learn how to dispose of your product. Before disposing of the product, cut off the power cable plug and make the door lock (if any) unusable to avoid dangerous conditions to children.
Future Transportation
- Keep the product's original carton and transport the product in it. Follow the instructions on the
carton. If you do not have the original carton, pack the product in bubble wrap or thick cardboard and tape it securely.
- To prevent the wire grill and tray inside the oven from damaging the oven door, place a strip of cardboard onto the inside of the oven door that lines up with the position of the trays. Tape the oven door to the side walls.
- Do not use the door or handle to lift or move the product.
Do not place other items on the top of the appliance. The appliance must be transported upright.
Check the general appearance of your product for any damages that might have occurred during transportation.
4 Preparation
Tips for saving energy
The following information will help you to use your appliance in an ecological way, and to save energy:
- Use dark coloured or enamel coated cookware in the oven since the heat transmission will be better.
- While cooking your dishes, perform a preheating operation if it is advised in the user manual or cooking instructions.
- Do not open the door of the oven frequently during cooking.
- Try to cook more then one dish in the oven at the same time whenever possible. You can cook by placing two cooking vessels onto the wire grill.
- Cook more than one dish one after another. The oven will already be hot.
- You can save energy by switching off your oven a few minutes before the end of the cooking time. Do not open the oven door.
- Defrost frozen dishes before cooking them.
- Use pots/pans with cover for cooking. If there is no cover, energy consumption may increase 4 times.
- Select the burner which is suitable for the bottom size of the pot to be used. Always select the correct pot size for your dishes. Larger pots require more energy.
- Pay attention to use flat bottom pots when cooking with electric hobs.
Pots with thick bottom will provide a better heat conduction. You can obtain energy savings up to 1/3.
- Vessels and pots must be compatible with the cooking zones. Bottom of the vessels or pots must not be smaller than the hotplate.
- Keep the cooking zones and bottom of the pots clean. Dirt will decrease the heat conduction between the cooking zone and bottom of the pot.
- For long cookings, turn off the cooking zone 5 or 10 minutes before the end of cooking time. You can obtain energy savings up to 20% by using the residual heat.
Initial operation
First cleaning of the appliance
The surface may get damaged by some detergents or cleaning materials. Do not use aggressive detergents, cleaning powder/cream or any sharp objects.
- Remove all packaging materials.
- Wipe the surfaces of the appliance with a damp cloth or sponge and dry with a cloth.
Initial heating
Heat up the product for about 30 minutes and then switch it off. Thus, any production residues or layers will be burnt off and removed.
Hot surfaces may cause burns! Do not touch the hot surfaces of the appliance. Use oven gloves. Keep children away from the appliance.
Electric oven
- Take all baking trays and the wire grill out of the oven.
- Close the oven door.
- Select the highest grill power; See How to use the electric oven, page 19.
- Operate the oven about 30 minutes.
- Turn off your oven; See How to use the electric oven, page 19
Grill oven
- Take all baking trays and the wire grill out of the oven.
- Close the oven door.
- Select the highest oven power for grill oven; see How to operate the top oven part, page 21.
- Operate the oven about 30 minutes.
- Turn off your grill; see How to operate the top oven part, page 21
i Smell and smoke may emit during first heating. Ensure that the room is well ventilated.
5 How to use the hob
General information on cooking

Risk of fire by overheated oil!
When you heat oil, do not leave it unattended.
Never try to extinguish the fire with water! When oil has caught fire, immediately cover the pot or pan with a lid. Switch off the hob if safe to do so and phone the fire service.
- Ensure handles of pans cannot accidentally be caught or knocked and do not get hot by adjacent heating zones. Avoid pans that are unstable and easily tipped. Pans that are too heavy to move easily when filled can also be a hazard. Only use flat bottomed pots or pans.
- Use pans which have sufficient capacity for the amount of food being cooked so they don't boil over and cause unnecessary cleaning.
Do not place lids on the hotplates/burners.
Always position pans centrally over the hotplates. When transferring pans from one hot-plate to another always lift the pans do not slide them.
Tips for glass ceramic hobs
- The glass ceramic surface is heat-resistant and insensitive to large temperature deviations.
- Do not use the glass ceramic hob for storing objects or as cutting surface.
- Use only saucepans and pans with machined bottoms. Sharp edges create scratches on the surface.
- Do not use aluminium pots and pans. Aluminium damages the glass ceramic surface.
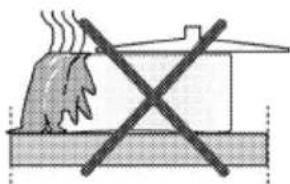
natural_image
Diagram showing a hand holding a steaming appliance next to a building, crossed out by a black X (no text or symbols present)Splashes may damage the ceramic surface and can cause fire.
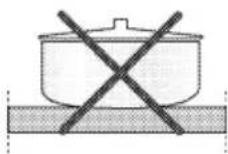
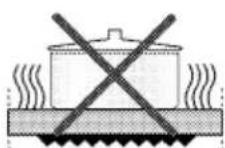
Do not use pots that have concave or convex bottoms.
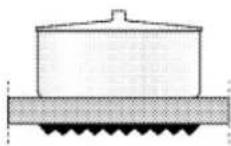
Use pots and pans with smooth bottoms. They ensure a good heat transfer. If the pan is too small energy is wasted
How to use hobs
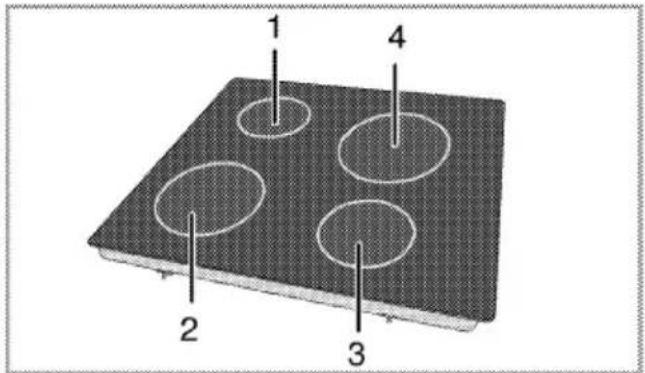
List of advised diameter of pots to be used on related burners.
1 Single-circuit cooking plate 14-16 cm
2 Single-circuit cooking plate 18-20 cm
3 Single-circuit cooking plate 14-16 cm
4 Single-circuit cooking plate 18-20 cm
Broken glass!
Do not let any objects fall onto the hob. Even small objects (e.g. salt shaker) may damage the hob.
Do not use glass ceramic hobs with cracks. Water may enter into the cracks and cause a short circuit.
If the surface is damaged in any way (e. g. visible cracks), switch off the device immediately to reduce the risk of an electric shock.
Quick heating glass-ceramic hobs emit a bright light when they are switched on. Do not stare at the bright light.
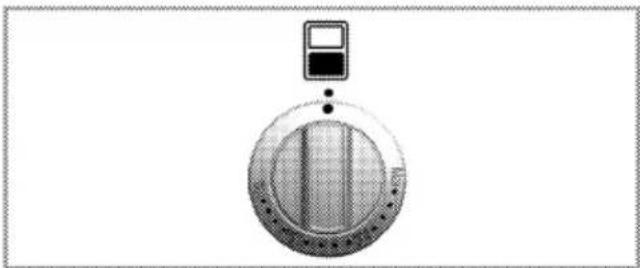
Switching the plate on
The hob control knobs are used for operating the plates. To obtain the desired cooking power, turn the hob control knobs to the corresponding level.
| Cooking level | 1 | 2 – 3 | 4 – 6 |
| warming | stewing, simmering | boiling |
Switching the plate off
Turn hob control knob to off position (top).
General information on baking, roasting and grilling

Risk of scalding by hot steam! Take care when opening the oven door as steam may escape.
Tips for baking
- Select the correct shelf position before turning the oven on - shelf positions are counted from the bottom upwards.
- Always preheat the oven first to ensure the food is at the correct temperature as soon as it goes into the oven.
- Use good quality baking tins such as non stick or aluminium. line tins with grease proof or baking paper to prevent sticking, if required.
- Do not fill cake tins more than half full.
- If baking one tray of food or cake, place centrally on the shelf and centrally within the oven.
- Do not open the oven door too much during cooking.
- To check if a cake is cooked, insert a skewer or cocktail stick into the centre of the cake. If it comes out clean, the cake is done, if it has food stuck to it, continue to cook the cake for a few minutes more and repeat the checking process.
Tips for roasting
- Preheat oven first.
- If possible take meat or poultry out of the refrigerator 30 minutes before cooking.
- Weigh meat first and calculate how long it will take to cook.
- Before cooking meat or poultry, lightly coat with butter or oil, and season with salt, pepper, herbs, or other seasoning. Place in a roasting dish and use a rack to lift the meat out of its juices. Place the dish in the centre of the oven.
- Turn meat over halfway through cooking.
- If the roasted meat is covered with aluminium foil it will help to keep the oven clean, always uncover the meat for the last half an hour of cooking to allow browning.
- Remove meat from the oven once cooked and stand covered in foil for 10-15 minutes to allow the meat to relax and juices to be reabsorbed which ensures the roast is tender and moist.
Tips for grilling
Grilling is a quick and healthy way of cooking meat, fish, vegetables and poultry. Flat pieces are particularly suitable for grilling.
• Preheat grill first.
- To keep the grill pan clean, line with a silicone baking liner. Do not line with aluminium foil.
- Most foods benefit with being brushed with oil before cooking.
• To enhance the flavour and moistness of meat, fish or poultry, marinate first.
- If using wooden kebab sticks, soak in water first to prevent them catching fire.
- Turn food halfway through cooking to ensure it is evenly browned..
How to use the electric oven
- As your appliance has two ovens please ensure that the appropriate function and thermostat control are selected for the oven you wish to use.
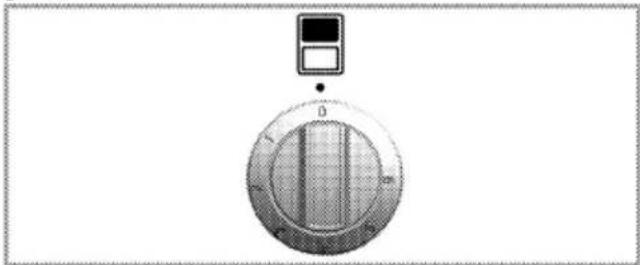
Select temperature and operating mode
natural_image
Circular device with internal striped pattern and a small screen on top (no text or symbols visible)• 1. Set the function knob to the desired temperature.
- The timings in this chart are meant as a guide. Timings may vary due to temperature of food, thickness, type and your own preference of cooking.
- Do not cook on the base of the oven.
• Shelf level 1 is the bottom of oven.
| Food | Shelf level | Rack position | Temperature (°C) | Cooking time (min.) (approx.) |
| Fruit pies | One level | 3 | 175 | 25 ... 30 |
| Pizza | One level | 3 | 190 | 12-25 mins depending on thickness |
| Small cakes | One level | 3 | 160 | 25 ... 30 |
| 2 levels | 1 - 5 | 175 | 25 ... 30 | |
| Victoria sandwich | One level | 3 | 160 | 25 ... 30 |
| Biscuits | One level | 3 | 160 | 20 ... 25 |
| 2 levels | 1 - 5 | 175 | 25 ... 30 | |
| Rich fruit cake (20-22cm) | One level | 3 | 140 | 3-4 hours, if required cover with baking parchment |
- » The oven heats up to the adjusted temperature and maintains it. During heating, temperature lamp stays on.
Switch off electric oven
Turn function knob to off position (top).
natural_image
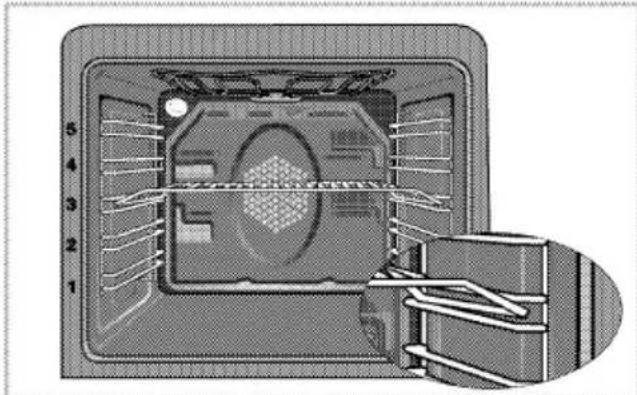
Cross-sectional diagram of a refrigerator interior showing internal compartments and ventilation duct (no text or labels)Shelf positions (model dependant)
It is important to position the wire grill on wire shelf correctly. The wire grill must be placed so that it will fit into the opening of the wire shelf as illustrated in the figure.
Cooking guide for main fan oven
- Stand dishes on a baking sheet to prevent spillages onto oven base and help keep oven clean.
• Preheat oven first. - Stand dishes on a baking sheet to prevent spillages onto oven base and help keep oven clean.
• Preheat oven first.
| Food | Shelf level | Rack position | Temperature (°C) | Cooking time (min.) (approx.) |
| Bread | One level | 3 | 190 | 20 ... 30 |
| Roast beef; Sirloin, topside, toprump, rib | One level | 3 | 220 then 180 | 20-30 mins, thenRare15mins per 450g/lb+ 15 minsMedium20mins per 450g/lb+ 20minsWell done25mins per 450g/lb + 25mins |
| Roast Lamb; Leg, shoulder, rack, breast, whole neck fillet | One level | 3 | 220 then 180 | 20-30 mins, then20-25mins per 450g/lb+ 20 mins |
| Roast pork; loin, shoulder, leg | One level | 3 | 220 then 180 | 20-30 mins, then25-30 mins per 450g/lb+ 25 mins |
| Roast chicken | One level | 3 | 220 then 180 | 20 mins, then20-25 mins per 450g/lb+ 20 mins |
| Roast turkey | One level | 2 | 250/max then180...190 | 20-30 mins, then25-30 mins per 450g/lb+ 25 mins |
| Casseroles | One level | 3 | 150 | 2-3 hours |
| Whole fish | One level | 3 | 180 | 20 ... 30 |
| Pasta bake | One level | 3 | 190 | 25 ... 30 |
| While cooking with 2 trays at the same time, place the deep tray to the upper shelf and shallow tray to the lower shelf. | ||||
(**) For preheating, set the required temperature, the thermostat lamp will go out when the required temperature is reached. Tips for baking cakes
Tips for baking cakes
- If pastry is too dry,
» Increase the temperature by 10°C and reduce the cooking time. - If pastry dropped,
» Use less liquid or lower the temperature by 10°C. - If pastry is too dark on top,
» Place it on a lower rack, lower temperature, and increase the cooking time. - If cooked well on the inside but sticky on the outside,
» Use less liquid, lower the temperature, and increase the cooking time.
Tips for baking pastry
- If the pastry is too dry,
» Increase the temperature some 10°C and decrease the cooking time.
» Dampen the layers of dough with a sauce composed of milk, oil, egg and yoghurt. - If the pastry takes too long to bake,
» Pay care that the thickness of the pastry you have prepared does not exceed the depth of the tray and remain level with it. - If the upper side of the pastry gets browned, but the lower part is not cooked,
» Make sure that the amount of sauce you have used for the pastry is not too much at the bottom of the pastry. Try to scatter the sauce equally between and on the dough layers for an even browning.
» Cook the pastry in accordance with the mode and temperature given in the cooking table. If the bottom part is still not browned enough, place it on a lower shelf next time.
Tips for cooking vegetables
- If the vegetable dish runs out of juice and gets to dry,
» Sthin using a lid during cooking will keep the juice of the dish in the pan, cook your vegetable dishes in a pan with a lid instead of a tray. - If a vegetable dish does not get cooked,
» Boil the vegetables beforehand or prepare them like canned food and put in the oven.
How to operate the top oven part
natural_image
Circular device with a screen and indicator light, no visible text or symbols on the device itself.It is important to position the wire grill on wire shelf correctly. The wire grill must be placed so that it will fit into the opening of the wire shelf as illustrated in the figure.

natural_image
Cross-sectional diagram of a device showing internal components and structural elements (no text or symbols)How to operate the grill -Top oven
This product is designed for OPEN DOOR GRILLING.
Hot surfaces may cause burns! Children must be kept away. When the door fully open, it remains tilted slightly, so that any spillage will be directed away form you.
Do not use the upper level for grilling.
The grill door has a door switch. As a safety feature, this switch prevents the grill from working when the door is closed.
In order to turn off the top oven; turn top oven control knob counterclockwise to off position "O" (top).
Switching on the grill
Turning the Grill control knob clockwise allows you grill in various temperature levels.
- If required, perform a preheating of about 5 minutes by switching the grill to position 4.
- Then, select the desired grilling temperature.
» Temperature light turns on.
Switching off the grill
-
Turn the Grill control knob to Off (upper) position.
-
Put big or medium-sized portions in correct rack position under the grill heater for grilling.
- For food only whose top is required to be roasted, grill the food either by placing onto the wire grill in the tray or by placing the tray onto the floor of grilling compartment.
- Food and plates placed onto the floor of grill compartment will get heated when the main oven is in use. Do not switch on the grill compartment when using it for storing food.
Do not use the upper level for grilling.
Fire danger due to food which is unsuitable for grilling!
Only use food for grilling which is suitable for intensive grilling heat. Do not place the food too far in the back of the grill. This is the hottest area and fat food may catch fire.
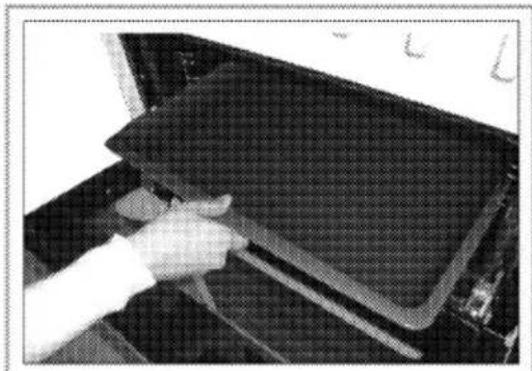
natural_image
Close-up of a hand holding a cable or wire above a dark panel, no visible text or symbols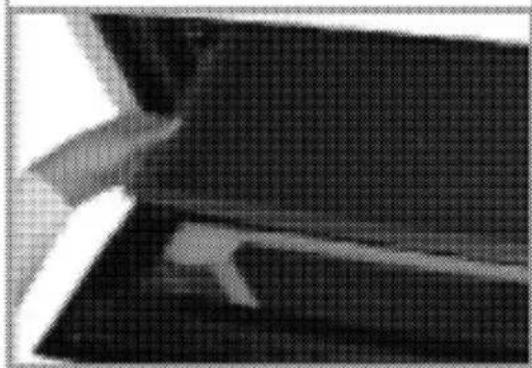
natural_image
Close-up of a mechanical component or tool interacting with a dark surface (no visible text or symbols)When removing tray from top oven, pull as shown in picture and hold with two hands from two sides.
Top oven cooking times table for grilling
Do not use the upper level for grilling.
Grilling with electric grill
Level 1 is the bottom level in the oven.
| Food | Insertion level | Grilling time (approx.) |
| Fish | 1 | 20...25 min.# |
| Sliced chicken | 1 | 25...35 min. |
| Lamb chops | 1 | 20...25 min. |
| Roast beef | 1 | 25...30 min.# |
| Veal chops | 1 | 25...30 min.# |
| Toast bread | 1 | 1...2 min. |
| #depending on thickness | ||

Maintenance and care
General information
Risk of electric shock!
Switch off the electricity before cleaning appliance to avoid an electric shock.
Hot surfaces may cause burns! Allow the appliance to cool down before you clean it.
The surface may get damaged by some detergents or cleaning materials.
Do not use aggressive detergents, cleaning powder/cream or any sharp objects.
Clean the appliance thoroughly after each use; in this way it will be possible to remove cooking residues more easily, thus avoiding these from burning the next time the appliance is used.
No special cleaning agents are required for cleaning the appliance. It is recommended to use warm water with washing liquid, a soft cloth or sponge and use a dry cloth for drying.
Do not use any abrasive cleaning materials!
Do not use steam cleaners for cleaning.
How to clean the hob
Ceramic hobs
Always rinse off fully with a clean cloth wrung out in clean water (as residue could damage the ceramic glass surface next time the hob is used). In no case should crusts be scraped off with serrated edge knives, steel wool or the like.
Remove calcium stains (yellow staining) with small amounts of decalcifying agents such as a non abrasive hob cleaner, vinegar or lemon juice.
Apply agent with a sponge and, in the event of heavier soiling, let it work in for a longer period of time. Afterwards, wash off with water.
Sugar-based food such as custard and syrup should immediately be scraped off without waiting for the surface to cool down. Otherwise the hob may be permanently damaged.
Cleaning the control panel
i Damage of the control panel! Do not remove the control knobs for control panel cleaning.
Clean control panel and control knobs.
Cleaning the oven
No oven cleaner or any other special cleaning agent is required for cleaning the oven. It is recommended to wipe the oven with a damp cloth while it is still warm.
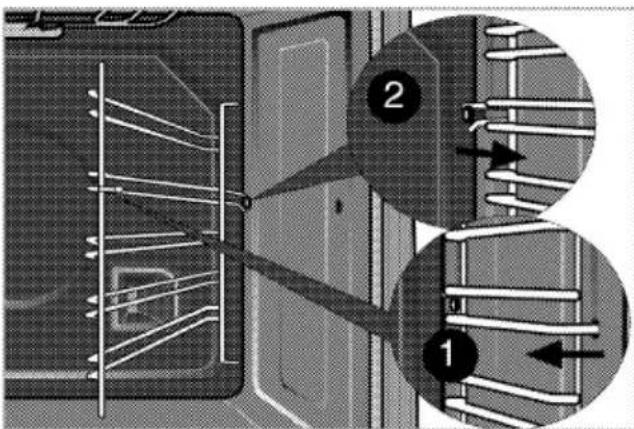
To clean the side wall,
-
Remove the front section of the side rack by pulling it in the opposite direction of the side wall.
-
Remove the side rack completely by pulling it towards you.
Clean oven door
Don't use any harsh abrasive cleaners or sharp metal scrapers for cleaning the oven door. They could scratch the surface and destroy the glass.
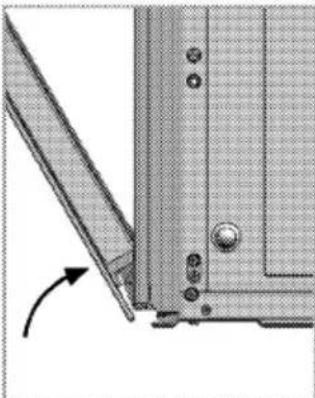
Removal top oven door
- Open the front door.
- Open the clips at the hinge housing on the right and left hand sides of the front door by pressing them down as illustrated in the figure.

1 Front door
2 Hinge
3 Oven
natural_image
Technical diagram of a mechanical joint or bracket with a rotation arrow indicating movement (no text or symbols present)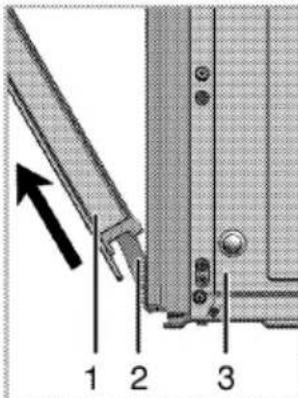
- Move the front door to half-way.
- Remove the front door by pulling it upwards to release it from the right and left hinges.
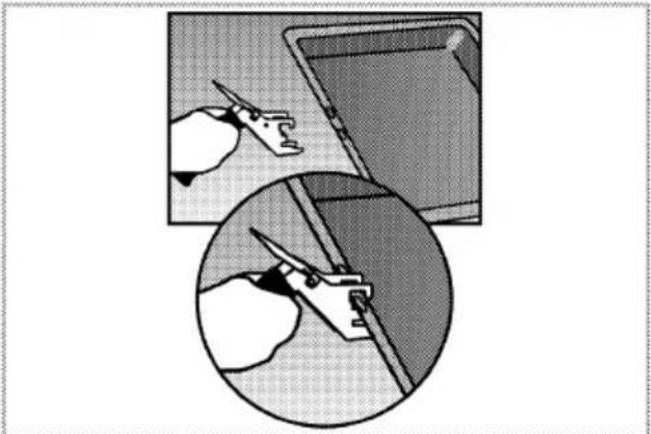
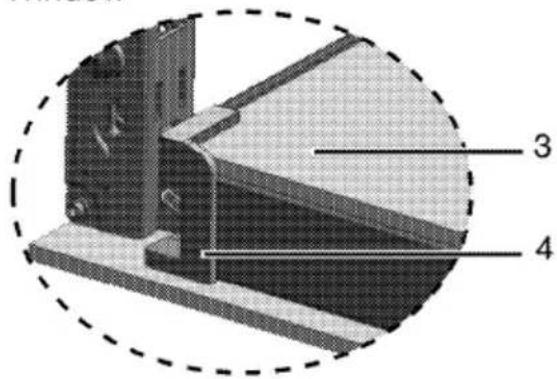
Removing the door inner glass
The inner glass panel of the oven door at upper oven can be removed for cleaning.
- Open the oven door.
- Remove the metal part (1) by removing two screws that secure it.
- To remove the plastic holders (2), use a flat metal or plastic, e.g., a knife, slotted screwdriver, to free the fixing foot (5).
Push the fixing foot through the window (6) in arrow direction.
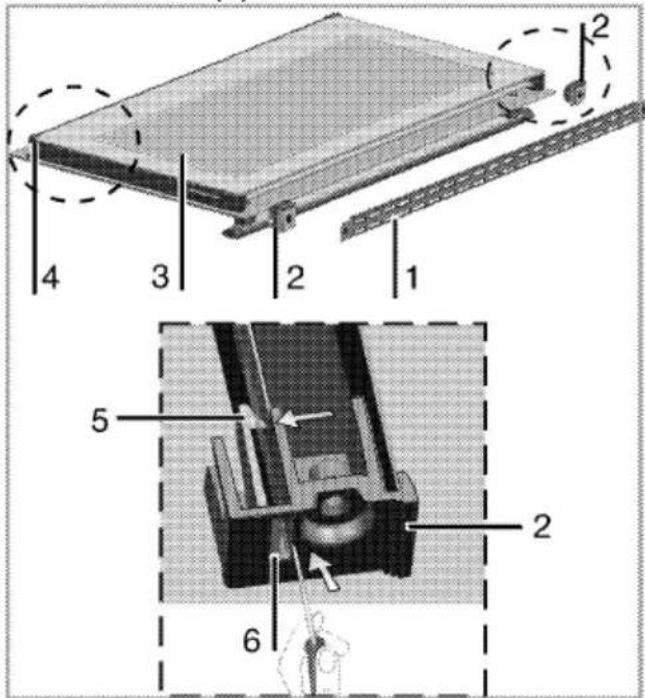
1 Metal part
2 Plastic carrier
3 Inner glass panel
4 Lower plastic slot
5 Fixing foot
6 Window
- Pull the inner glass panel (3) towards yourself until it detaches from its plastic slots (4).
- When reinstalling the glass panel, make sure that it is seated into the plastic slots.
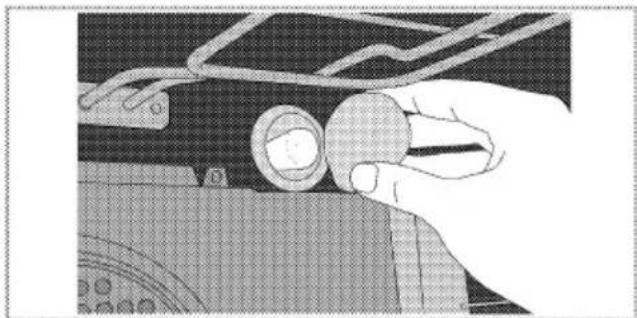
Replacing the oven lamp
Hot surfaces may cause burns! Make sure that the appliance is switched off and cooled down in order to avoid the risk of an electrical shock.
The oven lamp is a special heat-resisting (T 300 °C) electric light bulb; see Technical specifications, page 5. Oven lamps can be obtained from a good local electrical store.
i Position of lamp may vary from diagram.
- Switch off the appliance at the mains.
- Unscrew glass cover by turning anti-clockwise.
natural_image
Close-up of a hand holding a circular object with a ring, next to a mechanical component (no visible text or symbols)- Unscrew oven lamp by turning anti-clockwise and replace it with new one.
- Refit the glass cover.

Troubleshooting

Risk of electric shock, short circuit or fire by unprofessional repairs!
Repairs on the appliance must be carried out by an approved service centre.
- It is normal that steam escapes during operation. - When the metal parts are heated, they may expand and cause noise.
Before you call the service, please check the following points.
Normal operating conditions
- Smoke and smell may emit for a couple of hours during the first operation.
Electrical equipment
| Malfunction/problem | Possible cause | Advice/remedy |
| The appliance does not work. | The mains fuse is defective or has tripped. | Check fuses in the fuse box. If necessary, replace or reset them. |
| Oven light does not work | Oven lamp is defective. | Replace oven lamp. |
| No current. | Check fuses in the fuse box. If necessary, replace or reset them. | |
| Oven does not heat. | Function knob and/thermostat knob are not set. | Set function knob and thermostat knob. |
| If the appliance has a timer, the timer may not be set. | Set the time. | |
| No power. | Check mains supply and fuse box. |
If the problem has not been solved:
-
Separate unit from the mains supply (deactivate or unscrew fuse).
-
Call the appropriate telephone number for your area as shown in
the Guarantee and Service section of this user manual.

Do not attempt to repair the appliance yourself. There are no customer service items inside the appliance.
Your Beko product is guaranteed against the cost of breakdown repairs: Freeslanding appliances: 1 year Built-in appliances: 2 year from the date of the original purchase.
What is covered?
- All repairs necessary as a result of faulty materials, defective components or manufacturing defect.
• The cost of all functional replacement parts. - The labour costs of a Beko approved repairer to carry out the repair.
What is not covered?
• Transit or delivery damage
• Accidental damage
- Misuse, or abuse.
- Cabinet or appearance parts, including knobs and flaps
- Accessory items, including ice trays, scrapers, cutlery baskets,
- Repairs required as a result of unauthorised repairs or inexpert installation that fails to meet the requirements contained in the user instruction book.
Repairs to products used on commercial or non-residential household premises. Important notes.
- The product is guaranteed for domestic household use only.
- The guarantee will be void if the product is installed or used in commercial or non-residential household premises.
- The product must be correctly installed, located and operated in accordance with the instructions contained in the User Instructions Booklet provided.
• Professional Installation by a qualified plumber/electrical appliance installer is recommended for all Washing & Dishwashing Machines and Electric Cookers
• Gas Cookers must only be installed by a Gas Safe (or BORD GAIS) registered Gas Installer. - The guarantee is given only within the boundaries of the United Kingdom.
- The guarantee is not transferable if the product is resold.
- Beko plc disclaims any liability for incidental or consequential damages.
- The guarantee does not in anyway diminish your statutory or legal rights.
HOW TO OBTAIN SERVICE UNDER THE MANUFACTURERS GUARANTEE
Please keep your purchase receipt or other proof of purchase in a safe place; you will need to have it should the product require attention in the guarantee period
You should also complete the details below; it will help us assist you quicker when requesting service. (The model number is printed on the Instruction Booklet)
Model Number:
Purchased From:
Date of purchase:
For service under guarantee simply telephone the appropriate number below
LOCATION
TELEPHONE
UK Mainland & Northern Ireland
Fridges & Freezers
0845 600 4903
Electric Cookers
0845 600 4902
Gas & Dual Fuel Cookers
0845 600 4905
Washing Machines & Dishwashers
0845 600 4906
Republic of Ireland
All Refrigeration, Cooking, Washing & Dishwashing Machines
01 862 3411
Before requesting service please check the trouble-shooting guide in the Operating Instructions as a charge may be levied where no fault is found even though your product may still be under guarantee.
Service once the manufacturers guarantee has expired.
If you have purchased an extended guarantee please refer to the instructions contained within the extended guarantee agreement document. Otherwise please call the above numbers where service can be obtained at a charge.
Should you experience any difficulty in obtaining service please call the
Beko Customer Help-Line on 0845 600 4911
Beko House, Caxton Way, Watford, Herts, WD18 8UF, Tel: 0845 600 4911
24.03.2011-v1
Beko plc
Beko House
Caxton Way
Watford
Herts WD18 8UF
Tel: 0845 600 4911
Printed in Turkey
Part no: 285.3005.87
Rev: AB/13.05.2011