
Q6045-S Mk II - Sicherheitskamera AXIS - Kostenlose Bedienungsanleitung
Finden Sie kostenlos die Bedienungsanleitung des Geräts Q6045-S Mk II AXIS als PDF.

| Produkttyp | PTZ-Netzwerk-Sicherheitskamera |
| Modell | AXIS Q6045-S Mk II |
| Hersteller | Axis Communications |
| Auflösung | HDTV 1080p (1920 x 1080) |
| Objektiv | Motorzoom, 4.3–129 mm (30x optisch) |
| Schwenk-/Neigebereich | 360° endlos schwenkbar, -20° bis +90° neigbar |
| Nachtsicht | Tag/Nacht-Funktion, IR-LED (bis 100 m) |
| Stromversorgung | 24 V AC/DC oder Power-over-Ethernet (PoE+) |
| Schutzart | IP66 (staub- und strahlwassergeschützt) |
| Schlagfestigkeit | IK10 (mechanische Belastbarkeit) |
| Gewicht | Ca. 2,5 kg |
| Abmessungen (Durchmesser x Höhe) | 200 x 300 mm |
| Arbeitstemperatur | -30 °C bis +50 °C |
| Komprimierung | H.264, H.265, MJPEG |
| Netzwerkschnittstelle | RJ45 10/100/1000 Base-T |
| Audio | Zweiwege-Audio (Mikrofon und Lautsprecher) |
| Speicher | MicroSD-Kartenslot (bis 256 GB), NAS |
| Installation | Wand-/Deckenmontage, mitgelieferte Halterung |
| Reinigung | Gehäuse und Linse mit weichem, trockenem Tuch reinigen |
| Ersatzteile | Über AXIS-Partner erhältlich (Netzteil, Halterungen) |
Häufig gestellte Fragen - Q6045-S Mk II AXIS
Benutzerfragen zu Q6045-S Mk II AXIS
0 Frage zu diesem Gerät. Beantworten Sie die, die Sie kennen, oder stellen Sie Ihre eigene.
Eine neue Frage zu diesem Gerät stellen
Laden Sie die Anleitung für Ihr Sicherheitskamera kostenlos im PDF-Format! Finden Sie Ihr Handbuch Q6045-S Mk II - AXIS und nehmen Sie Ihr elektronisches Gerät wieder in die Hand. Auf dieser Seite sind alle Dokumente veröffentlicht, die für die Verwendung Ihres Geräts notwendig sind. Q6045-S Mk II von der Marke AXIS.
BEDIENUNGSANLEITUNG Q6045-S Mk II AXIS
USERMANUAL
AXISQ6045-SPTZDomeNetworkCamera
AboutthisDocument
ThismanualisintendedforadministratorsandusersoftheAXIS Q6045-SPTZDomeNetworkCamera, andisapplicabletofirmware 5.55andlater.Itincludesinstructionsforusingandmanagingthe productonyournetwork.Previousexperienceofnetworkingwillbeof usewhenusingthisproduct.SomeknowledgeofUNIXorLinux-based systemsmayalsobeneficial, fordevelopingshellscriptsand applications.LaterverersionsofthisdocumentwillbepostedtotheAxis website, asrequired.Sealsotheproduct'sonlinehelp, availablevia theweb-basedinterface.
LegalConsiderations
Videosurveillancecanberegulatedbylawsthatvaryfromcountryto country.Checkthelawsinyourlocalregionbeforeusingthisproduct forsurveillancepurposes.
Thisproductincludesone(1)H.264decoderlicense.Topurchase furtherlicenses,contactyourreseller.
Liability
Everycarehasbeentakeninthepreparationofthisdocument.Please informyourlocalAxisofficefanyinaccuraciesoromissions.Axis CommunicationsABcannotbeheldresponsibleforanytechnical or typographicalerrorsandreservestherighttomakechangestothe productandmanualswithoutpriornotice.AxisCommunicationsAB makesnowarrantyfanyakindwithregardtothematerialcontained withinthisdocument,including,butnotlimitedto,theimplied warrantiesofmerchantabilityandfitnessforaparticularpurpose.Axis CommunicationsABshallnotbeliablenorresponsibleforincidental or consequentialdamagesinconnectionwiththefurnishing,performance oruseofthismaterial.Thisproductisonlytobeusedforitsintended purpose.
IntellectualPropertyRights
AxisABhasintellectualpropertyrightsrelatingtotechnologyembodied intheproductdescribedinthisdocument.Inparticular,andwithout limitation,theseintellectualpropertyrightsmayincludeoneormore ofthepatentslistedatwww.axis.com/patent.htmandoneormore additionalpatentsorpendingpatentapplicationsintheUSandother countries.
Thisproductcontainslicensedthird-partysoftware.Seethemenuitem "About"intheproduct'suserinterfaceformoreinformation.
ThisproductcontainssourcecodecopyrightAppleComputer, Inc.,underthetermsofApplePublicSourceLicense2.0(see www.opensource.apple.com/apsl).Thesourcecodeisavailablefrom https://developer.apple.com/bonjour/
EquipmentModifications
This equipment must be installed and used in strict accordance with the instructions given in the user documentation. This equipment contains nouser-serviceable components. Unauthorized equipment changes or modifications will invalidate all applicable regulatory certifications and approvals.
TrademarkAcknowledgments
AXISCOMMUNICATIONS, AXIS, ETRAX, ARTPEC and VAPIX are registered trademarks to trademark applications of AxisAB in various jurisdictions. All other company names and products are trademarks or registered trademarks of their respective companies.
Apple,Boa,Apache,Bonjour,Ethernet,InternetExplorer,Linux,Microsoft,Mozilla,Real,SMPTE,QuickTime,UNIX,Windows,Windows VistaandWWWareregisteredtrademarksoftherespectiveholders. JavaandallJava-basedtrademarksandlogosaretrademarkors registeredtrademarksofOracleand/oritsaffiliates.UPnP ^TM i ^® certificationmarkoftheUPnP ^TM ImplementersCorporation.
SD, SDHC and SDXCare trademarksor registered trademark of SD-3C, LLC in the United States, other countries or both. Also, miniSD, microSD, miniSDHC, microSDHC, microSDXCare all trademarksor registered trademark of SD-3C, LLC in the United States, other countries or both.
RegulatoryInformation
Europe

ThisproductcomplieswiththeapplicableCEmarkingdirectives monizedstandards:
- Electromagnetic Compatibility (EMC) Directive 2004/108/EC. See Electromagnetic Compatibility (EMC), on page 2.
LowVoltage(LVD)Directive2006/95/ECSecSafetypropaga
- Restrictions of Hazardous Substances (RoHS) Directive 2011/65/EU. See Disposal and Recycling, on page 3.
Acopyoftheoriginaldeclarationofconformitymaybeobtainedfrom AxisCommunicationsAB.SeeContactInformation,onpage3.
Electromagnetic Compatibility(EMC)
This equipment has been designed and tested to fulfill applicable standards for:
- Radiofrequencyemissionwheninstalledaccordingtothe instructionsandusedinitsintendedenvironment.
- Immunitytoelectricalandelectromagneticphenomenawhen installedaccordingtotheinstructionsandusedinitsintended environment.
USA
This equipment has been tested using a shielded network cable (STP) and found to comply with the limits for a Class Adigital device, pursuant to part 15 of the FCC Rules. These limits are designed to provide reasonable protection against harmful interference when the equipment is operated in a commercial environment. This equipment generates, uses, and can radiate radio frequency energy and, if not installed and used in accordance with the instruction manual, may cause harmful interference or radiocommunication. Operation of this equipment is residential area is likely to cause harmful interference in which case the user will be required to correct the interference at this own expense. The product shall be connected using a shielded network cable (STP) that is properly grounded.
Canada
ThisClassAdigitalapparatuscomplieswithCanadianICES-003.The productshallbeconnectedusingashieldednetworkcable(STP)thatis properlygrounded. CetappareilnumériquedelaclasseAestconfomeàlanorme NMB-003duCanada.Leproduitdoitêtreconnectéal'aided'uncâble réseaublindé(STP)quiestcorrectementmisàlaterre.
Europe
ThisdigitalequipmentfulfillstherequirementsforRFemission according to the ClassAlimitofEN55022. The product shall be connected using ashielded network cable (STP) that is properly grounded. Notice! This is a Class A product. In domestic environment this product may cause RF finterference, in which case the user may be required to take adequate measures.
Thisproductfulfillstherequirementsforemissionandimmunity accordingtoEN50121-4andIEC62236-4railwayapplications.
This product fulfill therequirements for immunity according to EN61000-6-1 residential, commercial and light-industrial environments.
Thisproductfulfillstherequirementsforimmunityaccordingto EN61000-6-2industrialenvironments.
Thisproductfulfillstherequirementsforimmunityaccordingto EN55024officeandcommercialenvironments
Australia/NewZealand
This digitalequipmentfulfillstherequirementsforRFemission according to the ClassAlimitofAS/NZSCISPR22. The product shall be connected using ashieldednetworkable(STP) that is properly grounded. Notice! This is ClassAproduct. In domestic environment this product may cause RFInterference, in which case the user may be required to take adequate measures.
Japan
この装置は、クラスA情報技術装置です。この装置を家庭環境で使用すると電波妨害を引き起こすことがあります。この場合には使用者が適切な対策を講ずるよう要求されることがあります。本製品は、シールドネットワークケーブル(STP)を使用して接続してください。また適切に接地してください。
Korea
이기기는 업무용(A급)전자파적합기기로서판매자또는사용자는 이점을주의하시기바라며,가정외의지역에서사용하는것을목적으로합니다.적절히집지된STP(shielded twistedpair)케이블을사용하여제품을연결하십시오.
Safety
ThisproductcomplieswithIEC/EN60950-1andIEC/EN60950-22, SafetyofInformationTechnologyEquipment.Theproductshallbe groundedeitherthroughhashieldednetworkcable(STP)orother appropriatemethod.
The powersupply used with this product shall fulfill therequirements for Safety Extra Low Voltage (SELV) and Limited Power Source (LPS) according to IEC/EN/UL60950-1.
Thepowersupplyusedwiththisproductshallfulfilltherequirements forSafetyExtraLowVoltage(SELV)accordingtoIEC/EN/UL60950-1.
Battery
TheAxisproductusesa3.0VBR/CR2032lithiumbatteryasthepower supplyforitsinternalreal-timeclock(RTC).Undernormalconditions thisbatterywilllastforaminimumoffiveyears.
LowbatterypoweraffectstheoperationoftheRTC,causingittoresetateverypower-up.Whenthebatteryneedsreplacing,alogmessagewillappearintheproduct'sserverreport.Formoreinformationabouttheserverreport,seetheproduct'ssetuppagesorcontactAxissupport.
The battery should not be replaced unless required, but if the battery does need replacing, contact Axissupport at www.axis.com/techsupfor assistance.
▲WARNING
- Riskofexplosionifthebatteryisincorrectlyreplaced.
- Replaceonlywithanidenticalbatteryorabatterywhichis recommendedbyAxis.
- Disposeofusedbatteriesaccordingtolocalregulationsor thebatterymanufacturer'sinstructions.
DisposalandRecycling
Whenthisproducthasreachedtheendofitsusefullife,disposeof itaccordingtolocalrawsandregulations.Forinformationabout yournearestdesignedcollectionpoint,contactyourlocalauthority responsibleforwastedisposal.Inaccordancewithlocallegislation, penaltiesmaybeapplicableforincorrectdisposalofthiswaste.
Europe

Thissymbolmeansthattheproductshallnotbedisposedof togetherwithhouseholdorcommercialwaste. Directive2012/19/EU onwasteelectricalandelectronicequipment(WEEE)isapplicablein theEuropeanUnionmemberstates.Topreventpotentialharmto humanhealthandtheenvironment,theproductmustbedisposed ofinanapprovedandenvironmentallysaferecyclingprocess.For informationaboutyournearestdesignatedcollectionpoint,contact yourlocalauthorityresponsibleforwastedisposal.Businessesshould contacttheproductssupplierforinformationabouthowtodispose ofthisproductcorrectly.
ThisproductcomplieswiththerequirementsofDirective2011/65/EU ontherestrictionoftheuseofcertainhazardoussubstancesin electricalandelectronicequipment(RoHS).
China

Thisproductcomplieswiththerequirementsofthelegislative dministrationontheControlofPollutionCausedbyElectronic mationProducts(ACPEIP).
ContactInformation
AxisCommunicationsAB
Emdalavägen14
22369Lund
Sweden
Tel:+46462721800
Fax:+4646136130
www.axis.com
Support
Should you require any technical assistance, please contact your Axis reseller. If your questions cannot be answered immediately, your reseller will forward your queries through the appropriate channel to ensure a rapid response. If you are connected to the Internet, you can:
- downloaduserdocumentationandsoftwareupdates
• findanswerstoresolvedproblemsintheFAQdatabase.Search byproduct, category, orphrase
•reportproblemstoAxissupportstaffbyloggingintoyourprivate supportarea
- chatwithAxissupportstaff(selectedcountriesonly)
- visitAxisSupportatwww.axis.com/techsup/
LearnMore!
VisitAxislearningcenterwww.axis.com/academy/forusefultrainings, webinars,tutorialsandguides.
TableofContents
HardwareOverview....6
ConnectorsandButtons....7
LEDIndicators....7
MediaConverterSwitch....8
MediaConverterSwitchConnectors......8
NetworkConnectorDipSwitches....9
MediaConverterSwitchLEDIndicators....10
AccessingtheProduct....11
AccessfromaBrowser....11
AccessfromtheInternet....12
SettheRootPassword....12
TheLiveViewPage....13
MediaStreams....16
HowtoStreamH.264....16
MJPEG....16
AXISMediaControl(AMC)....16
AlternativeMethodsofAccessingtheVideoStream....17
SettingUptheProduct....19
BasicSetup....19
Video....20
VideoStream....20
StreamProfiles....21
CameraSettings....22
Overlay....23
PrivacyMask....24
LiveViewConfig....26
PTZ(PanTiltZoom)....29
PresetPositions....29
Gatekeeper....30
Autotracking....30
GuardTour....31
OSDIZones....32
Advanced....32
ControlQueue....33
Detectors....34
ShockDetection....34
MotionDetection....3.
ObjectRemoved....35
Enter/ExitDetector....36
FenceDetector....36
ObjectCounter......36
Applications....37
ApplicationLicenses....37
InstallApplication....37
ApplicationConsiderations....37
Events....39
SettingUpanActionRule....40
Recipients....41
Schedules....42
Recurrences....43
Recordings....44
RecordingList....44
ContinuousRecording....44
Languages....45
SystemOptions......46
Security......46
Date&Time....48
Network......48
Storage....53
Ports&Devices....55
Maintenance....55
TableofContents
Support......55
Advanced....56
ResettoFactoryDefaultSettings....57
Multi-ConnectorCable....58
Troubleshooting....59
CheckingtheFirmware....59
UpgradingtheFirmware....59
Symptoms, Possible Causes and Remedial Actions......60
TechnicalSpecifications....63
MediaConverterSwitchConnectors....66
PerformanceConsiderations....67
HardwareOverview
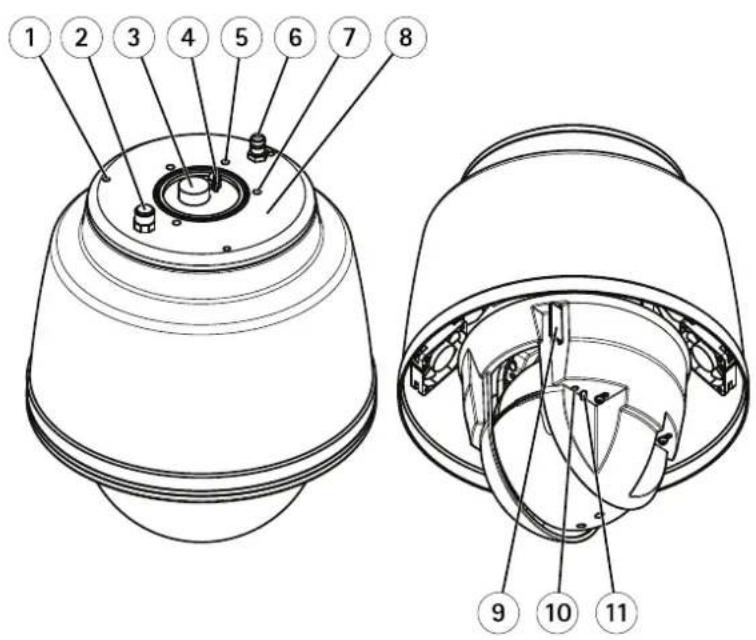
1 Mountingholeforsunshield(3x)
2 Pressurereliefvalve
3 Multiconnector
4 Hookforsafetywire
5 Guidehole
6 Inletvalve
7 Mountinghole(3x)
8 Partnumber(P/N)&Serialnumber(S/N)
9 SDcardslot(SDHC)
10 StatusLEDindicator
11 Controlbutton
PressurizetheCamera(Recommended)
ThecamerahousingcanbefilledwithNitrogengastopreventcondensation.
The filling process is repeated three times, releasing the pressure between fillings, to make sure that all air and humidity is purged from the housing.
Note
The camerahousinghasanpressurereliefvalvethatlimitsthefillingpressureto0.5bar(7psi).Duringnormalusethe pressureinsidethecamerahousingmaydropbelowthatpressure.Forfullprotectionmakesurethatthepressureisabove 0.2bar(3psi).
- Settheregulatorgaugeonthegascylinderto0.5bar(7psi).
- Removethecapsfromtheinletvalveandthepressurereliefvalve.
- Placethechuckontheinletvalveandpressdowntofillthecamerawithnitrogen.
-
Whenthepressureinsidethecamerahousingreaches0.5bar(7psi)thepressurereliefvalvewillopen.Placeyourhandoverthepressurereliefvalvetoverifythatthegasisflowingout.
-
Keep the gas flowing through the camera housing for on minute before removing the chuck from the inlet valve.
- Lift the pressurerelief valvetoletthe overpressure out of the camera unit.
- Repeat the filling process at total of 3 times, leaving the camera pressurized the last time.
- Putthecapsbackontheinletvalveandthepressurereliefvalve.
ConnectorsandButtons
Fortechnicalspecifications,seepage63.
Multi-connector
Terminalconnectorforconnectingthesuppliedmediaconverterswitch,whichprovidesthefollowingsignals:
- DCPower
• Network(Ethernet10/100Base-T) - Input/Output(I/O)
The supplied multi-connectorable required order to maintain the product's ratings of Multi-Connector Cable page 58.
SDCardSlot
ArSCard(notincluded)carbusedfoloCarecordingwithremovablestorageFomoreinformationseeTechnicalSpecifications.
NOTICE
Tpreventorruption recording the SCard should be unmounted before removal. Unmount and Setup System Options > Storage > SDCard and click Unmount.
ControlButton
Thecontrolbuttonisusedfor:
- Resetting the product to factory default settings. See page 57.
Connecting on AXISided Hosting System Service Page 50 Connectpress and hold the button for about second until the Status LED flashes green.
Connecting to AXIS Interne Dynamic DNS Service Seepage 50 Connectpress and hold the button for about seconds.
LEDIndicators
| LED | Color | Indication |
| Status | Unlit | Connectionandnormaloperation |
| Amber | Steadyduringstartup.Flashesduringfirmwareupgrade. | |
| Amber/redFlashesamber/red | fnetworkconnectionisunavailableorlost. | |
| RedFlashesredforfirmwareup | gradefailure. | |
| GreenShowssteadygreenfor | 0secondsfornormaloperationafterrestart. |
MediaConverterSwitch
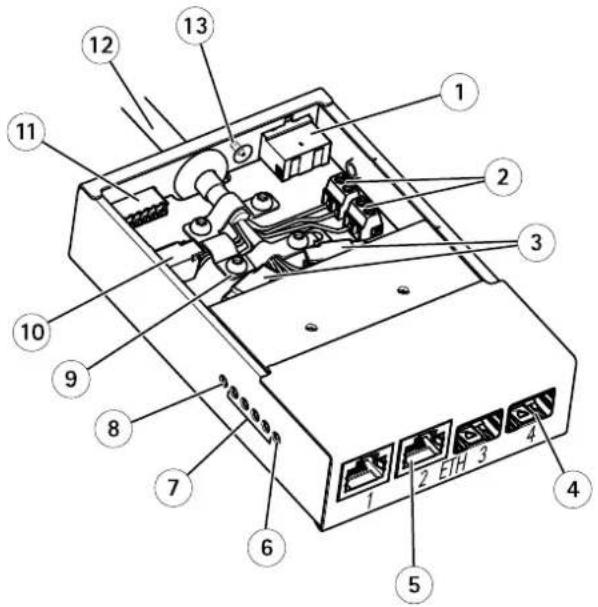
1 Powerconnector(DCinput)
2 Powerconnector(DCoutput)
3 Networkconnector(internal)
4 NetworkslotSFP(external)(2x)
5 NetworkconnectorRJ45(external)(2x)
6 CameraLEDindicator
7 NetworkLEDindicator(4x)
8 PowerLEDindicator
9 Groundclip
10 I/Oconnector(internal)
11 I/Oconnector(external)
12 Multi-connectorcable
13 Groundscrew
MediaConverterSwitchConnectors
Fortechnicalspecifications,seepage63.
NOTICE
The product shall be connected using a shielded network cable (STP) or an optical fiber cable. All cables connecting the product to the network shall be intended for their specific use. Makes sure that the network devices are installed in accordance with the manufacturer's instructions: information about regulatory requirements, Electromagnetic Compatibility (EMC), on page 2.
Important
Themediaconverterswitchdoesnotsupporthotswapping.Disconnectpowerfromtheswitchbeforeswappingcameras.An attempttohotswapcouldcausetheswitchtofreeze,inwhichcaseitmustberestarted.
Powerconnector(DCinput)-2-pinterminalblockforpowerinput.
Powerconnector(DCoutput)-Two2-pinterminalblockforpoweroutput(pin4isnotused).
NetworkconnectorRJ45(external)-TwoRJ45connectors(10/100Base-T)fornetworkconnectivity.
NetworkslotSFP(external)-TwoSFPslots(100Base-FX/1000Base-X)fornetworkconnectivity.
Each RJ4 and SFPorbaistowdipswitchThe dipswitches controhow the porforwards data SeeNetworkConnector DipSwitches.
| DipswitchpositionDescriptionofuse | ||
| Default(middle) | BWhenconnectingtothenetwork,directlyorthrougharouterornetwork switch. | |
| LeftAWhenconnectingtoacameraorade | vicethatisnotintendedforviewing data. | |
| Right | C | Whenconnectingtoanothermediaconverterswitch. |
Networkconnector(internal)-Two2-pinEthernetterminalblocks.
I/Oconnecto(external)6-pirconfigurable/Oterminablockwhichisconnectedtheamerathroughthemulti-connector cable. Usewithexternaldevicesincombinationwith,forexample,tamperingalarms,motiondetection,eventtriggering,timelapse recordingandalarmnotifications.InadditiontotheOVDReferencepointandpower(DCoutput),thel/Oconnectorprovidesthe interfaceto:
DigitabutputFoconnectingexternaldevicesuchaselaysandLEDsConnecteddevicesarbeactivated bytheVAPIX®ApplicationProgrammingInterface,outputbuttonsontheLiveViewpageorbyanActionRule. ThoutputwillShowactive(showundeSystemOptionsPorDevicesPorStatus)thealarm deviceisactivated.
DigitalInputAnalaminpufoconnectingDevice that cartoggle between an open and closed circuit for example: PIRs, door/windowcontacts, glassbreakdetectors, etc. When a signal is received the state changes and then pubecomes active (shown under SystemOptionsPort DevicesPort Status).
I/Oconnector(internal)-2-pinl/Oterminalblock.
NetworkConnectorDipSwitches
Important
Alwaysusethedefaultdipswitchsetting(positionB)iftherelationshipbetweendevicesinthesystemisnotdefined.
ThecameraattachesaparticularVLANtagtoallitsforwardedmulticastpackages.Themediaconverterswitchmanageshowthese multicastpackagesareforwardedbetweenecameras,mediaconverterswitchesandothernetworkdevices.Thisespeciallyusefulwhen connectingthecameraandmediaconverterswitchtothenetworkinadaisychain.
Bychanging the position of the dip switches, each network connector port in the media converters switch can be configured to anagemulticasts in three different ways.
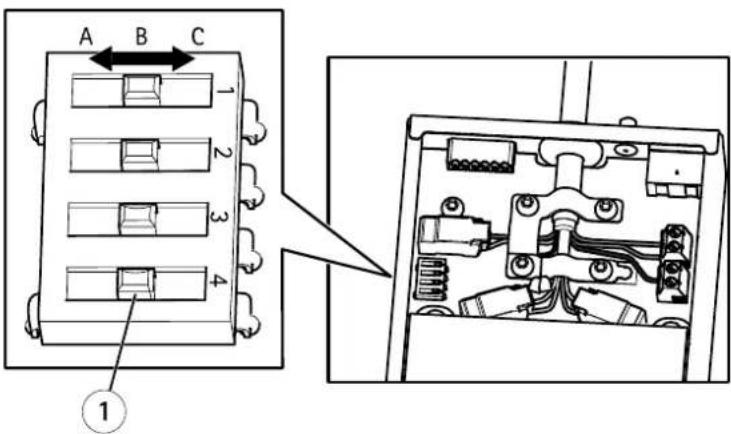
| DipswitchpositionDescription | ||
| Default(middle) | BRemoveVLANtagsfromforwardedmulticastpackages.Usethissettingwhenconnectingtothe network,directlyorthrougharouterornetworkswitch. | |
| LeftABlockmulticastpackages | gesthathaveaVLANtag.Usethissettingwhenconnectingtoadevicethatis notintendedformulticastviewing. | |
| Right | C | ForwardmulticastpackageswithaVLANtag.Usethissettingwhenconnectingtoanothermedia converterswitch. |
VLANtagsareusedtocreateindependentlogicalnetworks,virtuallocalareanetworks(VLANs),withinaphysicalnetwork.Multiple mediaconverterswitchesthatareconnectedtoeachotherinadaisychainaremembersofthesameVLAN.Themediaconverter switchestagthemulticastpackagesmovingbetweenthemsothatthenextmediaconverterswitchinlineknowsthedestinationof thepackages.Inotherwords,theVLANtagservesasaVLANidentifier.VLANtaggingshouldonlybeusedwhenusingmultiple camerasandmediaconverterswitchesbecauseforwardingmulticastpackageswithaVLANtagonlyservesapurposewhentheport isconnectedtoanothermediacconverterswitch,whichmightbeconnectedtopotentialviewers.
Note
When connecting an outgoing media converters switch network connector to another type of network device, set the dip switch top position Atoprotect the device from multicast traffic.
MediaConverterSwitchLEDIndicators
| LED | Color | Indication |
| Power | Unlit | DCpowerunconnectedorcurrentprotectionengaged(poweroverload) |
| GreenDCpowerconnected. | ||
| Network(4x) | Amber10Mbitconnection.Flashesduringactivity. | |
| Green | 100/1000Mbitconnection.Flashesduringactivity. | |
| CameraGreen | 100Mbitconnection.Flashesduringactivity. | |
AccessingtheProduct
ToinstalltheAxisproduct, refertothel InstallationGuidesupplied with the product.
The product can be used with most operating systems and browsers. There recommended browsers are Internet Explorer with Windows, Safari with Macintosh and Firefox with the operating system. See Technical Specifications or page 63.
ToviewstreamingvideoinInternetExplorer,allowinstallationofAXISMediaControl(AMC)whenprompted.
TheAxisproductincludesone(1)H.264decoderlicenseforviewingvideostreams. ThelicenseisautomaticallyinstalledwithAMC. Theadministratorcandisabletheinstallationofthedecoders,topreventinstallationofunlicensedcopies.
Note
- QuickTime ^TM is also supported for viewing H.264 streams.
- If your computer restrict the use of additional software components, the product can be configured to use a Java applet for viewing Motion JPEG.
AccessfromaBrowser
- Startabrowser(InternetExplorer, Firefox, Safari).
2.EntertheIPaddressorhostnameoftheAxisproductinthebrowser'sLocation/Addressfield.ToaccesstheproductfromaMacintoshcomputer(MacOSX),clickontheBonjourtabandselecttheproductfromthedrop-downlist.
If you donot know the I paddress, use AXISIP Utility to locate the product on thenetwork. For information about how to discover and assign I address through installation and management Software C doth document Assign or I Address and Access the Video Stream on Axis Support web at www axis.com/techsup
- Enteryourusernameandpassword.Ifthisisthefirsttimetheproductisaccessed,therootpasswordmustfirstbe configured.Forinstructions,seeSettheRootPassword,onpage 12.
- The product'sLiveViewpageopensinyourbrowser.
Note
The controls and layout of the liveView page may have been customized to meet specific installation requirements and user preferences. Consequently, some of the examples and functions featured her may differ from those displayed in your own live view page.
AccessingtheProduct
AccessfromtheInternet
Onceconnected,theAxisproductisaccessibleonyourlocalnetwork(LAN).ToaccesstheproductfromtheInternetyoumust configureyournetworkroutertoallowincomingdatatrafficctotheproduct.Todothis,enabletheNAT-traversalfeature,which willattemptautomaticallyconfiguretheroutetallowaccesstheproductThisenabledfromSetupSystemOptions>Network>TCP/IPAdvanced.
FomoreinformationsevNATraversa(portmapping)ofPv4orpag5SealsAXISnterneDynamidDNService atwww.axiscam.net
ForTechnicalnotesonthisandothertopics,visittheAxisSupportwebatwww.axis.com/techsup
SettheRootPassword
Tacces the Axi product you must the password for default administrator user or this slone the Configur Root Password dialog, which opens when the product is accessed for the first time.
Topreventnetworkeavesdropping,therootpasswordcanbesetviaanencryptedHTTPSconnection,whichrequiresanHTTPS certificate. HTTPS(HypertextTransferProtocoloverSSL)isaprotocolusedtoencrypttrafficbetweenwebbrowsersandservers.The HTTPScertificatensuresencryptedexchangofinformationSedHTTPSprpage46.
The default administrator names are root permanent and cannot be deleted the password for root to stop the product must be reset the factory default settings. See Reset Factory Default Settings page 57.
TosetthepasswordviaastandardHTTPconnection,enteritdirectlyinthedialog.
TosetthepasswordviaanencryptedHTTPSconnection,followthesesteps:
1.ClickUseHTTPS.
A temporary certificate(validforoneyear)iscreated,enabling encryptionofalltraffictoandfromtheproduct,andthe passwordcannowbesetsecurely.
2.Enterapasswordandthenre-enterittoconfirmthespelling.
3.ClickOK.Thepasswordhasnowbeenconfigured.
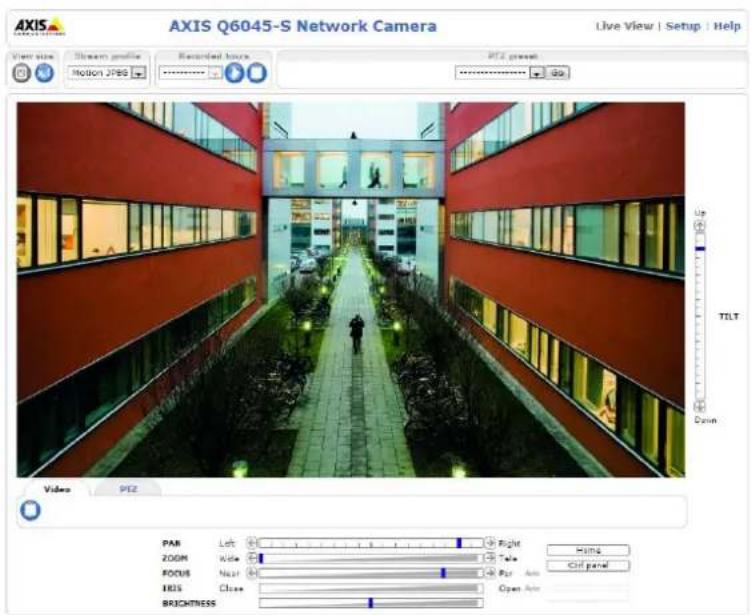
TheLiveViewPage
The controls and layout of the liveView pagemay have been customized to meet specific installation requirements and user preferences. Consequently, some of the examples and functions featured her may differ from those displayed in your own live view page. The following provides an overview of each available control.
ControlsontheLiveViewPage
SelectstreamprofileoftheLiveViewpagefromtheStreamProfiledrop-downlistInformationabouthowtoconfigurestreamprofiles,seepage21.
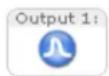
ClicPulsctactivattheproduct'sutpuporfordefineperiodofime:oinformationabouthowtenable andconfigureoutputbuttons,see page27.
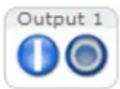
Click the Active/Inactive button to manually activate and activate the product output port information about how to enable and configure output buttons, see page 27.

The ManualTriggerbutton is used to trigger an action rule from the live View page. For information about how to configure and enable the button, see ManualTrigger, on page 13.

ClickSnapshot savesnapshot the video image Right-click the video image save in PEG form by your computer. This button is primarily intended for use when the AXIS Media Control view to toolbar is not available. Enable this button fromLiveViewConfig>Action Buttons.

Enabled disable the Gatekeeper by selecting OnOff from the drop-down list Read more about the Gatekeeper on page 30.
ManualTrigger
The ManualTrigger used trigger action rule from the live/view page. The manual trigger carfo example should validate actions during product installation and configuration.
Toconfigurethemanualtrigger:
1.GotoSetup>Events.
2.ClickAddtoaddanewactionrule.
BonthTriggedrop-downlistselectnpusignal.
4. From these second drop-down list, select Manual Trigger.
5. Select the desired action and configure the other settings as required.
Formoreinformationaboutactionrules,seeEvents,onpage39.
ToshowthemanualtriggerbuttonsintheLiveViewpage:
1.GotoSetup>LiveViewConfig.
2ndeActionButtonsselecShowmanuatriggebutton.
AXISMediaControlviewertoolbar
TheAXISMediaControlviewetoolbarsavailableInterneExploreonlySeeAXISMediaContro(AMC)prpage16omore information.Thetoolbardisplaysthefollowingbuttons:

ThePlaybuttonconnectstotheAxisproductandstartsplayingamediastream.

TheStopbuttonstopsthemediastream.

ThSnapshotbuttortakesnapshotthevideimageIndocationwherthimagesavedcarspecified intheAMCControlPanel.

ClickhViewFullScreenbuttonandthevideimagovilfilthentirescreenPresES(Escape)rthecomputer keyboardtocancelfullscreenview.

TheRecordbuttonisusedrecordhecurrentvideostreamThelocationwhererecordingsavedarabspecifiedintheAMMControPaneEnablethisbuttonfromLiveViewConfigVieweSettings.
PTZControls
TheLiveViewpagealsodisplaysPan/Tilt/Zoom(PTZ)controls.Theadministratorcanenable/disablecontrolsforspecifiedusersunder SystemOptions>Security>Users.
With the PTZControlQueue enabled the time each user is controlled by the PTZ settings limited. Click button to request release control of the PTZ control the PTZ control Queue setup under PTZ Control Queue.

Click the Emulatjoystickmodbutton and click themagtomovchcameraviewithdirectionofthemousepointer.

Click the Centemode button and click the image of the camera view with a position that the centemode button could also be used to zoom on an as specific area. Click the image and drag to draw a rectangular surrounding the are at obemagnified. To zoom out, rotate the mouse wheel.

Click the CtrpanebuttortoperthePTZontropanewhichprovidesadditionaPTZcontrols. User-definedbuttonscanalsoappearintheControlpanel.SeeControls,onpage33.

Selectarecordedtourandclicktoplayapreviouslyrecordedtourandclicktostop.See TourRecording,onpage31.

SelectaPTZpresetpositiontosteerthecameraviewtothesavedposition.SeePresetPositions, onpage29.

ClickhStarAutTrackbuttonstartautotrackingdirectlyfromtheLiveViewpageSee Autotracking,onpage30.
AccessingtheProduct

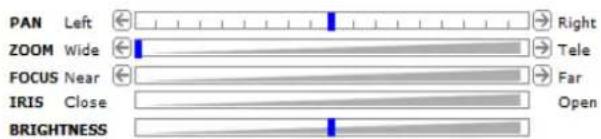
PanandTiltbars—Usethearrowstopanandtiltthecameraview,orclickonapositiononthebartosteerthe cameraviewtothatposition.
Zoombar-Usethearrowstozoominandout,orclickonapositiononthebartozoomtothatposition.
Focusbar-Usethearrowstofocusthecamera,orclickonapositiononthebartosetthefocusposition.Usingthe focusbarwilldisabletheproduct'sautofocus.Tore-enable,usethePTZcontrolpanelwhichisopenedbyclicking theCtrlpanelbutton(seeabove).
Irisbar-Clickonapositionontheirisbartochangethedegreetowhichtheirisopened. Thiswilldisable the product's autorisTore-enableused the PT2ontropanelwhichopened by clicking the Ctrpanebutton(seabove).
BrightnessbarClickorpositionorthbrightnesbatadjustthimagbrightnessThissettingwilhobaved. TomakesavedchangedSetupVideoCameraSettingsBrightnessandadjusttherightness.
The PTZ control sarbelisable under PTZ Advanced Controlssee Controlsprpage33.
MediaStreams
TheAxisproductprovidesseveralvideostreamformats.Yourrequirementsandthepropertiesofyournetworkwilldeterminethe typeyouuse.
TheLiveViewpageintheproductprovidesaccesstoH.264andMotionJPEGvideostreams,andtothelistofavailablestreamprofiles. Otherapplicationsandclientscanaccessvideostreamsdirectly,withoutgoingviatheLiveViewpage.
HowtoStreamH.264
The videocompression standard H.264 makes good use of bandwidth, and can provide high quality video streams at less than 1 Mbit/s.
Deciding which combination of protocols and method stoused depends on your viewing requirements, and on the properties of your network. The available options in AXISMediaControl are:
| UnicastRTP | Thisunicastmethod(RTPoverUDP)isused forliveunicastvideo,especiallywhenitis importanttoalwayshaveanup-to-datevideo stream,evenifsomeimagesaredropped. | Unicastingisusedforvideo-on-demand transmissionsothatthereisnovideotraffic onthenetworkuntilaclientconnectsand requeststhestream.Notethatthereareamaximumof20 simultaneousunicastconnections. |
| RTPoverRTSP | Thisunicastmethod(RTPtunneledoverRTSP) isusefulasitisrelativelysimpletoconfigure firewallstoallowRTSPtraffic. | |
| RTPoverRTSPoverHTTP | Thisunicastmethodcanbeusedtotraverse firewalls.Firewallsarecommonlyconfiguredto allowtheHTTPprotocol,thusallowingRTPto betunneled. | |
| MulticastRTP | Thismethod(RTPoverUDP)shouldbeusedforlivemulticastvideo.Thevideostreamisalways up-to-date,evenifsomeimagesaredropped.Multicastingprovidesthemostefficientusageofbandwidthwhentherearelargenumbersof clientsviewingsimultaneously.Amulticastcannothowever,passanetworkrouterunlessthe routerisconfiguredtoallowthis.ItisnotpossibletomulticastoverthelInternet,forexample.Notealsothatallmulticastviewerscountasoneunicastviewerinthemaximumtotalof20 simultaneousconnections. | |
AXISMediaControlnegotiateswiththeAxisproducttodeterminethetransportprotocoltouse.Theorderofpriority,listedintheAMCControlPanel,canbechangedandtheoptionsdisabled,tosuitspecificrequirements.
Note
H.264islicensedtechnology.TheAxisproductincludesoneH.264viewingclientlicense.Installingadditionalunlicensed copiesoftheclientisprohibited.Topurchaseadditionallicenses,contactyourAxisreseller.
MJPEG
This formatusesstandardJPEGstillimagesforthevideostream. These images are then displayed and updated at a rate sufficient to create stream that shows constantly updated motion.
TheMotionJPEGstreamusesconsiderableamountsofbandwidth,butprovidesexcellentimagequalityandaccesstoeveryimage containedinthestream.TherecommendedmethodofaccessingMotionJPEGlivevideofromtheAxisproductistousetheAXISMediaControlInInternetExplorerinWindows.
AXISMediaControl(AMC)
AXISMediaControl(AMC)inInternetExplorerinWindowsistherecommendedmethodofaccessinglivevideofromtheAxisproduct.
MediaStreams
TheAMCControlPanelcanbeusedtoconfigurevariousvideosettings.PleaseeseetheAXISMediaControlUser'sManualformore information.
TheAMCControlPanelisautomaticallyinstalledonfirstuse,afterwhichitcanbeconfigured.OpentheAMCControlPanelfrom:
- WindowsControlPanel(fromtheStartmenu)
Alternatively right-click the video image Interne Explore and click Settings.
AlternativeMethodsofAccessingtheVideoStream
YoucanalsoaccessvideoandimagesfromtheAxisproductinthefollowingways:
MotionPEGervepush(fupported by the client Firefox fo example) This option maintains proper HTTP connection to the browser and sends data as and when required, for as long as required.
StiUPEGimagesbrowserEntethepathhttp://
Window Media Player This requires AXIS Media Control and the 1.264 decoder to installed the following paths can be used:
-UnicastviaRTP:axrtpu://<ip>/axis-media/media.amp
-UnicastviaRTSP:axrtsp://<ip>/axis-media/media.amp
-UnicastviaRTSP,tunneledviaHTTP:axrtsphttp://<ip>/axis-media/media.amp
-Multicast:axrtpm://<ip>/axis-media/media.amp
- QuickTime TM. The following pathscanbeused:
-rtsp://<ip>/axis-media/media.amp
-rtsp://<ip>/axis-media/media.3gp
MediaStreams
Note
=|Paddress
•TheAxisproductsupportsQuickTime6.5.1andlater.- QuickTimeaddslatencytothevideostream.
- It maybe possible to use other player's view the H.264 stream using the paths above, although Axis does not guarantee this.
SettingUptheProduct
The Axi product are configured by users with administrator operator rights to the product's setup pages specific Setup the top-right-hand corner of the Live View page.
- Administratorshaveunrestrictedaccesstoallsettings.
- OperatorshaveaccesstoallsettingsexceptSystemOptions
Seealsotheonlinehelp

BasicSetup
BasicSetupprovidesshortcutstothesettingsthatshouldbemadebeforeusingtheAxisproduct:
1.Users.Seepage46.
2.TCP/IP.Seepage48.
3. Date&Time.Seepage48.
4.VideoStream.Seepage20.
TheBasicSetupmenucanbedisabledfromSystemOptions>Security>Users.
Video
ItispossibletoconfigurethefollowingvideofeaturesinyourAxisproduct:
•Videostream.Seepage20.
- Streamprofiles.Seepage21.
- Camerasettings.See page22.
•Overlayimage.Seepage23.
- Privacymask.Seepage24.
VideoStream
You can define following video stream settings from Video Stream:
- Image.Seepage21.
•H.264.Seepage21. - MJPEG.Seepage21.
![Basic Setup Video Stream Profiles Camera Settings Overlay Image Privacy Mask Live View Config PTZ Detectors Applications Events Recordings Languages System Options About Video Stream Settings Image 11.264 MJPEG Image Appearance Resolution: 1920x1080 (16/9) Compression: 30 [0..100] Rotate Image: 0 degrees Video Stream Maximum frame rate: ● Unlimited ○ Limited to [1..30] fps per viewer Overlay Settings □ Include overlay image at the coordinates: X 0 [0..] Y 0 [0..] □ Include data □ Include time □ Include text: Text overlay size: small Text color: white ▼ Text background color: black Place text/date/time at top ▼ of image Preview View image stream while configuring, Video format: MJPEG OpenUp Save Reset](/content/2026/05/1029172/images/0568962416837e1c70e2fcdaefd7e9855d893fc232b5f7a23176080e48dd8f76.jpg)
PixelCounter
Thepixelcountershowsthenumberofpixelsinanareaoftheimage. Thepixelcounterisusefulinsituationswherethereisa requirementthattheimageisacertainsize,forexampleinfacerecognition.
Thepixelcountercanbeaccessedfrom:
VideoVideStreamUndePreviewclickOpenandelecthShowpixelcounteroptiontenabletherectangleithemagdUsethmousctomovandesiztherectanglepentethnumberpixelsirthWidthandHeightfieldsandclickApply.
The LivViewpagerInterneExploreinWindowsRight-clickthimagandelecPixelcounterUsdhemouse tomoveandresizetherectangle.
Image
Thedefaultmagsettingscarbeconfiguredundelvideo>VideoStreamSelectdmagtab.
The followingsettingsareavailable:
- Resolution.Selectthedefaultresolution.
CompressionThe compressionlevel affects the image quality bandwidth and file size of saved images through the compression, the higher the image quality with higher bandwidth requirements and larger filesizes.
- Rotateimage.lfrequired, theimagecanberotated.
Maximunframeate avoid bandwidth problems the frame at allowed each view car be limited to fixed amount Alternatively the frame at car be a Unlimited which means the Ax product always delivers the highest framerate possible under the current conditions.
OverlayettingSeeOverlayprpage23.
ClickSavetoapplythenewsettings.
H.264
H.264,alsoknownasMPEG-4Part10/AVC,isavideocompressionstandardthatprovideshighqualityvideostreamsatlowbitrates. AnH.264videostreamconsistsofdifferenttypesofframessuchasl-framesandP-frames.Anl-frameisacompleteimagewhereas P-framesonlycontainthedifferencesfrompreviousframes.
The GOVength the number frames between two consecutive frames increasing the GOVength may save considerably in bandwidth requirements in some cases, but may also have an adverse effect on image equality.
The Axi product supports whd.264 profiles The Main profile provides higher compression that the Baseline profile with the same video quality, but requires more processing power to decode.
ThebitatcarbeseVariableBiRate(VBR)ConstantBiRate(CBR)VBRadjustthebitataccordingtheimage complexity,usingupmorebandwidthforincreasedactivityintheimage,andlessforlowerimageactivity.CBRallowsyoutoseta fixedtargebitatchatonsumespredictableamountbandwidthAshbitatowouldusuallyneedincreasefoincreased imageactivity,butinthiscasecannot,framerateandimagequalityareaffectednegatively.Topartlycompensateforthis,itis possibletoprioritizeeitherframerateorimagequality.Notsettingaprioritymeansthatframerateandimagequalityareequally affected.Youmustsaveyoursettingsbeforetheycantakeeffect.
The current coordinate appearance overlay told this select the included checkbox option under Overlay Settings and enter them modifier # bin the field.
MJPEG
Sometimes the imagesize is large duolow light or complex scenery. Adjusting them a maximum framesize help to control the bandwidth and storage by the Motion PEG video stream in these situations. Setting the framesize the Default setting provides consistently good image quality at the expense of increased bandwidth and storage usage in low light. Limiting the frame size optimizes bandwidth and storage usage, but may give poor image quality. Toprevent increased bandwidth and storage usage, the maximum framesizes should be set to an optimal value.
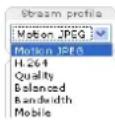
StreamProfiles
Astreamprofileisasetofpredefinedstreamsettingsincludingresolution,compression,framerateandoverlaysettings.Stream profilescanbeused:
- Whensettinguprecordingusingactionrules.SeeEvents,onpage39.
- Whensettingupcontinuousrecording.SeeContinuousRecording,onpage44.
In the ViewpageselectstreamprofilefromtheStreamprofiledrop-downlist.
Video
Forquicksetup, useoneofthepredefinedstreamprofiles. Each predefinedprofilehasadescriptivename, indicatingitspurpose. If required, thepredefinedstreamprofilescanbemodifiedandnewcustomizedstreamprofilescanbecreated.
To create new profile to modify existing profile and Setup VideoStreamProfiles.
To select default stream profile for the live view page to setup live view config.
CameraSettings
The Video Camer Settings page provides access to advanced image settings for the Axis product.
ImageAppearance
Increasing the Colo level Increase the colosaturation The value gives maximum colosaturation The value gives black and white image.
Thémage Brightnesscaradjustedrtheange0-100wherehighewalueproducesbrightimage.
Increasingh Sharpness an increase bandwidth usage sharper image might increase image noise especially low light conditions. Alowersetting reduces image noise, but the whole image will appear less sharp.
WhiteBalance
Whitebalanceisusedtomakecolorsintheimageappearthesameregardlessofthecolortemperatureofthelightsource.TheAxis productcanbesettoautomaticallyidentifythelightsourceandcompensateforitscolor.Alternatively,selectthetypeoflight
sourcefromthedrop-downlist.Foradescriptionofeachavailablesetting,seetheonlinehelp.

WideDynamicRange
Widdynamicangeanimprovethexposurewhetherconsiderablecontrasbetweenlightandlarareasithimage. EnableWDRinintensebacklightconditions.ThedifferentWDRsettingsadjustforvariousamountsofcontrastintheimage.Usea higherWDRnumberforahighercontrast.DisableWDRinlowlightconditionsforoptimalexposure.
ExposureSettings
Exposure control These settings used adapt the amount fight used Automatic default setting and table used most situations The hutterspeed automatically set to produce optimum image quality. Use Manual you have special requirements for the exposures setting and wishtolockit. Select the desired exposure time from the drop-downlist.
MaxexposureTimeSelect Maximum exposure time from the drop-down list Increasing exposure time will improve image quality but decreases the frame rate. There may also increase motion blur. Checking Allow low shutter decreases the shutterspeed in low light to improve image brightness.
Enable Backlight compensation Select Enable Backlight compensation bright pot fight for example light bulb causes other areas in the imageto appeartoodark.
HighlighCompensationTheAxisproductwildetectbrightlighfromsourcesuchtorchaheadlightsandmaskthatimagearea.Thissettingisusefulwhenthecameraoperatesinaverydarkareawhereabrightlightmayoverexposepartoftheimageandpreventtheoperatorfromseeingotherpartsofthescene.
MagainMeasureddecibel(dB)gaindescribethamountamplificationappliedsignalthisasthevisual informationintheimage.Ahighlevelofamplificationmayprovideabettermageinverylowlightsituations.Ahighgainwillalso increasetheamountofimagenoise.
Exposure zones This setting determines which par of the images used calculate the exposure from most situations the Auto setting can be used. For particular requirement, select a predefined area.
IRufilterTheRufilterpreventsinfrared(IR)ighfromreachinghemagsensorpoolightingconditionsforexample nightwhenusing external RampsettheRufilterOffThisincreasesightsensitivityandallowshproduct0see"
Video
infraredighTheimageshowninblaclandwhitewherthdRufilterofSethdRufiltertoAutdautomatically switchbetweenOrandOffaccordingdhightingconditions.
Day/Nighthif priority, Use the Day/Nighthif priority parameter determine whether the camera shift is either day mode or night mode. By default, the camera will automatically change from day to night mode at a pre-defined level which corresponds to light conditions. By dragging the bar handle toward the sun, the camera will change today mode earlier and change to night modelate.
ImageSettings
AutofocusenabledAutomaticfocusingisenabledbydefaultfhfocuspositionchangednuallyusingfhocubar, autofocuswilbdisabledevenlenabledherethiscaseusthePTZcontropanetenableautofocusseePTZControlsprpage 14fequiredthfocuscontrobandisabledundePTZAdvancedControls.
Noise reduction Set to Or enable noise reduction Noise reduction may increase the amount of motion blur.
ImagfreezerPTSelectAlmovementsfreezethimagwhilethecamerasmovingduringpantilbzoomoperation. OncethecamereacheestnewpositiontheviewfromthapositionishowPresetfreezethimagonlywherthecameramovesbetweenpresetpositions.
Overlay
Overlaysareusedtoprovideextrainformation,forexampleforforensicvideoanalysisorduringproductinstallationand configuration.Overlaysaresuperimposedoverthevideostream.
Anoverlaytextcandisplaythecurrentdateandtime,oratextstring.Whenusingatextstring, modifierscanbeusedtodisplay information such the currentbitato the currentframe location information about available modifiersseFileNamingt
Date/TimeFormatsintheonlinehelp
Italspossible displaytextwhenactionrulestriggeredsedUsingOverlayTextmanActionRule.
Toenableoverlays:
GdoVideoVideStreamandelecthæmagetab.
Tinclude overlayimages select include overlayimage the coordinates The overlayimage must first be uploaded to the Axisproduct, see OverlayImage.
Tincludelatandimeselectncludelatandncludetime.
TincludetextstringselectIncludetextandentethextrthfieldModifiersbanusedseFileNamingEt
Date/TimeFormatsintheonlinehelp

- Definetextoverlaycharacteristicsintherelevantfields.
6.ClickSave.
To modify the date and time format to SystemOptionsDateTimeSeeDateTimepage48.
OverlayImage
Anoverlayimageisastaticimagesuperimposedoverthevideostream.Theimage,forexamplecompanylogo,isusedtoprovide extrainformationortomaskapartoftheimage.
Sinceitisstatic, the position and size of an overlay image will remain the same regardless of resolution and Pan/Tilt/Zoom movements to update dynamic mask which will always mask the specific part of monitored rease Privacy Mask.
Touseanoverlayimage, theimagemustfirstbeuploadedtotheAxisproduct:
GoVideoOverlaymage.
2.ClickBrowseandbrowsetothefile.
Video
3.ClickUpload.
4. Select the imagetouse from the Use overlay imagelist.
5.ClickSave.
Todisplaytheoverlayimage:
GoVideoVideStreamandelecthæmagdab.
UndeOverlaySettingsselectIncludoverlaymagathcoordinatesandentethandcoordinates.
3.ClickSave.
Forinformationaboutsupportedimageformats,seetheonlinehelp

UsingOverlayTextinanActionRule
Actionrules:page39,cardisplayaroverlaytextwhetherulestriggeredThextarbasedprovideinformationforforensicvideoanalysis,notifiesurveillanceoperatorsorvalidatetriggersandactionsduringproductinstallationandconfiguration.
Tolisplayoverlaytextwhenactionrulestriggeredthemodifien# shouldbeusedasdescribedbelowWhertheules triggered,#Dwillbereplacedbythetextspecifiedintheactionrule.
Startbyenablingoverlaytextinthevideostream:
GoVideoVideStreamandelecthæmagetab.
UndeOverlaySettingsselectncludtext.
Enterthemodifier# andoptionallyadditionatextwhichwilbdisplayedalsowherthactionulenoactive.
Createtheactionrule:
- GotoEvents>ActionRules
2.ClickAddtocreateanewrule.
SelectTriggerandoptionally,SchedulandAdditionaConditionsSethonlinhelpodetails.
- From the Actionslist, select OverlayText
Entethtext Displayth Textfield This th Text that D wilbereplaced by.
Specify the Duration The text bar displayed while the rule active for fixed number seconds.
Example
T display text Motion detected when motion is detected, then include text field and time Motion detected in the text field when setting up the action rule.
PrivacyMask
Aprivacymaskisanareaofsolidcolorthatprohibitsusersfromviewingpartsofthemonitoredarea.Privacymaskscannotbe bypassedviatheVAPIX®ApplicationProgrammingInterface(API).
The PrivacyMaskList/VideoPrivacyMask shows a theme that are currently configured in the Axi product and indicates if they are enabled.
SincethePan/Tilt/Zoomcoordinatesdefineitssizeandposition,aprivacymaskisdynamicinrelationtothemonitoredarea.This meansthatregardlessoftheangleandzoomofthelens,thesameplaceorobjectwillbehidden.BoDefineatwhatmagnificationthe maskshouldbedisplayed,zoomtothedesiredlevelandclickSetlevel.
Youcanaddanewmask,re-sizethemaskwiththemouse,chooseacolorforthemask,andgivethemaskaname.
Video
Formoreinformation,seetheonlinehelp.

Important
Addingmanyprivacymasksmayaffecttheproduct'sperformance.
LiveViewConfig
YoucancustomizetheLiveViewpageandalterittosuityourrequirements.ItispossibletedefinethefollowingfeaturesoftheLiveViewpage.
-StreamProfile.Seepage21.
- DefaultViewerforBrowser.Seepage27.
-ViewerSettings.Seepage27.
ActionButtonsThesearchbuttonsdescribednControlstheLiveViewPageprpage13.
-UserDefinedLinks.Seepage27.
- OutputButtons.Seepage27.
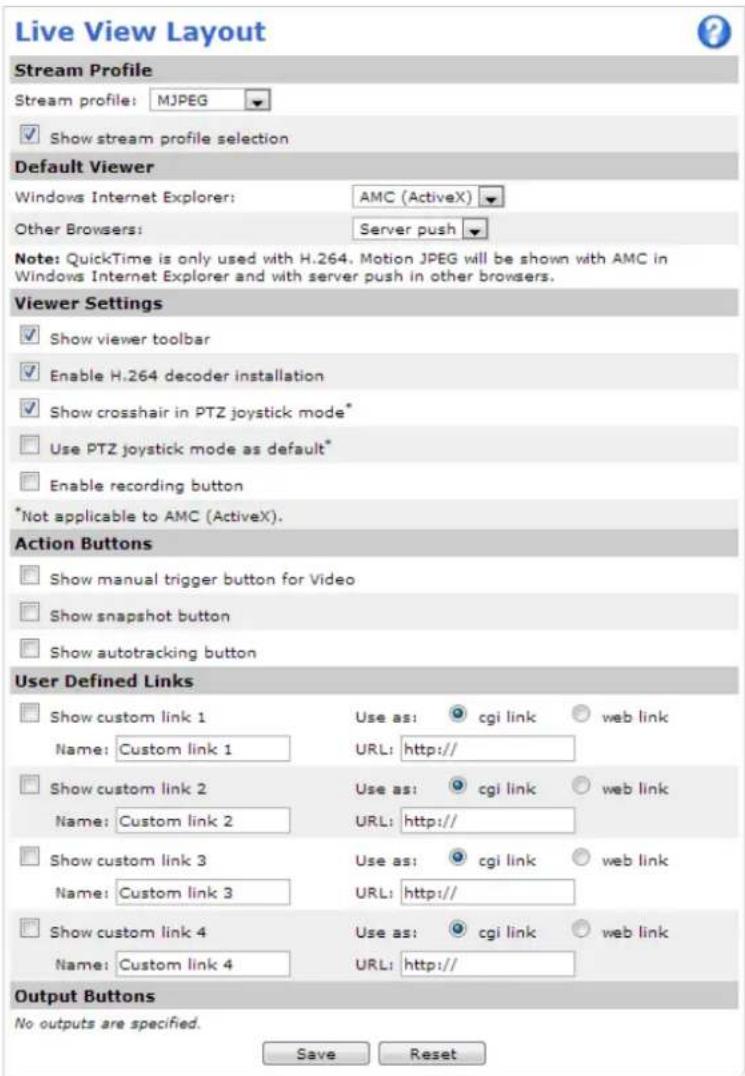
DefaultViewerforBrowsers
FromLiveViewConfigDefaultVieweselectdefaultmethodforviewingvideoimagesyoubrowserTheproductattempts toshowthevideoimagesintheselectedvideoformatandviewer.Ifthisisnotpossible,theproductoverridesthesettingsand selectsthebestavailablecombination.
| BrowserViewerDescription | ||
| WindowsInternetExplorer | AMC | RecommendedviewerinInternetExplorer(H.264/MotionJPEG). |
| QuickTime | H.264. | |
| Javaapplet | AslowerimagingalternativetoAMC(MotionJPEG).Requiresoneofthe followinginstalledontheclient:•JVM(J2SE)1.4.2orhigher.•JRE(J2SE)5.0orhigher. | |
| StillimageDisplays | stillimagesonly.ClicktheRefreshbuttoninyourbrosertoviewa newimage. | |
| Otherbrowsers | ServerPush | Recommendedviewerforotherbrowsers(MotionJPEG). |
| QuickTime | H.264. | |
| Javaapplet | AslowerimagingalternativetoServerPush(MotionJPEGonly). | |
| StillimageDisplays | stillimagesonly.ClicktheRefreshbuttoninyourbrosertoviewa newimage. |
Formoreinformation,pleaseetheonlinehelp.

ViewerSettings
Toconfigureoptionsfortheviewer, gotoLiveViewConfig>ViewerSettings.
SelectShowiewetoolbatolisplaytheAXISMediaControlAMCbtheQuickTimeviewetoolbaundethevideoimageinyourbrowser.
H264lecodeinstallationTheadministratorandisableinstallationofthe1.264lecodeincludedwithAXISMedia Control.Thisisusedtopreventinstallationofunlicensedcopies.Furtherdecoderlicensescanbepurchasedfromyour Axisreseller.
SelectShowcrosshainPTJoystickmode enablecrosshathwillIndicatethecentofthemagerPTJoystick mode.
SelectUsPTZystickmodesdefaultenablejoystickmodeThemodecarchangedemporarilyfromthe PTZcontrolpanel.
SelectEnablerecordingbutton enablerecordingfromtheviewpage This button is available when using the AMC viewer. TherecordingsaresavedtothelocationspecifiedintheAMCControlPanel.SeeAXISMediaControl (AMC),onpage 16.
UserDefinedLinks
Tolisplayuser-definedinkirthLiveViewpageselectShowcustomlinkoptiongivthinknamandherentethURL tolinkto.Whendefiningaweblinkdonotremovethehttp://fromtheURLaddress.Customlinkscanbeusedtorunscriptsor activateexternaldevicesconnectedtotheproduct,ortheycanlinktoawebpage.Customlinksdefinedascgilinkswillrunthe scriptinthebackground,inahiddenframe.Definingthelinkasaweblinkwillopenthelinkinanewwindow.
OutputButtons
Externall/OdevicesconnectedtotheAxisproduct'soutputportscanbecontrolleddirectlyfromtheLiveViewpage.
Note
Tenablethisettingateasbnd/Oportusbconfiguredasoutputported/Oportsprpage55.
TodisplayoutputbuttonsintheLiveViewpage:
- GotoSetup>LiveViewConfig.
- UnderOutputButtons, select the type of controltouse:
Pulsactivates houtpfordefineperiodbfimeThepulstimecarbsefrom1/10Second60 seconds.
-Active/Inactive displaywobuttons, oneoreachaction.
ToconfigureactivandnactivstatesgdsystemOptionsPortsDevicesl/Portandethport'NormaState.
Formoreinformationaboutl/Oports,seeI/OPorts,onpage55.
PTZ(PanTiltZoom)
PresetPositions
Apresetpositionisapredefinedviewthatcanbeusedtoquicklysteerthecameratoaspecificlocation.Presetpositionscan beaccessedinseveralways:
Byelecting the presefrom the Presepositions drop-downlist the liveViewPage.
- Whensettingupactionrules.Seepage39.
- WhensettingupGuardTour.Seepage31.
- WhensettinguptheGatekeeper.See page30
Toaddapresetposition:
- GotoPTZ>PresetPositions.
- Usethepan, tilt and zoom control, tosteer the camera view to the desired position.
3.EnteradescriptivenameintheCurrentpositionfield. - If required, select UsecurrentpositionasHome.
ClickAddThecamera'spositionirandfocussettingsareavedpreseposition.
The Composition is readily accessible by clicking the HomeButton or the Live View page and the Prese Position setup window.
To a customized composition select user position home when adding preposition the user-defined home position will have (H) added,forexample,Entrance(H).The default Home position, called "Home",will still be available.
TheproductcanbeconfiguredtoreturntotheHomepositionwhenthePTZfunctionalityhasbeeninactiveforaspecifiedlengthofimeEntethlengthfimenthReturnhomewheinactivefieldandlicSavSethdimdzerdpreventheproductfromautomaticallyreturningtotheHomeposition.
To include the preposition am in the overlay text to video select include overlay text and the modification Birth field.
FomoreinformationaboutmodifiersseeFileNamingDate/TimeFormatsthonlinlhelp

Theproductcanbemountedinthreedifferenthorizontaldirections.ThismaycausetheviewfromPan0°tobechangedfromthe originaviewClickSetNewPan0tosethparcoordinatesystemterorthecurrentdirectionSetNewPan0carbe usefulforinstancewhenre-installingtheproductaftermaintenance.Notethat,settingPan0°willaffectallpreviouslydefined presets,guardtours,masksetc.
![Preset Positions Preset Position Setup Current position: Use current position as home Add Available positions: Home (10) Go to Remove Return to home when inactive: 0 [0,300] seconds 0 = disabled Save Buying, Motor.2785 Up TILT Down Basic Setup Video Live View Config PTZ Preset Positions Autotracking Gatekeeper Guard Tour OSDI Zones Advanced Control Queue Detectors Applications Events Recordings Languages System Options About Set new Plan 0° BAR Left Right Zoom Wide Take Focus Near Far Auto BRS Close Open Air BRIGHTNE 96 Photo Off speed Start AutoTrack](/content/2026/05/1029172/images/a8f7a1efeb89a74ed2c12dfbba45fabde0ea2aaf395ba5015225e349fe4a48df.jpg)
Gatekeeper
TheActiveGatekeepermonitorsanareasuchasanentrancegate.Whenmotionisdetectedinthemonitoredarea,theGatekeeper will,dependingonconfiguration,steerthecameratoaselectedpresetpositionorstartautotrackingfromaselectedpresetposition. Usingazoomed-inpresetpositioncanmakeitpossibleto,forexample,readalicenseplateoridentifyaperson.Whenmotion isnolongerdetected,thecamerareturnstoitsHomepositionafteradefinedtime.
TenabletheGatekeepergctoPTZGatekeeperandfollowthonlininstructions.
ItalspossibleforexamplerecordideasavimagestakensnapshotwhiletheGatekeeperactiveGdEventandetupractionulwithPTPreseReachedAutotrackingstrigger.
Autotracking
TheAxisproductcandetectmovementinthefieldofview,forexampleamovingvehicleorperson.Ifautotrackingisenabled,the Axisproductwillautomaticallypanandtilttofollowthemovingobject.Incasethereismuchsimultaneousmovement,theareawithemostmovementwillbefollowed.Autotrackingcontinuesuntilthemovingobjectstopsordisappearsfromthemonitoredarea. Movementinareasblockedbyprivacymasksandinexcludeareasdoesnottriggerautotracking.
Itstronglyrecommended enable the PTZ ControlQueue autotracking and guardtoun are enabled simultaneously in the PTZ ControlQueue, guardtour has lower priority than autotracking, so autotracking will not be abandoned to start guardtour.
Configuration
Start/StopAutotrackingClickStartEnableautotrackingTolisableautotrackingclickStop.
SettingsTheMovementtriggersensitivitylevelbarbsetLowMediumHighMediumisusuallygoodchoicedependingn thesizeofthemovingobjectsandtheimagecontrast,aloworhighsensitivitymightbemoresuitable.
ExcludeAreas
Excludeareasareareaswheremovementistobeignored.
Note
Movementinanareablockedbyaprivacymaskisalwaysignored.
- ClickAddareatocreateanexcludearea
- Resizeandmovethearea(thebluerectangle)tothedesiredposition.
3.EnteradescriptivenameandclickSave.
To remove area click the nam of there and click Remove enabled disable area click the nam of there and click Enable/Disable.
MaxLimits
Thepanandtiltlimitsrestricttheareawhereautotrackingisallowed.Theareabeyondthesetlimitswillbeignored.Thismayprove useful,forexample,toavoidtrackingbirdsinthesky.Betweenthepanstartandendlimits,autotrackingisallowedgoingclockwise. Theillustrationsshowthedifferencebetweensettingarangefrom135°to45°(1)andarangefrom45°to135°(2).
SelectEnabletilimitandEnableparllimitspectively enablethetilandparlimits.
2.EntertheTiltangleandPanlimitvalues,orclickthelinksandmovethebluehorizontalandverticalbarsinthepreview windowuntilsatisfied.
3.ClickSave.
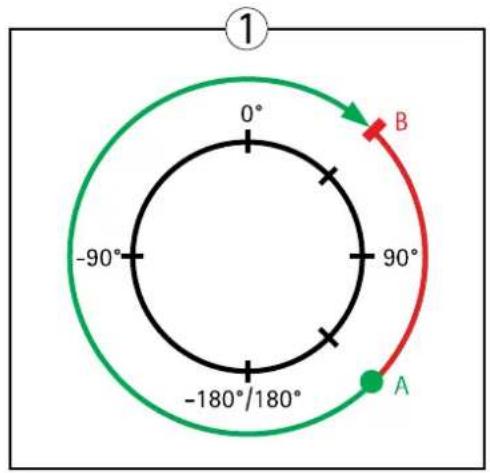
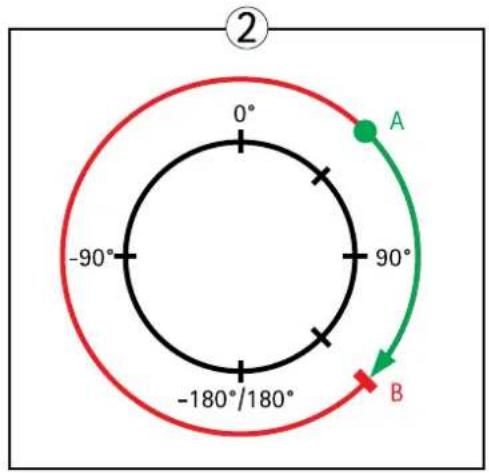
Topview
APanlimitstart
BPanlimitend
GuardTour
Aguardtourdisplaysthevideostreamfromdifferentpresetpositions,one-by-one,inapredeterminedorderoratrandomandforconfigurabletimeperiods.Theenabledguardtourwillkeeprunningaftertheuserhasloggedofforclosedthebrowser.
The guardour capability in this Axis product also includes recording Tour recordings described in Tour Recording page 81.
Toaddaguardtour:
GdPTZGuardTouandclicAdd.
SelectCreatopresetoundclicOK.
3.Enteradescriptivename.
-
Specify the pause length between runs.
-
Select an available preset position and click Apply.
-
SpecifytheMoveSpeed.
-
Specify theViewTimeinsecondsorminutes.
Specify the View Order Select the Random View order option.
9.ClickSave.
TomodifpremovguardoursgdPTZGuardTourselectheguardouirtheGuardTouListandlicModify/Remove.
Formoreinformationseetheonlinehelp

TourRecording
Theguardtourfunctioninthisproductincludestourrecording,whichallowsrecordingofacustomtourusinganinputdevicesuch asajoystick,mouse,keyboardorthroughtheVAPIX®ApplicationProgrammingInterface(API).Arecordedtourdisplaysthevideo streamoftherecordedsequenceofPan/Tilt/Zoommovements,includingtheirvariablespeedsandlengths.
Toaddarecordedtour:
PTZ(PanTiltZoom)
GdPTZGuardTouandclickAdd.
SelectRecordouandlicOK.
3.Enteradescriptivename.
- Specify the pause length between runs.
5.Click tostartrecordingthePan/Tilt/Zoommovements.
- Whensatisfied, click.
7.ClickOK.
Note
Only then a name of the recorded tour and pause between runscambemodified. Starting an new recording will over writ the existing guard tour.
TherecordedtourcanbeactivatedfromtheLiveViewandGuardTourpagesorthroughevents.Formoreinformationsee
theonlinehelp.
OSDIZones
On-ScreerDirectionIndicator(OSDI)onescarbincludedrtheoverlaytex(seoOverlayprpage23)aidhouseto navigate theAxisproduct.EachOSDIzoneissetupwithcoordinatesandadescriptivename.
OSDzonearesetupundePTZOSDZoneTheAxiproductusethecoordinatesftherentofthiewtsethlower leftandupperrightzoneareas.FirstnavigatetowhereyouwouldlikethelowermostleftpointoftheOSDIzonetobelocated. ClickGetsethecoordinatesProceedowherthupperighpointfzonshouldlocatedandlicGetGivezone descriptivenameandclickOK.
To include the name of the OSD zone through overlay text and video video stream settings Check include texbox and the modification. The field from information about modifiers, file, Naming, Date, Time, Format in
theonlinehelp
Advanced
Limits
Definethepan, tilt, zoom and focus limits for the Axis product. Movement to the left and right, up and down, can be restricted to narrow the area and undersurveillance.
Configurethenearfocuslimittoavoidfocusingonobjectstooclosetothecameralens.
WherEnable-flip selected as tiltslow and continues to par backwards the Ax product will automatically correct the view and flip it 180 degrees. The left limit must be setto-180 degrees and theright limit to 180 degrees fore-fliptowork.
Movespeedsetsthespeedofthecamera'spanandtiltmovements.Thedefaultsettingismaximumspeed.
When using joystick (oemulating new themouse) then a proportional speed setting can be used to reduce the maximum pan/tiltmovementspeed, i.e. the speed the cameraview moves at when the joystick is pushed all the way out in any direction. This is useful thenthe view is zoomed in nonan object.
Seetheonlinehelp
formoreinformation.
Controls
PaneShortcuCommandButtonsabeconfiguredprovide direct access commandissued via APIX® Application ProgrammingInterface. The button will be displayed in the PTZ control panel, which is available in the Live View page through the Ctr pane button se page 14.
DeselecttheoptionsundeEnable/Disablecontrolsdisablethepantilzoomfocusandrisontrols.
Note
DisablingPTZcontrolswillnotaffectpresetpositions. Forexample, ifthetiltcontrolisdisabled, theproductcanstillmoveto presetpositionsthatrequireatiltmovement.
ControlQueue
The administrator setup que ufo PTZ controller from PTZControlDueoOncsetupthePTZControlQueuebuttons appear in theLiveViewpageofferingoneviewerexclusivecontrolforalimitedperiodoftime. Other users will be placedinqueue.
Ausewhobelongsgroupisedusersorpage46withhighePT2prioritycargbeforetheusersithqueueandtakecontroloftheproduct.Theorderofpriorityisasfollows:
Administrator\Administrator takesovePTZ control regardless of which first queue the administrator will be removed from the queue 60 seconds after the last PTZ control command.
Event-TheAxiproductcarbeconfigured@topresepositionwhertriggeredbyalarm(seeEventsprpage39). Theeventwillimmediatelybeplacedfirstinthequeueexceptwhenanadministratorisincontrol.
- Operator—Sameas administrator but with lower priority
GuardTour-Aguardou(sepage3)hasPTZontrofoanindefinitperiodbfimd.mayoverridderbyan operator,eventoradministrator.Theguardtourwillresumewhenhigherprioritygroupsleavethequeue.
Viewer-MultipleviewersmustwaifotheiturnTheviewha6SecondPTZontrobeforecontrolpassed ontothenextviewerinqueue.
Note
- The administratorcanenableanddisablePTZcontrolsforselectedusers.
- Toidentifydifferentusersintheviewergroup,cookiesmustbeenabledontheclient.
Detectors
ShockDetection
EnableShockDetectionfromtheDetectorsmenuShockdetectionisusedforexampletgeneratalarmifhproducthit byanobject.
UsehShocksensitivityslideradjusthe sensitivity level which the product should be an alarm or being hit low sensitivity value implies that the product will generate an alarm only if the height is powerful.
MotionDetection
Motiondetectionisusedtogenerateanalarmwhenevermovementstartsorstopsinthecameraview.
Motiondetectionisconfiguredbydefiningupto10IncludeandExcludewindows:
- Includewindows—defineareaswheremotionsshouldbedetected
Exclude windows define areas within an include window that should be ignored (areas outside include windows are automatically ignored).
Forinstructions, see SetUpMotionDetectionWindows, onpage34.
To control the number of motion detection alarm parameters ObjectSize history and sensitivity can be adjusted to see Motion Detection Parameters, on page 35.
Oncemotiondetectionwindowsareconfigured, theAxisproductcanbeconfiguredtoperformactionswhenmotionisdetected. Possible actions include uploading images and startecording FomoreinformationSettingUponActionRuleprpage40.
Note
- Usingthemotiondetectionfeaturemaydecreasetheproduct'soverallperformance.
- ThepositionoftheMotionDetectionWindowisrelativetotheorientationoftheCamera.Changingtheorientationofthe camerawillalsochangethepositionoftheMotionDetectionWindow.
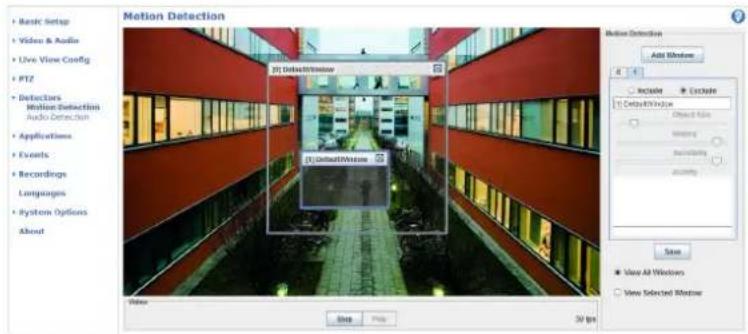
SetUpMotionDetectionWindows
TosetupamotiondetectionIncludeWindow, followtheseinstructions:
- GotoDetectors > MotionDetection.
Select the Configure included Windows option and lic New Select the new window with this window and enter adescriptivename.
- Adjustthesize(dragthebottomright-handcorner)andtheposition(clickonthetextatthetopanddragtothedesired position)ofthewindow.
Detectors
Adjust the Object Size History and Sensitivity profile labels (see Motion Detection Parameters for details) Any detected motion within an active window is indicated by red peaks in the Activity window.
5.ClickSave.
To exclude parts of the inclusion window, select the Configur Excluded Window and position the exclusion window within the inclusion window.
ToletanincludeexcludovindowselecthowindowwirthdisbwindowsandelicDel.
MotionDetectionParameters
The parameters controlling motion detection are described in the table below:
| Parameter | ObjectSize | History | Sensitivity |
| Description | Objectsizerelativetowindow size. | Objectmemorylength. | Differenceinluminance betweenbackground and object. |
| Highlevel(100%) | Onlyverylargeobjectstrigger motiondetection. | Anobjectthatappearsin thewindowtriggersmotion detectionforalongtime beforeitisconsideredas non-moving. | Ordinarycoloredobjectson ordinarybackgroundstrigger motiondetection. |
| Mediumlevel(50%) | Alargedifferenceinluminance isrequiredtotriggermotion detection. | ||
| Lowlevel(0%) | Evenverysmallobjectstrigger motiondetection. | Anobjectthatappearsin thewindowtriggersmotion detectiononlyforaveryshort timebeforeitisconsideredas non-moving. | Onlyverybrightobjectson adarkbackgroundtrigger motiondetection. |
| Recommendedvalues | 5–15%60–90%75–95% | ||
| Defaultvalues | 15%90%90% |
Note
- Totriggeronsmallobjectsormovements, useseveralsmallmotiondetectionwindowsratherthanonelargewindow andselectalowobjectsize.
- To avoid triggering on small objects, select a high object size.
- While monitoring an are a where removing objects are not expected, select a high history level. This will cause motion detection to trigger a long asthe object is present in the window.
- Toonlydetectflashinglight,selectalowsensitivity.Inothercaseshighsensitivityisrecommended.
ObjectRemoved
ObjectRemovedisusedtotriggeranalarmifanobject,withinapre-definedareaofinterest,isremoved.ObjectRemovedprovides toolstodefine:
AreofnteresThisvirtualareathsdefinedaroundobjectdetectthatobjechabeenremovedfromthscene.
Objectsize-Definesthesizeoftheobjectsthatshouldbedetected.
Sensitivity-Usethisslidebartodefinehowsensitivethedetectionsshouldbe.
DrawingOpacity:Use this slidebato defin how transparent there of interestshap should be Not that this change will not besaved.
Detectors
Seetheonlinehelpformoreinformation.
Enter/ExitDetector
Enter/ExitDetectorisusedtotriggeranalarmifanobject,withinapre-definedareaofinterest,hasenteredorleftthearea. Enter/ExitDetectorprovidestoolstodefine:
Areaofinterest-Thisisavirtualareathatisdefinedtodetectmovingobjectsenteringadefinedarea
Objectsize-Definesthesizeoftheobjectsthatshouldbedetected.
Sensitivity-Usethisslidebartodefinehowsensitivethedetectionsshouldbe.
DrawingOpacity is this slide because how transparent there is interest should be noted that this change will not be saved.
Seetheonlinehelp ? formoreinformation.
FenceDetector
FenceDetectorisusedtotriggeranalarmifanobjectcrossesavirtualline.FenceDetectorprovidestoolstodefine:
Areaofinterest-Thisisavirtuallinethatisdefinedtodetectobjectsmovingacrossit.
Objectsize-Definesthesizeoftheobjectsthatshouldbedetected.
Sensitivity-Use this slidebart define how sensitivethedetections should be.
DrawingOpacity:Use this slide at to define how transparent there is interest shape should be noted that this change will not be saved.
Seetheonlinehelp ② formoreinformation.
ObjectCounter
ObjectCounterisusedtocountobjectsthatmoveacrossavirtualline.ObjectCounterprovidestoolstodefine:
Areaofinterest-Thisisavirtuallinethatisdefinedtodetectobjectsmovingacrossitkeepcount.
Objectsize-Definesthesizeoftheobjectsthatshouldbedetected.
Sensitivity-Usethisslidebartodefinehowsensitivethedetectionsshouldbe.
DrawingOpacity:Use this slide because how transparent area of interest should be noted that this change will not be saved.
Seetheonlinehelp formoreinformation.
Applications
ThirdpartyapplicationscanbeuploadedtoandinstalledontheAxisproduct. Applicationsaddfunctionalitytotheproduct,for examplevideoanalyticsandintelligentvideocapabilitiessuchasrecognition,tracking,detectionandcounting.Forinformation aboutavailableapplications,downloads,trialsandlicenses,goto www.axis.com/applications
Note
- Itisrecommendedtorunoneapplicationatatime.
- Avoidrunningapplicationswhenthebuilt-inmotiondetectionisactive.
ApplicationLicenses
Someapplicationsneedalicensetorun.Licensescanbeinstalledintwoways:
•Automaticinstallation—requiresaccesstothelnternet
- Manualinstallation—obtainthelicensekeyfromtheapplicationvendoranduploadthekeytotheAxisproduct
Torequestalicense, theAxisproductserialnumber(S/N) is required. The serial number can be found on the product label and under SystemOptions > Support > SystemOverview.
InstallApplication
Toinstallandstartanapplication:
- GotoSetup>Applications.
UndeUploadApplicationclickBrowseLocatchapplicationfileandclickUploadPackage. - Install the license (if applicable). For instructions, seethedocumentation provided by the application vendor.
Start the applicationG40 page Applications select the application in the disf installed applications and click Start. - Configuretheapplication.Forinstructions,seethedocumentationprovidedbytheapplicationvendor.
Note
- Applicationscanbeuploadedbyproductadministrators.
- ApplicationsandlicensescanbeinstalledonmultipleproductsatthesametimeusingAXISCameraManagement,version 3.10andlater.
To generate log file of the application to Application Select the application and click Log.
ApplicationConsiderations
Ifanapplicationisupgraded, applicationsettings, including the license, will be removed. The license must be installed and the application reconfigured.
If the Axis product's firmware is upgraded, installed applications and their settings will remain unchanged, although this is not guaranteed by Axis Communications AB. Not that the application must be supported by the new firmware. For information about firmware upgrades, see Upgrading the Firmware.
If the Axis product is restarted, running applications will restart automatically.
If the Axis product is restored, installed applications remain unchanged but must be restarted. To start the application, goto Setup Application Select the application in this db installed applications and click Start Information about restoring the Axis product, see Maintenance.
Applications
If theAxisproductisresettofactorydefault, installed applications and their settings are removed. For information about factory default, see ResettoFactoryDefaultSettings.
Events
TheAxisproductcanbeconfiguredtoperformactionswhendifferenteventsoccur,forexample,startarecordingwhenmotionis detectedThesecondditionsthatefineshowandwhetheractionstriggeredcalledActionRule.
Available actionultriggersandconditionsinclude:
ApplicationsUsed installation applicationstriggethRuleSeeApplicationsprpage37.
- Detectors
LivStreamAccessedTrigger rule when any stream is accessed and during closestog playback. This can forexample be used to send notifications.
MotionDetectionTrigger rule when motion is detected. See Motion Detection page 34.
ShockDetectedTriggetheulewhertheAxiproductdetectshabeertiltedhitSeShockDetection, onpage34.
Enter/ExitTriggertheulwherambjectaenteredexitedhareaSeeEnter/ExitDetectorprpage36.
FenceDetectorTrigger rule when abstracted cross virtual line. See FenceDetector pr page 36
ObjectRemovedTriggerRuleWhenObjectabeerremovedfromscenSeeObjectRemoved, onpage35.
- Hardware
HeaterTriggetheRuletheatermalfunctioningThisarfoexampleusedendmaintenance notifications.
NetworkTrigger rule network connections lost restored This so example used start recording to the SDcard.
TemperatureTriggetheulifthtemperaturfallsoutsideinsidethoperatingangofhproductThis canforexamplebeusedtosendmaintenancenotifications.
- InputSignal
DigitalInputPortTriggetherulewhenal/Qort receive signa from connected device Sed/O Ports, on page 55.
ManualTriggerTriggertheuleusingtheManualTriggerbuttonithliveViewpageSeeControlson theLiveViewPage,onpage13.Thiscanforexamplebeusedtovalidateactionsduringproductinstallation andconfiguration.
VirtualInputscarbused by VMSVidedManagemenSystemdriggeactionsVirtualInputscanfor example, beconnectedtobuttonsintheVMSuserinterface.
•PTZ
AutotrackingTriggetheulewhenautotrackingstartstopSeeAutotrackingprpage30.
ErrorTriggetheulethePTFunctionalitynotworkingcorrectlyThisaforexampleusedo sendmaintenancenotifications.
MovingTriggethe rulewher the cameraviewmovesduetoPTZoperationThisarfoexampleused asanadditionalconditiontopreventanactionruletriggeredbymotiondetectiontorecordvideowhilethe cameraviewmovesduetoaPTZoperation.
PreseReachedTrigger rule when the camera stops to prese position This can be example used with the SendImages action to upload images from the preset position.
Events
ReadyTriggetheulewherthePTZfunctionalityreadytousedThisarfoexampleusedsteer thecameratoaspecificpresetpositionwhentheproductisstarted.
•Storage
DisruptionTrigger rule storage problems are detected for example if storage devices are unavailable, removed, full, locked or if other reader or write problems occur. This can forexample be used to send maintenance notifications.
RecordingTriggertheulwhertheAxiproductrecordsthoragdeviceTherecordingstatusrigger canbeusedtonotifytheoperator,forexamplebyflashingLEDlights,iftheproducthasstartedorstoppedto recordtothestoragedevice.Notethat,thistriggercanbeusedonlyforedgestoragerecordingstatus.
•System
SystemReadyTriggetheulwhertheproduchabeerstartedndalservicesrerunningThisarfor examplebeusedtosendanotificationwhentheproductrestarts.
•Time
RecurrenceTriggetheulperiodicallySeeRecurrencesprpage4Thisafoexampleusedo uploadanimageevery5minutes.
UsScheduleTriggertheulaccordingtheselectedscheduleSeSchedulesprpage42.
Availableactionsinclude:
Day/NighVisionModeSetlaymodel(Rufilteron)nightnode(Rufilteroff).
- OutputPort-ActivateanI/Oporttocontrolanexternaldevice.
OverlayTextDisplayanoverlayTextSedUsingOverlayTextfranActionRuleprpage24.
- PTZControl
AutotrackingStartautotrackingSeeAutotrackingpage80.
-PresetPosition-Gotoapresetposition.
GuardTourStartguardouSeeGuardTourprpage31.
- RecordVideo–Recordvideotoaselectedstorage.
- SendImages–Sendimagestoarecipient.
- SendNotifications–Sendanotificationmessagetoarecipient.
- SendVideoClip-Sendavideocliptoarecipient.
SettingUpanActionRule
Anactionruledefinestheconditionsthatmustbemetfortheproducttoperformanaction,forexemplerecordvideoorsendan emailnotification.Ifmultipleconditionsaredefined,allofthemmustbemettotriggertheaction.
The following example describes how to setup an action rule to record video to an network share if there is movement in the camera's field of view.
Setupmotiondetectionandaddanetworkshare:
GadDetectorsMotionDetectionandconfiguremotiondetectionwindowSeepage34
QoSystemOptionsStorageandetupthetworkshareSepage54.
Setuptheactionrule:
Events
GetEventsActionRulesandClickAdd.
- SelectEnableruleandenteradescriptivenamefortherule.
SelectDetectorsfromthTriggedrop-downlist.
SelectMotionDetectionfromthedrop-downlistSelectthemotiondetectionwindowtouse.
OptionallyselectSchedule and AdditionaConditionSebelow.
LondeActionsselecRecord/idefromthTypdrop-downlist.
SelectStreamprofil and configure the Duration settings as described below.
- SelectNetworkSharefromtheStoragedrop-downlist.
To additionacriteriaselectheAdditionaconditionsoption and additionatriggersPreventractionfrombeing triggeredepeatedlyWaitbeastimecarbeseEntethdimhoursminutesandsecondsduringwhichthetrigger shouldbeignoredbeforetheactionrulecanbeactivatedagain.
TherecordingDurationofomactionsarbeetincluddimmediatelybeforeandaftertheventSelectPre-triggetime and/oPost-triggetimendentethumbersecondsWhenWhiletheulactivivenabledactionstriggered againduringthepost-triggertime,therecordingtimewillbeextendedwithanotherpost-triggertimeperiod.
Formoreinformation,seetheonlinehelp

FallbackAction
Afallbackactionisstartediftheprimaryactioncannotbestarted,forexampleifconnectiontoarecipientcannotbeestablished.
Fallbackactionsaretypicallyusedtosendemailnotificationsonfailedactionsortuploadimagestoasecondaryrecipient.
Recipients
Recipientsreceivemediafilesandnotificationmessages.Thefollowingrecipientsareavailable:
| RecipientUsewithaction | |
| Email^1 | SendImagesSendNotificationSendVideoClip |
| FTP | SendImagesSendVideoClip |
| HTTP | SendImagesSendNotificationSendVideoClip |
| HTTPSSendImages | SendNotificationSendVideoClip |
Events
| NetworkShare ^2 | SendImagesSendVideoClip |
| TCPSendNotification |
Some email providers have security filters that prevent users from receiving viewingARG amount attachments from receiving scheduled emails and similar. Check the email provider's security policy to avoid delivery problems and locked email accounts.
An2workshare can also be stored device forecorded video System Options Storage configurenetworkshare before setting continuous recording action until recorded se Storage page 5 from more information about storage devices.
Toaddarecipient:
GdEventsRecipientandclickAdd.
2.Enteradescriptivename.
3.SelectarecipientType.
4.Entertheinformationneededfortherecipienttype.
5.ClickTesttotesttheconnectiontotherecipient.
6.ClickOK.
SettingUpanEmailRecipient
Emailrecipientscanbeconfiguredbyselectingoneofthelistedemailproviders,orbyspecifyingtheSMTPserver,portand authenticationusedby,forexample,accorporateemailserver.
Note
Some email providers have security filter that prevent users from receiving or viewing large amount of attachments, from receiving scheduled emails and similar. Check the email provider's security policy to avoid delivery problems and locked email accounts.
Tosetupanemailrecipientusingoneofthelistedproviders:
GetEventsRecipientandclickAdd.
EnterNameandelecEmaifronthTypeist.
Entethemailaddresses send emails forth To field Use commas separate multiple addresses.
- Select the email provider from the Provider list.
5.Entertheuser|Dandpasswordfortheemailaccount.
6.ClickTesttosendatestemail.
ToeuparemailrecipientusingforexamplecorporatemaiserverfollowthinstructionsaboveelectUsedefineds ProviderEntethemailaddressappeansendeintheFromfieldSelectAdvancedettingsandspecifthSMTServer addressportandauthenticationmethodOptionallyselectUsencryptiontoendemailsoverencryptedconnectionTheserver certificatecanbevalidatedusingthecertificatesavailableintheAxisproduct.Forinformationonhowtuploadcertificates, seeCertificates,onpage47.
Schedules
Schedulescanbeusedasactionruletriggersorasadditionalconditions,forexampletorecordvideoifmotionisdetectedoutside officehours.Useoneofthepredefinedschedulesorcreateanewscheduleasdescribedbelow.
Tocreateanewschedule:
GetEventsSchedulesandClickAdd.
Events
2.Enteradescriptivenameandtheinformationneededforadaily,weekly,monthlyoryearlyschedule.
3.ClickOK.
To the schedule action rule selects the schedule from the Schedule drop-down list the Action Rule Setup page.
Recurrences
Recurrencesareusedtotriggeractionrulesrepeatedly,forexamplevery5minutesoreveryhour.
Tosetuparecurrence:
GdEventsRecurrenceandlicAdd.
- Enteradescriptivenameandrecurrencepattern.
3.ClickOK.
To set the recurrence in action rule first select Time from the Trigger drop-downlist the Action Rule Setup page and then select the recurrence from these second drop-downlist.
TomodifyremoverecurrencesselecttherecurrencirthRecurrenceListandlicModifyRemove.
Recordings
TheAxisproductcanbeconfiguredtorecordvideocontinuouslyoraccordingtoanactionrule:
- Tostartacontinuousrecording,see page44.
- Tosetupactionrules,seepage40.
•Toaccessrecordings,seeRecordingList,onpage44.
•Toconfigurecameracontrolledstorage,seeStorage,onpage53.
RecordingList
Recorded videos and the Recordings List page. The shows each recording 'start lat and time duration and the event that triggered therecording.
Toplayordownloadarecording, followthesesteps:
- GotoRecordings>List.
Use filter to narrow disb recording Enteth desired filter criterion and lic Filte Some filters may take along timetocomplete.
- Selecttherecording.
@licPlayplaythecordingpclipDownloaddownloadhrecording.
Multiple recordingscarbdownloadedatthesamtimeSelectrecordingsandlicDownloadThedownloadedfilezipfile containingaminimumofthreefiles,ofwhichtheMatroska(mkv)filesaretheactualrecordings.Therecordingsaretime-stamped withthedateandtimetheyweredownloaded(thatis,notthedatetherecordingsweremade).
Note
ToplayrecordingsinWindowsMediaPlayer,AXISMatroskaFileSplittermustbeinstalled.AXISMatroskaFileSplitter canbedownloadedfromwww.axis.com/techsup/software
For detailed recording and video information, select recording and lic Properties.
Toremovearecording,selecttherecordingandclickRemove.
ContinuousRecording
The AxiproductarbeconfiguredcontinuouslyavoidedstoragedeviceSeeStorageprpage53omoreinformation aboutstoragedevices.Topreventthediskfrombecomingfull,itisrecommendedtoconfigurethedisktoautomaticallyremoveold recordings.Ifanewstreamprofileisselectedwhilearecordingisongoing,therecordingwillbestoppedandsavedintherecording listandanewrecordingwiththenewstreamprofilewillstart.Allpreviouscontinuousrecordingswillremainintherecordinglist untiltheyareremovedmanuallyyorthroughautomaticremovalofoldrecordings.
Tostartacontinuousrecording,followthesesteps:
- GotoRecordings>Continuous.
2.SelectEnabled. - SelecttypeofstoragedevicefromtheDisklist.
- SelectaStreamprofiletouseforcontinuousrecordings.
5.ClickSavetosaveandstarttherecording.
Languages
Languages
MultiplelanguagescanbeinstalledintheAxisproduct.AllwebpagesincludingtheonlinehelpwillbedisplayedintheselectedlanguageTo switchlanguagesgetSetupLanguagesandfirstuploadthenewlanguagefileBrowseendocattheilandclicktheUploadLanguagebutton.SelectthenewlanguagefromthelistandclickSave.
Note
- Resetting the product to factory default settings will erase any uploaded language file and reset the product language to English.
- ClickingtheRestorebuttonontheMaintenancepagewillnotaffectthelanguage.
- Afirmwareupgradewillnotaffectthelanguageused.Howeverifyouhaveuploadedanewlanguagetotheproductandlaterupgradethefirmware,itmayhappenthatthetranslationnolongermatchestheproduct'swebpages.Inthiscase,uploadanupdatedlanguagefile.
- Alanguagealreadyinstalledintheproductwillbereplacedwhenacurrentoralaterverersionofthelanguagefileisuploaded.
SystemOptions
Security
Users
Use access controlled enabled by default and bar configured under System Options Security Users Administrator can setup other users by giving them user names and passwords. It is also possible to allow anonymous viewer login, which means that anybody may access the Live View page.
Theuserlistdisplaysauthorizedusersandusergroups(accesslevels):
Viewer-AccesstotheLiveViewpage
Operator-AccessstotheLiveViewpageandtoallsettingsexceptSystemOptions
Administrator-Unrestrictedaccesstoallsettings;canadd,modifyandremoveotherusers.
UndeHTTP/RTSIPasswordSettingsselectthypopasswordallowYoumayneedallowunencryptepasswordsthere areviewingclientsthatdonotsupportencryption,orifyouupgradedthefirmwareandexistingclientssupportencryptionbutneed tologinagainandbeconfiguredtousethisfunctionality.
UndeUseSettingsselect the Enablanonymousviewelogimptionallowanonymoususersaccess the liveViewpage.
Select the Enablenonymou PTZontrologirtallovanonymoususeraccess the PTZ controls.
Deselect the Enable Basi Setup option to hide the Basi Setup menu Basi Setup provides quick access settings that should be made before using the Axis product.
ONVIF
ONVIF(OpenNetworkVideoInterfaceForum)isaglobalinterfacestandardthatmakesiteasierforendusers,integrators,consultants,andmanufacturerstotakeadvantageofthepossibilitiesofferedbynetworkvideotechnology.ONVIFenablesinteroperabilitybetweendifferentvendorproducts,increasedflexibility,reducedcostandfuture-proofsystems.
BycreatingauseryouautomaticallyenableONVIFcommunication.UsetheusernameandpasswordwithallONVIFcommunication withtheproduct.Formoreinformationseewww.onvif.org
IPAddressFilter
IAddressfiltering enableorth SystemOptions Security/AddressFiltepage Once enabled the listed address are allowed denied access the Axiproduct Select Allow Denfrom the dashed Apply to enable address filtering.
The administrator can add up to 256IP addressentriestothelist (asingleentry can contain multiple IP addresses).
HTTPS
HTTPS(HyperTextTransferProtocoloverSecureSocketLayer,orHTTPoverSSL)isawebprotocolprovidingencryptedbrowsing. HTTPScanalsobeusedbyusersandclientstoverifythatthecorrectdeviceisbeingaccessed. Thesecuritylevelprovidedby HTTPSisconsideredadequateformostcommercialexchanges.
TheAxisproductcanbeconfiguredtorequireHTTPSwhenusersfromdifferentusergroups(administrator, operator, viewer)connect.
TousHTTPSarHTTPScertificatenusfirstbainstalledGoSystemOptionsSecurityCertificatesinstallandmanage certificates.See Certificates,onpage47.
ToenableHTTPSontheAxisproduct:
- GotoSystemOptions>Security>HTTPS
SystemOptions
- SelectanHTTPCertificatefromthelistofinstalledcertificates.
- Optionally, click Ciphers and select the encryption algorithm for SSL.
- SettheHTTPSConnectionPolicyforthedifferentusergroups.
5.ClickSavetoenablethesettings.
TaccesstheAxiproductviathelesireprotocolenthttps://ohttp://irtheaddressfieldnbrowser.
The HTTP Sport change of the System Options Network TCP/IP Advance page.
IEEE802.1X
IEEE802.1Xisastandardforport-basedNetworkAdmissionControlprovidingsecureauthenticationofwiredandwirelessnetwork devices.IEEE802.1XisbasedonEAP(ExtensibleAuthenticationProtocol).
ToaccessanetworkprotectedbyIEEE802.1X,devicesmustbeauthenticated.Theauthenticationisperformedbyanauthentication servertypicallyRADIUServerexampleswhicharFreeRADIUSandMicrosoftInternetAuthenticationService.
InAxisimplementation, theAxisproductandtheauthenticationserveridentifythemselveswithdigitalcertificatesusingEAP-TLS (ExtensibleAuthenticationProtocolTransportLayeSecurity)ThecertificatesareprovidedbyCertificationAuthority(CA). Youneed:
- aCAcertificatetoauthenticatetheauthenticationserver.
- aCA-signedclientcertificatetoauthenticatetheAxisproduct.
TreatandInstallcertificatesgdSystemOptionsSecurityCertificateSecCertificatesprpage4ManCAcertificates arepreinstalled.
ToallowtheproducttoaccessanetworkprotectedbyIEEE802.1X:
- GotoSystemOptions>Security>IEEE802.1X. Select CACertificate and Client Certification from the list of installed certificates.
UndeSettingsselecttheEAPOLversionanprovidetheEARidentityassociatedwiththeclientcertificate.
- ChecktheboxtoenableIEEE802.1XandclickSave.
Note
Forauthenticationtoworkproperly, the date and timesettings in the Axis product should be synchronized with an NTP server. See Date & Time, on page 48.
Certificates
Certificatesareusedtoauthenticateddevicesonanetwork.Typicalapplicationsincludeencryptedwebbrowsing(HTTPS),network protectionviaIEEE802.1Xandsecureuploadofimagesandnotificationmessagesforexampleviaemail.Twotypesofcertificates canbeusedwiththeAxisproduct:
Server/Clientcertificates-ToauthenticatetheAxisproduct.
CAcertificates:Authenticatpeercertificatesforexamplethecertificato:AuthenticationserveincastheAxisproducts connectedtoanIEEE802.1Xprotectednetwork.
Note
Installedcertificates,exceptpreinstalledCAcertificates,willbedeletediftheproductisresettofactorydefault.PreinstalledCAcertificatesthathavebeendeletedwillbereinstalled.
Server/Client certificate can self-signed issued by Certificate Authority (CA) Self-signed certificate offers limited protection and can be used before CA-issued certificate has been obtained.
SystemOptions
Toinstallaself-signedcertificate:
- GotoSetup>SystemOptions>Security>Certificates.
- ClickCreateself-signedcertificateandprovidetherequestedinformation.
TocreateandinstallaCA-signedcertificate:
- Createaself-signedcertificateasdescribedabove.
- GotoSetup>SystemOptions>Security>Certificates.
ClickCreatecertificatsigningequestandprovidetherequestedinformation. - CopythePEM-formattedrequestandsendtotheCAofyourchoice.
Whether signed certificates returned, click install certificate and upload certificate.
Server/Clientcertificates:baninstalled.Certificatfromsigningequesta.CertificatanprivatkeySelectCertificate andprivatekeyiftheprivatekeyistobeuploadasaseparatefileorifthecertificateisinPKCS#12format.
The Axis product shipped with severapreinstalled C certificates, required addition a certificates are installed:
- GotoSetup>SystemOptions>Security>Certificates.
- ClickInstallcertificateanduploadthecertificate.
Date&Time
The Axi product's datandim settings are configured under System OptionsDateTime.
CurrenServeTimedisplaythecurrentlatandime(24clock)Thetimecarbeisplayedn12clockrthetexverlay(see below).
TochangeholatandimsettingsselecthpreferredTimmodeundeNewServeTime:
SynchronizewithcomputetimeSetslatandimaccordingthecomputer'slockWiththisoptiondatandtimearesetonceandwillnotbeupdatedautomatically.
SynchronizewithNTServerObtainslatandimfromanNTBerveWiththisoptiondatandimsettingsare updatedcontinuouslyEoinformationonNTBettingsseeNTPConfigurationprpage51.
IfisinghostnamefortheNTServerDNServermustconfiguredSeeDNSConfigurationprpage50.
- Setmanually–Allowsyoutomanuallysetdateandtime.
If using NTBerverselect your Timezone from the drop-downlist required check Automatically adjust todaylight saving timechanges.
The DateTimeFormUsedImagesthedatandimformatdisplayedstexoverlaythevidestreamUsthe
predefinedformatsorseeFileNaming&Date/TimeFormatsintheonlinehelp forinformationonhowtocreatecustomdateand timformatsIncluddatandimirthoverlaytextg0videandelectIncluddatandncludtime.
Network
BasicTCP/IPSettings
TheAxisproductsupportsIPversion4andIPversion6.Bothversionscanbeenabledsimultaneously, andatleastoneversion mustalwaysbeenabled.
SystemOptions
IPv4AddressConfiguration
Bydefault, theAxisproductissettouseIPv4(IPversion4) and to obtain theIPaddress automatically via DHCP. TheIPv4 settings are configured under SystemOptions > Network > TCP/IP > Basic.
DHCP(DynamicHostConfigurationProtocol) allows network administrator stocentrally manage and automate the assignment of IP addresses. DHCP should only be enabled if using dynamicIP address notification, or if the DHCP can update a DNS server. It is then possible to access the Axis product by name (hostname).
If DHCP is enabled and the product cannot be accessed, run AXISIPUtility to search then network for connected Axis products, or reset the product that factory default settings page 57 and then perform then installation again.
To restatid Paddress check Used following Paddress and specify the Paddress subnet masland default router.
IPv6AddressConfiguration
IfIPv6(IPversion6)isenabled,theAxisproductwillreceiveanIPaddressaccordingtotheconfigurationinthenetworkrouter.
TenablePv6gdoSystemOptionsNetworkTCP/IPBasicOthersettingsforIPvShouldbeconfiguredrthenetworkrouter.
ARP/Ping
The product's Address can be assigned using ARP and Ping for instructions see Assign/Address Using ARP/Ping on page 49.
TheARP/Pingserviceisenabledbydefaultbutisautomaticallydisabledtwominutesaftertheproductisstarted,orassoonasanIP addressisassigned.Tore-assignIPaddressusingARP/Ping,theproductmustberestartedtoenableARP/Pingforanadditional twominutes.
TalisabletheServicegotoSystemOptionsNetworkTCP/IPBasicandbleathoptionEnableARP/PingettingofPaddress.
Pinging the product is still possible when the service is disabled.
AssignIPAddressUsingARP/Ping
Theproduct'sIPaddresscanbeassignedusingARP/Ping.Thecommandmustbeissuedwithin2minutesofconnectingpower.
- AcquireafreestaticIPaddressonthesamenetworksegmentasthecomputer.
- Locatetheserialnumber(S/N) on the product label.
3.Openacommandpromptandenterthefollowingcommands:
Linux/Unixsyntax
arp-s<IPaddress><serialnumber>temp
ping-s408<IPaddress>
Linux/Unixexample
arp-s192.168.0.12500:40:8c:18:10:00temp
ping-s408192.168.0.125
Windowssyntax(thismayrequirethatyourunthecommandpromptasanadministrator)
arp-s<IPaddress><serialnumber>
ping-1408-t<IPaddress>
Windowsexample(thismayrequirethatyourunthecommandpromptasanadministrator)
arp-s192.168.0.12500-40-8c-18-10-00
ping-l408-t192.168.0.125
- Check that thenetwork cable is connected and then restart the product by disconnecting and reconnecting power.
SystemOptions
Glosthe comma prompt whether product responds with Reply from 92.168.0.125:..osimilar.
Openbrowseandyp:http://
intheLocation/Addressfield.Fothemethods of assigning the Address through installation and Management Software, CDothelocument AssignorIP Address and Access the Video Stream on Axis Support web at www.axis.com/techsup
Note
ToperformmanpromptWindowspperthStartmenuandtypecmdrthRun/Searchfield.
- TousetheARPcommandinWindows7/WindowsVista,right-clickthecommandprompticonandselectRunas administrator.
ToopercommanspromptMacOSxoperthTerminalutilityfromApplicationUtilities.
AXISVideoHostingSystem(AVHS)
AVHSusedinconjunctionwithanAVHSservice,provideaseasyandsecureInternetaccesstoliveandrecordedvideoaccessiblefromanylocation.FormoreinformationandhelptofindalocalAVHSServiceProvidergotowww.axis.com/hosting
The AVHSettings are configured under SystemOptionsNetworkTCPBasicThe possibility to connect AVHService is enabled by default. Todisable, clear the Enable AVHSbox.
One-clickenabledPresthproduct'sontrobuttonisedHardwareOverviewpropag &connectanAVHServiceovethe InternetOnceregisteredAlwayswilbenabledtheAxiproductstaysconnectedtheAVHServicdfhproductnot registeredwithin24hoursfromwhenthebuttonispressed,theproductwilldisconnectfromtheAVHSservice.
Always The AxiproductwilconstantlyattemptconnecttheAVHServicovethdInternet. Once registered the product will stayconnectedtotheservice.Thisoptioncanbeusedwhentheproductisalreadyinstalledanditisnotconveniettousethe one-clickinstallation.
AXISInternetDynamicDNSService
AXISnterneDynamidDNServicassignshostnamefocasyaccessdthproductFomoreinformationsewww.axiscam.net
Toregister the Axis product with AXIS Interne Dynamic DNS service for System Options Network TCP/IPBasid Under Services click the AXIS Interne Dynamic DNS Service Settings button (requires access to the Internet) The domain name currently registered at AXIS Internet Dynamic DNS service for the product can at any time be removed.
Note
AXISInternetDynamicDNSServicerequiresIPv4.
AdvancedTCP/IPSettings
DNSConfiguration
DNS(DomainNamServiceprovide)(translationofhostnameIDAddresses)TheDNSSettingareconfiguredundesystem Options>Network>TCP/IP>Advanced.
SelectObtainDNServeaddressidHCRusethDNSettingprovidedbythDHCServer.
TomakemanusettingsselectUs the followingDNServaddress and specify the following:
Domainname the domain(s) search forthosname used by the Axi product Multiple domains are separated by semicolons. The hosname always the first parb fully qualified domainame for example any server is the host name the fully qualified domainamany server. my company. con where my company. con the domainame.
Primary/SecondaryDNServeEntethdAddresses the primary and secondaryDNServes The secondaryDNServes optionalandwillbeusediftheprimaryisunavailable.
SystemOptions
NTPConfiguration
NTP(NetworkTimeProtocol)isusedtosynchronizetheclocktimesofdevicesinanetwork.TheNTPsettingsareconfiguredunder SystemOptions>Network>TCP/IP>Advanced.
SelectObtainNTBerveaddressidHCPOusethNTBettingprovidedbythDHBerver.
TomakemanuasettingsselectUsethfollowingNTBervaddressandentethoshamolAddressoftheNTBerver.
HostNameConfiguration
TheAxisproductcanbeaccessedusingahostnameinsteadofanIPaddress.ThehostnameisusuallythesameastheassignedDNS nameThehostnameisconfiguredundesystemOptionsNetworkTCP/IBAdvanced.
SelectObtainostnameviaPv4DHCRushostnameprovidedbytheDHCServerunningnPv4.
SelectUsethehostnametosetthehostnamemanually.
SelectEnableDynamidDNSupdatesdynamicallyupdatedocaDNServerswhenevertheAxisproduct'sAddresschanges.
Formoreinformation,seetheonlinehelp

Link-LocalIPv4Address
Link-LocalAddress=enabledbydefaultandassigntheAxiproduct:additionalPaddresswhichcarbasedaccess theproductfromotherhostsonthesamesegmentonthelocalnetwork.TheproductcanhaveaLink-LocalIPandastatic orDHCP-suppliedIPaddressatthesametime.
This function can be disabled under System Options Network TCP/IP Advanced.
HTTP
The HTTP port used by the Axiproductar changed under SystemOptionsNetworkTCP/IP Advanced addition to the default setting, which is 80, any port in therange 1024-65535 can be used.
HTTPS
The HTTP sport used by the Axi product are changed under System Options Network TCP/IB Advanced addition to the default setting, which is 443, any portion in the range 1024-65535 can be used.
TenableHTTPSgdsystemOptionsSecurityHTTPSFomoreinformationsedHTTPSprpage46.
NATtraversal(portmapping)forIPv4
Anetworkrouterallowsdevicesonaprivatenetwork(LAN)toshareasingleconnectiontotheInternet.Thisisdonebyforwarding networktrafficfromtheprivatenetworktothe"outside",thatis,theInternet.Securityontheprivatenetwork(LAN)isincreased sincemostroutersarepre-configuredtostopattemptsstoaccesstheprivatenetwork(LAN)fromthepublicnetwork(Internet).
UsNATraversawhentheAxiproductlocatedbranintrane(LAN)andyouwishtomakeavailableronther(WAN)sideofaNATrouter.WithNATtraversalproperlyconfigured,allHTTPtraffictoanexternalHTTPportintheNATrouterisforwardedtotheproduct.
NATraversalconfiguredundeSystemOptionsNetworkTCP/IPAdvanced.
Note
- ForNATtraversaltowork, this must be supported by the router. Therouter must also support UPnP
TM - Therouterhasmanydifferentnames:"NATrouter","Networkrouter","InternetGateway","Broadbandrouter","Broadband sharingdevice"or"Homefirewall"buttheessentialpurposeofthedeviceisthesame.
Enable/Disable Where enabled the Axi product attempts to configure port mapping in NAT route on your network using UPnP Notethat UPnP ^TM must be enabled in the product (see System Options > Network > UPnP).
TM.
SystemOptions
Usmanually selected NATouterSelect this option manually select NATouter and the address other route in the field. If norouter is specified, the product automatically searches for NATrouterson your network. If more than one router is found, the default router is selected.
Alternative HTTP Port Select this option manually defines external HTTP Port Entethop number the field of ports entered here, a port number is automatically selected when NAT traversal is enabled.
Note
- AnalternativeHTTPportcanbeusedorbeactiveevenifNATtraversalisdisabled.ThisisusefulifyourNATrouterdoesnot supportUPnPandyouneedtomanuallyconfigureportforwardingintheNATrouter.
- If you attempt to manually enter a port that is already in use, another available port is automatically selected.
Wherthports selected automatically displayed this field to change this sentence, new port hub and click Save.
FTP
TheFTPserverrunningintheAxisproductenablesuploadofnewfirmware,userapplications,etc.TheFTPservercanbedisabled underSystemOptions>Network>TCP/IP>Advanced.
Note
ThisFTPserverhasnothingtodowiththeproduct'sabilitytotransferimagesviaFTPtootherlocationsandservers.
RTSP
TheRTSPserverrunningintheAxisproductallowsaconnectingclienttostartanH.264stream.TheRTSPportnumbercanbe changedundeSystemOptionsNetworkTCP/IPAdvancedThedefaultport554.
Note
H.264videostreamswillnotbeavailableiftheRTSPserverisdisabled.
SOCKS
SOCKSisanetworkingproxyprotocol.TheAxisproductcanbeconfiguredtouseaSOCKSservertoreachnetworksontheother sideofafirewallorproxyserver.ThisfunctionalityisusefuliftheAxisproductislocatedonalocalnetworkbehindafirewall,and notifications,uploads,alarms,etcneedtobesenttoadestinationoutsidethelocalnetwork(forexamplethelnternet).
SOCKSconfiguredundesystemOptionsNetworkSOCKSFomoreinformationsethonlinehelp

QoS(QualityofService)
QoS(QualityofService)guaranteesacertainlevelofaspecifiedresourcetoselectedtrafficonanetwork.AQoS-awarenetwork prioritizesnetworktrafficandprovidesagreaternetworkreliabilitybycontrollingtheamountofbandwidthanapplicationmayuse.
TheQoSettings are configured under SystemOptionsNetworkQoSUsingDSCI(Differentiated ServiceCodepoint) values the Axisproduct can mark the following types of traffic: live video, event/alarm traffic and management traffic.
SNMP
TheSimpleNetworkManagementProtocol(SNMP) allows remotemanagementofnetworkdevices.AnSNMPcommunityisthe groupofdevicesandmanagementstationrunningSNMP.Communitynamesareusedtoidentifygroups.
The AxiproductarbeconfiguredsupportSNMPorthSystemOptionsNetworkSNMPage.
Dependingonthelevelofsecurityrequired,selecttheversiononSNMPtouse.
SNMR1/v2provide the lowest eveb security The community name can be specified as password for a read/write access to supported SNMR devices The default password for the community public and default password for the Write community is write.
SystemOptions
Note
If HTTPSisenabled, SNMPv1 and SNMPv2 should be disabled.
TrapfoSNMR1/v2areused by the Axiproductendmessage management system important event and status change. ChecEnabletrapandentethAddresswherethetrapmessage should be sent and the community that should receive themessage.
The following traps are available:
•Coldstart
•Warmstart
- Linkup
- Authenticationfailed
SNMR3 provides encryption and secure passwords to desktop with SNMR3 and SNMR3 management application required.
TousSNMR3HTTPSmusbeenabledsedHTTPSprpage46.enableSNMR3checkboxanprovidethenitialuser password.
Note
The initial password can only be set once. If the password is lost, the Axis product must be reset to factory default, see ResettoFactoryDefaultSettings, on page 57.
UPnP ^TM
TheAxisproductincludessupportforUPnP ^TM .UPnP ^TM isenabledbydefaultandtheproductisautomaticallydetectedbyoperating systemsandclientsthatsupportthisprotocol.
UPnP ^TM canbedisabledunderSystemOptions>Network>UPnP TM.
RTP/H.264
The RTPortangandmulticastettings are configured under SystemOptionsNetworkRTP.
The RTP portranged defines the range of ports from which the video ports are automatically selected. Form multicast streams, only certain IP addresses and port numbers should be used.
SelectAlwaysMulticasVidedostartmulticaststreamingwithoutpeningarRTSBession.
Bonjour
TheAxisproductincludessupportforBonjour.Bonjourisenabledbydefaultandtheproductisautomaticallydetectedbyoperating systemsandclientsthatsupportthisprotocol.
BonjourcanbedisabledunderSystemOptions>Network>Bonjour.
Storage
SDCard
TheAxisproductsupportsSDcardswithupto64GBofstorage.Forbestrecordingperformance,useanSDHCorSDXCcard withspeedclass10.
NOTICE
Topreventcorruptionofrecordings,theSDcardshouldalwaysbeunmountedbeforeitisejected.
TheAxisproductsupportsSDcardswiththefollowingfilesystems:
SystemOptions
ext4-recommendedduotresiliencagainstdatalossifthecardsjectedoftherisbruppowerlosstoaccess datastoredonthecardfromtheWindowsoperatingsystem,athird-partyext4driverorapplicationisrequired.
• vFAT—mostSDcardsarepre-formattedwithvFATwhenpurchased.
Ifrequired, theSDcardcanbemanuallyformattedtothedesiredfilesystem.ToformattheSDcard:
- Insert the SD card in the SD card slot.
GoSystemOptionsStorageandclickSDCard.
- ClickFormatandselectthedesiredfilesystem.
Note
During formatting any previous data stored on the disk will belost.
Mountingisdoneautomaticallywhenthecardisinsertedorwhentheproductisstarted.Amanualmountisonlyrequiredifthe cardhasbeenunmountedandnotejectedandre-inserted.
TounmounttheSDcard:
GoSystemOptionsStorageandclickSDCard.
2.ClickUnmount.
- The card can now be removed.
The SDcardsmanagedorthSystemOptionsStoragePageClickSDCardoperStorageManagement.
If he card's tatushows a failed click Check disk to see if problem can be found and then Repair this option only available for SD cards with next 4. For SD cards with v FAT, use acard reader or computertot roubles hoot the card.
T avoid filling the card is recommended to remove recordings continuously. Under Recording Settings select Remove recordings older than and select then number of days or weeks.
TstopwritingthecardinprotectecordingsfrombeingremovedselectLockundeRecordingSettings.
NetworkShare
NetworkshareallowsyoutoaddnetworkstoragesuchasaNAS(network-attachedstorage).TheNASshallbededicatedfor recordingsanddatafromtheAxisproductsconnectedtothenetwork.ForinformationaboutreferenceNASdevices,goto www.axis.com/products/cam_companion_software/supported.htm
Toaddanetworkshare:
- GotoSystemOptions>Storage.
2.ClickNetworkShare.
3.EnterthelPaddress,DNSorBonjourametothehostserverintheHostfield.
4.EnterthenameoftheshareintheSharefield.Subfolderscannotbeused.
I ^s required ^e selectTheshare requiresogirandentethusenamananspassword.
6.ClickConnect.
To clear recordings and data from the Axiproduct's folderth designated share click Clearunde Storage Tools.
To avoid filling the share if recommended remove recordings continuously Under Recording Settings; select Remove recordings older than and select then number of days or weeks.
Tstopwriting the share an protect recordings from being removed select Lockunde Recording Settings.
Ports&Devices
I/OPorts
Themediaconverterswitchprovidestwoconfigurableinputandoutputportsforconnectionofexternaldevices.Oneportis dedicatedforthel/Osignalsbetweenemediaconverterswitch,thesuppliedmulti-connectorcableandthecamera.Formore informationaboutthemulti-connectorcable,seepage58.
The /Ports are configured under System Options, Ports Devices, Ports Select port direction (Input Output) The ports are given descriptive names and the Normastates are configured as Opercircuit Grounded circuit.
PortStatus
TheisbrthSystemOptionsPortsDevicesPorStatuspagshowststatusfthproduct'sinputandoutputports.
Maintenance
The Axi product provides ever maintenance functions. These are available under System Options Maintenance.
ClickRestartperformcorrectestarttheAxiproductsobehavingsexpectedThiswillhoaffectanyofthecurrent settings.
ClickRestoresetmosettingsthofactorydefaultvaluesThefollowingsettingsarenotaffected:
•thebootprotocol(DHCPorstatic)
- thestaticIPaddress
- thedefaultrouter
- thesubnetmask
- thesystemtime
• the IEEE802.1Xsettings
- uploadedapplicationsarekeptbutmustberestarted
ClickDefaultResetSettingsincludingtheAddressFactorydefaultValuesThisbuttonshouldusedwithcautionTheAxiproductandisResetFactorydefaultusingthecontrolbuttonsetResetFactoryDefaultSettingspage57.
Tdesthproduct'PTZmechanicsclicTestundePTZstatus.
Forinformationaboutfirmwareupgrade,see UpgradingtheFirmware,onpage59.
Support
SupportOverview
The SystemOptionsSupportSupportOverviewpageprovidesinformationtroubleshootingandcontactInformation, shouldyourequiretechnicalassistance.
See also Troubleshooting, on page 59.
SystemOverview
Together overview of the Axaproduct status and settings and System Options Support System Overview Information that can be found here includes firmware version, IP address, network and security settings, event settings, imagesettings and recent log items. Many of the captions are linked to the proper Setup page.
SystemOptions
Logs&Reports
The SystemOptionsSupportLogReportpaggenerateslogsandreportsusefufosystemanalysisandroubleshootingIf contactingAxisSupport,pleaseprovideavalidServerReportwithyourquery.
SystemLog-Providesinformationaboutsystemevents.
AccesLogistalfailed attempts to access the product The AccesLogans also configured distal connection to the product(see below).
ServeReport Provides information about the product status: pop-up window. The Access Log automatically included in the Server Report.
ParametekisShowshproduct' parameters and their current settings This may prove useful when troubleshooting or when contacting AxisSupport.
ConnectionList-Listsallclientsthatarecurrentlyaccessingmediastreams.
CrashReport-Generatesanarchivewithdebugginginformation.Thereporttakesseveralminutestogenerate.
TheogevalfothSystemLogandheAccesLogresetundeSystemOptionsSupportLogReportsConfiguration. TheAccessLogcanbeconfiguredtolistallconnectionstotheproduct(selectCritical,Warnings&Info).
Advanced
Scripting
Scriptingallowsexperienceduserstocustomizeandusetheirownscripts.
NOTICE
ImproperusemaycauseunexpectedbehaviorandlossofcontactwiththeAxisproduct.
Axisstronglyrecommendsthatyoudonotusethisfunctionunlessyouunderstandtheconsequences.AxisSupportdoesnotprovide assistanceforproblemswithcustomizedscripts.
To Perth Script Editor System Options Advanced Scripting Scriptause problems, reset product its factory default settings, seepage 57.
Formoreinformation,seewww.axis.com/developer
FileUpload
Files,forexamplewebpagesandimages,canbeuploadedtotheAxisproductandusedascustomsettings.Touloadafile,go toSystemOptions>Advanced>FileUpload.
Uploadedfile accessed through http://
PlainConfig
PlainConfigisforadvanceduserswithexperienceofAxisproductconfiguration.Mostparameterscanbesetandmodifiedfromthis page.Helpisavailablefromthestandardhelppages.
ToperPlainConfigdSystemOptionsAdvancedPlainConfigAxiSupportdoesnoprovideassistance.
ResettoFactoryDefaultSettings
Important
Resettofactorydefaultshouldbeusedwithcaution.Aresettofactorydefaultwillresetallsettings,includingtheIP address,tothefactorydefaultvalues.
Note
The installation and management software tools are available on the CDs supplied with the product and from the support pages on www.axis.com/techsup
Toresettheproducttothefactorydefaultsettings:
- Disconnectpowerfromtheproduct.
PresandholdthecontrobuttonandreconnectpoweredHardwareOverviewprpag6 - Keep the control button pressed for about 15–30 seconds until the status LED indicator flashes amber.
- Releasethecontrolbutton. The process is complete when the status LED indicator turns green. The product has been reset to the factory default settings of DHCServer available for the network the default address 192.168.0.90
- Using the installation and management software tools, assign an IP address, set the password, and access the videostream.
It's also possible to rese parameters factory default via the web interface Gdo Setup System Options Maintenance.
Multi-ConnectorCable
Thesuppliedmulti-connectorcableisrequiredinordertomaintainthecamera'slPrating.
Connect them multi-connector cable to the camera's multi-connector and to the connectors in the supplied media converters switch, seepage6.
Thecableprovidesthefollowingsignals:
- DCpowertocamera
•Network(Ethernet10/100Base-T) - Input/Output(I/O)
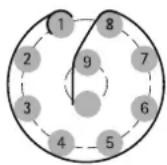
| FunctionPin-wireNotes | Specifications | ||
| Configurable(Input orOutput) | 2-blue7-yellow | Digitalinput-Connecttopin8toactivate,or leavefloating(unconnected)todeactivate. | Otomax30VDC |
| Digitaloutput-Connectedtopin1when activated,floating(unconnected)when deactivated.Ifusedwithaninductiveload,e.g.a relay,adiodemustbeconnectedinparallelwith theload,forprotectionagainstvoltagetransients. | Otomax30VDC,open drain,100mA | ||
| RX+ | 3-green/white | Ethernet-receiving | |
| RX- | 4-green | Ethernet-receiving | |
| TX+ | 5-orange/white | Ethernet-transmitting | |
| TX- | 6-orange | Ethernet-transmitting | |
| OVDC(-) | 8-black | QDC | |
| DCoutput(12V) | 1,9-redUsedtopowercamera | 12-13.2VDCMaxload=6A | |
Troubleshooting
CheckingtheFirmware
Firmwareissoftwarethatdeterminesthefunctionalityofnetworkdevices.Oneofyourfirstactionswhentroubleshootingaproblem shouldbetocheckthecurrentfirmwareversion.Thelatestversionmaycontainacorrectionthatfixesyourparticularproblem.The currenfirmwareversiontheAxiproductsdisplayedthepagSetupBasiSetupandSetupAbout.
UpgradingtheFirmware
WhenyouupgradetheAxisproductwiththelatestfirmwarefromAxiswebsite,theproductreceivesthelatestfunctionalityavailable. Alwaysreadthepugradeinstructionsandreleasenotesavailablewitheachnewrelease,beforeupgradingthefirmware.
Toupgrade, followtheseinstructions:
- Savethefirmwarefiletoyourcomputer. The latest version of the firmware is available free of charge from Axis website at www.axis.com/techsup
- GotoSetup>SystemOptions>Maintenanceintheproduct'swebpages.
UndeUpgradServerClicBrowsandocatchfileyourcomputerClicUpgrade.
Afterstartingtheupgradeprocess,alwayswaitatleast5–10minutesbeforerestartingtheproduct,evenifyoususpectthe upgradehasfailed.
AXISCameraManagementabusedomultipleupgradeSeewww.axis.confomoreinformation.
Note
- Yourdealerreservestherighttochargeforanyrepairattributabletofaultyupgradebytheuser.
- Preconfiguredandcustomizedsettingsaresavedwhenthefirmwareisupgraded(providingthefeaturesareavailableinthenewfirmware)althoughthisisnotguaranteedbyAxisCommunicationsAB.
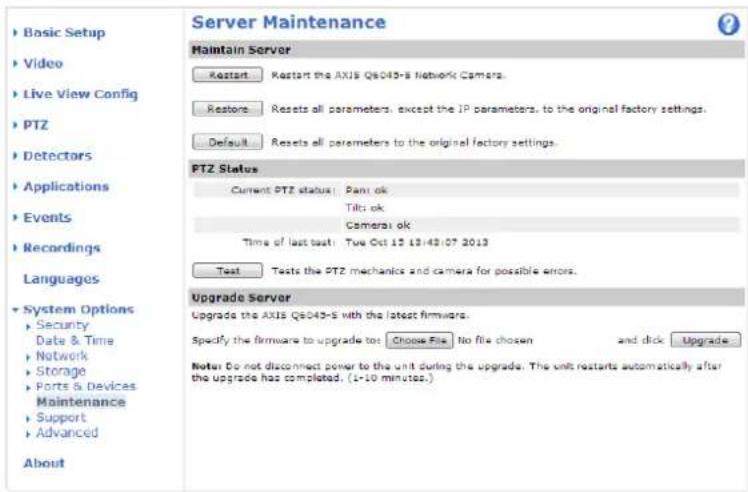
EmergencyRecoveryProcedure
If power or network connection is lost during the upgrade, the process fails and the product becomes unresponsive. Flashing red Status indicator indicates a failed upgrade. Torecover the product, follow the steps below. The serial number is found on the product's label.
- In UNIX/Linux, typethefollowing from the commandline:
Troubleshooting
arp-s<IPaddress><serialnumber>temp
ping-1408<IPaddress>

In Window stypd following from command/DO prompt(this may require that your the command prompts an administrator);

arp-s<IPaddress><serialnumber>
ping-1408-t<IPaddress>
- If the product does not reply in 30 seconds, restart it and wait for areply. Press CTRL + Ctostop Ping.
Openbrowseandypertheproduct'sAddressthepagchabpensusbROWSbuttontoselectheupgrade filetouse.ThenclickLoadtorestarttheupgradeprocess.
- After the upgrade is complete (1–10 minutes), the product automatically restarts and shows a steady green on the Status indicator.
- Reinstall the product, referring to the Installation Guide.
If the emergency recovery procedure does not get the product up and running again, contact Axissupport at www.axis.com/techsup/
Symptoms, Possible Causes and Remedial Actions
ProblemssettingtheIPaddress
| WhenusingARP/Ping | Trytheinstallationagain.TheIPaddressmustbesetwithintwominutesafterpowerhasbeen appliedtotheproduct.EnsurethePinglengththissetto408.Forinstructions,seeAssignIPAddressUsingARP/Ping,onpage49. |
| Theproductislocatedona differentsubnet | IfthelPaddressintendedfortheproductandthelPaddressofthecomputerusedtoaccessthe productarelocatedondifferentsubnets,youwillnotbeabletosethelPaddress.Contactyour networkadministratortoobtainanIPaddress. |
| ThelPaddressisbeingused byanotherdevice | DisconnecttheAxisproductfromthenetwork.RunthePingcommand(inaCommand/DOS window,typepingandthelPaddressoftheproduct):·Ifyoureceive:Replyfrom:bytes=32;time=10... thismeansthatthelPaddressmayalreadybeinusebyanotherdeviceonthenetwork. ObtainanewIPaddressfromthenetworkadministratorandreinstalltheproduct.·Ifyoureceive:Requesttimedout,thismeansthatthelPaddressisavailable forusewiththeAxisproduct.Checkallcablingandreinstalltheproduct. |
| PossibleIPaddressconflict withanotherdeviceonthe samesubnet. | ThestaticIPaddressintheAxisproductisusedbeforetheDHCPserversetsadynamicaddress. ThismeansthatifthesamedefaultstaticIPaddressisalsousedbyanotherdevice,theremay beproblemsaccessingtheproduct. |
| Theproductcannotbeaccessedfromabrowser | |
| Cannotlogin | WhenHTTPSisenabled,ensurethatthecorrectprotocol(HTTPorHTTPS)isusedwhenattempting tdognYoumayneedmanuallytypehttphttpsithebrowser'saddressfield.Ifthepasswordfortheuserrootislost,theproductmustberesettothefactorydefaultsettings.SeeResettoFactoryDefaultSettings,onpage57. |
Troubleshooting
| TheIPaddresshasbeen changedbyDHCP | IPaddressesobtainedfromaDHCPserveraredynamicandmaychange.IftheIPaddresshas beenchanged,useAXISIPUtilityorAXISCameraManagementtolocatetheproductonthe network.Identifytheproductusingitsmodelorserialnumber,orbytheDNSname(ifthename hasbeenconfigured).Ifrequired,astaticIPaddressscanbeassignedmanually.Forinstructions,seethInstallationand ManagemenSoftwareCDothedocumentAssignandAddressandAccesstheVideStreamonAxisSupportwebatwww.axis.com/techsup. |
| Certificateerrorwhenusing IEEE802.1X | Forauthenticationtoworkproperly,thedateandtimesettingsintheAxisproductshouldbe synchronizedwithanNTPserver.SeeDate&Time,onpage48. |
Theproductisaccessiblelocallybutnotexternally
| RouterconfigurationToconfigureyourroutertoallowincomingdatatrafficitotheAxisproduct,enabletheNAT-traversalfeaturewhichwillattempttoautomaticallyconfiguretheroutertoallowaccesstotheAxisproductsedNATtraversal(portmapping)forIPv4prpage51TheoutemustupporUPnP | TM. | |
| Firewallprotection | ChecktheInternetfirewallwithyournetworkadministrator. | |
| Defaultroutersrequired | CheckifyouneedtoconfiguretheroutersettingsfromSystemOptions>Network>TCP/IP>Basic. | |
ProblemswithstreamingH.264
| ProblemswithAXISMedia Control(InternetExplorer only) | ToenabletheupdatingofvideoimagesinInternetExplorer,setthebrowsertoallowActiveX controls.Also,makesurethatAXISMediaControlisinstalledonyourcomputer. |
| NoH.264displayedinthe client | CheckthattherelevantH.264connectionmethodsandcorrectinterfaceareenabledintheAMC ControlPanel(streamingtab).SeeAXISMediaControl(AMC),onpage 16.IntheAMControPanelselectdH.264bandlicSetdefaultH.264decoder.CheckhaRTSRenabledundesystemOptionsNetworkTCP/IPAdvanced. |
| MulticastH.264only accessiblebylocalclients | Checkifyourroutersupportsmulticasting,orifteroutersettingsbetweentheclientandthe productneedtobeconfigured.TheTTL(TimeToLive)valuemayneedtobeincreased. |
| NomulticastH.264 displayedintheclient | CheckwithyournetworkadministratorthatthemulticastaddressesusedbytheAxisproduct arevalidforyournetwork.Checkwithyournetworkadministratortoseeifthereisafirewallpreventingviewing. |
| Installationofadditional ActiveXcomponent restrictedorprohibited | ConfiguretheAxisproducttouseaJavaappletforupdatingvideoimagesinyourbrowser.Goto SetupLiveViewConfigandelectlavaappletundeDefaultviewer. |
| PoorrenderingofH.264 images | Ensurethatyourgraphicscardisusingthelatestdriver.Thelatestdriverscanusuallybe downloadedfromthemanufacturer'swebsite. |
| Colorsaturationisdifferent inH.264andMotionJPEG | Modifythesettingsforyourgraphicsadapter.Refertotheadapter'sdocumentationformore information. |
Troubleshooting
| Lowerframeratethan expected | SeePerformanceConsiderations,onpage67.Reducethenumberofapplicationsrunningontheclientcomputer.Limitthenumberofsimultaneousviewers.Checkwiththenetworkadministratorthatthereisenoughbandwidthavailable.CheckintheAMCControlPanel(H.264tag)thatvideoprocessingisNOTsettoDecodeonlykeyframes.Lowertheimageresolution.Themaximumframespersecondisdependentontheutilityfrequency(60/50Hz)oftheAxisproduct.SeeTechnicalSpecifications,onpage63. |
| Videoandimageproblems,general | |
| Imageunsatisfactory | CheckthevideestreamandcamersettingsundeSetupVideoVideStreamandSetup>Video>CameraSettings. |
| MotionDetectiontriggersunexpectedly | |
| Changesinluminance | Motiondetectionisbasedonchangesinluminanceintheimage.Thismeansthatiftherearesuddenchangesinthelighting,motiondetectionmaytriggermistakenly.Lowerthesensitivitysettingtoavoidproblemswithluminance. |
| Storageanddiskmanagementproblems | |
| Storagedisruption | Astoragedisruptionalarmissentifastoragedeviceisunavailable,removed,full,lockedorifotherreadwriteproblemsoccurIdentify thesourceofheproblemchecktheSystemLogunderSystemOptions>Support>LogsetReports.Dependingontheproblem,itmightbenecessarytore-mountthestorgagedevice.Forinformationonhowtosetupastoragedisruptionalarm,seeEvents,onpage39. |
| Videocannotberecorded | CheckthattheSDcardisnotwriteprotected(thatis,readonly). |
| SDcardcannotbemountedReformattheSDcardandthenclickMount. | |
| Mediaconverterswitch | |
| Mediaconverterswitchfreezsafterhotswapping | Themediaconverterswitchdoesnotsupporthotswapping.Disconnectpowerfromtheswitchbeforeswappingcameras.Restarttheswitchafterafailedattempttohotswap. |
TechnicalSpecifications
| Function/group | Item | Specifications |
| Camera | Models | AXISQ6045-S50HzAXISQ6045-S60Hz |
| Imagesensor | 1/3"ProgressiveScanCMOS | |
| Lensf4.45-89.0mm | F1.6-2.9AutofocusAutomaticday/nightHorizontalangleofview:62.98°-3.49° | |
| Minimumillumination | Color:0.6luxat30IREF1.6B/W:0.04luxat30IREF1.6 | |
| Shuttertime | 1/33000sto1/3s(50Hz)1/33000sto1/4s(60Hz) | |
| Pan/Tilt/Zoom | E-flip256presetpositionsPan360°endless,0.05°-450°/sTilt:220°,0.05°-450°/s20xopticalzoomand12xdigitalzoom,total240xzoom | |
| Pan/Tilt/Zoomfunctionalities | Tourrecording,guardtour,controlqueueOn-screendirectionalindicator,Setnewpan0° | |
| Video | Videocompression | H.264MainandBaselineprofile(MPEG-4Part10/AVC)MotionJPEG |
| Resolutions1920x1080HDTV1080pto320x180 | ||
| FramerateH.264 | Upto25/30fps(50/60Hz) | |
| FramerateMotionJPEG | Upto25/30fps(50/60Hz) | |
| Videostreaming | Multiple,individuallyconfigurablestreamsinH.264andMotionJPEGControllableframerateandbandwidthVBR/CBRH.264 | |
| Imagesettings | WideDynamicRange(WDR),manualshuttertime,compression,color,brightness,sharpness,whitebalance,exposurecontrol,exposurezones,rotation,backlightcompensation,highlightcompensation,finetuningofbehavioratlowlightTextandimageoverlay32individual3DprivacymasksImagefreezeonPTZ | |
| Network | SecurityPasswordprotection,IPaddressfiltering,HTTPSencryption*,IEEE802.1Xnetworkaccesscontrol*,digestauthentication,useraccesslog*ThisproductincludessoftwaredevelopedbytheOpenSSLProjectforuseintheOpenSSLToolkit(www.openssl.org) | |
| Supportedprotocols | IPv4/v6,HTTP,HTTPS*,SSL/TLS*,QoSLayer3DiffServ,FTP,CIFS/SMB,SMTP,Bonjour,UPnPTM,SNMPv1/v2c/v3(MIB-II),DNS,DynDNS,NTP,RTSP,RTP,TCP,UDP,IGMP,RTCP,ICMP,DHCP,ARP,SOCKS,SSH*ThisproductincludessoftwaredevelopedbytheOpenSSLProjectforuseintheOpenSSLToolkit(www.openssl.org) | |
TechnicalSpecifications
| Function/group | Item | Specifications |
| System Integration | Application Programming Interface | OpenAPIforsoftwareintegration,includingVAPIX®andAXISCameraApplication PlatformfromAxisCommunications;specificationsatwww axis.com AXISVideoHostingSystem(AVHS)withOne-ClickCameraConnection ONVIFProfileS,specificationatwww.onvif.org |
| Intelligentvideo | Videomotiondetection,Autotracking,ActiveGatekeeper Basicanalytics(nottobecomparedwiththird-partyanalytics):Objectremoved, Enter/Exitdetector,Fencedetector,Objectcounter,Highlightcompensation SupportforAXISCameraApplicationPlatformenablinginstallationofadditional applications | |
| Eventtriggers | Detectors:LiveStreamAccessed,MotionDetection,Enter/Exit,FenceDetector,Object Removed Hardware:CasingOpen,Fan,Heater,Network,Temperature InputSignal:ManualTrigger,VirtualInputs PTZ:Autotracking,Error,Moving,PresetReached,Ready Storage:Disruption,Recording System:SystemReady,ShockDetected Time:Recurrence,UseSchedule | |
| EventactionsFileupload | FTP,HTTP,networkshareandemail Notification:email,HTTPandTCP Externaloutput,PTZpreset,guardtour,videorecordingtoedgestorage,autotracking, day/nightmode Pre-andpost-alarmvideobuffering | |
| InstallationaidPixelcounter | ||
| Videoaccessfrom webbrowser | Cameraliveview Videorecordingtofile(ASF) CustomizableHTMLpages Windows7,WindowsVista,WindowsXP,WindowsServer2008,WindowsServer2003 DirectX9corhigher Forotheroperatingsystemsandbrowsers,seewww axis.com/techsup | |
| Management and maintenance | AXISCameraManagementtoolonCDandweb-basedconfiguration Configurationofbackupandrestore FirmwareupgradesoverHTTPorFTP,firmwareavailableonwww axis.com | |
TechnicalSpecifications
| Function/group | Item | Specifications |
| General | Casing | IP6K9K-,IP66-,IP67-andNEMA4X-ratedmetalcasing(stainlesssteelASTM316L/UNSS31603/EN1.4432),nyloncleardome |
| Memory512MBRAM | 128MBFlashBatterybacked-upreal-timeclock | |
| Power | 60WpoweredthroughAXIST8605MediaConverterSwitch | |
| Connectors | IP-66ratedmulti-connectorforDCpower,Ethernet10/100Base-T,inputandoutput,including7m(23ft.)cableAXIST8605MediaConverterSwitch:2xRJ-4510/100Base-T,2xSFP100Base-FX/1000Base-X,terminalblockswithpowerinput,poweroutputand2xconfigurableinput/output | |
| Edgestorage | SupportsSDcardswithupto64GBofstorage.Forbestrecordingperformance,usean SDHCorSDXCcardwithspeedclass10.(cardnotincluded)Supportforrecordingtonetworkshare(NetworkAttachedStorageorfileserver) | |
| Operating conditions | -30°Cto50°C(-22°Fto122°F)Humidity10-100%RH(condensing) | |
| Storage conditions | -40°Cto65°C(-40°Fto149°F) | |
| Approvals | EN55022ClassA,EN61000-3-2,EN61000-3-3,EN61000-6-1,EN61000-6-2,EN55024,EN50121-4,IEC62236-4,FCCPart15SubpartBClassA,ICES-003ClassA,VCCIClassA,C-tickAS/NZSCISPR22ClassA,KCCKN22ClassA,KN24,IEC/EN/UL60950-1,IEC/EN/UL60950-22,IEC/EN60529IP66,IP67,ISO20653IP6K9K,NEMA250Type4X,IEC60068-2-1,IEC60068-2-2,IEC60068-2-78,IEC60068-2-14,IEC60068-2-30,IEC60068-2-6,IEC60068-2-27,IEC60068-2-60,MIL-STD810G509.5 | |
| Weight | Camera:5.7kg(12.6lb.) | |
| Included accessories | AXIST8605MediaConverterSwitch,IP66-ratedmulti-connectorcable,Installation Guide,InstallationandManagementSoftwareCD,Windowsdecoder1-userlicense | |
| Video management software | AXISCameraCompanion(softwareincludedonCD)-Basicsurveillanceforsmall businesses,wherevideoisrecordedtoedgestorageAXISCameraStation(soldseparately)-Fullyfeaturedsurveillanceformedium-sized installations,wherevideoisrecordedonasystemserverFormoreinformationandsoftwareapplicationsfrompartners,see www.axis.com/products/video/software/ | |
| Optional accessories | PowersupplyWallbracketMountingbracketforT91C (AXIST91CMountingAccessories)SmokeddomecoverStainlesssteelsunshieldAXIST8310VideoSurveillanceControlBoardAXISP8221NetworkI/OAudioModuleAXIST90AlluminatorsInstallationDisplayMulti-userdecoderlicensepack |
MediaConverterSwitchConnectors
CameraConnectors
Powerconnector
Two2-pinterminalblocksforpoweroutput(pin4isnotused).
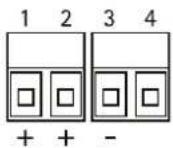
| FunctionPinNotes | Specifications | |||
| DCoutput | 12VDC | 12 | PowerouttocameraMaxload=6.5A | 12.0-13.2VDC,min70W |
| 0VDC(-) | 3 | 0DC | ||
| N/a | 4 | N/a | ||
Networkconnector
Two2-pinEthernetterminalblocks.

I/Oterminalconnector
2-pinterminalblock.
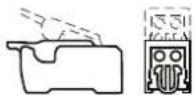
ExternalConnectors
Powerconnector
2-pinterminalblockforpowerinput.
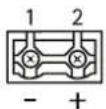
| FunctionPinNotes | Specifications | |||
| DCinput | 0VDC(-) | 1 | 0DC | |
| 12VDC | 2 | Powerinfrompowersupply(sold separately) | Maxload=7A12.0-13.2VDC,min75W | |
TechnicalSpecifications
I/Oterminalconnector
6-pinterminalblocksfor:
- DigitalInput/Output
•Power(DCoutput)
•OVDC(-)
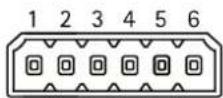
| FunctionPinNotes | Specifications | ||
| 0VDC(-) | 1,4,6 | 0DC | |
| DCoutput | 2 | Powerout | 12VDC,50mA |
| ConfigurableI/O1(Inputor Output) | 3 | Digitalinput | Otomax30VDC |
| Digitaloutput(transistor-open collector) | Otomax30VDC,opendrain, 100mA | ||
| ConfigurableI/O2(Inputor Output) | 5 | Digitalinput | Otomax30VDC |
| Digitaloutput(transistor-open collector) | Otomax30VDC,opendrain, 100mA |
PerformanceConsiderations
Whensettingsupyour system, it is important to consider how various settings and situations will affect performance. Some factors affect the amount of bandwidth (the bitrate) required, others can affect the framerate, and some affect both. If the load on the CPU reaches its maximum, this will also affect the framerate.
The following factors are among them most important to consider:
- Highimageresolutionand/orlowercompressionlevelsresultinimagescontainingmoredata.Bandwidthaffected.
- AccessbylargenumbersofMotionJPEGand/orunicastH.264clients.Bandwidthaffected.
- Simultaneousviewingofdifferentstreams(resolution, compression)bydifferentclients.Effectonframerateand bandwidth.
- AccessingMotionJPEGandH.264videostreamssimultaneously.Framerateandbandwidthaffected.
- Heavyusageofeventsettingsaffecttheproduct'sCPUload.Framerateaffected.
• Heavynetworkutilizationduetopoorinfrastructure.Bandwidthaffected.
•Viewingonpoorlyperformingclientcomputerslowersperceivedperformance.Framerateaffected.
- USERMANUAL
- AboutthisDocument
- LegalConsiderations
- Liability
- IntellectualPropertyRights
- EquipmentModifications
- TrademarkAcknowledgments
- RegulatoryInformation
- Electromagnetic Compatibility(EMC)
- USA
- Canada
- Europe
- Australia/NewZealand
- Japan
- Korea
- Safety
- Battery
- ▲WARNING
- DisposalandRecycling
- China
- ContactInformation
- Support
- LearnMore!
- TableofContents
- HardwareOverview
- PressurizetheCamera(Recommended)
- Note
- ConnectorsandButtons
- Multi-connector
- SDCardSlot
- NOTICE
- ControlButton
- MediaConverterSwitch
- MediaConverterSwitchConnectors
- Important
- NetworkConnectorDipSwitches
- AccessingtheProduct
- AccessfromaBrowser
- AccessfromtheInternet
- SettheRootPassword
- TheLiveViewPage
- ControlsontheLiveViewPage
- ManualTrigger
- AXISMediaControlviewertoolbar
- PTZControls
- MediaStreams
- HowtoStreamH.264
- MJPEG
- AXISMediaControl(AMC)
- AlternativeMethodsofAccessingtheVideoStream
- SettingUptheProduct
- BasicSetup
- Video
- VideoStream
- PixelCounter
- Image
- H.264
- StreamProfiles
- CameraSettings
- ImageAppearance
- WhiteBalance
- WideDynamicRange
- ExposureSettings
- ImageSettings
- Overlay
- OverlayImage
- UsingOverlayTextinanActionRule
- Example
- PrivacyMask
- LiveViewConfig
- DefaultViewerforBrowsers
- ViewerSettings
- UserDefinedLinks
- OutputButtons
- PTZ(PanTiltZoom)
- PresetPositions
- Gatekeeper
- Autotracking
- Configuration
- ExcludeAreas
- MaxLimits
- GuardTour
- TourRecording
- OSDIZones
- Advanced
- Limits
- Controls
- ControlQueue
- Detectors
- ShockDetection
- MotionDetection
- SetUpMotionDetectionWindows
- MotionDetectionParameters
- ObjectRemoved
- Enter/ExitDetector
- FenceDetector
- ObjectCounter
- Applications
- ApplicationLicenses
- InstallApplication
- ApplicationConsiderations
- Events
- SettingUpanActionRule
- FallbackAction
- Recipients
- SettingUpanEmailRecipient
- Schedules
- Recurrences
- Recordings
- RecordingList
- ContinuousRecording
- Languages
- SystemOptions
- Security
- Users
- ONVIF
- IPAddressFilter
- HTTPS
- IEEE802.1X
- Certificates
- Date&Time
- Network
- BasicTCP/IPSettings
- IPv4AddressConfiguration
- IPv6AddressConfiguration
- ARP/Ping
- AssignIPAddressUsingARP/Ping
- AXISVideoHostingSystem(AVHS)
- AXISInternetDynamicDNSService
- AdvancedTCP/IPSettings
- DNSConfiguration
- NTPConfiguration
- HostNameConfiguration
- Link-LocalIPv4Address
- HTTP
- NATtraversal(portmapping)forIPv4
- FTP
- RTSP
- SOCKS
- QoS(QualityofService)
- SNMP
- UPnP TM
- RTP/H.264
- Bonjour
- Storage
- SDCard
- NetworkShare
- Ports&Devices
- I/OPorts
- PortStatus
- Maintenance
- SupportOverview
- SystemOverview
- Logs&Reports
- Scripting
- FileUpload
- PlainConfig
- ResettoFactoryDefaultSettings
- Multi-ConnectorCable
- Troubleshooting
- CheckingtheFirmware
- UpgradingtheFirmware
- EmergencyRecoveryProcedure
- Symptoms, Possible Causes and Remedial Actions
- TechnicalSpecifications
- CameraConnectors
- ExternalConnectors
- I/Oterminalconnector
- PerformanceConsiderations
Marke : AXIS
Modell : Q6045-S Mk II
Kategorie : Sicherheitskamera