Kiymax GM-217 - Fleischwolf GoldMaster - Kostenlose Bedienungsanleitung
Finden Sie kostenlos die Bedienungsanleitung des Geräts Kiymax GM-217 GoldMaster als PDF.

Benutzerfragen zu Kiymax GM-217 GoldMaster
0 Frage zu diesem Gerät. Beantworten Sie die, die Sie kennen, oder stellen Sie Ihre eigene.
Eine neue Frage zu diesem Gerät stellen
Laden Sie die Anleitung für Ihr Fleischwolf kostenlos im PDF-Format! Finden Sie Ihr Handbuch Kiymax GM-217 - GoldMaster und nehmen Sie Ihr elektronisches Gerät wieder in die Hand. Auf dieser Seite sind alle Dokumente veröffentlicht, die für die Verwendung Ihres Geräts notwendig sind. Kiymax GM-217 von der Marke GoldMaster.
BEDIENUNGSANLEITUNG Kiymax GM-217 GoldMaster

KIYMAX
GM-217
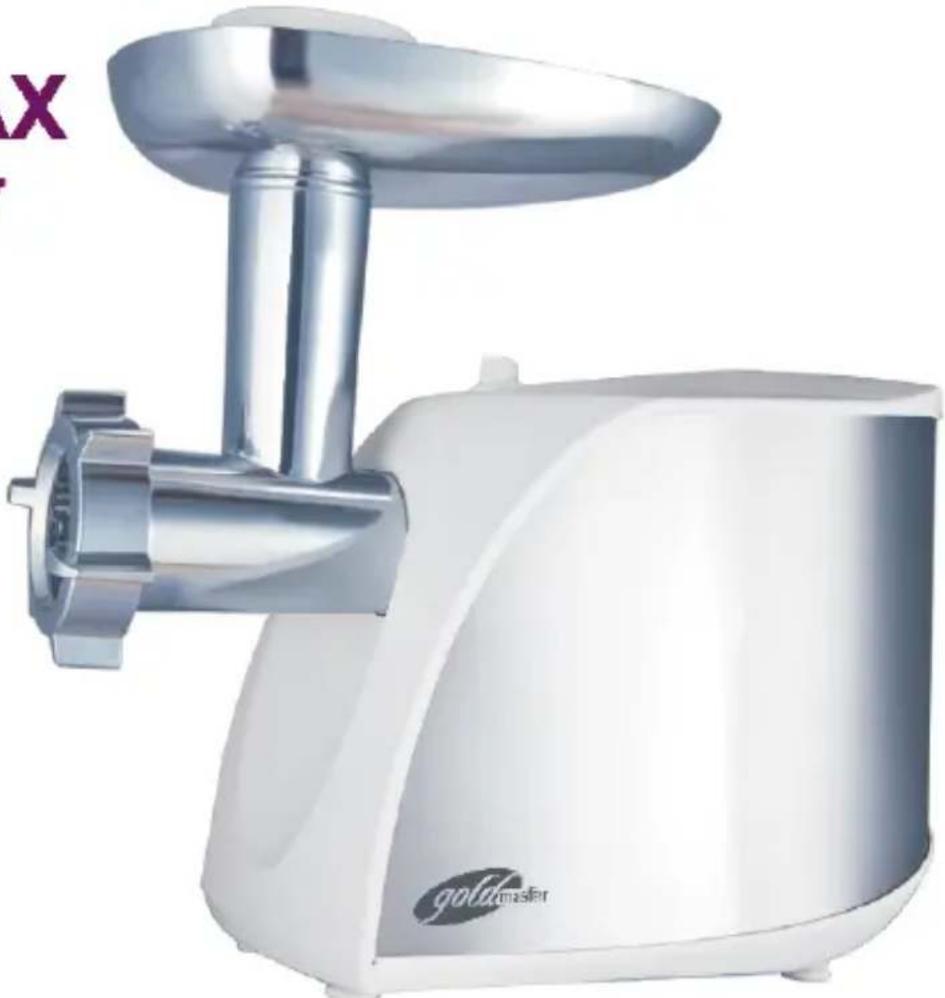
natural_image
White stainless steel robotic food processor with a metal handle and screw spout (no visible text or symbols)Kıyma Makinesi KULLANMA KILAVUZU
www.goldmaster.com.tr
iÇİNDEKİLER
Önemli Uyarılar 2
Genel Görünüm 3
Ürün Özellikleri 4
Ürün Kullanımı 4
Temizlik ve Bakım 6
Teknik Özellikler 7
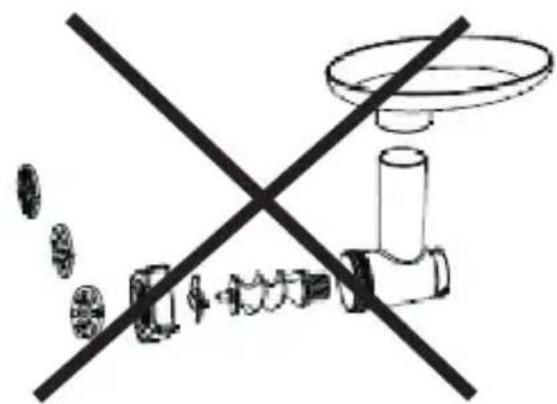
PARÇALAR BULAŞIK MAKİNESİNDE YIKANMAZ!
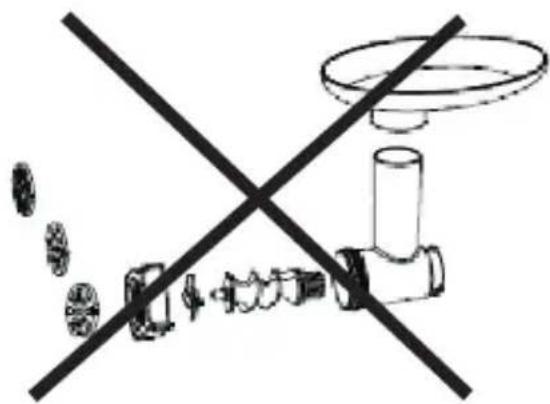
natural_image
Cross-shaped diagram with mechanical components and a circular component, no text or symbols present- Çıkabilen tüm işlem aparatlarını kesinlikle bulaşik makinesinde yıkamayınız, sadece ılık su ve sabunlu sünger ile temizleyiniz. Farklı temizleme kimyasalı kullanmayınız.
- Kesme plakalarını ılık su ile temizleyip kuruladıktan sonra yağlı olarak muhafaza ediniz. (Bunun için sıvı yağ kullanabilirsiniz.)
- Ürüne kesinlikle kemikli et koymayınız bu durumda motorun dönmesi zorlanacaktır ve yüksek ses çıkacaktır. REVERSE tuşuna basarak motorun geri dönmesini sağlayınız.
- Ürün ev kullanımı içindir profesyonel amaç için tasarlanmamıştır, çok uzun süre kullanmayınız.
- Ürünün bıçağını kesme plakalarına dönük şekilde doğru yönde takınız, kesinlikle ters takmayınız. Ters takıldığı durumda biçak eti kesmeyecektir.
Goldmaster marka Kıyma Makinesi'ni tercih ettiğiniz için teşekkür ederiz. Ürünü kullanmadan önce bu kullanım kılavuzunu dikkatlice okuyunuz. Daha sonraki kullanımlarınıza referans olması için kılavuzu güvenli bir yere saklayınız.
ÖNEMLİ UYARILAR
- Ürünün üzerinde yazılı voltajın, bulunduğunuz yerin voltajına uygun olup olmadığına dikkat ediniz. Herhangi bir uyuşmazlık durumunda meydana gelebilecek arızalardan firmamız sorumlu tutulamaz ve bu arıza garanti kapsamı dışında işlem görür.
– Ürün sadece evlerde kullanım içindir. Ticari ya da sanayi amaçlı kullanılmamalıdır. Aksi takdirde, garanti kapsamı dışında işlem görecektir.
– Ürüne zarar vermemek için yetersiz akım sağlayan uzatma kabloları kullanmayınız.
– Ürünü soba, ocak gibi direkt ısı kaynaklarının üzerine veya çok yakınına yerleştirmeyiniz.
– Ürünü çocukların erişemeyeceği bir yerde muhafaza ediniz. - Ürünü çocuklar, deneyim ve bilgi eksikliği olan kişiler, fiziksel (işitsel, görsel) veya zihinsel engelliler tarafından kullanıldığında, güvenliklerinden sorumlu bir kişinin gözetimi altında olmalıdır. Çocukların ürün ile oynamadıklarından emin olunmalıdır.
– Ürünü iki elinizle motor ünitesinden tutarak taşıyınız. Sadece yiyecek koyma haznesi ve ağız kısmından tutarak taşıyınız.
– İçli köfte yapma aparatını kullanırken kesme bıçağını ve kesme plakasını kullanmayın.
– Yiyecek koyma tepsisine gıdaları asla elinizle koymayın. Daima itme aparatını kullanın. - Ürününüzde kabuklu yemişler, kemik gibi sert gıdalar öğütmeyiniz.
Uyarı: Kıyma makinenizin çalışma süresi 10 dk'yı geçmemelidir. Ürünün motorunun soğuması için iki çalışma süresi arasında 10 dk'lık bir zaman dilimi olmalıdır.
Ürün çalışırken geri alma tuşuna asla basılmamalıdır motorun iyice durduğundan emin olunması içinen az 1 dk beklenmelidir. Aksi takdirde üründen anormal sesler, titreşim veya geçici kıvılcım atmaları meydana gelebilir. Bunlar cihaza ve kullanıcıya zarar verir.
– Ürünün kablosu ya da fişi arızalı ise, düşürülme ya da başka bir sebepten dolayı zarar gördü ise kullanmayınız. Kendiniz tamir etmeyiniz, en yakın yetkili servisimize başvurunuz. Sadece orjinal yedek parça kullanmaya özen gösteriniz.
- Ürünü kullanmadığınız zamanlarda, temizlik ve bakımını yapmadan önce mutlaka fişini prizden çıkarınız.
- Ürünü kullandıktan sonra öğütücü kısmının içinde bir miktar gıda parçası kalabilir. Bu normal bir durumdur. Bunları toplayıp atınız.
- Ürünün tutukluk yapmasını engellemek için ürüne işlem esnasında gereğinden fazla kuvvet uygulamayın.
– Cihazınızda sigorta devreye girerse, ürününüzü tekrar çalıştırmak için soğumasını bekleyin. - Ürün kablosunun masa ya da tezgahınızın kenarından sarkmamasına ya da başka bir cihaz ile temas etmemesine dikkat ediniz.
– Ürün çalışırken, hareketli parçalarına dokunmaktan kaçınız. Ellerinizi, saçlarını, giysinizi veya herhangi bir aleti yaklaştırmayınız. - Kullanım sırasında hareket eden bölümlere yaklaşmadan önce ürünün çalıştırma düğmesi üzerinden elinizi çekip motorun tamamen durmasını bekleyiniz ve fişini prizden çıkarınız.
– Ürüne, başka ürünlere ait aksesuarları kesinlikle takmayınız. - Ürünün kablo ve fişine zarar verecek hareketlerden kaçınız. Kablosundan tutarak taşımayınız, prizden çekmek için fişini tutunuz, asla kablosundan çekmeyiniz.
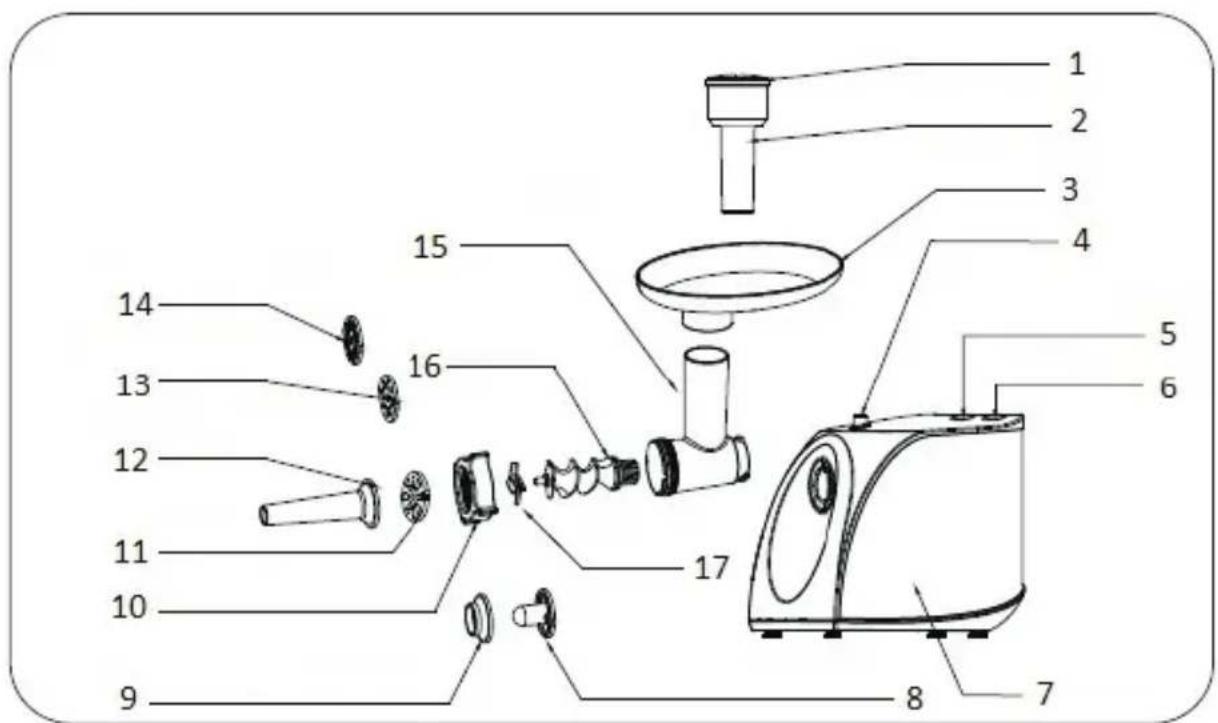
GENEL GÖRÜNÜM
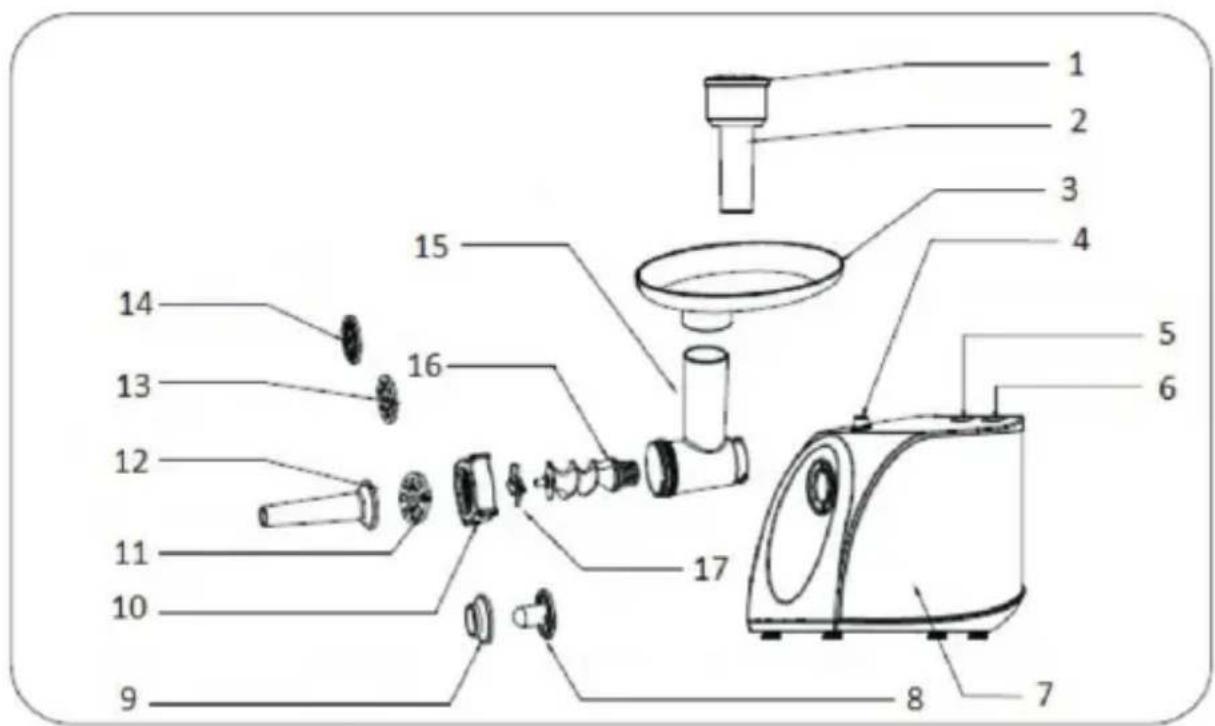
1-) Besin itme aparatı kapağı
2-) Besin itme aparati
3-) Yiyecek koyma tepsisi
4-) Kilitleme düğmesi
5-) Geri döndürme düğmesi
6-) Çalıştırma düğmesi
7-) Ana gövde
8-)İçli köfte aparatı-A
9-) Içli köfte aparatı-B
10-) Sabitleme çemberi
11-) Kesme plakası (kalın)
12-) Sosis yapma aparati
13-) Kesme plakası (orta)
14-) Kesme plakası (ince)
15-) Kıyma makinesi ağızı
16-) Besleme vidası
17-) Kesme bıçağı
ÜRÜN ÖZELLİKLERİ
- 2000W max güçlü motor
- Metal kıyma makinesi ağzı, sabitleme çemberi
- Metal yiyecek koyma tepsisi
- Ayrılabilir paslanmaz işlem plakaları
- İçli köfte ve sosis yapma aparatları
- Geri sarma özelliği
İlk Kullanım Öncesi
Ürün üzerindeki etiketteki gerilimin şebeke gerilimine uygun olup olmadığını kontrol edin.
Gövde hariç bütün parçaları ılık sabunlu suyla yıkayın.
Cihazın fişini prize takmadan önce anahtarın (OFF) konumunda olduğuna emin olunuz.
ÜRÜNÜN KULLANIMI
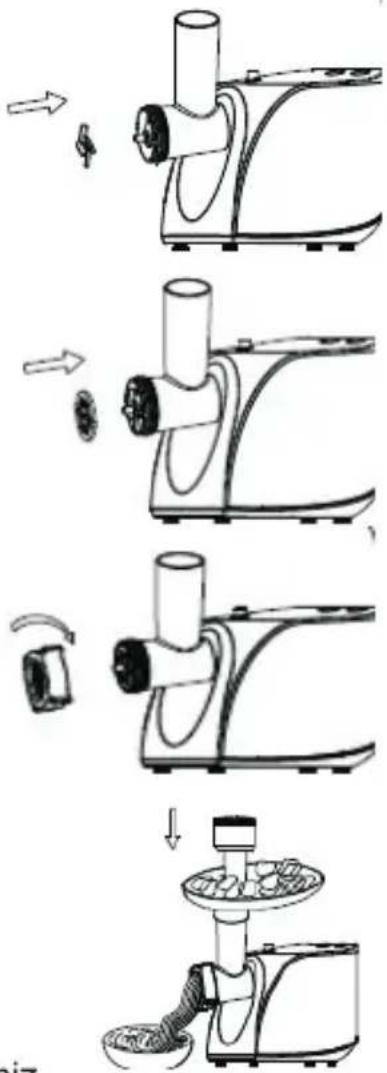
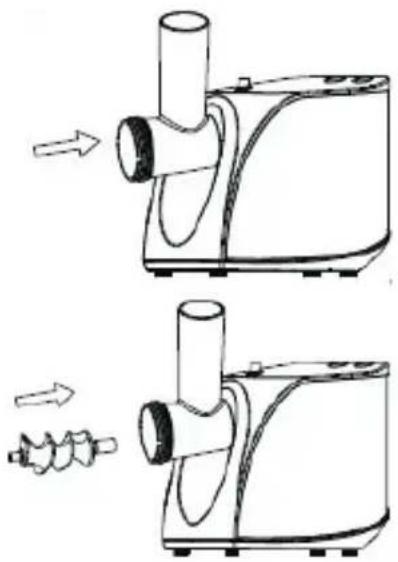
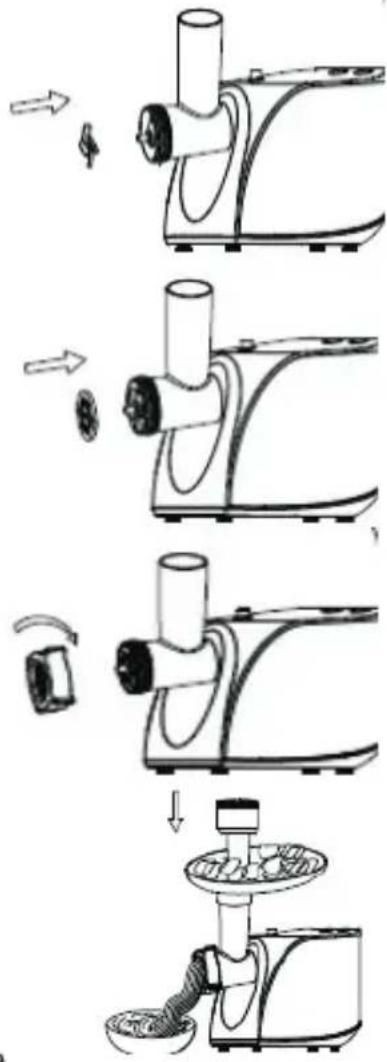
- Kıyma makinenizin besin koyma kısmından tutarak ürünün ağız girişine yanda görüldüğü üzere saat yönünün tersinde çevirerek yerleştiriniz. Böylece kıyma aparatı ürünün ağız kısmına yerleşmiş olur.
- Besleme vidasını ürünün ağız kısmının içine ilk olarak uzun kısım gelecek şekilde yerleştirin ve besleme vidasını motor muhafazasının içine geçecek şekilde döndürün.
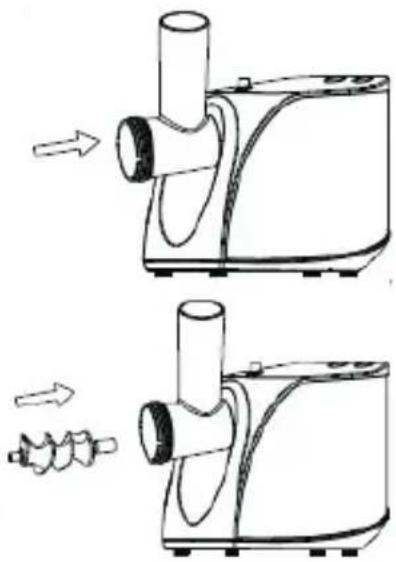
natural_image
Technical line drawing of a mechanical device with two views showing internal components and motion arrows (no text or symbols)- Kesme bıçaklarını besleme vidası milinin üzerine yanda gösterildiği gibi bıçağın keskin tarafı dışarıya bakacak şekilde yerleştirin. Eğer düzgün yerleşmediyse işlem gerçekleşmeyecektir.
- Kesme bıçağının yanına istediğiniz ayardaki kesme plakalarını getirin. Kesme plakasının çıkıntılarını yuvasına oturtunuz.
- Kesme plakasının ortasına bir destek veya parmağınızla basın ve sabitleme çemberini diğer parmağınızla plaka iyice sıklıncaya dek çeviriniz.
- Yiyecek koyma tepsisini şekilde görüldüğü gibi besin koyma bölümünün üst kısmına yerleştirin ve sabitleyin. Besinleri küçük parçalar halinde kesin ve yiyecekleri besin koyma tepsisine koyun. Fışı prize takıp 'ON' tuşuna basarak kıyma işlemine başlayabilirsiniz.
flowchart
graph TD
    A["Feeding Device"] --> B["Add Food to Paper"]
    B --> C["Add Paper into Dish with Cover"]
    C --> D["Add Paper into Cover with Cover"]
    D --> E["Add Paper into Dish with Cover"]
    E --> F["Product Packaging & Cleaning"]
Düğme fonksiyonları ve ikaz ışığı
Cihazın fişini prize takınız ve çalıştırma düğmesine (ON) basınız. Ürün normal olarak çalışmaya başlayacaktır.
Ürün çalışırken geri sarma fonksiyonunu çalıştırmak istiyorsanız durdurup daha sonra geri sarma (R) tuşuna basmalısınız, aksi halde motor zarar görebilir.
Geri sarma fonksiyonu
Ürünün üzerindeki (R) tuşuna bastığınızda geri sarma fonksiyonu çalışmaya başlayacaktır. Besleme vidası ters yönde dönecektir. Vidanın uç kısmı boşta kalacaktır. Aynı şekilde bu fonksiyondan normal çalıştırmaya geçmek için ilk önce durdurup daha sonra ON tuşuna basmalısınız.
İkaz ışığı ürünü çalıştırdığınız sürece mavi renkte yanmaya devam edecektir.
İçli Köfte Aparatı
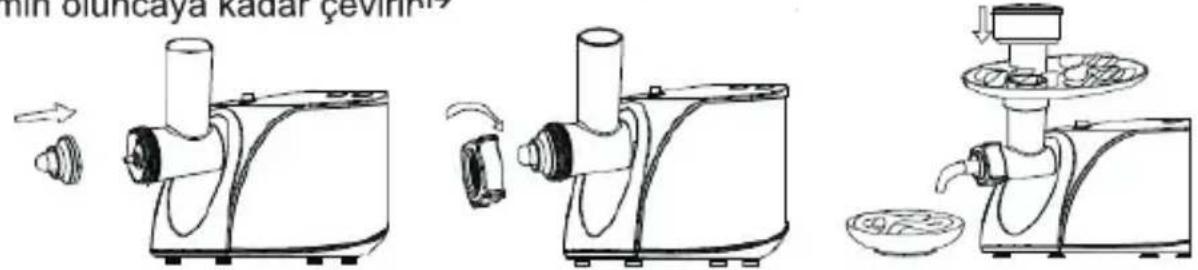
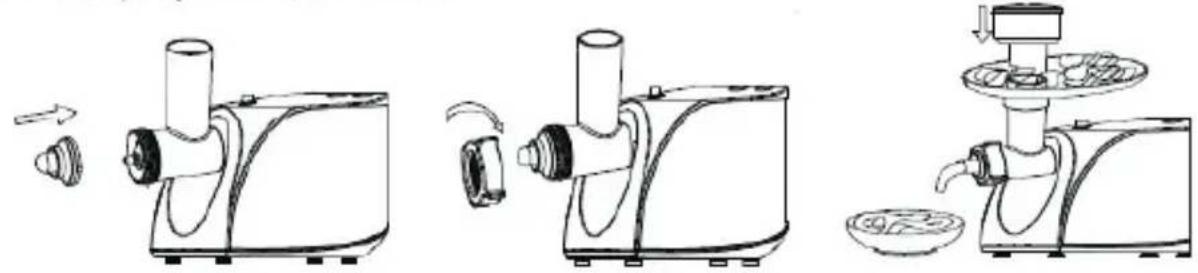
Öncelikle ürüne yerleştirdiğiniz kesme plakalarını ve kesme bıçağını kaldırın. Besleme vidasının üzerine içli köfte aparatını miliyle birlikte yerleştirin. Bunu yaparken içli köfte aparatındaki çıkıntıların, ürünün ağız kısmındaki yuvaya doğru şekilde yerleştiginden emin olunuz.
Daha sonra sabitleme çemberini ürünün ağız kısmına takarak iyice sıkıldığından emin oluncaya kadar çeviriniz
Sosis Yapma Aparati
Ürünü aşağıda görüldüğü üzere kurulumunu tamamlayın. Cihazınız sosis, sucuk vs yapımı için hazırldır.
natural_image
Line drawing showing a hand using a hairdryer to process a mechanical device with multiple ports (no text or symbols)TEMİZLİK VE BAKIM
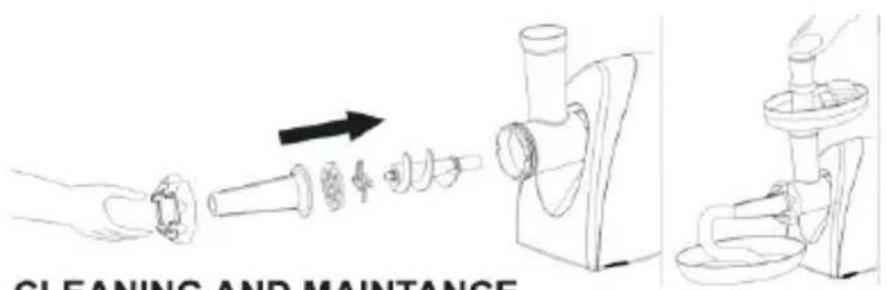
Ürün Sökümü
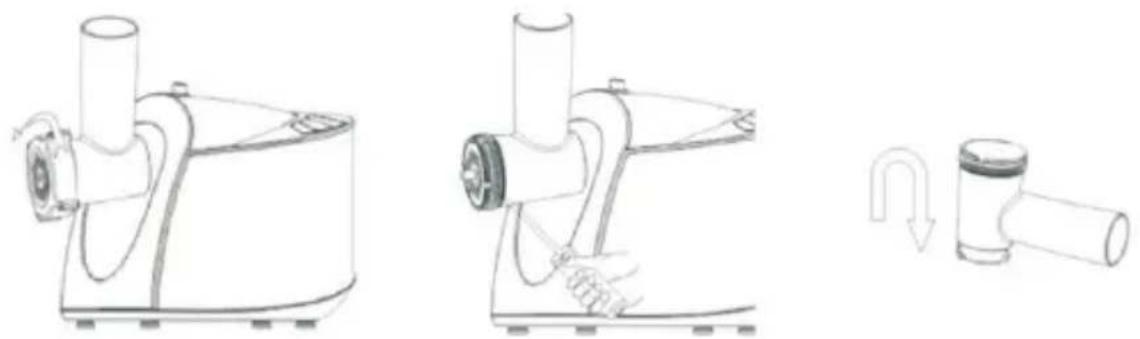
Ürünün çalışmadığından emin olunuz. Ürünü fisinden çıkartınız. Montaj işleminin tersini uygulayarak makineyi sökebilirsiniz. İşlemi kolaylaştırmak için tornavida kullanabilirsiniz. Kilitleme düğmesine basarak kıyma başlığını çıkarabilirsiniz.
natural_image
Line drawings of a mechanical device with a hand operating the shaft and a separate view showing a curved arrow indicating motion (no text or symbols)- Ürün üzerindeki et, gıda vs kalıntılarını atın. Her bir parçayı ilik sabunlu suyla yıkayın.
- Ürünü temizlerken aşındırıcı kimyasallar kullanmayın. Beyazlatıcı solüsyonlar alüminyum yüzeyi soldururlar.
- Ana gövdeyi kesinlikle suya daldırmayınız
- Ürünü bitkisel yağlı ıslak bir bezle silip iyice kurulayınız.
TEKNİK ÖZELLİKLER
Gerilim: 220-240V AC 50/60Hz
Güç: 1300W
Sinif: Class II
Max 2000W kilitli motor gücü
natural_image
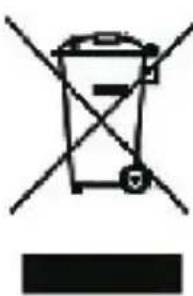
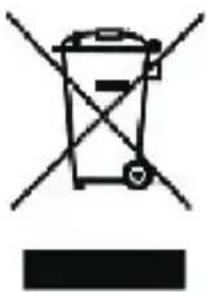
Simple line drawing of a trash bin with crossed lines indicating no waste or restriction (no text or symbols)WEEE
Cihazı evsel atıklar aracılığıyla imha etmeyiniz. Cihazın kurallara uygun olarak imha edilmesi için lütfen yetkili ve sertifikalı elektronik çöp toplama yerine başvurunuz. Bu toplama yerlerinin adreslerini, çevre koruması yetkililerinden veya belediyeden öğrenebilirsiniz. Cihazın ambalajı (karton kutu ve karton içindeki destek parçaları) atık kağıt olarak imha edilebilir.
Cihazın kullanım ömrü 7 yıldır.
EEE Yönetmeliğine uygundur.
EN-60335-2-14


KIYMAX
GM-217
Kıyma Makinesi
Merkez Servis İletişim Bilgileri
AYYILDIZ ELEKTRİKLİ EV EŞYALARI İMALAT VE PAZARLAMA AŞ.
Bakır ve Pirinççiler Sanayi Sitesi Karanfil Sk. No:1 Beylikdüzü/İstanbul TÜRKİYE
Fax:0212 693 02 24
Web:www.goldmaster.com.tr
E-mail:info@goldmaster.com.tr

CONTENTS
Important Safety Instructions 2
Overview 3
Features 4
Using your Meat Grinder 4
Cleaning and Maintenance 6
Technical Specification....7
PLS DON'T WASH IN BELOW APARATUS IN DISHWASHER!
natural_image
Cross-shaped diagram with mechanical components and a ring, no text or symbols present- PIs don't wash all processor aparatus in dishwasher. PIs clean these with warmish water and wet cloth. PIs don't use chemicals to clean aparatus.
- Dry the plate, grinder head, nut and other aluminium parts in order to avoid color-chang.
- PIs clean cutting discs with warmish water and dry it. Then put little esculent grease on the cutting discs to keep smoothy
- Do not grind hard food such as bones, nuts, etc. When put bones, pls press REVERSE button to avoid product fault.
- This product is for indoors, pls don't use in outdoors.
Thank you for purchasing this Meat Grinder. Before using this product, it is important to read this instruction manual carefully.
Use the product only as described and for indicated purpose. Keep this manual in a safe place. If you hand this product onto anyone else, ensure to pass on along all the documentations relating to this product.
IMPORTANT SAFETY INSTRUCTIONS
When using electrical appliances, basic safety precautions should always be followed including the following:
- Read all instructions carefully before you use the appliance.
- Make sure your electricity supply is the same as the one shown on the power handle before plugging in.
- Do not operate the appliance with a damaged cord or plug or after the appliance malfunctions, or is dropped or damaged in any manner. Return appliance to the nearest authorized service facility for examination, repair or electrical or mechanical adjustment.
- Never put the power handle and in water or let the cord or plug get wet, you could get an electric shock.
- Do not operate with wet hands. Make hands dry with cloth before plugging in.
- Reverse function is prohibited while the appliance is operating (For example switch “ON” knob to “R” knob or on the contrary) wait at least one minute until grinder has come to a complete stop, otherwise it may cause an abnormal noise, vibration or a transitory electric spark in the appliance. It could result easily damage to appliance and make a user frightened. After use, there would be a little food left in the grinder head. This is normal.
- There might be a bit of black metal powder adhering to the food ground in the end. Please pick them out and throw away, do not eat them.
-To avoid jamming, do not force to operate the unit with excessive pressure. - Do not fix the cutting blade and cutting plate when using kibbe attachment
- Never feed food by hand. Always use food pusher.
- Do not grind hard food such as bones, nuts, etc.
Do not let cord hang over edge of table or counter.
- Never let anybody trip over the power cord and attached cable. Don't let the cord touch hot surfaces or hang down where a child could grab it.
- Unplug from outlet when it is not in use, before putting on or taking off parts, before moving the appliance or adding the food, and before cleaning.
- Do not use outdoors.
- Do not grind ginger and other materials with hard fiber.
- When carrying the unit be sure to hold the motor housing with both hands.
- Do not carry the unit by holding only the hopper plate or head.
- Take the attachments off before cleaning.
- The use of attachments, including canning jars, not recommended by the manufacturer may cause a risk of injury to persons.
- Avoid contacting moving parts.
- Keep fingers, hair, clothing and utensils away from moving parts.
- This appliance is designed for domestic use only. No responsibility is accepted for damage resulting from use non-compatible with the instructions.
Caution: Continuous running of meat grinder should be not more than 10 minutes with the following 10 minutes interval for motor cooling.
OVERVIEW
1-) Pusher cover
2-) Pusher
3-) Food tray
4-) Lock button
5-) Reverse button
6-) Forward button
7-) Main body
8-) Kibbeh attachment - A
9-) Kibbeh attachment - B
10-) Nut
11-) Coarse cutting plate
12-) Sausage filling funnel
13-) Medium cutting plate
14-) Fine cutting plate
15-) Grinder head
16-) Spiral shaft
17-) Cutting blade
Features
- 2000W max power motor
- Metal grinder head and nut
- Metal food tray
- Detachable stainless cutting plates
- Kibbe and sausage attachments
- Reverse function
For the First Time
Check that voltage indicated on the rating label corresponds the mains voltage in your home.
Wash all parts (except body) in warm soapy water.
Before plugging in, ensure the "ON/OFF" switch is turned to "OFF" position.
INSTRUCTION FOR USE
Assembling
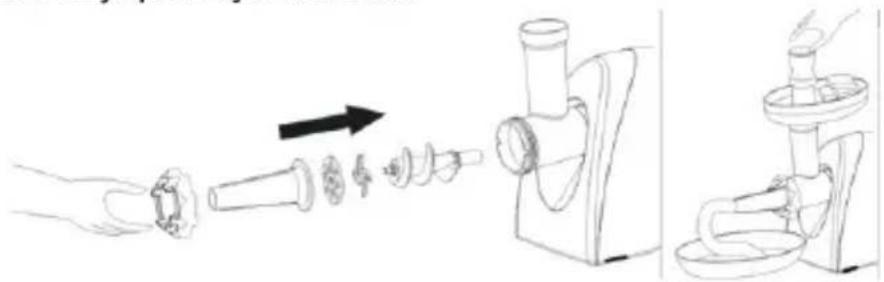
- Hold the grinder head, make the salient to match with the concave, then fasten the grinder head onto main body by Counter-clockwise.
- Put the spiral shaft inside the grinder head, remember to use the hexagon side to connect the main body, then rotate the shaft to make it match with the hexagon of main body.
natural_image
Technical line drawing of a mechanical device with two views showing internal components and motion arrows (no text or symbols)- Put the blade into the spiral shaft, make sure the sharp edge is outwards, or it can not grind meat. Remember that the shaft is through into the square hole of blade.
- Select one of the 3 cutting plate according to your need, put it in front of the blade, and make the salient to match with the concave.
- Fasten the nut onto the plate, but not too tight.
- Put the meat grinder on a stable table, put the food tray on the grinder head. Cut the meat small pieces which are without bones and can be fit to the food tube. Connect the plug to the socket, make the switch 'ON' position, put the meat on the tray and use the
flowchart
graph TD
    A["Feeding Device"] --> B["Add Food to Paper"]
    B --> C["Cut Paper into Dish with Roll"]
    C --> D["Heating to Cover Food"]
    D --> E["Product Packaging"]
    E --> F["Final Finishing"]
pusher to make it into the food tube, then press it gently.
Button function & indication light
'ON/OFF' button: power switch button, while the machine standby, press this button, then the machine will start forward working; while the machine is working press this button, then the machine will turn back to the standby mode.
Note: If from the 'forward working' operation turn back to the 'reverse working' operation, you must stop the machine first then to do that, otherwise it will affect the motor damage.
Reverse function
'REV' button: reverse button, while the machine standby, press this button, the machine will start the reverse function working, release the button, the machine will turn back to the standby mode while the machine is working, press this button
then the machine will stop, release this button the machine will go on working. Note: If from the 'reverse working' operation turn back to the 'forward working' operation, you must stop the machine first, otherwise it will affect the motor damage.
Indication light: while the machine working (no matter for the 'forward working' or 'reverse working'), the indication light will turn the blue light.
Kibbeh Attachment
Install the kibbeh attachment (A&B) to grinder head, no need the install the blade and the cutting plate, then fasten the nut. Put the materials for tegmen on the tray and grind it to make the tegmen.
Put the stuffing into the tegmen, and aggluinate the holes at two sides by hand, then deep-fry them, that is all.
natural_image
Illustration of three stages of a food robotic arm: slicing, adding a brush, and whole making a bowl (no text or symbols)Sausage Attachment
Before starting please assemble sausage attachment as per following.
CLEANING AND MAINTANCE
Disassesmbling
Turn to the 'OFF' position, unplug the power cord, make sure disassemble the unit after it stop running. The step is contrary against the assemble step. If the nut is not easy to take out, use a screwdriver unclench it. The cutted plate also can be unclenched.
Switch the lock button, take the grinder head out and downwards its outlet, knob gently on the desk to make the meat out.
natural_image
Line drawing of a mechanical device with a cylindrical shaft and base, no text or symbols present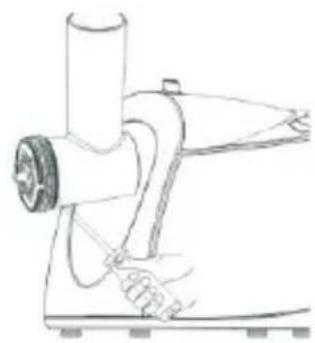
natural_image
Line drawing of a manual laboring machine with handle and workpiece (no text or symbols)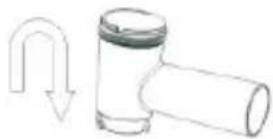
CLEANING
Remove meat, etc. Wash each part in warm soapy water. A bleaching solution containing chlorine will discolor aluminium surfaces. Do not immerse the motor housing in water, but only wipe it with a damp cloth. Wipe all the cutting parts by vegetable oil-wet cloth.
TECHNICAL SPECIFICATION
Voltage: 220-240V AC 50/60Hz
Power: 1300W
Class: ClassII
Max locked motor power 2000W


7 years life-time
natural_image
Symbol of a trash bin with crossed lines indicating no waste, and a solid black rectangle below (no text or labels)WEEE
This product contains recyclable materials. Do not dispose this product as unstorted municipal waste.
Please contact your local municipality for the nearest collection point.