Quadra Pro 3 Charger - Ladegerät LRP - Kostenlose Bedienungsanleitung
Finden Sie kostenlos die Bedienungsanleitung des Geräts Quadra Pro 3 Charger LRP als PDF.

Benutzerfragen zu Quadra Pro 3 Charger LRP
0 Frage zu diesem Gerät. Beantworten Sie die, die Sie kennen, oder stellen Sie Ihre eigene.
Eine neue Frage zu diesem Gerät stellen
Laden Sie die Anleitung für Ihr Ladegerät kostenlos im PDF-Format! Finden Sie Ihr Handbuch Quadra Pro 3 Charger - LRP und nehmen Sie Ihr elektronisches Gerät wieder in die Hand. Auf dieser Seite sind alle Dokumente veröffentlicht, die für die Verwendung Ihres Geräts notwendig sind. Quadra Pro 3 Charger von der Marke LRP.
BEDIENUNGSANLEITUNG Quadra Pro 3 Charger LRP
QUADRA PRO
OUAL POWER

100-240V AC / 12V DC CHARGE-DISCHARGE-CYCLE
1-14 CELLS NIMH/NICO
1-5 CELLS LIPO/LIFEPO
USER GUIDE - #41282
LRP electronic GmbH
Wilhelm-Enssle-Str. 132-134
73630 Remshalden, Germany
info@LRP.cc www.LRP.cc

BLUE IS BETTER
CONNECTIONS / OPERATION
The QUADRA PRO 3 was developed with the main objective placed on easy operation of all features. Intuitive navigation by means of 4 buttons makes it very easy to use and the Z-line blue backlit LC display offers perfect, reliable control of all settings and functions.
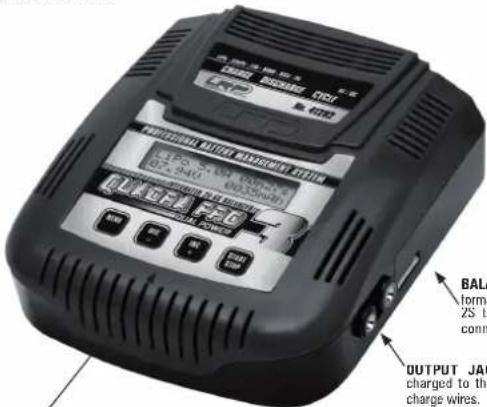
BALANCER CONNECTOR: high-performance integrated Lixx balancer for 2S to 6S packs using EHR balancing connector.
OUTPUT JACKET: connect battery to be charged to the 4.0mm jacket, using supplied charge wires.
Caution: Be careful with correct polarity!
BUTTONS:
MENU Scrolls/jumps through the function list.
DEC - Decrements the underscored value.
INC + Increments the underscored value.
START/STOP Next program step / Start a program / Cancel a running program.
* Button has high-speed function for rapid setting (hold down button to change value faster).
16x2 LCD SCREEN:

natural_image
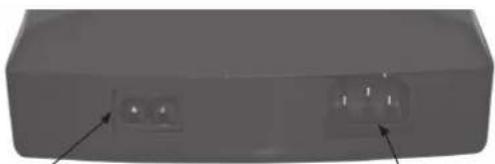
3D rendering of a rectangular electronic component with two small circular cutouts and arrows pointing to features (no text or symbols visible)DC INPUT: connect to a suitable DC source with 11-
15V, using the supplied connection wire.
Caution: Be careful with correct polarity!
- Red = Plus / Black = Minus
AC INPUT: connect to main power with 100-240VAC
Caution: Do not alter the wire or connector as this will void your warranty!
BALANCING FUNCTION
The QUADHA PHU 3 contains an integrated high-performance balancer for 2S to 6S Lithium based (LiPo, LiFePo, Lilo) battery packs using EHR balancing connector. Please refer to drawing (also like that on charger for correct parity, basically minus

(Black wire) is always on the far right side of the plug as shown on drawing. The balancer equalises the cells, during charge- and balance-function, which results in higher performance and higher cycle-life.
Caution: Avoid incorrect connection as in the worst case this may result in damage to the battery and/or charger!
RECOMMENDED SETTINGS
Always follow the cell manufacturers charge-/usage-recommendations, never use batteries outside their specifications!
| Battery Type | Voltage / Cells | Battery Type | Charge Current | D-Peak | Trickle | LiPo Volt | Dischg. Current | Dischg. Volt |
| NiCd Sportpacks (1600-2400mAh) | 7.2V / 6 | NiCd | 3.0A | 95mW | 0.1A | -- | 1.0A | 5.4V |
| NiMH Sportpacks (3000-4200mAh) | 7.2V / 6 | NiMH | 3.0A | 20mW | OFF | -- | 1.0A | 5.4V |
| NiMH Sportpacks (3000-4200mAh) | 12.0V / 10 | NiMH | 3.0A | 30mW | OFF | -- | 1.0A | 9.0V |
| NiMH Sportpacks (3000-4200mAh) | 14.4V / 14 | NiMH | 3.0A | 50mW | OFF | -- | 1.0A | 12.6V |
| NiMH Competition Cells | 4.8V / 4 | NiMH | 5.0A | 5mW | OFF | -- | 1.0A | 3.6V |
| NiMH Competition Cells | 6.0V / 5 | NiMH | 5.0A | 10mW | OFF | -- | 1.0A | 4.5V |
| NiMH Competition Cells | 7.2V / 6 | NiMH | 5.0A | 15mW | OFF | -- | 1.0A | 5.4V |
| NiMH Competition Cells | 12.0V / 10 | NiMH | 5.0A | 25mW | OFF | -- | 1.0A | 9.0V |
| NiMH Competition Cells | 14.4V / 14 | NiMH | 5.0A | 35mW | OFF | -- | 1.0A | 12.6V |
| AA/Magnon NiMH Cells (2000-2700mAh) | 9.6V / 8 | NiMH | 0.5A | 30mW | OFF | -- | 0.3A | 7.2V |
| 2/3A NiMH Cells (1200-1600mAh) | 6.0V / 5 | NiMH | 1.0A | 15mW | OFF | -- | 0.8A | 4.5V |
| LiPo Pack Air ~480mAh (plane/helicopter) | 11.1V / 3S | LiPo | 0.5A | -- | -- | 11.1V | 0.5A | 9.0V |
| LiPo Pack Air ~1500mAh (plane/helicopter) | 11.1V / 3S | LiPo | 1.5A | -- | -- | 11.1V | 1.0A | 9.0V |
| LiPo Pack Air ~300mAh (plane/helicopter) | 11.1V / 3S | LiPo | 3.0A | -- | -- | 11.1V | 1.0A | 9.0V |
| LiPo Pack Car ~1800mAh (Micro 1/18) | 7.4V / 2S | LiPo | 1.8A | -- | -- | 7.4V | 1.0A | 6.0V |
| LiPo Pack Car ~500mAh (1/10) | 7.4V / 2S | LiPo | 5.0A | -- | -- | 7.4V | 1.0A | 6.0V |
| LiPo Pack ,IX Only* ~2700mAh | 11.1V / 3S | LiPo | 1.5A | -- | -- | 11.1V | 0.5A | 9.0V |
| LiPo Pack ,RX Only* ~1800mAh | 7.4V / 2S | LiPo | 1.2A | -- | -- | 7.4V | 0.5A | 6.0V |
| LiFePo Pack ,JX Only* ~1800mAh | 6.8V / 2S | LiFePo | 1.2A | -- | -- | 6.8V | 0.5A | 5.2V |
| LiFePo Pack Car ~4500mAh | 6.8V / 2S | LiFePo | 4.5A | -- | -- | 6.8V | 1.0A | 5.2V |
Dear Customer,
thank you for your trust in this LRP product. By purchasing a LRP QUADRA-PRO 3 Professional Battery Management System, you have chosen a high-performance product which has the latest technology incorporated including the following High-Tech features:
- Charging - Discharging - Cycling Operation • LiPo • LiFePo • Lilo • NiMH • NiCd • Pb
- Integrated Balancer for 2S-6S Lixx batteries • Dual Input (100-240Vac + 12Vdc)
• Blue Backlit TbxZ LCD • 5 User Profile Memories
• 25-year warranty • Multi-Protection-System
Please read the following instructions carefully before you start using your charger. This user guide contains important notes for the installation, the safety, the use and the maintenance of this product. Thus protecting yourself and avoid damages of the product.
Proceed according to the user guide in order to understand your charger better. Please take your time as you will have much more joy with your product if you know it exactly.
This user manual shall be kept in a safe place. If another customer is using this product, this manual has to be handed out together with it.
TECHNICAL DATA
| Dimensions | [mm] | 145x160x60 In |
| Weight | [g] | 600 Autostart Tr |
| Input Voltage | [AC] | 100-240V Storage |
| [DC] | 11-19V | |
| Charging Capability | LiPo/LiFePo/Lilo | 1 - 6 cells |
| NiMH/NiCd | 1 - 14 cells LCD | |
| Pb | 2, 4, 6, 12V | |
| Charge Current | [A] | 0.1 - 5.0 |
| Trickle Current | [A] | 0 - 0.25 Buttons |
| Delta Peak | [mV] | 5 - 200 |
| Discharge Current | [A] | 0.1 - 1.0 |
| Discharge Cut-Off Voltage | LiPo/LiFePo | 2.5 - 14.0V |
| NiMH/NiCd | 0.9 - 16.0V |
Specifications subject to change without notice.
| Integrated Balancer yes, 2S - 6S | |
| User Profile Memory | 5 |
| 16x2, blue backlit | |
| Acoustic Signal Type | Buzzer |
| Finish Melody | adjustable |
| 4 | |
| Multi-Protection-System | yes |
| DC Input Connection | Alligator Clamps |
| AC Input Connection | AC connector |
| Output Connection 4.0mm jacket | |
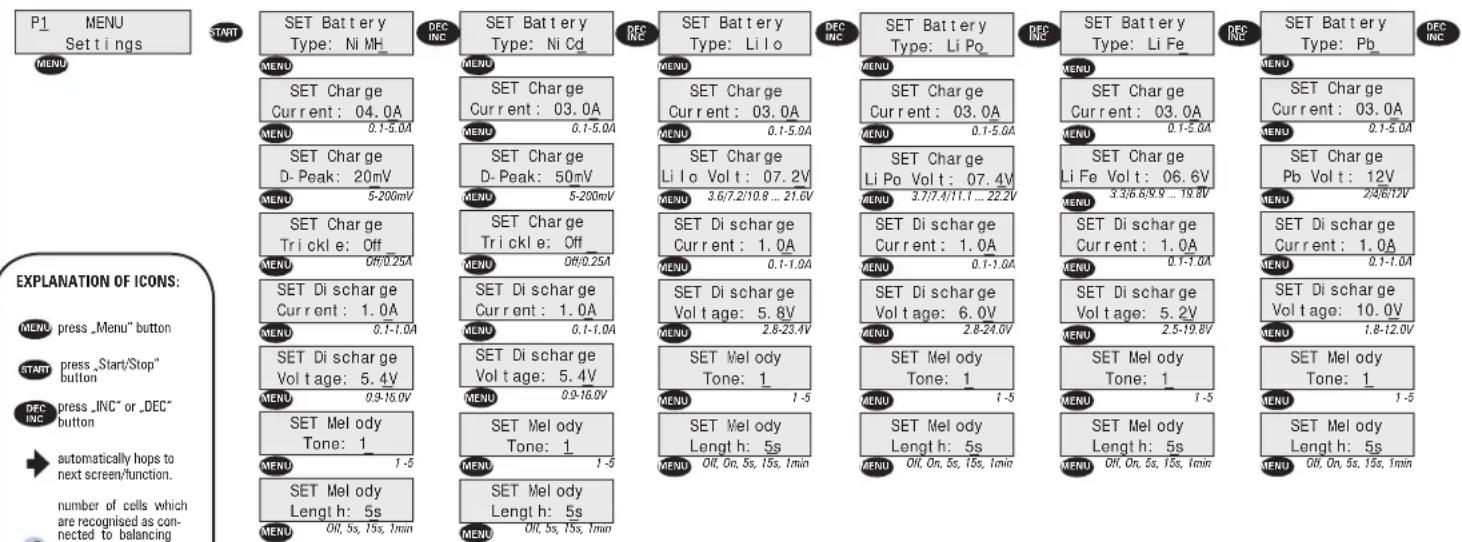
SETTINGS
The QUADRA PRO 3 allows you to save 5 individual user profiles. This means you can customize 3 personal charge profiles individually and store them for later use. The QUADRA PRO 3 has 5 preset works-default settings when shipped out as shown in this table:
The active profile P1 to P5 is displayed in the main menu. By pressing the IVC+ and DEC- buttons you can change between the profiles and their settings.
To reset to default settings, proceed as following:
• Disconnect input voltage.
- Hold down MENU button while reconnecting the input voltage.
| User Profile | P1 | P2 | P3 | P4 | P5 |
| Battery Type | LiPo | LiPo | LiFe | NiMH | NiCd |
| Charge Current | 5.0A | 3.0A | 5.0A | 4.0A | 3.0A |
| Charge D-Peak | -- | -- | -- | 20mV | 50mV |
| Charge Trickle | -- | -- | -- | Off | Off |
| Charge LiPo Volt | 7.4V | 11.1V | 6.6V | -- | -- |
| Discharge Current | 1.0A | 0.5A | 1.0A | 1.0A | 1.0A |
| Discharge Voltage | 6.0V | 9.0V | 4.6V | 5.4V | 5.4V |
CHARGE
SET Battery Type: The QUADRA PRO 3 can charge pretty much any type of cell (LiPo, LiFePo, Lilo, NiMH, NiCd, Pb) and incorporates the designated charge algorithms for each particular cell type for best performance, reliability and safety.
Lixx + Pb
→ charging using the CC/CV-charging method. With this charging method, the battery gets charged with a constant current first. As soon as the battery voltage reaches the max. allowed charging voltage per cell (for example, LiPo 4.2V and LiFePo 3.7V), the charger automatically reduces the charging current till the battery is fully charged.
NiMH/NiCd
→ charging with constant current + delta-peak detection. This is the most popular charging method for NiMH/NiCd-batteries in competition.
Caution: Always choose the correct BATTERY TYPE setting for the battery you want to charge, as wrong setting may result in damage to the battery, fire or explosion!
SET Charge Current: The charge current can be set from 0.1 to 5.0A. If not otherwise specified by the battery manufacturer, choose 0.5C charge rate which is always a safe value!
SET Charge Delta Peak: With NiMH/NiCd-batteries, you only obtain the optimum battery performance by slightly "overcharging" the battery. In real terms, it will not be overcharged, but charged to an optimum level. The battery voltage drops at the end of the charging process (delta). The size of the drop (delta peak) is adjustable in the range between 5'–200mV. The higher the value, the hotter the battery will be at the end of the charge. We recommend to start with the works-default settings.
Note: The adjustable Delta-Peak value applies to the whole battery pack and not to one single cell!
SET Charge Trickle: This current, which flows after delta peak cutoff, is adjustable from 0.0A to 0.25A to achieve the highest possible voltage for NiCd cells. Set this function to "Off" for NiMH cells.
SET Charge Lixx/Pb Volt (pack voltage): The packs rated voltage for LiPo/LiFePo/Lilo and Pb-batteries must be set according to the packs rating. See table on right side.
* C—Nominal capacity of the battery. E.g. with a nominal capacity of 3300mAh (3.3Ah), the battery can be charged with a max. current of 3.3A:
| Cell# | LiPo | LiFePo | Lilo | Pb |
| 1 (1S) | 3.7V | 3.3V | 3.6V | 2V |
| 2 (2S) | 7.4V | 6.6V | 7.2V | 4V |
| 3 (3S) | 11.1V | 9.9V | 10.8V | 6V |
| 4 (4S) | 14.8V | 13.2V | 14.8V | -- |
| 5 (5S) | 18.5V | 16.5V | 18.0V | -- |
| 6 (6S) | 22.2V | 19.8V | 21.6V | 12V |
DISCHARGE
The adjustable discharge circuit (0.1 to 1.0A) can be used for 1-14 cell NiMH/NiCd- and 1-6 cell Lixx/Pb-packs. The QUADRA PRO 3 informs you about all the data relating to the battery pack, e.g. discharge time, capacity and average voltage. By discharging your battery pack on the QUADRA PRO 3 after use, you obtain vital information about remaining capacity for optimizing your motor or gear ratio for the next run. This also maintains your battery packs in good condition.
SET Discharge Current: The discharge current can be set from 0.1 - 1.0A.
SET Discharge Voltage: The cut-off voltage can be adjusted from 0.9 - 14.0V depending on the number of cells. We recommend a cut-off voltage of 0.9V/cell with NiMH/NiCd-, 3.0V/cell with LiPo-and 2.6V/cell with LiFePo-batteries.
This means for example: - 5.4V for 6-cell NiMH/NiCd - 6.0V for a 2-cell LiPo - 5.2V. for a 2-cell LiFePo
CYCLE
This fully automatic cycling/matching function allows you to determine the actual performance of your packs before using them. Battery packs change during their life span. Use the QUADRA PRO 3 to detect the actual quality of your packs. This prevents nasty surprises.
The "Cycle" mode uses the charge and discharge values of the currently selected program, stored under "Settings". The pack is first discharged, then charged and finally discharged. At the end of the process, the pack capacity and the average discharge voltage are displayed.
There is a short delay in the timer during cycle operation, in order not to overheat the batteries, which is as following: - Initial Discharge -> Charge: 1min (if discharge was finished within 10min), otherwise 5min - Charge -> Discharge: 1min (if charge was finished within 10min), otherwise 5min
Note: The „Cycle" function can of course be used for all types of cells.

The crossed-out wheeled bin means that within the European Union the product must be taken to separate collection at the product end-of-life. Do not dispose of these products as unsorted municipal waste.
TROUBLESHOOTING
The QUADRA PRO 3 is protected against faults and operator errors by the Multi-Protection-System. Faults/Errors are displayed on the LCD screen and some faults/errors may interrupt the charging process to protect the charger and the battery.
The error messages are as follows:
ERROR-MESSAGES
| CAUTIONBattery Error |
| INTERRUPTLow Input Volts |
| INTERRUPTHigh Input Volts |
| INTERRUPTLow Bal. Volts |
| INTERRUPTHigh Bal. Volts |
| INTERRUPTOpen Balancer |
POSSIBLE CAUSES
- No battery connected?
- Wrong battery polarity, bad contact?
- Defective battery
- Wrong LiPo-cell quantity?
- Input voltage too low/switched off (<11.0V on DC input) - Bad contact on input clamps?
- Input voltage too high (>15.0V on DC input)
- Cell voltage at balancer port too low? Limits are: Lilo=2.65V, LiPo=2.75V, LiFe=2.0V
- Cell voltage at balancer port too high? Limits are: Lilo=4.2V, LiPo=4.3V, LiFe=3.9V
- Balancing wire disconnected from balancing port during use?
SPECIAL FEATURES
Storage Charge Mode: Never store your batteries completely empty as this will harm them and lower their performance. Due to this fact, the QUADR A PRO 3 features a "Storage charge" mode. With this function, you can set a fixed voltage (vor Lixx batteries) or fixed capacity (for Nixx batteries) value and the battery will be partially charged or discharged (in case of Lixx) exactly to this level. Thus you can always perfectly prepare your battery for storage, if you want to store them over a longer period of time.
How to do the storage charging of your battery: please follow the instructions under chapter „Programme Structure“.
Our recommendations:
NiMH/NiCd cells: 50% of nominal capacity
LiPo/LiFePo/Lilo cells: at nominal voltage (e.g. 3.7V for LiPo / 3.3V for LiFe)
Note: NiMH batteries can be stored for about 1-2 months without problems using this method. LiPo/LiFePo batteries can be stored for about 6 months without problems. After this time period, you should check the battery and, if necessary, put some charge in again!
Autostart Timer: This handy feature lets you preselect when you want to start charging your battery with the QUADRA PRO 3. The Autostart Timer is adjustable from 0 - 99min. If you stay in the „Autostart Display“ for longer then 30sec without setting a value, the charging process will start automatically.
Changing the charge current on the fly: The charge current can be changed on the fly by pressing INC+ or DEC- without interrupting the charging process. This change is not stored. The next time you start charging, the QUADRA PRO 3 takes the data settings of each charge profile, stored under "Settings".
Data View Function: at the end of each process (charge, discharge or cycle) you can view additional data by pressing MODE button. Also you can access DATA VIEW from initial screen by pressing MODE button, which allows you to view (press MENU again to hop through data): DC input voltage / Battery voltage / Charge data from last process / Discharge data / Balancing Voltages from last process.
Charging Pb batteries: be careful when charging Pb batteries, as these can not be fast charged. It is recommend to charge with 0.1C (10% of nominal battery capacity) if not mentioned differently. Follow the battery manufacturers guidelines when charging/using Pb batteries as wrong setting may damage your battery!
PROGRAMME STRUCTURE
flowchart
graph TD
    A["P1 MENU\nCharge"] --> B["START"]
    B --> C["Balance\nConn. xS PACK"]
    C --> D["START"]
    D --> E["Charge\nAut ost art: 00mi n"]
    E --> F["START"]
    F --> G["D- Peak: 10mV\nTrickle: Off"]
    G --> H["Ni MH 5.0A 00m35s\n08.58V 0048mAh"]
    H --> I["Done 50m03s\n09.06V 4170mAh"]
    I --> J["Trickle 0.25A\n09.06V 4170mAh"]
    J --> K["Trickle* screen is only available if trickle is not set to „Off”"]

    L["P1 MENU\nDi scharge"] --> M["START"]
    M --> N["Balance\nConn. xS PACK"]
    N --> O["Start"]
    O --> P["Di sch1.0A 0029s\n07.61V 0080mAh"]
    P --> Q["Done Avg. 07.396V\n07.74V 3950mAh"]
    Q --> R["Done 1422s\n07.75V 3950mAh"]

    S["P1 MENU\nCycling"] --> T["START"]
    T --> U["Balance\nConn. xS PACK"]
    U --> V["Start"]
    V --> W["Di sch1.0A 0012s\n06.51V 0033mAh"]
    W --> X["Dolary/Pause"]
    X --> Y["Ni MH5.0A 00m40s\n08.60V 0055mAh"]
    Y --> Z["Dolary/Pause"]
    Z --> AA["Di sch1.0A 0120s\n07.58V 0333mAh"]
    AA --> AB["Done Avg. 07.383V\n07.72V 4023mAh"]
    AB --> AC["Done 1448s\n07.72V 4023mAh"]

    AD["P1 MENU\nBalance"] --> AE["START"]
    AE --> AF["Balance\nSt art ....."]
    AF --> AG["Start"]
    AG --> AH["3.46 3.42 3.52V\n3.50 3.32 3.45V"]
    AH --> AI["Done 3.32 3.32 3.32V"]
    AI --> AJ["Done 3.32 3.32 3.32V"]
REPAIR PROCEDURES / LIMITED WARRANTY
All products from LRP electronic GmbH (hereinafter called "LRP") are manufactured according to the highest quality standards. LRP guarantees this product to be free from defects in materials or workmanship for 90 days (non-european countries only) from the original date of purchase verified by sales receipt. This limited warranty doesn't cover defects, which are a result of misuse, improper maintenance, outside interference or mechanical damage.
„This applies among other things on:
- Cut off/changed original input- and/or output-wires
- Mechanical damage of the case, electronic components or PCB
• Humidity/Water inside the case
• Soldered on the PCB
• Charger disassembly by customer
• Any modification of the charger done by the customer
• Over temperature failures due to blocking the fan or the cooling slots
• Reverse polarity at DC output
To eliminate all other possibilities or improper handling, first check all other components in your model and the trouble shooting guide, if available, before you send in this product for repair. If products are sent in for repair, which do operate perfectly, we have to charge a service fee according to our pricelist.
With sending in this product, the customer has to advise LRP if the product should be repaired in either case. If there is neither a warranty nor guarantee claim, the inspection of the product and the repairs, if necessary, in either case will be charged with
a fee at the customers expense according to our price list. A proof of purchase including date of purchase needs to be included. Otherwise, no warranty can be granted. For quick repair- and return service, add your address and detailed description of the malfunction.
If LRP no longer manufactures a returned defective product and we are unable to service it, we shall provide you with a product that has at least the same value from one of the successor series.
The specifications like weight, size and others should be seen as guide values. Due to ongoing technical improvements, which are done in the interest of the product, LRP does not take any responsibility for the accuracy of these specs.
With LRP 25-Years Warranty products, the warranty terms on the LRP 25-Years Warranty card do also apply. The legal warranty claims, which arose originally when the product was purchased, shall remain unaffected.
LRP-Distributor-Service:
- Package your product carefully and include sales receipt and detailed description of malfunction.
- Send parcel to your national LRP distributor.
• Distributor repairs or exchanges the product - Shipment back to you usually by COD (cash on delivery), but this is subject to your national LRP distributor's general policy.