DVB-T MPEG4 HD - Medienplayer LifeView - Kostenlose Bedienungsanleitung
Finden Sie kostenlos die Bedienungsanleitung des Geräts DVB-T MPEG4 HD LifeView als PDF.

Benutzerfragen zu DVB-T MPEG4 HD LifeView
0 Frage zu diesem Gerät. Beantworten Sie die, die Sie kennen, oder stellen Sie Ihre eigene.
Eine neue Frage zu diesem Gerät stellen
Laden Sie die Anleitung für Ihr Medienplayer kostenlos im PDF-Format! Finden Sie Ihr Handbuch DVB-T MPEG4 HD - LifeView und nehmen Sie Ihr elektronisches Gerät wieder in die Hand. Auf dieser Seite sind alle Dokumente veröffentlicht, die für die Verwendung Ihres Geräts notwendig sind. DVB-T MPEG4 HD von der Marke LifeView.
BEDIENUNGSANLEITUNG DVB-T MPEG4 HD LifeView

www.notonlytv.net
Quick Installation Guide
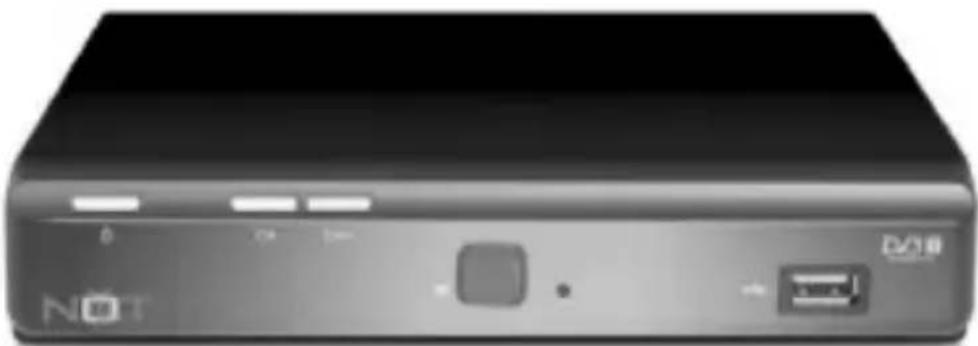
natural_image
Front view of a black rectangular electronic device with ports and indicator lights (no readable text or symbols)MPEG4 HD MULTIMEDIA
RECEIVER & RECORDER
Front Panel
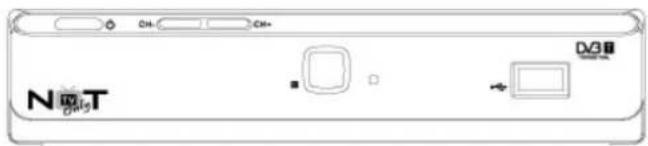
USB HOST 2.0
Back Panel
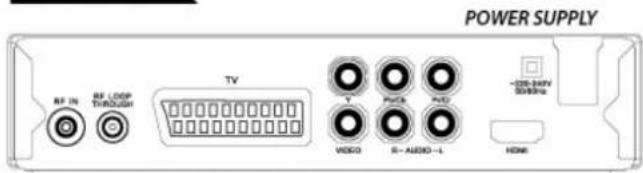
ANTENNA
SCART
AUDIO/VIDEO
CVBS Stereo RCA YUA
HDMI 1080P
INDEX
FIRST TIME INSTALLATION 3
FUNCTIONS 4
Program list / Subtitles / Audio settings of TV programs / Aspect ratio / Information / Teletext / Volume / TV and Radio List / Change Program / Navigation in the Setup Settings / Resolution / EPG / Favourite
RECORDER FUNCTION 6
Live Record / Schedule recording / Photo+Music+Video
MULTIMEDIA FUNCTIONS 8
Photo+Music+Video / Supported file formats / Supported Media /
Multimedia Player
PHOTO/MUSIC/MOVIE
SETTINGS 12
PROGRAM / PICTURE / CHANNEL SEARCH / TIME / OPTION / SYSTEM / USB
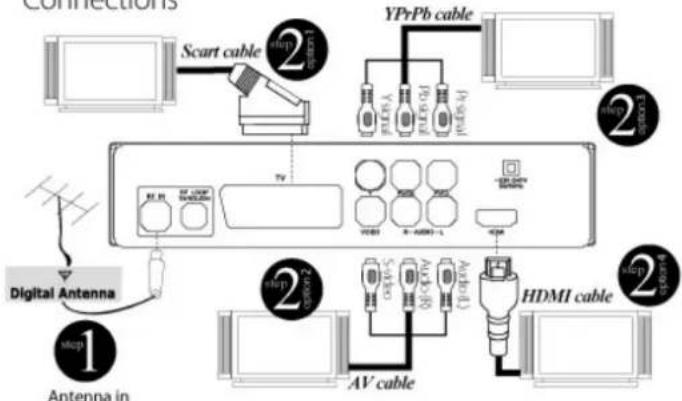
FIRST TIME INSTALLATION
Step 1: plug in Antenna cable
Step 2: you can choose one of 4 options to connect your TV:
Option 1 by SCART cable
Option 2 by AV cable
Option 3 by YPrPb cable
Option 4 by HDMI cable

Connections
flowchart
graph TD
    A["PC"] --> B["Scart cable"]
    B --> C["TV"]
    C --> D["AC/DC"]
    D --> E["AV cable"]
    E --> F["HDMI cable"]
    F --> G["PC"]
    C --> H["AC/DC"]
    H --> I["AC/DC"]
    I --> J["AC/DC"]
    J --> K["HDMI cable"]
    K --> L["PC"]
    style A fill:#f9f,stroke:#333
    style B fill:#ccf,stroke:#333
    style C fill:#cfc,stroke:#333
    style D fill:#fcc,stroke:#333
    style E fill:#cff,stroke:#333
    style F fill:#ffc,stroke:#333
    style G fill:#cfc,stroke:#333
    style H fill:#fcc,stroke:#333
    style I fill:#cff,stroke:#333
    style J fill:#ffc,stroke:#333
    style K fill:#cfc,stroke:#333
    style L fill:#fcc,stroke:#333
Step 3: Plug the power cord to electricity
Step 4: Press from remote control to switch the unit on
Step 5: Choose your own country and language by remote control
Press to run the automatic search.

Step 6: Once that scanning is completed you can start watching TV.
FUNCTIONS
Program list

Retrieve the program list

Next/previous program


Next/previous page

Activating the chosen program

Exit the program list
Subtitles
Pressing

enables subtitles. If subtitles are available for this program you can enable them with

□ Audio settings of TV programs
Access the audio settings by pressing . Change language (only certain programs), choose another audio track (if available) or choose between the audio settings (left / right channel, stereo)
Note: Selecting AC-3 audio track will not work via SCART. When AC-3 is selected the audio is put out via the coaxial output.
□ Aspect ratio
When viewing live pictures you have the possibility to change the aspect ratio directly via the remote control. For changing aspect ratio press The available modes are AUTO 16:9, 4:3 PS and 4:3 Letterbox.
Information
Pressing INFO shows a lot of information. By pressing the INFO button the first time the overview shows up: TV program name, active TV programs, availability of teletext, etc. Pressing it twice shows the EPG information of the current program.
□ Teletext
The teletext is activated via the button.
Navigation: - Numeric for entering teletext sites

Next/previous page

for closing teletext
- RED, GREEN, YELLOW and BLUE for the shown sites


Volume
Change the volume by pressing the
TV and Radio List
To switch from TV to the Radio list, please press the

Change Program
To switch program please press the

□ Navigation in the Setup Settings
With the Navigate in settings please use the buttons of the navigation cross

Resolution
To change the video output resolution please press on the remote control. You can set the resolution 720p to 1080i to 576i to 576p and back to 720p.
□ EPG
The EPG is an on-screen TV guide that shows scheduled programs seven days in advance for every tuned channel. Press to access guide. You can use the key to select the preferred program.
If there is more than one page of information, use the BLUE ● for page up and the YELLOW ● for page down.
Additional buttons to navigate are:

Apply to timer programming

Shows timer programming

Next/previous program

Change TV program

Next 7-day-Page

Exit timer programming
Favourite
If you have configured favourites

shows the list of favourites.

Starting chosen TV program

Next/previous program

Next/previous page of favourites

Exit favourites list
RECORDER FUNCTION
You have to plug a USB Memory or external Hard disk to access to Multimedia functions:

Live Record: Press

from remote control to start recording


to stop recording.

Schedule recording: Press from remote control to set day and
channel for your recording. Then save your recording data choosing
***Mode setup has to be set to "RECORD" for schedule recording.

Photo+Music+Video: Press , select "USB", press two
times 📄 and enjoy all your multimedia files (Audio, video and music).
IMPORTANT NOTICE: Supports Flash memory USB 2.0 and 3.5" External Hard disk in FAT/Fat32 format. If the external Hard disk is above 500GB please hold 50 seconds before changing channels to allow the device to upload the files.
All recorded broadcast can be access by the button on the remote control. The record list appears on the screen.
The navigation are:

Select video to play in preview window
Next/previous recording
Switch full screen/preview
Changes layer
Delete recording
Rename recording

Exit recording list
Fast forward
Fast backward
Pause. Pressing again continues playing
EXIT/STOP Exit playing, changing back to recording list

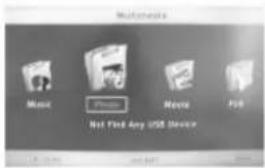
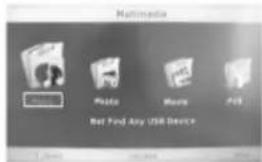
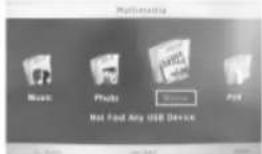
MULTIMEDIA FUNCTIONS
You have to plug a USB Memory or external Hard disk to access to Multimedia functions:

music+Video: Press

select "USB", press two

"USB", press two
Supported file formats: Pictures (JPEG, GIF), Music (MP3, WMA) or video files (MPEG-1, MPEG-2, MPEG-4)
Supported Media : The USB port supports a set of different sizes of flashdrives. Use a USB flashdrive with a minimum of 8GB for recording. Smaller media are maybe too slow for recording.

Multimedia Player

PHOTO
For viewing photos connect the USB media and enter the menu item Photo.
If there are pictures in this directory they are listed in the file browser and a preview is shown on the right. It is possible to play music while browsing in the pictures. Choose a music file before you go to the picture browser.
Navigating in the file browser

Show picture in fullscreen

Previous directory

Start slide show (all pictures in the directory)

Exit to multimedia menu

Next/Previous picture
Slide show
Start the slide show with

or

The slide show will proceed according to the settings in the USB menu.

Next picture

Previous picture
Rod

Zoom picture (Normal->x2->x4->x8->Normal->x1/4->x1/2)
Green

Rotate picture 90"
Yellow

Rotate picture 90"

Show information of the picture like file name, resolution and file size

Exit to file browser
MUSIC
For listening music connect the USB media and enter the menu item Music.
After initialising the USB media the directory structure is shown. Choose the directory

and enter with

If there are music files in this directory they are listed in the file browser. ID Tags are also shown.

Play

Stop

Next TRACK

Previous TRACK.

Pause

Exit to multimedia
menu

Increase / Decrease volume
Fast Forward
If you press while playing music the BLUE button, then you start the fast forward. Each press the BLUE button increases the speed. Switch
to normal speed with


The zooms change as follows:
x1 -> x2 -> x3 -> x4 -> x8 -> x16 -> x32 -> x1
Supported formats
Formats: MP3, WMA, AAC
Sampling frequencies: 8-48kHz (MP3) or 32 - 48kHz (WMA)
Bitrate: 8 - 320 kbps (MP3) or 32 - 192 kbps (WMA)
MOVIE
For playing MOVIE connect the USB media and enter the menu item Movies.
Please pay attention to following rules:
- The resolution of the movies should be not exceeding 1920 x 1080
- The file name should not be exceeding 15 letters
-
Supported containers: AVI, DIVX, MKV, MP4, MPG, VOB, MOV.
-
Supported codex: Should be created with established standards.
MPEG-2: ISO/IEC13818, MPEG-4 ISO/IEC 14496
- Supported transport streams: MPG, TS, TRP
- Supported subtitles: Subrip (SRT), Micro-DVD (SUB), Sami (SMI). Internal subtitles are not supported
-
Supported audio formats are:
-
MPEG-4 files: AC3, MP3, AAC (LC or HE)
- MPEG-2: MP2/MPA, AC3
NOTES:
The variety of different video codes, audio codes, video container and PC programs, it is possible that some video files are not supported. Although each part considered individually (e.g., H.264, AC3, MP4) which can lead to a combination of non-playable files.
After initialising the USB media the directory structure is shown. Choose
the directory with


and enter with

If there are movie files in this directory they are listed in the file browser.
Navigating in the file browser

Next/Previous file

Play / Open directory

Previous directory

Exit to multimedia menu

Preview / Full screen
Navigating while playing
If you press OK the movie is shown in the preview window on the right. Switch to full screen with RED .
Press for playing directly in full screen.

Show information like play time (current and over all) file name etc.

Exit to file browser (the movie continues in preview window)

Exit to file browser (the movie continues in preview window)


Fast forward/backward

Next Movie

Previous Movie

Pause

PROGRAM
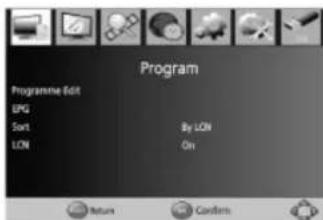
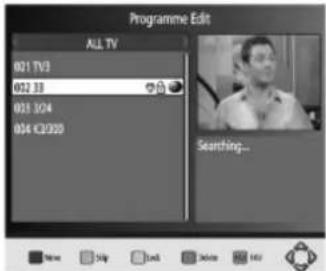
Program Edit
You have the possibility to sort / edit the channels as you wish. You need a password for access (888888).
Move Channels
If you wish to move a channel press RED, Now choose channel you want to move with and press RED. The chosen channel is highlighted now. Move the channel to the new position with and press. The channel is dropped on this position.
Skip Channels
If you wish skip a channel press GREEN. Now choose channel you want to skip with and press GREEN. The chosen channel is highlighted now with "SKIP".
Lock Channels
If you wish to lock a channel press YELLOW. Now choose channel you want to move with and press YELLOW. The chosen channel is highlighted with a lock symbol now. If you want to watch to a locked channel you have to type the password after choosing the channel (0 0 0 0 0 0).
Delete Channels
If you wish to delete a channel press BLUE. Now choose channel you want to delete with and press BLUE. A security query appears if you really want to delete the channel or not. To confirm press to decline press. After confirming the channel is deleted instantly.
Favourites
If you wish to define a channel as favourite press. Now choose channel you want to add to favourites with and press and choose a category (Video, News, Sport, Music). Press to add the channel to the chosen category. The channel is now highlighted with a heart symbol.
Rename Channels
If you wish to rename a channel press . Now choose channel you want to rename with and press . Now type in the new name and navigate to the OK field and confirm with OK .
Sort Channels
This option sorts the channels according to the specifications (Standard, LCN).
LCN
With this option you can display the logical channel numbers.
Using the

button to activate the option on or off.

PICTURE
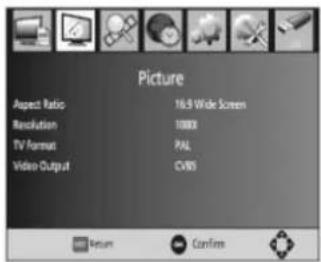
Aspect Ratio
With this menu you set the type of your TV. Please mind your aspect ratio of your TV.
- Auto
-16:9 Fullscreen - 4:3 PanScan
- 4:3 Letterbox
NOTE: Usually AUTO affords the optimal effect.
Resolution
Define the HDMI output resolution
- 576i (PAL) / 480i (NTSC)
- 576p (PAL) / 480p (NTSC)
-720i
-1080i
NOTE: Please use the resolution of your TV e.g.: 720p for HD-Ready TVs or 1080i for Full-HD TVs.
TV Format
Choose between PAL, NTSC or AUTO.
NOTE: Usually AUTO affords the optimal effect.
Video Output
Choose the type of SCART output. You can choose between RGB and FBAS (CVBS). If your TV supports RGB you should choose RGB because it affords a better video quality than FBAS.

CHANNEL SEARCH
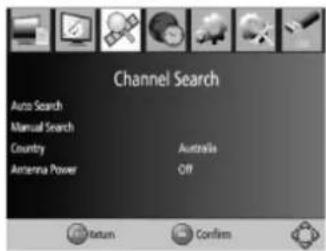
Auto Search
Enabling this option will start the automatic search of itself, the language and country parameters are taken from the default settings.
Manual Search
If you find a TV channel or multiple TV channels were not found, then you have the opportunity to start a manual scan. Depending on the country selection appears different in the channel name, frequency and bandwidth
values. Using the

keys to change the channel name

(frequency channel). Restart the manual search, where you pressing
Now the window switches to the search and the search results are displayed.
Country
Using the

keys to change the country.
Antenna Power
With this option you can activate voltage at the antenna output on or off.

TIME
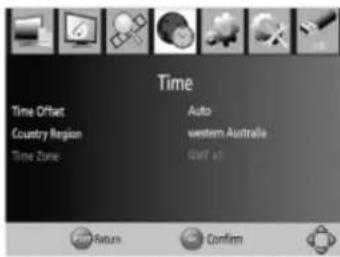
Time Offset
If you enable this function the time is extracted from the digital data constantly.
Time Zone
Define the time zone you are in.
Country Region
This parameter can be changed only if there is one country in different time zones.

OPTION
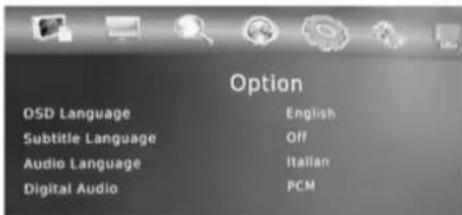
OSD / Subtitle / Audio Language
Define the OSD / Audio / Subtitle Language.
Digital Audio
Here you can switch on/off the digital audio output and choose the type of digital audio.
Off: Deactivate digital audio
PCM: Digital audio output (PCM format)
RAW: All types digital audio

SYSTEM
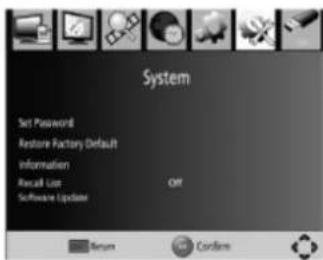
Set Password
Change your password. At first you have to confirm the old password (standard 8 8 8 8 8 8). After confirming the old password type in the new password and repeat it. If all data was correct the new password is active.
Restore Factory Default
Restore ALL settings to factory defaults. ALL changed settings will be lost.
Information
Shows information about soft- and hardware.

USB
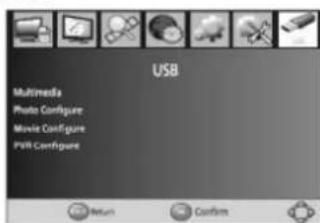
Photo configure
Slide Time — Define the duration for every picture in the slide mode (1-8sec)
Slide Mode — There are 59 different types of slide effects. Random is also possible.
Aspect Ratio — Choose weather the aspect ratio of your pictures should be original or changed to full screen (DISCARD). DISCARD can cause deformations of the pictures.
NOTES: We recommend following settings: Slide Time: 8sek Slide Mode: Random Aspect Ratio: Keep
Movie configure
These settings are only for external Subtitles.
Subtitle Specific — Define the size of subtitles
Subtitle BG — Choose between transparent and coloured background
Subtitle Letters — Define the colour of the subtitle letters
Formats — Supported formats
- Micro DVD (SUB)
• Subrip (SRT)
• Sami (SMI)
Please be sure that movie and subtitle are named equal e.g.: Movie.avi, Movie.srt
It is also possible to use 2 languages: Movie.avi, Movie.ger.srt, Movie.eng.srt
PVR Settings
Information about USB media is shown here. You can also format you USB medi
Recorder — Information about the recorder
• Type of media (usually FAT32)
• Entire memory
• Free memory
Only FAT32 formatted USB media is supported. Media with multiple partitions are only shown if FAT32 partitions are available.
Format — You have the possibility to format you USB media. Formatting is only possible in FAT32 mode.
REMOTE CONTROL
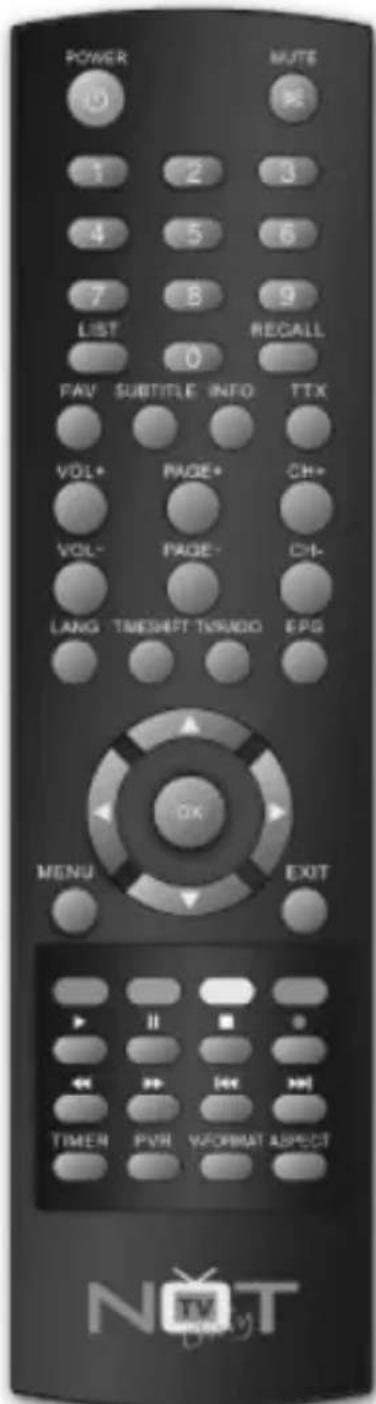
POWER: Switch the receiver in and out of Standby mode.
<0>-<9>: Numeric keys.
CH-/CH+: Program changing keys.
MENU: Display main menu on TV screen, and press again to disappear menu.
OK: To confirm current setting, or display channel list in no-menu mode.
VOL-/VOL+: To increase / decrease volume.
:Press to move the cursor
EPG: Shows the electronic program guide.
FAV: Displays your favorite channels list. Press FAV again to access to the other favorite lists.
V-FORMAT: Switch the HDMI 720P and 1080i.
RECALL: Go back to the previous viewed channel.
Red/Green/Yellow/Blue: Use to navigate between pages in teletext mode and special functions in Menu or EPG.
TXT: Switch on Teletext, if current channel has this option, and use EXIT key to quit Teletext.
SUBTITLE: Display subtitle options (availability depends on the channel).
LANG: Change the Audio language and Left/Right channel (availability depends on the channel).
EXIT: Use this key to quit current menu.
INFO: Display information about the current channel.
TV/RADIO: Switch between digital radio and DVB-T modes.
MUTE: To navigate inside the menu us.
PAGE+/PAGE-: To navigate inside the menus.
ASPECT: Switch 4:3/16:9.
TIMESHIFT: Use after RECORD button for timeshift.
TIMMER: Use to access ON/OFF timer directly.
PVR: Use to access recorded content in USB drive
Multimedia Keys:
| PLAY | PAUSE | STOP | REC |
| REW | FF | PREV | NEXT |