NVR-2350 - Dvd player NEVIR - Kostenlose Bedienungsanleitung
Finden Sie kostenlos die Bedienungsanleitung des Geräts NVR-2350 NEVIR als PDF.

| Produkttyp | DVD-Player |
| Marke | Nevir |
| Modell | NVR-2350 |
| Abmessungen (B x T x H) | 360 x 240 x 45 mm |
| Gewicht | 1,5 kg |
| Stromversorgung | 220–240 V, 50 Hz |
| Energieverbrauch (Betrieb/Standby) | < 10 W / < 1 W |
| Unterstützte Disc-Formate | DVD, DVD±R/RW, CD, CD-R/RW |
| Videoausgänge | HDMI, Composite (Cinch), Component (YUV) |
| Audioausgänge | Stereo-Cinch, Digital koaxial |
| USB-Anschluss | Ja, für Mediatypen wie DivX, MP3, JPEG |
| Wiedergabefunktionen | Zufallswiedergabe, Wiederholung, Programmwiedergabe |
| Untertitel-Unterstützung | Ja |
| Kindersicherung | Ja, per PIN-Code |
| Fernbedienung | Ja, enthalten |
| Menüsprachen | Mehrsprachig (u. a. Deutsch, Englisch) |
| Reinigung | Staubtuch verwenden; keine aggressiven Reinigungsmittel |
| Sicherheitshinweise | Nur für Innenräume; bei Gewitter Netzstecker ziehen |
| Reparatur und Ersatzteile | Über den Kundendienst oder Fachhändler |
Häufig gestellte Fragen - NVR-2350 NEVIR
Benutzerfragen zu NVR-2350 NEVIR
0 Frage zu diesem Gerät. Beantworten Sie die, die Sie kennen, oder stellen Sie Ihre eigene.
Eine neue Frage zu diesem Gerät stellen
Laden Sie die Anleitung für Ihr Dvd player kostenlos im PDF-Format! Finden Sie Ihr Handbuch NVR-2350 - NEVIR und nehmen Sie Ihr elektronisches Gerät wieder in die Hand. Auf dieser Seite sind alle Dokumente veröffentlicht, die für die Verwendung Ihres Geräts notwendig sind. NVR-2350 von der Marke NEVIR.
BEDIENUNGSANLEITUNG NVR-2350 NEVIR
nevir®
NVR-2350DVD-HDUG
Reproductor DVD con TDT de Alta Definición

MANUAL DE INSTRUCCIONES
Lea el manual con atención antes de usar el producto
NOTAS IMPORTANTES

Este símbolo advierte al usuario que el interior del producto contiene alto voltaje que supone gran peligro.

Para reducir el riesgo de descarga eléctrica o incendio, no a abra la cubierta. Para reparación, acuda a personal de servicio técnico cualificado.

Este símbolo advierte al usuario importantes instrucciones de uso.

Este símbolo indica que esta unidad contiene productos láser de clase I.
Advertencias:
- Para prevenir riesgos de incendio o descarga eléctrica, no exponga esta unidad a la lluvia o a la humedad. En su interior contiene componentes de alto voltaje, por lo que no debe tratar de abrir la cubierta. Únicamente se permite el mantenimiento de la unidad a personal de servicio técnico cualificado.
Precaución:
- Este reproductor de DVD contiene un sistema diodo láser de clase 1.
- Lea atentamente este manual y familiarícese con las instrucciones antes de utilizar la unidad.
- Una vez leído este manual, consérvelo para futuras consultas.
- Para evitar la radiación láser directa, no trate de abrir la cubierta. Cuando ésta se abra o cuando el dispositivo de cierre se libere, irradiará un rayo láser visible. ¡No mire al rayo láser!
- Para evitar dañar la óptica laser de la unidad, no tire ni empuje la bandeja del cargador mientras esté funcionando. Apague la fuente de alimentación únicamente cuando se muestra "NO DISC".
- No coloque nunca objetos sobre la unidad ya que pueden afectar a la reproducción o dañar el dispositivo.
- Si el enchufe y el conector se usan como un dispositivo de conectar y desconectar, deben ser utilizados sin brusquedad.
- Mantenga la unidad lejos del agua o de alta humedad y evite poner sobre la unidad cualquier utensilio que contenga líquido, como puede ser un florero.
CONTENIDO
| NOTAS IMPORTANTES | Página 1 |
| Instrucciones de Seguridad | Página 1 |
| Formatos Compatibles | Página 2 |
| SOBRE LA UNIDAD | Página 3 |
| Elementos del Panel Frontal | Página 3 |
| Elementos del Panel Trasero | Página 3 |
| Mando a Distancia | Página 4 |
| Mando a Distancia: Teclas y Funciones | Página 5 |
| CONEXIONES | Página 6 |
| Conexión del Sistema | Página 6 |
| Conexión a la Antena | Página 6 |
| SISTEMA DEL MENÚ DE CONFIGURACIÓN DEL REPRODUCTOR DVD | Página 7 |
| Configuración General del Menú de Configuración | Página 7 |
| Configuración del Sistema | Página 7 |
| Configuración de Idioma | Página 9 |
| Configuración de Audio | Página 9 |
| Configuración de Video | Página 10 |
| Configuración de Altavoces | Página 10 |
| Configuración Digital | Página 11 |
| CONFIGURACIÓN DEL TDT | Página 12 |
| Guía de Instalación | Página 12 |
| Menú | Página 12 |
| Menú Principal | Página 12 |
| Uso Diario | Página 15 |
| Tecla Info. | Página 15 |
| Tecla Audio | Página 15 |
| Tecla SUB | Página 15 |
| Tecla PREV/NEXT y REV/FWD . | Página 16 |
| GEP (Guía Electrónica de Programas) | Página 16 |
| Lista de Canales de Televisión y Radio | Página 16 |
| Canales Favoritos | Página 16 |
| Función PVR (Grabación) | Página 17 |
| Especificaciones Técnicas | Página 20 |
| Guía de Solución de Problemas | Página 21 |
INSTRUCCIONES DE SEGURIDAD
Lea con atención las instrucciones de seguridad, advertencias y precauciones antes de utilizar el aparato. Guarde bien este manual para futuras consultas.
Observe bien todas las advertencias, precauciones e instrucciones en la Instrucción de uso
INSTALACIÓN
- No use este aparato cerca del agua o en un ambiente húmedo por ejemplo, una bañera, lavabo, fregadero, lavadero, sótano húmedo, cerca de una piscina... etc.
- No coloque esta unidad en superficies poco firmes ya que puede caerse y producir daños tanto a niños como a adultos.
- No coloque la unidad sobre la cama, sofá, manta o elementos similares.
- No coloque la unidad en espacios reducidos, tales como estanterías o armarios empotrados a no ser que haya ventilación adecuada.
- Las ranuras y las aperturas en la carcasa son para su necesaria ventilación. Para asegurar el uso del aparato y protegerlo de sobrecalentamiento, estas ranuras y aperturas NO pueden estar bloqueadas o tapadas. No cubra nunca las ranuras y aperturas con paño u otros materiales.
- No coloque este aparato cerca o encima de un radiador, un calentador o donde esté directamente expuesto a la luz solar.
- Este aparato debe exclusivamente usarse con el tipo de fuente de alimentación eléctrica indicada en la etiqueta comercial. Si usted no está seguro del tipo de fuente de alimentación de su casa, por favor consulte a su distribuidor o la compañía eléctrica local.
- Cuando no esté en funcionamiento, especialmente cuando el aparato no se utilice por un tiempo prolongado, desenchúfelo de la toma de corriente. No tire del cable para desenchufar la unidad.
OTRAS OBSERVACIONES IMPORTANTES
- Para una protección extra de este aparato durante una tormenta con relámpagos, o cuando nadie lo use durante un largo periodo de tiempo, desenchúfelo de la toma de corriente y desconecte la antena. Al hacerlo puede prevenirle daños al aparato producidos por los relámpagos o aumentos de tensión en la toma eléctrica.
- Desenchufe el aparato antes de limpiarlo. No use quitamanchas de líquido o de aerosol. Limpie el exterior del aparato con un paño ligeramente húmedo.
- Desenchufe el aparato de la toma de corriente y consulte a personal de servicio técnico cualificado si observa que el cable de alimentación está dañado.
- No sobrecargue la toma eléctrica; Las regletas múltiples no deben ser usadas por encima de su capacidad o de la de la toma de corriente ya que puede provocar incendios o descargas eléctricas.
- Fije el cable de alimentación para evitar ser pisado o presionado contra objetos colocados sobre o contra él. Preste atención particularmente a los enchufes, receptáculos y el punto de salida del cable desde la unidad.
- Nunca introduzca objetos de ningún tipo en el aparato a través de las aperturas ya que pueden tocar puntos de voltaje peligrosos y/o causar cortocircuitos, que pueden derivar en un incendio o descarga eléctrica. Nunca derrame líquido de ningún tipo en el aparato.
- No trate de reparar el aparato por usted mismo ya que al abrir o quitar la cubiertas puede dejarle expuesto a alto voltaje peligroso u otros riesgos. Para cualquier reparación, consulte a personal de servicio técnico cualificado.
- Contacte con un técnico de servicio cualificado si:
1.- El aparato no funciona normalmente cuando, siguiendo las instrucciones de uso, usted hace ajustes indicados en las mismas. Ajustes no indicados pueden causar daños y en consecuencia requerir de un técnico cualificado para recuperar el funcionamiento normal del aparato.
-
- El aparato ha sufrido un fuerte golpe o la carcasa ha sido dañada.
3.- El aparato no parece funcionar normalmente o presenta un cambio notable en su rendimiento, que puede indicar la necesidad de reparación.
4.- Se ha derramado líquido en él, o algún objeto ha golpeado contra el mismo.
5.- El aparato ha sido expuesto a la lluvia o al agua.
NOTAS IMPORTANTES
- Generalmente esta unidad reproduce discos CD-R, CD-RW y MP3, aunque CD-R y CD-RW no se indiquen en el display. Sin embargo, dada la variedad de los tipos de disco, sistemas de grabación, sistemas operativos y softwares de grabación, no podemos garantizar que se puedan reproducir todo tipo de discos CD-R o CD-RW. Esta unidad no reproduce DVD-ROM, CD-ROM y es imposible reproducir discos en sistema de color SECAM, ya que sólo reconoce PAL y NTSC.
El tipo de funciones y operaciones aplicables para un disco en particular depende de las características del mismo. A veces, las funciones pueden diferir de las descripciones en este Manual de Instrucciones. En este caso, siga las instrucciones dadas en la pantalla. El presente manual sólo cubre los usos básicos del disco, así que usted debería leer también las informaciones adjuntas al disco.
Si el signo INVALID KEY (tecla no válida) aparece en la pantalla, será porque usted ha tratado de activar una función restringida en la fabricación del disco.
FORMATOS COMPATIBLES
| Tipo de disco | Símbolo | Contenido |
| DVD |  | Audio-Vídeo digital compacto |
| MPEG4 |  | Audio-Vídeo digital compacto |
| Video-CD (VCD) |  | Audio-Vídeo digital compacto |
| Super-VCD (SVCD) |  | Audio-Vídeo digital compacto |
| CDDA |  | Audio digital |
| MP3 |  | Audio digital compacto |
| Kodak Picture CD |  | Imágenes estáticas digitales compactas |
| JPEG |  | Imágenes estáticas digitales compactas |
- Toda reparación y servicio técnico debe ser realizado por especialista cualificados de centros de servicio.
- Todas las imágenes que aparecen en este manual son esquemáticas y puede diferir de las imágenes reales.
ELEMENTOS DEL PANEL FRONTAL

natural_image
Simple line drawing of a rectangular structure with two vertical supports and two horizontal supports, no text or symbols present.
- Puerta del disco DVD
- Botón ENCENDIDO
- Sensor de señal del mando a distancia
- Display
- Botón ABRIR/CERRAR
- Botón REPRODUCIR/PAUSA
- Ranura USB
- Botón PARAR
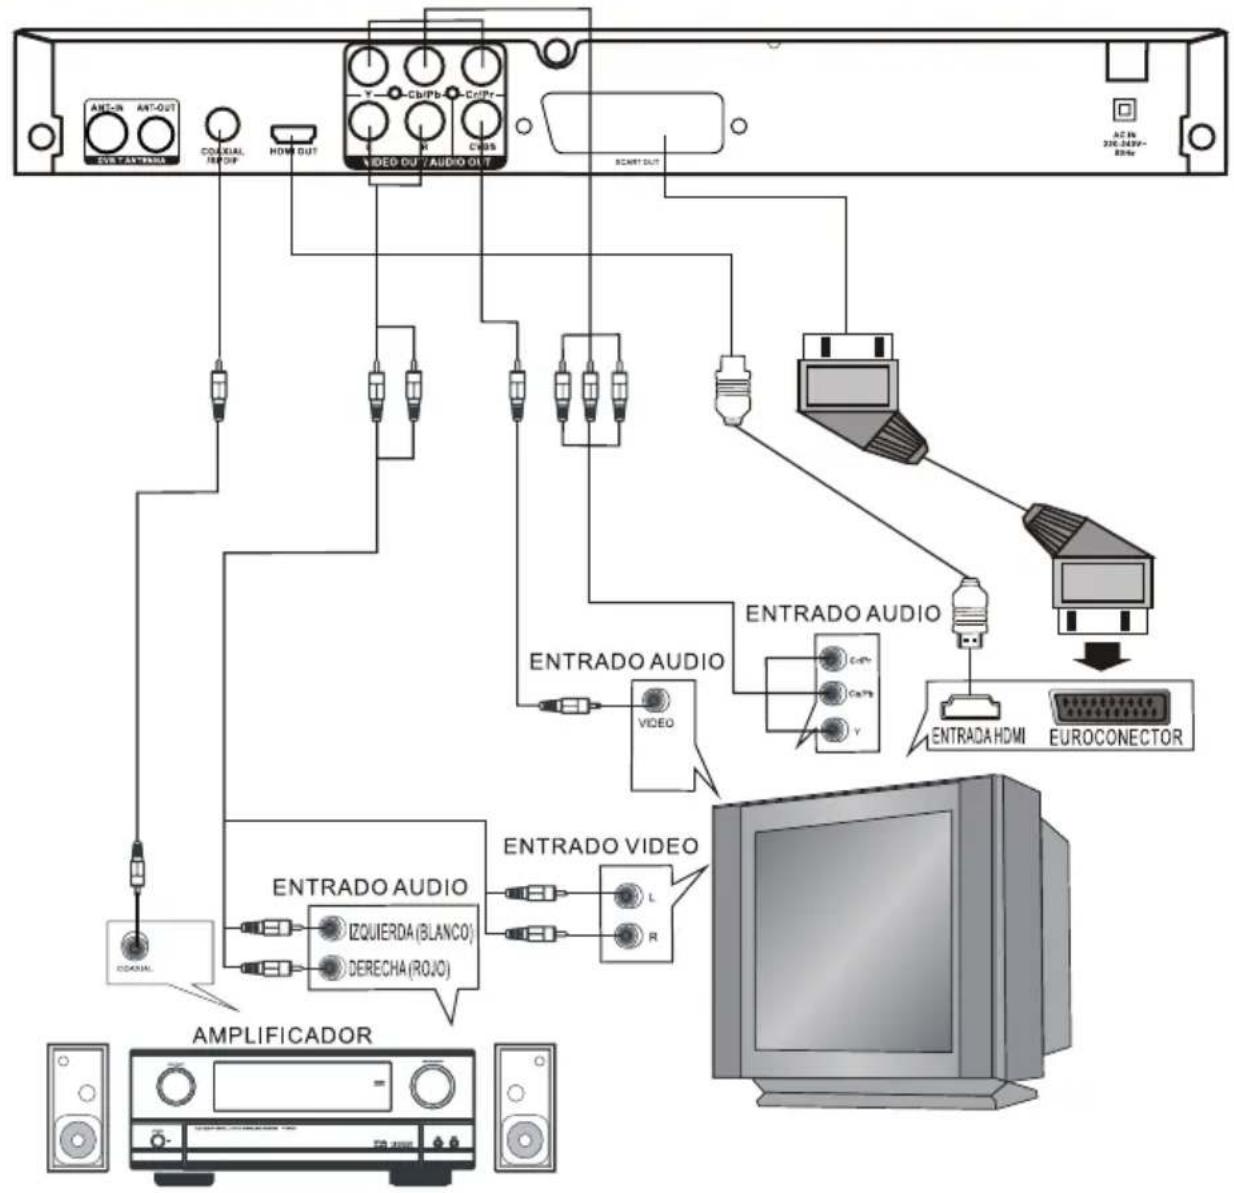
ELEMENTOS DEL PANEL TRASERO
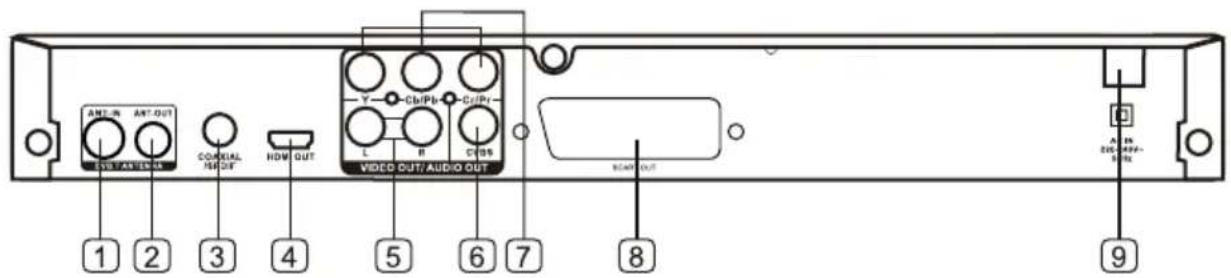
- Entrada de Antena (Conéctela con RF)
- Salida de Antena (Conéctela con otro televisor)
- Salida Coaxial Digital
- Salida HDMI
- Salida de Audio Estéreo Derecho/Izquierdo (R/L)
- Salida de Vídeo
- Salida por componente Y Cb/Pb Cr/Pr
- Euroconector
- Cable de alimentación a fuente de alimentación de 220V-240V\~
MANDO A DISTANCIA
Observaciones:
Al usar el mando a distancia, diríjalo al sensor infrarrojo de la unidad (con un ángulo de unos 45 grados.)
No coloque el mando a distancia cerca de fuentes de calor o en un ambiente húmedo o mojado.
No sumerja el mando a distancia en el agua ni en ningún otro líquido.
No use al mismo tiempo pilas viejas y nuevas y siempre use el mismo tipo de pilas
Cambie las pilas cuando vea que el mando a distancia no funciona o lo hace intermitentemente.
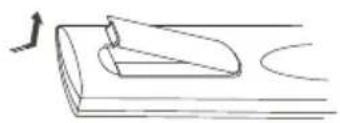
Insertar las pilas del mando a distancia:
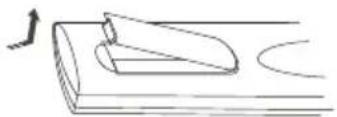
natural_image
Simple line drawing of a mechanical component or tool with an arrow indicating direction (no text or symbols)- Quite la tapa siguiendo la dirección de la flecha.
- Inserte dos pilas de 1,5V AAA, asegurándose colocarlas en la polaridad correctas (+ y -).

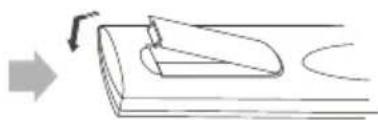
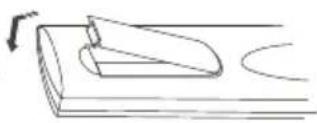
natural_image
Simple line drawing of a mechanical component with an arrow indicating rotation (no text or symbols)- Ponga de nuevo la tapa de las baterías.
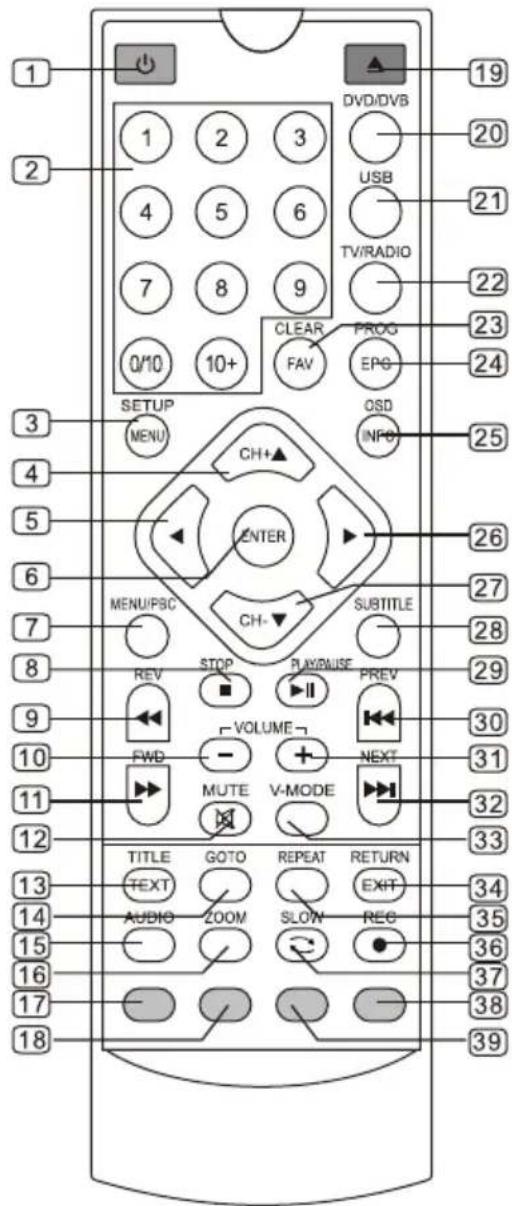
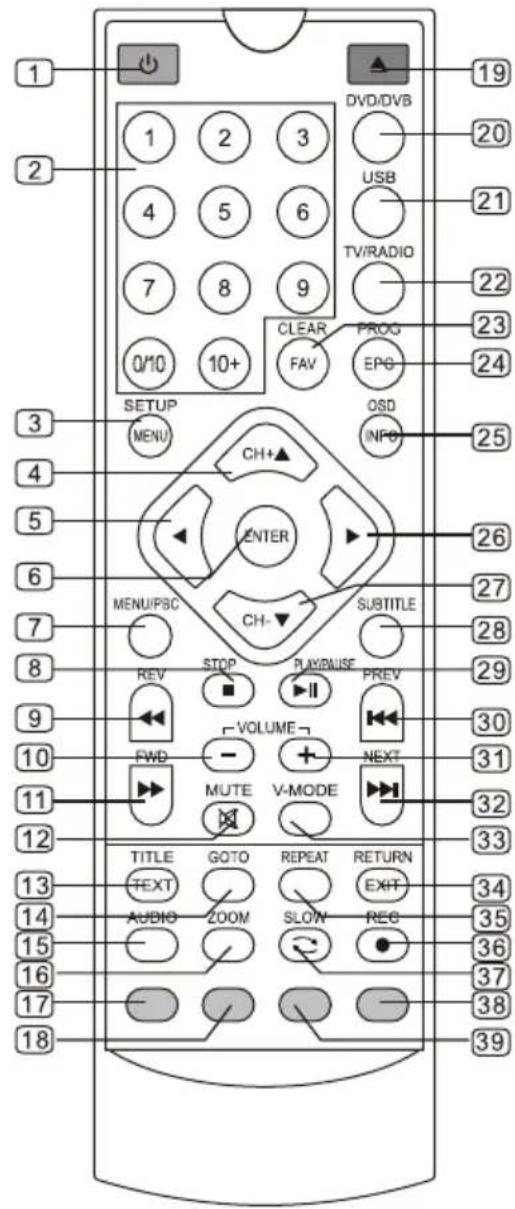
MANDO A DISTANCIA: TECLAS Y FUNCIONES
| Núm. | Nombre/símbolo | Función en modo de DVD | Función en Modo de TV digital |
| 1 | ENCENDIDO | Encendido/En espera | Encendido/En espera |
| 2 | 0-10+ | Elegir pista o capítulo | Cambiar de canalIntroducir números y letras en el menú |
| 3 | CONFIGURACIÓN /MENÚ | Entrar en el menú de configuración de DVD | Entrar en el menú de configuración del TDT |
| 4 | ▲ | Subir en las opciones de menú | Subir en las opciones de menúCambiar canales en orden ascendente |
| 5 | Mover a la izquierda en las opciones de menú | Mover a la izquierda en las opciones de menú | |
| 6 | ENTRAR | Pulsar para confirmar selección | Pulsar para confirmar selección |
| 7 | PBC/MENÚ | Display /Salir del menú de DVD | Sin función |
| 8 | PARAR | Detener la reproducción | Detener la operación en modo grabación.Timeshift o reproducción de archivo por USB. |
| 9 | REV | Retroceso rápido | Retroceso rápido para la función de reproducción de archivos por USB |
| 10 | VOL- | Bajar volumen | Bajar volumen |
| 11 | FWD | Avance rápido | Avance rápido para la función de reproducción de archivos por USB |
| 12 | MUDO | SILENCIO | SILENCIO |
| 13 | TÍTULO/TEXTO | Elegir el título del DVD /No función | No función/Empezar y detener el teletexto digital |
| 14 | IRA | Ir al título/capítulo/duración del DVD que desee ver. | Cuando reproduzca archivos con formato MPEG4, H264, MKV se habilitara esta función |
| 15 | AUDIO | Elegir el idioma de audio | Elegir el idioma de audio |
| 16 | ZOOM | Reducir/ampliar la salida de vídeo | Reducir/ampliar la salida de vídeo |
| 17 | TECLAROJA | Sin función | Tecla de función auxiliar |
| 18 | Botón VERDE | Sin función | Tecla de función auxiliar |
| 19 | ABRIR/CERRAR | Abrir o cerrar tapa de DVD | Sin función |
| 20 | DVD/DVB | Cambiar entre modo DVD/TDT | Cambiar entre modos DVD/TDT |
| 21 | USB | Sin función | Cambiar entre modos DVD/USB |
| 22 | TV/RADIO | Sin función | Cambiar entre canales de televisión o radio |
| 23 | BORRAR/FAV | Borrar el contenido en la pantalla | Cambiar la configuración de los canales favoritos |
| 24 | PROG/EPG | Cambiar el orden de reproducción | Mostrar o salir de GEP (Guía Electrónica de Programas) |
| 25 | OSD/INFO | Mostrar título/capítulo/tiempo | Mostrar información sobre el programa de Televisión |
| 26 | Mover a la derecha en las opciones de menú | Mover a la derecha en las opciones de menú | |
| 27 | Bajar en las opciones de menú | Bajar en las opciones de menúCambiar canales en orden descendente | |
| 28 | SUBT | Elegir subtítulos | Cambiar opciones subtítulos ON/Off |
| 29 | REPRODUCIR/PAUSA | Reproducir disco/ Pausa | Función Timeshift , Pausa en archivos de USB |
| 30 | ANTERIOR | Saltar al capítulo o pista anterior | Saltar al archivo anterior en archivos de USB |
| 31 | VOL+ | Subir Volumen | Subir Volumen |
| 32 | SIGUIENTE | Saltar al capítulo o pista siguiente | Saltar al archivo siguiente en archivos de USB |
| 33 | MODO-V | Elegir el formato de salida de vídeo | Elegir resolución de alta definición |
| 34 | SALIR/REGRESAR | Salir del DVD /regresar al menú | Salir de TDT |
| 35 | REPETIR | Repetir el título o el capítulo | Sin función |
| 36 | REC | Sin función | Inicio de grabación de canal de televisión/radio/función de PVR |
| 37 | LENTO | Regresar a las funciones de programa | |
| 38 | Botón AMARILLO | Sin función | Botón de función auxiliar |
| 39 | Botón AZUL | Sin función | Botón de función auxiliar |


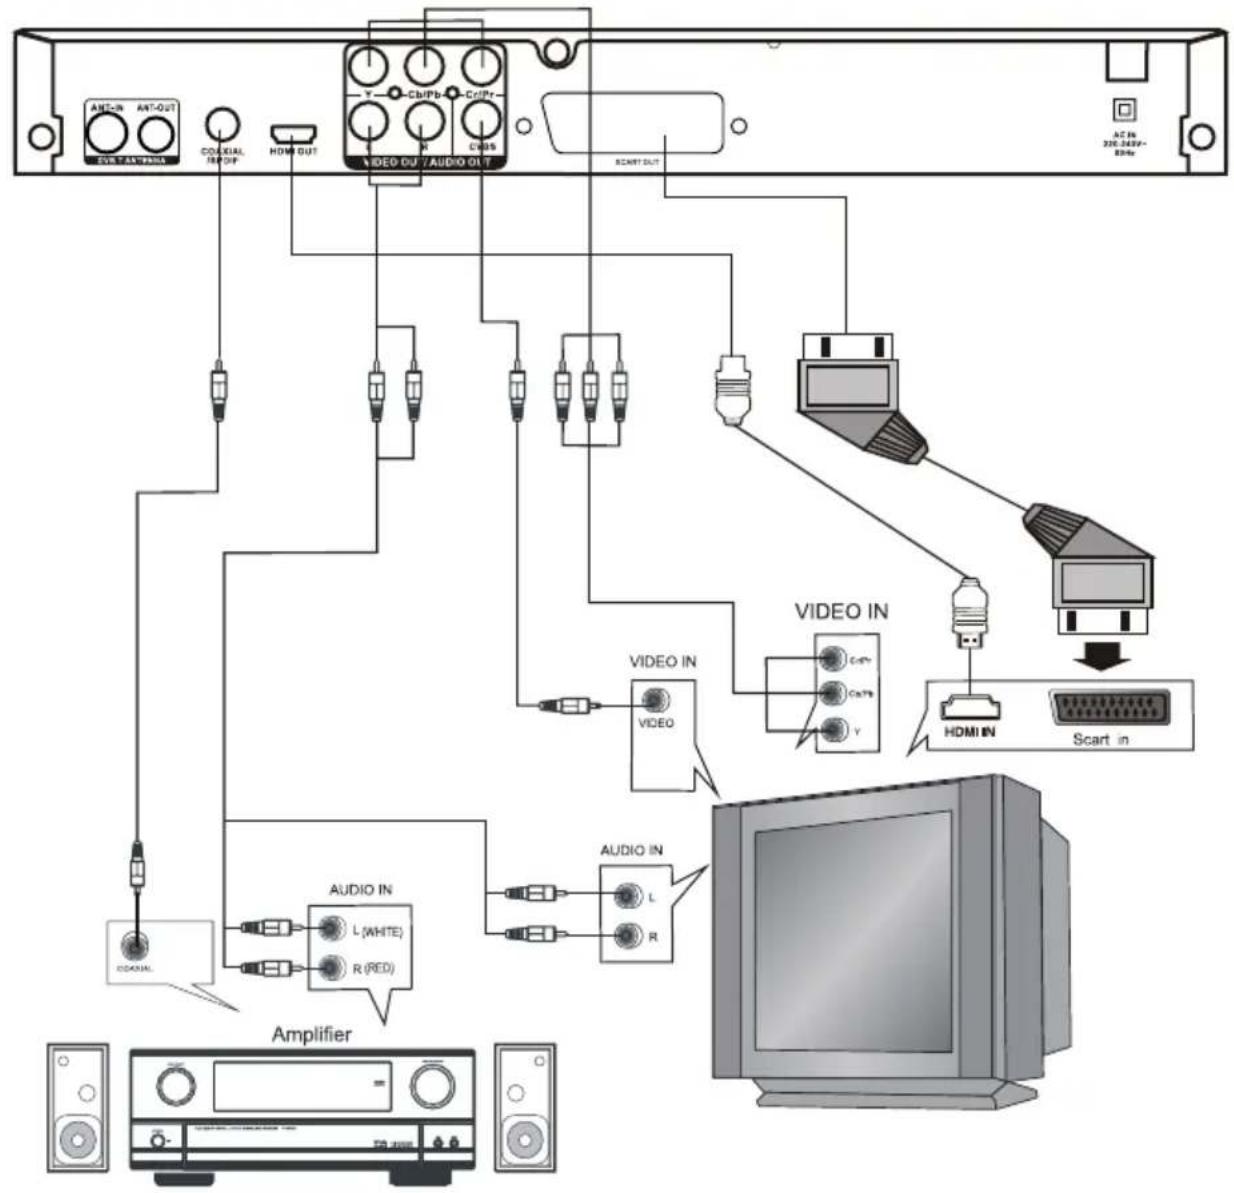
CONEXIONES DEL SISTEMA
flowchart
graph TD
    A["AMPLIFICADOR"] --> B["EXTRACTION"]
    B --> C["VIDEO CU /AUDIO OT"]
    C --> D["ACIN 320-243P-85Hz"]
    C --> E["VIDEO"]
    C --> F["VIDEO"]
    C --> G["VIDEO"]
    C --> H["VIDEO"]
    C --> I["VIDEO"]
    C --> J["VIDEO"]
    C --> K["VIDEO"]
    C --> L["VIDEO"]
    C --> M["VIDEO"]
    C --> N["VIDEO"]
    C --> O["VIDEO"]
    C --> P["VIDEO"]
    C --> Q["VIDEO"]
    C --> R["VIDEO"]
    C --> S["VIDEO"]
    C --> T["VIDEO"]
    C --> U["VIDEO"]
    C --> V["VIDEO"]
    C --> W["VIDEO"]
    C --> X["VIDEO"]
    C --> Y["VIDEO"]
    C --> Z["VIDEO"]
    C --> AA["VIDEO"]
    C --> AB["VIDEO"]
    C --> AC["VIDEO"]
    C --> AD["VIDEO"]
    C --> AE["VIDEO"]
    C --> AF["VIDEO"]
    C --> AG["VIDEO"]
    C --> AH["VIDEO"]
    C --> AI["VIDEO"]
    C --> AJ["VIDEO"]
    C --> AK["VIDEO"]
    C --> AL["VIDEO"]
    C --> AM["VIDEO"]
    C --> AN["VIDEO"]
    C --> AO["VIDEO"]
    C --> AP["VIDEO"]
    C --> AQ["VIDEO"]
    C --> AR["VIDEO"]
    C --> AS["VIDEO"]
    C --> AT["VIDEO"]
    C --> AU["VIDEO"]
    C --> AV["VIDEO"]
    C --> AW["VIDEO"]
    C --> AX["VIDEO"]
    C --> AY["VIDEO"]
    C --> AZ["VIDEO"]
    C --> BA["VIDEO"]
    C --> BB["VIDEO"]
    C --> BC["VIDEO"]
    C --> BD["VIDEO"]
    C --> BE["VIDEO"]
    C --> BF["VIDEO"]
    C --> BG["VIDEO"]
    C --> BH["VIDEO"]
    C --> BI["VIDEO"]
    C --> BJ["VIDEO"]
    C --> BK["VIDEO"]
    C --> BL["VIDEO"]
    C --> BM["VIDEO"]
    C --> BN["VIDEO"]
    C --> BO["VIDEO"]
    C --> BP["VIDEO"]
    C --> BQ["VIDEO"]
    C --> BR["VIDEO"]
    C --> BS["VIDEO"]
    C --> BT["VIDEO"]
    C --> BU["VIDEO"]
    C --> BV["VIDEO"]
    C --> BW["VIDEO"]
    C --> BX["VIDEO"]
    C --> BY["VIDEO"]
    C --> BZ["VIDEO"]
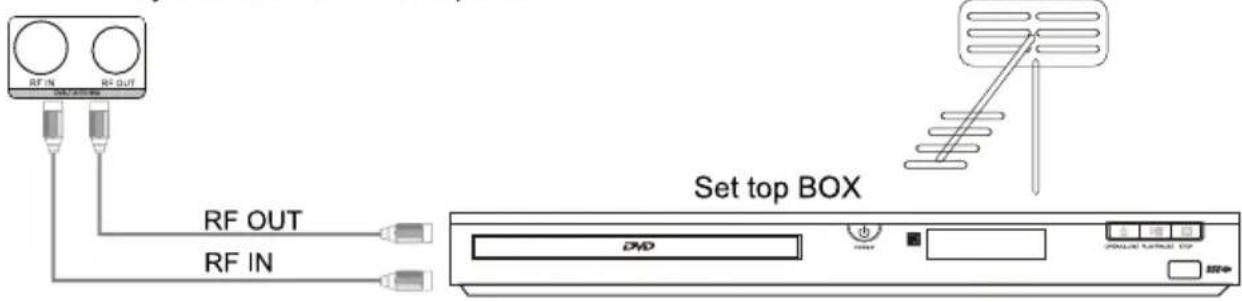
CONEXIÓN A LA ANTENA
NO conecte el enchufe de alimentación a la toma de corriente antes de completar todas las conexiones
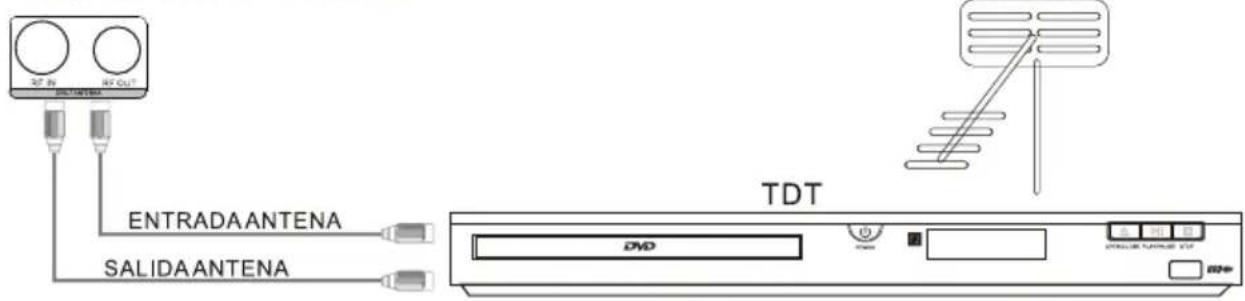
Conecte la toma de antena terrestre a la entrada RF IN (Entrada de Antena) de la unidad. RF OUT (Salida Antena) puede usarse para pasar la señal a otro dispositivo.
CONFIGURACIÓN GENERAL DEL MENÚ DE CONFIGURACIÓN
A) A) Al pulsar la tecla "CONFIGURACIÓN", la página de configuración general aparece. Cuando esto ocurre el sistema del DVD entra automáticamente en pausa
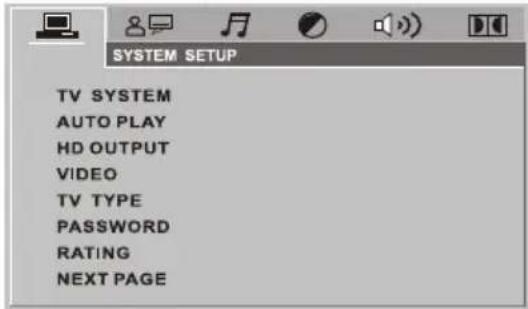
B) Pulse la tecla ABAJO o DERECHA para activar la opción o pestaña determinada; por ejemplo, si usted quiere configurar la página de vídeo, pulse DERECHA para destacar el símbolo de Vídeo y la página de vídeo aparecerá en la pantalla.
C) A) Pulse la tecla de flecha ABAJO para destacar la opción que usted desee. Presione ENTRAR o DERECHA para seleccionar; la configuración de esa opción aparece a la derecha; por ejemplo, presione el botón de flecha ABAJO para destacar la opción de LUMINOSIDAD y luego pulse ENTRAR para elegir, la configuración de la luminosidad aparece a la derecha.
D) Pulse los botones de flecha para destacar la opción de SALIR DE LA CONFIGURACIÓN y luego pulse ENTRAR u otra vez
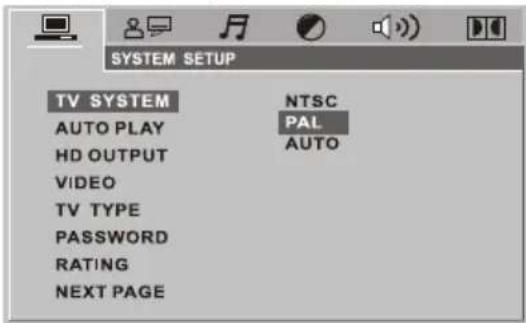
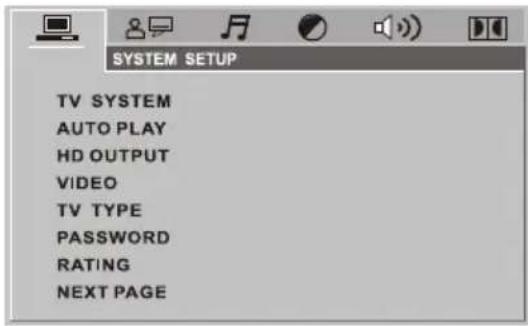
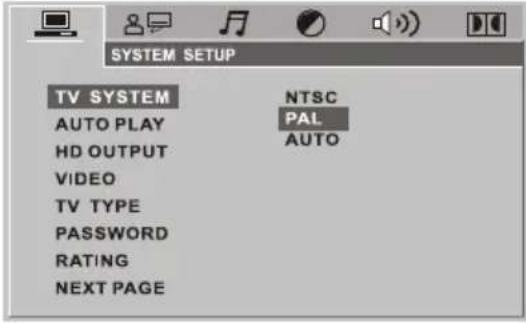
CONFIGURACIÓN DE SISTEMA
● SISTEMA DE TELEVISIÓN
♦ AUTO (Automático): Elija esta opción si su reproductor de DVD está conectado con un televisor de Multi-sistema.
◆ NTSC: elija esta opción si su reproductor de DVD está conectado con un televisor de NTSC.
◆ PAL: Elija esta opción si su reproductor de DVD está conectado con un televisor de PAL. La configuración predeterminada es PAL.
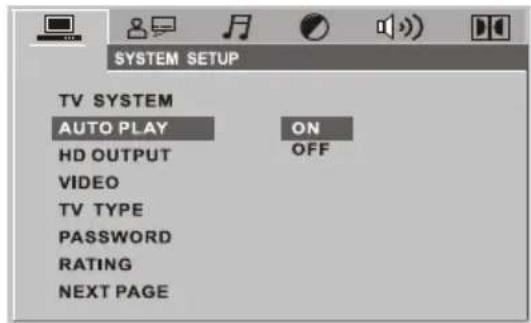
● REPRODUCCIÓN AUTOMÁTICA (AUTO)
◆ ON:: Elija esta opción para activar la REPRODUCCIÓN AUTOMÁTICA.
◆ OFF: Elija esta opción para cancelar la REPRODUCCIÓN AUTOMÁTICA
La configuración predeterminada es ON.

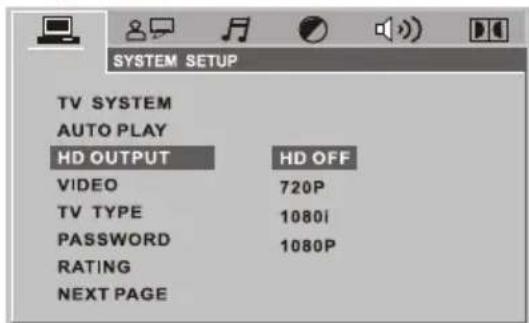
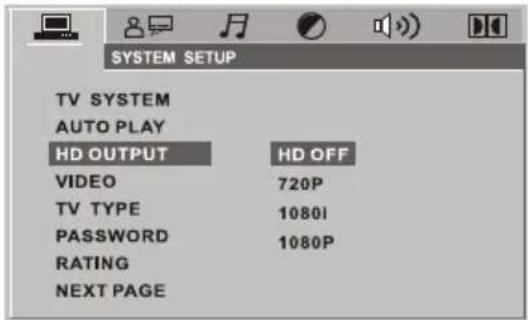
• SALIDA HD (SALIDA HDMI)
◆ HD OFF: Elija HD DESACTIVADO para desactivar la salida de HD.
◆ 720P: Elija esta opción para salida de vídeo de alta definición 720P
◆ 1080i: Elija esta opción para salida de vídeo de alta definición 1080i
◆ 1080P: Elija esta opción para salida de vídeo de alta definición 1080P
La configuración predeterminada es HD OFF.
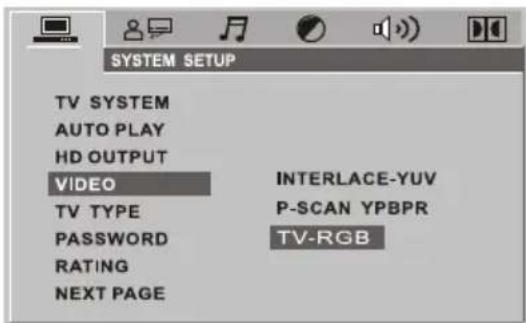
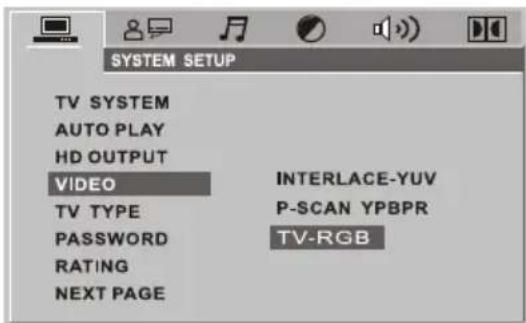
• VÍDEO
◆ Interfaz-YUV: Elija esta opción si su reproductor de DVD está conectado con un televisor mediante cable de vídeo por componentes (Y, Cb, Cr)
◆P-SCAN: Elija esta opción si su reproductor de DVD está conectado con un televisor de escaneo progresivo mediante cable de vídeo por componente
◆ TV-RGB: Elija esta opción si su reproductor de DVD está conectado con un televisor mediante cable RGB. La configuración predeterminada es TV-RGB
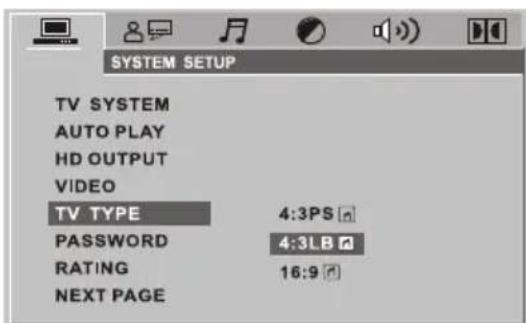
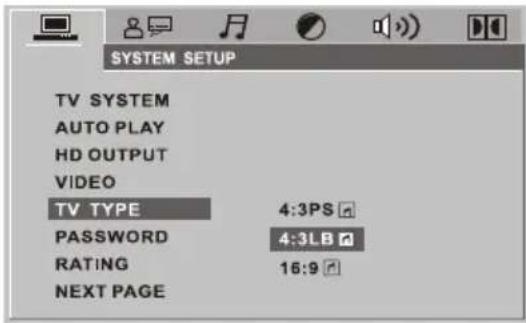
- FORMATO
◆16:9 (Pantalla Panorámica): Elija esta opción si su reproductor de DVD está conectado con un televisor de pantalla ancha. Si usted elige esta opción y no tiene un televisor de pantalla ancha, las imágenes en la pantalla pueden aparecer distorsionadas a causa de la compresión vertical.
◆4:3 LB (Buzón): Al elegir esta opción si su reproductor de DVD está conectado con un televisor de proporción normal, usted puede ver las películas en su relación de aspecto original (proporción de alto-ancho). Usted va a ver la imagen completa pero, verticalmente vista, ésta va a ocupar una porción más pequeña de la pantalla, así que posiblemente la película va a aparecer con barras negras en lo alto y lo bajo de la pantalla.
◆4:3 PS (Pan&Scan): Puede elegir esta opción si su reproductor de DVD está conectado con un televisor con formato normal. Usted puede ampliar la imagen a toda la pantalla de su televisor, lo que puede suponer que no se vean partes de la imagen (los bordes derecho e izquierdo).
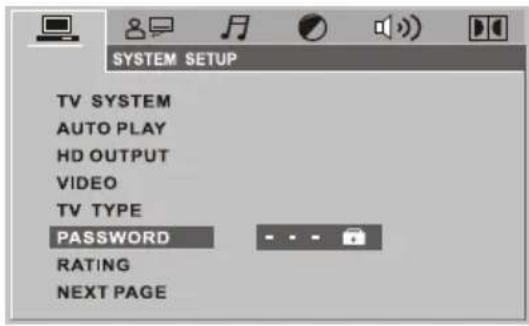
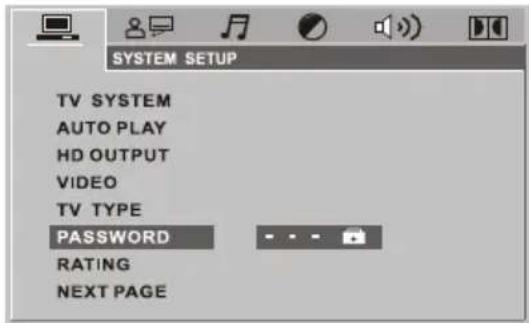
- CONTRASEÑA
La opción de la contraseña viene bloqueada por defecto y por este motivo, inicialmente usted no puede configurar la opción de
Control Parental o cambiar la contraseña. Para que funcione la opción Control Parental, el modo contraseña tiene que estar activado. Si usted quiere configurar la opción de Control Parental, necesita introducir la contraseña predeterminada, que es 0000, y luego pulsar ENTRAR para confirmar. Para cambiar la contraseña, a usted se le solicitará la antigua contraseña, y luego otra nueva. Introduzca un número de 4 cifras (ésta será su nueva contraseña).
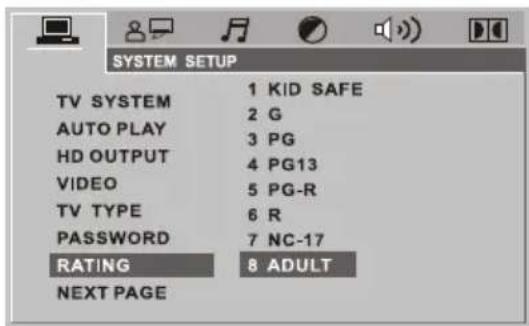
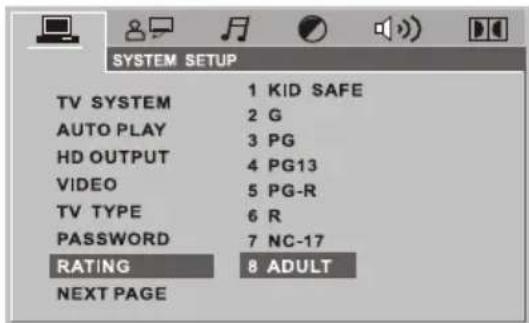
- CLASIFICACIÓN
Esta opción establece un sistema de clasificación de contenidos, como la clasificación del cine. Funciona con discos de DVD que han establecido una clasificación que puede ayudarle a usted a controlar los tipos de DVD que su familia ve.
Hay 8 opciones de clasificación: 1 Kid Safe (Seguro para niños); 2 G; 3 PG; 4 PG 13; 5 PGR; 6 R; 7 Nc17 y 8 ADULTOS (para Adultos)
Elija la opción 8 ADULTOS para borrar el límite de clasificación.
La configuración predeterminada es 8 ADULTOS
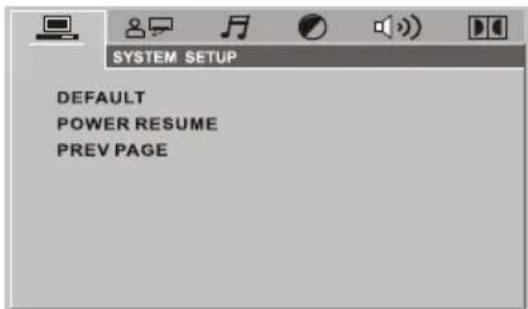
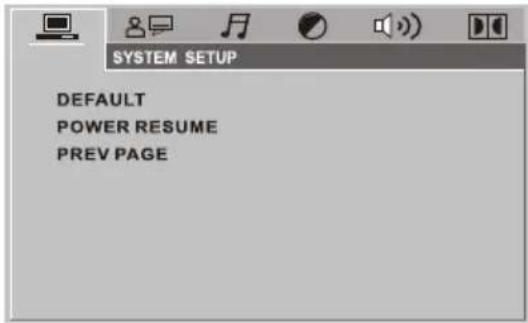
- CONFIGURACIÓN POR DEFECTO
Elija esta opción para volver a la configuración predeterminada de la unidad
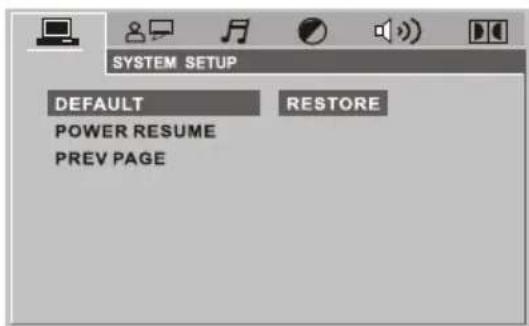
- ULTIMA MEMORIA
Esta opción es solo aplicable en modo DVD.
ON: Activar
OFF: Desactivar

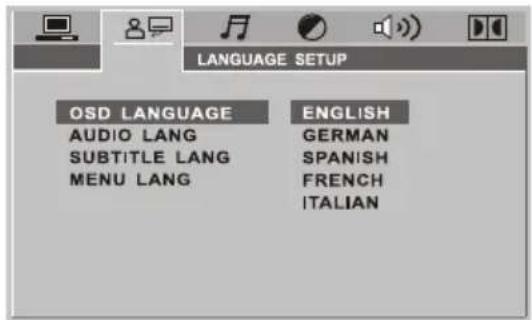
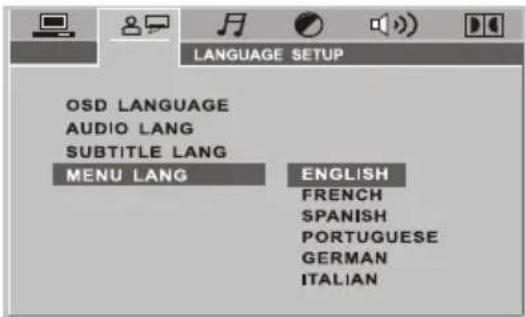
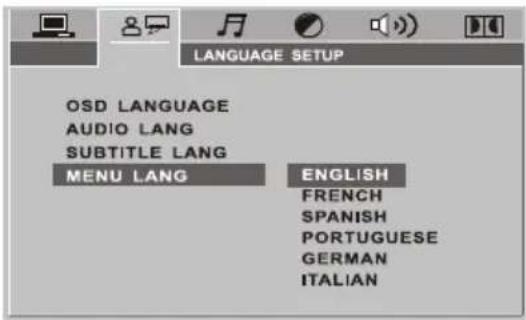
CONFIGURACIÓN DE IDIOMAS
• IDIOMA DE OSD
◆ Destaque la opción de IDIOMA DE OSD y luego pulse los botones de flecha para elegir el idioma que usted prefiera. Pulse ENTRAR para confirmar y el OSD se mostrará en ese idioma
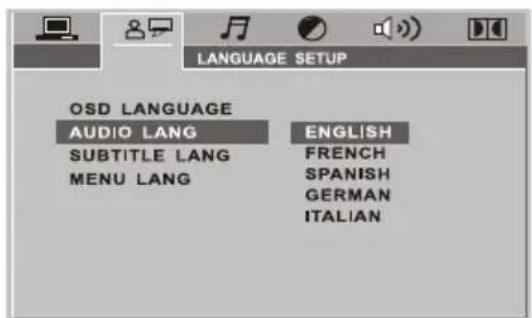
● IDIOMA DE AUDIO
◆ Destaque la opción de IDIOMA DE AUDIO y luego pulse los botones de flecha para elegir el idioma que usted prefiera. Si el disco que usted quiere ver lo tiene disponible, este se reproducirá con el audio por usted seleccionado. Hay 5 idiomas de audio para elegir: inglés, francés, español, alemán e italiano.
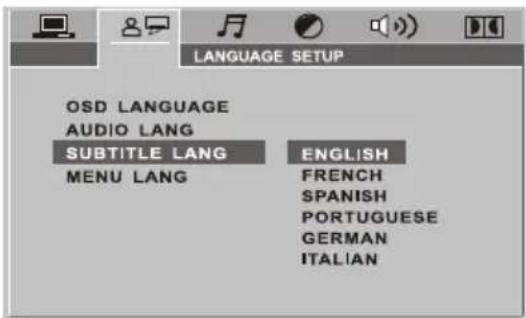
● IDIOMA DE SUBTÍTULO
◆ Destaque la opción de IDIOMA DE SUBTÍTULO y luego pulse los botones de flecha para elegir el idioma que usted prefiera. Si el disco que usted quiere ver lo tiene disponible, este reproducirá el Idioma de subtítulo seleccionado. Hay 6 idiomas de subtítulo para elegir: inglés, francés, español, português, alemán e italiano.
● IDIOMA DE MENÚ
◆ Destaque la opción de IDIOMA DE MENÚ y luego pulse los botones de flecha para elegir el idioma que usted prefiera. Pulse ENTRAR para confirmar. Si el disco que usted quiere ver lo tiene disponible, el menú se mostrará en ese idioma. Hay 6 idiomas para elegir: inglés, francés, español, portugües, alemán e italiano.
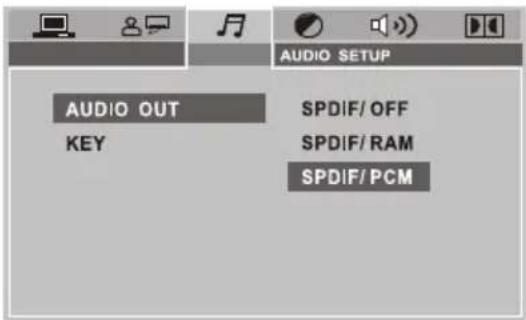
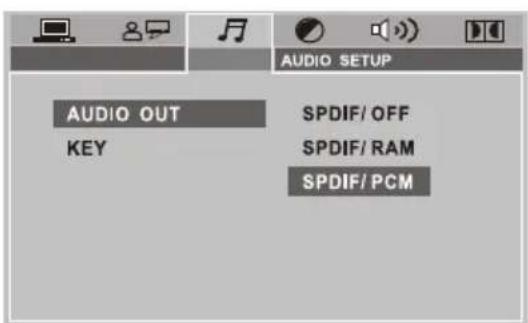
CONFIGURACIÓN DE AUDIO
- SALIDA DE AUDIO
Destaque la opción SALIDA SPDIF y presione las teclas de dirección (flechas) para elegir el modo de salida spdif que usted prefiera. Pulse ENTRAR para confirmar.
Hay 3 modos de salida spdif para elegir: SPDIF/OFF, SPDIF/RAM y SPDIF/PCM.
◆SPDIF/OFF: Apagado.
◆SPDIF/RAM: Elija esta opción si su reproductor de DVD está conectado a un amplificador a través de un cable coaxial. Al reproducir un disco grabado en formatos de audio Dolby Digital, DTS y MPEG, las señales digitales correspondientes van a salir a través de la ranura de salida coaxial. Las ranuras de salida digital del presente reproductor están diseñadas para conectarse a un receptor o decodificador Dolby Digital, DTS o MPEG.
◆SPDIF/PCM: elija esta opción si su reproductor de DVD está conectado a un amplificador estéreo digital de 2 canales. Al reproducir un disco grabado en formatos de audio Dolby Digital, y MPEG, las señales de audio van a ser moduladas a señales PCM de 2 canales a través de la salida coaxial.
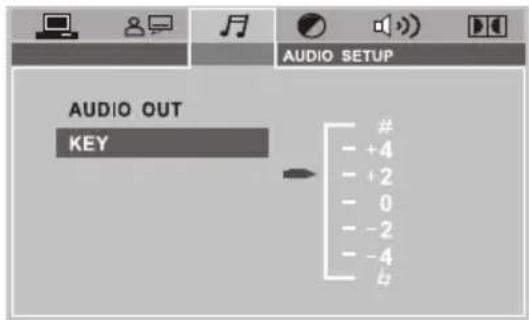
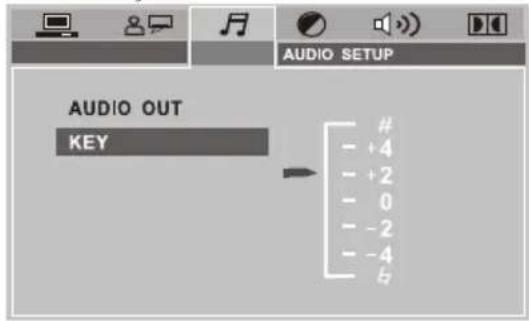
TECLA
Use las teclas de dirección ARRIBA y ABAJO para ajustarlo.
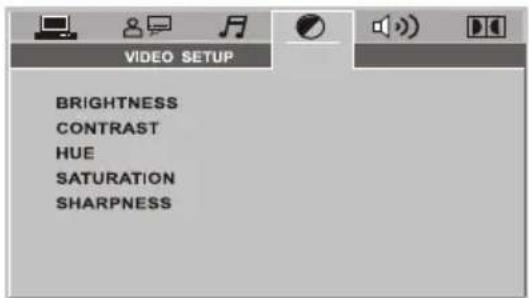
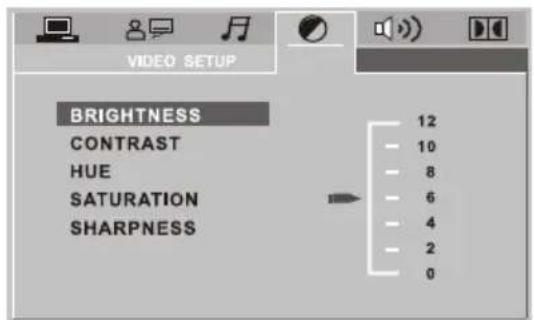
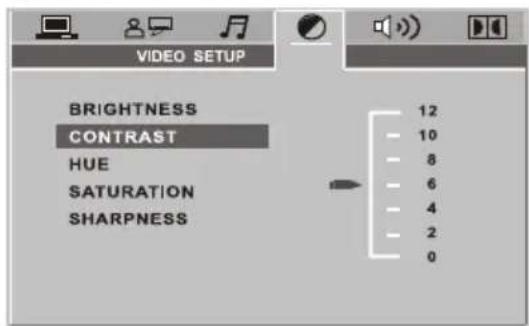
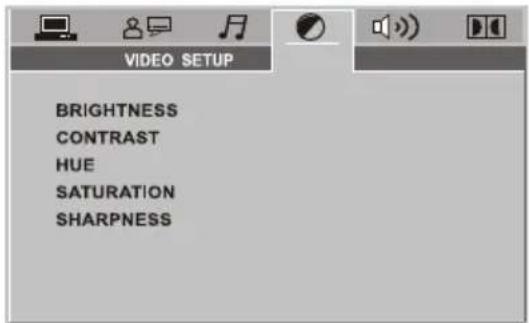
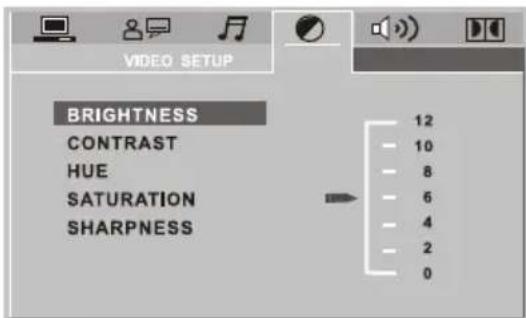
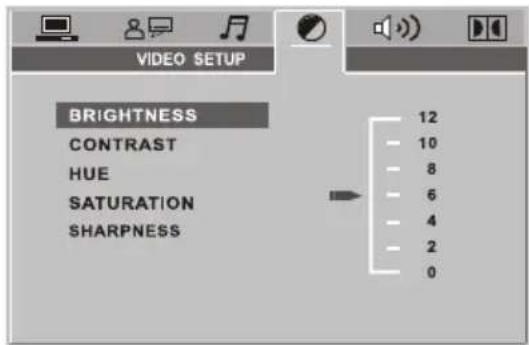
CONFIGURACIÓN DE VÍDEO
BRILLO
Use las teclas de dirección ARRIBA y ABAJO para ajustar el brillo
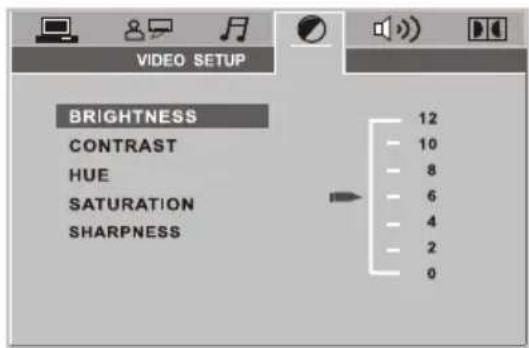
CONTRASTE
Use las teclas de dirección ARRIBA y ABAJO para ajustar el CONTRASTE.
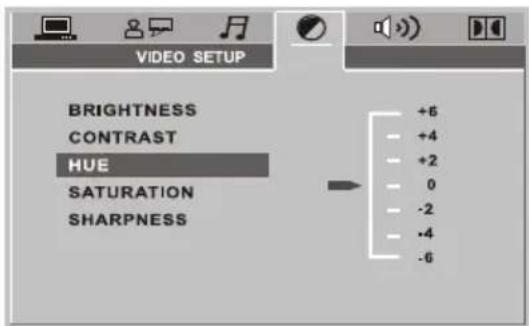
COLOR
Use las teclas de dirección ARRIBA y ABAJO para ajustar el COLOR.
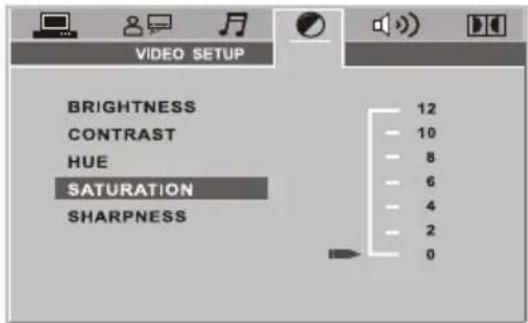
SATURACIÓN
Use las teclas de dirección ARRIBA y ABAJO para ajustar la SATURACIÓN.
CONFIGURACIÓN ALTAVOZ
- DOWNMIX
Use las teclas de dirección ARRIBA y ABAJO para ajustar el altavoz
◆ LT/RT: Al elegir esta opción, va a sonar como si estuviera en un cine siempre y cuando la grabación original de la película del disco esté codificada en formato Pro Logic Dolby Digital.
◆ ESTÉREO: para 2.1 canales
◆ VSS: Elija esta opción, cuando se reproduce un disco grabado en formato de sonido 2.1 canales y poder crear un efecto ficticio de sonido envolvente.


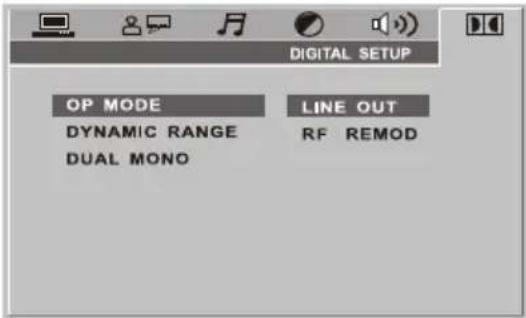
CONFIGURACIÓN DIGITAL
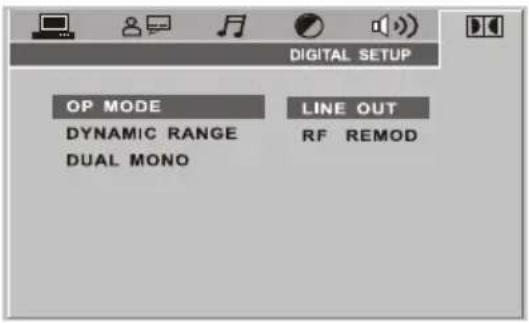
● MODO OP
◆ SALIDA EN LÍNEA: Esta opción es para la salida en línea de las señales entrantes y es la opción más adecuada para la reproducción nocturna, ya que el volumen de salida es bajo.
◆RF REMOD: Esta opción es más adecuada para la reproducción diurna, ya que el volumen de salida es alto.
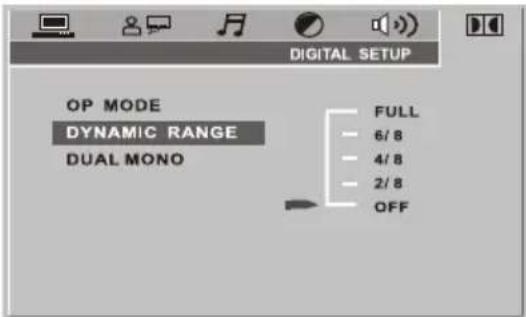
● RANGO DINÁMICO
◆RANGO DINÁMICO: cuando se elige "SALIDA EN LÍNEA", elija esta opción para ajustar la proporción de la salida y obtener diferentes efectos. Al ajustarlo a FULL (Completo), el valor máximo de la señal de audio será el mínimo, y al ajustarlo a OFF será el máximo.
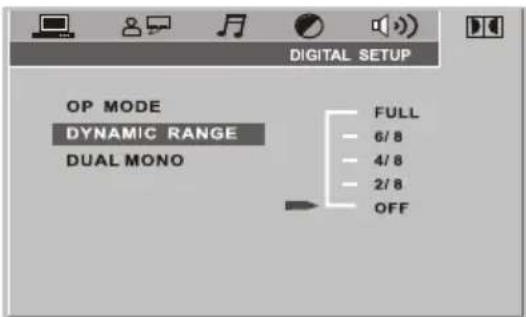
NOTA: Esta opción será validada cuando el DOWNMIX está desactivado(OFF)
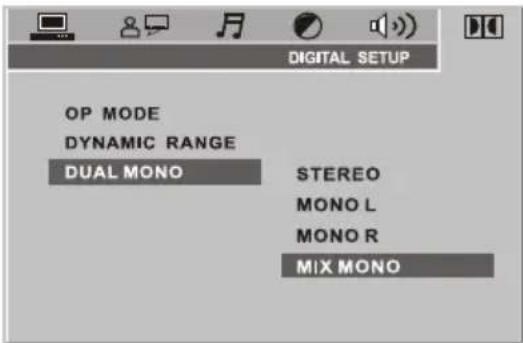
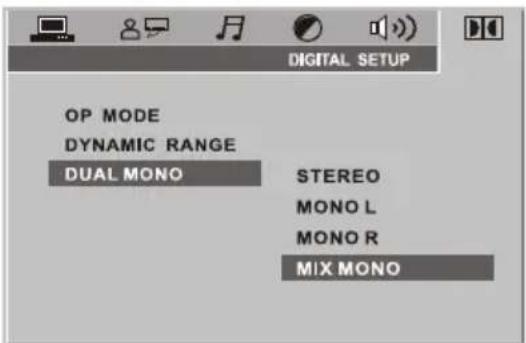
● DUAL MONO (IZQUIERDA + DERECHA)
Elija esta opción para establecer el modo de salida mono de izquierda y derecha. Hay 4 modos en esta opción: ESTÉREO, MONO IZQUIERDO, MONO DERECHO y MIX MONO. Se usa principalmente en el modo de karaoke.
Cuando desee pasar al modo TDT, presione la tecla DVD/DVB de su mando a distancia
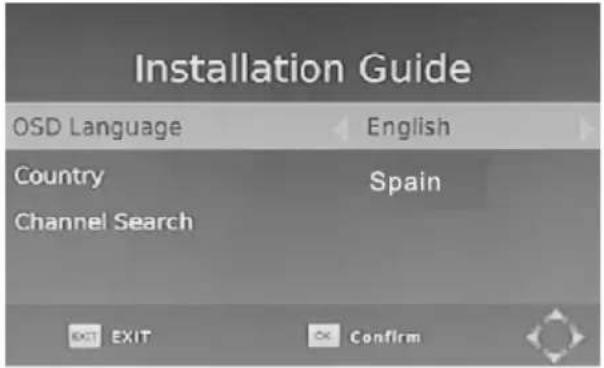
GUÍA DE INSTALACIÓN
Si usted está usando esta unidad por primera vez o ha restaurado la configuración a los valores predeterminados de fábrica, esta Guía de Instalación va a aparecer en la pantalla de su televisión. Siga dicha guía para elegir el idioma preferente del menú y el país (región) correcto para empezar la búsqueda de canales.

(1)Idioma OSD: Pulse el botón Derecha/Izquierda para elegir un idioma.
(2)País: Pulse el botón Derecha/izquierda para elegir su país de residencia.
(3) Búsqueda de canales: Pulse el botón Derecha u OK para empezar una búsqueda automática de canales.
Si no se encuentra ningún canal durante el proceso de búsqueda de canales, por favor, revise sus conexiones de antena. Después que el proceso de escaneo termine, el receptor va a guardar automáticamente los canales encontrados y emitir el primer canal en la lista.
Cuando usted esté usando esta unidad y si quiere empezar una búsqueda AUTOMÁTICA entre en el menú de BÚSQUEDA DE CANALES para hacer la búsqueda de canales AUTOMÁTICA/MANUAL. Pulse el botón MENÚ en el mando a distancia y elija BÚSQUEDA DE CANALES con los botones DERECHA/IZQUIERDA. Este menú ofrece opciones para ajustar la configuración de la BÚSQUEDA DE CANALES. Pulse ARRIBA/ABAJO para elegir una opción y DERECHA/IZQUIERDA para ajustar la configuración. Finalmente presione EXIT (SALIR) para salir del Menú.
MENÚ
MENÚ PRINCIPAL
La mayoría de las funciones están disponibles en el menú principal. Siga la información de ayuda al pie del menú para modificar las opciones de preferencia. Se le requerirá una contraseña cuando usted modifique las opciones avanzadas en el Menú. La contraseña predeterminada es 000000.
Pulse el botón MENU/SETUP en el mando a distancia, para entrar en el MENÚ PRINCIPAL. Hay 7 pestañas que muestran diferentes elementos para configurar. Use los botones IZQUIERDA y DERECHA para navegar por el menú. Elija la opción que desee y pulse el botón OK o DERECHA para ajustar la configuración. Finalmente presione EXIT (SALIR) para salir del Menú.


MENÚ DE CONFIGURACIÓN DEL TDT
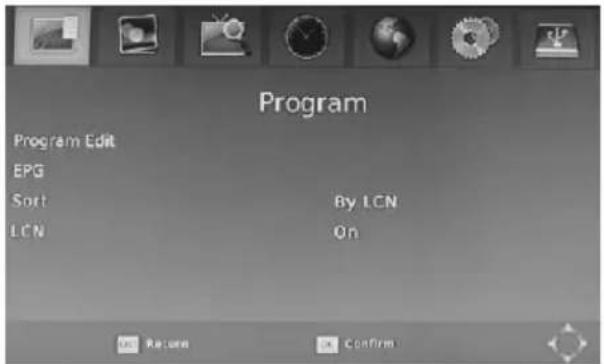
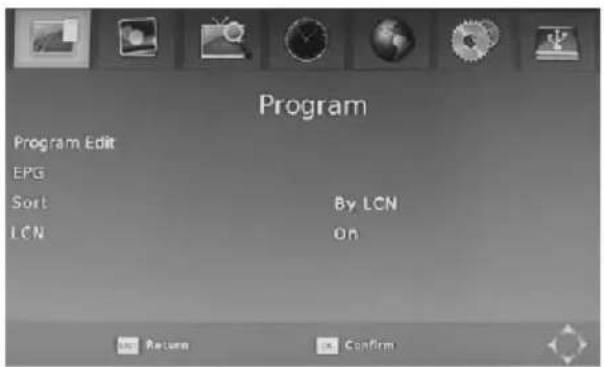
a.Configuración de programas:
Usted puede editar los programas, revisar la Guía de Programación, clasificar los canales y configurar el LCN aquí.
1) Para editar sus preferencias de programa (para bloquear, omitir, establecer preferencias, moverse o eliminar un programa), puede usted necesitar introducir una contraseña. Si esto fuera así, la contraseña predeterminada es 000000 y la contraseña maestra de desbloqueo es 888888.
2) El GEP es la Guía ELECTRONICA de Programas y en ella puede ver el horario de los programas en cada canal sintonizado. Pulse el botón EPG en el mando a distancia para entrar en la Guía.
3) Ordenar
Nota: Es importante desactivar la función LCN cuando usted impone un orden a los canales. La función ORDENAR le permite disponer los canales según diferentes métodos:
Por LCN: Permite la disposición de los canales según un orden ascendente.
Por Nombre: Permite la disposición de los canales según un orden alfabético.
Por ID de Servicio: Permite la disposición de los canales según la identidad de los servicios.
Por ONID: Permite la disposición de los canales según ONID.
b.Configuraciones de imagen:
La opción de imagen le permite a usted configurar las funciones diferentes como las siguientes: Relación de Aspecto
La relación de aspecto del vídeo puede ser de 4:3 (conocida también como Imagen Anamórfica) o 16:9 (conocida también como televisión panorámica). Normalmente, la relación de aspecto del vídeo de definición estándar debe ser de 4:3 y la del vídeo de alta definición debe ser de 16:9. Para obtener excelente calidad en el televisor, pulse el botón MENÚ para entrar en el menú y elija el menú de configuración de la relación de aspecto para establecer proporción adecuada. La captura de pantalla de la ventana de la relación de aspecto se muestra como lo siguiente.
He aquí una descripción de cómo, una vez elegido el modo de conversión de relación de aspecto, la señal recibida y el televisor del usuario establecen las relaciones de aspecto.
Señal de 16:9 en un televisor de 16:9

En cualquier modo
Señal de 4:3 en un televisor de 16:9

natural_image
Simple black oval shape centered within a white rectangle (no text or symbols)En Buzón

natural_image
Simple black oval shape centered on a white background, no text or symbols present.En Pan y Scan

natural_image
Simple black oval shape centered on a white background (no text or symbols)En Pantalla completa
Señal de 4:3 en un televisor de 4:3

En cualquier modo
Señal de 16:9 en un televisor de 4:3

En Buzón

En Pan y Scan

En Pantalla completa
MENÚ DE CONFIGURACIÓN DEL TDT
Resolución:
Usted puede elegir diferentes resoluciones según su televisor: 576i, 576p, 720p, 1080i y 1080p. Formato de Televisor: PAL/NTSC.
c.Configuraciones de la Búsqueda de Canales:
(a) Búsqueda Automática: Con esta opción se puede buscar automáticamente canales de televisión y radio y guardarlos cuando el escaneo termine. Todos los canales y configuraciones anteriormente guardadas se borrarán.
(b) Búsqueda Manual: Con esta opción se le permite a usted escanear por nuevos canales sin borrar los canales y configuraciones anteriormente guardadas.
1) Elija Búsqueda Manual, pulse el botón OK o DERECHA y la página de búsqueda manual de canales aparecerá.
2) Pulse los botones DERECHA o IZQUIERDA para elegir la frecuencia del canal.
3) Pulse el botón OK para empezar el escaneo de nuevos canales.
4) Si se encuentra un nuevo canal, se lo guardará y almacenará junto con el resto de los canales.
(c)País: Selecciones el país (Por ejemplo, España)
(d)Alimentación de Antena: Elija entre activado y desactivado
d.Configuraciones horaria:
Le permiten establecer:
Ajuste Temporal: Elija automática o manualmente el ajuste temporal GMT.
Región: Elija la región cuando la zona horaria está fijada en AUTO (automático).
Zona Horaria: Elija la zonas horaria cuando el "Ajuste Temporal" este fijado en Manual.
Auto-Apagado: Elija el tiempo tras el cual la unidad se auto-apagará.
e.Opciones:
Este menú contiene las siguientes opciones:
Idioma OSD: cambia el idioma que se muestra en pantalla
Idioma de subtítulo: le permite elegir el idioma de subtítulo.
Idioma de audio: si el programa tiene idiomas múltiples, puede establecer aquí su idioma preferido.
Salida Digital. Puede elegir entre Desactivado, PCM, RAM HDMI ON y RAM HDMI OFF
f.Configuraciones de sistema:
El menú contiene las siguientes opciones:
a) Control Parental: Las opciones para establecer las referencias de edad empiezan desde 4 años hasta 18 años. Para empezar esta función usted necesita introducir un código. La contraseña predeterminada es 000000. Para desactivar esta función simplemente hace falta ponerla en OFF.
b) Establecer contraseña: Le permite a usted modificar la contraseña predeterminada que es 000000.
c) Restaurar la configuración predeterminada de fábrica: Le permite restaurar la unidad a la configuración predeterminada de fábrica. Se le va a requerir introducir su contraseña 000000. Pulse el botón OK cuando termine de hacerlo.
Nota: Esta función va a borrar todos sus canales guardados y sus configuraciones personales.
d) Información: Puede revisar la versión del software de su unidad.
g.Configuraciones de USB:
El menú de USB tiene 5 opciones:
1) MULTIMEDIA:
En el modo de TV, y después de insertar un dispositivo de almacenamiento USB, pulse el botón USB para entrar en el menú Multimedia. El menú contiene 4 símbolos diferentes: Música, Foto, Película y PVR.
Reproducción de Música: elija el símbolo MÚSICA, mueva el cursor para entrar en el archivo de audio que desee y luego pulse el botón OK para reproducir el archivo de audio elegido.
Fotos: elija el símbolo de FOTO, entre en el archivo de fotos que desee y luego pulse el botón OK para ver los archivos de fotos elegidos.
Reproducción de películas: Elija el símbolo PELÍCULA, mueva el cursor para elegir el archivo de vídeo que desee y luego pulse el botón OK para reproducir el archivo de vídeo elegido.
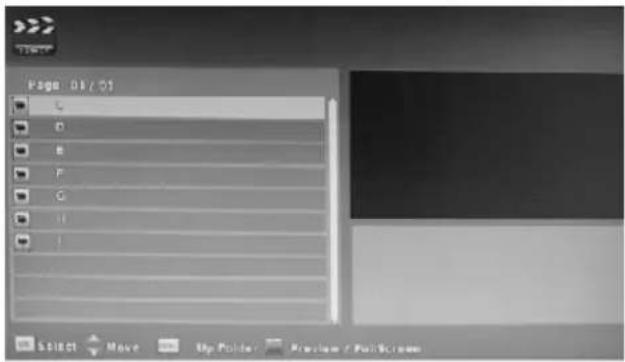
Reproducción archivos PVR: Elija el símbolo PVR, seleccione el archivo grabado que desee reproducir y pulse OK para empezar la reproducción. Pulse el botón ROJO para cambiar entre modos de VISTA PREVIA (Preview) y PANTALLA COMPLETA. Use el botón AMARILLO para eliminar el archivo que usted no quiere. Pulse el botón VERDE si desea cambiar el nombre del archivo grabado
MENÚ DE CONFIGURACIÓN DEL TDT
2) Configuración fotos: permite ajustar el tiempo entre diapositivas, el modo y el aspecto.
3) Configuración de Películas: permite configurar al formato, detalle de los subtítulos, el fondo y el color de los subtítulos.
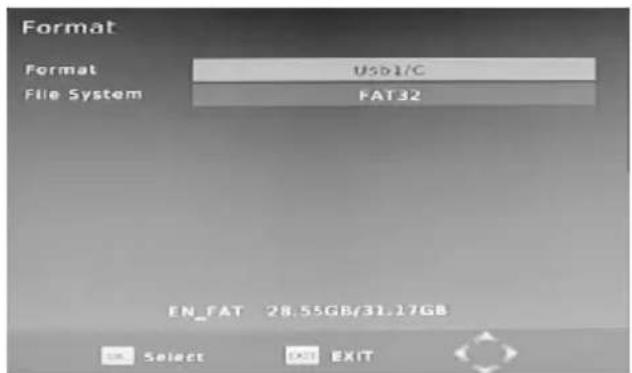
4) Configuración de PVR: dispositivo de Grabación. En él puede ver el contenido de su dispositivo de almacenamiento USB conectado, incluyendo el Tipo de Formato, el espacio total y el espacio libre disponible. Puede elegir la opción FORMATEO para formatear su dispositivo USB en formato FAT32 o NTFS.
USO DIARIO
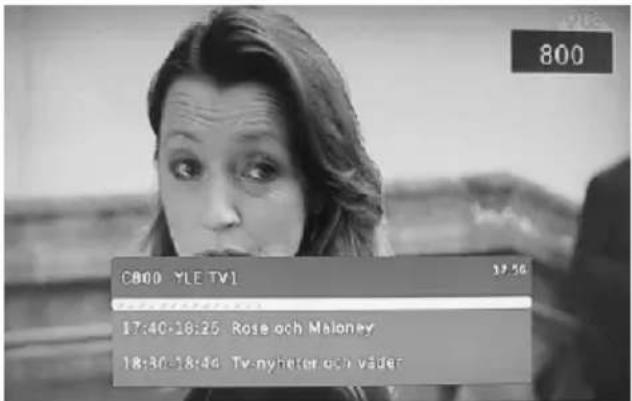
Tecla INFO.
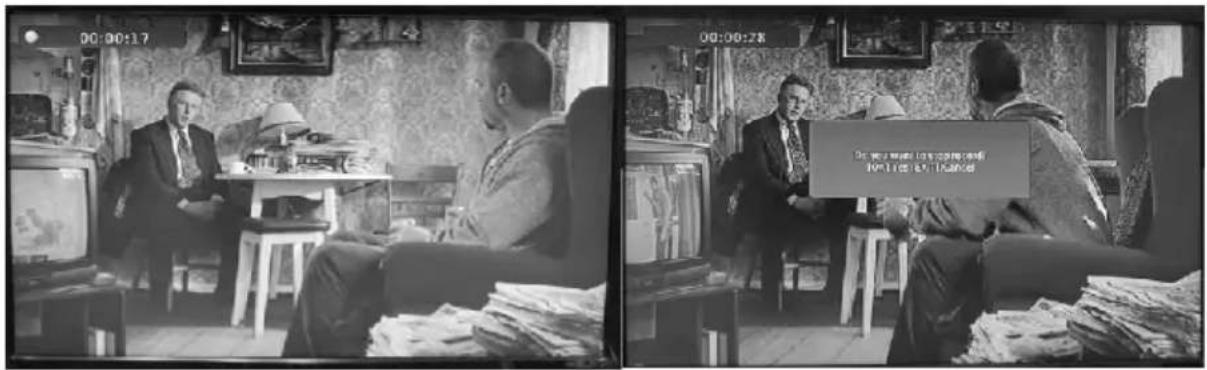
Pulse el botón INFO para ver información de programa de Televisión que está viendo. Panel de Información:
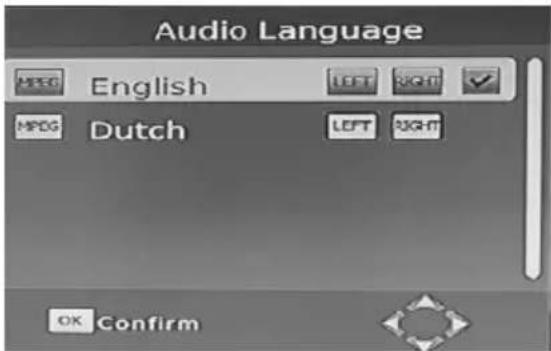
Tecla AUDIO
Algunos programas pueden tener audios en múltiples idiomas y su emisión puede tener diferentes modos, como Estéreo, Izquierdo o Derecho. Todos los idiomas de audio disponibles se mostrarán cuando usted pulse el botón Izquierda/Derecha (L/R), como se ilustra en la foto. Si no hubiera salida de audio una vez que hubiera elegido el idioma de audio deseado, indicaría la no existencia de audio en este modo y necesitaría volver al modo de audio anterior.
Botón de SUB
Ciertos programas contienen subtítulos en múltiples idiomas. Todos los idiomas de subtítulos disponibles se mostrarán en la ventana de información cuando usted pulse el botón SUBTÍTULO. Siga las informaciones de ayuda para elegir el subtítulo preferido.

MENÚ DE CONFIGURACIÓN DEL TDT
Teclas PREV/NEXT y REV/FWD
La teclas ANTERIOR/SIGUIENTE (PREV/NEXT) y RETROCESO/AVANCE (REV/FWD) se pueden usar durante la reproducción de archivos multimedia desde su dispositivo USB externo. Pulse PREV/NEXT para ir al archivo anterior/siguiente y REV/FWD para retroceso/avance rápido durante la reproducción.
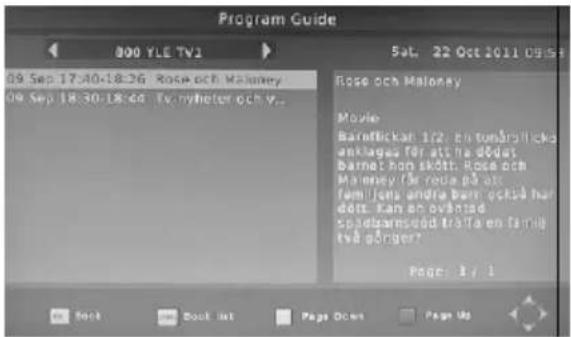
EPG (GEP: Guía Electrónica de Programas)
Pulse la tecla EPG para mostrar la guía de programas de televisión.
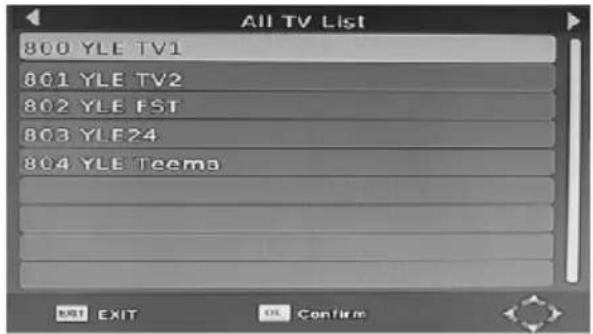
LISTA DE CANALES DE TELEVISIÓN Y RADIO
Pulse el botón ENTER para mostrar todos los canales de televisión y radio y siga la ayuda al pie de la ventana para elegir el canal preferido.
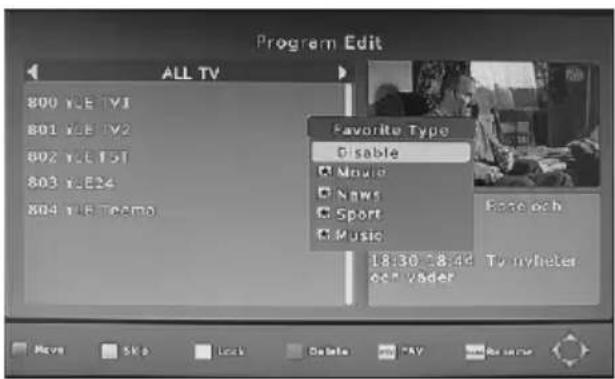
CANALES FAVORITOS
Establecer canales favoritos de televisión o radio:
Usted puede añadir canales preferidos a una lista de canales favoritos. Pulse la tecla MENU/SETUP para entrar en el menú Editar Programas. La opción de canales favoritos le permite a usted clasificar los canales por diferentes géneros: Películas/Noticias/Deportes/Música. Pulse el botón FAV u OK para confirma su selección. Un símbolo en forma de estrella aparecerá al lado del canal, lo que confirma su selección.
Inhabilitar canales favoritos de televisión o radio:
Pulse la tecla MENU/SETUP para entrar en el menú Editar Programas. La lista de los canales favoritos se mostrará. Destaque el canal que quiere inhabilitar. Pulse el botón FAV, elija la opción Inhabilitar (Disable) y pulse el botón FAV u OK para la cancelación. Pulse el botón Salir (Exit) para salir del menú.
MENÚ DE CONFIGURACIÓN DEL TDT
Ver Canales favoritos:
Pulse la tecla FAV para entrar en su menú de canales favoritos. Pulse Izquierda o Derecha en su mando a distancia para entrar en el submenú (Películas/Noticias/Deportes/Música). Pulse ARRIBA o ABAJO para navegar por sus canales favoritos. Finalmente, pulse OK para elegir su canal favorito.
Eliminar un programa de Televisión o Radio:
Pulse el botón MENU/SETUP para entrar en el menú Editar Programas. Elija el programa que usted quiere eliminar y pulse el botón AZUL en su mando a distancia. Un mensaje de advertencia aparecerá en la pantalla de su televisión. Pulse el botón OK para confirmar la eliminación del canal. Repita el procedimiento anterior para eliminar otros canales.
Omitir un canal de televisión o radio:
Pulse el botón MENU/SETUP para entrar en el menú Editar Programas. Elija el canal que usted quiere Omitir (Skip) y pulse el botón VERDE en su mando a distancia. Cuando un símbolo de omisión aparezca el canal ya está marcado como omitido. Para guardar sus configuraciones y salir del menú, pulse el botón SALIR (Exit).
Mover un programa de televisión o radio:
Pulse el botón MENU/SETUP para entrar en el menú Editar Programas. Elija el canal que usted quiere mover y pulse el botón ROJO en su mando a distancia. Cuando un símbolo de MOVER aparezca en la pantalla de su televisión, pulse los botones ARRIBA o ABAJO para mover el canal a la posición que desee. Pulse el botón OK para confirmar su selección. Repita el proceso anterior para mover otros canales.
FUNCIÓN PVR
ADVERTENCIA:
Para usar la función PVR (tanto para el modo de grabación instantánea como temporizada vía EPG) la función Timeshift, la reproducción de programas grabados y el reproductor multimedia, es necesario conectar un dispositivo externo como un dispositivo flash de USB o un disco duro externo al puerto USB. La capacidad máxima permitida de disco duro externo es de 350 GB. Se aceptan formatos de archivo FAT32 y NTFS. Aunque este producto es totalmente compatible con USB 1.1 y 2.0 estándar, puede que un pequeño porcentaje de los dispositivos USB no se puedan leer debido a que los fabricantes de los dispositivos no cumplen con los estándares completos (oficiales) 1.1 y 2.0.
La función PVR de su receptor le permite a usted grabar y reproducir sus programas favoritos. La grabación instantánea, la grabación a través de la EPG y la grabación temporizada están disponibles en su unidad.
1) Grabación Instantánea
Pulse la tecla Grabación (REC) para empezar una grabación instantánea de un programa televisivo. El símbolo de grabación aparecerá en la parte superior de la pantalla. Pulse la tecla INFO para recibir información de dicha grabación. Pulse la tecla PARAR (Stop) para detener la grabación instantánea.
MENÚ DE CONFIGURACIÓN DEL TDT
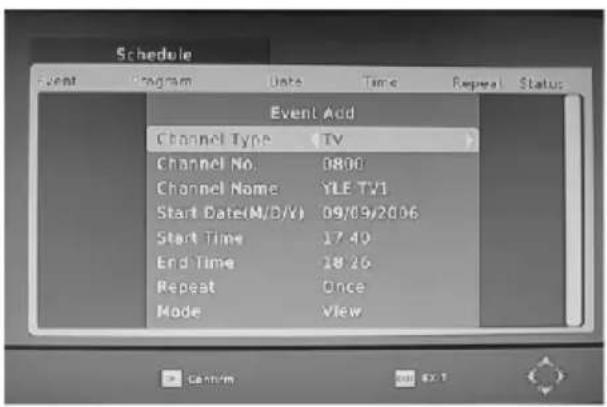
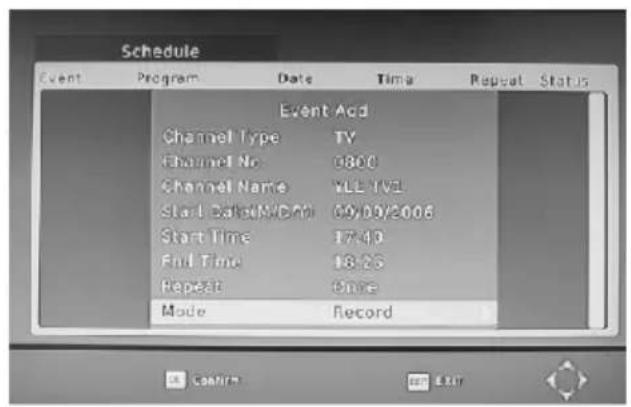
2) Grabación a través de la EPG
Nunca se perderá usted ninguno de sus programa favoritos. Ahora tiene la opción de grabarlos a través de la guía de programación.
En modo TV, pulse el botón EPG para entrar en la Guía de Programas Electrónicos y elija el canal y programa que usted quiere grabar. Pulse el botón OK para elegir el programa que desee grabar y le aparecerá una ventana con los horarios de los eventos. Elija y establezca los parámetros correctos para programar la grabación. Establezca en Modo la opción "grabación" y así este programa se grabará automáticamente en el momento establecido.
Usted puede editar la configuración de la grabación a través del Menú de Horario de Eventos estableciendo el número y el nombre del canal, la fecha, la hora de inicio y la hora final. Elija entre las siguientes opciones de Grabación: UNAVEZ, DIARIO y SEMANAL. Una vez que finalice con la configuración del horario, usted puede pulsar el botón VERDE para editar la grabación de los horarios a cualquier hora o pulsar el botón AZUL en su mando a distancia para cancelar la grabación fijada. Después de haber terminado la configuración de la grabación, pulse el botón SALIR para guardar la configuración y salir.
3) TIMESHIFT
La función TIMESHIFT le permite a usted hacer pausa en programa de televisión que esté viendo. Una vez iniciada la pausa el programa se comienza a almacenar en su disco duro o dispositivo flash de USB conectado.
Cuando usted esté viendo un programa, pulse la tecla PLAY ( REPRODUCIR) en el mando a distancia para activar la función. Ahora puede usar el botón REV. (función de rebobinado) para volver al punto donde usted ha iniciado la pausa o el botón FWD para volver a la televisión en vivo. Si usted desea parar la función timeshift pulse el botón STOP

THE SETUP MENU SYSTEM OF DVB-T
Si usted pulsa el botón INFO., puede entrar en la pantalla de información timeshift.
ADVERTENCIAS:
En cuanto a la compatibilidad de los dispositivos USB y Discos Duros con la función Timeshift y PVR, por favor consulte la siguiente lista:
| TIMESHIFT | GRABACIÓN DE PVR | FORMATO | |
| Dispositivo de USB | Funciona | Funciona | Fat32 |
| Disco Duro de 3.5 pulgadas | Funciona | Funciona | NTFS |
| Disco Duro de 2.5 pulgadas | Funciona | Funciona | NTFS / FAT 32 |
| Disco Duro de 1.8 pulgadas | No funciona | Funciona | NTFS / FAT 32 |
Cuidado de NO usar un dispositivo de USB o un HDD de 1.8 pulgadas para la función Timeshift.
4) Reproductor de multimedia
A través del reproductor multimedia usted puede optar ahora entre ver fotos, reproducir archivos musicales de MP3 y ver archivos de vídeo. A continuación se detallan los archivos compatibles con esta unidad. Los sistemas de archivo NTFS, FAT32 y FAT16 son compatibles.
| Reproductor | Archivos soportados |
| Foto | JPEG, BMP, PNG |
| Música | *.wma, *.mp3, *.aac |
| Película | *.avi, *.mpg, *.dat, *.vob, *.mkv, *.mjpeg |
5) FORMATEAR UN DISCO DURO PORTÁTIL
Esta unidad también está provista de una función de formateo de discos duros portátiles. Formatear un disco duro puede eliminar permanentemente todos los datos en éste, por lo que se recomienda hacer una copia de seguridad de todos estos datos antes de realizar el formateo de su disco duro.
ESPECIFICACIÓN TÉCNICAS
Sintonizador
| Conector de entrada | IEC 16902. Hembra |
| Rango de frecuencia de entrada | VHF & UHF |
| Número de entradas de RF | 1 |
| Impedancia de entrada | 75 ohm |
| Conector de salida de RF | (BYPASS) IEC 169-2 Macho |
| Bucle de salida | 177,5—816,5 Mhz |
Demodulación
| Estándar | ETSI EN300 744 |
| Modos de intervalo de guarda | 1/32, 1/16, 1/8 de la duración de símbolo activo |
| Tasa de modos FEC | 1/2, 2/3, 3/4, 5/6, 7/8 |
| Portadores/Constelación | Todos los modos están soportados, el no jerárquico incluído |
| demodulación | COFDM (QPSK/QAM16/QAM64) 2K y 8K |
Decodificador de vídeo
| Estándar | ISO/IEC 13818-2 y ISO/IEC 14496-10 |
| Corriente de transporte | ISO/IEC 13818-1 |
| Decodificación de vídeo | MPEG-2 SD/HD (MP@ML y MP@HL), MPEG-4 H.264/AVC SD/HDJPEG, BMP, PNG, JPEG en movimientoAVI, VOB, MOV, MKV |
| Relación de aspecto | 4:3, 16:9 |
Decodificador de audio
| Estándar | ISO/IEC13818-3 TR1011154 |
| Decodificación de audio | MPEG-1 y MPEG-2 de nivel I y II, Audio de Dolby Digital, WMA y Audio de HE-AAC Digital |
| Frecuencia de muestreo | 32 kHz, 22,1 kHz, 44,1 kHz, 48 kHz |
Subtítulos
| Subtítulos | Subtítulo de TDT |
Accesorios
| Unidad de mando a distancia | IR (36kHz) RC3/Otra a solicitud (38 kHz) NEC |
| Baterías | Tipo de AAA R03P x 2 |
| Manual para el usuario | 1 pieza |
| Cable de AV | 1 pieza |
Energía
| Rango de entrada AC | AC220V—240V 50/60 Hz |
| Consumo en encendido | <20W |
| Consumo en espera (Standby) | <1W |
GUÍA DE SOLUCIÓN DE PROBLEMAS
| Síntoma | Solución |
| No enciende | ♦ Conecte el enchufe de alimentación a la toma de corriente |
| No hay imagen | ♦ Verifique la conexión de la salida de vídeo del DVD a la entrada de vídeo del televisor y luego ponga el televisor en el modo adecuado (vídeo 1)♦ Inserte el cable de vídeo correctamente y consulte el manual para usuarios de su televisión |
| No hay sonido | ♦ Conecte el cable de audio correctamente.♦ Verifique la conexión de la salida de audio del DVD a la entrada de audio del televisor u otro receptor y luego pase a la fuente adecuada en el receptor. Consulte el manual para usuarios de su amplificador de audio. |
| Imágenes b/w | ♦ Pulse el botón P/N en su mando a distancia |
| Imágenes en blanco y negro | ♦ El conector S-Vídeo está dañado ( pin doblado) |
| Las imágenes reproducidas sufren distorsión ocasional | ♦ La distorsión de unas cuantas imágenes puede aparecer debido a una transferencia de mala calidad de vídeo/sonido a disco. Es especialmente frecuente en discos fabricados entre 19971998.♦ El disco está rayado. |
| La luminosidad no es estable o se producen ruidos en las imágenes reproducidas | ♦ Conecte el reproductor de DVD directamente al televisor y no a través de otra fuente. Lo que usted está viendo es el efecto del circuito de protección de copias requerido en todo reproductor de DVD.♦ Si no tiene una salida de vídeo en su televisor, usted necesita comprar un adaptador. |
| El reproductor de vídeo de DVD no empieza la reproducción | ♦ Coloque el disco con el lado gráfico hacia arriba♦ Coloque correctamente el disco sobre la bandeja de discoAsegure que el disco no sufra rayaduras y huellas digitales.♦ Cancele la función de bloqueo parental o cambie el nivel del bloqueo♦ Apague la unidad , desconecte el enchufe y vuelva a conectarlo |
| El MP3 no lee el disco o salta al hacerlo | ♦ Retire el disco ya que la edición de software usada puede ser incompatible con el reproductor. . |
| El mando a distancia no funciona debidamente | ♦ Reemplace las baterías con otras nuevas. |

Este símbolo es el símbolo de clasificación selectiva para los residuos de equipamiento electrónicos y eléctricos (WEEE, por sus siglas en inglés). Este producto debe manejarse siguiendo la Directiva Europea 2002/96/EC sobre reciclaje o desmantelamiento para minimizar el impacto en el medio ambiente y debe ser depositado al final de su vida útil al margen de la basura doméstica. Hay sistemas de recogida y reciclaje en toda la UE.
Para más información, consulte con las autoridades locales o con la tienda donde adquirió el reproductor
"Para dar cumplimiento a la Norma UNE EN-60065, indicamos que si el cable flexible se daña, únicamente puede ser sustituido por un taller de reparación reconocido por el fabricante NEVIR, S.A., ya que se necesitan herramientas especiales


nevir®
NVR-2350DVD-HDUG
DVD Player with HD DVB-T

USER MANUAL
Read this manual carefully before use
Utilization of the product
If you want to dispose this product, do not mix it with general household waste. There is a separate collection system for used electronic products in accordance with legislation that requires proper treatment, recovery and recycling.
Please contact your local authorities for the correct method of disposal. By doing so, you will ensure that your disposed product undergoes the necessary treatment, recovery and recycling and thus prevent potential negative effects on the environment and human health.
IMPORTANT NOTICE
Alerts the user to the presence of dangerous voltage within the product's enclosure.
To reduce the risk of electric shock or fire, do not open the cover. Refer servicing to qualified service personnel.

Alerts the user to the presence of important operating instructions.

This mark indicates this unit belongs to class 1 laser product.
Warning:
To prevent the risk of fire or electric shock, do not expose this unit to rain or moisture. There are high voltage components inside so do not attempt to open the enclosure. Only qualified service technicians are allowed to maintain the unit.
Caution:
This DVD player contains a class 1 laser diode system.
Read this manual carefully and familiarize yourself with the instructions before operating.
After reading this manual, please keep for future reference.
To prevent direct laser radiation, do not attempt to open the enclosure. A visible laser beam will radiate when the enclosure is opened or when the interlock device is released. Do not stare at the laser beam.
To avoid damaging the loader of the unit, please do not pull or drag the tray of the loader when operating, and switch off the power supply only when "NO DISC" is displayed.
Never place objects on top of the unit. Doing so may affect playback or damage the device.
If using power plug and appliance coupler as a make and break device, it should be operated easily.
Keep the unit away from water or high humidity. It is strongly forbidden to place any utensil with liquid such as a vase on the top of the unit.
Table of Contents
Page 1 IMPORTANT NOTICE
Page 1 Important safeguards
Page 2 Supported formats
Page 3 ABOUT THE UNITS
Page 3 Front panel identification
Page 3 Rear panel identification
Page 4 Remote control panel identification
Page 5 Remote control buttons&functions
Page 6 CONNECTION
Page 6 System connection
Page 6 Connection to ANTENNA
Page 7 THE SETUP MENU SYSTEM OF DVD PLAYER
Page 7 General setup of setup menu
Page 7 System setup
Page 9 Language setup
Page 9 Audio setup
Page 10 Video setup
Page 10 Speaker setup
Page 11 Digital setup
Page 12 THE SETUP MENU SYSTEM OF DVB-T
Page 12 Installation guide
Page 12 MENU
Page 12 Main menu
Page 15 Daily use
Page 15 INFO. Key
Page 15 Audio key
Page 15 SUB key
Page 16 PREV/NEXT key & F.R./F.F. Key
Page 16 EPG
Page 16 TV channel and radio channel list
Page 16 Favourite channel
Page 17 PVR function
Page 20 Technical specification
Page 21 Troubleshooting guide
IMPORTANT SAFEGUARDS
Please read the safety instructions, warnings and precautions carefully before you operate the appliance. Keep this manual safely for future reference.
Please carefully observe all warning, precautions and instructions on the operating instruction, and follow the guide to use them.
INSTALLATION
Water and Moisture - Do not use this appliance near water or high humidity environment - for example, a bathtub, washbowl, kitchen sink, or laundry tub, in a damp basement or near a swimming pool etc.
Accessories - Do not place the appliance on an unstable cart, stand, tripod, bracket, or table. The appliance may fall, causing serious injury to a child or an adult, and serious damage to the appliance.
- Never block the slots and openings by placing the appliance on a bed, sofa, rug or other similar.
- Never place the appliance in a confined space such as a bookcase, or built-in cabinet, unless proper ventilation is provided.
Ventilation - The slots and openings in the cabinet are provided for necessary ventilation. To ensure reliable operation of the appliance, and to protect it from overheating, these slots and openings must NOT be blocked or covered.
- Never cover the slots and openings with a cloth or other materials.
Heat - Do not place the appliance near or over a radiator or heater, or where it is exposed to direct sunlight.
- An appliance and cart combination should be moved with care. Quick stops, excessive force and uneven surfaces may cause the appliance and cart combination to overturn.
Power source - This appliance should be operated only from the type of power source indicated on the marking label. If you are not sure of the type of electrical power supplied to your home, please consult your dealer or local power company. For those appliances designed to operate from battery power, or other sources, please refer to the operating instructions.
When not in use-Unplug the power cord of the appliance from the outlet when the appliance is not used for a long period of time.
To disconnect the cord, pull it out by grasping the plug. Never pull the plug out by the cord.
Lightning-for added protection for this appliance during a lightning storm, or when it is left unattended and unused for long periods of time, please unplug it from the wall outlet and disconnect the antenna or cable system. This will prevent damage to the appliance due to lightning and power line surges.
Cleaning -Unplug the appliance from the wall outlet before cleaning or polishing it. Do not use liquid cleaners or aerosol cleaners. Use a cloth lightly dampened with water for cleaning the exterior of the appliance
Damage Requiring Service- Unplug the appliance from the wall outlet and refer servicing to qualified service personnel under the following conditions:
- When the power cord plug is damaged or frayed.
Overloading -Do not overload wall outlets, extension cords or convenience receptacles beyond their capacity, since this can result in fire or electric shock.
Power-cord protection - Route the power cord so that it is not likely to be walked on or pinched by items placed upon or against them, Paying particular attention to the plugs, receptacles and the point where the cord exits from the appliance.
Object and liquid entry - Never push objects of any kind into the appliance through openings as they may touch dangerous voltage points or short out parts that could result in a fire or electric shock. Never spill liquid of any kind on the appliance.
Servicing-Do not attempt to repair the appliance yourself as opening or removing covers may expose you to dangerous voltage or other hazards. Do refer all servicing to qualified service personnel.
Call a qualified service technician if:
-
The appliance does not operate normally when following the operating instructions, adjust only those controls that are specified in the operating instructions. Improper adjustment of other controls may result in damage and will often require extensive work by a qualified technician to restore the appliance to normal operation.
-
The appliance has been subject to excessive shock by being dropped, or the cabinet has been damaged.
-
The appliance does not appear to operate normally or exhibits a marked change in performance. This indicates a need for service.
-
Liquid has been spilled or objects have fallen into the appliance.
-
The appliance has been exposed to rain or water.
IMPORTANT NOTICE
• Usually the unit plays CD-R, CD-RW and Mp3 discs, although CD-R and CD-RW media with not be indicated in the display. But due to the variety of disc types, recording computer, operating systems and burning software we cannot guarantee that every CD-R or CD-RW is playable. The unit does not play DVD-ROM, CD-ROM, ect. And there is no way to play back discs in SECAM color system, just PAL and NTSC be supported.
The type of functions and operations that can be used for a particular disc vary depending on the features of that disc. In some cases, there and operations may differ from the description given in this Operations Manual. In this event, follow the instructions given on the screen. This Operations Manual only covers basic disc operations. Therefore you should also read the information enclose to the Disc.
If this sign INVALID KEY appears on the screen, you have called up a function restricted by the Disc manufacture.
Supported formats
| Disc types | Symbol | Contents |
| DVD |  | Compressed digital audio - video |
| MPEG4 |  | Compressed digital audio - video |
| Video-CD (VCD) |  | Compressed digital audio - video |
| Super-VCD (SVCD) |  | Compressed digital audio - video |
| CDDA |  | Digital audio |
| MP3 |  | Compressed digital audio |
| Kodak Picture CD |  | Compressed digital static image |
| JPEG |  | Compressed digital static image |
- All repairs and technical service should be made by qualified specialist from service centers.
- All images provided herein are schematic drawings of real objects and may differ from their real images.
Front panel identification

natural_image
Simple line drawing of a horizontal beam supported by two vertical supports and two horizontal supports with circular markers (no text or symbols)
① DVD Disc door
② Power button
③ Remote control signal sensor
4 LED display
⑤ Open/close button
⑥ Play/pause button
7 USB jack
8 Stop button
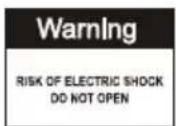
Rear panel identification
① ANTENNA IN (Connect to the RF)
② ANTENNA OUT (Connect to another TV)
③ Digital Coaxial output
4 HDMI output
⑤ R/L Audio Stereo output
6 Video output
⑦ Component Y Cb/Pb Cr/Pr output
8 Scart output
9 Power cable to 220-240V\~power source


Remote control panel identification
Remark:
When using, direct the remote control to the infra-red sensor on the product(within 45 degrees angle.
Do not put remote control near sources of heat or in an environment where moisture or dampness is present.
Do not immerse the remote control in water or any other liquid.
Do not use old and new batteries and always use the same type of batteries.
Please replace batteries when you find the remote control does not work or work's intermittently.
Insert Remote batteries
natural_image
Simple line drawing of a mechanical component or tool with an arrow indicating direction (no text or symbols)- Remove the battery comer in the direction of the arrow.


-
Insert two 1.5V AAA batteries, paying attention to the correct polarities(+ and -)
-
Replace the battery cover.


Remote control buttons&functions
| No. | Name/Symbol | Function in DVD Mode | Function in Digital TV Mode |
| 1 | POWER | Power / Standby | Power / Standby |
| 2 | 0-10+ | Select track or chapter | Change ChannelsEnter numbers and letters into menus. |
| 3 | SETUP/MENU | Enter the DVD setup menu | Enter the DVB setup menu |
| 4 | ▲ | Move up in menu items | Move up in menu items/move up the channel |
| 5 | ◀ | Move left in menu items | Move left in menu items |
| 6 | ENTER | Press to confirm the selected menu | Press to confirm the selected menu |
| 7 | PBC/MENU | Display /Exit the DVD/VCD menu | No Function |
| 8 | STOP | Stop the playing | Stop function when in the recording files, timeshift and read USB. |
| 9 | REV | Reverse search | For reading USB files function |
| 10 | VOL- | Volume down | Volume down |
| 11 | FWD | Fast Forward | For reading USB files function |
| 12 | MUTE | Mute | Mute |
| 13 | TITLE/TEXT | Select the DVD title /No function | No function / Start & Stop digital teletext |
| 14 | GOTO | Goto the title/chapter/time of the DVD/VCD you want to watch | When reading USB moves format MPEG4/H264 /MKV, that will be have goto function. |
| 15 | AUDIO | Select Audio Language | Select Audio Language |
| 16 | ZOOM | Reduce / Enlarge video output | Reduce / Enlarge video output |
| 17 | RED button | No function | Auxiliary function button |
| 18 | GREEN button | No function | Auxiliary function button |
| 19 | OPEN/CLOSE | Open or close the disc | No function |
| 20 | DVD/DVB | Switch DVB/ DVD mode | Switch DVB/ DVD mode |
| 21 | USB | No function | Switch DVD/ USB mode |
| 22 | TV/RADIO | No function | Switch the TV or Radio channel |
| 23 | CLEAR/FAV | Clear the screen display | Favorite channel setting switch |
| 24 | PROG/EPG | Change playback order | Display or exit EPG |
| 25 | OSD/INFO | Display Title/Chapter/Tim | Display the TV program information |
| 26 | ▶ | Move right in menu items | Move right in menu items |
| 27 | ▼ | Move down in menu items | Move down in menu items/move down the channel |
| 28 | SUBT | Select language subtitle | Switch Subtitle On/Off |
| 29 | PLAY/PAUSE | Play disc/ Pause playback | Timeshift function button, Pause playback when reading USB files |
| 30 | PREV | Skip to the prev chapter or track | For reading USB files function |
| 31 | VOL+ | Volume up | Volume up |
| 32 | NEXT | Skip to the next chapter or track | For reading USB files function |
| 33 | V-MODE | Select the video out format | Select high-definition resolution |
| 34 | EXIT/RETURN | Exit DVD/Return to the menu | Exit DVB |
| 35 | REPEAT | Title or chapter repeat | No function |
| 36 | REC | No function | Start to record current TV/Radio channel /PVR function |
| 37 | SLOW ↻ | Slow Play | Back to program functions |
| 38 | YELLOW button | No function | Auxiliary function button |
| 39 | BLUE button | No function | Auxiliary function button |


SYSTEM CONNECTION
flowchart
graph TD
    A["TV/ACV"] --> B["Audio IN"]
    B --> C["Video IN"]
    C --> D["Monitor"]
    D --> E["Scart in"]
    F["Amplifier"] --> G["Coaxial"]
    G --> H["L (WHITE)"]
    G --> I["R (RED)"]
    H --> J["Audio IN"]
    I --> J
    J --> K["L"]
    J --> L["R"]
    M["Video OUT"] --> N["Audio IN"]
    N --> O["L"]
    N --> P["R"]
    Q["Video IN"] --> R["HDMI IN"]
    R --> S["Scart in"]
    T["ACV"] --> U["320.243P-85Hz"]
CONNECT TO ANTENNA
DO NOT: Connect the AC power socket to the wall outlet before the system connection is completed.
Put the Terrestrial aerial's connector jack into the player's "RF IN" socket, on its rear panel. "RF OUT" socket also can be connected to another STB, which provides same aerial signals.
General Setup of Setup Menu
A) Press the Setup button, the main setup appears. When the main menu displayed the DVD system will auto pause.
B) Press the Down or Right arrow button to activate that page; For example, if you want to setup the video page, press Right to highlight the video icon, the video page will be displayed on the screen.
C) Press the Down arrow button to highlight the desired option. Press Enter or press Right to select, the setting of that option appear on the right; For example, press the Down arrow button to highlight the BRIGHTNESS option, the press Enter to select, the brightness setting appear on the right.
D) Press the arrow buttons to highlight the Exit Setup option, then press Enter or Setup again to exit Setup Menu.
SYSTEM SETUP
The system setup options are illustrated below:
● TV SYSTEM
According to the Color System of the TV, you can choose the TV System.
◆AUTO: Choose this settings if your DVD player is connected to a multi-systemTV.
◆NTSC: Choose this settings if your DVD player is connected to a NTSC TV.
◆PAL: Choose this settings if your DVD player is connected to a PAL TV.
The default setting is PAL.
● AUTO PLAY
◆ ON: Choose this setting to activate the AUTO PLAY.
◆ OFF: Choose this setting to cancel the AUTO PLAY.
The default setting is ON.
- HD OUTPUT(HDMI OUTPUT)
◆ HD OFF: Select HD OFF to turn off the HD OUTPUT
◆ 720P: Select this option for 720P high-definition video out
◆ 1080i: Select this option for 1080i high-definition video out
◆ 1080P: Select this option for 1080P high-definition video out
The default setting is HD OFF.


• VIDEO
◆ Interlace-YUV: Choose this setting if your DVD player is connected to a TV with Y, Cb, Cr video cables.
◆P-SCAN: Choose this setting if your DVD player is connected to a progressive scan TV with Y, Cb, Cr video cables.
◆ TV-RGB: Choose this setting if your DVD player is connected to a TV with an TV-RGB cable.
The default setting is TV-RGB.
• TV TYPE
◆16 : 9 (Wide Screen): Choose this setting if your DVD player is connected to a wide screen TV. If you choose this setting and you do not have a wide screen TV. The images on the screen may appear distorted due to vertical compression.
◆4 : 3 LB (Letter Box): Choosing this setting if your DVD player is connected to a normal ratio TV, connector You will see the movies in their original aspect ratio(height-to-width ratio). You will see the entire frame of the movie, but it will take up a smaller portion of the screen vertically. The movie might appear with black bars at the top and bottom of the screen.
◆4 : 3 PS (Pan & Scan): Choosing this setting if your DVD player is connected to a normal ratio TV. You can fill the movie to the entire screen of your TV. This might mean the parts of the picture (the left and right edges) will not be seen.
- PASSWORD
The password option is initialized locked, and you cannot set the parental limit or change the password. In order for the Parental feature word, the password mode must be turned on. If you want to set the parentals limit, you will need to enter the default password, which is 0000, then press Enter to confirm. To change the password, you will be prompted for the old password, then be prompted for a new. Enter a 4-digit number (this is your password).
● RATING
The rating feature is a rating limit system, like movie ratings. It works with DVD discs that have assigned a rating. This helps you control the types of DVD that your family watches.
There are 8 rating options: 1 Kid Safe; 2 G; 3 PG; 4 PG 13; 5 PGR; 6 R; 7 Nc17; and 8 ADULT.
Select the 8 ADULT option to cancel the rating limit. The default setting is 8 ADULT.
● DEFAULT
Choose this option to resume all the setup options to default settings.
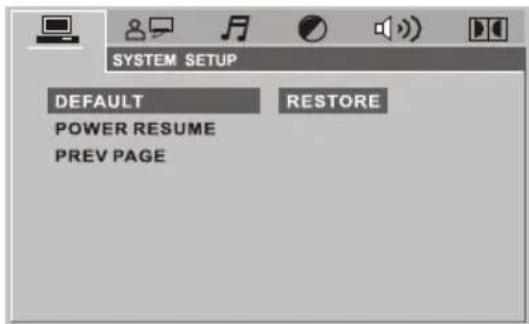
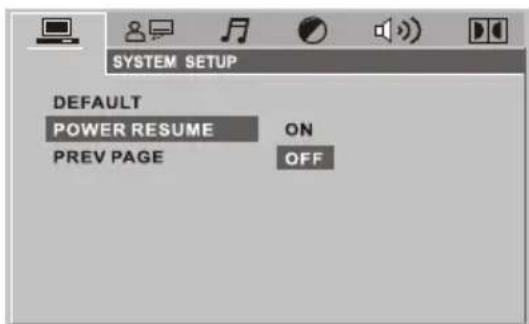
● POWER RESUME
Highlight the POWER RESUME option, is only available for DVD/VCD/CD.
ON: turn on the POWER RESUME OFF: turn off the POWER RESUME

LANGUAGE SETUP
The language setup options are illustrated below:
● OSD LANGUAGE
◆ Highlight the OSD LANG option, and press the arrow buttons to choose the OSD language you prefer. Press Enter to confirm. And it will displays OSD in that language.
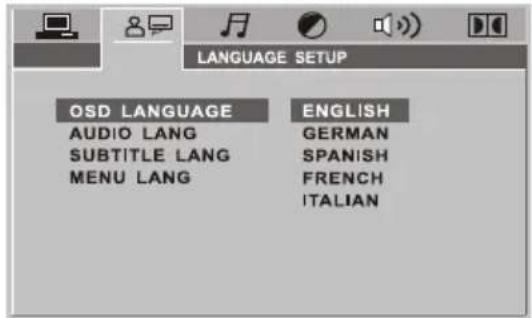
● AUDIO LANGUAGE
◆ Highlight the AUDIO LANG option, and press the arrow buttons to choose the audio language you prefer. Press Enter to confirm. If the disc you are playing has that language available, it will displays audio in that language; There are 5 optional audio language: English, French, Spanish, German, Italian.

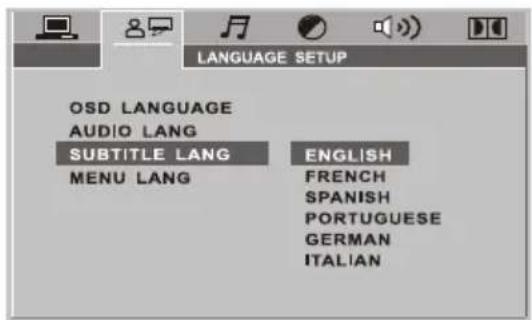
SUBTITLE LANGUAGE
◆ Highlight the SUBTITLE LANG option, and press the arrow buttons to choose the subtitle language you prefer. Press Enter to confirm. If the disc you are playing has that language available, it will displays subtitles in that language; There are 6 optional audio language: English, French, Spanish, Portuguese, German, Italian.
● MENU LANGUAGE
◆ Highlight the MENU LANG option, and press the arrow buttons to choose the menu language you prefer. Press Enter to confirm. If the disc you are playing has that language available, it will displays menu in that language; There are 6 optional audio language: English, French, Spanish, Portuguese, German, Italian.
AUDIO SETUP
The audio setup options are illustrated below:
AUDIO OUT
Highlight the SPDIF OUTPUT option, and press the arrow buttons to choose the spdif output mode you prefer. Press Enter to confirm; There are 3 optional spdif output modes: SPDIF/OFF, SPDIF/RAM, and SPDIF/PCM.
◆SPDIF/OFF: From the Coaxial Output jack, no signal is output.
◆ SPDIF/ RAW: Choose this setting if your DVD player is connected to a power amplifier with a coaxial cable; when playing a disc recorded with Dolby Digital, DTS and MPEG audio formats, the corresponding digital signals will be output from the Coaxial Output jack. This player is digital output jacks are designed for a connection to a Dolby Digital, DTS or MPEG receiver or decoder.
◆SPDIF/ PCM: Choose this setting if your DVD player is connected to a 2-channel digital stereo amplifier; When playing a disc recorded with Dolby Digital and MPEG audio formats, audio signals will be modulated into a 2-channel PCM signal, and it will be output from the Coaxial Output jack.


THE SETUP MENU SYSTEM OF DVD PLAYER
KEY
Use the Up and Down arrow button to move the scroll and adjust the KEY.
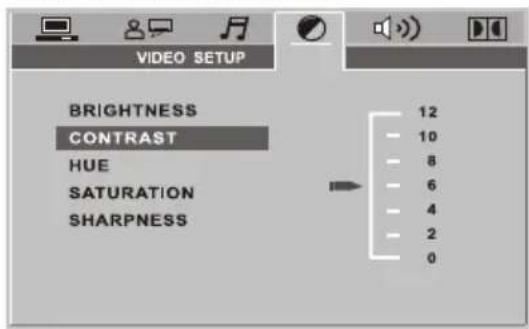
VIDEO SETUP
The video setup options are illustrated below:
● BRIGHTNESS
Use the Up and Down arrow button to move the scroll and adjust the brightness.
CONTRAST
Use the Up and Down arrow button to move the scroll and adjust the contrast.
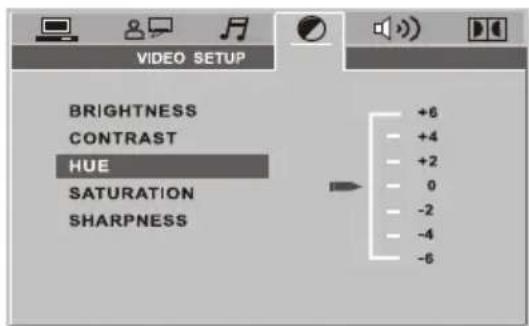
HUE
Use the Up and Down arrow button to move the scroll and adjust the hue.
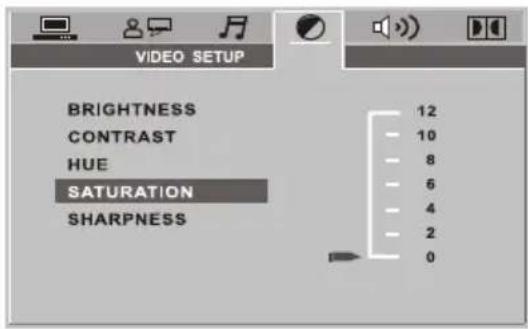
SATURATION
Use the Up and Down arrow button to move the scroll and adjust the saturation.
SPEAKER SETUP
The speaker setup options are illustrated below:
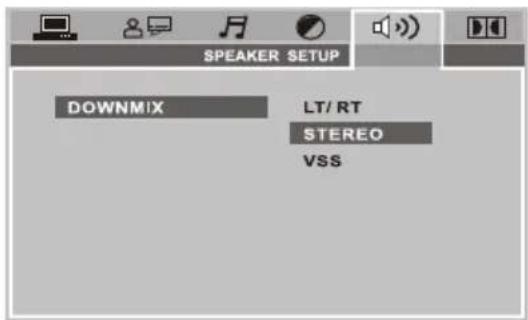
- DOWNMIX
Use the Up and Down arrow button to move scroll and adjust the saturation.
◆LT/RT: Choose this setting, it will be sound like in a movie theatre if the original movie the disc was recorded from was encoded in the Pro Logic Dolby Digital format.
♦STEREO: Choose this setting, when 2.1-channel sound playing, two channels of signals will be output from the left and right sound track; when 2-channel sound playing, stereo signal will be output.
◆VSS: Choose this setting, when a disc recorded with 2.1-channel sound formatplaying, the fictitious surround sound tracks effect will be heard from the main sound track.


DIGITAL SETUP
The video setup options are illustrated below:
● OP MODE
◆LINE OUT: Choose this setting to line out the input signal. It will be more suitable for playing in the night time, for the output volume is low.
◆RF REMOD: It will be more suitable to choose this setting for playing in the day time, for the output volume is high.
● DYNAMIC RANGE
◆DYNAMIC RANGE: When "LINE OUT" is selected, choose this setting to adjust the line out ratio and get different effect. If adjusting to FULL, the audio signal peak value will be the minimum, while adjusting to OFF maximum.
NOTE:
This option will be validated when the DOWNMIX OFF.
- DUAL MONO (LEFT+RIGHT)
Choose this option to setup the L and R mono output mode; There are four modes in this option: STEREO, MONO L, MONO R, and MIX MONO; It is mainly used in karaoke mode.
When you want to the DVB-T mode, press "DVD/DVB" button of the remote control.
INSTALLATION GUIDE
If you are using the unit for the first time or have restored the unit to Factory Default, the installation Guide Menu will appear on your TV screen. Follow the help information that at the bottom of the window to select preference menu language and suitable country (Region) and start channel search.
(1) [OSD Language] Press RIGHT/LEFT key to select a language.
(2) [Country] Press RIGHT/LEFT key to select your country of residence.
(3) [Channel Search] Press RIGHT or OK key to begin Automatic channel search. If no channel is found during the channel searching process, please check your antenna connections and antenna are in working order. After the scanning process is completed the receiver will automatically save the scanned channels and display the first channel in the list.
While you are using the unit, if you wish to perform an AUTO search, simply press the SCAN key on the remote control. Or you can access the CHANNEL SEARCH menu to do the AUTO/MANUAL channel search. Press MENU key on the remote and select [Channel Search] using RIGHT/LEFT keys.
This Menu provides options to adjust the Search Channel settings. Press UP/DOWN to select an option and press RIGHT/LEFT to adjust the settings. Press EXIT to exit the Menu.
MENU
MAIN MENU
Most functions are available in main menu. Follow the operation help information on the bottom of the menu to modify the preference options. A password will be required when modifying advanced options in the Menu. The default password is "000000".
Press the MENU key on the remote control; you can access the Main MENU. There are 7 items for set up. Use the LEFT and RIGHT keys to navigate through the menu. Select the desired option and press the OK key or the RIGHT key to adjust the settings. Press the EXIT key to exit the main menu.

a. Program Settings:
You can edit the programs, check the TV Program Guide, sort the channels, and set the LCN here.
1) To edit your program preferences (to lock, skip, favourite, move or delete a program), you need to enter a password. Enter the default password "000000". The master unlock password is "888888".
2) The EPG is an on-screen TV guide that shows scheduled programs seven days in advance for every tuned channel. Press the EPG key on the Remote Control to access the Electronic Program Guide.
3) Sort
NOTE: It is important to deactivate the LCN function while sorting out the position of the channels. The "Sort" function allows you to sort the channels by different methods:
By LCN: This will sort the channels by ascending order.
By Service name: This will sort the channels in alphabetical order.
By Service ID: This will sort the channels by Service ID.
By ONID: This will sort the channels according to the ONID.
b. Picture Settings:
The Picture option allows you to set the different functions such as:
Aspect ratio
The aspect ratio of the video can be 4:3 (also known as Anamorphic Image) or 16:9 (also known as widescreen TV). Normally the aspect ratio of standard definition video should be 4:3 and the high definition video should be 16:9. In order to get excellent quality on the TV set, press the MENU key to enter the menu, and choose the aspect ratio setup menu to set suitable aspect ratio. The screenshot of the aspect ratio window is illustrated below.
Here is a description of how the aspect ratio conversion mode chosen, the received stream and the user's television set aspect ratios.
16:9 Stream on a 16:9 TV

Whatever the mode
4:3 Stream on a 4:3 TV

Whatever the mode
4:3 Stream on a 16:9 TV
natural_image
Simple black oval shape centered on a white background, enclosed in a black rectangle (no text or symbols)Letter-box
16:9 Stream on a 4:3 TV

Letter-box

natural_image
Simple black oval shape centered on a white background, no text or symbols present.Pan and scan

Pan and scan

natural_image
Simple black oval shape centered on a white background (no text or symbols)Full Screen

Full Screen

Display black bars Not display area of the stream


Resolution:
You can choose different resolution according to your TV: 576i, 576p, 720p, 1080i, 1080p.
TV format: PAL/NTSC.
c. Channel Search settings:
(a) Auto Search: This option will automatically search for TV and Radio channels and save them once the scanning is complete. All previously saved channels and settings will be deleted.
(b) Manual Search: This option allows you to scan for new channels without deleting previously saved channels and settings.
(1) Select "Manual Search" and press the "OK" or "Right" key. The Manual Channel search screen will appear.
(2) Press the "Right" or "Left" keys to select the channel frequency.
(3) Press the "OK" key to start scanning for new channels.
(4) If a new channel is found, it will be saved and stored along with the rest of the channels. If no channels are found, the unit will automatically exit after finishing the scanning process.
d. Time settings:
It allows you to set:
Time Offset: Select auto or manual for GMT offset adjustments.
Country Region: Select the Country Region when [Time Offset] is set to AUTO.
Time Zone: Select the Time Zone offset when [Time Offset] is set to MANUAL.
Power Down (Sleep): Select the desired time for the Auto-shut off function (from 1 hour to 12 hours or set it to Off).
e. Option:
The menu contains the following options:
OSD Language: Change the ON Screen Display language.
Subtitle language: Select the subtitle language.
Audio language: If the program has multi-languages. Set your preference here.
f. System settings:
The menu contains the following options:
a) Parental Guidance: The options for setting up the age reference starts from 4 years to 18 years. To access this function you will require to input a code. The default password is "000000". This function can also be deactivated simply by setting it to OFF.
b) Set Password: It allows you to modify the default password, which is "000000".
c) Restore Factory Default: It allows you to restore the unit to its default factory settings. You will be asked to enter your password "000000". Press "OK" key once done.
Note: This function will delete all your saved channels and your personal settings.
d) Information: You can check the software version of your unit.
g. USB Settings:
The USB menu has 5 options:
(1) MULTIMEDIA:
While in TV Mode, press the "USB" button to access to the Multimedia menu. The menu contains 4 different icons: Music, Photo, Movie, and PVR.
Music Playing: Select "MUSIC" icon, move the cursor to enter the path of the desired audio file. Press the OK button to play the selected audio file.
Photo Viewing: Choose PHOTO icon, and enter the path of the desired photo files. Press OK button to view the desired photo files.
Movie Playing: Choose MOVIE icon, and move the cursor to choose the path of the desired video files. Press the OK button to play the desired video files.


THE SETUP MENU SYSTEM OF DVB-T
PVR Playing: Select PVR icon. Select the recorded file you want to play, press OK to begin playback. Press the RECALL key to move up to the next Folder. Press the RED key to switch between Preview and Full screen modes. Use the YELLOW key to delete the file you don't want. Press the GREEN key to rename the recorded file if desired.
(2) Photo configure: You can adjust the slide time, slide mode and aspect ratio here.
(3) Movie configure: You can set the Aspect Ratio, Subtitle Specific, Subtitle background and Subtitle Font-colour here.
(4) PVR configure: Record Device, here you can view information of your connected USB storage device which includes Format Type, Total and Free space available on drive. You can choose the option FORMAT to format your USB compatible device in Fat 32 of NTFS formats.
Daily use
INFO. KEY
Press "INFO" key to display the Information banner while viewing TV programs.
Information banner:
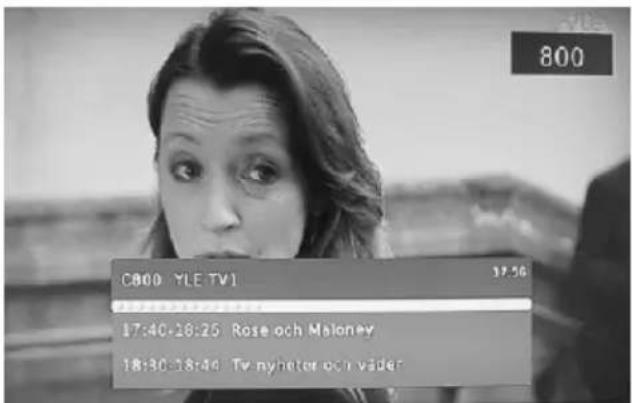
AUDIO KEY
Some programs may have multilingual audio language and this audio broadcast may be on a different audio mode such as Stereo, Left or Right. All the available audio languages will be displayed on the audio track window when you press the L/R key. The screenshot illustrates this below. If there is no audio output after you have selected the audio language, it indicates that there is no audio on the current audio mode, so you have to select the previous audio mode.
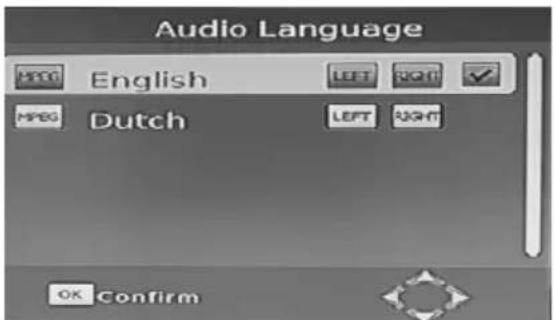
SUB KEY
Certain programs have multilingual subtitle information. All available subtitle languages will be displayed in the subtitle information window when you press the SUBTITLE key. The screenshot illustrates this below. Follow the help information in the subtitle window to select preferred subtitle.
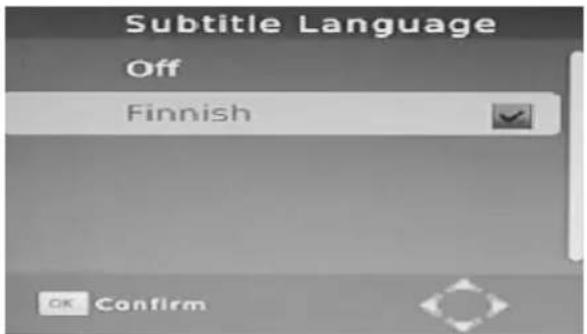


THE SETUP MENU SYSTEM OF DVB-T
PREV/NEXT KEY & F.R./F.F. KEY
The PREV/NEXT key and F.R./F.F. key can be used during playback of multimedia programs from your external USB device. Press the PREV/NEXT key to go to the previous/next program and F.R./F.F. key to fast forward or rewind during playback.
EPG
Press EPG key to display the on screen electronic program guide.
This displays a 7 Day Electronic Program Guide for all programs being broadcast from all broadcasters.
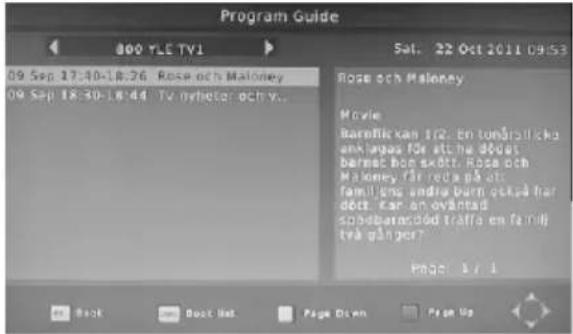
TV CHANNEL AND RADIO CHANNEL LIST
Press OK key to display all TV channels or all Radio channels. Follow the help information at the bottom of the window to select preferred channel.
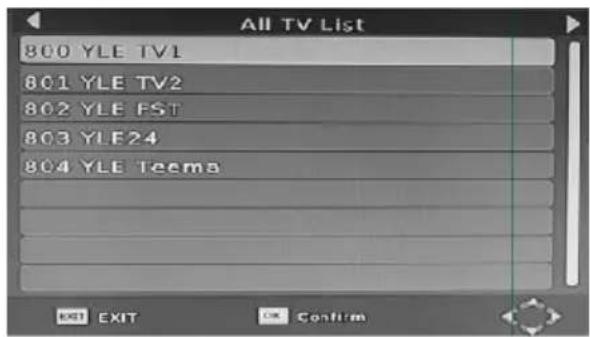
FAVOURITE CHANNEL
Setting up Favourite TV or Radio Channels:
You can add preferred channels to a favourite's channel list. Press the Menu key to access the Program Edit Menu. The Favourite channel option allows you to classify the channels by different genre: Movies/News/Sports/Music. Press the "FAV" or "OK" key to confirm your selection. A heart shaped symbol will appear next to that channel which confirms your selection.
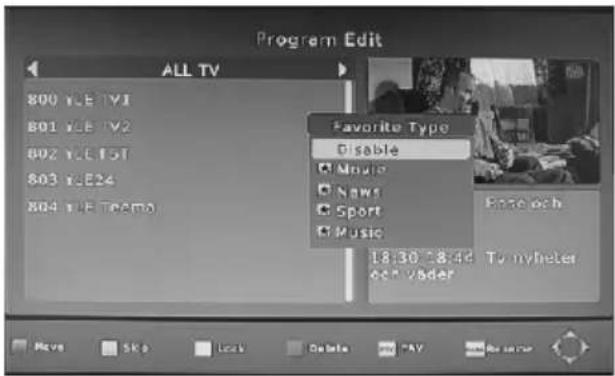
Disable Favourite TV or Radio Channel:
Press the Menu key to access the Program Edit Menu. The list of the favourite channels will be displayed. Highlight the desired channel to be disabled. Press "FAV" button, select the "Disable" option and press the "FAV" or OK" key to cancel. Press the "Exit" key to exit the menu.


View Favourite Channel:
While in normal viewing mode, press the "FAV" key to access to your favourite channel menu. Press the LEFT or RIGHT keys on your remote to access to the classified Sub-Menu (Movies/News/Sports/Music). Press the UP or DOWN keys to browse through your favourite channels. Press the "OK" key to select your favourite channel.
Delete a TV or RADIO Program:
Press the Menu key to access the Program Edit Menu. Select the program you wish to delete and press the "BLUE" key on your remote. A warning message will appear on your TV screen. Press the "OK" key to confirm the deletion of the channel. Repeat the above procedure to delete further channels.
Skip TV or RADIO Channel:
Press the Menu key to access the Program Edit Menu. Select the channel you would like to "Skip" and press the "GREEN" key on your remote. A skip symbol will appear. Now the channel is marked as a SKIP. To save your settings and exit the menu, press the "Exit" key.
Move a TV or RADIO Program:
Press the Menu key to access the Program Edit Menu. Select the desired channel you wish to move and press the "RED" key on your remote. A "MOVE" symbol will appear on your TV screen. Press the UP or DOWN keys to move the channel to the desired position. Press the "OK" key to confirm your selection. Repeat the above process to move further channels.
PVR FUNCTION
The PVR function of your receiver allows you to record and playback your favourite programs. Instant recordings, TV program Guide recordings and timer recordings are all available.
NOTE: To use the PVR function and TIMESHIFT function, make sure you have a USB Hard Disk Drive or a USB Flash Drive connected to the USB port of the receiver. Please note that due to buffer speed requirements some USB Flash Drives may not be compatible for use with the Timeshift function.
1) Instant recording
Press the REC. key to start instant recording of the TV program currently being viewed, the recording symbol would be displayed in the top left of the screen. Press the INFO. key to view information of the instant recording. Press the STOP key to stop the instant recording.
WARNING
To use the PVR function, Instant Recording function, TV program guide timer recording function, Timeshift function, playback program function and Multimedia Player function it is necessary to connect an external device such as a USB flash or an external Hard disk drive to the USB port. The maximum capacity of HDD supported by this unit is up to a size of 350GB. It supports FAT32 and NTFS formats.
Although this product is fully compatible with USB 1.1 and 2.0 standards, a small percentage of USB Flash drives might not be readable due to those USB-Drive manufacturers non-compliance with the full (official) USB 1-1/2-2 standards.
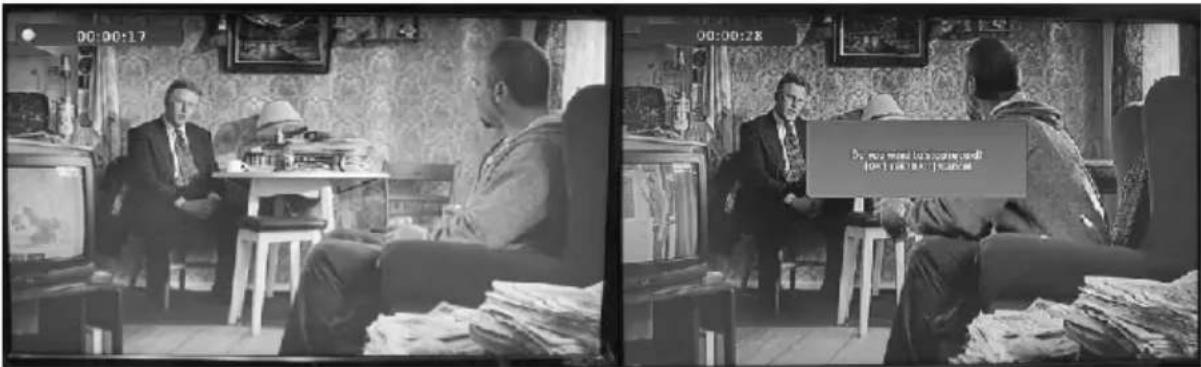

2) Electronic Program Guide Timer recording
MENU =>PROGRAM EPG=>Program Guide => Planning =>Schedule =>Event Add =>Timer Recording.
You will never miss any of your favourite programs again with the Electronic Program Guide recording feature.
While in TV mode, press the "EPG" key to access the on screen Electronic Program Guide, select the channel and program you wish to record. Press the "OK" key to select the desired program to be recorded. A Schedule Event window will appear. Select and set the correct parameters to schedule the recording. Set the Mode option to "Record". This program will be automatically recorded at the scheduled time.
You can edit the set timer recording in the Schedule Event Menu by editing the channel number, name, date, start time, and end time. Select the option of Once, Daily, Weekly or Monthly recording as desired.
Once the recording schedule setup has been set, you can at any time edit the schedule recording by pressing the "GREEN" key or delete the scheduled recording by pressing the "BLUE" key on your remote.
After having finished the Schedule Recording setup, press the "EXIT" key to save and exit.
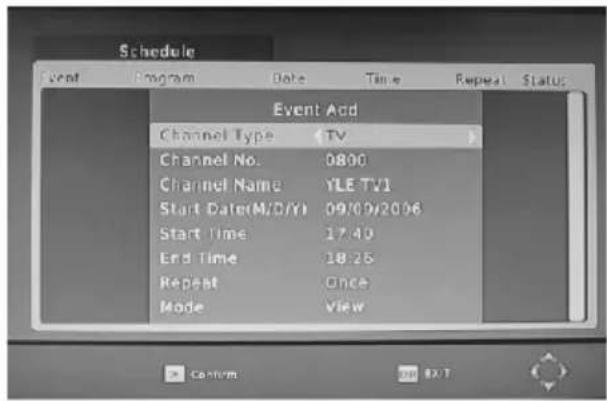
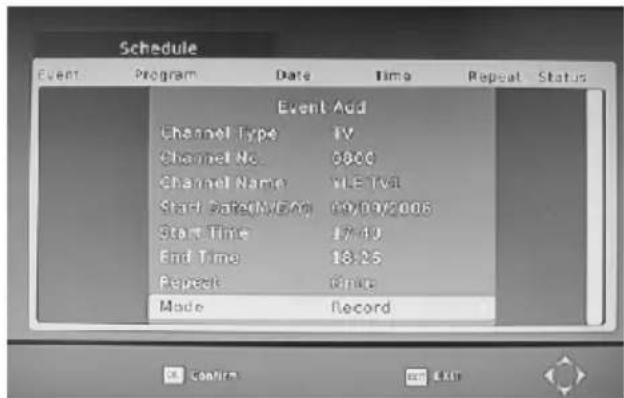
3) TIMESHIFT
The TIMESHIFT function allows you to pause the TV program being viewed. Once paused the tv program is being stored on your connected USB Hard Drive or Flash Drive.
When watching a program, press the "PLAY" key on the remote control to activate the function. You can now use the F.R. (Rewind function) to go back to the point you began the TIMESHIFT function or F.F. (Fast Forward) to catch up to live viewing. If you wish to stop the TIMESHIFT function, press the "STOP" key.
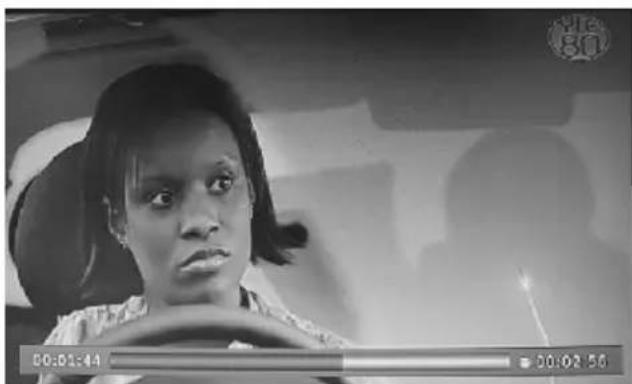
natural_image
Black-and-white photo of a person in a car, focused on the side mirror (no visible text or symbols)THE SETUP MENU SYSTEM OF DVB-T
To save the space of the USB hard drive, the recorded program is not stored under time shift mode. If you press the "INFO" key, you can access the TIMESHIFT information screen.
WARNING:
For the compatibility of HDD and USB devices with TIMESHIFT and PVR function, please refer to the table below:
| TIMESHIFT | PVR RECORD | FORMAT | |
| USB device | Works | Works | Fat32 |
| 3.5inch HDD | Works | Works | NTFS |
| 2.5inch HDD | Works | Works | NTFS / FAT 32 |
| 1.8inch HDD | doesn't work | Works | NTFS / FAT 32 |
Please make sure that you are NOT using an USB device or a 1.8inch HD for TIMESHIFT function.
MENV=>USB=>Multimedia=>PVR
4) Multimedia player
MENV=>Mul timdia You can now select to view Photos, play MP3 music files and view Movie files via the multimedia player. Known supported files are outlined below. NTFS, FAT32 and FAT16 file systems are supported.
| Player | Supported file |
| Photo | JPEG, BMP, PNG |
| Music | *.wma, *.mp3, *.aac |
| Movie | *.avi, *.mpg, *.dat, *.vob, *.mkv, *.mjpeg |
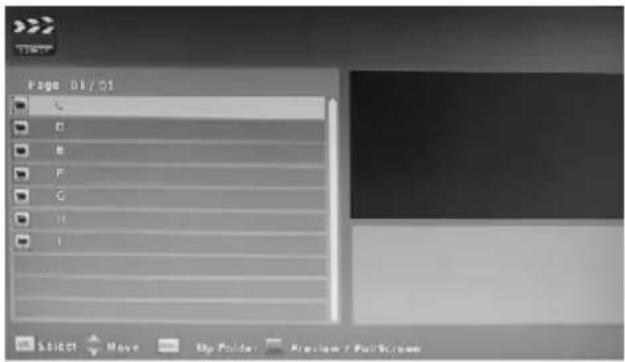
5) Format portable hard disk
A Format hard disk function has also been provided. Formatting a hard disk will permanently delete all the data on the hard disk. It is strongly recommended to backup all the data before formatting your hard disk drive.
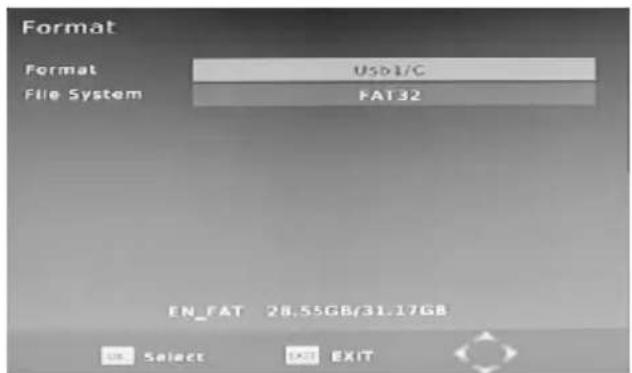
Tuner
| Input Connector | IEC 16902. Female |
| Input Frequency Range | VHF & UHF |
| Num of RF Inputs | 1 |
| Input impedance | 75 ohm |
| RF output Connector | (bypass)IEC 169-2 Male |
| Loop through | 177.5-816.5MHz |
Demodulation
| Standard | ETSI EN300 744 |
| Guard interval Modes | 1/32,1/16,1/8 Active Symbol duration |
| FEC Modes Rate | 1/2,2/3,3/4,5/6,7/8 |
| Carriers/Constellation | All modes supported including non hierarchical |
| Demodulation | COFDM(QPSK/QAM16/QAM64) 2K and 8K |
Video Decoder
| Standard | ISO/IEC 13818-2 and ISO/IEC 14496-10 |
| Transport stream | ISO/IEC 13818-1 |
| Video decoding | MPEG-2 SD/HD (MP@ML and MP@HL), MPEG-4 H.264/AVC SD/HDJPEG,BMP,PNG, Motion JPEGAVI, VOB, MOV, MKV |
| Aspect ratio | 4:3, 16:9 |
Audio Decoder
| Standard | ISO/IEC13818-3 TR1011154 |
| Audio decoding | MPEG-1 and MPEG-2 Layer I & II, Dolby Digital Audio, WMA and HE-AAC Digital Audio |
| Sample rate | 32 kHz, 22.1 kHz, 44.1KHz,48 kHz |
Subtitles
| Subtitle | DVB Subtitle |
Accessories
| Remote control unit | IR (36kHz) RC3 / other on request (38kHz)NEC |
| Batteries | 2 x AAA R03P type |
| User Manual | 1 pc |
| AV cable | 1 pc |
Power
| AC input range | AC 220V–240V 50/60Hz |
| Power consumption | <20W |
| Standby consumption | <1W |
| Symptom | Correction |
| No power | ◆ Connect the power plug into wall outlet securely |
| No picture | ◆ Verify the connection from the DVD video output to the TV video input. Then switch TV to appropriate mode (video 1)◆ Connect the video cable into the jacks securely. Refer to your television owners manual. |
| No sound | ◆ Connect the audio cable into the jacks securely.◆ Verify the connection from the DVD audio output to the TV or receiver audio input. Then switch to the appropriate source on the receiver. Refer to your audio amplifier owners manual. |
| Rolling b/w picture | ◆ Press the P/N button on your remote control.◆ Adjust the vertical hold on your TV. |
| Black&White picture | ◆ Damaged S-Video connector ( bent pin ) |
| The playback picture has occasional distortion | ◆ A small amount of picture distortion may appear because of a poor quality video/ sound transfer to disc. This is especially true of some discs manufactured between 1997-1998.◆ Scratched disc. |
| Brightness is unstable or noises are produced on playback pictures | ◆ Connect the DVD player directly through the TV and not through any other source. What you are viewing is the effect of the copy protection circuitry required on all DVD players.◆ If you do not have a video input on your TV, you must purchase an adapter from your dealer. |
| The DVD video player does not start playback | ◆ Place the disc with the graphics side up.◆ Place the disc on the disc tray correctly inside the guide.◆ Make sure the disc is free from scratches&fingerprint.◆ Cancel the parental lock function or change the parental lock level.◆ Turn the power off then disconnect the power plug and reinsert it back into the wall outlet. |
| Mp3 won't read disc or it skips | ◆ Return disc as the software edition used may not be compatible with the player. Check web site for instruction.◆ Use new editions of software such as Voyetra Audio station 4, Adaptecs Easy CD Creator, NTI or Roxios Toast Titanium.◆ Make sure Mp3 files are not encoded with a variable bit rate such as provided by Real Networks. |
| The remote control does not work properly | ◆ Replace the batteries with new ones. |

This symbol indicates that when the end-user wishes to discard this product, it must be sent to separate collection facilities for recovery and recycling. By separating this products from other household-type waste, the volume of waste sent to incinerators or land fields is reduced and natural resources will thus be conserved.
In order to fulfill ruling UNE EN-60065, we indicate that if the flexible wire is damaged, it can only be substituted by a technical service recognized by NEVIR, S.A., as per special tooling is required


DECLARACIÓN DE CONFORMIDAD
NEVIR, S.A. declara bajo su responsabilidad que el aparato indicado cumple los requisitos de las siguientes directivas:
| DIRECTIVA EMC | LOW VOLTAGE DIRECTIVA EEC |
| EN 55013:2001+A1:2003+A2:2006EN 61000-3-2:2006+A1:2009+A2:2009EN 61000-3-3:2008EN 55020:2007 | EN60065:2002+A1:2006+A11:2008 |
Descripción del aparato:
Reproductor DVD con TDT de alta definición
Modelo NEVIR:
NVR-2350DVD-HDUG
Importador: NEVIR, S.A.
Dirección del importador: Nevir S.A.
C/ Canteros, 14
Parque Empresarial Puerta de Madrid
28830 San Fernando de Henares Madrid
CIF: A-28966307