
AS200A Trio - Telefon GIGASET - Kostenlose Bedienungsanleitung
Finden Sie kostenlos die Bedienungsanleitung des Geräts AS200A Trio GIGASET als PDF.


| Produkttyp | DECT-Telefon mit Anrufbeantworter |
| Modell | AS200A Trio |
| Marke | Gigaset |
| Anzahl Mobilteile | 3 |
| Display | LCD, hintergrundbeleuchtet |
| Stromversorgung Basis | Netzteil 230 V/50 Hz |
| Stromversorgung Mobilteil | 2x AAA Ni-MH 1,2 V, 550 mAh |
| Gesprächszeit | bis zu 14 Stunden |
| Bereitschaftszeit | bis zu 180 Stunden |
| Reichweite Innen | bis zu 50 m |
| Reichweite Außen | bis zu 300 m |
| Gewicht Mobilteil | ca. 130 g |
| Maße Basis (BxHxT) | ca. 100 x 100 x 60 mm |
| Telefonbuch | bis zu 100 Einträge |
| Anruferkennung | CLIP |
| Freisprechen | Ja |
| Anrufbeantworter | Ja, bis zu 25 Minuten Aufnahme |
| Babyruf | Ja (Baby-Überwachung) |
| Hörgerätekompatibel | Ja (HAC) |
| Entsorgung | Nicht im Hausmüll; über Sammelstellen |
| Garantie | 2 Jahre |
Häufig gestellte Fragen - AS200A Trio GIGASET
Benutzerfragen zu AS200A Trio GIGASET
0 Frage zu diesem Gerät. Beantworten Sie die, die Sie kennen, oder stellen Sie Ihre eigene.
Eine neue Frage zu diesem Gerät stellen
Laden Sie die Anleitung für Ihr Telefon kostenlos im PDF-Format! Finden Sie Ihr Handbuch AS200A Trio - GIGASET und nehmen Sie Ihr elektronisches Gerät wieder in die Hand. Auf dieser Seite sind alle Dokumente veröffentlicht, die für die Verwendung Ihres Geräts notwendig sind. AS200A Trio von der Marke GIGASET.
BEDIENUNGSANLEITUNG AS200A Trio GIGASET

Gigaset AS200-AS200A-AS300_AS300A_UK_A31008-M2208-L101-2-7619
Pack contents

1 one Gigaset AS200/AS200A/AS300/AS300A Base station
2 one mains adapter
3 one Gigaset AS200H/AS300H handset
4 one phone cord
5 two batteries
6 one battery cover
7 this Quick start guide
If you have purchased a model with multiple handsets the package should contain two batteries, a battery cover, a charging cradle 8 with mains adapter 9 for each additional handset.
Connecting the base station
Connect power adapter 1 and Phone jack 2 to the base and place the cable recesses. Please ensure the power lead is fully inserted.
◆ The mains adapter must always be connected, as the Phone will not operate without a mains connection.
◆ Always use the power adapter and Phone cord supplied. Pin connections on Telephone cables can vary.
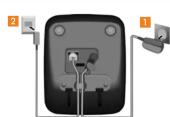
Please note:
Connecting the charging cradle (if included)

If you need to disconnect the plug from the charging cradle, press the release button 3 and disconnect the plug 4.
▶ Connect the flat plug from the mains adapter 1.
▶ Plug the mains adapter into the plug socket 2.
Preparing the handset
▶ Insert the batteries the right way round. The polarity is indicated in/on the battery compartment.
▶ Then slide the battery cover back into the main casing until it clicks into place.


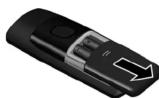
If you need to open the battery cover, for instance to replace the batteries, place your fingertip in the grooved area on the top of the cover and slide down.
Initial charging and discharging of the batteries

The correct charge status can only be displayed if the batteries are first fully charged and discharged
the batteries are first fully charged and discharged
▶ Place the handset in the charger for 7 hours.
Then remove the handset from the charger, make and receive Phone calls, setup the Phone etc. and do not put it on the charger until the batteries are fully discharged.
Setting the date and time
Set the date and time so that the correct date and time can be assigned to incoming calls, and so that the alarm can be used.

▶ Press the key below MENU on the display screen to open the main menu.
▶ Press the bottom of the control key ...
... until the Settings menu item appears.
▶ Press the key below OK on the display screen to confirm your selection.
The Date/Time menu item appears on the display.
▶ Press the key below OK on the display screen to open the input field.
The active cursor position is flashing. Enter day, month and year as an 6-digit number via the handset, e.g. 011010 for 01/10/10.
Message indication
Message Indication Key ☑ on handset will flash to indicate one or all of the following events:
- missed calls (if caller ID is enabled for your line numbers will be shown)
- new messages on the answer machine (AS200A/AS300A only)
Activating/deactivating the answer machine (AS200A/AS300A only)
MENU → Voice Mall → OK → Answer Mach. → OK (√ = on)
If the answer machine is activated, the answer machine icon will be displayed in the header.
To retrieve your messages, just press the flashing ☑ key on your handset.
Dial tone
The dial tone will only be heard when pressing the call button for 2 seconds. A short press will open the redial list.
You can also use the ☑ speaker button (AS300/AS300A only).
Display in idle status
◆ 2: internal number, if more then one handset is registered
- QD: answer machine is activated (AS200A/AS300A only)
Battery charge status:
- ③ □ □ □ □ (empty to full)
- ☐ flashes: batteries almost empty
- ① ② ③ flashes: charging procedure
Registration handset
Your handsets should already be registered by default, if your handset is flashing the text "No Base" then it can be that:
- Your base station is not switched on, please check if the power supply is connected properly.
◆ There is too much distance between the handset and base.
◆ Your handset has not been pre-registered in the factory.
In the case that the handset has not been pre-registered, or you want to register an additional handset to your base station, use the manual registration procedure below.
Automatic registering procedure
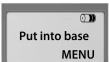
Place the handset with the display facing up in the base station.
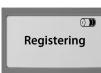
The handset registers automatically. Registration can take up to 5 minutes. Do not remove the handset from the base station during this time.

Manual registration procedure
- On the handset: MENU → Settings → OK → Handset → OK → Register HS → OK → enter the system PIN for the base and press OK. Default PIN = 0000
- On the base station:
Within 60 seconds of entering the system PIN, press and hold the registration/paging key (in. 3 seconds). Registration takes approx. 1 minute.
You can register up to four handsets to your base. You can also register other Gigaset handsets and handsets from other devices with GAP functionality.
Frequently asked questions
Q: There is no dial tone.
A: Press call button for 2 seconds (long press) to obtain dial tone. A short press opens the radial list.
O: The line is crackling / not clear
A: Have you used the new line cable provided? Please do not use an old cable.
Q: The display is not clear / seems to be broken.
A: The display is protected by a plastic film, please make sure you have removed the protective film.
O: The handset is not registered.
A: If your handset is not registered, please follow the Registration handset procedure.
(Described on this page)
Q: The caller ID is not working.
A. Have you subscribed to this service (CLIF) from your provider?
Q. Message indicator flashing and I cannot retrieve my message.
A: Message indicator will flash to indicate missed calls. (Described on this page)
Please check:
Have you used the phone cord supplied
Have you fully inserted the power cable into the base station
Have you inserted the batteries correctly
Have you charged the batteries for 7 hours
Have you set up the Date/Time
To download the latest manuals, visit our web-site: http://www.gigaset.com
You have questions? As a Gigaset customer, you can take advantage of our comprehensive service offerings. You can find help quickly in this User Manual and in the service pages of our Gigaset online portal: http://www.gigaset.com
If you have problems setting up or operation this product please call
GIGASET UK HELPLINE 0845 3670812
GIGASET IRL HELPLINE 1850 777277
Product may not be fully compatible with the national telephone network. It is clearly specified on the box near the CE mark for which country/countries the equipment has been developed. If the equipment is used in a manner inconsistent with this advice or with the instructions of the manual and on the product itself, this may have implications on the conditions for warranty or guarantee claims (repair or exchange of product). In order to make use of the warranty, the product purchaser is asked to submit a receipt which proves the date of purchase (date from which the warranty period starts) and the type of goods that have been purchased.
The handset and base at a glance
The handset at a glance
1 Charge status of the batteries
2 Answer machine icon (AS300A/AS300A only)
3 Displayke
4 Message key
Flashes:
5 AS200/AS200A:
Directory key
A3500/A3500A. Handfree ker
6 Control key (☐)
7 Talk e
8 AS300/AS300A:
(press down)
9 End call and
Off/Off key 0 Pinger on (of
(press and hold
in idle status)
1 Keypad lock on/or (press and hold)
2 Recall key
- Consum (flash)
- Dialling pause
(press and hold)
4 "Microphone off"
1 Microphone on
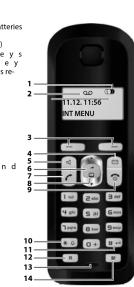
Display keys on handset: Pressing a key launches the function that appears above that key in the display.
Display icon Function when pressed INT Call other registered
handsets.
MENU Open main/submenu
Go back one menu
level.
▲ Scroll up/down or
adjust volume with □.
Move cursor to left/
right with [■].
◀ C Backspace deletes one
character at a time from right to left.
OK Confirm menu
function or save entry.
(No text)
AS200/AS200AAS300/AS300A
The Ground Truth image displays a single, solid horizontal line. According to Rule 2 (UNDERSCORE & LINE RULES), this is a stylistic or background line, not a placeholder underscore. Therefore, the OCR result must ignore it. The provided OCR content is "____", which consists of four underscores. This is an incorrect interpretation of the line as a placeholder, violating the rule that stylistic lines must be ignored. The OCR has hallucinated text (underscores) where none should exist. Hence, the result is inconsistent with the Ground Truth.
B
1
[1]
•
1
ess briefly, "Paging")
s and hold ). d deactivate answer machine
nine is activated.
: one new message or message is
r about 4 seconds; memory is full.
ter; + = louder)
act. adjust the speaking volume. adjust ringer volume
(二) 2017年1月1日至2018年1月1日
in the answer machine, or cancel
[Non-Text]
[Non-Text]
ent message (press once) or go o (press twice)
2 (p. 2017)
[Non-Text]
Making calls
Making external calls and ending calls
External calls are sell using the public telephone
External calls are calls using the public telephone network.
(Enter the phone number) → r
The phone number is dialled. (Of you can first
number.) During the call you can adjust the ear.
piece volume using (*) and set the volume with (*)
End the call/cancel diallin
Press the end call key ⚠.
You can automatically insert a network provider dialling code before any phone number.
Accepting a call
The handset indicates a
and by a display on the sc
7 to accept the call. When Auto Answer is acti-
voted, simply remove the handset from the base station/charging cradle. In idle status, use [1] to
activate the menu for setting the call volume and
use [ ] to set the volume.
Calling Line Identification
When you receive a call, the caller's number will be displayed on your handset; the caller's name will
be displayed if it is stored in the directory
Roguiromonts:
- You have asked your network provider for the
caller's number (CLIP) to be displayed on your
handset screen.
2 The Caller has asked the network number to be identified (CU).
<<0>> appears in the display if you have
not requested Calling Line Identification
Withheld appears if the caller has withheld CLI
and Unavailable appears if CLI has not been
requested.
Switch to mute
You can mute your handset when making automal cells. You sell on no longer bar
Press the "Microphone off" key ☒ during the call
to activate/deactivate the function.
Using the directory and lists
Using shortcut keys
You can assign directory entries to the keys 0
and 2=9.
→ MENU → Shortcut
→ (press the key you want
entry to)
To dial, press and hold the required shortcut key.
三、备查文件
Transferring the directory to
another na
Requirements: • The ordering and receiving the
- The sending and receiving manusees must both be registered to the same base station.
◆ The other handset and the base station can
send and recei
(□) → □ (select entry) → MENU
→ Send Entry / Send List → OK
→ (enter the internal number of the
RECEIVING HANDSET) → OK
Last number redial list
This list contains the ten last dialled numbers
Dialling from the last number redial list
C (press briefly)
→ □ (select entry)
→
Managing entries in the last number
redial list
(press briefly
→ [ ] (select entry)
▼ MEN
You can select the following settings
Use Number Edit or add to the number
Then dial or select other functions from the MENU
- 2017年 ,中国银行
Copy to Bill: Copy all entry to the
Delete Entry Delete selected entry
Delete List Delete all entries
[Non-Text]
[Non-Text]
[Non-Text]
Calls list/voicemail (network
mailbox) list
An advisory tone sounds and the message key
list/unicemail list. A message appears in the
display.
when you press the ☒ key, all the lists are dis-
played: if only one list contains new messages, this will be opened automatically.
Please note
If calls are saved in the network mailbox, you will
receive a message if the appropriate settings
have been set (depending on your network provider).
1
Calls list
Precondition: CLIP Depending on the type of list set, the calls list
contains
- answered calls
- missed calls - calls on the answer machine (AS200A/AS300A)
Depending on the type of list set, all numbers of
the last 25 in
The calls list is displayed as follows:
CallList 01:02
Conseist Office
Number of new chines: 1 Number of old, lead chines On the sell list
Open the calls in CallList 01
The last incoming call is displayed
If necessary, use [▶] to select another entry.
Using other funct
(select entry) → MENU
The following functions can be selected with [w]
Delete Entry
Copy to Dir. Copy an entry to the directory.
Date/Time Call date and time (if set).
Status New Call: new missed call.
Old Call: entry already read Answer call taken
1982.11.10
Delete ESK Waiting! All old and new entries will be deleted
7.19
Calling back a caller from the calls list
→ [*] (select entry) → C
Answer machine (AS200A/AS300A)
The answer machine can be operated from the bandest or by using the key on the base station.
The telephone is supplied with a pre-recorded
announcement. You can only record your own
This pre-recorded announcement is used if no
personal announcement is available.
If the memory is full, the answer machine switches itself off automatically. It activates again automat
ically when you delete old messages.
Activating/deactivating the answer machine
MENU → Voice Mail → OK → Answer Mach.
→ OR ( √ = on)
When the answer machine is switched on, the oo iron appears in the display.
D. 2017
MENU → Voice Mail → OK → Announ
→ OK → Rec announce → OK
→ Speak after OK → OK
You hear the ready tone (short tone). Now say your announcement (at least 3 seconds).
Press OK to confirm or press ⬇ or ➤ to reject you
recording. After recording, the announcement is played back for you to check
Please note:
Recording ends automatically when the max.
recording time of 170 seconds is reached or if
there is a life 7 seconds
Playing/deleting messages
Playing, deleting messages Open the voicemail list to play back messages
Stopping and controlling playback
During message playback:
2 Stop playback. Press 2 again to resume
Go to the start of the current message.
2 x ☐ Skip to the previous message
Skip to the next message.
2x | Go to the next message but one
Deleting individual messages
while playback is paused, press the 4C display key
Deleting all old messages During playback or pause:
MENU'→ Delete all old
OK (confirm the security prompt)
Accepting call from answer machine
You can still accept a call while the answ
Machine is recording the message by pressing a Recording stops and you can speak to the caller.
Setting up the answer machine
The answer machine has already been preset at
the factory. Make individual settings using the handset.
Details on how to set a delay time, after which the
answer machine is to answer a call, as well as details on how to set the recording length and
activate call screening during
available from the Menu tree.
Assigning key 1 for fast acc
machine (network mailbox)
Simply press and hold key 1 on the handset and
you will be connected direct machine (network mailbox)
The following table is provided in the image:
Remote operation when on the move You can check and activate your answer
from any other telephone (hotel, pay phone etc.)
Rec
◆ You have set a system PIN other than 000
◆ The phone you are using for remote
operation has touch tone claming (DTMF), i.e. you hear different tones when you pro
the keys.
Calling the answer machine and playing
back messages
(Dial your own number) → while listening to
you the
The following book are used for operation:
- Go to the start of the current message
Press twice to go back to the previous
message.
□ Stop playback. Press again to resume.
- Skip to next message. - delete current messages.
-
Activating the answer machine
(■) Enter your own number and allow the phone to sing until you have the messages "Please enter
PIN") → enter system PIN
The base station at a glance
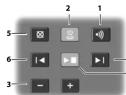
1 Registration/paging key:
Search for handsets (press briefly,
2 On/Off key: activate and deactivate answer machine.
Lights up: answer machine is activated.
- Flashes: there is at least one new message of message in the success of being presented.
Flashes very quickly for about 4 seconds; memory is fr
3 Volume keys: (- = quieter; + = louder) During previous block delivering the prompting volume
During message playback, adjust the speaking volume. While phone is ringing: adjust ringer volume.
4 Play/Stop key:
Play back messages from the answer machine, or cano playback.
During message
5 Delete current message.
6 Skip to the start of the current message (press once) or go to the previous message (press twice).
7 Skip to next message.
[Non-Text]
General
Changing the display language
MENU → Settings → OK
→ Language → OK
→ select the language → OK
The current language is indicated by √
if you accidentally choose a language you do not
understand. MENU 4.2
(press the keys one after the other)
Select the correct language with
The Ground Truth image displays a single, solid horizontal line. According to Rule 2 (UNDERSCORE & LINE RULES), this is a stylistic or background line, not a placeholder underscore. Therefore, the OCR result must ignore it. The provided OCR content is "____", which consists of four underscores. This is an incorrect interpretation of the line as a placeholder, violating the rule that stylistic lines must be ignored. The OCR has hallucinated underscores where none should exist in the GT. Therefore, the OCR result is inconsistent with the Ground Truth.
Resetting the handset
You can reset individual settings and changes that you have made. Entries in the directory, the calls
list and the handset's registration to the base
station will be retained.
MENU → Settings → OK
→ Handset → OK → Reset Handset → OK
Cancel the reset with 2
Restoring the base station to the
factory settings
When restoring factory settings:
◆ All handsets are de-registere
◆ Individual settings
- All lists are deleted - The system DIN is next to the original
code 0000
Only the date and time are retained.
Software reset
MENU → Settings → OK
→ Base → OK → Save Point → OK
- 2023年1月1日
Disconnect the power cord from the base station
Hold down the registration/paging key on the
base station while reconnecting the power cable
to the base station. Release the key after approximately 5 seconds.
。
Repeater mode
With a repeater you can increase the range of your
base station. You will need to activate repeater mode. Repeator mode and Eco mode or Eco
mode+ cancel each other out.
Operating the base station on
the PABX
The following settings are only necessary if


- Pack contents
- Connecting the base station
- Please note:
- Preparing the handset
- Setting the date and time
- Message indication
- Dial tone
- Display in idle status
- Registration handset
- Manual registration procedure
- Frequently asked questions
- Please check:
- The handset and base at a glance
- Making calls
- Using the directory and lists
- Answer machine (AS200A/AS300A)
- General
Marke : GIGASET
Modell : AS200A Trio
Kategorie : Telefon