P3384-V - Sicherheitskamera AXIS - Kostenlose Bedienungsanleitung
Finden Sie kostenlos die Bedienungsanleitung des Geräts P3384-V AXIS als PDF.

| Produkttyp | Netzwerkkamera |
| Modell | AXIS P3384-V |
| Marke | AXIS |
| Auflösung | 1920 x 1080 (HDTV 1080p) |
| Objektiv | 3,6 mm, feste Brennweite |
| Blickwinkel | ~80° horizontal |
| Tag/Nacht | Ja, IR-LEDs für Nachtsicht bis zu 15 m |
| Kompression | H.264 |
| Netzwerk | 10/100 Base-T Ethernet, PoE IEEE 802.3af |
| Stromversorgung | PoE (Power over Ethernet) oder 12 V DC |
| Schutzart | IP52 (staub- und spritzwassergeschützt) |
| Betriebstemperatur | 0 °C bis 50 °C |
| Abmessungen | ca. 100 mm x 80 mm (Durchmesser x Höhe) |
| Gewicht | ca. 300 g |
| Hauptfunktionen | Bewegungserkennung, Tag/Nacht-Umschaltung, digitaler I/O |
| Wartung und Reinigung | Gehäuse mit trockenem Tuch reinigen, kein Wasser oder Reinigungsmittel |
| Sicherheit | Passwortschutz, HTTPS-Verschlüsselung, IP-Adressfilter |
| Ersatzteile und Reparierbarkeit | Ersatzteile über AXIS-Support, Reparatur durch autorisiertes Servicecenter |
| Allgemeine Informationen | Konformitätserklärungen, CE-Kennzeichnung |
Häufig gestellte Fragen - P3384-V AXIS
Benutzerfragen zu P3384-V AXIS
0 Frage zu diesem Gerät. Beantworten Sie die, die Sie kennen, oder stellen Sie Ihre eigene.
Eine neue Frage zu diesem Gerät stellen
Laden Sie die Anleitung für Ihr Sicherheitskamera kostenlos im PDF-Format! Finden Sie Ihr Handbuch P3384-V - AXIS und nehmen Sie Ihr elektronisches Gerät wieder in die Hand. Auf dieser Seite sind alle Dokumente veröffentlicht, die für die Verwendung Ihres Geräts notwendig sind. P3384-V von der Marke AXIS.
BEDIENUNGSANLEITUNG P3384-V AXIS
AXISP3384-VFixedDomeNetworkCamera
AboutthisDocument
Thismanualisintendedforadministratorsandusersofthe AXISP3384-VNetworkCamera, andisapplicabletofirmware6.50and later. It includes instructions for using and managing the product on your network. Previous experience of networking will be found when using this product. Some knowledge of UNIX or Linux-based systems may also be beneficial, for developing shell scripts and applications. Later versions of this document will be posted to the Axis website, as required. See also the product's online help, available via the web-based interface.
Legalconsiderations
Videoandaudiosurveillancecanberegulatedbylawsthatvaryfrom countrytocountry.Checkthelawsinyourlocalregionbeforeusing thisproductforsurveillancepurposes.
Thisproductincludesthefollowinglicences:
- one(1)AACdecoderlicense - one(1)H.264decoderlicense Topurchasefurtherlicenses,co
Liability
Everycarehasbeentakeninthepreparationofthisdocument.Please informyourlocalAxisofficeofanyinaccuraciesoromissions.Axis CommunicationsABcannotbeheldresponsibleforanytechnical or typographicalerrorsandreservestherighttomakechangestothe productandmanualswithoutpriornotice.AxisCommunicationsAB makesnowarrantyofanykindwithregardtothematerialcontained withinthisdocument,including,butnotlimitedto,theimplied warrantiesofmerchantabilityandfitnessforaparticularpurpose.Axis CommunicationsABshallnotbeliablenorresponsibeforincidental or consequentialdamagesinconnectionwiththefurnishing,performance oruseofthismaterial.Thisproductisonlytobeusedforitsintended purpose.
Intellectualpropertyrights
AxisABhasintellectualpropertyrightsrelatingtotechnologyembodied in the product described in this document. In particular, and without limitation, these intellectual property rights may include one or more of the patents listed at www.axis.com/patent.htmandoneormore additional patents or pending patent applications in the US and other countries.
Thisproductcontainslicensedthird-partysoftware.Seethemenuitem "About"intheproduct'suserinterfaceformoreinformation.
ThisproductcontainssourcecodecopyrightAppleComputer, Inc.,underthetermsofApplePublicSourceLicense2.0(see www.opensource.apple.com/apsl).Thesourcecodeisavailablefrom https://developer.apple.com/bonjour/
Equipmentmodifications
This equipment must be installed and used in strict accordance with the instructions given in the user documentation. This equipment contains no user-serviceable components. Unauthorized equipment changes or modifications will invalidate all applicable regulatory certifications and approvals.
Trademarkacknowledgments
AXISCOMMUNICATIONS, AXISandVAPIXareregisteredtrademarksor trademarkapplicationsofAxisABinvariousjurisdictions. All other company names and products are trademarksor registered trademarks of their respective companies.
Apple,Boa,Apache,Bonjour,Ethernet,InternetExplorer,Linux, Microsoft,Mozilla,Real,SMPTE,QuickTime,UNIX,Windows,Windows VistaandWWWareregisteredtrademarksoftherespectiveholders. JavaandallJava-basedtrademarksandlogosaretrademarksor registeredtrademarksofOracleand/oritsaffiliates.UPnP ^TM is certificationmarkoftheUPnP ^TM ImplementersCorporation.
SD, SDHC and SDXC are trademarks or registered trademarks of SD-3C, LLC in the United States, other countries or both. Also, miniSD, microSD, miniSDHC, microSDHC, microSDXC are all trademarks or registered trademarks of SD-3C, LLC in the United States, other countries or both.
Regulatoryinformation
Europe
CE ThisproductcomplieswiththeapplicableCEmarkingdirectives andharmonizedstandards:
•ElectromagneticCompatibility(EMC)Directive2014/30/EU.See Electromagneticcompatibility(EMC)onpage2.
LowVoltage(LVD)Directive2014/35/EUSeSafetyonpag8
- Restrictions of Hazardous Substances (RoHS) Directive 2011/65/EU. See Disposal and recycling on page 3.
Acopyoftheoriginaldeclarationofconformitymaybeobtainedfrom AxisCommunicationsAB.SeeContactinformationonpage3.
Electromagneticcompatibility(EMC)
This equipment has been designed and tested to fulfill applicable standards for:
- Radiofrequencyemissionwheninstalledaccordingtothe instructionsandusedinitsintendedenvironment.
- Immunitytoelectricalandelectromagneticphenomenawhen installedaccordingtotheinstructionsandusedinitsintended environment.
USA
Usinganunshieldednetworkcable(UTP)-Thisequipmenthas beentestedusinganunshieldednetworkcable(UTP)andfoundto complywiththelimitsforaClassAdigitaldevice,pursuantopart 15oftheFCCRules.Theselimisaredesignedtoprovidereasonable protectionagainsttharmfulinterferencewhentheequipmentis operatedinacommercialenvironment.Thisequipmentgenerates, uses,andcanradiateradiofrequencyenergyand,ifnotinstalledand usedinaccordancewiththeinstructionmanual,maycauseharmful interferencetoradiocommunications.Operationofthisequipmentina residentialareaislikelytocauseharmfulinterferenceinwhichcase theuserwillberequiredtocorrecttheinterferenceathisownexpense.
Usingashieldednetworkcable(STP)—Thisequipmenthasalso beentestedusingashieldednetworkcable(STP)andfoundtocomply withthelimitsforaClassBdigitaldevice,pursuanttopart15ofthe FCCRules.Theselimitsaredesignedtoprovidereasonableprotection againstharmfulinterferenceinaresidentialinstallation.This equipmentgenerates,usesandcanradiateradiofrequencyenergyand,ifnotinstalledandusedinaccordancewiththeinstructions,maycause harmfulinterferencetoradiocommunications.However,thereisno guaranteeethatinterferencewillnotoccurinaparticularinstallation.If thisequipmentdoescauseharmfulinterferencetoradioortelevision reception,whichcanbedeterminedbyturningtheequipmentoffand on,theuserisencouragedtotrytocorrecttheinterferencebyoneor moreofthefollowingmeasures:
•Reorientorrelocatethereceivingantenna.
- Increase these separation between the equipment and receiver.
- Connecttheequipmentintoanoutletonacircuitdifferentfrom thattowhichthereceiverisconnected.
- Consultthedealeroranexperiencedradio/TVtechnicianforhelp. Tobeusedinaresidentialareaorademandingelectricalenvironment, theproductshallbeconnectedusingashieldednetworkcable(STP) thatisproperlygrounded.
Canada
ThisdigitalapparatuscomplieswithCANICES-3(ClassB).Theproduct shallbeconnectedusingashieldednetworkcable(STP)thatis properlygrounded.Cetappareilnumériqueestconformeàlanorme CANNMB-3{TclasseB).Leproduitdoîtêtreconnectéal'aided'uncâble réseaublindé(STP)quiestcorrectementmisàlaterre.
Europe
This digitalequipmentfulfillstherequirementsforRFemission according to the ClassBlimitofEN55022. The product shall be connected using ashieldednetworkcable(STP) that is properly grounded.
This product fulfill therequirements for immunity according to EN61000-6-1 residential, commercial and light-industrial environments.
Thisproductfulfillstherequirementsforimmunityaccordingto EN61000-6-2industrialenvironments.
Thisproductfulfillstherequirementsforimmunityaccordingto EN55024officeandcommercialenvironments.
Australia/NewZealand
This digitalequipmentfulfillstherequirementsforRFemission according to the ClassBlimitofAS/NZSCISPR22. The product shall be connected using ashieldednetworkcable(STP) that is properly grounded.
Japan
この装置は、クラスB情報技術装置です。この装置は、家庭環境で使用することを目的としていますが、この装置がラジオやテレビジョン受信機に近接して使用されると、受信障害を引き起こすことがあります。取扱説明書に従って正しい取り扱いをして下さい。本製品は、シールドネットワークケーブル(STP)を使用して接続してください。また適切に接地してください。
Korea
이기기는가정용(B급)전자파적합기기로서주로가정에서사용하는것을목적으로하며,모드지역에서사용할수있습니다.적절히접지된STP(shieldedtwistedpair)케이블을사용하여제품을연결하십시오.
Safety
ThisproductcomplieswithIEC/EN/UL60950-1,SafetyofInformation TechnologyEquipment.
Ifitsconnectingcablesareroutedoutdoors, theproductshallbe groundedeitherthroughashieldednetworkcable(STP)orother appropriatemethod.
Battery
TheAxisproductusesa3.0VBR2032lithiumbatteryasthepower supplyforitsinternalreal-timeclock(RTC).Undernormalconditions thisbatterywilllastforaminimumoffiveyears.
LowbatterypoweraffectstheoperationoftheRTC,causingittoresetateverypower-up.Whenthebatteryneedsreplacing,alogmessagewillappearintheproduct'sserverreport.Formoreinformationabouttheserverreport,seetheproduct'ssetuppagesorcontactAxissupport.
The battery should not be replaced unless required, but if the battery does need replacing, contact Axissupport at www.axis.com/support for assistance.
Lithiumcoincell3.0Vbatteriescontain1,2-dimethoxyethane;ethylene glycoldimethylether(EGDME),CASno.110-71-4.
WARNING
- Riskofexplosionifthebatteryisincorrectlyreplaced.
- Replaceonlywithanidenticalbatteryorabatterywhichis recommendedbyAxis.
- Disposeofusedbatteriesaccordingtolocalregulationsor thebatterymanufacturer'sinstructions.
Disposalandrecycling
Whenthisproducthasreachedtheendofitsusefullife,disposeof itaccordingtolocallawsandregulations.Forinformationabout yournearestdesignatedcollectionpoint,contactyourlocalauthority responsibleforwastedisposal.Inaccordencewithlocallegislation, penaltiesmaybeapplicableforincorrectdisposalofthiswaste.
Europe

Thissymbolmeanthattheproductshallnotbedisposedof togetherwithhouseholdorcommercialwaste. Directive2012/19/EU onwasteelectricalandelectronicequipment(WEEE)isapplicablein theEuropeanUnionmemberstates.Topreventpotentialharmto humanhealthandtheenvironment,theproductmustbedisposed ofinanapprovedandenvironmentallysaferecyclingprocess.For informationaboutyournearestdesignatedcollectionpoint,contact yourlocalauthorityresponsibleforwastedisposal.Businessesshould contacttheproductsupplierforinformationabouthowtodispose ofthisproductcorrectly.
ThisproductcomplieswiththerequirementsofDirective201 1/65/EUon therestrictionoftheuseofcertainhazardoussubstancesinelectrical andelectronicequipment(RoHS).
China

ThisproductcomplieswiththerequirementsofSJ/T1 1364-2014, Markingfortherestrictionofhazardoussubstancesinelectricaland electronicproducts.
| 有毒有害物质或元素 | ||||||
| 部件名称 | 铅(Pb) | 汞(Hg) | 镉(Cd) | 六价铬(Cr(VI)) | 多溴联苯(PBB) | 多溴二苯醚(PBDE) |
| 电气实装部分 0 | X 0 | 0 | ||||
| 0:表示该有毒有害物质在该部件所有均质材料中的含量均在GB/T26572标准规定的限量要求以下。X:表示该有毒有害物质至少在该部件的某一均质材料中的含量超出GB/T26572标准规定的限量要求。 | ||||||
Contactinformation
AxisCommunicationsAB
Emdalavägen14
22369Lund
Sweden
Tel:+46462721800
Fax:+4646136130
www.axis.com
Support
Should you require any technical assistance, please contact your Axis reseller. If your questions cannot be answered immediately, your reseller will forward your queries through the appropriate channel to ensure rapid response. If you are connected to the Internet, you can:
downloaduserdocumentationandsoftwareupdates
findanswerstoresolvedproblemsintheFAQdatabase.Search byproduct, category, orphrase
reportproblemstoAxissupportstaffbyloggingintoyourprivate supportarea
chatwithAxissupportstaff
visitAxisSupportatwww.axis.com/support
Learnmore!
VisitAxislearningcenterwww.axis.com/academy/forusefultrainings, webinars,tutorialsandguides.
Safetyinformation....6
Hazardlevels....6
Othermessagelevels......6
Hardwareoverview....7
LEDIndicators....7
Howtoaccesstheproduct....9
Howtoaccesstheproductfromabrowser....9
HowtoaccesstheproductfromtheInternet....9
Howtosettherootpassword....10
SetPowerLineFrequency....10
Abouttheliveviewwindow....10
Aboutmediatretains
AboutH.264format....14
AboutMJPEGformat....14
AboutAXISMediaControl(AMC)....14
Alternativemethodsofaccessingthevideostream....15
AccessAudioStreams....16
Howtoetuptheproduclt
Howtoperformabasicsetup....17
VideoandAudio....18
Howtosetupvideostreams....18
Aboutstreamprofiles....20
AboutONVIFmediaprofiles....20
Aboutcamerasettings....20
ViewArea....22
Aboutoverlays....23
Aboutprivacymasks....25
Setfocusandzoom....25
Howtochangeaudiosettings....25
AudioClips....27
Howtoconfiguretheliveviewwindow....28
Howtosetdefaultviewerforbrowsers......28
Aboutviewersettings....28
Aboutuser-definedlinks....29
OutputButtons....29
AboutPTZ(ParTilZoom)
Aboutpresetpositions....30
Aboutguardtours....30
Advanced....31
Aboutthecontrolqueue....32
Aboutdetectors....33
Aboutcameratampering....33
AudioDetection....33
Aboutapplications....34
Aboutapplicationlicenses....34
Howtouploadandstartanapplication....34
ApplicationConsiderations....34
Aboutevêts
Howtosetupactionrules....35
Howtoaddrecipients....37
Howtocreateschedules....39
Howtosetuprecurrences....39
Aboutecordings
Howtofindrecordings....40
Howtoplayrecordings....40
Howtoexportavideoclip....41
RecordingList....41
Aboutcontinuousrecording....42
Aboutanguages
About system options
Security......44
TableofContents
Date&Time....47
Network......47
Storage....52
Ports&Devices....55
Maintenance....55
Support....56
Advanced....56
Howtoresettofactorydefaultsettings....57
Troubleshooting....58
Howtocheckthecurrentfirmware....58
Howtougradethefirmware....58
Symptoms, possible causes and remedial actions....59
Technicalspecifications....62
LEDIndicators....62
SDcardslot....62
Buttons....62
Connectors....63
Performanceconsiderations....64
Safetyinformation
Hazardlevels
DANGER
Indicatesahazardoussituationwhich,ifnotavoided,willresultindeathorseriousinjury.
WARNING
Indicatesahazardoussituationwhich,ifnotavoided,couldresultindeathorseriousinjury.
CAUTION
Indicatesahazardoussituationwhich,ifnotavoided,couldresultinminorormoderateinjury.
NOTICE
Indicatesasituationwhich,ifnotavoided,couldresultindamagetoproperty.
Othermessagelevels
Important
Indicatessignificantinformationwhichisessentialfortheproducttofunctioncorrectly.
Note
Indicatesusefulinformationwhichhelpsingettingthemostoutoftheproduct.
Hardwareoverview
Fospecifications of hardware components; Technical specifications or page 62.
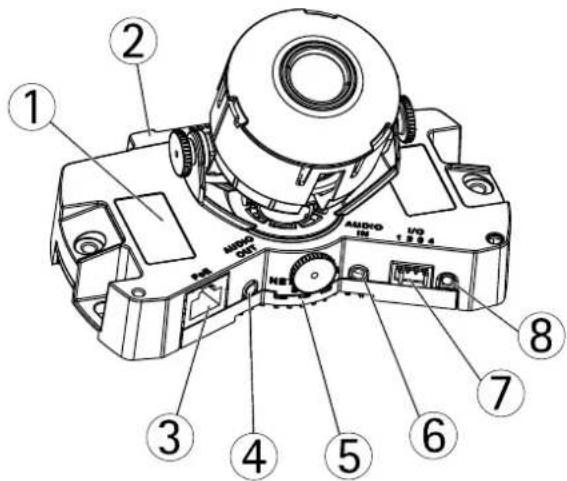
1 ProductIDandSerialnumber(S/N)
2 SDcardslot
3 Networkconnector(PoE)
4 Audioout
5 Network, Status and Power LED indicators
6 Audioin
7 I/Oconnector
8 Controlbutton
LEDIndicators
Note
The StatusLEDcarbeconfigured to unlituring normabperationToconfiguregetSetupSystemsPorts &Devices>LED.Seetheonlinehelpformoreinformation.
- TheStatusLEDcanbeconfiguredtoflashwhileaneventisactive.
The Status LED carbe configured flashoid identifying the unit Gd Setup System Options Maintenance.
| StatusLED | Indication |
| GreenSteadygreenfornormaloperation. | |
| Amber | Steadyduringstartup.Flasheswhenrestoringsettings. |
| RedFirmwareupgradefailure. | |
| NetworkLEDIndication | |
| Green | Steadyforconnectiontoa100Mbit/snetwork.Flashesfornetworkactivity. |
| Amber | Steadyforconnectiontoa10Mbit/snetwork.Flashesfornetworkactivity. |
| UnlitNonetworkconnection. | |
| PowerLEDIndication | |
| Green | Normaloperation. |
| Amber | Flashesgreen/amberduringfirmwareupgrade. |
Howtoaccesstheproduct
ToinstalltheAxisproduct,seetheInstallationGuidesuppliedwiththeproduct.
Theproductcanbeusedwithmostoperatingsystemsandbrowsers.Werecommendthefollowingbrowsers:
- InternetExplorer ^® withWindows ^®
- Safari ^ withOSX ^
- Chrome TM orFirefox® withotheroperatingsystems.
ToviewstreamingvideoinInternetExplorer, allowinstallationofAXISMediaControl(AMC)whenprompted.
TheAxisproductincludesone(1)H.264decoderlicenseforviewingvideostreamsandone(1)AACaudiolicense.Thelicensesare automaticallyinstalledwithAMC.Theadministratorcandisabletheinstallationofthedecoderstopreventinstallationofunlicensed copies.
Note
- QuickTime ^TM is also supported for viewing H.264 streams and for audio.
Howtoaccesstheproductfromabrowser
1.Startawebbrowser.
2.EntertheIPaddressorhostnameoftheAxisproductinthebrowser'saddressfield.
ToaccesstheproductfromaMaccomputer(OSX),gotoSafari,clickonBonjourandselecttheproductfromthe drop-downlist.
If you donot know the I paddress, use AXISIP Utility to locate the product on thenetwork. For information about how to discover and assign I paddress, the document Assign I P Address and Access the video Stream or Axis Support web at www.axis.com/support
Note
ToshowBonjourasabrowserbookmark, gotoSafari>Preferences.
- Enteryourusernameandpassword.Ifthisisthefirsttimetheproductisaccessed,therootpasswordmustfirstbe configured.
- The product's live view page opens in your browser.
Note
The controls and layout of the live view pagem may have been customized to meet specific installation requirements and user preferences. Consequently, some of the examples and functions featured her may differ from those displayed in your own live view page.
HowtoaccesstheproductfromtheInternet
Onceconnected, theAxisproductisaccessibleonyourlocalnetwork(LAN).ToaccesstheproductfromtheInternetyoumust configureyournetworkroutertoallowincomingdatatrafficctotheproduct.Todothis, enabletheNAT-traversalfeature, which will attempt automatically, configurethroutetotallowaccessdtheproductThis enabled fromSetupSystemOptions>Network>TCP/IPAdvanced.
FomoreinformationedNATraversa(portmapping)ofPv4orpage50SealsAXISnterneDynamidDNServicat www.axiscam.net
ForTechnicalnotesonthisandothertopics,visittheAxisSupportwebatwww.axis.com/support
Howtosettherootpassword
Tacces the Axi product you must the password for the default administrator user or this is longer the Configure Root Password dialog, which opens when the product is accessed for the first time.
Topreventnetworkeavesdropping,therootpasswordcanbesetviaanencryptedHTTPSconnection,whichrequiresanHTTPS certificate. HTTPS(HypertextTransferProtocoloverSSL)isaprotocolusedtoencrypttrafficbetweenwebbrowsersandservers.The HTTPscertificateensuresencryptedexchangeofinformation.SeeHTTPSonpage45.
The default administrator usenameroortpermanent and cannot be deleted the password for root post the product must be reset which factory default setting See how to reset factory default settings or page 57.
TosetthepasswordviaastandardHTTPconnection, enteritdirectlyinthedialog.
TosetthepasswordviaanencryptedHTTPSconnection,followthesesteps:
- ClickUseHTTPS.
A temporary certificate(validforoneyear)iscreated,enabling encryptionofalltraffictoandfromtheproduct,andthe passwordcannowbesetsecurely.
2.Enterapasswordandthenre-enterittoconfirmthespelling.
3.ClickOK.Thepasswordhasnowbeenconfigured.
SetPowerLineFrequency
PowelinfrequencysetfirstimtheAxiproductaccessedandaronlychangedronPlainConfig(sepage57) orbyresettingtheproducttofactorydefault.
Select the power line frequency (50Hz or 60Hz) used at the location of the Axis product. Selecting the wrong frequency may cause image flicker if the product is used in fluorescent light environments.
When using 50Hz, the maximum framerate is limited to 25fps.
Note
Powerline frequency varies depending on geographic region. The Americas usually use 60Hz, whereas most other parts of the world use 50Hz. Local variations could apply. Always check with the local authorities.
Abouttheliveviewwindow
The controls and layout of the live view window may have been customized to meet specific installation requirements and user preferences. Consequently, some of the examples and functions featured her may differ from those displayed in your own live view window. The following provides an overview of each available control.
Aboutthecontrolsintheliveviewwindow


ClicViewsiztoscalethemagedowrto80pixelswidodtfulscaleOnlyavailableinMJPEG.
ClickWDRortenableWDRintensbacklightconditionsReadmoreaboutwidelynamicrange orpage2. ClickLightfindeModenabl thismodeEomoreinformationaboutlightfinder, seepage21.
SelectstreamprofileofthdiviewwindowfromhStreamProfiledrop-downlistEoinformation abouthowtoconfigurestreamprofiles,seepage20.
ClicPulsectactivattheproduct'sutputporfodefineperiodofimefinformationabouthow tenablandconfigureutputbuttonsseepage29Theutpubottomammaydifferdependingn thenameenteredinthel/OPortsconfiguration.
Click the Active/Inactive buttons manually activate and inactive the product output port for information about how to enable and configure output buttons, see page 29.

UschManuaTriggerbuttondriggeractionrulefromtheivewindowEoinformation about how to configure and enable the buttonsee Aboutthemanualtriggerpage1.

ClickSnapshot=av=snapshotthe=imageThisbuttonprimarilyntendedforusewhen theAXISMediaControlviewertoolbarisnotavailable.EnablethisbuttonfromLiveViewConfig>ActionButtons.
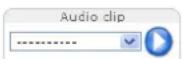
The Audioclip drop-down list allows you to play a audioclip from the view window. Select the audioclip and click the Play button.

The product's fan is controlled by the ambient temperature and disturbed on and off automatically. If required the fan be activated manually by clicking the Far button to show the button do Setup Live View Config Under Action Buttons select Show Far button and specify the number of minutesthe fans should be activated.

Activate de-activate Illumination from Setup Video & Audio Camer Settings Enable this button fromLiveViewConfig>ActionButtons. Movetheslidertoincrease or decrease the intensity of the Illumination.
Aboutthemanualtrigger
The ManualTrigger used trigger action rule from the LiveView page. The manual trigger can be used to validate actions during product installation and configuration.
Toconfigurethemanualtrigger:
- GotoSetup>Events.
2.ClickAddtoaddanewactionrule.
BonthTriggedrop-downlistselectnpuSignal.
- From these second drop-downlist, select Manual Trigger.
- Select the desired action and configure the other settings as required.
Formoreinformationaboutactionrules,seeAbouteventsonpage35.
ToshowthemanualtriggerbuttonsintheLiveViewpage:
1.GotoSetup>LiveViewConfig.
2ndeActionButtonsselecShowmanuatriggebutton.
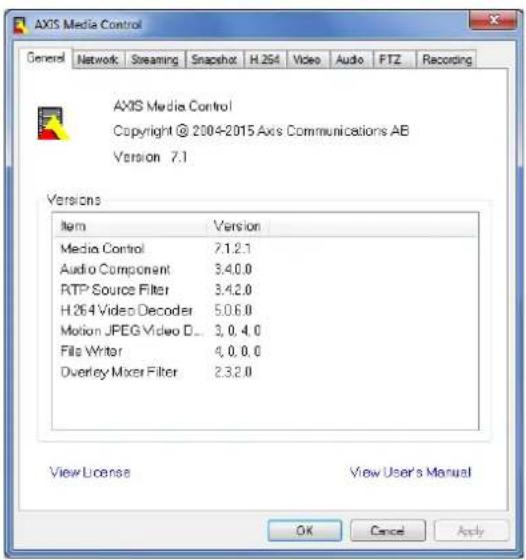
AbouttheAXISMediaControlviewertoolbar
TheAXISMediaControlviewetoolbarsavailableInterneExploreonlySeeAboutAXISMedicContro(AMC)brpage1for moreinformation.Thetoolbardisplaysthefollowingbuttons:

ThePlaybuttonconnectstotheAxisproductandstartsplayingamediastream.

TheStopbuttonstopsthemediastream.

TheSnapshotbuttontakesasnapshotofthevideoimage.

Click the View Full Screen button and the video image will fill entire screen press ESC Escape or the computer keyboard to cancel full screen view.

TheRecordbuttonusedrecordthecurrentvidestreamonyoucomputerThelocationwherethecordingsavedcarspecifiedtheAMControlPaneEnablethisbutterfromLiveViewConfigVieweSettings.
AMCAudioControls
AMCaudiobuttonscontrolthespeakersandmicrophoneconnectedtotheclientcomputer.Thebuttonsareonlyvisiblewhen audioisenabled.
Foinformation about how to configure audioed How to change audio settings or page 25.

Speakerbutton—Clicktoturnthespeakersonoroff.

Microphone button Clickout unmut themicrophons Simplex speaker only modeth Microphon and talk button must both be activetosendaudiototh the Axis product. Clickeither button to stop audiotransmission.

Usetheslidertocontrolthevolumeofthespeakersandthemicrophone.


Half-duplexmode
TheTalk/ListButtonisused switch between sending and receiving audio TheButtoncarbe configured from the AudiotabintheAMCControlpanel:
- Push-To-Talkmode: Clickandholdthebuttontotalk/send. Releasethebuttontolisten.
- Togglemode: Clickoncetoswitchbetweentalkingandlistening.
Simplex-speakeronlymode
To end audio the Tall and Microphone buttons mus both active. Cicle the buttort stop audio transmission.
Note
These controls are available to digital PTZ enabled through selected view area based on ViewArepage22.

Click the EmulatjoystickmodeButtonandclickthemagedomovthecameraviewithdirectionofthemousepointer.

Click the Centemode button and click the image to cent the camera viewth a position.
Thecentermodebuttoncouldalsobeusedtozoominonaspecificarea.Clickintheimageanddragtodrawa rectanglesurroundingtheareatobemagnified.Tozoomout,rotatethemousewheel.

Toviewaspecificviewareaorpresetposition,selectitfromtheSourcelist.
PanandTilbarsUse the arrows to panandlthe cameraview policy position on that steethe camera view to that position.
Zoombar–Usethearrowstozoominandout,orclickonapositiononthebartozoomthatposition.
The PTZ controls are disabled under PTZ Advanced Controls see About advanced PTZ Settings or page 3.1.
Aboutmediastreams
TheAxisproductprovidesseveralaudioandvideostreamformats.Yourrequirementsandthepropertiesofyournetworkwill determinethetypeyouuse.
ThelivewindowintheproductprovidesaccesstoH.264andMotionJPEGvideostreams,audiostreamsandtothelistofavailablestreamprofiles.Otherapplicationsandclientscanaccessvideoandaudiostreamsdirectly,withoutgoingviathelivewindow.
AboutH.264format
H.264can, without compromising image quality, reduce the size of a digital video file by more than 80% compared with the Motion JPEG format and as much as 50% more than the MPEG-4 standard. This means that much less network bandwidth and storage space are required for a video file. Or seen another way, much higher video quality can be achieved for a given bitrate.
Deciding which combination of protocols and method stoused depends on your viewing requirements, and the properties of your network. The available options in AXIS Media Control are:
| UnicastRTP | Thisunicastmethod(RTPoverUDP)isused forliveunicastvideo,especiallywhenitis importanttohaveanup-to-datevideostream, evenifsomeframesaredropped. | Unicastingisusedforvideo-on-demand transmissionsothatthereisnovideotraffic onthenetworkuntilaclientconnectsand requeststhestream.Notethatthereareamaximumof20 simultaneousunicastconnections. |
| RTPoverRTSP | Thisunicastmethod(RTPtunneledoverRTSP) isusefulasitisrelativelysimpletoconfigure firewallstoallowRTSPtraffic. | |
| RTPoverRTSPoverHTTP | Thisunicastmethodcanbeusedtotraverse firewalls.Firewallsarecommonlyconfiguredto allowtheHTTPprotocol,thusallowingRTPto betunneled. | |
| MulticastRTP | Thismethod(RTPoverUDP)shouldbeusedforlivemulticastvideo.Thevideostreamisalways up-to-date,evenifsomeframesaredropped.Multicastingprovidesthemostefficientusageofbandwidthwhentherearelargenumbersof clientsviewingsimultaneously.Amulticastcannothowever,passanetworkrouterunlessthe routerisconfiguredtoallowthis.ItisnotpossibletomulticastovertheInternet,forexample.Notealsothatallmulticastviewerscountasoneunicastviewerinthemaximumtotalof20 simultaneousconnections. | |
AXISMediaControlnegotiateswiththeAxisproducttodeterminethetransportprotocoltouse.Theorderofpriority,listedintheAMCControlPanel,canbechangedandtheoptionsdisabled,tosuitspecificrequirements.
Note
H.264islicensedtechnology.TheAxisproductincludesoneH.264viewingclientlicense.Installingadditionalunlicensed copiesoftheclientisprohibited.Topurchaseadditionallicenses,contactyourAxisreseller.
AboutMJPEGformat
This formatusesstandardJPEGstillimagesforthevideostream. These images are then displayed and updated at a ratesufficient to create stream that shows constantly updated motion.
TheMotionJPEGstreamusesconsiderableamountsofbandwidth,butprovidesexcellentimagequalityandaccesstoeveryimage containedinthestream.TherecommendedmethodofaccessingMotionJPEGlivevideofromtheAxisproductistousetheAXISMediaControlInInternetExplorerinWindows.
AboutAXISMediaControl(AMC)
AXISMediaControl(AMC)inInternetExplorerinWindowsistherecommendedmethodofaccessinglivevideofromtheAxisproduct.
TheAMCControlPanelcanbeusedtoconfigurevariousvideoandaudiosettings.PleaseeseetheAXISMediaControlUser's Manualformoreinformation.
TheAMCControlPanelisautomaticallyinstalledonfirstuse,afterwhichitcanbeconfigured.OpentheAMCControlPanelfrom:
- WindowsControlPanel(fromtheStartscreenorStartmenu)
Alternatively right-click the video image Internet Explore and click Settings.
Alternativemethodsofaccessingthevideostream
YoucanalsoaccessvideoandimagesfromtheAxisproductinthefollowingways:
MotionPEGervepush(ifupported by the client Chromo Firefox example) This option maintains a proper HTTP connection to the browser and sends data as and when required, for as long as required.
StiJPEGimagesmbrowserEntethpathhttp://
WindowMedPlayerThisrequiresAXISMediaControlandH.264lecodetobinstalledThefollowingpaths canbeused:
-UnicastviaRTP:axrtpu://<ip>/axis-media/media.amp
-UnicastviaRTSP:axrtsp://<ip>/axis-media/media.amp
-UnicastviaRTSP,tunneledviaHTTP:axrtsphttp://<ip>/axis-media/media.amp
-Multicast:axrtpm://<ip>/axis-media/media.amp
- QuickTime TM. The following pathscanbeused:
-rtsp://<ip>/axis-media/media.amp
-rtsp://<ip>/axis-media/media.3gp
Note
=IPaddress
•TheAxisproductsupportsQuickTime6.5.1andlater.- QuickTimemayaddlatencytothevideostream.
- It maybe possible to use other player to view the H.264 stream using the paths above, although Axis does not guarantee this.
AccessAudioStreams
TheLiveViewpageprovidesaccesstoaudiothroughAXISMediaControl;inadditionaudiocanbeaccessedinthefollowingways:
VAPIX®ApplicationProgrammingInterface(API)Fomoreinformationyisitwww.axis.com/developer
-WindowsMediaPlayersupportssimplexaudio.Thefollowingpathscanbeused:
-UnicastviaRTP:axrtpu://<ip>/axis-media/media.amp
-UnicastviaRTSP:axrtsp://<ip>/axis-media/media.amp
-UnicastviaRTSP,tunneledviaHTTP:axrtsphttp://<ip>/axis-media/media.amp
-Multicast:axrtpm://<ip>/axis-media/media.amp
- QuickTime TM supportsG.711andAACaudioencoding.Thefollowingpathscanbeused:
-rtsp://<ip>/axis-media/media.amp
-rtsp://<ip>/axis-media/media.3gp
Howtosetuptheproduct
The Axproduct are configured by users with administrator operator rights to the product's setup pages click Setup in the copyright-hand corner of the live view window.
- Administratorshaveunrestrictedaccesstoallsettings.
Operator have restricted access settings and User page 44
Seealsotheonlinehelp

Howtoperformabasicsetup
BasicSetupprovidesshortcutstothesettingsthatshouldbemadebeforeusingtheAxisproduct:
1.Users.Seepage44.
2.TCP/IP.Seepage47.
3. Date&Time.See page47.
4.VideoStream.Seepage18.
5.Focus&Zoom.See page25.
6.AudioSettings.See page25.
TheBasicSetupmenucanbedisabledfromSystemOptions>Security>Users.
VideoandAudio
Thevideoandaudiosettingscanbeusedtooptimizevideoandaudioquality.Youcanconfigurethefollowing:
•Videostreamsettings.Seepage 18.
- Streamprofiles.See page20.
•ONVIFMediaProfiles.Seepage20.
- Camerasettings.Seepage20.
•Viewareas.Seepage22.
•Overlayimage.Seepage23.
- Privacymask.See page25.
- Focusandzoom.See page25.
• Audiosettings.Seepage25.
• Audioclips.Seepage27.
Howtosetupvideostreams
Toetuphproduct'svidestreamsgdVide&AudioVideStream.
Thevideostreamsettingsaredividedintothefollowingtabs:
- Image.See page 18.
•Audio.Seepage25.
•H.264.Seepage19. - MJPEG.Seepage20.
Aboutthepixelcounter
Thepixelcountershowsthenumberofpixelsinanareaoftheimage. Thepixelcounterisusefulinsituationswherethereis aspecificsizerequirement,forexampleinfacerecognition.
Thepixelcountercanbeused:
When setting videostreamed how setup videostreams or page 8, IndePreviewclickOpen and select the Showpixel counterption enable the rectangle image Uschemous movement and size the rectangle per enter the number of pixels in the Width and Height fields and click Apply.
When setting focussee Set focus and zoom page 2 Select the Show pixel counter option ten able the rectangle in themage Us themouse to move and size the rectangle pent the number pixels in the Width and Height fields and click Apply.
- When accessing theLiveViewpageinInternetExplorerwithAXISMediaControl(AMC)inWindows.Right-clickinthe imageandselectPixelcounter.Usethemousetomoveandresizetherectangle.
Image
The default image settings are configured under VideoAudioVideoStreamSelectImageTab.
The followingsettingsareavailable:
- Resolution.Selectthedefaultresolution.
CompressionThe compression level affects the image quality bandwidth and file size of saved image width. The compression, the higher the image quality with higher bandwidth requirements and larger filesizes.
- Mirrorimage. If required, the image can be mirrored.
- Rotateimage.lfrequired, theimagecanberotated.
Maximum framed avoid bandwidth problems the framed allowed each viewer can be limited to fixed amount Alternatively the framed car base Unlimited which means the Axis product always delivers the highest framerate possible under the current conditions.
OverlayettingSeeAboutoverlaytextbrpage23.
ClickSavetoapplythenewsettings.
AboutH.264
H.264,alsoknownasMPEG-4Part10/AVC,isavideocompressionstandardthatprovideshighqualityvideostreamsatlowbitrates. AnH.264videostreamconsistsofdifferenttypesofframessuchasl-framesandP-frames.Anl-frameisacompleteimage,whereas P-framesonlycontainthedifferencesfrompreviousframes.
AboutH.264profiles
TheAxisproductsupportsthefollowingH.264profile(s):
BaselineUs the Baselineprofil the client does not support CABA Entropy coding.
MainTheMainprofile: CABAAndprovidesbettercompressionwithmaintainedvidequality,requires larger amountofprocessingpowertodecodethantheBaselineprofile.
Aboutbitratecontrol
Bitratecontrolisusefultomakesurethevideostreamingdoesnottakeuptoomuchbandwidth.
Aboutvariablebitrate
Variablebitrate(VBR)adjustthebitrateaccordingthimagecomplexityWherthactivitythecenincreases)/BAdjuststhebitrateaccordingtothecomplexity,usingupmorebandwidthforincreasedactivityinthescene,andlessforlowersceneactivity.Variablebitrateissuitableifthereisasurplusinbandwidth,wheretheincreasedbitratemaynotbeanissue.
Aboutmaximumbitrate
If you have limited bandwidth, we recommend Maximum bitrate (MBR). MBR allows youto set target bitrate to control the bandwidth consumption. The target value limit the bitrate, but it maintains a flexibility to be able to prioritize a continuous video stream. Consequently, the frameratemight need to go down and the image equality might decrease. Toply compensate forth this, you can select which variables shall be prioritized. Not setting a priority mean that framerate and image quality are equally affected.
HowtosetanH.264profile
The changing settings for H.264 stream that lo use stream profileg to videoAudioVideStreamH.264.
-
To increase or decrease the number of frames per GOP, set the GOP length.
-
SelectoneoftheH.264profiles.
-
Selectoneofthefollowing:
-Variablebitrate
-Maximumbitrate
I pouselectMaximumbitateselectwhichvariableprioritizerthePrioritydrop-downlist.
6.ClickSave.
Howtoincludecurrentbitrateinatextoverlay
- GotoVideo&Audio>VideoStream>OverlaySettings.
- In the Includetextfieldenter#b.
3.ClickSave.
AboutMJPEGsettings
Sometimes the imagesize is large du et low light or complex scenery. Adjusting them a maximum framesize help to control the bandwidth and storage used by Motion PEG video stream in these situations. Setting the framesize default setting provides consistently good image quality at the expense of increased bandwidth and storage usage in low light. Limiting the frame size optimizes bandwidth and storage usage, but may result in poor image quality.
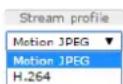
Aboutstreamprofiles
Astreamprofileisasetofpredefinedstreamsettingsincludingresolution,compression,framerateandoverlaysettings.Stream profilescanbeused:
- Whensettinguprecordingusingactionrules.SeeAbouteventsonpage35.
- Whensettingupcontinuousrecording.SeeAboutcontinuousrecordingonpage42.
In theLiveViewpageselectstreamprofilefromtheStreamprofiledrop-downlist.
To create new profile to modify existing profile to Setup Video & Audio Stream Profiles.
To select default stream profile for the Live View page and Setup Live View Config.
AboutONVIFmediaprofiles
AnONVIFmediaprofileconsistsofasetofconfigurationsthatcanbeusedtochangemediastreamsettings.ONVIFmediaprofiles canbeusedbyaclienttoconfiguremediastreamproperties.
The ONVIFmediaprofile page distal preconfigure profiles. These profiles are included in the product for quick setup. You can add, modify or remove ONVIFmediaprofiles from this page.
Aboutcamerasettings
The VideoAudioCameraSettingspage provides access to advanced image settings for the Axis product.
Aboutimageappearance
TochangdmageAppearance@themenusundeSetupVideoAudioCameraSettings.
Increasing the Colo level increases the colosaturation value 0 produces maximum colosaturation and the value results in black and white image.
Thimag Brightnessaradjustedtherange-100wherehighewalueproducesbrightimage.
Increasing Sharpness can increase bandwidth usage, sharper image might increase image noise especially low light conditions. Alowersetting reduces image noise, but the whole image will appear less sharp.
The Contrastangestrelativdifferencbteweerlightandarktcarbadjustedsingthslidebar.
Aboutwhitebalance
TochangethissettinggotoSetup>Video&Audio>CameraSettings
Whitebalanceisusedtomakecolorsintheimageappearthesameregardlessofthecolortemperatureofthelightsource.TheAxis productcanbesettoautomaticallyidentifythelightsourceandcompensateforitscolor.Alternatively,selectthetypeoflight sourcefromthedrop-downlist.Foradescriptionofeachavailablesetting,seetheonlinehelp
The white balance window enabled for the Automation and Automatic outdoor options that appear in the White balance drop-down list. Select of the options from the drop-downlist set the white balance window properties. Select Automatic use the default settings for the Automation and Automatic outdoor options (in the White balance drop-downlist). Select Custom manually set a reference window for white balance in the view area.
WideDynamicRange
Widdynamicrange(WDRDynamicCapture) can improve the exposure whether there is considerable contrasbetween light and dark areas in the image. Enable WDRinintensebacklightconditions.DisableWDRinlowlightconditionsfor optimalexposure.
Important
UseWDRincombinationwithautomaticexposurecontrol. Other exposuresettingscouldgiveundesirableresults.
Use the highlight recovery slides to improve the image appearance by decreasing brightness through bright parts of the image.
UsethShadowsecoveryslidetomprovthimageappearancbyncreasingbrightnessithdarlpartofhimage.
LightfinderMode
Select the Lightfinder Mode option from the drop-down list from Camer Settings Width Dynamic Range This modenables heightened visibility in the product, and better image quality in low light conditions such as parking lots, city surveillance and constructions sites.
ExposureSettings
Exposureistheamountoflightthecamera'ssensorcapturesforascene.Toomuchlightresultsinawashedoutimageandtoo littlelightresultsinadarkimage.
Exposurecontrol-Selectasuitableoptiontocontroleexposure.
FomostcenesthAutomaticoptionwilprovidthebestesultTheshutterspeedsautomaticallysetproduceoptimum imagequality.Fluorescentlampsorotherlightsourcescansometimescauseflickeringintheimage.Toreduceflickerintheimage, selecttheFlickeroptionthatmatchsthepowerlinefrequency. TheHoldcurrentoptionlocksthecurrentexposuresettings.
MaxexposureShutterspeedalscalledexposuretime'ststandforthengthofimthecamershutterspenthereby exposingthecamerasensortolight.Ifshutterspeedisfastitcanfreezeactioneffectively.Ifshutterspeedisslow,itcancause movingobjectstoappearblurred.Decreasingtheexposuretimewillreducemotionblur.
Shutter&Gain
Theshutterandgainsettingsaffecttheamountofmotionblurandnoiseintheimage.Toadapttodifferentlighting,available storagespaceandbandwidth,itisoftennecessarytoprioritizeeitherlowmotionblurorlownoise.TheAxisproductallowsdifferent prioritizationinnormallightandinlowlight.
Shutterspeedsrelatedthemounbfimtheshutterisopenedandmeasuredsecond(s)slowshutterspeedallows morelighttoreachthesensorandcanhelpproduceabrighterimageinlowlightsituations.Ontheotherhand,aslowshutter speedcancausemovingobjectstoappearblurry.
SetShutterto:
AstdsethshutterspeedautomaticallylfrequiredusMaxhutterdimthshutterspeedpreventframe ratefrombeingreduced.
Forexample,toget30fps,setMaxshutterto1/30.
•Fixedtouseafixedshutterspeed.
Gainmeasureddecibe(dB)isheamountamplificationappliedthemagenhighgainmayprovidebetterimagerlow lightsituationsbutwillincreasetheamountofimagenoise.
SetGainto:
AetdoethgainautomaticallyrequireduseMaxairtdimitheappliedgain.
- Fixedtouseafixedgain.
Example
Ifstoragespaceorbandwidth this limited, try using a lower gain. This will reduce image noise and produces smaller image files.
Irisadjustment
Select Enable automatic adjustment automatically compensate for changing light conditions. This option is not available if a fixed dirisis used.
Day/Night
TheIRcutfilterpreventsinfrared(IR)lightfromreachingtheimagesensor.Inpoorlightingconditions,forexampleatnight,orwhenusingarexternalRampsetdIRcutfiltertoOffThisincreasesightsensitivityandallowsheproducto"seeInfraredightTheimageisshowninblackandwhitewhenthelIRcutfilterisoff.
If using automatic exposure control, the R filter, Auto automatically switch between Orange Off according to the lighting conditions.
The Day/Nightshiftvebahelpsleterminwherthe camerawilshifromdaymodeonightmodeNormally, the camera automatically changes mode from day to night when very dark level 00th slider By setting Day/Nightshiftveta low value, the camerawillchangetonightmodeearlier.
ViewArea
Aiveware is cropped for the full view. Each view are treated as video source. Live View and hosts a video stream and PTZ settings.
When setting up a view area, it is recommended that the video stream resolution is the same size as smaller than the view area size. Setting the video stream resolution larger than the view area size implies digitally scaled up video aftersensor capture, requiring more bandwidth without adding image information.
TenablegedVideoAudioCameraSettingsandelecEnableViewAreas.
Toaddanewviewarea:
- GotoVideo&Audio>ViewArea.
2.ClickAdd.
The new ievare appears under Selected view area Enter descriptive name in the Nam field.
Select aspectation and video stream resolution.
5.Anewviewareacoversthewholeimage.Usethemousetomoveandresizetheviewarea.
- SelectEnablePTZtoenabledigitalPTZfortheviewarea.
7.ClickSavetosavethesettings.
TomodifyviewareaselecttheviewarearthdstandmodifythsettingsasequiredClickSave.
Toremoveaviewarea,selecttheviewareaandclickRemove.
Note
ThePTZfunctionalityisusefulduringinstallationoftheAxisproduct.Useaviewareatocropoutaspecificpartofthefullview.
Aboutoverlays
Overlaysaresuperimposedoverthevideostream.Theyareusedtoprovideextrainformationduringrecordings,suchasatimestamp,orduringproductinstallationandconfiguration.
Aboutoverlaytext
Anoverlaytextcancludethecurrentdateandtime,oratextstring.Whenusingatextstring,so-calledmodifierscanbeusedto display,forexample,thecurrentbitrateorthecurrentframerate.
You can choose between the following text overlays:
| Size | TextheightBackgroundheight | |
| Small | 10pixels20pixels | |
| Medium16pixels28pixels | ||
| Large21pixels36pixels |
Howtoincludeoverlaytext
GoVideoAudioVideStreamandelectdImagetab.
Dincludatandimeselectncludatandncludtime.
TincludetextstringselectIncludetextandentethtexthfieldModifierscarbusedseeFileNamingft
Date/TimeFormatsintheonlinehelp

- Selectsize, color, and placement of the text string.
5.ClickSave.
To modify the date and time format to SystemOptionsDateTimeSeeDateTimepage47.
Howtoincludeoverlaytextinanactionrule
Note
Todisplayoverlaytextinmultipleviewareas, overlaytextmustbeenabledineachviewarea.
GdVideoAudioVideStreamandelectdmagtab.
L2ndeOverlassettingsselectncludtext.
Entethenodifier# DWhertheulestriggered# Displacedbythextspecifiedrthactionrule.
Additionaltextinthisfieldwillbedisplayedalsowhentheactionruleisnotactive.
@ddEventsActionRulesandcreateyouactionrule.
From the Actions list selec Overlay text.
6.EnterthetexttodisplayintheTextfield.
Specify the DurationIndexcar displayed while the rule active for fixed number seconds.
Aboutoverlayimages
Anoverlayimageisastaticimagesuperimposedoverthevideostream.Theimage,forexampleacompanylogo,isfirstuploadedto theAxisproductandthenusedtoprovideextrainformationortomaskapartoftheimage.
Imagespecifications:
- The uploadedimages should be a Windows 24-bit BMP image with maximum 250 colors.
- Theimagewidthandheight,inpixels,mustbeexactlydivisiblebyfour.
•The image cannot belarger than the maximum imager resolution. - If you combine at text overlay with and image overlay, the text overlayalway stakes presidence over the overlay image in height. A text overlayalways stretches across the whole video image which means you cannot shrink the overlay stripto make room for image information about the different text overlay heights see About overlay text.
Sinceitisstatic, thepositionandsizeofanoverlayimageremainsthesameregardlessofresolutionandpan, tiltorzoommovements.
To cover part of the monitored area using privacy masks. See About privacy mask or page 25.
Howtuploadanoverlayimage
-
GotoVideo&Audio>OverlayImage.
2.ClickBrowseandbrowsetothefile.
3.ClickUpload. -
The Transparency Settings page is now displayed:
TomakcoloirtheoverlaymagetransparentselectUsertransparencyandentetheRGBexadecimalvalue forthecolor.Example:Tomakwhitetransparent,enterFFFFFF.
Formoreexamplesofhexadecimalvalues,seetheonlinehelp

TscalethémageAutomaticallyselectScalewithresolutionThémagewilbscaledlowrtofthe resolutionusedbytheAxisproduct.
5.ClickSave.
Howtoincludeanoverlayimage
- GotoVideo&Audio>OverlayImage.
SelectheimagdousfromtheUsoverlaymagdstandClickSave.
GoVideoAudioVideStreamandelecthemagtab.
UndeOverlasSettingsselectincludeoverlaymagatheordinates.
Econtrotheimage'positionentetho(horizontal)and(vertical)coordinateTheX=And'=Positions thetopleftcorner.Ifapartoftheimageispositionedoutsidethevideoimage,theoverlayimagewillbemovedso thatthewholeimageisvisible.
6.ClickSave.
Aboutprivacymasks
Aprivacymaskisauser-definedareathatcoverspartsofthemonitoredarea.Privacymasksappearasblocksofsolidcolorandare appliedonthevideostream.PrivacymaskscannotbebypassedusingtheVAPIX®applicationprogramminginterface(API).
The PrivacyMaskList(Video&AudioPrivacyMask) shows all the masks that are currently configured in the Axis product and indicates if they are enabled.
Youcanaddanewmask,re-sizethemaskwiththemouse,chooseacolorforthemask,andgivethemaskaname.
Formoreinformation,seetheonlinehelp

Important
Adding many privacy masks may affect the product's performance.
Setfocusandzoom
Focusandzoomshouldonlybeconfiguredwheninstallingorreinstallingtheproduct.
- Install the camera as described in the Installation Guide.
2.GotoSetup>Video&Audio. - On the focus page goto the Basic tab.
- Setthezoomlevelusingtheslider.
Note
Movementsinfrontofthecamerashouldbeavoidedwhenperformingautofocus.
5.ClickPerformautofocus.
6. If the result is not satisfactory, goto the Advanced tab.
Note
Changingthezoomlevelmovesthefocusposition.Focusshouldalwaysbeadjustedafterchangingthezoom.
OntheAdvancedtab, focuscanbeadjustedmanually:
ClickOpenirisopertherisotsmaximumpositionThisgiveshsmallestlepthofieldanprovideshebest conditionsforfocusing.
2. FocusissetintheFocuswindow. Use themousetomove and resizing the focus window.
3. ClickintheFocuspositionbartofocusonadesiredlocation.
4. Whensatisfied, clickEnableiristoenabletheiris.
Howtochangeaudiosettings
Tochangthproduct's audiosettingsgVideo&Audio&AudioSettings.
To include the audio streaming video streaming video Audio Video Stream Unde the Audio data select Enable audio.
Eachstreamprofileisaseparatevideostream.Toincludetheaudiostreaminalstreamprofiles,gototheaudiotabineachstreamprofilsettingspagandenableaudidfomoreinformationseeAboutstreamprofilespage20.
If you have enabled view areas, remember that each view area is a separate video stream. To include the audio stream all view areas get the audio reach video stream page and enable audio from more information viewed at page 22.
AudioModes
TheAxisproductsupportsthefollowingaudiomodes:
Felduplex Simultaneous two-way audio allowing the Axiproduct transmit and receive audio the same time.
Thereisnoechocancellation; iffeedbackloopsappear, trymovingthemicrophoneorthespeaker.
Half-duplexAudiocartransmittedandfromtheAxiproducubnlyrondirectionatimEdransmitaudiusingtheLiveViewpageuschthallandListerbuttonsseeAMAudioControlsorpage12.
SimplexNetworkCamerspeakeonlyAudiotransmittedfromclienttheAxiproductandcarplayed by apeakeconnectedtheproducttransmitaudiusingtheLiveViewpagethTallandMicrophonorbuttons mustbothbeactive,seeAMCAudioControlsonpage12.
SimplexNetworkCameramicrophononlyAudio captured by the product microphone transmitted from the Axisproducttooneormoreclients.
ToethaudiomodegVideoAudioAudiSettingsandselecthesiredmodefromtheAudiomodelrop-downlist.
Audiolnput
ArexternamicrophonoidinsourcarbeconnectedtheAudio-irconnectorConfigurdheaudiinputsettingsundeVideo &Audio>AudioSettings.
Note
Theinternalmicrophoneisusedbydefault;theexternalmicrophoneisusedwhenconnected.Itispossibletodisablethe internalmicrophonebyconnectingaplugtothemicinput.
Note
IfusingunbalancedLineinamonocontactmustbeused.Signalontipandgroundonsleeve.
Select Microphonon users externamicrophone. Lindous linear device, gaudionixefomultiplenicrophones oramicrophonewithabuilt-inamplifier, asaudiosource.
The Microphonepoweroption provides DC power for an external microphone.
Microphonepowershouldonlybeusedwithmicrophonesthathavenobatteryandwhenusingtheinternalmicrophone.Thissetting shouldnotbeenabledwhenusingadynamicorbatterypoweredmicrophone.Microphonepowerwillnotharmthemicrophone;if youareuncertain,tryswitchingitoffandon.
Touseaprofessionalmicrophonerequiring48Vphantompower,youneedanexternalpowersupplyandabalanced-unbalanced converter(audiotransformer)inbetween.
Use the input gain control volume of audio input through sound to dow choosighed. Value amplifies the sound if sounds to high choosdowed. Value The leve bagives visuale representation of audio signale level in B relativeto the full-scale input level.
- Green—thesignalisatagoodlevel.
- Yellow—thesignalisbecomingdistorted.
- Red—thesignalisdistorted.
UsetheEncodingoptiontoselectdigitalaudioencodingformat.
AAC requires licenses for both encoding and decoding AAC the least complicated and most widely used coded achieving the best possible audio quality is priority, AAC is there recommended codectouse. An AAC license is included in the Axis product.
G7 1 Sanulicensed standard coded that useful when integrating audiointal System
G726anunlicensedspeechcodechatsmostcommonlyusedwithinthesecurityindustry.
Note
The Sampleate defines the number of time per second sounds sampled by higher sample rate will provide better audio quality, but also requires a greater bandwidth.
SethrequiredBitatependingorthselectedencodingAighebitatewillgivbetteraudiqualityAowebitatemayhavelatencyordelay,butwillrequirelessbandwidth.
Formoreinformationaboutthesesettings,pleaseetheonlinehelp

AudioOutput
AnexternalspeakercanbeconnectedtotheAudio-outconnector(anactivespeakerwithbuilt-inamplifierisrequiredforthis).The outputcanbeconnectedtoanotheramplifierwithspeakers.Astereoconnectormustbeusedfortheaudioout.
Configure the audio output settings under Video & Audio Audi Settings.
Output gain Control volume of the audio output hours today choose higher values to high, choose lower value.
AudioClips
Audioclip sound file that is played where events occur directly from the live view page. The audioclip must first be uploaded to the Axis product recorded by a microphone connected to the product.
To adddownloadmodifyremoveaudiclipsgdVide&AudioAudicLipsFomoreinformationsethonlinehelp

ToconfiguretheAxisproducttoplayaudioclipswhenaneventoccurs,anactionrulemustbesetup.Formoreinformation, seeAbouteventsonpage35.
Note
Audiolips cannot be used the product's audifunctionality enabled. The audifunctionality enabled for the Audio tabunder Video & Audio >VideoStream.
Howtoconfiguretheliveviewwindow
Youcancustomizetheliveviewwindowandalterittosuityourrequirements.Itispossibletodefinethefollowingfeaturesoftheliveviewwindow.
- StreamProfile.Seepage20.
- DefaultViewerforBrowser.Seepage28.
-ViewerSettings.Seepage28.
AetiorButtonsThe search buttons described About the controls in the dive view window or page 10.
-UserDefinedLinks.Seepage29.
- OutputButtons.Seepage29.
Howtosetdefaultviewerforbrowsers
FromLiveViewConfigDefaultVieweselectdefaultmethodofviewingideimagesyoubrowserTheproductattempts toshowthevideoimagesintheselectedvideoformatandviewer.Ifthisisnotpossible,theproductoverridesthesettingsand selectsthebestavailablecombination.
| BrowserViewerDescription | ||
| WindowsInternetExplorer | AMC | RecommendedviewerinInternetExplorer(H.264/MotionJPEG). |
| QuickTime | H.264. | |
| StillimageDisplays | stillimagesonly.ClicktheRefreshbuttoninyourbrosertoviewa newimage. | |
| Otherbrowsers | ServerPush | Recommendedviewerforotherbrowsers(MotionJPEG). |
| QuickTime | H.264. | |
| StillimageDisplays | stillimagesonly.ClicktheRefreshbuttoninyourbrosertoviewa newimage. |
Formoreinformation,pleaseetheonlinehelp.

Aboutviewersettings
Toconfigureoptionsfortheviewer, gotoLiveViewConfig>ViewerSettings.
SelectShowewetoolbatdisplaytheAXISMediaControl(AMC)theQuickTimeviewetoolbaundethideoimageinyourbrowser.
H.264decodeinstallationTheadministratorandisableinstallationofH.264decodeincludedwithAXISMedia Control.Thisisusedtopreventinstallationofunlicensedcopies.Furtherdecoderlicensescanbepurchasedfromyour Axisreseller.
SelectShowcrosshainPTZoystickmode enable crosshawillindicate the center of the image PTZoystick mode.
SelectUsePTZoystickmodedefaultenablejoystickmodehemodecarchangedemporarilyfromthe PTZcontrolpanel.
SelectEnablerecordingbutton enablerecordingfromtheViewpageThisbuttonisavailablewhenusingtheAMViewerTherecordingsareavedthdocationspecifiedtheAMControlPaneSeeAboutAXISMediaControl(AMC)onpage14.
Aboutuser-definedlinks
Todisplayuser-definedinkirtheivewindowselecthShowcustomlinkoptiongivthinknamandherentethe URLtolinkto.Whendefiningaweblinkdonotremovethehttp:///fromtheURLaddress.Customlinkscanbeusedtorunscriptor activateexternaldevicesconnectedtotheproduct,ortheycanlinktoawebpage.Customlinksdefinedascgilinkswillrunthe scriptinthebackground,inahiddenframe.Definingthelinkasaweblinkwillopenthelinkinanewwindow.
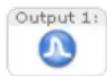
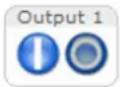
OutputButtons
Externall/OdevicesconnectedtotheAxisproduct'soutputportscanbecontrolleddirectlyfromtheLiveViewpage.
TodisplayoutputbuttonsintheLiveViewpage:
- GotoSetup>LiveViewConfig.
- UnderOutputButtons, select the type of controltouse:
Pulsactivates the output for define period of time. The pulse time can be seen from 10 seconds to 60 seconds.
-Active/Inactive displaywobuttons, oneoreachaction.
ToconfigureactivandnactivstatesgodSystemOptionsPortsDevicesl/Portandethport'Normastate.
Formoreinformationaboutl/Oports,seeI/OPortsonpage55.
AboutPTZ(PanTiltZoom)
PTZ(pan,tiltandzoom)isavailableifyouhaveenabledddigitalPTZintheselectedviewarea.Formoreinformationonviewareas, seeViewAreaonpage22.
Aboutpresetpositions
Apresetpositionisasavedviewthatcanbeusedtoquicklysteerthecameratoaspecificposition.Apresetpositionconsistsof thefollowingvalues:
•Panandtiltpositions
- Zoomposition
Eachviewareahasitsownpresetpositions.
Howtoaccessthepresetpositions
Presetpositionscanbeaccessedinseveralways:
- ByselectingthepresetfromtheSourcedrop-downlistintheLiveViewPage.
- Whensettingupactionrules.Seepage35.
- Whensettingupguardtours.Seepage30.
Howtoaddapresetposition
- GotoSetup>PTZ>PresetPositions.
- Clickintheimageorusethecontrolstosteerthecameraviewtothedesiredposition.
- WriteanameintheCurrentpositionfield.
4.ClickAddtosavethepresetposition.
Howtoincludethepresetpositionnameinanoverlaytext
- GotoVideo&Audio.
2.SelectIncludeoverlaytext. - Writethemodifier# Pinthefield.
4.ClickSave.
Howtosetthehomeposition
The entire view are treated the composition which readily accessible by clicking the Home button through a view window and in the Preset Positions setup window.
The product are configured to return the Home position when the PT functionality has been inactive for specified length of time. Ententh length of time the Return home after field and click Save Seth dimension to prevent the product from automatically returning to the Home position.
Aboutguardtours
Aguardtourdisplaysthevideostreamfromdifferentpresetpositions,one-by-one,inapredeterminedorderoratrandom,andfor configurabletimeperiods.Theenabledguardtourwillkeeprunningaftertheuserhasloggedofforclosedthebrowser.
Note
Forproductsthatsupportlimitedguardtours,thereisafixedminimumviewtimeof10seconds.
Howtocreateaguardtour
- GotoSetup>PTZ>GuardTour.
2.ClickAdd.
3.Typeaname. - Specify the pause length between runs.
- Selectapresetpositionfromthedrop-downlistandclickAdd.
- Foreachpresetposition, entertheViewTimeinsecondsorminutes.
SpecifyViewOrderthepresepositionspselectRandomvieworder.
8.ClickSave.
Howtoeditaguardtour
- GotoSetup>PTZ>GuardTour.
- Select the guard tour in the Guard Tour List.
3.ClickModify.
Howtodeleteaguardtour
- GotoSetup>PTZ>GuardTour.
- Select the guard tour in the Guard Tour List.
3.ClickRemove.
Advanced
AboutadvancedPTZsettings
AdvancedPTZsettingscanbeconfiguredunderPTZ>Advanced>Controls.
The PaneShortcuCommandButtonisshowshuser-definedbuttonthataraccessedfromtheViewpage'Ctrl panel. These buttons are used to provide direct access command issued using the APIX® application programming interface. ClickAddtoaddanewshortcutcommandbutton.
The following PTZ controls are enabled by default:
•Pancontrol
- Tiltcontrol
- Zoomcontrol
Tolisable specific controls deselect options under Enable/Disable controls.
Ifusing multiple view areas, deselecting a control will only disable the control in these selected view area.
Aboutthecontrolqueue
Note
- The administratorcanenableanddisablePTZcontrolsforselectedusers.
- Toidentifydifferentusersintheviewergroup,cookiesmustbeenabledontheclient.
The ControqueupoltimesmeasuredsecondsFomoreinformationsechonlinehelp

The administrator setup queufo PTZ controller from PTZ Control Queue Once setup the PTZ Control Queue buttons appear in the live view window of offering one viewer exclusive control for a limited period of time. Other users will be placed in queue.
AusewholongtogroupisedUserspage44withhighePTprioritycargbeforetheusersthequeuandake controloftheproduct.Theorderofpriorityisasfollows:
Administrator\Administrator takesove PTZ control regardless of who's first queue. The administrator will be removed from the queue 60 seconds after the last PTZ control command.
Event-TheAxproductabeconfigured@dopresepositionwhertriggeredbyanlarm(seeAbouteventson page35).Theeventwillimmediatelybeplacedfirstinthequeueexceptwhenanadministratorisincontrol.
- Operator—Sameas administrator but with lower priority
GuardTour-Aguardou(sepage30)hasPTZontroforindefinitperiobfimefimdmayoverridderbyan operator,eventoradministrator.Theguardtourwillresumewhenhigherprioritygroupsleavethequeue.
Viewer-MultipleviewersmustwaifotheiturnTheviewehasSecondPTZontrobeforecontrolpassed ontothenextviewerinqueue.
Aboutdetectors
Aboutcameratampering
CameraTamperingcangenerateanalarmwhenthecameraisrepositioned,orwhenthelensiscovered,spray-paintedorseverely de-focused.Tosendanalarm,forexampleviaemail,anactionrulemustbesetup.
Howtoconfiguretamperingdetection
- GotoDetectors > CameraTampering.
Seth Minimum duration that the dim that must elapse before alarm is generated. Increase time to prevent false alarms for known conditions that affect the image.
Select Alarm for dark images of alarm should be generated when light and dimmed turned off if then is sprayed, covered, or rendered severely out of focus.
4.ClickSave.
Howtoconfigureanactionrulefortamperingalarm
- GotoEvents>ActionRules.
2.ClickAddtosetupanewactionrule.
- EnteraNamefortheactionrule.
UndeConditionselecDetectorfromthTriggerist.
-
SelectTamperingfromthelistofdetectors.
-
Optionally, select as schedule and set additional conditions.
SelectactionExampleToendaremailselectSendNotificationandselectRecipientfromtheDistbefined recipients.
Note
The Which the ulective option under Duration cannot be used with cameramperings since camerampering does not have aduration and once it has been triggered, it will not automatically return to its untriggered state.
Formoreinformationonactionsrules,seeAbouteventsonpage35.
AudioDetection
TheAxisproductcanbeconfiguredtogenerateanalarmwhenaudiorisesaboveorfallsbelowthethresholdvalue.Thethreshold valuecanbesetintherange0–100where0isthemostsensitiveand100theleastsensitive.
-
GotoDetectors>AudioDetection.
-
SettheaudioalarmlevelandclickSave.
GdEventsActionRulesandsetupactionrulesedHowtsetupactionrulesorpage35.
Detected audio indicated by colore peak in the Activity indicator Areven is triggered when detected audio rises above falls below threshold value, which is represented by the bar.
Aboutapplications
AXISCameraApplicationPlatform(ACAP)isanopenplatformthatenablesthirdpartiestodevelopanalyticsandotherapplications forAxiproductsFoinformationaboutavailableapplicationsdownloadstrialsandicensesgovwww.axis.com/applications
TofindtheusermanualsforAxisapplications,goto www.axis.com
Note
- Several applications can run at the same time but some applications might not be compatible with each other. Certain combination of applications might require to much processing power or memory resources when run in parallel. Verify that the applications work together before deployment.
Aboutapplicationlicenses
Someapplicationsneedalicensetorun.Licensescanbeinstalledintwoways:
•Automaticinstallation—requiresaccesstothelnternet
- Manualinstallation—obtainthelicensekeyfromtheapplicationvendoranduploadthekeytotheAxisproduct
Torequestalicense, theAxisproductserialnumber(S/N) is required. The serial number can be found on the product label and under SystemOptions > Support > SystemOverview.
Howtuploadandstartanapplication
Touploadandstartanapplication:
- GotoSetup>Applications.
2ndeUploadApplicationclickBrowseLocatheapplicationfileandclickUploadPackage. - Install the license (if applicable). For instructions, seethedocumentation provided by the application vendor.
Start the applicationGdoApplicationsselect the applicationirthdisfinstalled applicationsand clickStart. - Configuretheapplication.Forinstructions,seethedocumentationprovidedbytheapplicationvendor.
Note
- Applicationscanbeuploadedbyproductadministrators.
- ApplicationsandlicensescanbeinstalledonmultipleproductsatthesametimeusingAXISCameraManagement,version 3.10andlater.
To generate log file of the application and Applications Select the application and click Log.
ApplicationConsiderations
Ifanapplicationisupgraded, applicationsettings, including the license, will be removed. The license must be installed and the application reconfigured.
If the Axis product's firmware is upgraded, uploaded applications and their settings will remain unchanged, although this is not guaranteed by Axis Communications. Not that the application must be supported by the new firmware. For information about firmware upgrades, see Howtopgradation the firmware on page 58.
If the Axis product is restarted, running applications will restart automatically.
If the Axis product is restored or reset to factory default, uploaded applications and their settings are removed. For information about restoring the Axis product, see Maintenance page 55. For information about factory defaults, how reset to factory default settings on page 57.
Aboutevents
The event pages allow you to configure your product to perform actions when different events occur. For example, the product can start are recording or send an email notification when motion is detected. The set of conditions that define show and when the action is triggered discalled an action rule.
Howtosetupactionrules
Anactionruledefinestheconditionsthatmustbemetfortheproducttoperformanaction,forexemplerecordvideoorsendan emailnotification.Ifmfultipleconditionsaredefined,allofthemmustbemettotriggertheaction.
FomoreinformationaboutavailabletriggersandactionsseeAbouttriggersorpage35andActionsorpage37.
The following example describes how to setup an action rule to record video to an network share if there is movement in the camera's field of view.
Howtosetupmotiondetectionandaddanetworkshare:
GdaApplications star and configure AXIS/ided Motion Detection Section help.
QdsSystemOptionsStorageandsetupnetworkshareSepage54.
Howtosetuptheactionrule:
GdEventsActionRulesandclicAdd.
- SelectEnableruleandenteradescriptivenamefortherule.
SelectApplicationsfromthTriggedrop-downlistandheselect/MD.
OptionallyselectScheduleandAdditionaConditionSebelow.
UndeActionsselecRecordVidedfromthTypdrop-downlist.
SelectStreamprofilandconfigureDurationsettingsdescribedbelow.
- SelectNetworkSharefromtheStoragedrop-downlist.
TousemordharondriggefothactionruleselectAdditionaconditionsandclickAddadditionatriggersWhenusing additionalconditions,allconditionsmustbemettotriggertheaction.
Tprevenractionfrombeingtriggeredepeatedly,WaiteastimcanbeetEntethimhoursminutesandseconds, duringwhichthetriggersshouldbeignoredbeforetheactionrulecanbeactivatedagain.
The recording Duration of actions can be set in each immediately before and after the event Select Pre-trigger time and/or Post-triggered number seconds. When while the active is enabled and the action is triggered again during the post-trigger time, thereocording timewill be extended with another post-trigger time period.
Formoreinformation,seetheonlinehelp

Abouttriggers
Available action rule triggers and conditions include:
ApplicationsUsed installed applications trigger the rule See About applications or page 84.
- Detectors
AudioDetectionTrigger rule when audiosdetected See AudioDetection on page 3.
Aboutevents
Day/NightModeTrigger rule whether product switches between day mode (IRcutilten) and night mode (IRcutilteroff). This can forexample be used to control an external infrared (IR) light connected to an output port.
LivStreamAccessedTrigger the rule when any stream is accessed and during ed storage playback. This can forexample be used to send notifications.
TamperingTrigger rule whertamperings detected See About cameratampering on page 3.
- Hardware
FanTriggetheulefhefamalfunctioningThisaforexampleusedsendmaintenance notifications.
NetworkTriggertheRuleNetworkconnectionisobrestoredThisaforexamplebusedstart recordingtotheSDcard.
TemperatureTriggetheulefthemperaturfallsoutsideinsidethoperatingangofthproductThis canforexamplebeusedtosendmaintenancenotifications.
- InputSignal
DigitalInputPortTriggetheulewheran/OporteceivessignafromconnecteddevicSed/0 Portsonpage55.
ManualTriggerTriggertheuleusinghManualTriggerbuttonintheLiveViewpageSeeAbouthe controlsintheliveviewwindowonpage10.Thiscanforexamplebeusedtovalidateactionsduringproduct installationandconfiguration.
VirtualInputscanused by VMSVidedManagementSystem;driggeractionsVirtualInputscanfor example,beconnectedtobuttonsintheVMSuserinterface.
•PTZ
MovingTrigger the rule whether the camera view moves dueto PT operation This is a example based as an additional condition to prevent an action rule triggered by motion detection to record video while the camera view moves dueto PT operation.
PreseReachedTrigger the rule where the camera stops at prese position This can be example used with the SendImages action to upload images from the preset position.
•Storage
DisruptionTriggetheuleStorageproblemsdetectedforexamplefthstoragedevicisunavailable, removed,full,lockedorifotherreadorwriteproblemsoccur.Thiscanforexamplebeusedtosendmaintenance notifications.
RecordingTriggertheulewhertheAxisproductrecordsthestoragedeviceTherecordingstatustrigger canbeusedtonotifytheoperator,forexamplebyflashingLEDlights,iftheproducthasstartedorstoppedto recordtothestoragedevice.Notethat,thistriggercanbeusedonlyforedgestoragerecordingstatus.
•System
SystemReadyTrigger the rule whether product has been started and services are running. This can for example be used to send an notification when the product restarts.
•Time
RecurrenceTrigger the ul periodically See how to set precurrences or page 39 This afo example be used to upload an image every 5 minutes.
UsScheduleTriggertheulaccording theselectedscheduleSeeHowtcreateschedulesonpage89.
Actions
Availableactionsinclude:
- IRIllumination-ActivateordeactivateIRlight.
Day/NightVisionModeSetlaymodel(Rufilterbn)nightmode(Rufilteroff). - OutputPort-ActivateanI/Oporttocontrolanexternaldevice.
PlayAudioClipSeeAudioClipsorpage27.
- PTZControl
-PresetPosition-Gotoapresetposition.
GuardTourStartguardtourSeeAboutguardoursorpage30.
RecordVideoRecordvideoandaudidoselectedstorageTorecordaudiouseAACaudiencodingandmakesurthataudioisenabledintheselectedstreamprofile.
- SendImages–Sendimagestoarecipient.
- SendNotification–Sendanotificationmessagetoarecipient.
SendSNMF TrapSendSNMTrapmessage the operator Make surchaSNMP enabled and configured under SystemOptionsNetworkSNMP.
- SendVideoClip-Sendavideocliptoarecipient.
Statul EDFlaslthLED Indicator This afo example bused o validat e triggers such motion detection during product installation and configuration.
WDRModeTheVDRModeLightfindeModecarbturnedwherthactionrulestriggeredThisactionmay beusedtochangebetweenthesemodesautomatically.
Howtoaddrecipients
Theproduct cansendmediafilesandmessagesto notifyusersaboutevents.Beforetheproduct cansendmediafilesornotification messagesyoumustdefinonoremorerecipientsFoinformationaboutavailableoptionsseeAboutrecipienttypespage37.
Toaddarecipient:
GdEventsRecipientandlicAdd.
2.Enteradescriptivename.
3.SelectarecipientType.
4.Entertheinformationneededfortherecipienttype.
5.ClickTesttotesttheconnectiontotherecipient.
6.ClickOK.
Aboutrecipienttypes
The followingrecipienttypesareavailable:
| RecipienttypesUsewithactionNotes | ||
| SendImagesSendNotificationSendVideoClip | Anemailrecipientcancontainmultipleemailaddresses. | |
| FTP | SendImagesSendVideoClip | |
| SFTPSendImages | SendVideoClip | EncryptedfiletransferusingSSHFileTransportProtocol(SFTP).SFTPisamoresecuremethodthanFTPbutfiletransfermightbeslower,especiallyforlargefilessuchashighresolutionvideo.SpecifylogininformationfortheSFTPserverandtheserver'spublickeyMD5fingerprint(32hexadecimaldigits).TheSFTPrecipientsupportsSFTPserversusingSSH-2withRSAandDSAhostkeytypes.RSAisthepreferredmethod.TouseDSA,disabletheRSAkeyontheSFTPserver. |
| HTTP | SendImagesSendNotificationSendVideoClip | |
| NetworkShareSendImages | SendVideoClip | Anetworksharecanalsobeusedasastoragedeviceforrecordedvideo.GoSystemOptions>Storagetoconfigureanetworksharebeforesettingupacontinuousrecordingoranactionruletorecordvideo.Formoreinformationaboutstoragedevices,seeStorageonpage52. |
| TCPSendNotification | ||
Howtosetupemailrecipients
Emailrecipientscanbeconfiguredbyselectingoneofthelistedemailproviders,orbyspecifyingtheSMTPserver,portand authenticationusedby,forexample,accorporateemailserver.
Note
Some email providers have security filter that prevent users from receiving or viewing large attachments, from receiving scheduled emails and similar. Check the email provider's security policy to avoid delivery problems and locked email accounts.
Tosetupanemailrecipientusingoneofthelistedproviders:
GdEvents Recipients and click Add.
EnteaNamandelecEmaifronthTypdist.
Entethemailaddresses send email forth To field Use commas separate multiple addresses.
- Select the email provider from the Provider list.
5.Entertheuser|Dandpasswordfortheemailaccount.
6.ClickTesttosendatestemail.
TsetupremairecipientusingforexamplecorporatemaierverfollowtheinstructionsabovebutelecUsedefineds ProvideEntethemailaddressappeansendeirthFromfieldSelectAdvancedettingandspecifythSMTBerver addressportandauthenticationmethodOptionallyselectUsencryptionsendmailsoverencryptedconnectionTheerver
certificatecanbevalidatedusingthecertificatesavailableintheAxisproduct.Forinformationonhowtuploadcertificates,see Aboutcertificatesonpage46.
Howtocreateschedules
Schedulescanbeusedasactionruletriggersorasadditionalconditions,forexampletorecordvideoifmotionisdetectedoutside officehours.Useoneofthepredefinedschedulesorcreateanewscheduleasdescribedbelow.
Tocreateanewschedule:
GdEventsSchedulesandclicAdd.
- Enteradescriptivename and the information needed for daily, weekly, monthly or yearly schedule.
3.ClickOK.
To the schedule in action rules, select the schedule from the Schedule drop-down list the Action Rule Setup page.
Howtosetuprecurrences
Recurrencesareusedtotriggeractionrulesrepeatedly,forexamplevery5minutesoreveryhour.
Tosetuparecurrence:
GdEventsRecurrencesandliclAdd.
2.Enteradescriptivenameandrecurrencepattern.
3.ClickOK.
To set the recurrence in action rule first select Time from the triggered drop-downlist the Action Rule Setup page and then select the recurrence from these second drop-downlist.
TomodifyremoverecurrencesselecttherecurrencirthRecurrenceListandlicModifyRemove.
Aboutrecordings
TheAxisproductcanbeconfiguredtorecordvideocontinuouslyoraccordingtoanactionrule:
- Tostartacontinuousrecording,seepage42.
- Tosetupactionrules,seepage35.
•Toaccessrecordings,seeRecordingListonpage41. - Toconfigurecameracontrolledstorage,seeStorageonpage52.
Howtofindrecordings
Recordingstore@theStarnetworkshareaccessedfromRecordingsListpageThepagdistalrecordingonthestoragedeviceandshowseachrecording'sstartdateandtime,durationandtheeventthattriggeredtherecording.
Note
Therecording'sstartdateandtimeissetaccordingtotheAxisproduct'sdateandtimesettings.IftheAxisproductisconfiguredusetimezonedifferenfromthocatizonemakeuredcconfigurehRecordingtimefiltersaccordingtchproduct'stizoneDateandtimesettingsareconfiguredundeSystemOptionsDateTimesedDateTimeonpage47.
Tofindarecording, followthesesteps:
- GotoRecordings>List.
AreducednumberfcordingsdisplayedselectdesireoptionundeFilter:
RecordingtimeListecordingsthattartebetweentheFromandTdimes.
EventListecordingsthatwerdriggeredbyspecificEventSelectcontinuoudistontinuousecordings.
Storage-Listrecordingsfromaspecificstoragedevice.
Sort-Specifyhowrecordingsshouldbesortedinthelist.
Results-Specifythemaximumnumberofrecordingstodisplay.
Apply the filters click the Filte button Some filters may take long time complete.
- TherecordingsaredisplayedintheRecordinglist.
T play recording select the recording and click PlaySe als How to play recordings or page 40.
To view detailed information about recording select the recording and lic Properties.
To export recording parb recording videoclip select the recording and lic Export Sealsd How export videoclipon page 41.
To remove recording from storage device, select the recording and click Remove.
Howtoplayrecordings
RecordingsontheSDcardornetworksharecanbeplayeddirectlyfromtheAxisproduct'swebpages.
Toplayarecording, followthesesteps:
- GotoRecordings>List.
Treduce the number of recordings displayed; select the desired options under Filter and click the Filte button to apply the filters. See also How to find recordings on page 40.
Select the recording and click Play The recording will be played a new browser window.
Howtoexportavideoclip
Recordings on the SD cardornetworkshare can be exported as videoclips. You can export a complete recording or part of a recording.
Note
TheexportedrecordingisaMatroskavideofile.(mkv).ToplaytherecordinginWindowsMediaPlayer,AXISMatroskaFileSplittemusbinstalledAXISMatroskaFileSplittercandownloadedfromwww.axis.com/support/downloads
Toexportavideoclip, followthesesteps:
- GotoRecordings>List.
Treduce the number of recordings displayed, select the desired options under Filter and click the Filte button to apply the filters. See also How to find recordings on page 40.
SelectrecordingandlicExportTheExporRecordingdialogpens.
-
By default, the completerecording is selected. To export a part of the recording, modify the start and stop times.
-
Optionally, enterafilename for therecording.
6.ClickExport.
Note
Recordingscanalsobeexportedfromtheplaybackwindow.
RecordingList
Recorded videos and the Recordings List page the shows a recording start date and time duration and the event that triggered the recording.
Toplayordownloadarecording, followthesesteps:
- GotoRecordings>List.
UscheltetonarrowthdisofecordingEntethdesiredfiltercriteriandlicFilteSomfiltersmaytake alongtimetocomplete.
- Selecttherecording.
@licPlayplaytherecordingcirclicDownloaddownloadtherecording.
Multiple recordings arbedownloaded the samtime Selectrecordings and click Download the downloaded files:zip file containing a minimum of three files, of which the Matroska (mkv) files are the actual recordings. Therecordings are time-stamped with the date and timethey were downloaded (as opposed to the date therecordings were made).
Note
ToplayrecordingsinWindowsMediaPlayer,AXISMatroskaFileSplittermustbeinstalled.AXISMatroskaFileSplittercan bedownloadedfromwww.axis.com/support/downloads
FodetailedrecordingandvideinformationselectrecordingandclickProperties.
Toremovearecording,selecttherecordingandclickRemove.
Aboutcontinuousrecording
The Axisproduct can be configured continuously, avoided storage device information about storage devices see Storage or page 52 to prevent the disk from becoming full if recommended configuration disk automatically removed in recordings.
Ifanewstreamprofileisselectedwhilearecordingisongoing,therecordingwillbestoppedandsavedintherecordinglistanda newrecordingwiththenewstreamprofilewillstart.Allpreviouscontinuousrecordingswillremainintherecordinglistuntilthey areremovedmanuallyorthroughautomaticremovalofoldrecordings.
Tostartacontinuousrecording,followthesesteps:
- GotoRecordings>Continuous.
2.SelectEnabled. - SelectthetypeofstoragedevicefromtheStoragelist.
SelectStreamprofile:useforontinuousecordingsTincludeaudiortherecordinguseAAaudiencodingandmakesurethataudioisenabledintheselectedstreamprofile.
5.ClickSavetosaveandstarttherecording.
Aboutlanguages
MultiplelanguagescanbeinstalledintheAxisproduct.AllwebpagesincludingtheonlinehelpwillbedisplayedintheselectedlanguageTo switchlanguagesgoSetupLanguagesandfirstuploadthenewlanguagefileBrowseandocatchefilandclicktheUploadLanguagebutton.SelectthenewlanguagefromthelistandclickSave.
Note
- Resetting the product to factory default settings will erase any uploaded language files and reset the product language to English.
- ClickingtheRestorebuttonontheMaintenancepagewillnotaffectthelanguage.
- Afirmwareupgradewillnotaffectthelanguageused.Howeverify you have uploaded an ewlanguageto the product and later upgradethe firmware, it may happen that the translation no longer match the product's web pages. In this case, upload an updated language file.
- Alanguagealreadyinstalledintheproductwillbereplacedwhenacurrentoralaterverersionofthelanguagefileisuploaded.
Aboutsystemoptions
Security
Users
Use access controlled by default and a configured under System Options Security Users Administrator can setup other users by giving them usernames and passwords. It is also possible to allow anonymous viewer login, which means that anybody may access the Live View page.
Theuserlistdisplaysauthorizedusersandusergroups(accesslevels):
•ViewershaveaccesstotheLiveViewpage
- Operatorshaveaccesstoallsettingsexcept:
-creatingandmodifyingPTZpresets
-creatingandmodifyingPTZcontrolsettings
-creatingandmodifyingprivacymasksettings
-uploadingapplicationsandlanguagefiles
-anyofthesettingsincludedintheSystemOptions
Administrator have unrestricted accessal settings. The administrator can add modify and remove other users.
Note
Note that whether the option Encrypted unencrypted selected the web serve will encrypt the password This should option for anewunitor a unit reset to factory default settings.
UndeHTTP/RTSIPasswordSettingsselecttheypofpasswordallowYoumayneedallowunencryptedpasswordsifthereareviewingclientsthatdonotsupportencryption,orifyouupgradedthefirmwareandexistingclientssupportencryptionbutneedtologinagainandbeconfiguredtousethisfunctionality.
UndeUseSettingsselecttheEnablanonymousvieweloginoptiortallowanonymoususersaccessdtheLiveViewpage.
Select the Enable Anonymou PTZ control into allowed anonymous users access the PTZ controls.
Deselect the Enabl Basi Setup option to width the Basi Setup menu. Basi Setup provides quick access to settings that should be made before using the Axis product.
ONVIF
ONVIF(OpenNetworkVideoInterfaceForum)isaglobalinterfacestandardthatmakesiteasierforendusers,integrators,consultants,andmanufacturerstotakeadvantageofthepossibilitiesofferedbynetworkvideotechnology.ONVIFenablesinteroperabilitybetweendifferentvendorproducts,increasedflexibility,reducedcostandfuture-proofsystems.
BycreatingauseryouautomaticallyenableONVIFcommunication.UsetheusernameandpasswordwithallONVIFcommunication withtheproduct.Formoreinformationseewww.onvif.org
IPAddressFilter
IAddressfiltering enable forth SystemOptions Security. IAddressFilterpage. Once enabled the listed address are allowed, denied access the AxiproductSelectAllowoDenyronthdistance. Apply enable address filtering.
The administrator can add up to 256IP addressentriestothelist (asingleentry can contain multiple P addresses).
HTTPS
HTTPS(HyperTextTransferProtocoloverSecureSocketLayer,orHTTPoverSSL)isawebprotocolprovidingencryptedbrowsing. HTTPScanalsobeusedbyusersandclientstoverifythatthecorrectdeviceisbeingaccessed. Thesecuritylevelprovidedby HTTPSisconsideredadequateformostcommercialexchanges.
TheAxisproductcanbeconfiguredtorequireHTTPSwhenusersfromdifferentusergroups(administrator, operator, viewer)login.
TouseHTTPSaHTPScertificatenusfirsbeinstalledGoSystemOptionsSecurityCertificatesinstallandmanage certificates.SeeAboutcertificatesonpage46.
ToenableHTTPSontheAxisproduct:
- GotoSystemOptions>Security>HTTPS
- SelectanHTTPCertificatefromthelistofinstalledcertificates.
- Optionally, click Ciphers and select the encryption algorithm for SSL.
- SettheHTTPSConnectionPolicyforthedifferentusergroups.
5.ClickSavetoenablethesettings.
Taccess the Axis product via desired protocol, the address field browser, https://fortheHTTPprotocol. and http://fortheHTTPprotocol.
The HTTP Sport change or the System Options Network TCP/IP Advance page.
IEEE802.1X
IEEE802.1Xisastandardforport-basedNetworkAdmissionControlprovidingsecureauthenticationofwiredandwirelessnetwork devices.IEEE802.1XisbasedonEAP(ExtensibleAuthenticationProtocol).
ToaccessanetworkprotectedbyIEEE802.1X,devicesmustauthenticatethemselves.Theauthenticationisperformedbya third-partyentitycalledauthenticationservertypicallyRADIUServerexamplesofwhichareFreeRADIUSandMicrosoft InternetAuthenticationService.
InAxis'implementation, thenetworkdevice and the authentication server authenticatethemselves with the help of digital certificates using EAP-TLS (ExtensibleAuthenticationProtocol-TransportLayerSecurity). The certificates are provided by a Certification Authority (CA). You need:
- aCAcertificatetovalidatetheidentityoftheauthenticationserver
- aCA-signedclientcertificateandaprivatekeytoauthenticatethenetworkdevice.
ToallowthenetworkdevicetoaccessanetworkprotectedbyIEEE802.1X:
- Obtain a CA certificate, a client certificate and a client private key (contact your network administrator).
QoSetupSystemOptionsSecurityEEB02.1XanduploadhCAcertificatetheclientcertificatandheclientprivatekey.
UndeSettingsselecttheEAPOLversionprovideyouEARidentityandprivatekeypassword.
- ChecktheboxtoenableIEEE802.1XandclickSave.
Certificates
CACertificateTheCAcertificateisusedtovalidatetheidentityoftheauthenticationserver.Enterthepathto thecertificatdirectlyallocatefileusinghBrowsbuttonTheclickUploadRemove acertificate,clickRemove.
Clientcertificate Theclientcertificateandprivatekeyareusedtoauthenticatethenetworkdevice.Theycanbe uploadedasseparatefilesorinonecombinedfile(e.g.aPFXfileoraPEMfile).UsetheClient privatekeyfieldifuploadingonecombinedfile.Foreachfile,enterthepathtothefile,orlocatethe fileusingtheBrowsebuttonTheclickUploadRemovefileclicRemove.
Settings
EAPOLversion SelecttheEAPOLversion(1or2)asusedinyournetworkswitch.
EAPidentity Entertheuseridentity(maximum16characters)associatedwithyourcertificate.
Privatekeypassword Enterthepassword(maximum16characters)fortheprivatekey.
EnableIEEE802.1X ChecktheboxtoenabletheIEEE802.1Xprotocol.
Aboutcertificates
Certificatesareusedtoauthenticatedevicersonanetwork.Typicalapplicationsincludeencryptedwebbrowsing(HTTPS),network protectionviaIEEE802.1Xandsecureuploadofimagesandnotificationmessagesforexampleviaemail.Twotypesofcertificates canbeusedwiththeAxisproduct:
Server/Clientcertificates: Authentication the Axiproduct Server/Client certificate can self-signed or issued by Certificate Authority(CA). A self-signed certificate offers limited protection and can be used before a CA-issued certificate has been obtained.
CAcertificatesToauthenticatpeecertificatesforexamplethecertificatoAuthenticationserverincasteTheAxisproducts connectedtoanIEEE802.1Xprotectednetwork.TheAxisproductisshippedwithseveralpreinstalledCAcertificates.
Note
- If the product is reset to factory default, all certificates, except preinstalled CA certificates, will be deleted.
- If the product is reset to factory default, all preinstalled CA certificate that have been deleted will bere installed.
Howtocreateaself-signedcertificate
- GotoSetup>SystemOptions>Security>Certificates.
- ClickCreateself-signedcertificateandprovidetherequestedinformation.
HowtocreateandinstallaCA-signedcertificate
Create self-signed certificatesed How to create self-signed certificate or page 46.
- GotoSetup>SystemOptions>Security>Certificates.
ClickCreatecertificatsigningequestanprovidetherequestedinformation.
- CopythePEM-formattedrequestandsendtotheCAofyourchoice.
Whether signed certificate returned click install certificate and upload certificate.
HowtoinstalladditionalCAcertificates
- GotoSetup>SystemOptions>Security>Certificates.
- ClickInstallcertificateanduploadthecertificate.
AudioSupport
SelectEnableaudisupportallowclientsRetrievaudiostreamfromtheAxiproductFoinformationhowtoconfigure audiosettings,seeHowtochangeaudiosettingsonpage25.
Note
DeselectingthisoptionwilldisableaudiogloballyintheAxisproduct,forconfiguredeventsandprofileswithaudioaswell.
Date&Time
The Axi product'slatandimsettings are configured under System OptionsDateTime.
CurrenServerTimedisplaythecurrentlatandtime(24clock)Thetimecarbelisplayedn12clockirthextoverlay(see below).
TochangthedatandimsettingsselecthepreferredTimmodundeNewServeTime:
SynchronizovithcomputetimeSetslatandimaccordingthecomputer'slockWiththisoptiondatandtimearesetonceandwillnotbeupdatedautomatically.
SynchronizovitNTServerObtainslatandimfromanNTServerWiththisoptiondatandimsettingsare updatedcontinuouslyEoinformationonNTBettingsseeNTPConfigurationorpage49.
IfusinghostnamefothNTServer,DNServemuseconfiguredSeeDNSConfigurationorpage49.
- Setmanually-Allowsyoutomanuallysetdateandtime.
If using NTServer, select you Timezone from the drop-downlist, required check Automatically adjust todaylight saving timechanges.
The DateTimeFormUsedImages the date and timeframe displayed at each overlay the video stream uses
predefinedformatsorsee FileNaming&Date/TimeFormatsintheonlinehelp forinformationonhowtocreatecustomdateand timeformatsIncluddatandimintheoverlaytextg0dVideAudianselectIncluddatandncludtime.
Network
BasicTCP/IPSettings
TheAxisproductsupportsIPversion4andIPversion6.Bothversionscanbeenabledsimultaneously, andatleastoneversion mustalwaysbeenabled.
IPv4AddressConfiguration
Bydefault, theAxisproductissettouseIPv4(IPversion4) and to obtain theIPaddress automatically via DHCP. TheIPv4settings are configured under SystemOptions > Network > TCP/IP > Basic.
DHCP(DynamicHostConfigurationProtocol) allows network administrator to centrally manage and automate the assignment of IP addresses. DHCP should only be enabled if using dynamicIP address notification, or if the DHCP can update a DNS server. It is then possible to access the Axis product by name (hostname).
If DHCP is enabled and the product cannot be accessed, run AXISIPUtility to search then network for connected Axis products, or reset the product that factory default settings (see page 57) and then perform the installation again.
To usestatid PaddresscheckUse the following Paddress and specify the Paddress subnet mask defaultouter.
IPv6AddressConfiguration
IfIPv6(IPversion6)isenabled,theAxisproductwillreceiveanIPaddressaccordingtotheconfigurationinthenetworkrouter.
TenablePv6gctSystemOptionsNetworkTCP/IPBasicOthesettingsforPv6shouldbeconfiguredrthenetworkrouter.
ARP/Ping
The product's Address can be assigned using ARP and Ping for instructions see Assign/Address Using ARP/Ping or page 48.
TheARP/Pingserviceisenabledbydefaultbutisautomaticallydisabledtwominutesaftertheproductisstarted,orassoonasanIP addressisassigned.Tore-assignIPaddressusingARP/Ping,theproductmustberestartedtoenableARP/Pingforanadditional twominutes.
Todisable the service data System Options Network TCP/IP Basic and cleath option Enable ARP/Pingetting of Paddress.
Pinging the product is still possible when the service is disabled.
AssignIPAddressUsingARP/Ping
Theproduct'sIPaddresscanbeassignedusingARP/Ping.Thecommandmustbeissuedwithin2minutesofconnectingpower.
1.AcquireafreestaticIPaddressonthesamenetworksegmentasthecomputer.
2. Locatetheserialnumber(S/N) on the product label.
3.Openacommandpromptandenterthefollowingcommands:
Linux/Unixsyntax
arp-s<IPaddress><serialnumber>temp
ping-s408<IPaddress>
Linux/Unixexample
arp-s192.168.0.12500:40:8c:18:10:00temp
ping-s408192.168.0.125
Windowssyntax(thismayrequirethatyourunthecommandpromptasanadministrator)
arp-s<IPaddress><serialnumber>
ping-1408-t<IPaddress>
Windowsexample(thismayrequirethatyourunthecommandpromptasanadministrator)
arp-s192.168.0.12500-40-8c-18-10-00
ping-l408-t192.168.0.125
- Check that thenetwork cable is connected and then restart the product by disconnecting and reconnecting power.
Glosch command prompt whether product responds with Reply from 92.168.0.125:.. osimilar.
Openbrowseandyphttp://
Fothenmethods:AssigningtheAddress;ethdocumentAssignor1AddressandAccesstheidedStreamorAxisSupport webatwww.axis.com/support
Note
To open command prompt Windows peripheral Start menu and type cmd the Run/Searchfield.
- TousetheARPcommandinWindows8/Windows7/WindowsVista,right-clickthecommandprompticonandselectRunasadministrator.
ToopercommandpromptMacOSxopenthTerminalutilityfromApplicationUtilities.
AXISVideoHostingSystem(AVHS)
AVHSusedinconjunctionwithanAVHSservice,provideaseasyandsecureInternetaccesstoliveandrecordedvideoaccessiblefromanylocation.FormoreinformationandhelptofindalocalAVHSServiceProvidergotowww.axis.com/hosting
The AVHSettings are configured under SystemOptions Network TCPBasic The possibility to connector AVHService is enabled by default. Todisable, clear the Enable AVHSbox.
One-clickenabledPressandholdtheproduct'sontrobutton(seeHardwareovervieworpag)foraboutSecondsconnecttoanAVHServiceovethdInternetOnceregisteredAlwayswilbenabledtheAxisproductstaysconnectedtheAVHService.Iftheproductisnotregisteredwithin24hoursfromwhenthebuttonispressed,theproductwilldisconnectfromtheAVHService.
AlwaysTheAxisproductwilconstantlyattemptconnecttheAVHServiceovethinternetOnceregisteredhproductwill stayconnectedtotheservice.Thisoptioncanbeusedwhentheproductisalreadyinstalledanditisnotconvenienttousethe one-clickinstallation.
AXISInternetDynamicDNSService
AXISnterneDynamidDNServicassignshosthamforeasyaccesstthproductFomoreinformationsewww.axiscam.net
To register the Axis product with AXIS Internet Dynamic DNS service and System Options Network TCP/IPBasid Under Services click the AXIS Internet Dynamic DNS Service Settings button (requires access to the Internet) The domain name currently registered at AXIS Internet Dynamic DNS service for the product can at any time be removed.
Note
AXISInternetDynamicDNSServicerequiresIPv4.
AdvancedTCP/IPSettings
DNSConfiguration
DNS(DomainNamService)provides the translation of names to addresses The DNS Settings are configured under System Options > Network > TCP/IP > Advanced.
SelectObtainDNServeaddressidHCPrustheDNSettingsprovidedbytheDHCRServer.
TomakemanuasettingsselectUsethfollowingDNServeaddressandspecifythefollowing:
DomainnameEntethelomain(s)searchfortheshnameusedbytheAxiproductMultipledomainscarbseparated by semicolonsThehoshnameiswaythefirstparbfullyqualifieddomainameforexamplenyserveritheshnamerthefullyqualifieddomainamemyserver.mycompany.conwhermycompany.comtheldomainame.
Primary/SecondaryDNServeEntethdAddresses the primary and secondary DNServers The secondary DNServes optionalandwillbeusediftheprimaryisunavailable.
NTPConfiguration
NTP(NetworkTimeProtocol)isusedtosynchronizetheclocktimesofdevicesinanetwork.TheNTPsettingsareconfiguredunder SystemOptions>Network>TCP/IP>Advanced.
SelectObtainNTBerveaddress via DHCP to the NTBetting provided by the DHCPerver.
TomakmanuasettingsselectUsethefollowingNTBerveaddressandentethosthamofAddressoftheNTBerver.
HostNameConfiguration
TheAxisproductcanbeaccessedusingahostnameinsteadofanIPaddress.ThehostnameisusuallythesameastheassignedDNS nameThehoshamesconfiguredindeSystemOptionsNetworkTCP/IPAdvanced.
SelectObtainhostnamePv4DHCRusnosthamprovidedbythDHCRerverunningorIPv4.
SelectUsethehostnametosetthehostnamemanually.
SelectEnableDynamidDNSUpdates dynamically update docaDNServers whenever the Axis product's Address changes.
Formoreinformation,seetheonlinehelp
Link-LocalIPv4Address
Link-LocalAddress=enabledyleafalandassigntheAxiproduct:additionalPaddresswhichcanused:access theproductfromotherhostsonthesamesegmentonthelocalnetwork.TheproductcanhaveaLink-LocalIPandastatic orDHCP-suppliedIPaddressatthesametime.
This function can be disabled under System Options Network TCP/IP Advanced.
HTTP
The HTTP port used by the Axiproductar changed under SystemOptionsNetworkTCP/IP Advanced addition the default setting, which is 80, any port in therange 1024-65535 can be used.
HTTPS
The HTTP sport used by the Axi product are changed under SystemOptions Network TCP/IP Advanced Laddition to the default setting, which is 443, any portion in the range 1024-65535 can be used.
TenableHTTPSgdoSystemOptionsSecurityHTTPSFomoreinformationsedHTTPSpage45.
NATtraversal(portmapping)forIPv4
Anetworkrouterallowsdevicesonaprivatenetwork(LAN)toshareasingleconnectiontothelnternet.Thisisdonebyforwarding networktrafficfromtheprivatenetworktothe"outside",thatis,theInternet.Securityontheprivatenetwork(LAN)isincreased sincemostroutersarepre-configuredtostopattemptsstoaccesstheprivatenetwork(LAN)fromthepublicnetwork(Internet).
Use NATraversalwhentheAxisproductlocatedbranintrane(LAN)andyouwistomaketavailablefromthe(WAN)ide ofaNATrouter.WithNATtraversalproperlyconfigured,allHTTPtraffictoanexternalHTTPportintheNATrouterisforwardedto theproduct.
NATraversalconfiguredindeSystemOptionsNetworkTCP/IPAdvanced.
Note
- ForNATtraversaltowork, this must be supported by the router. Therouter must also support UPnP TM.
- In this context, router refer to an any network routing devices such as NATrouter, Networkrouter, Internet Gateway, Broadbandrouter, Broadband sharing device, or as softwares such as a firewall.
Enable/Disable Where enabled the Axi product attempts to configure port mapping in NAT route by you network using UPnP NotethatUPnP ^TM must be enabled in the product (see System Options > Network > UPnP).
TM.
Usmanually selected NATouteSelect this option manually select NAToute and entethdaddress so the route in the field. If norouter is specified, the product automatically searches for NATrouterson your network. If more than one router is found, the default router is selected.
Alternative HTTP Port Select this option manually defines externa HTTP Port Enter port the range 024-65535. The portfield isemptyor contains the default setting, which is 0, a port number is automatically selected when enabling NAT traversal.
Note
- AnalternativeHTTPportcanbeusedorbeactiveevenifNATtraversalisdisabled. ThisisusefulifyourNATrouterdoesnot supportUPnPandyouneedtomanuallyconfigurereportforwardingintheNATrouter.
- If you attempt to manually enter a port that is already in use, another available port is automatically selected.
Wherth port selected automatically displayed this field to change this sentence new port number and click Save.
FTP
TheFTPserverrunningintheAxisproductenablesuploadofnewfirmware,userapplications,etc.TheFTPservercanbedisabled underSystemOptions>Network>TCP/IP>Advanced.
Note
ThisFTPserverhasnothingtodowiththeproduct'sabilitytotransferimagesviaFTPtootherlocationsandservers.
RTSP
TheRTSPserverrunningintheAxisproductallowsaconnectingclienttostartanH.264stream.TheRTSPportnumbercanbe changedindeSystemOptionsNetworkTCP/IPAdvancedThedefaultport554.
Note
H.264videostreamswillnotbeavailableiftheRTSPserverisdisabled.
SOCKS
SOCKSisanetworkingproxyprotocol.TheAxisproductcanbeconfiguredtouseaSOCKSservertoreachnetworksontheother sideofafirewallorproxyserver.ThisfunctionalityisusefuliftheAxisproductislocatedonalocalnetworkbehindafirewall,and notifications,uploads,alarms,etcneedtobesenttoadestinationoutsidethelocalnetwork(forexampletheInternet).
SOCKSconfiguredundesystemOptionsNetworkSOCKSFomoreinformationsethonlinehelp

QoS(QualityofService)
QoS(QualityofService)guaranteesacertainlevelofaspecifiedresourcetoselectedtrafficonanetwork.AQoS-awarenetwork prioritizesnetworktrafficandprovidesagreaternetworkreliabilitybycontrollingtheamountofbandwidthanapplicationmayuse.
The DoSettings are configured under SystemOptions Network QoS Using DSCR Differentiated Service Codepoint values the Axisproduct can mark different types of traffic.
Note
LiveaudioDSCPwillbeequaltolivevideoDSCPifH.264overRTSPisused.
SNMP
TheSimpleNetworkManagementProtocol(SNMP) allows remotemanagementofnetworkdevices.AnSNMPcommunityisthe groupofdevicesandmanagementstationrunningSNMP.Communitynamesareusedtoidentifygroups.
AXISVideoMIB(ManagementInformationBase)forvideohardwarecanbeusedtomonitorAxis-specific,hardware-related issuesthatmayneedadministrativeattention. FormoreinformationaboutAXISVideoMIBandtodownloadMIBfiles,goto www.axis.com/support
TenableandconfigurSNMPrtheAxiproductgdthSystemOptionsNetworkSNMPage.
Dependingonthelevelofsecurityrequired,selecttheversiononSNMPtouse.
Trapareused by the Axis product send messages to management system important events and status changes Check Enable trap and enter the address where the trap message should be sent and the trap community that should receive the message.
Note
If HTTPSisenabled, SNMPv1 and SNMPv2 should be disabled.
TrapfoSNMR1/v2areused by the Axiproduct send messages to management system important events and status change. Check Enable trap and the address where the trap message should be sent and the trap community that should receive them message.
The followingtrapsareavailable:
•Coldstart
•Warmstart
- Linkup
- Authenticationfailed
Note
AllAXISVideoMIBtrapsareenabledwhenSNMPv1/v2ctrapsareenabled.Itisnotpossibletoturnonoroffspecifictraps.
SNMR3provide:encryptionandsecurpasswordsTousdrapswithSNMR3arSNMR3managementapplicationrequired.
TousENMR3HTTPSmusenabledseethTPSorpage45 enableSNMR3checkboxanprovidethenitialuser password.
Note
TheinitiapasswordcanonlysetncelfhpasswordsosttheAxiproductmustresetfactorydefaultsedHow toresettofactorydefaultsettingspage57.
UPnP ^TM
TheAxisproductincludessupportforUPnP ^TM .UPnP ^TM isenabledbydefaultandtheproductisautomaticallydetectedbyoperating systemsandclientsthatsupportthisprotocol.
UPnP™ canbedisabledunderSystemOptions>Network>UPnP.
RTP/H.264
The RTPortrangeandmulticastettings are configured under SystemOptionsNetworkRTP.
The RTP portrangedefinestherangeofportsfromwhichthevideo/audiportsareautomaticallyselected.Formulticaststreams, only certainIPaddressesandportnumbersshouldbeused.
SelectAlwayMulticastVideoand/orAlwayMulticastAudioStartmulticaststreamingwithoutopeningRTSSession.
Bonjour
TheAxisproductincludessupportforBonjour.Bonjourisenabledbydefaultandtheproductisautomaticallydetectedbyoperating systemsandclientsthatsupportthisprotocol.
BonjourcanbedisabledunderSystemOptions>Network>Bonjour.
Storage
AboutSDcards
NOTICE
Topreventdatacorruption, the SDcardshouldbeunmountedbeforeremoval.
Note
ForSDcardrecommendationsseewww.axis.com
TheAxisproductsupportsSD/SDHC/SDXCcards.
The following SDcardfilesystemsaresupported:
ext4-recommendedudotsresiliengagainstdatalossfthecardsjectedifherisbruppowetossToaccess datastoredonthecardfromtheWindowsoperatingsystem,athird-partyext4driverorapplicationisrequired.
- vFAT—supportedbymostoperatingsystemsforpersonalcomputers.
The SCardmanagedorthSystemOptionsStoragePageClickSTCardoperStorageManagement.
If the card's status shows failed, click Checkisk or the problem can be found and then repair. This option only available for SD cards with next 4. For SD cards with v FAT, use a card reader or computer to troubleshoot the card.
To avoid filling the card it recommended to remove recordings continuously. UndeGenera Settings select Remove recordings older than and select then number of days or weeks.
TstopwritingthecardanprotectecordingsfrombeingremovedselectLockundeGeneraSettings.
HowtomountandunmounttheSDcard
NOTICE
Topreventcorruptionofrecordings, the SDcardshouldalwaysbeunmountedbeforeitisejected.
TheSDcardisautomaticallymountedwhenthecardisinsertedintotheAxisproductorwhentheproductisstarted.Amanual mountisonlyrequiredifthecardhasbeenunmountedandnotejectedandre-inserted.
TounmounttheSDcard:
OpertheAxisproduct'swebpagesandSetupSystemsOptionsStorage.
2.ClickSDCard.
3.ClickUnmount.
- The cardcannowberemoved.
HowtoformattheSDcard
NOTICE
FormattingtheSDcardwillremovealldataandrecordingsstoredonthecard.
TheAxisproductcanbeconfiguredtoautomaticallyformatSDcardsthataireinsertedintotheproduct.IfautoformatisenabledandanSDcardisinserted,theproductwillcheckiftheSDcardhastheext4filesystem.Ifthecardhasadifferentfilesystem,thecardwillautomaticallybeformattedtoext4.
Important
Ifautoformatisenabled,onlyuseneworemptySDcards.Anydatastoredonthecardwillbelostwhenthecardisinserted intotheAxisproduct.
Toenableautomaticformatting, followthesesteps:
OpertheAxisproduct'swebpagesandSetupSystemsOptionsStorage.
2.ClickSDCard.
UndeGeneraSettingsselecAutoformato.
4.ClickOKtosavesettings.
AnSDcardinsertedintotheproductcanbemanuallyformattedtooneofthesupportedfilesystems.Tomanuallyformatthe SDcard,followthesesteps:
- Insert the SD card in the SD card slot.
OpertheAxisproduct'swebpages and SetupSystemsStorage.
3.ClickSDCard.
- ClickFormatandselectthedesiredfilesystem.
5.ClickOKtostartformattingthecard.
HowtoencryptSDcarddata
Topreventunauthorizedindividualsandsystemsfromaccessingrecordedvideo,theSDcardcontentcanbeencrypted.Encryption canonlybeenabledwhenthecardisunmounted.Afterenablingencryption,theSDcardmustbeformattedsothatnounencrypted dataremainsonthecard.Thecardmustalsobemountedbeforeitcanbeused.
Note
Ifautoformatisenabled, thecardwillbeformattedandmountedautomaticallywhenencryptionisenabled. Theformatand mountstepsbelowshouldthenbeskipped.
ToencrypttheSDcardcontent:
OpertheAxisproduct'swebpagesandSetupSystemOptionsStorage.
ClickSDCardoperStorageManagement.
- If the SD card is mounted, click Unmounttounmountthecard.
4.ClickEncrypt. - SelectEnableSDcardencryptionandenterapassphrase.
- BackinStorageManagement, clickFormattoformattheSDcard.
7.ClickMounttomounttheSDcard.
It possible changing the passphrases without e formatting the card Oper Storage Management clic Encrypt and the old and new passphrases. The passphrase can only be changed when the card is mounted. Changing the passphrases does not disrupt ongoing recordings.
Tolisable encryption unmounted SD card and follow the steps above but least Enable SD encryption option. The card must be formatted and mounted when encryption has been disabled.
NetworkShare
NetworkshareallowsyoutoaddnetworkstoragesuchasaNAS(network-attachedstorage).TheNASshallbededicatedfor recordingsanddatafromtheAxisproductsconnectedtothenetwork.ForinformationaboutreferenceNASdevices,goto www.axis.com/products/axis-companion/support-and-documentation
Note
ForNASrecommendationsseewww.axis.com
Toaddanetworkshare:
- GotoSystemOptions>Storage.
2.ClickNetworkShare.
3.EntertheIPaddress,DNSorBonjourametothehostserverintheHostfield.
4.EnterthenameoftheshareintheSharefield.Subfolderscannotbeused.
I ^s requiredselectThesharerequiresogirandentethusenamenanspassword.
6.ClickConnect.
To clear recordings and data from the Axi product's folderth designated share click Cleaunde Storage Tools.
T avoid filling the share if recommended remove recordings continuously Under Recording Settings; select Remove recordings older than and select then number of days or weeks.
Tstopwriting the share and protect recordings from being removed, select Lockunde Recording Settings.
Ports&Devices
I/OPorts
TheAxisproductprovidesoneinputportandoneoutputportforconnectionofexternaldevices.Forinformationabouthowtoconnectexternaldevices,seeConnectorsonpage63.
The/Oports configuration System Options Ports Devices/Ports The ports caregiver descriptivenames and their Normatates are configured Oper circuit Grounded circuit.
PortStatus
The birth System Options Port Devices Port Status page show the status of the product's input and output ports.
Maintenance
The Axi produc provides ever maintenance functions. These are available under System Options Maintenance.
ClickRestart perform correct start the Axiproductsobehaving expected This will have affected the current settings.
Note
ArestartclearsallentriesintheServerReport.
ClickRestoresetmostettingsofthefactorydefaultvaluesThefollowingsettingsarenotaffected:
•thebootprotocol(DHCPorstatic)
- thestaticIPaddress
- thedefaultrouter
- thesubnetmask
- thesystemtime
• theIEEE802.1Xsettings
•thefocusposition
Note
If the Axis product is restored, uploaded applications and their settings are removed.
ClickDefaultresetsettingsincludingtheAddress factorydefaultvaluesThisbuttonshouldusedwithcautionTheAxiproductandalsoresetfactorydefaultusingthecontrolbuttonsedHowtoresetfactorydefaultsettingsorpage57.
ToesethopticsclicCalibrateundesystemOptionsMaintenanceOpticsThismaynecessaryisituationswherethe opticshaslostitscalibrationduringtransportorhasbeenexposedtoextremevibrations.Ifnecessaryconfigurefocusandzoom again(seeHowtoperformabasicsetuponpage17).
Tidentify the product testh Status LED click Flash LED undel identify and specify duration in seconds minutes hours. This can be useful for identifying the product among other products installed in the same location.
Forinformationaboutfirmwareupgrade,seeHowtoupgradethefirmwareonpage58.
Support
SupportOverview
The SystemOptionsSupportSupportOverviewpage provides information for troubleshooting and contact information, should you require technical assistance.
See also Troubleshooting on page 58.
SystemOverview
Together overview of the Axi product status and settings and System Options Support System Overview Information that can be found here includes firmware version, IP address, network and security settings, event settings, images settings and recent log items.
Logs&Reports
ThSystemOptionsSupportLogReportpagegeneratelogsandeportusefufosystemanalysisandroubleshootingIf contactingAxisSupport,pleaseprovideaServerReportwithyourquery.
SystemLog-Providesinformationaboutsystemevents.
AccesLogListalfailedattemptsaccesstheproductTheAccesLoganslsoconfigureddistalconnectionsthe product(seebelow).
ServeReportProvidesinformationaboutthoproductstatus:pop-upwindowTheAccessLogautomaticallyincludedintheServerReport.
Youcanviewordownloadtheserverreport.Downloadingtheserverreportcreatesa.zipfilethatcontainsacompleteserverreport texfileUTF-8FormaSelecthIncludesnapshowwithdefaultmagsettingsoptionincludesnapshoftheproductLive View.Theserverreport.zipfileshouldalwaysbeincludedwhencontactingsupport.
ParameteLisShowProduct parameters and their current setting This may prove useful when troubleshooting or when contacting AxisSupport.
ConnectionList-Listsallclientsthatarecurrentlyaccessingmediastreams.
CrashReport-Generatesanarchivewithdebugginginformation.Thereporttakesseveralminutestogenerate.
TheogelvelsothSystemLogandhAccesLogrectundeSystemOptionsSupportLogReportsConfiguration TheAccessLogcanbeconfiguredtolistallconnectionstotheproduct(selectCritical,Warnings&Info).
Advanced
Scripting
Scriptingallowsexperienceduserstocustomizeandusetheirownscripts.
NOTICE
Improperuse may cause unexpected behavior and loss of contact with the Axis product.
Axisstronglyrecommendsthatyoudonotusethisfunctionunlessyouunderstandtheconsequences.AxisSupportdoesnotprovide assistanceforproblemswithcustomizedscripts.
To PerthScriptEditorgdsystemOptionsAdvancedScriptingScriptauseproblems,sethproductotsfactorydefaultsettings,seepage57.
Formoreinformation,see www.axis.com/developer
FileUpload
Files,forexamplewebpagesandimages,canbeuploadedtotheAxisproductandusedascustomsettings.Tuploadafile,go toSystemOptions>Advanced>FileUpload.
Uploadedfilesaccessedthroughhttp://
PlainConfig
PlainConfigisforadvanceduserswithexperienceofAxisproductconfiguration.Mostparameterscanbesetandmodifiedfrom thispage.
TooperPlainConfigdSystemOptionsAdvancedPlainConfigAxisSupportdoesnoprovideassistancewiththisfeature.
Howtoresettofactorydefaultsettings
Important
Resettofactorydefaultshouldbeusedwithcaution.Aresettofactorydefaultresetsallsettings,includingtheIPaddress,to thefactorydefaultvalues.
Toresettheproducttothefactorydefaultsettings:
- Disconnectpowerfromtheproduct.
- Pressandholdthecontrolbuttonandreconnectpower.
- Keep the control button pressed for 15–30 seconds until the status LED indicator flashes amber.
- Release the control button. The process is complete when the status LED indicator turns green. The product has been reset to the factory default settings in DHC server available for the network the default address 192.168.0.90
- Using the installation and management software tools, assign an Paddress, set the password, and access the videostream.
The installation and management software tools are available from the support pages at www.axis.com/support
It's possible to rese parameters for factory default via web interface Gdo Setup System Options Maintenance and clickDefault.
Troubleshooting
Howtocheckthecurrentfirmware
Firmwareissoftwarethatdeterminesthefunctionalityofnetworkdevices.Oneofyourfirstactionswhentroublershootingaproblem shouldbetocheckthecurrentfirmwareversion.Thelatestversionmaycontainacorrectionthatfixesyourparticularproblem.The currenfirmwareversiontheAxiproductsdisplayedthepagSetupBasiSetupandrSetupAbout.
Howtoupgradethefirmware
Important
- Yourdealerreservestherighttochargeforanyrepairattributabletofaultyupgradebytheuser.
- Preconfiguredandcustomizedsettingsaresavedwhenthefirmwareisupgraded(providingthefeaturesareavailableinthenewfirmware)althoughthisisnotguaranteedbyAxisCommunicationsAB.
Note
- After the upgrade process has completed, the product restarts automatically. If you restart the product manually after the upgrade, wait 10 minutes seven if you suspect that the upgrade has failed.
-
When you upgrade the Axis product with the latest firmware, the product receives the latest functionality available. Always read the upgrade instructions and releases notes available with each new release before upgrading the firmware.
-
Download the latest firmware file to your computer, available free of charge at www.axis.com/support
- GotoSetup>SystemOptions>Maintenanceintheproduct'swebpages.
UndeUpgradServerclickBrowseandocate the filonyoucomputer.
4.ClickUpgrade.
- Wait approximately 10 minutes while the product is being upgraded and restarted. Then access the product.
6.GotoSetup>BasicSetuptoverifythefirmwareupgrade.
AXISCameraManagementabusedomultipleupgradeSeewww.axis.comfromoreinformation.
EmergencyRecoveryProcedure
If power or network connection is lost during the upgrade, the process fails and the product may become unresponsive. Flashing red Status indicator indicates a failed upgrade. Torecover the product, follow the steps below. The serial number is found on the product's label.
1. In UNIX/Linux, typethefollowingfromthecommandline:
arp-s<IPaddress><serialnumber>temp
ping-1408<IPaddress>

In Window stypeth following from command/DO prompt(this may require that your the command prompts an administrator):

arp-s<IPaddress><serialnumber>
ping-1408-t<IPaddress>
- If the product does not reply in 30 seconds, restart it and wait for areply. Press CTRL + Ctstop Ping.
Openbrowseandyporthproduct'saddressrthepagthabpensustheBrowsbuttontoelectheupgrade filetouse.ThenclickLoadtorestarttheupgradeprocess.
- After the upgrade is complete (1–10 minutes), the product automatically restarts and shows a steady green on the Status indicator.
- Reinstall the product, referring to the Installation Guide.
If the emergency recovery procedure does not get the product and running again contact Axis support at www.axis.com/support
Symptoms, possible causes and remedial actions
| Problemsupgradingthefirmware | |
| Firmwareupgradefailure | Ifthefirmwareupgradefails,theproductreloadsthepreviousfirmware.Checkthefirmware fileandtryagain. |
| ProblemssettingthelPaddress | |
| WhenusingARP/Ping | Trytheinstallationagain.ThelPaddressmustbesetwithintwominutesafterpowerhasbeen appliedtotheproduct.EnsurethePinglengthissetto408.Forinstructions,seeAssignIPAddress UsingARP/Pingonpage48. |
| Theproductislocatedona differentsubnet | IfthelPaddressintendedfortheproductandthelPaddressofthecomputerusedtoaccessthe productarelocatedondifferentsubnets,youwillnotbeabletosethelPaddress.Contactyour networkadministratortoobtainanIPaddress. |
| ThelPaddressisbeingused byanotherdevice | DisconnecttheAxisproductfromthenetwork.RunthePingcommand(inaCommand/DOS window,typepingandthelPaddressoftheproduct):·Ifyoureceive:Replyfrom:bytes=32;time=10... thismeansthatthelPaddressmayalreadybeinusebyanotherdeviceonthenetwork. ObtainanewlPaddressfromthenetworkadministratorandreinstalltheproduct.·Ifyoureceive:Requesttimedout,thismeansthatthelPaddressisavailable forusewiththeAxisproduct.Checkallcablingandreinstalltheproduct. |
| PossiblelPaddressconflict withanotherdeviceonthe samesubnet | ThestaticlPaddressintheAxisproductisusedbeforetheDHCPserversetsadynamicaddress. ThismeansthatifthesamedefaultstaticlPaddressisalsousedbyanotherdevice,theremay beproblemsaccessingtheproduct. |
| Theproductcannotbeaccessedfromabrowser | |
| Cannotlogin | WhenHTTPSisenabled,ensurethatthecorrectprotocol(HTTPorHTTPS)isusedwhenattempting tdognYoumayneedmanuallytypehttphttpithebrowser'saddressfield.Ifthepasswordfortheuserrootislost,theproductmustberesettothefactorydefaultsettings.SeeHowtoresettofactorydefaultsettingsonpage57. |
| ThelPaddresshasbeen changedbyDHCP | IPaddressesobtainedfromaDHCPserveraredynamicandmaychange.IfthelPaddresshas beenchanged,useAXISIPUtilityorAXISCameraManagementtolocatetheproductonthe network.Identifytheproductusingitsmodelorserialnumber,orbytheDNSname(ifthename hasbeenconfigured).Ifrequired,astaticlPaddresscanbeassignedmanually.Forinstructions,seethedocumentAssign anlPAddressandAccesstheVideStreamorAxiSupportwebwww.axis.com/support. |
| Certificateerrorwhenusing IEEE802.1X | Forauthenticationtoworkproperly,thedateandtimesettingsintheAxisproductshouldbe synchronizedwithanNTPserver.SeeDateEtTimeonpage47. |
| Theproductisaccessiblelocallybutnotexternally | |
| RouteconfigurationyourrouterallowincomingdatatraffictheAxisproductenabletheNAT-traversal featurewhichwillattempttoautomaticallyconfiguretheroutertoallowaccesstotheAxis productseeNATtraversal(portmapping)forIPv4page50TheroutemustsupportUPnP TM. | |
Troubleshooting
| Firewallprotection | ChecktheInternetfirewallwithyournetworkadministrator. |
| Defaultroutersrequired | CheckifyouneedtoconfiguretheroutersettingsfromSystemOptions>Network>TCP/IP>Basic. |
| ProblemswithstreamingH.264 | |
| ProblemswithAXISMedia Control(InternetExplorer only) | ToenabletheupdatingofvideoimagesinInternetExplorer,setthebrowsertoallowActiveX controls.Also,makesurethatAXISMediaControlisinstalledonyourcomputer. |
| NoH.264displayedinthe client | CheckthattherelevantH.264connectionmethodsandcorrectinterfaceareenabledintheAMC ControlPanel(streamingtab).SeeAboutAXISMediaControl(AMC)onpage14. |
| IntheAMCControPanelselecthd.264bandlicSetdefaultH.264decoder. | |
| CheckthaRTSRenabledundeSystemOptionsNetworkTCP/IPAdvanced. | |
| MulticastH.264only accessiblebylocalclients | Checkifyourroutersupportsmulticasting,orifteroutersettingsbetweentheclientandthe productneedtobeconfigured.TheTTL(TimeToLive)valuemayneedtobeincreased. |
| NomulticastH.264 displayedintheclient | CheckwithyournetworkadministratorthatthemulticastaddressesusedbytheAxisproduct arevalidforyournetwork. |
| Checkwithyournetworkadministratorortoseeifthereisafirewallpreventingviewing. | |
| PoorrenderingofH.264 images | Ensurethatyourgraphicscardisusingthelatestdriver.Thelatestdriverscanusuallybe downloadedfromthemanufacturer'swebsite. |
| Colorsaturationisdifferent inH.264andMotionJPEG | Modifythesettingsforyourgraphicsadapter.Refertotheadapter'sdocumentationformore information. |
| Lowerframeratethan expected | SeePerformanceconsiderationsonpage64. |
| Reducethenumberofapplicationsrunningontheclientcomputer. | |
| Limitthenumberofsimultaneousviewers. | |
| Checkwiththenetworkadministratorthatthereisenoughbandwidthavailable. | |
| CheckintheAMCControlPanel(H.264tag)thatvideoprocessingisnotsettoDecodeonly keyframes. | |
| Lowertheimageresolution. | |
StatusandNetworkindicatorLEDsareflashingredrapidly
| Hardwarefailure | ContactyourAxisreseller. |
| Productdoesnotstartup | |
| ProductdoesnotstartupIftheproductdoesnotstartupkeepthenetworkcableconnectedandre-insertthepowercable tothemidspan. | |
| Videoandimageproblems,general | |
| Imageunsatisfactory | CheckthevidestreamandcamersettingsundesetupVideAudioVideStreamand Setup>Video&Audio>CameraSettings. |
Troubleshooting
Noaudio
| Incorrectsetup | Checkthesoundcardinthecomputer.Ensurethatmuteisnotselectedandthatthevolume settingsarecorrect.CheckhaEnableaudisupportselectedundesetupSystemOptionsSecurityAudio Support.CheckthatcorrectAudionputourceselectedundesetupVideoAudioAudio Settings. |
| Pooraudioquality | |
| Stuttering | Reducethenumberoflistenersandviewers.Decreaseimageresolutionandcompression. |
| Unsynchronizedaudioand videousingH.264 | Synchronizetheproduct'sdateandtimesettingswithanNTPserver.GotoSetup>System Options>Date&Time. |
| Distortedaudio | CheckthatcorrectAudionputourceselectedundesetupVideoAudioAudio Settings. |
| FeedbackloopsFeedbackloopsmightappearinfull-duplexmode.Trymovingthemicrophoneorthespeaker,or usehalf-duplexmodeinstead. | |
| Storageanddiskmanagementproblems | |
| Storagedisruption | Astoragedisruptionalarmissentifastoragedeviceisunavailable,removed,full,lockedorifother readwriteproblemsoccurToidentifthsourceofthproblemcheckthSystemLogunder SystemOptions>Support>LogsetReports.Dependingontheproblem,itmightbenecessaryto re-mountthestorgagedevice.FoinformationhowtosetupstoragedisruptionalarmseeAbouteventserpage35. |
| Videocannotberecorded | CheckthattheSDcardisnotwriteprotected(thatis,readonly). |
| SDcardcannotbemountedReformattheSDcardandthenclickMount. | |
NOTICE
Formattingthecardwillremoveallcontent,includingallrecordings,fromtheSDcard.
Technicalspecifications
Youcanfindthelatestversionofthedatasheetatwww.axis.com
LEDIndicators
Note
The StatusEDcarbeconfiguredbeunlituringnormabperationToconfiguregdSetupSystemOptionsPorts &Devices>LED.Seetheonlinehelpformoreinformation.
- TheStatusLEDcanbeconfiguredtoflashwhileaneventisactive.
The StatusEDcarbconfiguredflashfoidentifyingtheunitGdSetupSystemOptionsMaintenance.
| StatusLED | Indication |
| GreenSteadygreenfornormaloperation. | |
| Amber | Steadyduringstartup.Flasheswhenrestoringsettings. |
| RedFirmwareupgradefailure. | |
| NetworkLEDIndication | |
| Green | Steadyforconnectiontoa100Mbit/snetwork.Flashesfornetworkactivity. |
| Amber | Steadyforconnectiontoa10Mbit/snetwork.Flashesfornetworkactivity. |
| UnlitNonetworkconnection. |
| PowerLEDIndication | |
| Green | Normaloperation. |
| Amber | Flashesgreen/amberduringfirmwareupgrade. |
SDcardslot
NOTICE
- Riskofdamage to SDcard. Donotuses sharptools, metal objects are excessive force when inserting or removing the SDcard. Jsey our fingersto insert and remove the card.
- Riskofdatalossandcorruptedrecordings.DonotremovetheSDcardwhiletheproductisrunning.Disconnectpoweror unmounttheSDcardfromtheAxisproduct'swebpagesbeforeremoval.
ThisproductsupportsSD/SDHC/SDXCcards(notincluded).
ForSDcardrecommendations,see www.axis.com
Buttons
ControButton
Forocation of the controbuttoned Hardware overview page?
Thecontrolbuttonisusedfor:
ResettingproductfactorydefaultsettingSepage57.
Connecting an AXISided Hosting SystemServiceSepage48 connectpressandholdhouttorfoabou3 secondsuntiltheStatusLEDflashesgreen.
Connecting to AXIS Interne Dynamic DNS Service Seepage49 To connect press and hold the button for about seconds.
Connectors
Networkconnector
RJ45EthernetconnectorwithPoweroverEthernet(PoE).
NOTICE
Duetolocalregulationsortheenvironmentalandelectricalconditionsinwhichtheproductistobeused,ashieldednetwork cable(STP)maybeappropriateorrequired.Allcablesconnectingtheproducttotherenetworkandthatareroutedoutdoors orindemandingelectricalenvironmentsshallbeintendedfortheirspecificuse.Makesurethatthenetworkdevicesare installedinaccordancewiththemanufacturer'sinstructions.Forinformationaboutregulatoryrequirements,seethe InstallationGuideavailableatwww.axis.com
Audioconnector
TheAxisproducthasthefollowingaudioconnectors:
- Audioin(pink)-3.5mminputforamonomicrophone,oraline-inmonosignal.
Audio (green) 3.5mm output for audio (linevel) that can be connected to public address (PA system) an activespeaker with built-in amplifier. Astereoconnectormust be used for audioout.
Foraudioin, the left channel is used from a stereosignal.
3.5mmaudioconnectors (stereo)

| 1Tip2Ring | 3Sleeve | ||
| AudioInput | Microphone/Linein | Ground | |
| AudioOutput | Lineout,mono(stereoconnector compatible) | Lineout,mono(stereoconnector compatible) | Ground |
Aboutl/Oconnectors
Usethel/Oconnectorwithexternaldevicesincombinationwith,forexample,tamperingalarms,motiondetection,eventtriggering,andalarmnotifications.InadditiontotheOVDReferencepointandpower(DCoutput),thel/Oconnectorprovidestheinterfaceto:
DigitabutpuForconnectingexternaldevicesuchaselaysandLEDConnecteddevicesarboactivatedbythe/APIX® ApplicationProgrammingInterfaceorintheproduct'swebpage.
DigitalInputForconnectingDevice that cartoggl between an open and closed circuit for example PIRensorsdoor/window contacts, and glassbreakdetectors.
4-pinterminalblock
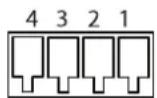
| FunctionPinNotes | Specifications | ||
| 0VDC(-) | 1 | 0DC | |
| DCoutput | 2 | Canbeusedtopowerauxiliaryequipment.Note:Thispincanonlybeusedaspowerout. | 3.3VDCMaxload=50mA |
| Digitalinput | 3 | Connecttopin1toactivate,orleavefloating(unconnected)todeactivate | 0tomax40VDC |
| Digitaloutput | 4 | Connectedtopin1whenactivated,floating(unconnected)whendeactivated.Ifusedwithaninductiveload,e.g.arelay,adiodemustbeconnectedinparallelwiththeload,forprotectionagainstvoltagetransients. | 0tomax40VDC,opendrain,100mA |
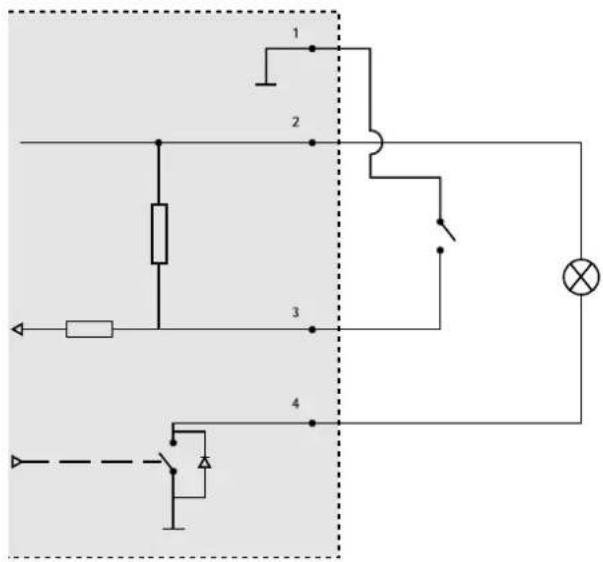
1 OVDC(-)
2 DCoutput3.3V,max50mA
3 DigitalinputOtomax40VDC
4 Digitaloutput0tomax40VDC,opendrain,100mA
Performanceconsiderations
Whensettingupyour system, it is important to consider how various settings and situations affect the performance. Some factors affect the amount of bandwidth (the bitrate) required, others can affect the framerate, and some affect both. If the load on the CPU reaches its maximum, this also affects the framerate.
The following factors are them most important to consider:
- Highimageresolutionorlowercompressionlevelsresultinimagescontainingmoredatawhichinturnaffectsthe bandwidth.
- AccessbylargenumbersofMotionJPEGorunicastH.264clientsaffectsthebandwidth.
- Simultaneousviewingofdifferentstreams(resolution, compression)bydifferentclientsaffectsbothframerateand bandwidth.
Use identical streams wherever possible to maintain a high framerate. Stream profile can be used to ensure that streams are identical.
- AccessingMotionJPEGandH.264videostreamssimultaneouslyaffectsbothframerateandbandwidth.
Technicalspecifications
- Heavyusageofeventsettingsaffectstheproduct'sCPUloadwhichinturnaffectstheframerate.
- UsingHTTPSmayreduceframerate, inparticularifstreamingMotionJPEG.
- Heavynetworkutilizationduetopoorinfrastructureaffectsthebandwidth.
- Viewingonpoorlyperformingclientcomputerslowersperceivedperformanceandaffectsframerate.
- Running multiple AXISCameraApplicationPlatform(ACAP)applicationssimultaneouslymayaffecttheframerateand thegeneralperformance.