
P3364-LVE - Sicherheitskamera AXIS - Kostenlose Bedienungsanleitung
Finden Sie kostenlos die Bedienungsanleitung des Geräts P3364-LVE AXIS als PDF.

| Produkttyp | Netzwerk-Sicherheitskamera (Fixed Dome) |
| Auflösung | 2 Megapixel (1920x1080) |
| Bildsensor | 1/2,8'' Progressive Scan CMOS |
| Objektiv | 2,8–8 mm motorisch, P-Iris |
| Tag- und Nachtfunktion | Ja, mit IR-Sperrfilter |
| Infrarot-Beleuchtung | Ja, optimiert für Farbe bei Nacht |
| Videokompression | H.264, MJPEG |
| Schutzart | IP66, IK10 |
| Stromversorgung | PoE IEEE 802.3af/at, 24 V AC / 12 V DC (optional) |
| Betriebstemperatur | -40 °C bis 50 °C |
| Abmessungen (ohne Sonnenschutz) | Ø 150 mm x 128 mm |
| Gewicht (netto) | 1,1 kg |
| Montage | Decken- oder Wandmontage |
| Speicher | MicroSD-Karte (nicht im Lieferumfang) |
| Audio | Zweiwege-Audio (optionales Mikrofon) |
| Netzwerk | RJ45 10/100 Base-T |
| Funktionen | Bewegungserkennung, Tampering-Alarm, Super Wide Dynamic, HDTV 1080p |
| Wartung | Gehäuse mit feuchtem Tuch reinigen, Lüftungsschlitze frei halten |
| Sicherheit | Passwortschutz, HTTPS, IP-Filter |
| Ersatzteile | Netzteil, Montagehalterung, Sonnenschutz (separat erhältlich) |
| Reparaturfähigkeit | Modulares Design, Firmware-Updates möglich |
Häufig gestellte Fragen - P3364-LVE AXIS
Benutzerfragen zu P3364-LVE AXIS
0 Frage zu diesem Gerät. Beantworten Sie die, die Sie kennen, oder stellen Sie Ihre eigene.
Eine neue Frage zu diesem Gerät stellen
Laden Sie die Anleitung für Ihr Sicherheitskamera kostenlos im PDF-Format! Finden Sie Ihr Handbuch P3364-LVE - AXIS und nehmen Sie Ihr elektronisches Gerät wieder in die Hand. Auf dieser Seite sind alle Dokumente veröffentlicht, die für die Verwendung Ihres Geräts notwendig sind. P3364-LVE von der Marke AXIS.
BEDIENUNGSANLEITUNG P3364-LVE AXIS
USERMANUAL
AXISP3364-LVNetworkCamera
AboutthisDocument
ThismanualisintendedforadministratorsandusersoftheAXIS P3364-LVFixedDomeNetworkCamera,andisapplicabletofirmware 5.4andlater.Itincludesinstructionsforusingandmanagingthe productonyournetwork.Previousexperienceofnetworkingwillbeof usewhenusingthisproduct.SomeknowledgeofUNIXorLinux-based systemsmayalsobeneficial,fordevelopingshellscriptsand applications.LaterverersionsofthisdocumentwillbepostedtotheAxis website,asrequired.Sealsotheproduct'sonlinehelp,availablevia theweb-basedinterface.
LegalConsiderations
Videoandaudiosurveillancecanberegulatedbylawsthatvaryfrom countrytocountry.Checkthelawsinyourlocalregionbeforeusing thisproductforsurveillancepurposes.
Thisproductincludesone(1)H.264decoderlicenseandone(1)AAC decoderlicense.Topurchasefurtherlicenses,contactyourreseller.
Liability
Everycarehasbeentakeninthepreparationofthisdocument.Please informyourlocalAxisofficefanyinaccuraciesoromissions.Axis CommunicationsABcannotbeheldresponsibleforanytechnical or typographicalerrorsandreservestherighttomakechangestothe productandmanualswithoutpriornotice.AxisCommunicationsAB makesnowarrantyfanyakindwithregardtothematerialcontained withinthisdocument,including,butnotlimitedto,theimplied warrantiesofmerchantabilityandfitnessforaparticularpurpose.Axis CommunicationsABshallnotbeliablenorresponsibleforincidental or consequentialdamagesinconnectionwiththefurnishing,performance oruseofthismaterial.Thisproductisonlytobeusedforitsintended purpose.
IntellectualPropertyRights
AxisABhasintellectualpropertyrightsrelatingtotechnologyembodiedintheproductdescribedinthisdocument.Inparticular,andwithoutlimitation,theseintellectualpropertyrightsmayincludeoneoremoreofthepatentslistedathttp://www.axis.com/patent.htmandoneoremreadditionalpatentsorpendingpatentapplicationsintheUSandothercountries.
Thisproductcontainslicensedthird-partysoftware.Seethemenuitem "About"intheproduct'suserinterfaceformoreinformation.
ThisproductcontainssourcecodecopyrightAppleComputer, Inc.,underthetermsofApplePublicSourceLicense2.0(see http://www.opensource.apple.com/apsl).Thesourcecodeisavailable from http://developer.apple.com/darwin/projects/bonjour/
EquipmentModifications
This equipment must be installed and used in strict accordance with the instructions given in the user documentation. This equipment contains nouser-serviceable components. Unauthorized equipment changes or modifications will invalidate all applicable regulatory certifications and approvals.
TrademarkAcknowledgments
AXISCOMMUNICATIONS, AXIS, ETRAX, ARTPECandVAPIXare registeredtrademarksortrademarkapplicationsofAxisABinvarious jurisdictions. All other company names and products are trademarks or registered trademark of their respective companies.
Apple,Boa,Apache,Bonjour,Ethernet,InternetExplorer,Linux, Microsoft,Mozilla,Real,SMPTE,QuickTime,UNIX,Windows,Windows VistaandWWWareregisteredtrademarksoftherespectiveholders. JavaandallJava-basedtrademarksandlogosaretrademarkor registeredtrademarksofOracleand/oritsaffiliates.UPnP ^TM is certificationmarkoftheUPnP ^TM ImplementersCorporation. SD,SDHCandSDXCaretrademarksorregisteredtrademarksofSD-3C, LLCintheUnitedStates,othercountriesorboth. Also,miniSD,microSD, miniSDHC,microSDHC,microSDXCarealltrademarksorregistered trademarksofSD-3C,LLCintheUnitedStates,othercountriesorboth.
RegulatoryInformation
Europe

ThisproductcomplieswiththeapplicableCEmarkingdirectives andharmonizedstandards:
- ElectromagneticCompatibility(EMC)Directive2004/108/EC.See ElectromagneticCompatibility(EMC),onpage2.
LowVoltage(LVD)Directive2006/95/ECSecSafetyprpag
- Restrictions of Hazardous Substances (RoHS) Directive 2011/65/EU. See Disposal and Recycling, on page 2. Acopy of the original declaration of conformity may be obtained from Axis Communications AB, Emdalavägen 14, SE-22369 Lund.
Electromagnetic Compatibility(EMC)
This equipment has been designed and tested to fulfill applicable standards for:
- Radiofrequencyemissionwheninstalledaccordingtothe instructionsandusedinitsintendedenvironment.
- Immunitytoelectricalandelectromagneticphenomenawhen installedaccordingtotheinstructionsandusedinitsintended environment.
USA
This equipment has been tested using a shielded network cable (STP) and found to comply with the limits for a Class Digital device, pursuant to part 15 of the FCC Rules. These limits are designed to provide reasonable protection against harmful interference in residential installation. This equipment generates, uses and can radiate radio frequency energy and, if not installed and used in accordance with the instructions, may cause harmful interference or radio communications. However, there is no guarantee that interference will not occur in particular installation. If this equipment does cause harmful interference or radio television reception, which can be determined by turning the equipment off and on, the user is encouraged to try to correct the interference by one or more of the following measures:
•Reorientorrelocatethereceivingantenna.
- Increase these separation between the equipment and receiver.
- Connecttheequipmentintoanoutletonacircuitdifferentfrom thattowhichthereceiverisconnected.
- Consultthedealeroranexperiencedradio/TVtechnicianforhelp. Canada
ThisClassBdigitalapparatuscomplieswithCanadianICES-003.
This product fulfill therequirements for immunity according to EN61000-6-1 residential, commercial and light-industrial environments.
Thisproductfulfillstherequirementsforimmunityaccordingto EN61000-6-2industrialenvironments.
Thisproductfulfillstherequirementsforimmunityaccordingto EN55024officeandcommercialenvironments
Australia/NewZealand
This digitalequipmentfulfillstherequirementsforRFemission according to the ClassBlimitofAS/NZSCISPR22.
Japan
この装置は、クラスB情報技術装置です。この装置は、家庭環境で使用することを目的としていますが、この装置がラジオやテレビジョン受信機に近接して使用されると、受信障害を引き起こすことがあります。取扱説明書に従って正しい取り扱いをして下さい。
Korea
이기기는가정용(B급)전자파적합기기로서주로가정에서사용하는것을목적으로하며,모든지역에서사용할수있습니다.
Safety
ThisproductcomplieswithIEC/EN/UL60950-1,SafetyofInformation TechnologyEquipment.
Photobiological Safety
Thisproductfulfillstherequirementsforphotobiologicalsafety accordingtoIEC/EN62471(riskgroup1).
DisposalandRecycling
Whenthisproducthasreachedtheendofitsusefullife,disposeof itaccordingtolocalrawsandregulations.Forinformationabout yournearestdesignatedcollectionpoint,contactyourlocalauthority responsibleforwastedisposal.Inaccordancewithlocallegislation, penaltiesmaybeapplicableforincorrectdisposalofthiswaste.
Europe

Thissymbolmeansthattheproductshallnotbedisposedof togetherwithhouseholdorcommercialwaste.Directive2012/19/EU onwasteelectricalandelectronicequipment(WEEE)isapplicablein theEuropeanUnionmemberstates.Topreventpotentialharmto humanhealthandtheenvironment,theproductmustbedisposed ofinanapprovedandenvironmentallysaferecyclingprocess.For informationaboutyournearestdesignatedcollectionpoint,contact yourlocalauthorityresponsibleforwastedisposal.Businessesshould contacttheproductsupplierforinformationabouthowtodispose ofthisproductcorrectly.
ThisproductcomplieswiththerequirementsofDirective2011/65/EU ontherestrictionoftheuseofcertainhazardoussubstancesin electricalandelectronicequipment(RoHS).
China
Thisproductcomplieswiththerequirementsofthelegislative actAdministrationontheControlofPollutionCausedbyElectronic InformationProducts(ACPEIP).
Support
Should you require any technical assistance, please contact your Axis reseller. If your questions cannot be answered immediately, your reseller will forward your queries through the appropriate channel to ensure a rapid response. If you are connected to the Internet, you can:
- downloaduserdocumentationandsoftwareupdates
• findanswerstoresolvedproblemsintheFAQdatabase.Search byproduct, category, orphrase
• reportproblemstoAxissupportstaffbyloggingintoyourprivate supportarea - chatwithAxissupportstaff(selectedcountriesonly)
- visitAxisSupportatwww.axis.com/techsup/
LearnMore!
VisitAxislearningcenterwww.axis.com/academy/forusefultrainings, webinars,tutorialsandguides.
TableofContents
HardwareOverview....6
Connectors....7
LEDIndicators....7
AccessingtheProduct....9
AccessfromaBrowser....9
AccessfromtheInternet....10
SettheRootPassword....10
TheLiveViewPage....11
MediaStreams....14
HowtoStreamH.264....14
MJPEG....14
AXISMediaControl(AMC)....14
AlternativeMethodsofAccessingtheVideoStream....15
AccessingAudiStreams
SettingUptheProduct....17
BasicSetup....17
VideoandAudio....18
VideoStream....18
StreamProfiles....19
CameraSettings....20
ViewArea....22
Overlay 22
PrivacyMask 23
2 FocusZoom
AudioSettings....24
AudioClips....25
LiveViewConfig
PTZ(PanTiltZoom)....29
PrasePositions
29 GuardTour
30 Advanced
Detectors
CameraTampering....31.
MofiDrDetection
AudioDetection....33
Applications....34
ApplicationLicenses....34
InstaApplication
ApplicationConsiderations....34
Events....36
SettingUpActionRule
38 Recipients
Schedules....38
Recurrences
Recordings....40
RecordingList....40
ContinuousRecording....40
SystemOptions....41
41 Security
Date&Time....44
45 Network
49_Storage
Borts Devices
Maintenance....51
51 Support
52 Advanced
ResetFactoryDefaultSettings
Troubleshooting....54
CheckingtheFirmware....54
Upgrading®Firmware
EmergencyRecoveryProcedure....54.
TableofContents
Symptoms, Possible Causes and Remedial Actions....55 Technical Specifications....58 Performance Considerations....60
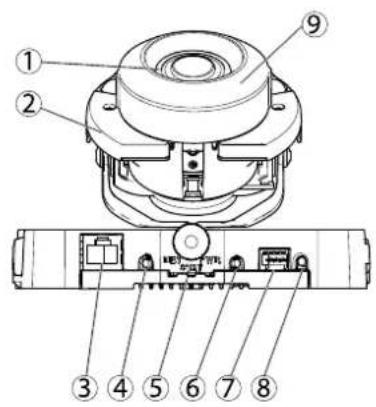
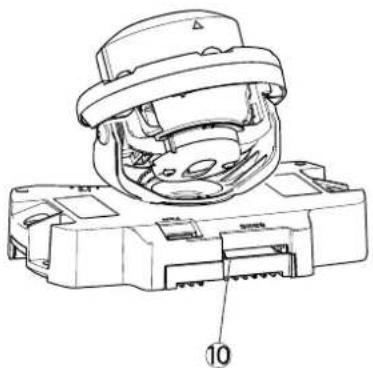
HardwareOverview
natural_image
Technical line drawing of a mechanical component with labeled part 10 (no text or symbols beyond label)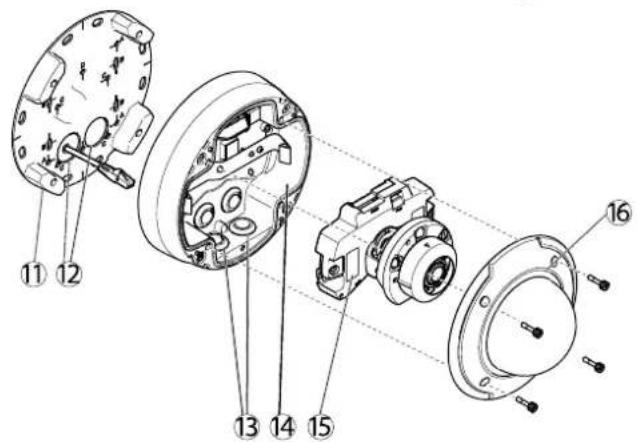
- Heater(onlyinoutdoormodel)
- IRlight
- Networkconnector(PoE)
- Audioout
- LEDindicators
- Audioin
- I/Oconnector
- Controlbutton
- Opticalshield
- SDmemorycardslot
- Mountingbracket
- Holesforcablesroutedthroughthewall
- Sideholeswithgasketsforcablesroutedalongthewall
- Unitcasing
- Serialnumber
- Domecover
Connectors
Fortechnicalspecifications,seepage58.
Networkconnector-RJ-45Ethernetconnector.SupportsPoweroverEthernet(PoE).
NOTICE
The product shall be connected using a shielded network cable (STP). All cables connecting the product to thenetwork switch shall be shielded (STP) and intended for their specific use. Makes sure that the network switch is properly grounded. Seefor regulatory requirements.
Audior(pink)3.5mminpufoamonomicrophonepdine-imonosigna(lefthannelsusedfromstereoignal).
Audioout(green)3.5mmoutput@audio(dlindevel)thatarbeconnected@publicaddress(PA)systemaractivespeaker withabuilt-inamplifier.Astereoconnectormustbeusedforaudiout.
SD card lot Standard high-capacity SD card (not included) car used for tocate cording with removable storage.
NOTICE
To prevent interruption recording the SD card should be unmounted before removal. Unmount grid Setup System Options > Storage > SDCard and click Unmount.
Controlbutton-Thecontrolbuttonisusedfor:
Connecting an AXIS Vided Hosting System Service Page 4.5 Connect press and hold the button for about 1 second until the Status LED flashes green.
ConnectingAXISInternedynamicDNServiceSepage46.connectpressandholdthebuttonfor about3seconds.
- Resetting the product to factory default settings. Seepage52.
I/OrminatconnectorUserapplicationfoe.gmotiondetectioneventriggeringtimdapsecordingandalarmotifications. InadditiontoanauxiliarypowerandaGNDpin, thel/Oterminalconnectorprovidestheinterfaceto:
DigitabutputForconnectingexternaldevicesuchelays and LEDsConnecteddevicesarbeactivated by theVAPIX®ApplicationProgrammingInterface,outputbuttonsontheLiveViewpageorbyanActionRule.The outputwithshowactiv(shownundesystemOptionsPortsDevices)thealarmdevicisactivated.
DigitalInputAralarinputforconnectingdevicesthatartogglebetweenamperandclosedcircuitfor example:PIRs,door/windowcontacts,glassbreakdetectors,etc.Whenasignalisreceivedthestatechangesand theinputbecomesactive(shownunderSystemOptions>Ports&tDevices).
LEDIndicators
| LED | Color | Indication |
| Network | Green | Steadyforconnectiontoa100MBit/snetwork.Flashesfornetworkactivity. |
| Amber | Steadyforconnectiontoa10MBit/snetwork.Flashesfornetworkactivity. | |
| UnlitNonetwork | connection. | |
| Status | GreenSteadygreenfornormaloperation. | |
| Amber | Steadyduringstartupandwhenrestoringsettings. | |
| Red | Slowflashforfailedupgrade. | |
HardwareOverview
| Power | Green | Normaloperation. |
| Amber | Flashesgreen/amberduringfirmwareupgrade. |
Note
The StatusLEDcarbeconfiguredbeunlitduringnormabperationTconfigurationdSetupSystemsPorts &Devices>LED.Seetheonlinehelpformoreinformation.
- TheStatusLEDcanbeconfiguredtoflashwhileaneventisactive.
TheStatusEDcarbconfiguredflashfordidentifyingtheunitGdSetupSystemOptionsMaintenance
AccessingtheProduct
ToinstalltheAxisproduct, refertothel InstallationGuidesupplied with the product.
Theproductcanbeusedwithmostoperatingsystemsandbrowsers.TherecommendedbrowsersareInternetExplorerwithWindows, SafarwithMacintoshandFirefoxwiththeoperatingsystemsSeeTechnicalSpecificationsprpage58Toviewstreamingvideon InternetExplorer,allowinstallationofAXISMediaControl(AMC)whenprompted.
Note
- QuickTime ^TM is also supported for viewing H.264 streams and for audio.
- If your computer restrict the use of additional software components, the product can be configured to use a Java applet for viewing Motion JPEG.
AccessfromaBrowser
- Startabrowser(InternetExplorer, Firefox, Safari).
2.EntertheIPaddressorhostnameoftheAxisproductinthebrowser'sLocation/Addressfield.Toaccesstheproductfroma Macintoshcomputer(MacOSX),clickontheBonjourtabandselecttheproductfromthedrop-downlist.
If you donot know the I paddress, use AXISIP Utility to locate the product on thenetwork. For information about how to discover and assign I address the installation and management software C doth e document Assign and I Address and Access the Video Stream on Axis Support web at www axis.com/techsup
- Enteryourusernameandpassword.Ifthisisthefirsttimetheproductisaccessed,therootpasswordmustfirstbe configured.Forinstructions,seeSettheRootPassword,onpage 10.
- The product'sLiveViewpageappearsinyourbrowser.
Note
The controls and layout of theLiveViewpagem may have been customized to meet specific installation requirements and user preferences. Consequently, some of the examples and functions featured her may differ from those displayed in your ownLiveViewpage.
AccessingtheProduct
AccessfromtheInternet
Onceconnected, theAxisproductisaccessibleonyourlocalnetwork(LAN).ToaccesstheproductfromtheInternetyoumust configureyournetworkroutertoallowincomingdatatrafficctotheproduct.Todothis, enabletheNAT-traversalfeature, which willattemptautomaticallyconfiguretheroutetallowaccesstheproductThisenabledfromSetupSystemOptions>Network>TCP/IPAdvanced.
FomoreinformationpleasedNATraversal(portmapping)forPv4prpage4SealsAXISnterneDynamidDNServicat www.axiscam.netForTechnicalnotesonthisandothertopics,visittheAxisSupportwebatwww.axis.com/techsup
SettheRootPassword
TogainaccesstheAxiproductyoumustethepasswordfothedefaultadministratouseroofthislonerthConfigure RootPassworddialog,whichappearswhentheproductisaccessedforthefirsttime.
Topreventnetworkeavesdropping,therootpasswordcanbesetviaanencryptedHTTPSconnection,whichrequiresanHTTPS certificate. HTTPS(HypertextTransferProtocoloverSSL)isaprotocolusedtoencrypttrafficbetweenwebbrowsersandservers.The HTTPScertificatensuresencryptedexchangofinformationSedHTTPSpage47.
The default administrator user name root permanent and cannot be deleted the password for lost the product must be reset the factory default settings See Reset Factory Default Settings page 52.
TosetthepasswordviaastandardHTTPconnection, enteritdirectlyinthefirstdialog.
TosetthepasswordviaanencryptedHTTPSconnection,followthesesteps:
- ClickCreateself-signedcertificate.
Provide the requested information and click OK The certificate created and the password camovb set securely All traffic to and from the product is encrypted from this point on.
Enterpasswordandthere-enterconfirmthespellingClickOKThepasswordhasnowbeenconfigured.
AccessingtheProduct
![Create Certificate Secure configuration of the root password via HTTPS requires a self- certificate. Create self-signed certificate... Configure Root Password using HTTP User name: root Password (max 64 characters): Confirm password: OK The password for the pre-configured administrator root must be changed before the product can be used. If the password for root is lost, the product must be reset to the factory default settings, by pressing the button located in the product's casing. Please see the user documentation for more information. ONVIF will be disabled. To enable ONVIF go to Setup > System Options > Security > ONVIF Create Self-Signed Certificate Common name: 10.93.28.211 Validity: 363 days [1..9644] *The name of the entity to be certified, i.e. the IP address or host name of this product: OK Cancel Once the certificate is created, this page will close and you will be able to configure the root password via HTTPS. AXIS Configure Root Password using HTTPS User name: root Password (max 64 characters): Confirm passwords: OK The password for the pre-configured administrator root must be changed before the product can be used. If the password for root is lost, the product must be reset to the factory default settings, by pressing the button located in the product's casing. Please see the user documentation for more information. ONVIF will be disabled. To enable ONVIF go to Setup > System Options > Security > ONVIF](/content/2026/05/1022267/images/1514142645a25932f4b65505bd855e902b989e17cc30bef8d07f1c55224a0513.jpg)
SetPowerLineFrequency
PowerInfrequencysethefirstimtheAxiproductaccessedandonlychangedfromPlainConfig(sepage52) orbyresettingtheproducttofactorydefault.
Selectthepowerlinefrequency(50Hzor60Hz)usedatthelocationoftheAxisproduct.Selectingthewrongfrequencymaycause imageflickeriftheproductisusedinfluorescentlightenvironments.
When using 50Hz, the maximum framerate is limited to 25fps.
Note
Powerlinefrequencyisdifferentindifferentgeographicregions.IntheAmericas,60Hzisusuallyused;mostotherpartsof theworlduse50Hz.Localvariationsmayapply,alwayscheckwiththelocalauthorities.
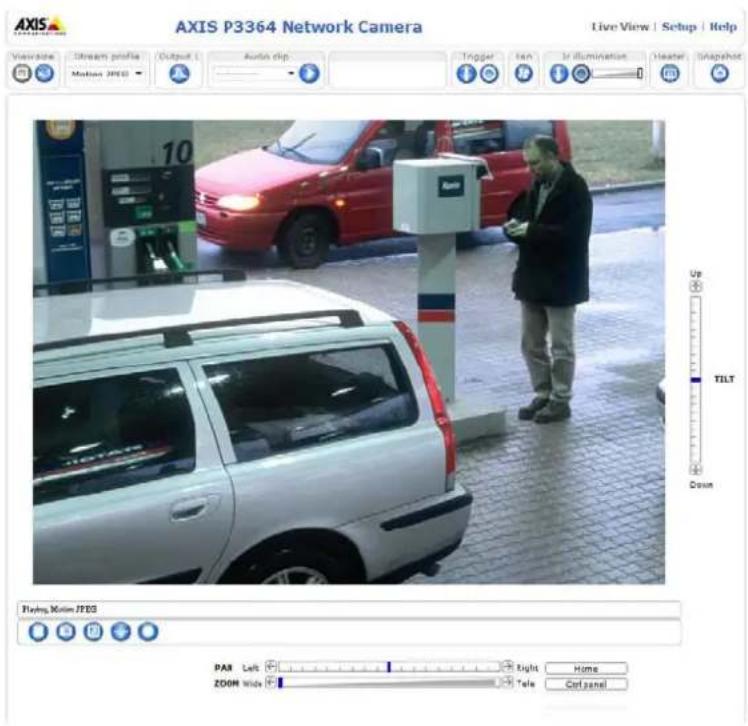
TheLiveViewPage
The controls and layout of the liveView pagemay have been customized to meet specific installation requirements and user preferences. Consequently, some of the examples and functions featured her may differ from those displayed in your own live view page. The following provides an overview of each available control.
ControlsontheLiveViewPage

ClicViewsizetscalethemagedowrto80pixelswidetofulscaleOnlyavailableMJPEG.
SelectstreamprofileoftheLiveViewpagefromthStreamProfiledrop-downlistEoinformationabouthowtoconfigurestreamprofiles,see page 19.

ClicPulse activate the product's output for define period of time. Information about how to enable and configure output buttons, see page 27.
AccessingtheProduct
Click the Active/Inactive button to manually activate and activate the product output portion information about how to enable and configure output buttons, see page 27.

TheManuaTriggerbuttonisuseddriggeractionrulefronthdLiveViewpageEoinformationabouthow toconfigureandenablethebutton,see.

ClickSnapshot>saveSnapshotthevideimageRight-clickthevideimagesaveinPEGformabyour computer.ThisbuttonisprimarilyintendedforusewhentheAXISMediaControlviewertoolbarsisnotavailable. EnablethisbuttonfromLiveViewConfig>ActionButtons.

TheAudiocliprop-downlistallows/outplayaudioclipfromtheLiveViewpageSelectaudioclipandclickthePlaybutton.

Activate de-activated Illumination from Setup Video Audio Camera Settings Move the slide on increase or decrease the intensity of the LEDs. Enable this button from LiveView Config > Action Buttons.
AXISMediaControlviewertoolbar
TheAXISMediaControlviewetoolbarsavailableInterneExploreonlySeeAXISMediaControl(AMC)prpage14omore information.Thetoolbardisplaysthefollowingbuttons:

ThePlaybuttonconnectstotheAxisproductandstartsplayingamediastream.

TheStopbuttonstopsthemediastream.

ThSnapshobuttortakesnapshobthevideimagehdocationwherdhimagesavedcarspecifiedintheAMCControlPanel.

Click the View Full Screen button and the video image will fill entire screen press ESC (Escape) or the computer keyboard to cancel full screen view.

TheRecordbuttonusedrecordtheurrentvidestreamThelocationwhertherecordingsavedcarbspecifiedn theAMControPaneEnablethisbuttonfromLiveViewConfigVieweSettings.
AMCAudioControls
AMCaudiobuttonscontrolthespeakersandmicrophoneconnectedtotheclientcomputer.Thebuttonsareonlyvisiblewhen audioisenabled.

Speakerbutton—Clicktoturnthespeakersonoroff.

MicrophonbuttonClickmutounmutdhemicrophondSimplespeakeonlymodehMicrophonandTalk buttonsmustbothbeactivetosendaudiototheAxisproduct.Clickeitherbuttontostopaudiotransmission.
AccessingtheProduct
Usetheslidertocontrolthevolumeofthespeakersandthemicrophone.


Half-duplexmode
TheTalk/ListerbuttonusedswitchbetweensendingandreceivingaudioThebuttoncarbeconfigured fromtheAudiotabintheAMCControlpanel:
- Push-To-Talkmode: Clickandholdthebuttontotalk/send. Releasethebuttontolisten.
- Togglemode: Clickoncetoswitchbetweentalkingandlistening.
Simplex-speakeronlymode
To end audio the Tall and Microphone buttons mus but be active Click the button to stop audio transmission.
PTZControls
TheLiveViewpagealsodisplaysPan/Tilt/Zoom(PTZ)controls.Theadministratorcanenable/disablecontrolsforspecifiedusersunderSystemOptions>Security>Users.
Note
These controls are available digital PTZ enabled through selected view area page 22.

Click the EmulatjoystickmodButtonandclickthemagtomovehcameraviewithdirectionofth mousepointer.

Click the Centemode button and click the image to cent the camera view that position the centemode button could also be used to zoom on an as specific area. Click the image and drag to draw a rectangular surrounding the are at obemagnified. To zoom out, rotate the mouse wheel.

Click the CtrpanebuttortoperthePTZontropanewhichprovidesadditionaPTZontrols. User-definedbuttonscanalsoappearintheControlpanel.SeeControls,onpage30.

SelectaPTZpresetpositiontosteerthecameraviewtothesavedposition.SeePresetPositions, onpage29.

PanandTiltbars—Usethearrowstopanandtiltthecameraview,orclickonapositiononthebartosteerthe cameraviewtothatposition.
Zoombar-Usethearrowstozoominandout,orclickonapositiononthebartozoomtothatposition.

The PTZ control can be disabled under PTZ Advanced ControlsseeControlsprpage30.
MediaStreams
TheAxisproductprovidesseveralaudioandvideostreamformats.Yourrequirementsandthepropertiesofyournetworkwill determinethetypeyouuse.
TheLiveViewpageintheproductprovidesaccesstoH.264andMotionJPEGvideostreams,audiostreamsandtothelistofavailablestreamprofiles.Otherapplicationsandclientscanaccessvideoandaudiostreamsdirectly,withoutgoingviatheLiveViewpage.
HowtoStreamH.264
The videocompressionstandardH.264 makes good use of bandwidth, and can provide high quality video streams at less than 1 Mbit/s.
Deciding which combination of protocols and method stoused depends on your viewing requirements, and on the properties of your network. The available options in AXIS Media Control are:
| UnicastRTP | Thisunicastmethod(RTPoverUDP)isused forliveunicastvideo,especiallywhenitis importanttoalwayshaveanup-to-datevideo stream,evenifsomeimagesaredropped. | Unicastingisusedforvideo-on-demand transmissionsothatthereisnovideotraffic onthenetworkuntilaclientconnectsand requeststhestream.Notethatthereareamaximumof20 simultaneousunicastconnections. |
| RTPoverRTSP | Thisunicastmethod(RTPtunneledoverRTSP) isusefulasitisrelativelysimpletoconfigure firewallstoallowRTSPtraffic. | |
| RTPoverRTSPoverHTTP | Thisunicastmethodcanbeusedtotraverse firewalls.Firewallsarecommonlyconfiguredto allowtheHTTPprotocol,thusallowingRTPto betunneled. | |
| MulticastRTP | Thismethod(RTPoverUDP)shouldbeusedforlivemulticastvideo.Thevideostreamisalways up-to-date,evenifsomeimagesaredropped.Multicastingprovidesthemostefficientusageofbandwidthwhentherearelargenumbersof clientsviewingsimultaneously.Amulticastcannothowever,passanetworkrouterunlessthe routerisconfiguredtoallowthis.ItisnotpossibletomulticastoverthelInternet,forexample.Notealsothatallmulticastviewerscountasoneunicastviewerinthemaximumtotalof20 simultaneousconnections. | |
AXISMediaControlnegotiateswiththeAxisproducttodeterminethetransportprotocoltouse.Theorderofpriority,listedintheAMCControlPanel,canbechangedandtheoptionsdisabled,tosuitspecificrequirements.
Note
H.264islicensedtechnology.TheAxisproductincludesoneH.264viewingclientlicense.Installingadditionalunlicensed copiesoftheclientisprohibited.Topurchaseadditionallicenses,contactyourAxisreseller.
MJPEG
This formatusesstandardJPEGstillimagesforthevideostream. These images are then displayed and updated at a ratesufficient to create stream that shows constantly updated motion.
TheMotionJPEGstreamusesconsiderableamountsofbandwidth,butprovidesexcellentimagequalityandaccesstoeveryimage containedinthestream.TherecommendedmethodofaccessingMotionJPEGlivevideofromtheAxisproductistousetheAXISMediaControlinInternetExplorerinWindows.
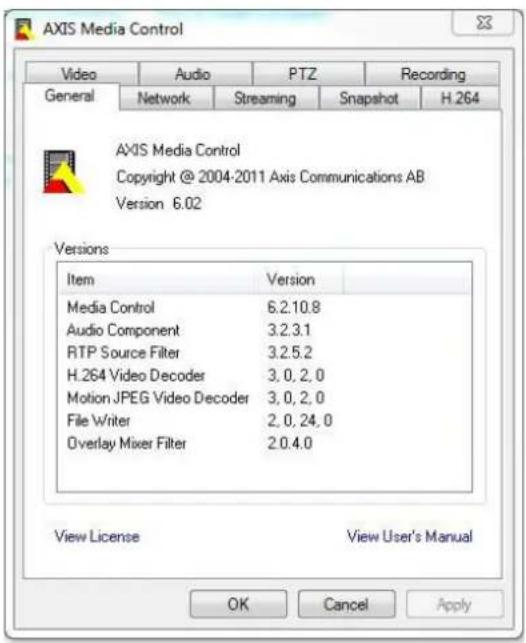
AXISMediaControl(AMC)
AXISMediaControl(AMC)inInternetExplorerinWindowsistherecommendedmethodofaccessinglivevideofromtheAxisproduct.
MediaStreams
TheAMCControlPanelcanbeusedtoconfigurevariousvideoandaudiosettings.PleaseeseetheAXISMediaControlUser's Manualformoreinformation.
TheAMCControlPanelisautomaticallyinstalledonfirstuse,afterwhichitcanbeconfigured.OpentheAMCControlPanelfrom:
- WindowsControlPanel(fromtheStartmenu)
Alternatively right-click the video camera Interne Explore and click Settings.
AlternativeMethodsofAccessingtheVideoStream
YoucanalsoaccessvideoandimagesfromtheAxisproductinthefollowingways:
MotionPEGervepush(fupported by the client Firefox example) This option maintains proper HTTP connection to the browser and sends data as and when required, for as long as required.
StiUPEGmagesnbrowserEntethepathhttp://
Window Media Player This requires AXIS Media Control and the 1.264 decoder installed The following paths can be used:
-UnicastviaRTP:axrtpu://<ip>/axis-media/media.amp
-UnicastviaRTSP:axrtsp://<ip>/axis-media/media.amp
-UnicastviaRTSP,tunneledviaHTTP:axrtsphttp://<ip>/axis-media/media.amp
-Multicast:axrtpm://<ip>/axis-media/media.amp
- QuickTime TM. The following pathscanbeused:
-rtsp://<ip>/axis-media/media.amp
-rtsp://<ip>/axis-media/media.3gp
Note
=|Paddress
•TheAxisproductsupportsQuickTime6.5.1andlater.- QuickTimeaddslatencytothevideostream.
- It maybe possible to use other player's view the H.264 stream using the paths above, although Axis does not guarantee this.
AccessingAudioStreams
TheLiveViewpageprovidesaccesstoaudiothroughAXISMediaControl;inadditionaudiocanbeaccessedinthefollowingways:
VAPIX®ApplicationProgrammingInterface(API)Fomoreinformationyisitwww.axis.com/developer
-WindowsMediaPlayersupportssimplexaudio.Thefollowingpathscanbeused:
-UnicastviaRTP:axrtpu://<ip>/axis-media/media.amp
-UnicastviaRTSP:axrtsp://<ip>/axis-media/media.amp
-UnicastviaRTSP,tunneledviaHTTP:axrtsphttp://<ip>/axis-media/media.amp
-Multicast:axrtpm://<ip>/axis-media/media.amp
-QuickTime TM supportsG.711andAACaudioencoding.Thefollowingpathscanbeused:
-rtsp://<ip>/axis-media/media.amp
-rtsp://<ip>/axis-media/media.3gp
-TheJavaappletsupportssimplexaudiowithG.711encoding.
SettingUptheProduct
The Axproducta b configured by users with administrator operator rights To perth product' Setup pages clic Setup the topright-handcorner of theLiveView page.
- Administratorshaveunrestrictedaccesstoallsettings.
- OperatorshaveaccesstoallsettingsexceptSystemOptions
Seealsotheonlinehelp

BasicSetup
BasicSetupprovidesshortcutstothesettingsthatshouldbemadebeforeusingtheAxisproduct:
1.Users.Seepage41.
2.TCP/IP.Seepage45.
3. Date&Time.See page44.
4.VideoStream.Seepage18.
5.Focus&Zoom.See page23.
6.AudioSettings.See page24.
TheBasicSetupmenucanbedisabledfromSystemOptions>Security>Users.
VideoandAudio
Thevideoandaudiosettingscanbeusedtooptimizevideoandaudioquality.Youcanconfigurethefollowing:
•Videostreamsettings.See page 18.
- Streamprofiles.See page 19.
- Camerasettings.See page20.
•Viewarea.Seepage22.
• Overlayimage.Seepage22.
- Privacymask.Seepage23.
• Focusandzoom.See page23.
• Audiosettings.Seepage24.
• Audioclips.Seepage25.
VideoStream
You can define the following video stream settings from VideoAudioVideoStream:
- Image.Seepage18.
•H.264.Seepage19. - MJPEG.Seepage19.
![Basic Setup Video & Audio Stream Profiles Camera Settings View Area Overlay Image Privacy Mask Focus & Zoom Audio Settings Audio Clips Live View Config PTZ Detectors Applications Events Recordings System Options About Video Stream Settings Image Audio H.201 MJPEG Image Appearance Resolution: 1280x960 (4:3) pixels View area size: 1280x960 Compression: 30 [0..100] Mirror image: Rotate image: 0 degrees Video Stream Maximum frame rate: Unlimited Limited to [1..30] fps per viewer Overlay Settings Include overlay image at the coordinates: x 0 [0..] y 0 [0..] Include date Include time Include text: Text color white Text background color black Place text/data/time at top of image Preview View image stream while configuring. Video format: MPEG Open... Save Reset](/content/2026/05/1022267/images/497a7074cfd60ca4076b3d1fb5471c2d0fa8dc8ccb8c8fdfed13ecdf67e53707.jpg)
Image
The default image settings can be configured under VideoAudioVideoStreamSelectdImageTab.
The followingsettingsareavailable:
•Resolution.Selectthedefaultresolution.
VideoandAudio
CompressionThe compressioneveaffect the image quality bandwidth and file size of a vamed image sthow the compression, the higher the image quality with higher bandwidth requirements and larger filesizes.
- Rotateimage.lfrequired, theimagecanberotated.
- Mirror.Ifrequired, theimagecanbemirrored.
Maximum framed avoid bandwidth problems the framed allowed each view car limited to fixed amount Alternatively the framed car be set Unlimited which means the Axis product always delivers the highest framerate possible under the current conditions.
OverlayettingSeeOverlayprpage22.
ClickSavetoapplythenewsettings.
H.264
H.264,alsoknownasMPEG-4Part10/AVC,isavideocompressionstandardthatprovideshighqualityvideostreamsatlowbitrates. AnH.264videostreamconsistsofdifferenttypesofframessuchasl-framesandP-frames.Anl-frameisacompleteimagewhereas P-framesonlycontainthedifferencesfrompreviousframes.
The GOVength the number frames between two consecutive frames increasing the GOVength may have considerably bandwidth requirements in some cases, but may also have an adverse effect on image quality.
The Axisproductsupportswd.264 profiles The Mainprofil provides higher compression than the Baseline profile with the same videoquality, but requires more processing power to decode.
The bitrateVariableBiRate(VBR)ConstantBiRate(CBR)VBR adjusts the bitrate according to image complexity, using up more bandwidth for increased activity in the image, and less for lower image activity. CBR allows youtoseta fixed target at that consumes predictable amount bandwidth. As itate would usually need increase from increased image activity, but in this case cannot, framerate and image quality are affected negatively. Topartly compensate forth this, it is possible to prioritize either framerate or image quality. Not setting a priority mean that framerate and image quality are equally affected. You must save your settings before they can take effect.
The current table set appears to display this selection and the checkbox option under Overlay Settings and enter them modifier # bin the field.
MJPEG
Sometimes the imagesize is large duolow light or complex scenery. Adjusting them a maximum framesize help to control the bandwidth and storage used by the Motion PEG video stream ithes situation Setting the framesize the Default setting provides consistently good image quality at the expense of increased bandwidth and storage usage in low light. Limiting the frame size optimizes bandwidth and storage usage, but may give poor image quality. Toprevent increased bandwidth and storage usage, them a maximum framesizes should be set to an optimal value.
StreamProfiles
Astreamprofileisasetofpredefinedstreamsettingsincludingresolution,compression,framerateandoverlaysettings.Stream profilescanbeused:
- Whensettinguprecordingusingactionrules.SeeEvents,onpage36.
- Whensettingupcontinuousrecording.SeeContinuousRecording,onpage40.
In the ViewpageselectstreamprofilefromStreamprofiledrop-downlist.
Forquicksetup, useoneofthepredefinedstreamprofiles. Each predefinedprofilehasadescriptivename, indicatingitspurpose. If required, thepredefinedstreamprofilescanbemodifiedandnewcustomizedstreamprofilescanbecreated.
TreatenewprofilomodifyexistingprofilegtdSetupVide&AudioStreamProfiles.
To select default stream profile for the live view page to setup live view config.
CameraSettings
The Video Audio Camera Settings page provides access to advanced image settings for the Axi product.
ImageAppearance
Increasing the Coloreve increase the colosaturation The value gives maximum colosaturation The value gives blackandwhiteimage.
Thimage Brightness can be adjusted the range 0–100 where higher value produces brighter image.
Increasing Sharpness in increase bandwidth usage, sharp image might increase image noises especially now light conditions. Alowersetting reduces image noise, but the whole image will appear less sharp.
The ContrastangestrelativdifferencbteweerlightandarkcarbadjustedsingtheSlidebar.
WhiteBalance
Whitebalanceisusedtomakecolorsintheimageappearthesameregardlessofthecolortemperatureofthelightsource.TheAxis productcanbesettoautomaticallyidentifythelightsourceandcompensateforitscolor.Alternatively,selectthetypeoflight
sourcefromthedrop-downlist.Foradescriptionofeachavailablesetting,seetheonlinehelp

The white balance window enabled the Automation and Automatic outdoor options that appear the White balance drop-down list. Select of the options from the drop-down list the white balance window properties Select Automatic use the default settings for the Automation and Automatic outdoor options (in the White balance drop-down list). Select Custom manually set a reference window for white balance in the view area.
WideDynamicRange
Widdynamicrange(DynamicContrast) can improve the exposure whether there is considerable contrasbetween light and dark areas in the image. Enable WDRinintensebacklightconditions. Disable WDRinlowlightconditions for optimalexposure.
Note
Thissettingisonlypossiblewhenusingautomaticexposurecontrol.
ExposureSettings
Configure the exposures setting stosuit the image quality requirements in relation to lighting, framerate and bandwidth considerations.
Exposurevalue-Clickinthebartofine-tunetheexposure.
Exposure control These settings used adapt the amount of fight used Automatic default settings caused most situations. The shutterspeeds automatically set to produce optimum image quality. Flicker-free 50-60 is used to remove flicker which can be caused by fluorescent and other light sources. The current option lock the current exposure settings.
Enable Backlight compensation Enable this option brightspotfightfoexample lightbulbcauses the area in theimagetoappeartoodark.
Exposure zones This settings determines which part of images used to calculate the exposure from most situations the Auto setting can be used. For particular requirement, select a predefined area.
Shutter&Gain
Theshutterandgainsettingsaffecttheamountofmotionblurandnoiseintheimage.Toadapttodifferentlighting,available storagespaceandbandwidth,itisoftennecessarytoprioritizeeitherlowmotionblurorlownoise.TheAxisproductallows usingdifferentprioritizationinnormallightandinlowlight.
Shutterspeedsrelatedtheamountfimtheshuttersopenedandmeasuredsecond(s)/slowshutterspeedallows morelighttoreachthesensorandcanhelpproduceabrighterimageinlowlightsituations.Ontheotherhand,aslowshutter speedcancausemovingobjectstoappearblurry.
VideoandAudio
SetShutterto
Autosethshutterspeedautomatically,requireduseMaxhutterdimithshutterspeedpreventframe ratefrombeingreduced. Forexample,toget30fps,setMaxshutterto1/30.
•Fixedtouseafixedshutterspeed.
Gainmeasureddecibe(dB)isheamountaimplificationappliedthemaghighgaimmayprovidebetterimagerlow lightsituationsbutwillincreasetheamountofimagenoise.
SetGainto
AetdoethgainautomaticallyrequireduseMaxairtdimitheappliedgain.
- Fixedtouseafixedgain.
WherShutterandGainarebothsetAutoifispossiblegethePrioritybetweenlowmotionbluandownoismanuallyandousdifferenPriorityNormalLightandLowLight.
Example
Consideranareawherepeopleorvehiclesmoveduringtheday, butwherethereshouldbenomovementsduringnight.Tobeableto, forexample, recognizefacesorlicenseplates, movethenormallightpriorityslidertowardlowmotionblur. Atnighttime, motion detectionismoreimportantthanidentification.Motionblurisacceptableandsincelowlightcancausealotofnoise, move thelowlightpriorityslidertowardlownoise.
Example
Ifstoragespaceorbandwidth this limited, try using a lowerergain. This will reduce image noise and produces smaller image files.
Irisadjustment
SelectEnableautomaticadjustmentautomaticallycompensatefchanginglightconditionsThisoptionisotavailable ifafixedirisisused.
UsetherisadjustmentlidetcethreferredF-valueThecalrepresentsthamountherisoperlsetoOtherisisopenedasmuchaspossible.lfsetto100,theirisisclosedasmuchaspossible.TheactualF-valueisshownbelowtheslider.Ifautomaticirisadjustmentisenabled,theiriswillstayatthispositionaslongaslightconditionsarefavorable.Iflightconditionschange,theiriswilladjustitselftothebestirissettings.Ifautomaticirisadjustmentisdisabled,theiriswilllockonthesetpositionregardlessoflightconditions
Day/Night
TheIRcutfilterpreventsinfrared(IR)lightfromreachingtheimagesensor.Inpoorlightingconditions,forexampleatnight,or whenusingandRampsetdRcutfiltertoOffThisincreasesightsensitivityandallowtheproducto"seeInfraredightThe imageisshowninblackandwhitewhenthelRcutfilterisoff.
If using automatic Exposure control, the R filter to Auto automatically switch between Or and Off according the lighting conditions.
The Day/Night shiftvebah helps to determine whether the camera will shift from day to night mode. Normally, the camera automatically changes from day to night when every dark level 00th slider by setting Day/Night shift velocity lower value, the camera will change on night mode earlier.
Built-inIRIlluminationsLEDs
CAUTION
DonotlookdirectlyintotheIRLEDatshortdistance.SincetheIRlightprovidedfromtheIRLEDispowerfullightoutsideofthevisiblerange,pleaseusethecameratocheckifIRlightisactivatedornot.
TheRilluminationcanbeactivatedorde-activated, anditsintensitycanbeincreasedordecreasedbymovingtheslider, from the product'sLiveViewpageOthesettingscandefinedfromSetupVideAudioCameraSettings.
De-selectsEnableRlluminationoptiondisabldRlluminationaltogetherlydusabledSynchronizrRlluminationwithday/nighoptionRlluminationwilhobesynchronizedwithday/nighchangesTconfigureRlluminationclicEdit
The Illumination window display approximates Right will illuminate the current settings When Angle of illumination is to Auto the Illumination automatically adjusted according to camera's zoom. Whether this Autobehavior is disabled, possible manually adjusting angle of Right by moving the Angle of Illumination slider.
ViewArea
AivewareiscroppeparbfthfulviewTheiverea-treatedvideosourcerLiveViewandhastownvideostreamandPTZsettings.
When setting up avieware aitis recommended that the videostream resolution is the same size as smaller than the view area size. Setting the videostream resolution larger than the view area size implies digitally scaled up video aftersensor capture, requiring more bandwidth without adding image information.
TenableviewareagdVideoAudioCameraSettingsandelecEnableViewArea.
Toconfiguretheviewarea:
- GotoVideo&Audio>ViewArea.
SelectnAspectation and Videestreamresolution.
-
Usethemousetomoveandresizetheviewarea.
-
SelectEnablePTZtoenabledigitalPTZfortheviewarea.
5.ClickSavetosavethesettings.
Note
ThePTZfunctionalityisusefulduringinstallationoftheAxisproduct.Useaviewareatocropoutaspecificpartofthefullview.
Overlay
Overlaysareusedtoprovideextrainformation,forexampleforforensicvideoanalysisorduringproductinstallationand configuration.Overlaysaresuperimposedoverthevideostream.
Anoverlaytextcandisplaythecurrentdateandtime,oratextstring.Whenusingatextstring, modifierscanbeusedtodisplay information such as cheurrenbitato the currenframeate information about available modifiersse FileNamingt
Date/TimeFormatsintheonlinehelp
Toenableoverlays:
GoVideoAudioVideStreamandelectdImagetab.
Include overlaymageselectncludoverlaymagatheordinatesThe overlaymagemustfirsbploaded to theAxisproduct,seeOverlayImage.
Bincludatandimeselectncludatandncludtime.
TincludetextstringselectIncludetextandentethdextrthfieldModifiersbanusedseFileNamingEt
Date/TimeFormatsintheonlinehelp

- Definetextoverlaycharacteristicsintherelevantfields.
6.ClickSave.
Tomodify the date and time format data System Options Date Time See Date Time per page 44.
OverlayImage
Anoverlayimageisastaticimagesuperimposedoverthevideostream.Theimage,forexamplecompanylogo,isusedtoprovide extrainformationortomaskapartoftheimage.
Sinceitisstatic, the position and size of an overlay image will remain the same regardless of resolution and digital Panama/Tilt movements. Setup dynamic mask which will always mask specific parameters monitored by Privacy Mask.
Touseanoverlayimage, theimagemustfirstbeuploadedtotheAxisproduct:
GoVideoAudioOverlaymage.
2.ClickBrowseandbrowsetothefile.
3.ClickUpload.
4. Select the imagetouse from the Use overlay imagelist.
5.ClickSave.
Todisplaytheoverlayimage:
GoVideoAudioVideStreamandelectdmagtab.
UndeOverlaySettingsselectincludeoverlaymagethecoordinatesandentethandcoordinates.
3.ClickSave.
Forinformationaboutsupportedimageformats,seetheonlinehelp

PrivacyMask
Aprivacymaskisanareaofsolidcolorthatprohibitsusersfromviewingpartsofthemonitoredarea.Privacymaskscannotbe bypassedviatheVAPIX®ApplicationProgrammingInterface(API).
The Privacy Mask List (VideoAudioPrivacyMask) shows all the mask that are currently configured in the Axis product and indicates if they are enabled.
Youcanaddanewmask,re-sizethemaskwiththemouse,chooseacolorforthemask,andgivethemaskaname.
Formoreinformation,seetheonlinehelp

Important
Adding many privacy masks may affect the product's performance.
Focus&Zoom
Focusandzoomshouldonlybeconfiguredwheninstallingorreinstallingtheproduct.Forinstallationinstructions,refertothe product'sInstallationGuide.
Tosetfocusandzoom:
- Install the camera as described in the Installation Guide.
QtdVide&AudioFocusZoom.
OrthBasicabsethezoomlevelusingsliderThebuttonsandmovethezoompositiononstepreither direction.Thebuttons<
-
Click Perform autofocus of focus the camera automatically.
-
If more adjustments are needed, goto the Advanced tab.
Note
- Changingthezoomlevelmovesthefocusposition.Focusshouldalwaysbeadjustedafterchangingthezoom.
- Movementsinfrontofthecamerashouldbeavoidedduringautomaticfocusing.
OntheAdvancedtab, focuscanbeadjustedmanually:
OlicOpenirisopertherisotmaximunpositionThisgiveshsmallestdepthofieldanprovideshebest conditionsforfocusing.
- FocusissetintheFocuswindow. Use themousetomove and resizethe focus window.
SethzoomlevelusingtheslideandlicPerformautfocusfocuscamerautomatically.
Click the Focus position based focus desired location. The buttons and move the focus position step in either direction. The buttons < and >> move the focus position in multiple steps, either direction.
- Whensatisfied, clickEnableiristoenabletheiris.
The Pixelcountershow the number of pixels in a range of the image and bar used to address the size of the image fulfill certain requirements, for example for facerecognition. Use them ousetomove and resizethepixelcounter, or enter the number of pixels in width and height fields and click Apply.
AudioSettings
The audiofunctionalityforeachvidestreamenabledundeVideAudioVideStreamAudio.
AudioModes
TheAxisproductsupportsthefollowingaudiomodes:
Fulluplex Simultaneous two-way audio allowing the Axis product transmit and receive audio in the same time. There is no echocancellation; if feedback loops appear, try moving themicrophone or the speaker.
Half-duplexAudiocarberransmittedandfromtheAxiproductubonlyrondirectionatTimeTransmitaudiusingtheLiveViewpageusethTalkandListbuttonsseeAMoAudioControlsprpage12.
SimplexspeakeonlyAudiotransmittedfromclienttheAxiproductandarbeplayedspeakerconnectedttheproducttransmitaudiusingtheLiveViewpagethTallandMicrophonbuttonsmustbothactiveseeAMCAudioControls,onpage12.
Simplex-microphononlyAudio captured by the product microphonestransmitted from the Axis production more clients.
To the Audiomodeg video Audio Audi Settings and select the desired mode from the Audiomode drop-downlist.
Audiolnput
Anexternalmicrophoneoralinesourcecanbeconnectedtotheproduct'sAudio-inconnector.Configuretheaudioinputsettings undevideoAudioAudiSettings.
Note
The internal microphone is used by default; the external microphone is used when connected. It is possible to disable the internal microphone by connecting a plugtothemic input.
Select Microphondo user external microphone. Lind use linear device. graudionixefomultiplenicrophones oramicrophonewith built-in amplifier, as audiosource.
The Microphon power option provided QowefoarexternahmicrophondMicrophon power should only be used with microphonesthathavenobatteryandwhenusingtheinternalmicrophone. This settings should not be enabled when using adynamic orbatterypoweredmicrophone. Microphone power will notharm themicrophone; if you are uncertain, tryswitchingitoffandon.
VideoandAudio
Touseaprofessionalmicrophonerequiring48Vphantompower,youneedanexternalpowersupplyandabalanced-unbalanced converter(audiotransformer)inbetween.
Use the input control volume (dB Full Scale) the audio input function sound to how choose higher than amplify the sound to sound to high choose down the level bag gives visual representation of the audio signal level in B relative to the full-scale input level.
•Green—thesignalisatagoodlevel.
- Yellow—thesignalisbecomingdistorted.
- Red—thesignalisdistorted.
UsetheEncodingoptiontoselectdigitalaudioencodingformat.
AAC requires license for bot encoding and decoding AACs the least complicated and most widely used coded achieving the best possible audio quality is priority, AACist there recommended codectouse. An AAC license is included in the Axis product.
G71 is an unlicensed standard code that useful when integrating audio into VolSystem
G726 anunlicensed speechcode that most commonly used within the security industry.
The Sampleate defines the number of times per second sounds sampled. High sampling will provide better audio quality, but also requires a greater bandwidth.
SetherequireBitatdependingorthelectedencodingAighebitatovilgivbetteaudiaqualityAowebitatemayhavelatencyordelay,butwillrequirelessbandwidth.
Formoreinformationaboutthesesettings,pleaseetheonlinehelp

AudioOutput
Anexternalspeakercanbeconnectedtotheproduct'sAudio-outconnector(abuilt-inamplifierisrequiredforthis).Theoutputcan beconnectedtoanotheramplifierwithspeakers.Astereoconnectormustbeusedfortheaudioout.
Configure the audio output settings under Video & Audio Audio Settings.
OutputainControtheVolume(dBulScale) the audio output the soundstodow,choosehighed B the soundstoo high,choosealowerdB.
AudioClips
A musicalip sound file that are played where events occur directly from the Live View page. The audio clip must first be uploaded to the Axis product recorded by a microphone connected to the product.
TaddownloadmodifyremoveAudioclipsgetVidedAudioAudioClipsEomoreinformationsethonlinehelp

ToconfiguretheAxisproducttoplayaudioclipswhenaneventoccurs,anactionrulemustbesetup.Formoreinformation,seeEvents,onpage36.
Note
Audio lips:annobased the product's audiofunctionality enabled the audiofunctionality enabled the Audio tabunderVideo&Audio>VideoStream.
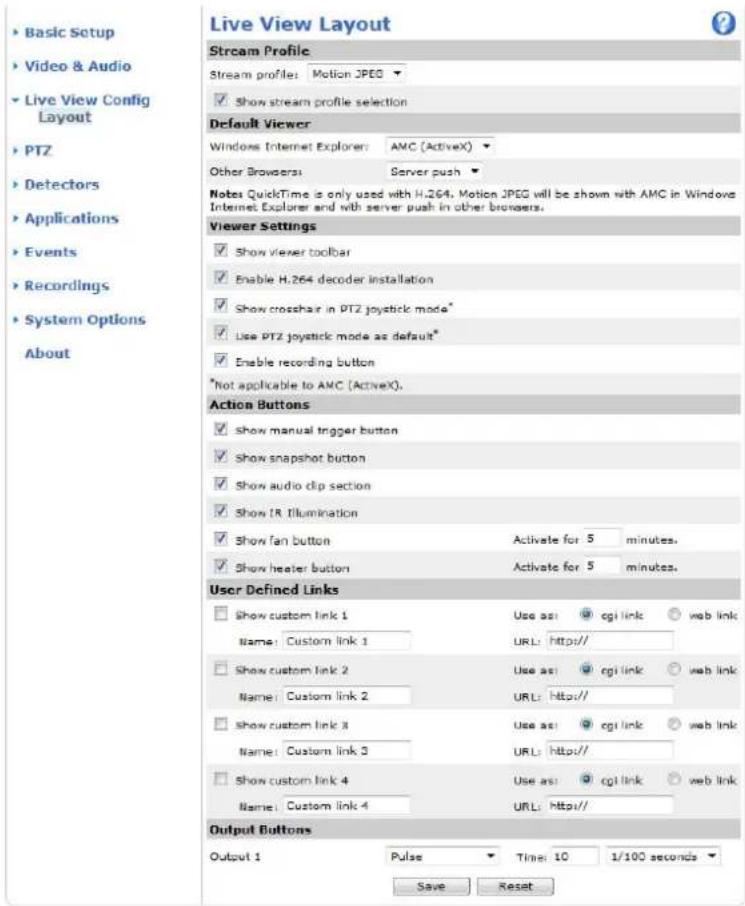
LiveViewConfig
YoucancustomizetheLiveViewpageandalterittosuityourrequirements.ItispossibletedefinethefollowingfeaturesoftheLiveViewpage.
- StreamProfile.Seepage19.
- DefaultViewerforBrowser.Seepage26.
-ViewerSettings.Seepage27.
ActionButtonsThesearchbuttonsdescribednControlstheLiveViewPageprpage1.
-UserDefinedLinks.Seepage27.
- OutputButtons.Seepage27.
DefaultViewerforBrowsers
FromLiveViewConfigDefaultVieweselectdefaultmethodforviewingvideimagesyoubrowserTheproductattempts toshowthevideoimagesintheselectedvideoformatandviewer.Ifthisisnotpossible,theproductoverridesthesettingsand selectsthebestavailablecombination.
| BrowserViewerDescription | ||
| WindowsInternetExplorer | AMC | RecommendedviewerinInternetExplorer(H.264/MotionJPEG). |
| QuickTime | H.264. | |
| Javaapplet | AslowerimagingalternativetoAMC(MotionJPEG).Requiresoneofthe followinginstalledontheclient:•JVM(J2SE)1.4.2orhigher.•JRE(J2SE)5.0orhigher. | |
| StillimageDisplays | stillimagesonly.ClicktheRefreshbuttoninyourbrosertoviewa newimage. | |
| Otherbrowsers | ServerPush | Recommendedviewerforotherbrowsers(MotionJPEG). |
| QuickTime | H.264. | |
| Javaapplet | AslowerimagingalternativetoServerPush(MotionJPEGonly). | |
| StillimageDisplays | stillimagesonly.ClicktheRefreshbuttoninyourbrosertoviewa newimage. |

Formoreinformation,pleaseesetheonlinehelp.
ViewerSettings
Toconfigureoptionsfortheviewer,gotoLiveViewConfig>ViewerSettings.
SelectShowewetoolbatalisplaytheAXISMediaControl(AMC)theQuickTimeviewetoolbaundethideoimageinyourbrowser.
H.264lecodeinstallationThe administratorandisableinstallationofH.264lecodeincludedwithAXISMedia Control.Thisisusedtopreventinstallationofunlicensedcopies.Furtherdecoderlicensescanbepurchasedfromyour Axisreseller.
SelectShovercrosshainPTJoystickmode enable crosshathwillIndicate the center of the image PTJoystick mode.
SelectUsePTZystickmodasdefaultenablejoystickmode. The mode can be changed temporarily from the PTZcontrolpanel.
SelectEnableecordingbuttonEnablerecordingfromtheLiveViewpageThisbuttonisavailablewhenusingtheAMCviewer.TherecordingsaresavedtothelocationspecifiedintheAMCControlPanel.SeeAXISMediaControl(AMC),onpage 14.
UserDefinedLinks
Todisplayuser-definedinkinthliveViewpageselecthShowcustomlinkoptiongivthedinknamandherentethURL tolinkto.Whendefiningaweblinkdonotremovethehttp://fromtheURLaddress.Customlinkscanbeusedtorunscriptor activateexternaldevicesconnectedtotheproduct,ortheycanlinktoawebpage.Customlinksdefinedascgilinkswillrunthe scriptinthebackground,inahiddenframe.Definingthelinkasaweblinkwillopenthelinkinanewwindow.
OutputButtons
Externall/OdevicesconnectedtotheAxisproduct'soutputportscanbecontrolleddirectlyfromtheLiveViewpage.
TodisplayoutputbuttonsintheLiveViewpage:
-
GotoSetup>LiveViewConfig.
-
UnderOutputButtons, select the type of controltouse:
Pulsactivates the output for define period of time. The pulse time can be seen from 10 seconds to 60 seconds.
-Active/Inactive displaywobuttons, oneoreachaction.
ToconfigureactiveandnactivstatesgdSystemOptionsPortsDevicesl/Portandethport'Normastate.
Formoreinformationaboutl/Oports,seeI/OPorts,onpage50.
PTZ(PanTiltZoom)
ThePTZmenuisavailableifdigitalPTZ(pan,tiltandzoom)isenabledintheselectedviewarea.Formoreinformationonviewareas, seeViewArea,onpage22.
PresetPositions
Apresetpositionisapredefinedviewthatcanbeusedtoquicklysteerthecameratoaspecificlocation.Presetpositionscan beaccessedinseveralways:
- ByselectingthepresetfromtheSourcedrop-downlistintheLiveViewPage.
- Whensettingupactionrules.See page36.
- WhensettingupGuardTour.Seepage29.
Toaddapresetposition:
1.GotoPTZ>PresetPositions.
2. Usethepan, tilt and zoom control, tosteer the camera view to the desired position.
3.EnteradescriptivenameintheCurrentpositionfield.
TheproductcanbeconfiguredtoreturntotheHomepositionwhenthePTZfunctionalityhasbeeninactiveforaspecifiedlengthofimEntethengthofimtherthefieldandlicSavSethimezerdpreventheproductfromautomaticallyreturningtotheHomeposition.
To include the preposition am a ther to overlay text go video Audio select In cl u d over lay text and ent e them modifien in th el id E form or en formation about modifiers see File Naming Date / Time Format sth on linl help

![Basic Setup Video & Audio Live View Config PTZ Preset Positions Guard Tour Advanced Detectors Applications Events Recordings System Options About Preset Positions Preset Position Setup Current positions: Add Available positions: Home (M) Edit Return to home after: 30 [0..300] seconds, 0 = disabled Save Up TILT Down OK Left Right Home ZOOM Value Table Ctrl panel](/content/2026/05/1022267/images/41cdabaae81535a5ad42e54fca9f3d2e79d6f3a8da241f8be3bbab6663d95478.jpg)
GuardTour
Aguardtourdisplaysthevideostreamfromdifferentpresetpositions,one-by-one,inapredeterminedorderoratrandomandforconfigurabletimeperiods.Theenabledguardtourwillkeeprunningaftertheuserhasloggedofforclosedthebrowser.
Toaddaguardtour:
GdPTZGuardTouandclicAdd.
2.Enteradescriptivename.
PTZ(PanTiltZoom)
- Specify the pause length between runs.
- SelectanavailablepresetpositionandclickApply.
- Specify theViewTimeinsecondsorminutes.
SpecifyViewOrderselecttheRandomviewDeoption.
7.ClickSave.
TomodifypremoveguardoursgdoPTZGuardTourselectheguardourirtheGuardTouListandlicModify/Remove.
Formoreinformationseetheonlinehelp

Advanced
Limits
Definethepan, tilt, zoom and focus limits for the Axis product. Movement to the left and right, up and down, can be restricted to narrow the area and surveys surveillance.
Movespeedsetsthespeedofthecamera'spanandtiltmovements. Thedefaultsettingismaximumspeed.
When using joystick (forming new mouse), the Enable proportion as speed setting can be used to reduce the maximum pan/tilt movements speed, i.e. the speed the cameraview moves at when the joystick is pushed all the way out in any direction. This is useful thenthe view is zoomed in nonan object.
Seetheonlinehelp

formoreinformation.
Controls
PaneShortcuCommandButton Sarbe configured provide direct access command issued via APIX® Application Programming Interface. The button will be displayed in the PTZ control panel, which is available in the Live View page through the Ctr pane button se page 13.
Detectors
CameraTampering
CameraTamperingcangenerateanalarmwheneverthecameraisrepositioned,orwhenthelensiscovered,sprayedorseverely defocused.Tosendanalarm,forexampleanemail,anactionrulemustbesetup.
Toconfiguretampering:
- GotoDetectors > CameraTampering.
Seth Minimum duration that the aim must be before alarm generated. This help prevent false alarms for known conditions that affect the image.
Select Alarmfordarkimagesfalarmshouldgeneratedfightaredimmedturnedofforthenisprayed, covered,orrenderedseverelyoutoffocus.
4.ClickSave.
Toconfiguretheproducttosendanalarmwhentamperingoccurs:
- GotoEvents>ActionRules.
2.ClickAddtosetupanewactionrule.
- EnteraNamefortheactionrule.
UndeConditionselecDetectorsfromthTriggerist.
-
SelectTamperingfromthelistofdetectors.
-
Optionally, select as schedule and set additional conditions.
SelectactionTo sendaremailselectSendNotificationandselectRecipientfromtheisbfefinedrecipients.
Note
The Whileu16activeoptionunde Duration can be used with cameramperings since camerampering does not have duration and onceithasbeentriggereditwillnotautomaticallyreturntoitsuntriggeredstate.
Formoreinformationonactionsrules,seeEvents,onpage36.
MotionDetection
Motiondetectionisusedtogenerateanalarmwhenevermovementstartsorstopsinthecameraview.
Motiondetectionisconfiguredbydefiningupto10IncludeandExcludewindows:
- Includewindows—defineareaswheremotionsshouldbedetected
Exclude windows define areas within a window that should be ignored (areas outside include windows are automatically ignored).
Forinstructions, see SetUpMotionDetectionWindows, onpage32.
To control the number of motion detection alarm parameters Object Size History and Sensitivity, arbadjusted See Motion Detection Parameters, on page 32.
Oncemotiondetectionwindowsareconfigured, theAxisproductcanbeconfiguredtoperformactionswhenmotionisdetected. Possible actions include uploading images and startecording. From information setting up an Action Rule page 37.
Detectors
Note
Usingthemotiondetectionfeaturemaydecreasetheproduct'soverallperformance.
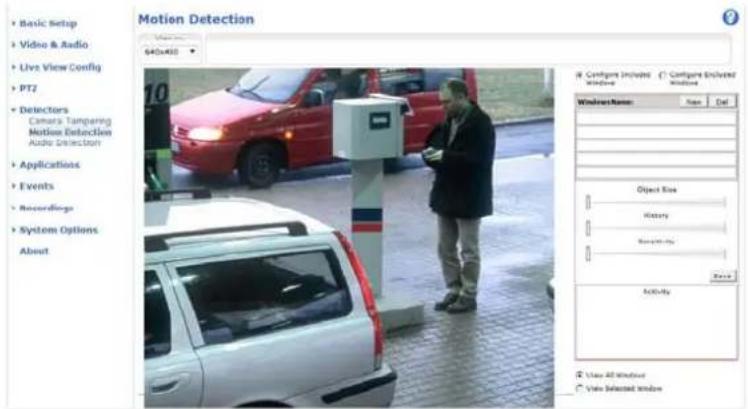
SetUpMotionDetectionWindows
TosetupamotiondetectionIncludeWindow, followtheseinstructions:
- GotoDetectors > MotionDetection.
Select the Configured Windows option and click New Select the new window with the disp windows and enter adescriptivename.
- Adjustthesize(dragthebottomright-handcorner)andtheposition(clickonthetextatthetopanddragtothedesired position)ofthewindow.
Adjust the Object Size History and Sensitivity profile labels (see Motion Detection Parameters for details) Any detected motion within an active window is indicated by red peaks in the Activity window.
5.ClickSave.
To exclude parts of the inclusion window, select the Configur Excluded Windows an position the exclusion window within the inclusion window.
ToletanincludeexcludovindowselecthowindowirthistofwindowandlicDel.
MotionDetectionParameters
The parameters controlling motion detection are described in the table below:
| Parameter | ObjectSize | History | Sensitivity |
| Description | Objectsizerelativetowindow size. | Objectmemorylength. | Differenceinluminance betweenbackground and object. |
| Highlevel(100%) | Onlyverylargeobjectstrigger motiondetection. | Anobjectthatappearsin thewindowtriggersmotion detectionforalongtime beforeitisconsideredas non-moving. | Ordinarycoloredobjectson ordinarybackgroundstrigger motiondetection. |
| Mediumlevel(50%) | Alargedifferenceinluminance isrequiredtotriggermotion detection. |
Detectors
| Lowlevel(0%) | Evenverysmallobjectstrigger motiondetection. | Anobjectthatappearsin thewindowtriggersmotion detectiononlyforaveryshort timebeforeitisconsideredas non-moving. | Onlyverybrightobjectson adarkbackgroundtrigger motiondetection. |
| Recommendedvalues | 5–15%60–90%75–95% | ||
| Defaultvalues | 15%90%90% |
Note
- Totriggeronsmallobjectsormovements,useseveralsmallmotiondetectionwindowsratherthanonelargewindow andselectalowobjectsize.
- To avoid triggering on small objects, select a high object size.
- IfnoobjectsshouldappearinthIncludeWindow,selectahighhistorylevel.Thiswillcausemotiondetectiontotriggeras longastheobjectispresentinthewindow.
- Toonlydetectflashinglight,selectalowsensitivity.Inothercaseshighsensitivityisrecommended.
AudioDetection
TheAxisproductcanbeconfiguredtogenerateanalarmwhenaudiorisesaboveorfallsbelowthethresholdvalue.Thethreshold valuecanbesetintherange0-100where0isthemostsensitiveand100theleastsensitive.
-
GotoDetectors>AudioDetection.
-
Set the audio alarm level and click Save.
GoEventsActionRulesandetuparactionruleseSettingUparActionRuleonpage37.
Detected audio indicated by colore peaks in the Activity indicator Are vent triggered when detected audio rises above falls below threshold value, which is represented by the bar.
Applications
ThirdpartyapplicationscanbeuploadedtoandinstalledontheAxisproduct. Applicationsaddfunctionalitytotheproduct,for examplevideoanalyticsandintelligentvideocapabilitiessuchasrecognition,tracking,detectionandcounting.Forinformation aboutavailableapplications,downloads,trialsandlicenses,goto www.axis.com/applications
Note
- Itisrecommendedtorunoneapplicationatatime.
- Avoidrunningapplicationswhenthebuilt-inmotiondetectionisactive.
ApplicationLicenses
Someapplicationsneedalicensetorun.Licensescanbeinstalledintwoways:
•Automaticinstallation—requiresaccesstothelnternet
- Manualinstallation—obtainthelicensekeyfromtheapplicationvendoranduploadthekeytotheAxisproduct
Torequestalicense, theAxisproductserialnumber(S/N) is required. The serial number can be found on the product label and under SystemOptions > Support > SystemOverview.
InstallApplication
Toinstallandstartanapplication:
- GotoSetup>Applications.
UndeUploadApplicationclicBrowseLocatheapplicationfilandclicUploadPackage. - Install the license (if applicable). For instructions, seethedocumentation provided by the application vendor.
Start the applicationGd page Applications select the application in the list of installed applications and click Start. - Configuretheapplication.Forinstructions,seethedocumentationprovidedbytheapplicationvendor.
Note
- Applicationscanbeuploadedbyproductadministrators.
- ApplicationsandlicensescanbeinstalledonmultipleproductsatthesametimeusingAXISCameraManagement,version 3.10andlater.
To generate of file to the application and Application Select the application and click Log.
ApplicationConsiderations
Ifanapplicationisupgraded, applicationsettings, including the license, will be removed. The license must be installed and the application reconfigured.
If the Axis product's firmware is upgraded, installed applications and their settings will remain unchanged, although this is not guaranteed by Axis Communications AB. Not that the application must be supported by the new firmware. For information about firmware upgrades, see Upgrading the Firmware.
If the Axis product is restarted, running applications will restart automatically.
If the Axis product is restored, installed applications remain unchanged but must be restarted. To start the application, goto Setup Application Select the application in this db installed applications and click Start Information about restoring the Axis product, see Maintenance.
Applications
If theAxisproductisresettofactorydefault, installed applications and their settings are removed. For information about factory default, see ResettoFactoryDefaultSettings.
Events
TheAxisproductcanbeconfiguredtoperformactionswhendifferenteventsoccur,forexample,startarecordingwhenmotionis detectedThesecondditionshatefineshowandwhetheractionstriggeredsalledActionRule.
AvailableActionRuletriggersandconditionsinclude:
Applications=usinstalled applicationsdriggetheuleseeApplicationsprpage34.
- Detectors
AudioDetection-triggered rule when audiosdeltected see AudidDetectionpage33.
Day/NightMode-triggethe rule wherthproduct switches between day model (Rc filter on) and night mode (IRc filter off). This can forexample be used to control an external infrared (IR) light connected to an output port.
MotionDetection-triggered when motion is detected see MotionDetection or page 31.
Tampering-triggered rule whertampering detected see CameraTamperingpage31.
- Hardware
Network-triggetheulifnetworkconnectionisostrestoredThisafoexampleusedstart recordingtotheSDcard.
Temperature-triggered temperature falls outside inside the operating angle product This can forexample be used to maintain an enotifications.
- InputSignal
DigitalInputPort-triggered rule when an Port receives signa from connected devices of O Ports, on page 50.
ManualTrigger-triggered rules using the ManualTriggerbutton in the LiveViewpages Control on theLiveViewPage, on page 11. This can forexample be used to validate actions during product installation and configuration.
•PTZ
Moving-triggered rule whether the cameraviewmoves due to PTZ operation This is a example used as an additional condition to prevent an action rule triggered by motion detection to record videowhile the cameraview moves due to PTZ operation.
PreseReached-triggered rule when the cameratops prese position This can be example used with the SendImagesactionuploadimages from the preset position.
•Storage
Available-triggered rule when the storage devices are unmounted removed. This is a example used to send maintenance notifications.
Full-Trigger the rule when the storage device is full. Undenormabperation, the oldest recordings will be overwritten to prevent the storage device from becoming full.
-Locked—triggertheruleifthestoragedeviceislocked(writeprotected).
•System
SystemInitializing-trigger the rule whether product being started This can be used to send notification when the product restarts.
•Time
Events
Recurrence-triggered ul periodically see Recurrences or page 39 This afo example used upload an image every 5 minutes.
UsSchedule-triggered uul according the selected schedulee Schedulesppage38.
Availableactionsinclude:
- IRlight—activate/de-activateIRlight.
Day/NightVisionMode-setlaymode(Rufilterpn)nightmode(Rufilteroff).
- OutputPort—activateanl/Oporttocontrolanexternaldevice.
PlayAudioClipseeAudioClipsprpage25.
- PTZControl
-PresetPosition—gotoapresetposition.
GuardTourstartguardourseGuardTourpage29.
- RecordVideo—recordvideotoaselectedstorage.
- SendImages—sendimagestoarecipient.
- SendNotifications—sendanotificationmessagetoarecipient.
Statul ED-flasthd EIndicatorThisarfoexampleusedo validatedtriggersuchasmotiondetectionduring productinstallationandconfiguration.
SettingUpanActionRule
Anactionruledefinestheconditionsthatmustbemetfortheproducttoperformanaction,forexemplerecordvideoorsendemail notifications.lfmultipleconditionsaredefined,allmustbemettotriggertheaction.
The following example describes how to setup an action rule to record video to an network share if there is movement in the camera's field of view.
Setupmotiondetectionandaddanetworkshare:
GatDetectorsMotionDetectionandconfiguremotiondetectionwindowsepage32
QoSystemOptionsStorageandsetupnetworksharesepage50.
Setuptheactionrule:
GdEventsActionRulesandClickAdd.
- SelectEnableruleandenteradescriptivenamefortherule.
SelectDetectorsfromthTriggedrop-downlist.
SelectMotionDetectionfromthedrop-downlisSelectthemotiondetectionwindowtuse.
Optionally select Schedule and Additiona conditions below.
UndeActionsselecRecord/idefromthTypdrop-downlist.
SelectStreamprofilandconfiguretheDurationsettingsdescribedbelow.
- SelectNetworkSharefromtheStoragedrop-downlist.
To additionacriteria, select the Addition conditions option and additionatriggers to prevent aaction from being triggered repeatedly. Waiteastime can be Entethim hours minutes and seconds during which the trigger should be ignored before the action rule can be activated again.
Events
The recording Duration of actions can be set in each immediately before and after the event Select Pre-trigger time and/or Post-triggered number seconds. When while the activity is enabled and the action is triggered again during the post-trigger time, thereocording timewill be extended with another post-trigger time period.
Formoreinformation,seetheonlinehelp

Recipients
Recipientsreceivemediafilesandnotificationmessages.Thefollowingrecipientsareavailable:
| RecipientUsewithaction | |
| SendImagesSendNotification | |
| FTP | SendImages |
| HTTP | SendImagesSendNotification |
| NetworkShareSendImages | |
| TCPSendNotification |
Note
AnetworksharealsbusedstoragedevicforecordedvideoGdSystemOptionsStorageconfiguranetworkshareforsettingpontinuousecordingaractionulorecordidedSeeStorageprpage49omoreinformationaboutstoragedevices.
Toaddarecipient:
GodEvents Recipients and click Add.
2.Enteradescriptivename.
3.SelectarecipientType.
4.Entertheinformationneededfortherecipienttype.
5.ClickTesttotesttheconnectiontotherecipient.
6.ClickOK.
Schedules
Schedulescanbeusedasactionruletriggersorasadditionalconditions,forexampletorecordvideoifmotionisdetectedoutside officehours.Useoneofthepredefinedschedulesorcreateanewscheduleasdescribedbelow.
Tocreateanewschedule:
GdEventsSchedulesandclicAdd.
2.Enteradescriptivenameandtheinformationneededforadaily,weekly,monthlyoryearlyschedule.
3.ClickOK.
TausethscheduleinActionRuleselectshedschedulfromthScheduldrop-downlisttheActionRulSetuppage.
Events
Recurrences
RecurrencesareusedtotriggerActionRulesrepeatedly,forexampleevery5minutesoreveryhour.
Tosetuparecurrence:
GetEventsRecurrencesandClickAdd.
2.Enteradescriptivenameandrecurrencepattern.
3.ClickOK.
TarstherecurrencianActionRulefirstselectTimefromthTriggedrop-downlisttheActionRuleSetuppageandthenselecttherecurrencefromtheseconddrop-downlist.
TomodifyremoverecurrencesselecttherecurrenceirthRecurrenceListandClickModifyRemove.
Recordings
TheAxisproductcanbeconfiguredtorecordvideocontinuouslyoraccordingtoanactionrule:
- Tostartacontinuousrecording,see page40.
- Tosetupactionrules,seepage37.
•Toaccessrecordings,seeRecordingList,onpage40.
•Toconfigurecameracontrolledstorage,seeStorage,onpage49.
RecordingList
Recorded videos and the Recordings List page. The shows each recording 'start lat and time duration and the event that triggered therecording.
Toplayordownloadarecording, followthesesteps:
- GotoRecordings>List.
Use filter to narrow disb recording Enteth desired filter criterion and lic Filte Some filters may take along timetocomplete.
- Selecttherecording.
@licPlayplaythecordingorlicDownloaddownloadhrecording.
Multiple recordings are downloaded at the same time. Select the recordings and click Download the downloaded file or file containing a minimum of three files, of which the Matroska (mkv) files are the actual recordings. There recordings are time-stamped with the date and timethey were downloaded (that is, not the date therecordings were made).
Note
ToplayrecordingsinWindowsMediaPlayer,AXISMatroskaFileSplittermustbeinstalled.AXISMatroskaFileSplitter canbedownloadedfromwww.axis.com/techsup/software
For detailed recording and video information, select recording and click Properties.
Toremovearecording,selecttherecordingandclickRemove.
ContinuousRecording
The AxiproductarbeconfiguredcontinuouslyavoidedstoragedeviceSeeStorageprpage49omoreinformation aboutstoragedevices.Topreventthediskfrombecomingfull,itisrecommendedtoconfigurethedisktoautomaticallyremoveold recordings.Ifanewstreamprofileisselectedwhilearecordingisongoing,therecordingwillbestoppedandsavedintherecording listandanewrecordingwiththenewstreamprofilewillstart.Allpreviouscontinuousrecordingswillremainintherecordinglist untiltheyareremovedmanuallyyorthroughautomaticremovalofoldrecordings.
Tostartacontinuousrecording,followthesesteps:
- GotoRecordings>Continuous.
2.SelectEnabled. - SelecttypeofstoragedevicefromtheDisklist.
- SelectaStreamprofiletouseforcontinuousrecordings.
5.ClickSavetosaveandstarttherecording.
SystemOptions
Security
Users
Use access controlled enabled by default and bar configured under System Options Security Users Administrator can setup other users by giving them usernames and passwords. It is also possible to allow anonymous viewer login, which means that anybody may access the Live View page.
Theuserlistdisplaysauthorizedusersandusergroups(accesslevels):
Viewer-AccesstotheLiveViewpage
Operator-Access to theLiveViewpage and to all settingsexceptSystemOptions
Administrator-Unrestrictedaccesstoallsettings;canadd,modifyandremoveotherusers.
UndeHTTP/RTSIPasswordSettingsselectthypopasswordallowYoumayneedallowunencryptepasswordsdthere areviewingclientsthatdonotsupportencryption,orifyouupgradedthefirmwareandexistingclientssupportencryptionbutneed tologinagainandbeconfiguredtousethisfunctionality.
UndeUseSettingsselecttheEnablanonymousvieweloginoptionallowanonymoususersaccesstheLiveViewpage.
Select the Enablenonymou PTZontrologirtallovanonymoususeraccess the PTZ controls.
Deselect the Enable Basi Setup option width the Basi Setup menu Basi Setup provides quick access settings that should be made before using the Axis product.
ONVIF
ONVIF(OpenNetworkVideoInterfaceForum)isaglobalinterfacestandardthatmakesiteasierforendusers,integrators,consultants,andmanufacturerstotakeadvantageofthepossibilitiesofferedbynetworkvideotechnology.ONVIFenablesinteroperabilitybetweendifferentvendorproducts,increasedflexibility,reducedcostandfuture-proofsystems.
BycreatingauseryouautomaticallyenableONVIFcommunication.UsetheusernameandpasswordwithallONVIFcommunication withtheproduct.Formoreinformationseewww.onvif.org
IPAddressFilter
IAddressfiltering enableorth SystemOptions Security/AddressFilterpage Once enabled the listed address are allowed denied access the Axiproduct Select Allow Denfront distance Apply enable address filtering.
The administrator can add up to 256IP addressentriestothelist (asingleentry can contain multiple IP addresses).
HTTPS
The Axi product supports encrypted browsing using HTTP This configuredorth System Options Security HTTP Page.
Self-signed certificate can be used until Certificate Authority-issued certificate has been obtained. Click Create self-signed certificate install self-signed certificate Although self-signed certificates are free and offer some protection trust security only implemented after the installation of a signed certificate issued by a Certificate Authority.
To obtain signed certificate from issuing Certificate Authorityyclic Create Certificate Request Whether signed certificate is returned click installed signed certificate from port the certificate The properties any certificate request currently resident in the productor installed can be viewed by clicking Properties.
TenableHTTPSrtheAxisproductthHITPSConnectionPolicymusbeforeachusegroup.
Formoreinformation,seetheonlinehelp

SystemOptions
HTTPS
HTTPS(HyperTextTransferProtocoloverSecureSocketLayer,orHTTPowerSSL)isawebprotocolprovidingencryptedbrowsing. HTTPScanalsobeusedbyusersandclientstoverifythatthecorrectdeviceisbeingaccessed. Theseuritylevelprovidedby HTTPSisconsideredadequateformostcommercialexchanges.
TheAxisproductcanbeconfiguredtorequireHTTPSwhenusersfromdifferentusergroups(administrator, operator, viewer)connect.
TousHTTPSarHTTPScertificatemusfirsbeinstalledGoSystemOptionsSecurityCertificatesinstallandmanage certificates.See Certificates,onpage43.
ToenableHTTPSontheAxisproduct:
- GotoSystemOptions>Security>HTTPS
- Selectan HTTPS certificate from the list of installed certificates.
- Optionally, click Ciphers and select the encryption algorithm for SSL.
- SettheHTTPSConnectionPolicyforthedifferentusergroups.
5.ClickSavetoenablethesettings.
To access the Axis product via the desire protocol to https://onhttp://irthaddressfieldbrowser.
The HTTP Sport change orth System Options Network TCP/IP Advance page.
IEEE802.1X
IEEE802.1Xisastandardforport-basedNetworkAdmissionControlprovidingsecureauthenticationofwiredandwirelessnetwork devices.IEEE802.1XisbasedonEAP(ExtensibleAuthenticationProtocol).
ToaccessanetworkprotectedbyIEEE802.1X,devicesmustauthenticatethemselves.Theauthenticationisperformedbya third-partyentitycalledauthenticationservertypicallyRADIUServerexamplesofwhichareFreeRADIUSandMicrosoft InternetAuthenticationService.
InAxis'implementation, thenetworkdevice and the authentication server authenticatethemselves with the help of digital certificates using EAP-TLS (Extensible Authentication Protocol-Transport Layer Security). The certificates are provided by an Certification Authority (CA). You need:
- aCAcertificatetovalidatetheidentityoftheauthenticationserver
- aCA-signedclientcertificateandaprivatekeytoauthenticatethenetworkdevice.
ToallowthenetworkdevicetoaccessanetworkprotectedbyIEEE802.1X:
- Obtain a CA certificate, a client certificate and a client private key (contact your network administrator).
QoSetupSystemOptionsSecurityAEEB02.1XanduploadhCAertificatethclientcertificatandheclientprivatekey.
UndeSettingsselecttheEAP0versionprovideyouEARidentityandprivatekeypassword.
- ChecktheboxtoenableIEEE802.1XandclickSave.
SystemOptions
Certificates
CACertificateTheCAcertificateisusedtovalidatetheidentityoftheauthenticationserver.Enterthepathto thecertificatdirectlyplocatefileusinghBrowsebuttonTherclicUploadRemove acertificate,clickRemove.
Clientcertificate Theclientcertificateandprivatekeyareusedtoauthenticatethenetworkdevice.Theycanbe uploadedasseparatefilesorinonecombinedfile(e.g.aPFXfileoraPEMfile).UsetheClient privatekeyfieldifuploadingonecombinedfile.Foreachfile,enterthepathtothefile,orlocatethe fileusinghBrowsebuttonTherclicUploadRemovefileclicRemove.
Settings
EAPOLversion SelecttheEAPOLversion(1or2)asusedinyournetworkswitch.
EAPidentity Entertheuseridentity(maximum16characters)associatedwithyourcertificate.
Privatekeypassword Enterthepassword(maximum16characters)fortheprivatekey.
EnableIEEE802.1X ChecktheboxtoenabletheIEEE802.1Xprotocol.
IEEE802.1X
IEEE802.1Xisastandardforport-basedNetworkAdmissionControlprovidingsecureauthenticationofwiredandwirelessnetwork devices.IEEE802.1XisbasedonEAP(ExtensibleAuthenticationProtocol).
ToaccessanetworkprotectedbyIEEE802.1X,devicesmustbeauthenticated.Theauthenticationisperformedbyanauthentication servertypicallyRADIUServerexampleswhichareFreeRADIUSandMicrosoftInternetAuthenticationService.
InAxisimplementation, the Axisproduct and the authentication server identify themselves with digital certificates using EAP-TLS (Extensible Authentication Protocol Transport Layer Security) The certificates are provided by Certification Authority CA).
Youneed:
- aCAcertificatetoauthenticatetheauthenticationserver
- aCA-signedclientcertificatetoauthenticatetheAxisproduct.
TreatandInstallcertificatesgdsystemOptionsSecurityCertificatesSecCertificatesorpage4.ManCAcertificates arepreinstalled.
ToallowtheproducttoaccessanetworkprotectedbyIEEE802.1X:
- GotoSystemOptions>Security>IEEE802.1X.
Select CACertificatandClientCertificatfromtheistoInstalledcertificates.
UndeSettingsselect the EAPOversion and provide the EARidentity associated with the client certificate.
- ChecktheboxtoenableIEEE802.1XandclickSave.
Note
Forauthenticationtoworkproperly, the date and timesettings in the Axis product should be synchronized with an NTP server. See Date & Time, on page 44.
Certificates
Certificatesareusedtoauthenticatedevicesonanetwork.Typicalapplicationsincludeencryptedwebbrowsing(HTTPS),network protectionviaIEEE802.1Xandsecureuploadofimagesandnotificationmessagesforexampleviaemail.Twotypesofcertificates canbeusedwiththeAxisproduct:
Server/Clientcertificates-toauthenticatetheAxisproduct
SystemOptions
CAcertificates:authenticatpeercertificatesforexamplethecertificato:authenticationserveincastheAxisproducts connectedtoanIEEE802.1Xprotectednetwork.
Note
Installedcertificates,exceptpreinstalledCAcertificates,willbedeletediftheproductisresettofactorydefault.Preinstalled CAcertificatesthathavebeendeletedwillbereinstalled.
Server/Client certificate can self-signed issued by Certificate Authority(CA) Self-signed certificate offers limited protection and can be used before a CA-issued certificate has been obtained.
Toinstallaself-signedcertificate:
- GotoSystemOptions>Security>Certificates.
- ClickCreateself-signedcertificateandprovidetherequestedinformation.
TocreateandinstallaCA-signedcertificate:
- Createaself-signedcertificateasdescribedabove.
- GotoSystemOptions>Security>Certificates.
ClickCreatecertificatsigningequestandprovidetherequestedinformation. - CopythePEM-formattedrequestandsendtotheCAofyourchoice.
Whether signed certificates returned click install certificate and upload certificate.
Server/Clientcertificates:aninstalled:Certificate from signing equesba Certificaten private key Select Certificate and private key if the private key istobe upload as a separate file or if the certificate is in PKCS # 12 format.
The Axis product shipped with severapreinstalled C certificates, required addition a certificates can be installed:
- GotoSystemOptions>Security>Certificates
- ClickInstallcertificateanduploadthecertificate.
AudioSupport
SelectEnableaudisupportallowclientsRetrievaudiostreamfromtheAxisproductEoinformationhowtoconfigure audiosettings,seeAudioSettings,onpage24.
Note
Deselecting this option will disable audioglobally in the Axis product, for configured events and profiles with audio as well.
Date&Time
The Axi product's latandim settings are configured under System OptionsDateTime.
CurrenServeTimedisplaythecurrentlatandtime(24clock)Thetimecarbelisplayednl2clockrthetextverlay(see below).
TochangthedatandimsettingsselecthepreferredTimemodeundeNewServeTime:
Synchronizewithcomputetimesetlatandimaccordingthecomputer'slockWiththisoptiondatandtimearesetonceandwillnotbeupdatedautomatically.
SynchronizewithNTBerverobtainslatandimfromanNTBerverWiththisoptiondatandimsettingare updatedcontinuouslyEoinformationorNTBettingssedNTRConfigurationoprpage46.
IfusinghostnamefortheNTServerDNServemusbconfiguredSeeDNSConfigurationorpage46.
SystemOptions
- Setmanuallyallowsyoutomanuallysetdateandtime.
Ifising NTBerverselect your Timezone from the drop-downlist required check Automatically adjust for daylight saving timechanges.
TheDateTimeFormaUsedImagesthdatandimformatdisplayedstexoverlaythevidestreamUsethe
predefinedformatsorseeFileNaming&Date/TimeFormatsintheonlinehelp forinformationonhowtocatecustomdateand timformatsIncluddatandimintheoverlaytextd#VideAudianselectIncluddatandncludtime.
Network
BasicTCP/IPSettings
TheAxisproductsupportsIPversion4andIPversion6.Bothversionscanbeenabledsimultaneously, andatleastoneversion mustalwaysbeenabled.
NetworkInterfaceMode
ThenetworkinterfacetotheAXISproductcanbewiredorwireless.Differentsettingscanbeusedforeachnetworkinterface,butonlyncarbusedatimd.Automodtheproductwillusewirelessnetworkunlessnetworkablesconnected,inwhichcasetwillusthewirednetworkLWiredmodtheproductwilrequirenetworkableconnectthonetwork.
IPv4AddressConfiguration
Bydefault, theAxisproductissettouseIPv4(IPversion4) and to obtain theIPaddress automatically via DHCP. TheIPv4 settings are configured under SystemOptions > Network > TCP/IP > Basic.
DHCP(DynamicHostConfigurationProtocol) allows network administrator stocentrally manage and automate the assignment of IP addresses. DHCP should only be enabled if using dynamicIP address notification, or if the DHCP can update a DNS server. It is then possible to access the Axis product by name (hostname).
If DHCP is enabled and the product cannot be accessed, run AXISIP Utility to search then network for connected Axis products, or reset the product the factory default setting (see page 52) and perform then installation again.
TouestaticAddresscheckUsethfollowingAddressandspecifytheAddresssubnetmasklanddefaultrouter.
IPv6AddressConfiguration
IfIPv6(IPversion6)isenabled,theAxisproductwillreceiveanIPaddressaccordingtotheconfigurationinthenetworkrouter.
TenablePv6gctSystemOptionsNetworkTCP/IPBasicOthesettingsforPvShouldbeconfiguredrthetworkrouter.
ARP/Ping
Theproduct'sIPaddresscanbeassignedusingARPandPing.Forinstructions,see.
TheARP/Pingserviceisenabledbydefaultbutisautomaticallydisabledtwominutesaftertheproductisstarted,orassoonasanIP addressisassigned.Tore-assignIPaddressusingARP/Ping,theproductmustberestartedtoenableARP/Pingforanadditional twominutes.
TalisabletheServicegodoSystemOptionsNetworkTCP/IPBasicandcleathoptionEnableARP/PingettingofPaddress.
Pinging the product is still possible when the service is disabled.
AXISVideoHostingSystem(AVHS)
AVHSusedinconjunctionwithanAVHSservice,provideaseasyandsecureInternetaccesstoliveandrecordedvideoaccessiblefromanylocation.FormoreinformationandhelptofindalocalAVHSServiceProvidergotowww.axis.com/hosting
SystemOptions
AVHS enabled by default settings are configured under SystemOptions Network TCP Basic.
One-clickenabledPresthproduct'sontrobuttonisedHardwareOverviewpragdconnectionAVHServiceovethe InternetOnceregisteredAlwaysvilbenabledtheAxiproductstaysconnectedtheAVHServicdfhproductnot registeredwithin24hoursfromwhenthebuttonispressed,theproductwilldisconnectfromtheAVHSservice.
Always The AxiproductwilconstantlyattemptconnecttheAVHServiceovertheInternetOnceregisteredtheproductwill stayconnectedtotheservice.Thisoptioncanbeusedwhentheproductisalreadyinstalledanditisnotconveniettousethe one-clickinstallation.
AXISInternetDynamicDNSService
AXISInternetDynamicDNSServiceassignsahostnameforeasyaccesstotheproduct.Formoreinformation,seewww.axiscam.net
ToregistethAxiproductwithAXISnterneDynamidDNServicedSystemOptionsNetworkTCP/IPBasidUnderServicesclicktheAXISnterneDynamidDNServiceSettingsbutton(requiresaccessdtheInternet)ThedomainnamecurrentlyregisteredatAXISInternetDynamicDNSservicefortheproductcanatanytimeberemoved.
AdvancedTCP/IPSettings
DNSConfiguration
DNS(DomainNamServiceprovides the translation of names to addresses The DNS Settings are configured under System Options > Network > TCP/IP > Advanced.
Select Obtain DNServeaddressidHCRustheDNSettingsprovidedbytheDHCRerver.
TomakemanuasettingsselectUsethfollowingDNServeaddressandspecifythofollowing:
DomainnameEntethdomain(s)searchforthoshameusedbytheAxiproductMultipl domainsarbseparated by semicolonsThehoshamesalwaytheirsparbfullyqualifieddomainameforexamplenyserverithhoshamerthefullyqualifieddomainamemyserver.mycompany.conwhermycompany.conishdomainame.
Primary/SecondaryDNServeEntethdAddresses the primary and secondaryDNServers The secondaryDNServes optionalandwillbeusediftheprimaryisunavailable.
NTPConfiguration
NTP(NetworkTimeProtocol)isusedtosynchronizetheclocktimesofdevicesinanetwork.TheNTPsettingsareconfiguredunder SystemOptions>Network>TCP/IP>Advanced.
Select Obtain NTBerveaddress;DHCRouse the NTBetting provided by the DHCPerver.
TomakemanuasettingsselectUsethefollowingNTBerveaddressandentethosnameofAddressoftheNTBerver.
HostNameConfiguration
TheAxisproductcanbeaccessedusingahostnameinsteadofanIPaddress.ThehostnameisusuallythesameastheassignedDNS nameThehostnameconfiguredundesystemOptionsNetworkTCP/IBAdvanced.
SelectObtainmoshamoidPv4DHCRusmoshamprovidedbythDHCServerunningorPv4.
SelectUsethehostnametosetthehostnamemanually.
SelectEnablDynamiDNS updates dynamically update docaDNServers whenever the Axiproduct's Paddress changes.
Formoreinformation,seetheonlinehelp

SystemOptions
Link-LocalIPv4Address
Link-LocalAddress enabled default and assign the product additional address which can be used to access the product from other hosts on the same segment on the local network. The product can have a Link-LocalIPandastic or DHCP-suppliedIPaddressatthesametime.
This function carbeisableundeSystemOptionsNetworkTCP/IBAdvanced.
HTTP
The HTTP port used by the Axiproductar be changed under SystemOptionsNetworkTCP/IP Advanced addition the default setting, which is 80, any port in therange 1024-65535 can be used.
HTTPS
The HTTP sport used by the Axi product are changed under SystemOptionsNetworkTCP/IP Advanced addition to the default setting, which is 443, any portion in the range 1024–65535 can be used.
TenableHTTPSgoSystemOptionsSecurityHTTPSFomoreinformationsepage41.
NATtraversal(portmapping)forIPv4
Anetworkrouterallowsdevicesonaprivatenetwork(LAN)toshareasingleconnectiontothelnternet.Thisisdonebyforwarding networktrafficfromtheprivatenetworktothe"outside",thatis,theInternet.Securityontheprivatenetwork(LAN)isincreased sincemostroutersarepre-configuredtostopattemptstoaccesstheprivatenetwork(LAN)fromthepublicnetwork(Internet).
UsNATraversalwhertheAxiproductlocatedranintrane(LAN)andyouwistomakeavailablefromother(WAN)sideofaNATrouter.WithNATtraversalproperlyconfigured,allHTTPtraffictoanexternalHTTPportintheNATrouterisforwardedtotheproduct.
NATraversalconfiguredundeSystemOptionsNetworkTCP/IPAdvanced.
Note
- ForNATtraversaltowork, this must be supported by the router. Therouter must also support UPnP
TM. - Therouterhasmanydifferentnames:"NATrouter","Networkrouter","InternetGateway","Broadbandrouter","Broadband sharingdevice"or"Homefirewall"buttheessentialpurposeofthedeviceisthesame.
Enable/DisableWhenenabledtheAxiproductattemptsconfigurportmappingNARouteponounetworkusingUPnP NotethatUPnP™ mustbeenabledintheproduct(seeSystemOptions>Network>UPnP).
TM.
Usmanually selected NATouteSelect this option manually select NAToute and enter the address for the router in the field. If norouter is specified, the product automatically searches for NATrouterson your network. If more than one router is found, the default router is selected.
Alternative HTTP port Select this option manually defines externa HTTP port Ent the port number birth field. Ports entered here, a port number is automatically selected when NAT traversalis enabled.
Note
- AnalternativeHTTPportcanbeusedorbeactiveevenifNATtraversalisdisabled. ThisisusefulifyourNATrouterdoesnot supportUPnPandyouneedtomanuallyconfigureportforwardingintheNATrouter.
- If you attempt to manually enter a port that is already in use, another available port is automatically selected.
WherthportselectedautomaticallyitsdisplayedthisfieldTochangthisenternewportnumberandclickSave.
FTP
TheFTPserverrunningintheAxisproductenablesuploadofnewfirmware,userapplications,etc.TheFTPservercanbedisabled underSystemOptions>Network>TCP/IP>Advanced.
SystemOptions
Note
ThisFTPserverhasnothingtodowiththeproduct'sabilitytotransferimagesviaFTPtootherlocationsandservers.
RTSP
TheRTSPserverrunningintheAxisproductallowsaconnectingclienttostartanH.264stream.TheRTSPportnumbercanbe changedundeSystemOptionsNetworkTCP/IBAdvancedThedefaultport554.
Note
H.264videostreamswillnotbeavailableiftheRTSPserverisdisabled.
SOCKS
SOCKSisanetworkingproxyprotocol.TheAxisproductcanbeconfiguredtouseaSOCKSservertoreachnetworksontheother sideofafirewallorproxyserver.ThisfunctionalityisusefuliftheAxisproductislocatedonalocalnetworkbehindafirewall,and notifications,uploads,alarms,etcneedtobesenttoadestinationoutsidethelocalnetwork(forexamplethelnternet).
SOCKSconfiguredundeSystemOptionsNetworkSOCKSFomoreinformationsettheonlinhelp

QoS(QualityofService)
QoS(QualityofService)guaranteesacertainlevelofaspecifiedresourcetoselectedtrafficonanetwork.AQoS-awarenetwork prioritizesnetworktrafficandprovidesagreaternetworkreliabilitybycontrollingtheamountofbandwidthanapplicationmayuse.
TheQoSettings are configured under SystemOptionsNetworkQoSUsingDSCP Differentiated ServiceCodepoint values the Axisproduct can mark the following types of traffic: live video, live audio, event/alarm traffic and management traffic.
Note
LiveaudioDSCPwillbeequaltolivevideoDSCPifH.264overRTSPisused.
SMTP(email)
TosendemailmessagesfromtheAxisproductviaSMTP(SimpleMailTransferProtocol),anSMTPmailservermustbesetup.This isdoneunderSystemOptions>Network>SMTP(email).
Entethosnames of addresses an for numbers to the primary and secondary ma iservers in the field provided. From email address also required them a iserver requires authentication check Use authentication to get this server and enter the necessary information.
SNMP
TheSimpleNetworkManagementProtocol(SNMP) allows remotemanagementofnetworkdevices.AnSNMPcommunityisthe groupofdevicesandmanagementstationrunningSNMP.Communitynamesareusedtoidentifygroups.
The Axiproductarbeconfigured support SNMPorthSystemOptionsNetworkSNMPage.
Dependingonthelevelofsecurityrequired,selecttheversiononSNMPtouse.
SNMR1/v2provide the lowest website security. The community name can be specified as password for overhead, write access to supported SNMR devices. The default password for the community public and default password for the community is written.
Note
IfHTTPSisenabled,SNMPv1andSNMPv2cshouldbedisabled.
TrapfoSNMR1/v2areused by the Axiproduct send messages management system important event and status change Check Enable trap and the address where the trap message should be sent and the community that should receive them message.
SystemOptions
The followingtrapsareavailable:
•Coldstart
•Warmstart
- Linkup
- Authenticationfailed
SNMR3provide:encryptionandsecurepasswordsTousdrapswithSNMR3arSNMR3managementapplicationrequired.
TousENMR3HTTPSmustenabledsedHTTPSpage41EnableENMR3checkboxanprovidethenitialuser password.
Note
The initial password can only be set once. If the password is lost, the Axis product must be reset to factory default, see Resetto Factory Default Settings, on page 52.
UPnP ^TM
TheAxisproductincludessupportforUPnP ^TM .UPnP ^TM isenabledbydefaultandtheproductisautomaticallydetectedbyoperating systemsandclientsthatsupportthisprotocol.
UPnP ^TM canbedisabledunderSystemOptions>Network>UPnP TM.
RTP/H.264
The RTPortangandmulticastettings are configured under SystemOptionsNetworkRTP.
The RTP portrangedefinestherangeofportsfromwhichthevideo/audiportsareautomaticallyselected.Formulticaststreams, only certainIPaddressesandportnumbersshouldbeused.
SelectAlwayMulticastVideoand/oAlwayMulticastAudiostartmulticaststreamingwithoutpeningRTSSession.
Bonjour
TheAxisproductincludessupportforBonjour.Bonjourisenabledbydefaultandtheproductisautomaticallydetectedbyoperating systemsandclientsthatsupportthisprotocol.
BonjourcanbedisabledunderSystemOptions>Network>Bonjour.
Storage
SDCard
NOTICE
Topreventcorruptionofrecordings, the SDcardshouldalwaysbeunmountedbeforeitisejected.
TheAxisproductsupportsSDcardswiththefollowingfilesystems:
ext4-recommended due to resiliency against latdos if the cards ejected if there is bruppower loss to access data store done on the card from the Windows operating system, at third-party ext4 driver or application is required.
- vFAT—mostSDcardsarepre-formattedwithvFATwhenpurchased.
Ifrequired, theSDcardcanbemanuallyformattedtothedesiredfilesystem.ToformattheSDcard:
- Insert the SD card in the SD card slot.
QdsSystemOptionsStorageandlicSICard.
SystemOptions
- ClickFormatandselectthedesiredfilesystem.
Note
During formatting any previous data stored on the disk will belost.
Mountingisdoneautomaticallywhenthecardisinsertedorwhentheproductisstarted.Amanualmountisonlyrequiredifthe cardhasbeenunmountedandnotejectedandre-inserted.
TounmounttheSDcard:
GoSystemOptionsStorageandlicSICard.
2.ClickUnmount.
3. The card can now be removed.
The SDcardsmanagedSystemOptionsStoragePageClickSDCardoperStorageManagement.
If the card's status shows a failed click Check disk to see if problem can be found and then repair this option only available for SD cards with next 4. For SD cards with v FAT, use a card reader or computer to troubleshoot the card.
T avoid filling the card is recommended to remove recordings continuously. Under Recording Settings select Remove recordings older than and select then number of days or weeks.
TstopwritingthecardanprotectecordingsfrombeingremovedselectLockundeRecordingSettings.
NetworkShare
NetworkshareallowsyoutoaddnetworkstoragesuchasaNAS(NetworkAttachedStorage)oranyserverthatusesCIFS(Common InternetFileSystem)andusethemforstorageofrecordings.
Toaddanetworkshare:
- GotoSystemOptions>Storage.
2.ClickNetworkShare.
3.EntertheIPaddress,DNSorBonjourametothehostserverintheHostfield.
4.EnterthenameoftheshareintheSharefield.Subfolderscannotbeused.
I ^s required ^e lectTheshare requires logirantentethusenamandpassword.
6.ClickConnect.
To eal recordings and data from the Axiproduct's folderth designated share click Clearunde Storage Tools.
T avoid filling the share if recommended remove recordings continuously Under Recording Settings select Remove recordings older than and select then number of days or weeks.
TstopwritingdshareanprotectecordingfrombeingemovedselecLockundeRecordingSettings.
Ports&Devices
I/OPorts
TheAxisproductprovidesoneinputportandoneoutputportforconnectionofexternaldevices.Forinformationonhowtoconnectexternaldevices,seeConnectors,onpage7.
The/Oportareconfigured/undesystemOptionsPortsDevices/OPortsTheportscarbgiverdescriptivenamesandtheir Normastatescarbeconfigured:OpercircuitGroundedircuit.
SystemOptions
PortStatus
ThdisbthSystemOptionsPort&DevicesPorStatuspageshowststatusoftheproduct'sinputandoutputports.
Maintenance
The Axisproduc provides several maintenance functions. These are available under System Options Maintenance.
ClickRestart perform correct start the Axiproducts no behaving expected This will have affected any of the current settings.
ClickRestoreresetmostettingofthefactorydefaultvaluesThefollowingsettingsarenotaffected:
•thebootprotocol(DHCPorstatic)
- thestaticIPaddress
- thedefaultrouter
- thesubnetmask
- thesystemtime
•theIEEE802.1Xsettings
•thefocusposition
- uploadedapplicationsarekeptbutmustberestarted
ClickDefaultresetsettingsincludingtheAddress factoryvaluesThisbuttonshouldusedwithcautionTheAxiproductandsetefactorydefaultusingthecontrolbuttonsetResetFactoryDefaultSettingspage52.
Toesethoptics the factory default position click Calibrate under Optics This may be necessary situations where the optics has lost its calibration during transport or has been exposed to extreme vibrations.
To identify the product test the Status LED click Flash LED undel identify and specify the duration in seconds minutes hours. This can be useful for identifying the product among other products installed in the same location.
Forinformationaboutfirmwareupgrade,seeUpgradingtheFirmware,onpage54.
Support
SupportOverview
Th SystemOptionsSupportSupportOverviewpageprovidesinformationtroubleshootingandcontactinformation, shouldyourequiretechnicalassistance.
See also Troubleshooting, on page 54.
SystemOverview
Together overview of the Axi product's status and settings go System Options Support System Overview Information that can be found here includes firmware version, IP address, network and security settings, event settings, imagesettings and recent log items. Many of the captions are linked to the proper Setup page.
Logs&Reports
The SystemOptionsSupportLogReportpage generates logs and reports useful for system analysis and troubleshooting if contactingAxisSupport, please provide a valid Server Report with your query.
SystemLog-Providesinformationaboutsystemevents.
SystemOptions
AccesLog lists failed attempts to access the product The AccesLog can also be configured distal connection to the product (see below).
ServeReportProvidesinformationaboutthproductstatus:pop-upwindowTheAccesslogsautomaticallyincludedintheServerReport.
Youcanviewordownloadtheserverreport.Downloadingtheserverreportcreatesa.zipfilethatcontainsacompleteserverreport texfileUTF-formaSelecthIncludenapshowwithdefaultImagesettingsoptionincludesnapshobtheproduct's LivViewthatalsowthsettingsspecifiedundeVideStream>Image>ImageAppearanceTheerverreportzipfileshould alwaysbeincludedwhencontactingsupport.
ParametelisShow the product' parameters and their current settings This may prove useful when troubleshooting or when contacting AxisSupport.
ConnectionList-Listsallclientsthatarecurrentlyaccessingmediastreams.
CrashReport-Generatesanarchivewithdebugginginformation.Thereporttakesseveralminutestogenerate.
ThegevelsforthSystemLogandtheAccessLogreundeSystemOptionsSupportLogsReportsConfiguration. TheAccessLogcanbeconfiguredtolistallconnectionstotheproduct(selectCritical,Warnings&Info).
Advanced
Scripting
Scriptingallowsexperienceduserstocustomizeandusetheirownscripts.
NOTICE
ImproperusemaycauseunexpectedbehaviorandlossofcontactwiththeAxisproduct.
Axisstronglyrecommendsthatyoudonotusethisfunctionunlessyouunderstandtheconsequences.AxisSupportdoesnotprovide assistanceforproblemswithcustomizedscripts.
To Perth Script Editord System Options Advanced Scripting Scriptauses problems,set the product of factory default settings,see page 52.
Formoreinformation,seewww.axis.com/developer
FileUpload
Files,forexamplewebpagesandimages,canbeuploadedtotheAxisproductandusedascustomsettings.Touloadafile,go toSystemOptions>Advanced>FileUpload.
Uploadedfile:accessedhroughthttp://
PlainConfig
PlainConfigisforadvanceduserswithexperienceofAxisproductconfiguration.Mostparameterscanbesetandmodifiedfromthis page.Helpisavailablefromthestandardhelppages.
TooperPlainConfigdSystemOptionsAdvancedPlainConfigAxisSupportdoesnoprovideassistance.
ResettoFactoryDefaultSettings
Important
Resettofactorydefaultshouldbeusedwithcaution.Aresettofactorydefaultwillresetallsettings,includingtheIP address,tothefactorydefaultvalues.
SystemOptions
Toresettheproducttothefactorydefaultsettings:
- Disconnectpowerfromtheproduct.
PresandholdthecontrobuttonandeconnectpowerSeeHardwareOverviewprpag6 - Keep the control button pressed for about 15 seconds until the status LED indicator flashes amber.
- Release the control button. The process is complete when the status LED indicator turns green. The product has been reset to the factory default settings and DHC serve available through network default address 92.168.0.90
- Usethetools provided on the Installation and Management Software CD to assign an I address, set the password and access the videostream. This information is also available from the support pages on www.axis.com/techsup
It's possible to reseparameter factory default via the web interface Gdo Setup System Options Maintenance.
Troubleshooting
CheckingtheFirmware
Firmwareissoftwarethatdeterminesthefunctionalityofnetworkdevices.Oneofyourfirstactionswhentroubleshootingaproblem shouldbetocheckthecurrentfirmwareversion.Thelatestversionmaycontainacorrectionthatfixesyourparticularproblem.The currenfirmwareversiontheAxiproductsdisplayedthepagSetupBasiSetupandriSetupAbout.
UpgradingtheFirmware
When you upgrade the product with the latest firmware from Axis website, the product receives the latest functionality available. Always read the upgrade instructions and releases notes available with each new release, before upgrading the firmware.
Toupgrade, followtheseinstructions:
- Savethefirmwarefiletoyourcomputer. The latest version of the firmware is available free of charge from Axis website at www.axis.com/techsup
- GotoSetup>SystemOptions>Maintenanceintheproductswebpages.
UndeUpgradServerclickBrowseandocatchfileyourcomputerClickUpgrade.
Afterstartingtheupgradeprocess,alwayswaitatleast5–10minutesbeforerestartingtheproduct,evenifyoususpectthe upgradehasfailed.
AXISCameraManagementcanbeusedformultipleupgrades.Seewww.axis.comformoreinformation.
Note
- Yourdealerreservestherighttochargeforanyrepairattributabletofaultyupgradebytheuser.
- Preconfiguredandcustomizedsettingsaresavedwhenthefirmwareisupgraded(providingthefeaturesareavailableinthenewfirmware)althoughthisisnotguaranteedbyAxisCommunicationsAB.
![Server Maintenance Maintain Server Restart Restart the AXIS P0374 Network Camera. Restore Resorts all parameters, except the JP and focus parameters, to the original factory settings. Default Resorts all parameters to the original factory settings. Optics Calibrate Calibrate focus and zoom. Upgrade Server Upgrade the AXIS P0374 with the latest firmware. Specify the firmware to upgrade to: Browse... and click Upgrade Notes: Do not disconnect power to the unit during the upgrade. The unit restarts automatically after the upgrade has completed. (1-10 minutes.) Identify Flash LED for 10 seconds ▼ [1..60] Basic Setup Video & Audio Live View Config PTZ Detectors Applications Events Recordings System Options Security Date & Time Network Storage Ports & Devices Maintenance Support Advanced About](/content/2026/05/1022267/images/b721dbc784284e98f5ef66e4e9e3530c718267f6b4f78c32ff695a6d68c5972a.jpg)
EmergencyRecoveryProcedure
If power or network connection is lost during the upgrade, the process fails and the product becomes unresponsive. Flashing red Status indicator indicates a failed upgrade. Torecover the product, follow the steps below. The serial number is found on the product's label.
- In UNIX/Linux, typethefollowing from the commandline:
Troubleshooting
arp-s<IPaddress><serialnumber>temp
ping-s408<IPaddress>
In Windowstype the following from command/DO prompt(this may require your command prompts an administrator):
arp-s<IPaddress><serialnumber>
ping-1408-t<IPaddress>
- If the product does not reply in 30 seconds, restart it and wait for areply. Press CTRL + Ctostop Ping.
Openbrowseandypartheproduct'sAddresslthepaghatappearsusheBrowsbuttortoselectheupgrade filetouse.ThenclickLoadtorestarttheupgradeprocess.
-
After the upgrade is complete (1–10 minutes), the product automatically restarts and shows a steady green on the Status indicator.
-
Reinstall the product, referring to the Installation Guide.
If the emergency recovery procedure does not get the product up and running again, contact Axissupport at www.axis.com/techsup/
Symptoms, Possible Causes and Remedial Actions
ProblemssettingtheIPaddress
| WhenusingARP/Ping | Trytheinstallationagain.TheIPaddressmustbesetwithintwominutesafterpowerhasbeen appliedtotheproduct.EnsurethePinglengththissetto408.Forinstructions,see. |
| Theproductislocatedona differentsubnet | IfthelPaddressintendedfortheproductandthelPaddressofthecomputerusedtoaccessthe productarelocatedondifferentsubnets,youwillnotbeabletosethelPaddress.Contactyour networkadministratortoobtainanIPaddress. |
| ThelPaddressisbeingused byanotherdevice | DisconnecttheAxisproductfromthenetwork.RunthePingcommand(inaCommand/DOS window,typepingandthelPaddressoftheproduct:·Ifyoureceive:Replyfrom:bytes=32;time=10... thismeansthatthelPaddressmayalreadybeinusebyanotherdeviceonthenetwork. ObtainanewIPaddressfromthenetworkadministratorandreinstalltheproduct.·Ifyoureceive:Requesttimedout,thismeansthatthelPaddressisavailable forusewiththeAxisproduct.Checkallcablingandreinstalltheproduct. |
| PossibleIPaddressconflict withanotherdeviceonthe samesubnet. | ThestaticIPaddressintheAxisproductisusedbeforetheDHCPserversetsadynamicaddress. ThismeansthatifthesamedefaultstaticIPaddressisalsousedbyanotherdevice,theremay beproblemsaccessingtheproduct. |
Theproductcannotbeaccessedfromabrowser
| Cannotlogin | WhenHTTPSisenabled,ensurethatthecorrectprotocol(HTTPorHTTPS)isusedwhenattemptingtdoginYoumayneedmanuallytypehttp://ttpithpsirthbrowser'saddressfield. |
| Ifthepasswordfortheuserrootislost,theproductmustberesettothefactorydefaultsettings.SeeResettoFactoryDefaultSettings,onpage52. |
Troubleshooting
| TheIPaddresshasbeen changedbyDHCP | IPaddressesobtainedfromaDHCPserveraredynamicandmaychange.IftheIPaddresshas beenchanged,useAXISIPUtilityorAXISCameraManagementtolocatedtheproductonthe network.Identifytheproductusingitsmodelorserialnumber,orbytheDNSname(ifthename hasbeenconfigured).Ifrequired,astaticIPaddressscanbeassignedmanually.Forinstructions,seethInstallationand ManagemenSoftwareCDothedocumentAssignandAddressandAccessthe/ideoStreamonAxisSupportwebatwww.axis.com/techsup |
| Certificateerrorwhenusing IEEE802.1X | Forauthenticationtoworkproperly,thedateandtimesettingsintheAxisproductshouldbe synchronizedwithanNTPserver.SeeDate&Time,onpage44. |
Theproductisaccessiblelocallybutnotexternally
| RouterconfigurationToconfigureyourroutertoallowincomingdatatrafficitotheAxisproduct,enabletheNAT-traversalfeaturewhichwillattempttoautomaticallyconfiguretheroutertoallowaccesstotheAxisproductsedNATtraversal(portmapping)forIPv4prpage47TheroutemustupporUPnP | TM. | |
| Firewallprotection | CheckthelInternetfirewallwithyournetworkadministrator. | |
| Defaultroutersrequired | CheckifyouneedtoconfiguretheroutersettingsfromSystemOptions>Network>TCP/IP>Basic. | |
ProblemswithstreamingH.264
| ProblemswithAXISMedia Control(InternetExplorer only) | ToenabletheupdatingofvideoimagesinInternetExplorer,setthebrowsertoallowActiveX controls.Also,makesurethatAXISMediaControlisinstalledonyourcomputer. |
| NoH.264displayedinthe client | CheckthattherelevantH.264connectionmethodsandcorrectinterfaceareenabledintheAMC ControlPanel(streamingtab).SeeAXISMediaControl(AMC),onpage 14.IntheAMCcontroPaneSelecthd.264bandlicSetdefaultH.264decoder.CheckhaRTSPenabledundesystemOptionsNetworkTCP/IPAdvanced. |
| MulticastH.264only accessiblebylocalclients | Checkifyourroutersupportsmulticasting,orifteroutersettingsbetweentheclientandthe productneedtobeconfigured.TheTTL(TimeToLive)valuemayneedtobeincreased. |
| NomulticastH.264 displayedintheclient | CheckwithyournetworkadministratorthatthemulticastaddressesusedbytheAxisproduct arevalidforyournetwork.Checkwithyournetworkadministratortoseeifthereisafirewallpreventingviewing. |
| Installationofadditional ActiveXcomponent restrictedorprohibited | ConfiguretheAxisproducttouseaJavaappletforupdatingvideoimagesinyourbrowser.Goto SetupLiveViewConfigandselectLavaappletundeDefaultviewer. |
| PoorrenderingofH.264 images | Ensurethatyourgraphicscardisusingthelatestdriver.Thelatestdriverscanusuallybe downloadedfromthemanufacturer'swebsite. |
| Colorsaturationisdifferent inH.264andMotionJPEG | Modifythesettingsforyourgraphicsadapter.Refertotheadapter'sdocumentationformore information. |
Troubleshooting
| Lowerframeratethan expected | SeePerformanceConsiderations,onpage60. |
| Reducethenumberofapplicationsrunningontheclientcomputer. | |
| Limitthenumberofsimultaneousviewers. | |
| Checkwiththenetworkadministratorthatthereisenoughbandwidthavailable. | |
| CheckintheAMCControlPanel(H.264tag)thatvideoprocessingisNOTsettoDecodeonly keyframes. | |
| Lowertheimageresolution. | |
| Themaximumframespersecondisdependentontheutilityfrequency(60/50Hz)oftheAxis product.SeeTechnicalSpecifications,onpage58. |
StatusandNetworkindicatorLEDsareflashingredrapidly
| Hardwarefailure | ContactyourAxisreseller. |
| Videoandimageproblems,general | |
| Imageunsatisfactory | CheckthevideestreamandcamersettingsundeSetupVideAudioVideStreamand Setup>Video&Audio>CameraSettings. |
| MotionDetectiontriggersunexpectedly | |
| Changesinluminance | Motiondetectionisbasedonchangesinluminanceintheimage.Thismeansthatifthereare suddenchangesinthelighting,motiondetectionmaytriggermistakenly.Lowerthesensitivity settingtoavoidproblemswithluminance. |
| Noaudio | |
| Incorrectsetup | Checkthesoundcardinthecomputer.Ensurethatmuteisnotselectedandthatthevolume settingsarecorrect.CheckhaEnableaudiosupportselectedundesetupSystemOptionsSecurityAudio Support.CheckthatcorrectAudionpursoselectedundesetupVideAudioAudio Settings. |
| Pooraudioquality | |
| Stuttering | Reducethenumberoflistenersandviewers.Decreaseimageresolutionandcompression. |
| Unsynchronizedaudioand videousingH.264 | Synchronizetheproduct'sdateandtimesettingswithanNTPserver.GotoSetup>System Options>Date&Time. |
| Distortedaudio | CheckthatcorrectAudionpursoselectedundesetupVideAudioAudio Settings. |
| FeedbackloopsFeedbackloopsmightappearinfull-duplexmode.Trymovingthemicrophoneorthespeaker,or usehalf-duplexmodeinstead. | |
| Storageanddiskmanagementproblems | |
| Videocannotberecorded | CheckthattheSDcardisnotwriteprotected(thatis,readonly). |
| SDcardcannotbemountedReformattheSDcardandthenclickMount. | |
TechnicalSpecifications
| Function/group | Item | Specifications |
| Models | AXISP3364-LV | |
| Imagesensor | ProgressivescanRGBCMOS1/3",1.3MP(opticallyactive) | |
| LensVarifocal,remotefocusandzoom,P-iris,IRcorrected,mexapixelresolution6mmmodels:2.5-6mm,F1.2,horizontalangleofview:107°-49°,verticalangleofview:79°-37°,diagonalangleofview:136°-61°12mmmodels:3.3-12mm,F1.4,horizontalangleofview:82°-24°,verticalangleofview:59°-18°,diagonalangleofview:109°-31° | ||
| DayandNightAutomaticallyremovableinfrared-cutfilter | ||
| Minimumillumination | 6mmmodels:Color:0.1lux,F1.2,B/W:0.02lux,F1.212mmmodels:Color:0.15lux,F1.4,B/W:0.03lux,F1.4B/W:0luxwith|Rilluminationon | |
| Shuttertime | Capturefrequency50Hz:1/24500sto2sCapturefrequency60Hz:1/29500sto2s | |
| Pan/Tilt/Zoom | DigitalPTZ,presetpositions,guardtour | |
| Cameraangleadjustment | Pan360°,tilt170°,rotation340° | |
| Video | Videocompression | H.264BaselineandMainProfile(MPEG-4Part10/AVC)MotionJPEG |
| Resolutions | 1280x960*to160x90*1400x1050(1.4MP)scaledresolutionavailableviaVAPIX® | |
| FramerateH.264 | 25fpswithCapturefrequency50Hz,30fpswithCapturefrequency60Hz | |
| FramerateMotionJPEG | 25fpswithCapturefrequency50Hz,30fpswithCapturefrequency60Hz | |
| Videostreaming | Multi-streamH.264andMotionJPEGControllableframerateandbandwidthVBR/CBRH.264H.264:2individuallyconfiguredstreamsinHDTV720pandfullframerateMotionJPEG:2individuallyconfiguredstreamsinHDTV720pandfullframerate1H.264and1MotionJPEGstreamsinHDTV720pandfullframerateMorestreamsifidenticalorlimitedinframerateorresolution | |
| Imagesettings | Compression,color,brightness,sharpness,contrast,whitebalance,exposurecontrol,exposurezones,backlightcompensation,finetuningofbehavioratdifferentlightlevels,widedynamicrange-dynamiccontrastRotation:0°,90°,180°,270°,includingCorridorFormatTextandimageoverlay,privacymaskandmirroringofimages | |
| UsersUpto20simultaneousunicastconnectionsUnlimitednumberofusersusingmulticast(H.264) | ||
| Audio | AudiostreamingTwo-way,fullduplex | |
| Audiocompression | AACLC8/16kHz,G.711PCM8kHz,G.726ADPCM8kHzConfigurablebitrate | |
| Audioinput/output | Externalmicrophoneinputorlineinput,lineleveloutputBuilt-inmicrophone.Pluggingtheaudioinputjackdisablesinternalmicrophone. | |
TechnicalSpecifications
| Function/group | Item | Specifications |
| Network | SecurityPasswordprotection,IPaddressfiltering,HTTPSencryption*,IEEE802.1Xnetworkaccess control*,digestauthentication,useraccesslog | |
| Supported protocols | IPv4/v6,HTTP,HTTPS,SSL/TLS*,QoSLayer3DiffServ,FTP,SMTP,Bonjour,UPnP, SNMPv1/v2c/v3(MIB-II),DNS,DynDNS,NTP,RTSP,RTP,TCP,UDP,IGMP,RTCP,ICMP, DHCP,ARP,SOCKS,etc.*ThisproductincludessoftwaredevelopedbytheOpenSSL ProjectforuseintheOpenSSLToolkit(www.openssl.org) | |
| System Integration | Application Programming Interface | OpenAPIforsoftwareintegration,includingtheONVIFspecificationavailableat www.onvif.org,aswellasVAPIX®andAXISCameraApplicationPlatformfromAxis Communications,specificationsavailableatwww.axis.comSupportforAXISVideo HostingSystem(AVHS)withOne-ClickCameraconnection |
| IntelligentvideoVideomotiondetection,activetamperingalarm SupportforAXISCameraApplicationPlatformenablinginstallationofadditional applications Audiodetection | ||
| EventsIntelligentvideo Externalinput | ||
| AlarmactionsFileuploadviaFTP,HTTPandemail Notificationviaemail,HTTPandTCP Videorecordingtoedgestorage Pre-andpost-alarmvideobuffering Day/Nightswitching StatusLEDactivation Externaloutputactivation,audiorecordingtoedgestorage,playingaudioclipsActivation ofIRillumination | ||
| Videoaccessfrom webbrowser | CameraliveviewVideoandaudiorecordingtofile(ASF)CustomizableHTMLpages Windows7,Vista,XP,Server2008,Server2003DirectX9corhigherForotheroperating systemsandbrowsersseewww.axis.com/techsup | |
| Installation, management and maintenance | AXISCameraManagementtoolonCDandweb-basedconfiguration Configurationofbackupandrestore FirmwareupgradesoverHTTPorFTP,firmwareavailableonwww.axis.com | |
| General | Casing | Aluminuminnercameramodulewithencapsulatedelectronics IK10impact-resistantcasingwithmetalbaseandruggedpolycarbonatetransparentcover Color:WhiteNCSS1002-B |
| Processor, memory | ARTPEC-4,256MBRAM,128MBFlash Batterybacked-upreal-timeclock | |
| PowerPoweroverEthernetIEEE802.3af Class3;max:12.1W | ||
| Connectors | RJ-4510BASE-T/100BASE-TXPoE Terminalblockfor1alarminputand1output 3.5mmjackformicin(max80mVpp)orlinemonoinput(max6.4Vpp) 3.5mmjackforLinemonooOutput(max1.3Vpp)toactivespeaker | |
| IRilluminationHighlyefficient,long-lifeIRLEDswithadjustableintensityandangleofillumination. Rangeofreachupto30m. | ||
| Edgestorage | SD/SDHCmemorycardslot(cardnotincluded) Supportforrecordingtonetworkshare(NetworkAttachedStorageorfileserver) | |
| Storage temperature | -40to70°C(-40to158°F) | |
| Operating conditions | 0to50°C(32to122°F),humidity10-85%RH(non-condensing) | |
TechnicalSpecifications
| Function/group | Item | Specifications |
| Approvals | CE: Emission:EN55022:2006+A1ClassB Harmonics:EN61000-3-2 Flicker:EN61000-3-3 Immunity:EN55024,EN61000-6-1,EN61000-6-2 Safety::IEC/EN/UL60950-1 FCC: FCCPart15,SubpartB,ClassBdemonstratedbycompliancewithEN55022(CISPR22) Japan:VCCI-2008,ClassB,ITE•C-tickAS/NZSCISPR22,demonstratedbycompliance withEN55022(CISPR22) Canada:ICES-003CanadianICES-003,ClassBdigital,demonstratedbycompliance withEN55022(CISPR22) Korea: Emission:KN22 Immunity:KN24 Environmental:IEC60068-2-1,IEC60068-2-2,IEC60068-2-14,IEC60068-2-27,IEC 60068-2-64,IEC60068-2-78,IEC62262IK10 IR:EN-62471 | |
| Dimensions (HxWxD) | 97x148x148mm(3.82x5.83x5.83") | |
| Weight | 670g(1.5lb.) | |
| Included accessories | InstallationGuide,CDwithininstallationtools,recordingsoftwareandUserManual, Windowsdecoder1-userlicense Connectorkit | |
| Video management software(not included) | AXISCameraStation-Videomanagementsoftwareforviewingandrecordingupto100 cameras Seewww.axis.com/products/video/software/formoresoftwareapplicationsviapartners | |
| Optional accessories | AXISIlluminators AXIST91Abrackets IP51-rateddrop-ceilingmountkitwithtransparentorsmokedcover Pendantadapterkit Mountingbracket |
PerformanceConsiderations
Whensettingsupyoursystem,itisimportanttoconsiderhowvarioussettingsandsituationswillaffectperformance.Somefactors affecttheamountofbandwidth(thebitrate)required,otherscanaffecttheframerate,andsomeaffectboth.Iftheloadonthe CPUreachesitsmaximum,thiswillalsoaffecttheframerate.
The following factors are among them most important to consider:
- Highimageresolutionand/orlowercompressionlevelsresultinimagescontainingmoredata.Bandwidthaffected.
- AccessbylargenumbersofMotionJPEGand/orunicastH.264clients.Bandwidthaffected.
- Simultaneousviewingofdifferentstreams(resolution, compression)bydifferentclients.Effectonframerateand bandwidth.
- AccessingMotionJPEGandH.264videostreamssimultaneously.Framerateandbandwidthaffected.
- Heavyusageofeventsettingsaffecttheproduct'sCPUload.Framerateaffected.
- Heavynetworkutilizationduetopoorinfrastructure.Bandwidthaffected.
- Viewingonpoorlyperformingclientcomputerslowersperceivedperformance.Framerateaffected.
- USERMANUAL
- AboutthisDocument
- LegalConsiderations
- Liability
- IntellectualPropertyRights
- EquipmentModifications
- TrademarkAcknowledgments
- RegulatoryInformation
- Electromagnetic Compatibility(EMC)
- USA
- Australia/NewZealand
- Japan
- Korea
- Safety
- Photobiological Safety
- DisposalandRecycling
- Europe
- China
- Support
- LearnMore!
- TableofContents
- HardwareOverview
- Connectors
- NOTICE
- Note
- AccessingtheProduct
- AccessfromaBrowser
- AccessfromtheInternet
- SettheRootPassword
- SetPowerLineFrequency
- TheLiveViewPage
- ControlsontheLiveViewPage
- AXISMediaControlviewertoolbar
- AMCAudioControls
- PTZControls
- MediaStreams
- HowtoStreamH.264
- MJPEG
- AXISMediaControl(AMC)
- AlternativeMethodsofAccessingtheVideoStream
- AccessingAudioStreams
- SettingUptheProduct
- BasicSetup
- VideoandAudio
- VideoStream
- Image
- H.264
- StreamProfiles
- CameraSettings
- ImageAppearance
- WhiteBalance
- WideDynamicRange
- ExposureSettings
- Shutter&Gain
- SetShutterto
- SetGainto
- Example
- Irisadjustment
- Day/Night
- Built-inIRIlluminationsLEDs
- CAUTION
- ViewArea
- Overlay
- OverlayImage
- PrivacyMask
- Important
- Focus&Zoom
- AudioSettings
- AudioModes
- Audiolnput
- AudioOutput
- AudioClips
- LiveViewConfig
- DefaultViewerforBrowsers
- ViewerSettings
- UserDefinedLinks
- OutputButtons
- PTZ(PanTiltZoom)
- PresetPositions
- GuardTour
- Advanced
- Limits
- Controls
- Detectors
- CameraTampering
- MotionDetection
- Configure Included Window
- SetUpMotionDetectionWindows
- MotionDetectionParameters
- AudioDetection
- Applications
- ApplicationLicenses
- InstallApplication
- ApplicationConsiderations
- Events
- SettingUpanActionRule
- Recipients
- Schedules
- Recurrences
- Recordings
- RecordingList
- ContinuousRecording
- SystemOptions
- Security
- Users
- ONVIF
- IPAddressFilter
- HTTPS
- IEEE802.1X
- Certificates
- Settings
- AudioSupport
- Date&Time
- Network
- BasicTCP/IPSettings
- NetworkInterfaceMode
- IPv4AddressConfiguration
- IPv6AddressConfiguration
- ARP/Ping
- AXISVideoHostingSystem(AVHS)
- AXISInternetDynamicDNSService
- AdvancedTCP/IPSettings
- DNSConfiguration
- NTPConfiguration
- HostNameConfiguration
- Link-LocalIPv4Address
- HTTP
- NATtraversal(portmapping)forIPv4
- FTP
- RTSP
- SOCKS
- QoS(QualityofService)
- SMTP(email)
- SNMP
- UPnP TM
- RTP/H.264
- Bonjour
- Storage
- SDCard
- NetworkShare
- Ports&Devices
- I/OPorts
- PortStatus
- Maintenance
- SupportOverview
- SystemOverview
- Logs&Reports
- Scripting
- FileUpload
- PlainConfig
- ResettoFactoryDefaultSettings
- Troubleshooting
- CheckingtheFirmware
- UpgradingtheFirmware
- EmergencyRecoveryProcedure
- Symptoms, Possible Causes and Remedial Actions
- TechnicalSpecifications
- PerformanceConsiderations
Marke : AXIS
Modell : P3364-LVE
Kategorie : Sicherheitskamera