CS-GMC2 - Kit de montage voiture CRUX - Gratis brugsanvisning og manual
Find enhedens vejledning gratis CS-GMC2 CRUX i PDF-format.


Brugerspørgsmål om CS-GMC2 CRUX
0 spørgsmål om dette apparat. Besvar dem du kender, eller stil dit eget.
Stil et nyt spørgsmål om dette apparat
Download vejledningen til din Kit de montage voiture i PDF-format gratis! Find din vejledning CS-GMC2 - CRUX og tag din elektroniske enhed tilbage i hånden. På denne side er alle dokumenter nødvendige for brugen af din enhed offentliggjort. CS-GMC2 af mærket CRUX.
BRUGSANVISNING CS-GMC2 CRUX
PRODUCT FEATURES:
- Retains factory features in select GM Class II Data Bus vehicles while functioning with an aftermarket radio.
- Pre-programmed to retain factory Steering Wheel Controls.
- Voice Recognition Command from factory SWC.
- Supports Bose, non-Bose and Y-91 audio systems.
- Retains chime functions.
- Built-in chime volume adjustment.
- EIA color coded wiring for easy installation.
PARTS INCLUDED:
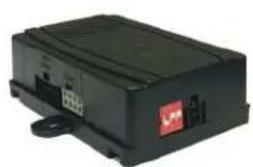
natural_image
Black rectangular electronic device with ports and a red logo (no visible text or symbols)
natural_image
Coiled electrical connectors with various colors and wires, no visible text or symbols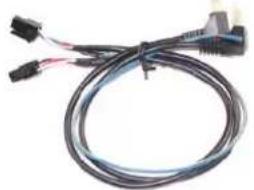
natural_image
Coiled black electrical connector with two connectors (no text or symbols visible)SWRGM-48 MODULE SWRGM-48 HARNESS SWC CABLE
INSTALLATION DIAGRAM:
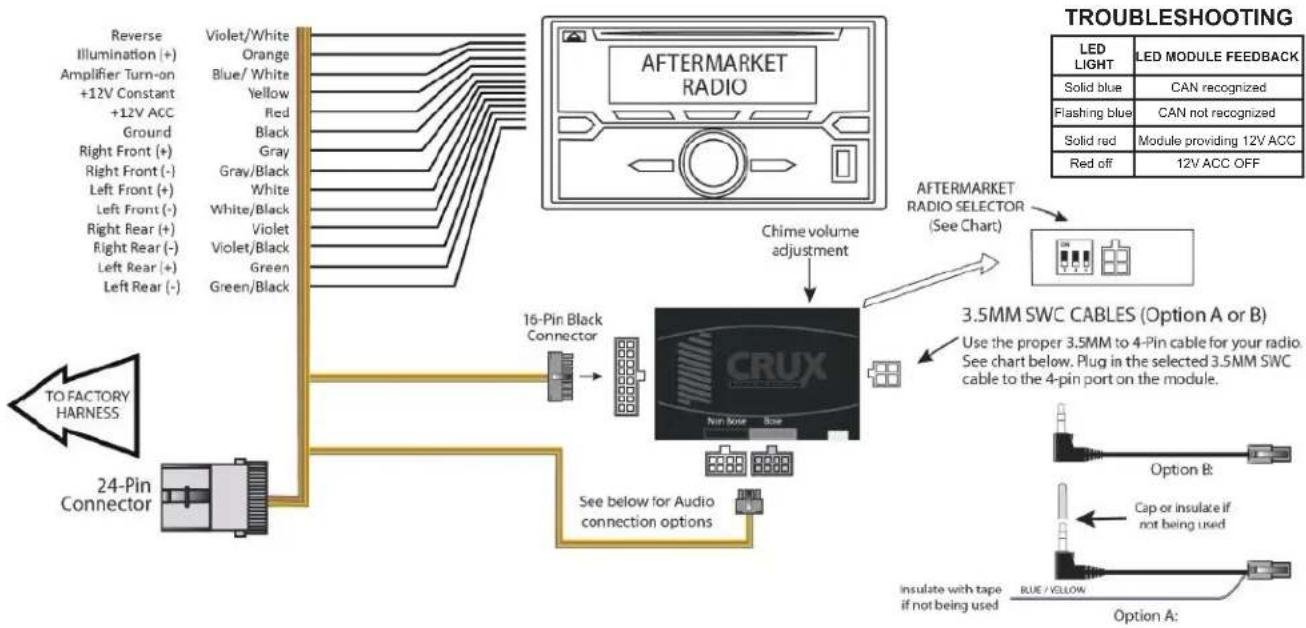
flowchart
graph TD
    A["TO FACTORY HARNESS"] --> B["24-Pin Connector"]
    B --> C["16-Pin Black Connector"]
    C --> D["CRUX"]
    D --> E["Chime volume adjustment"]
    E --> F["3.5MM SWC CABLES (Option A or B)"]
    F --> G["LED LIGHT"]
    F --> H["LED MODULE FEEDBACK"]
    F --> I["Flashing blue"]
    F --> J["Solid red"]
    F --> K["Red off"]
    F --> L["Cap or insulate if not being used"]
    F --> M["Blue/Yellow"]
    F --> N["Insulate with tape if not being used"]
    F --> O["Option A:"]
DIP SWITCH SETTINGS:
AFTERMARKET RADIO DIP SWITCH SETTINGS:
| RADIO BRAND: | DIP#: | 1 | 2 | 3 |
| Atoto, Dual, Fahrenheit, Jensen, Nakamichi,Pioneer, Power Acoustik, SoundstreamBlaupunkt, Most off-brand RadioAlpineClarionKenwoodJVCBoss, Old SonyNew Sony (with CarPlay) | OFF | ON | ON | |
| OFF | ON | ON | ||
| OFF | ON | ON | ||
| OFF | OFF | OFF | ||
| ON | ON | OFF | ||
| ON | ON | ON | ||
| ON | OFF | ON | ||
| ON | OFF | OFF | ||
| OFF | ON | OFF | ||
SWC MODULE
DIP SWITCH
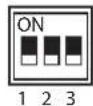
SWC Troubleshoot option
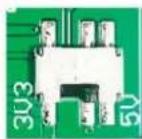
Located internally Need to take plastic Casing off module
- If Steering Wheel Controls don't work or work properly please switch internal dip switch from 3v3 to 5v as shown in picture above.
NOTE: For Atoto, Blaupunkt, Dual, Farenheit, Nakamichi, Power Acoustik, Soundstream, and most off-brand radios, check the aftermarket radio's manual to see if the SWC buttons need to be programmed.
4-PIN SWC CABLE
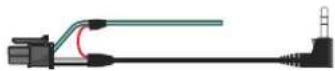
Use the proper 3.5MM to 4-Pin SWC cable for the aftermarket radio you are using.
OPTION A is used for ALPINE, CLARION. Use the Blue/Yellow wire for JVC and KENWOOD units. OPTION B is used for ATOTO, BLAUPUNKT, BOSS, DUAL, FARENHEIT, JENSEN, POWER ACOUSTIK, PIONEER, SONY, SOUNDSTREAM and Most Off-Brand Radios.
NOTE: Cap or insulate the 3.5mm plug or Blue/Yellow wire if not being used.
For aftermarket radios that have wires for SWC connections, cut off the 3.5mm plug on the Crux SWC Cable (option B) and connect the SWC wires as follows:

natural_image
Pure electrical circuit lines without any symbolsRED to SWC Key 1
WHITE to SWC Key 2
SHIELD to SWC Ground
Note that there are some radios that only have SWC1 and SWC2, in this case "shield" does not need to be connected.
SELECTING THE AUDIO SYSTEM:
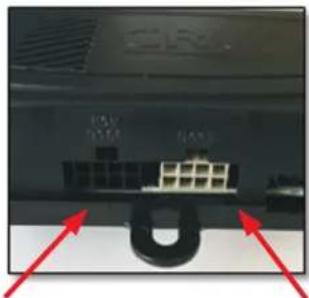
If the vehicle is equipped with an amplified audio system, the SWRGM-48 has a built-in audio level adaptor that outputs the proper audio level from the aftermarket radio to the factory amplifier. To use this feature, plug in the male 8-pin connector on the SWRGM-48 harness to the GRAY female 8-pin connector on the SWRGM-48 module. The module is also labeled "Bose" and "Non Bose" to avoid confusion. (see picture below)
If the vehicle is NOT equipped with a factory amplified system, plug in the male 8-pin connector to the BLACK female 8-pin on the SWRGM-48 module.
natural_image
Close-up of a black electronic device rear panel with red arrows pointing to ports (no visible text or symbols)NON BOSE
(Non-Amplified)
Connection
BOSE
(Amplified)
Connection
CHIME VOLUME ADJUSTMENT:
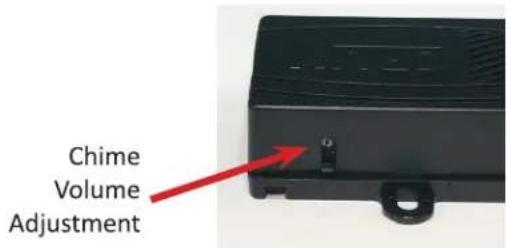
The SWRGM-48 has a potentiometer to adjust the chime volume. It is set at half way by default. To adjust the volume, simply use a suitable screw driver and turn the potentiometer clockwise to increase the volume and counter-clockwise to decrease the volume.
text_image
Chime Volume AdjustmentSTEERING WHEEL CONTROL BUTTON FUNCTIONS:
4 BUTTON SWC
| SWC Button | SHORT PRESS | LONG PRESS |
| VOL + | Step Increment | Continuous VOL + |
| VOL - | Step Decrement | Continuous VOL – |
| AM/FM | Source | Pick Up Call |
| Preset | Activate VR / | End Call |
| NOTES: | To Deactivate VR =on Pioneer, press “PRESET”on JVC = say “Cancel” | To Deactivate VR =on Kenwood, long press of PRESET |
4 BUTTON SWC
| SWC Button | SHORT PRESS | LONG PRESS |
| ALPINE | ||
| VOL + | Step Increment | Continuous VOL + |
| VOL - | Step Decrement | Continuous VOL – |
| Seek Up ▲ | Seek Up | N/A |
| Seek Down ▼ | Seek Down | N/A |
| Source Up | Pick up Call | End Call |
| Source Down | Source | N/A |
| Prog | ||
| Voice | ||
| SWC Button | SHORT PRESS | LONG PRESS |
| CLARION | ||
| VOL + | Step Increment | Continuous VOL + |
| VOL - | Step Decrement | Continuous VOL – |
| Seek Up ▲ | Preset Up | N/A |
| Seek Down ▼ | Preset Down | N/A |
| Source Up | Pick up Call | End Call |
| Source Down | Source | N/A |
| Prog | Mute | N/A |
| Voice | Mute | N/A |
STEERING WHEEL CONTROL BUTTON FUNCTIONS (Continued):
| SWC Button | SHORT PRESS | LONG PRESS |
| JVC | ||
| VOL + | Step Increment | Continuous VOL + |
| VOL - | Step Decrement | Continuous VOL – |
| Seek Up | Seek Up | N/A |
| Seek Up ▲ | Seek Down | N/A |
| Seek Down ▼ | Pick up Call | End Call |
| Source Down | Source | N/A |
| Prog | Activate Voice Recognition | N/A |
| Voice | Activate Voice Recognition | N/A |
NOTE: Say "CANCEL" to Deactivate VR
| SWC Button | SHORT PRESS | LONG PRESS |
| KENWOOD | ||
| VOL + | Step Increment | Continuous VOL + |
| VOL - | Step Decrement | Continuous VOL – |
| Seek Up ▲ | Seek Up | Tune Up |
| Seek Down ▼ | Seek Down | Tune Down |
| Source Up | Pick up Call | End Call, Deactivate VR |
| Source Down | Source | N/A |
| Prog | Activate Voice Recognition | Deactivate VR |
| Voice | Activate Voice Recognition | N/A |
NOTE: BT Inactive, Source Up Activate Call History
| SWC Button | SHORT PRESS | LONG PRESS |
| PIONEER | ||
| VOL + | Step Increment | Continuous VOL + |
| VOL - | Step Decrement | Continuous VOL – |
| Seek Up ▲ | Preset Up | N/A |
| Seek Down ▼ | Preset Down | N/A |
| Source Up | Pick up Call | End Call |
| Source Down | Source | N/A |
| Prog | Activate Voice Recognition | Deactivate VR, End Call |
| Voice | Activate Voice Recognition | Deactivate VR |
STEERING WHEEL CONTROL BUTTON FUNCTIONS (Continued):
ANALOG SWC
BUICK – Century, LaCrosse, Rainier, Rendevous, Terraza
CHEVROLET – Corvette, Impala, Monte Carlo
OLDSMOBILE – Alero, Bravada, Silhouette
PONTIAC – Aztec, Grand Am, Grand Prix, Montana, Sunfire
| SWC Button | SHORT PRESS | LONG PRESS |
| ALPINE | ||
| VOL + | Step Increment | Continuous VOL + |
| VOL - | Step Decrement | Continuous VOL – |
| Mode / Play | Source | N/A |
| MUTE | Attenuation | N/A |
| Seek Up ▲ | Seek Up | N/A |
| Seek Down ▼ | Seek Down | N/A |
| Type Seek / Band | Pick up Call | N/A |
| Preset / 1-6 | End Call | |
| SWC Button | SHORT PRESS | LONG PRESS |
| CLARION | ||
| VOL + | Step Increment | Continuous VOL + |
| VOL - | Step Decrement | Continuous VOL – |
| Mode / Play | Source | N/A |
| MUTE | Mute | N/A |
| Seek Up ▲ | Preset Up | N/A |
| Seek Down ▼ | Preset Down | N/A |
| Type Seek / Band | Pick up Call | End Call |
| Preset / 1-6 | N/A | N/A |
| SWC Button | SHORT PRESS | LONG PRESS |
| JVC | ||
| VOL + | Step Increment | Continuous VOL + |
| VOL - | Step Decrement | Continuous VOL – |
| Mode / Play | Source | N/A |
| MUTE | Mute | N/A |
| Seek Up ▲ | Seek Up | N/A |
| Seek Down ▼ | Seek Down | N/A |
| Type Seek / Band | Pick up Call | End Call |
| Preset / 1-6 | Activate Voice Recognition | N/A |
NOTE: Say "CANCEL" to Deactivate VR
STEERING WHEEL CONTROL BUTTON FUNCTIONS (Continued):
SWC Button
SHORT PRESS
LONG PRESS
KENWOOD
| VOL + | Step Increment | Continuous VOL + |
| VOL - | Step Decrement | Continuous VOL – |
| Mode / Play | Source | N/A |
| MUTE | Attenuation | N/A |
| Seek Up ▲ | Seek Up | N/A |
| Seek Down ▼ | Seek Down | N/A |
| Type Seek / Band | Pick up Call | End Call, Deactivate VR |
| Preset / 1-6 | Activate Voice Recognition | N/A |
SWC Button
SHORT PRESS
LONG PRESS
PIONEER
| VOL + | Step Increment | Continuous VOL + |
| VOL - | Step Decrement | Continuous VOL – |
| Mode / Play | Source | N/A |
| MUTE | Mute | N/A |
| Seek Up ▲ | Preset Up | N/A |
| Seek Down ▼ | Preset Down | N/A |
| Type Seek / Band | Pick up Call | End Call |
| Preset / 1-6 | Activate Voice Recognition / Deactivate Voice Recognition | N/A |
STEERING WHEEL CONTROL SETTINGS:
Note: Identify Alpine SWC learning radios by checking for three SWC cables and a SWC learn menu, instead of a 3.5mm SWC input.
If Interface has one SWR-100 Cable included
If Interface has two SWR Cables included
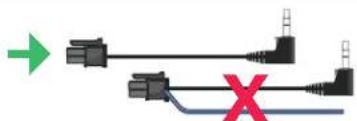
1 - Find the included SWC adapter cable.
1 - Identify appropriate SWC adapter cable. Do not use cable with Blue / Yellow wire.
text_image
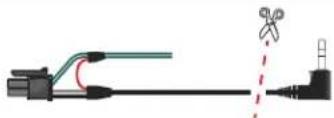
Diagram showing two connected electrical connectors with a red X symbol indicating a fault or failure point.2 - Prepare the SWC Cable: Cut the SWC cable. You will find a red wire, a white wire, and a ground (shield) wire inside.
natural_image
Pure electrical circuit lines without any symbols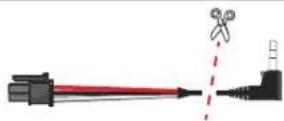
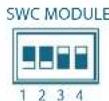
3 - Adjust the Module Settings: Set the module to the Pioneer dip switch setting. This configures the module to communicate correctly with the Alpine radio.
| DIP: | 1 | 2 | 3 | 4 | |
| On Alpine iLX series radios use Pioneer settings | OFF | OFF | ON | ON | |
4 - Configure the Alpine Radio: On your Alpine radio, select the setting that includes an adapter for SWC. This ensures the radio will recognize the steering wheel controls.
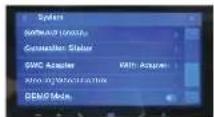

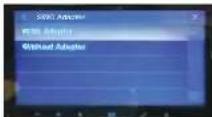
Select the setting "With Adapter" Select "SWC Adapter"
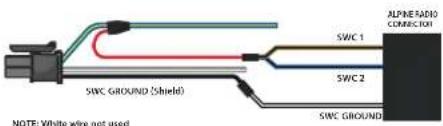
5 - Connect the Wires: Connect both the SWC1 and SWC2 wires from aftermarket radio to the red wire from our SWC cable. Connect the SWC ground wire to the shield (ground) wire of our SWC cable. These steps should enable the steering wheel controls on your Alpine iLX series radio.
text_image
ALPINE RADIO CONNECTION SWC 1 SWC 2 SWC GROUND SINC GROUND (Shield) NOTE: White wire not used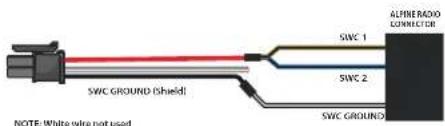
text_image
SWC GROUND (Shield) NOTE: White wire not used SWC 1 ALFIREBADO CONNECTOR SWC 2 SWC GROUND- Program the SWC: Navigate to the SWC settings on your Alpine radio to assign and test each control function.
VEHICLE APPLICATIONS:
| Buick | GMC | ||
| 2004-2005 | Century* | 2004-2011 | Canyon |
| 2005-2007 | LaCrosse* | 2002-2009 | Envoy |
| 2004-2007 | Rainier* | 2003-2007 | Savana |
| 2003-2007 | Rendezvous* | 2003-2006 | Sierra |
| 2005-2007 | Terraza* | 2007 | Sierra Classic |
| 2003-2006 | Yukon | ||
| Cadillac | |||
| 2003-2006 | Escalade | Hummer | |
| Chevrolet | 2003-2007 | H2 | |
| 2005-2010 | H3 | ||
| 2003-2006 | Avalanche | ||
| 2000-2005 | Cavalier | Oldsmobile | |
| 2004-2013 | Colorado | 2001-2004 | Alero* |
| 2005-2013 | Corvette* | 2002-2004 | Bravada* |
| 2004-2007 | Express | 2000-2004 | Silhouette* |
| 2000-2005 | Impala* | ||
| 2001-2003 | Malibu | Pontiac | |
| 2000-2005 | Monte Carlo* | 2001-2005 | Aztec* |
| 2003-2004 | S-10 | 2001-2005 | Grand Am* |
| 2003-2006 | Silverado | 2004-2008 | Grand Prix* |
| 2007 | Silverado Classic | 2000-2006 | Montana* |
| 2003-2006 | SSR | 2000-2005 | Sunfire* |
| 2003-2006 | Suburban | ||
| 2003-2006 | Tahoe | Saab | |
| 2002-2009 | Trailblazer | 2005-2008 | 9-7X |
| 2005-2008 | Uplander | ||
| 2003-2005 | Venture | Saturn | |
| 2005-2007 | Relay | ||
| Isuzu | |||
| 2003-2008 | Ascender | ||
*Analog Steering Wheel Controls. See pages 5 and 6 for SWC button functions.