
KF-21U40 - Fjernsyn LG - Gratis brugsanvisning og manual
Find enhedens vejledning gratis KF-21U40 LG i PDF-format.

Brugerspørgsmål om KF-21U40 LG
0 spørgsmål om dette apparat. Besvar dem du kender, eller stil dit eget.
Stil et nyt spørgsmål om dette apparat
Download vejledningen til din Fjernsyn i PDF-format gratis! Find din vejledning KF-21U40 - LG og tag din elektroniske enhed tilbage i hånden. På denne side er alle dokumenter nødvendige for brugen af din enhed offentliggjort. KF-21U40 af mærket LG.
BRUGSANVISNING KF-21U40 LG

LG
Colour TVCR OWNER'S MANUAL
Please read this manual carefully before operating your set.
Retain it for future reference.
Record model number and serial number of the set.
See the label attached on the back cover and quote this information to your dealer when you require service.
Model number :
Serial number :
P/NO : 3820 M (MV64A, 231P/R/Y TX)
Contents
Installation 3
Location and function of controls 4
Remote control handset
Battery installation
Front panel
Basic operation 7
On and off
Programme selection
Volume adjustment
Mute function
Quick view
On screen language selection (option)
On screen menus 8
Menu selection
Setting up TV stations 9
Auto programme tuning
Manual programme tuning
Fine tuning
Programme edit
Picture adjustment 13
Picture adjustment
Auto picture control
Other functions 14
TV and AV modes
Auto sleep
Auto repeat
Colour system setting
Sleep timer
Time setting 16
Clock
On/off time
VCR operation 17
Playing tapes
Tape tracking control
Pause/still picture control
Fast forward, cue, rewind and review
Clock/count selection
Memory stop
VHS Index Search System (VISS)
Recording 20
Manual recording
Instant timer recording (ITR)
Timer programme setting
Connection of external equipment 22
Aerial socket
Audio/Video in/out sockets (option)
Euro scart socket (option)
Audio/Video in sockets
Troubleshooting check list 23
Installation
Power
This set operates on an AC mains supply, the voltage is as indicated on the label on the back cover. Never apply DC power to the set. In the event of thunderstorms or powercuts, please pull out the aerial and mains plugs.
Warning
To prevent fire or shock hazard, do not expose the set to rain or moisture.
Service
Never remove the back cover of the set as this can expose you to very high voltage and other hazards. If the set does not operate properly, unplug it and call your dealer.
Aerial
Connect the aerial cable to the socket marked 75¥ on the back cover. For the best reception an outdoor aerial should be used.
Location
Position your set so that no bright light or sunlight falls directly onto the screen. Care should be taken not to expose the set to any unnecessary vibration, moisture, dust or heat. Also ensure that the set is placed in a position to allow a free flow of air. Do not cover the ventilation openings on the back cover.
Location and function of controls
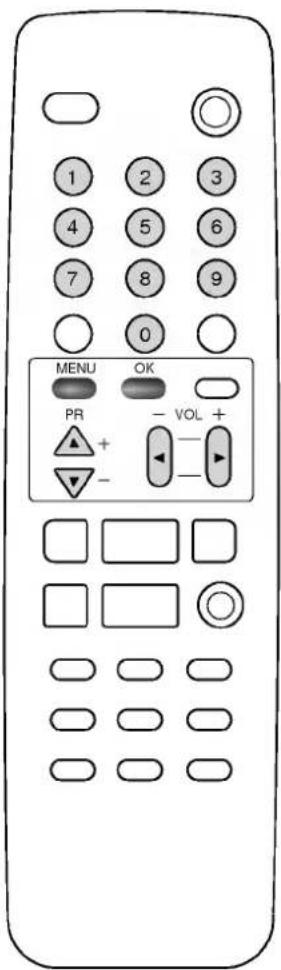
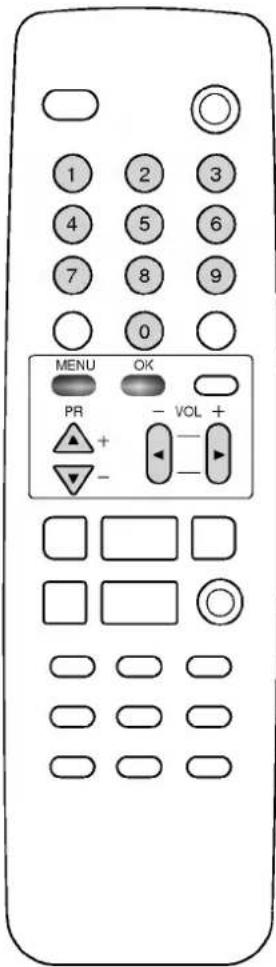
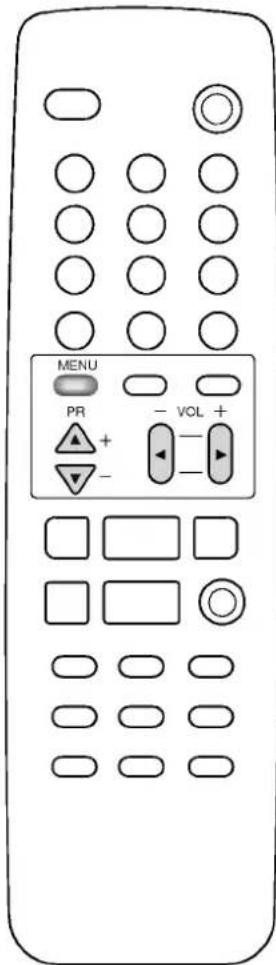
All the functions can be controlled with the remote control handset. Some functions can also be adjusted with the buttons on the front panel of the set.
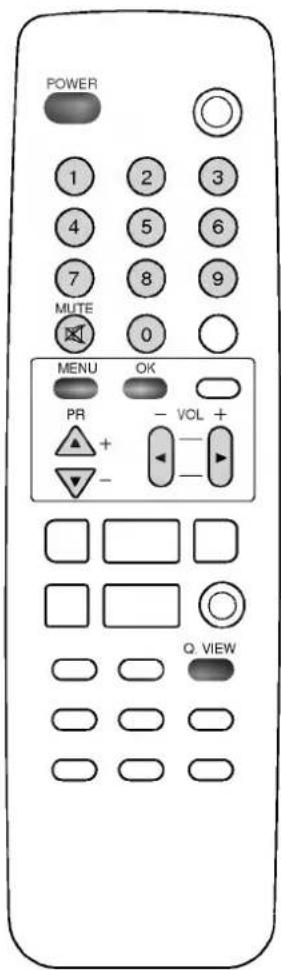
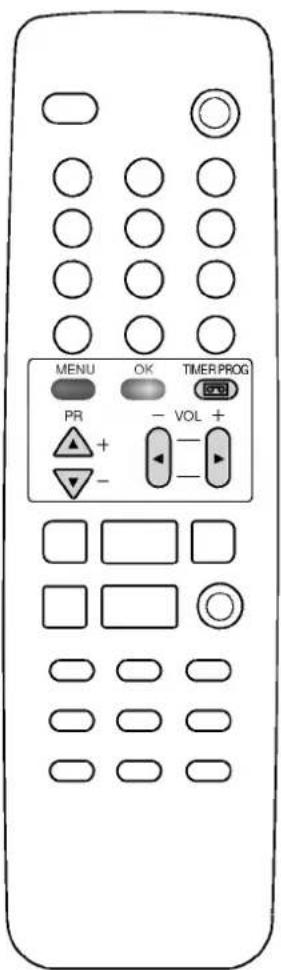
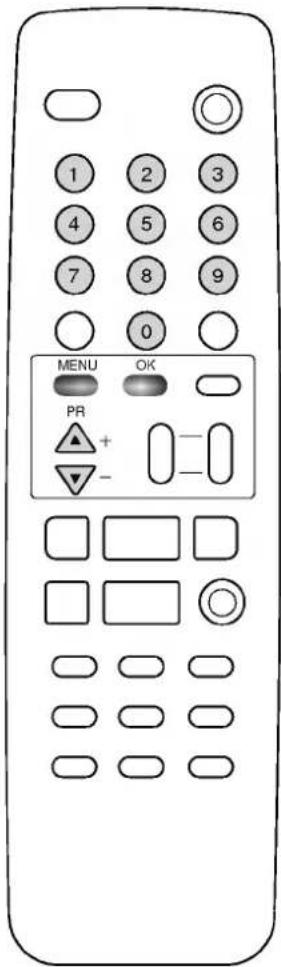
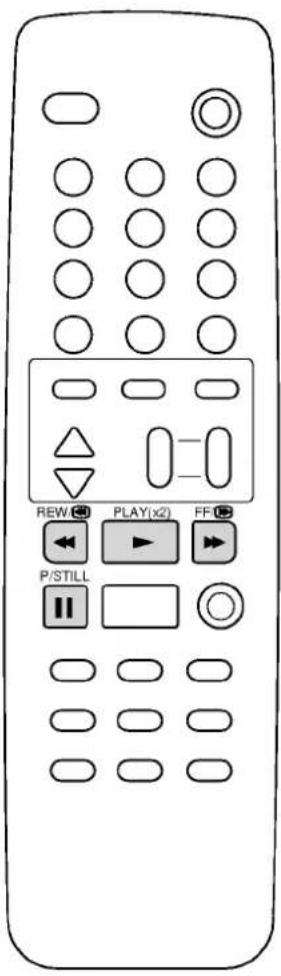
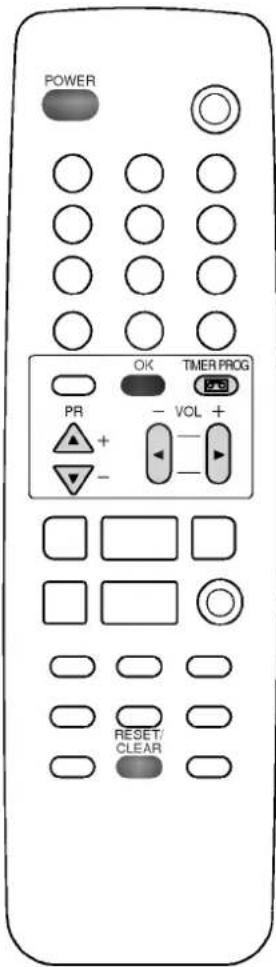
Remote control handset
Before you use the remote control handset, please install the batteries. See the next page.

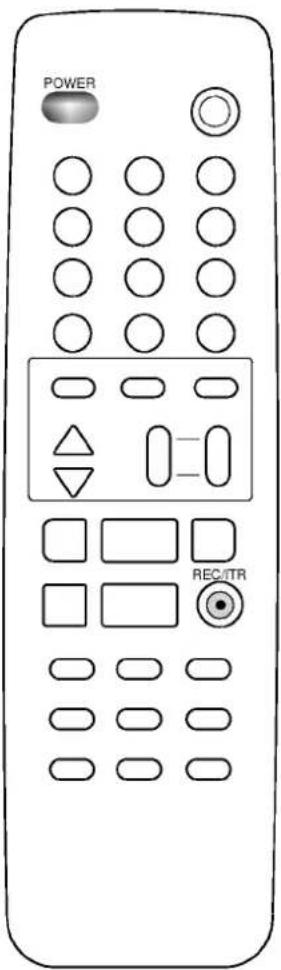
1. POWER
switches the set on from standby or off to standby.
2. NUMBER BUTTONS
select a programme or directly select a number.
3. MUTE
switches the sound on or off.
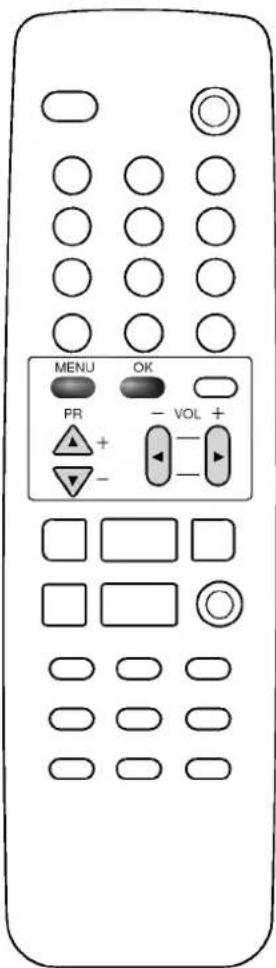
4. MENU
selects a menu.
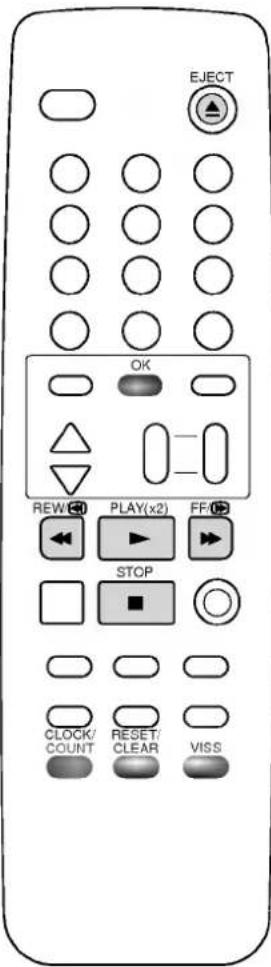
5. OK
accepts your selection or displays the current mode.
6. i a / i (PROGRAMME UP/DOWN)
switches the set on from standby. selects a programme or a menu item.
7. REW (REWIND/REVIEW)
rewinds the tape in the stop mode. reviews fast the tape during playback.
8. PLAY(x2)
plays back the tape at normal speed or twice speed.
9. PAUSE/ STILL
stops the tape temporarily during recording. displays a still picture during playback.
10. STOP
stops the tape.
11. SLEEP
sets the sleep timer.
12. TRK AUTO, +/-
adjust the picture automatically or manually during playback.
13. CLOCK/COUNT
displays the current time or tape counter.
14. RESET/CLEAR
resets the tape counter or clears a data in the Timer programme menu.
Location and function of controls
15. EJECT
ejects the tape.
16. TV/AV
selects a TV or AV mode.
17. TIMER PROG
displays the timer programme recording menu.
18. ♦,/♂" (VOLUME UP/DOWN)
adjusts the volume. adjusts menu settings.
19. FF (FAST FORWARD/CUE)
winds the tape forward in the stop mode. fast forward playback.
20. REC/ITR
starts a manual recording or instant timer recording.
21. QUICK VIEW
returns to the previously viewed programme.
22. SYSTEM
selects the desired colour system.
23. VISS
selects the VISS (VHS Index Search System) mode.
Battery installation
The remote control handset is powered by two AA type batteries. Gently pull down the cover of the remote control handset until the battery compartment is exposed. Install two batteries as indicated by the polarity symbols(S] and S^) marked inside the compartment.

natural_image
Diagram showing a device with a rectangular panel and two vertical cylindrical components, one with an arrow indicating direction (no text or symbols present)Note : To avoid damage from possible battery leakage, remove the batteries if you do not plan to use the remote control handset for an extended period of time.

Location and function of controls
Front panel
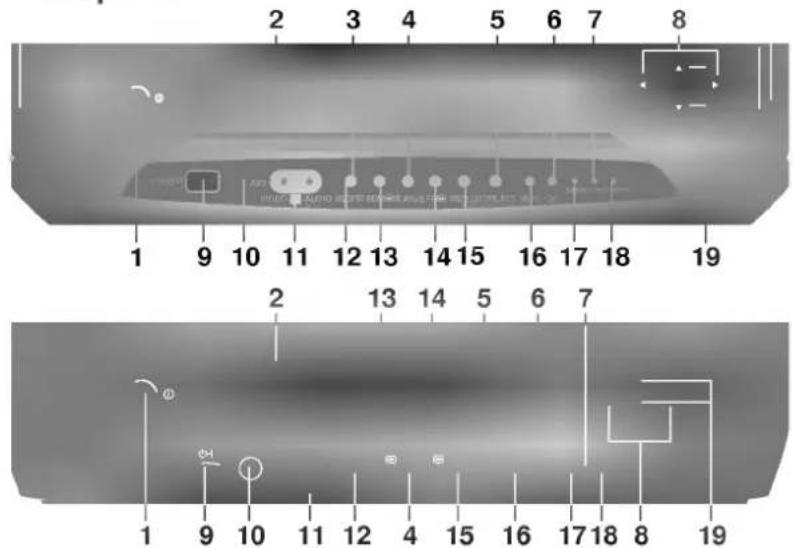
- MAIN POWER
switches the set on or off.
- CASSETTE COMPARTMENT
To insert a video cassette tape here.
- REC/ITR INDICATOR
illuminates red during recording.
- PLAY(x2)
plays back the tape at normal speed or twice speed.
- STOP/EJECT
stops the tape or ejects the tape.
- OK
accepts your selection or displays the current mode.
- TAPE-IN INDICATOR
illuminates green while a video cassette tape is inserted.
- VOLUME UP/DOWN
adjusts the volume.
adjusts menu settings.
- POWER
switches the set on from standby or off to standby.
-
REMOTE CONTROL SENSOR
-
AUDIO/VIDEO IN SOCKETS (AV2)
Connect the audio/video out sockets of the external VCR to these sockets.
- REC/ITR
starts a manual recording or instant timer recording.
- REW (REWIND/REVIEW)
rewinds the tape in the stop mode.
reviews fast the tape during playback.
- FF (FAST FORWARD/CUÊ)
winds the tape forward in the stop mode. fast forward playback.
- PAUSE/STILL
stops the tape temporarily during recording.
displays a still picture during playback.
- MÉNU
selects a menu.
- STANDBY INDICATOR
illuminates red when the set is in standby mode.
- TIMER REC INDICATOR
illuminates in standby mode when the timer programme is set for recording.
- PROGRAMME UP/DOWN
switches the set on from standby.
selects a programme or a menu item.
Basic operation
On and off
- Press the main power button to switch the set on.
- If the set is in standby mode, press the POWER (or ⏻-1) or ; a/; button to switch it on fully.
- Press the POWER (or ⏻-I) button. The set reverts to standby mode.
- Press the main power button again to switch the set off.
Note : If, while the set is switched on, the mains plug is disconnected the set will switch to standby when the mains plug is replaced in the mains power socket.
Programme selection
You can select a programme number with the ;a/; or NUMBER buttons.
Volume adjustment
Press the ♀,/♀" button to adjust the volume.
Mute function
Press the MUTE button. The sound is switched off and the display appears. You can cancel it by pressing the MUTE or ♦,/♦" button.
Quick view
Press the Q.VIEW button to view the last programme you were watching.
On screen language selection (option)
This is an optional function. In the models which have on screen language function, the menu can be displayed on the screen in English or Arabic. First select your language.
- Repeatedly press the MENU button to select MENU 3.
- Press the ;a/; button to select Language.
- Press the ♀,/♀" button to select the desired language. All the on screen displays will appear in the selected language.
- Press the OK button to return to normal TV viewing.
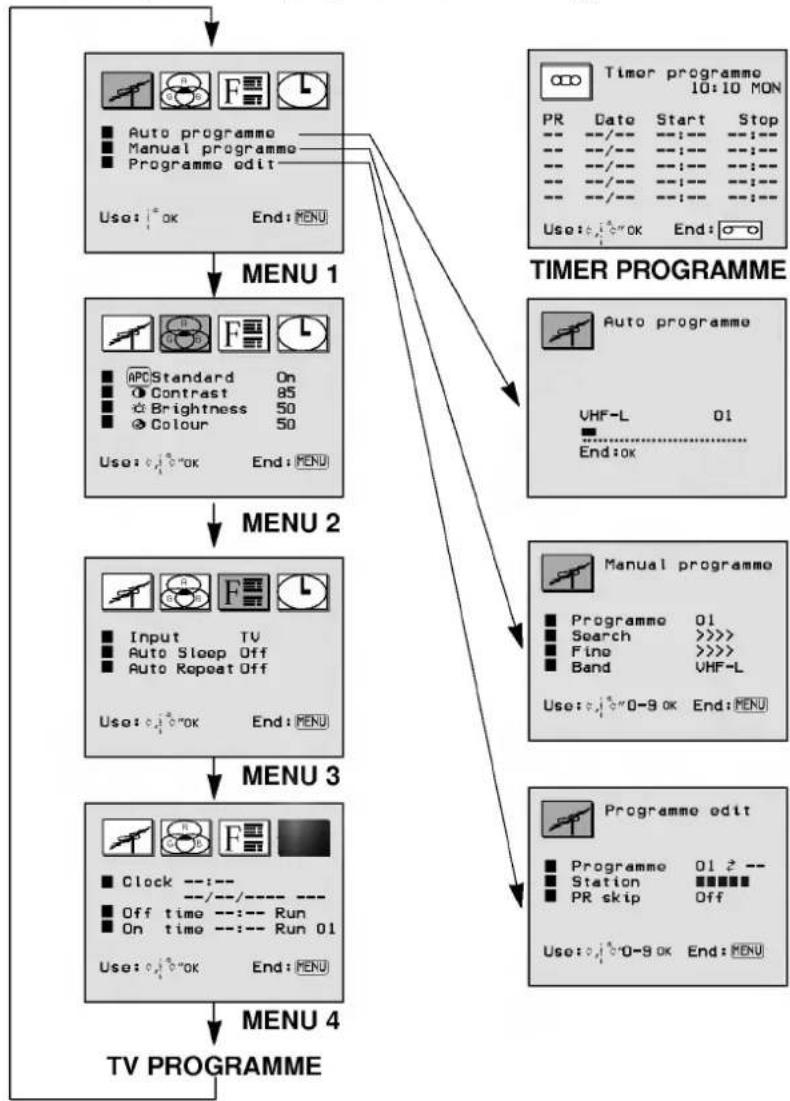
On screen menus
The dialogue between you and your set takes place on screen with an operator menu. The buttons required for the operating steps are also displayed.
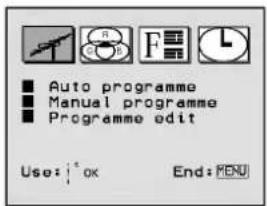
Menu selection
- Repeatedly press the MENU button to display each menu.
- Press the ;a/; button to select a menu item. The selected menu item changes from blue to purple.
- Press the ♦,/♂" button to set a menu item or OK button to display the sub menu.
Note :
a. The menus automatically disappear in about 12 seconds if you do not press a button. However if you press the MENU button again, the last selected menu will appear.
b. In the AV, playback or recording mode, MENU 1 is not displayed.
c. If you press the TIMER PROG button on the remote control handset, the Timer programme menu will appear.
flowchart
graph TD
A["TV PROGRAMME"] --> B["MENU 1"]
B --> C["MENU 2"]
C --> D["MENU 3"]
D --> E["TIMER PROGRAMME"]
E --> F["Output: PR Date Start Stop"]
F --> G["PR Use: Open End: Open"]
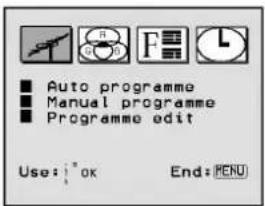
B --> H["Menu 1: Auto programme, Manual programme, Programme edit"]
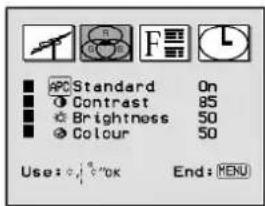
C --> I["Menu 2: APC Standard On, Contrast 85, Brightness 50, Colour 50, Use: Open End: Open"]
D --> J["Menu 3: Input TV, Auto Sleep Off, Auto Repeat Off, Use: Open End: Open"]
E --> K["Output: Manual programme: Programme 01 Search >>> Fine >>> Band VHF-L, Use: Open End: Open"]
F --> L["Output: Timer programme 10:10 MON"]
G --> M["Output: Timer programme 10:10 MON"]
H --> N["Output: Timer programme 10:10 MON"]
I --> O["Output: Timer programme 10:10 MON"]
J --> P["Output: Timer programme 10:10 MON"]
K --> Q["Output: Timer programme 10:10 MON"]
Setting up TV stations
Up to 100 TV stations can be stored in this set by programme numbers (00 to 99). Once you have preset the stations, you will be able to use the ;a/; or NUMBER buttons to scan the stations you programmed.
Stations can be tuned using an automatic or a manual mode.
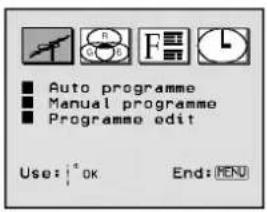
MENU 1
Auto programme tuning
All stations that can be received are stored by this method. It is recommended that you use auto programme during installation of this set.
- Repeatedly press the MENU button to select MENU 1.
- Press the ;a/; button to select Auto programme.
- Press the OK button to begin auto programming.
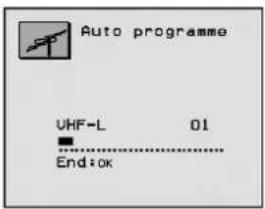
The band automatically changes VHF-L □A VHF-H □A UHF.
When auto programming is completed, the station stored into programme number 1 will appear on the screen.
To stop auto programming, press the OK button. The active programme at that time will be displayed.
Note : Some undesired stations may be stored, such as noisy or unclear signals from distant transmitters. You can easily skip these stations by entering Programme edit mode.
Setting up TV stations
MENU 1
Manual programme tuning
Manual programme lets you manually tune and arrange the stations in whatever order you desire.
- Repeatedly press the MENU button to select MENU 1.
- Press the ;a/; button to select Manual programme.
- Press the OK button to display the Manual programme mode.
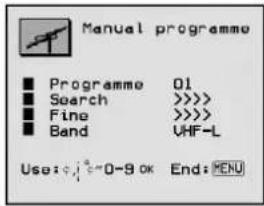
- Press the ;a/; button to select Programme. Select the desired programme number with the ¢,/¢" button or NUMBER buttons. Any number under 10 is entered with a numeric '0' in front of it, i.e. '05' for 5.
- Press the ;a/; button to select Band. Press the ¢,/¢" button to select VHF-L, VHF-H or UHF as required.
- Press the ;a/; button to select Search. Press the ¢,/¢" button to commence searching. If a station is found the search will stop.
- If this station is the one required press the OK button, if not press the ¢,/¢"button again.
- Press the OK button. The display Stored will appear.
- To store another station repeat steps 4 to 8.
- Repeatedly press the MENU button to return to normal TV viewing.
Fine tuning
Normally fine tuning is only necessary if reception is poor.
- Repeat steps 1 to 3 above.
- Press the ; a/; button to select Fine.
- Press the ♦,/♀" button to fine tune for the best picture and sound.
- Press the OK button. The display Stored will appear.
- Repeatedly press the MENU button to return to normal TV viewing.
The finely tuned programme will be indicated by yellow number during programme selection.
Setting up TV stations
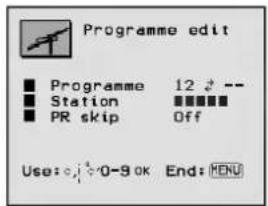
Programme edit
This function enables you to rearrange the programmes stored by auto programming in whatever order you desire. Also you can skip particular programme numbers stored by auto programming.
- Repeatedly press the MENU button to select MENU 1.
- Press the ;a/; button to select Programme edit.
- Press the OK button, and the Programme edit mode will appear.
Exchanging programmes
- Press the ♦,/♦" button to change the left hand programme number. The viewing station corresponding to the new programme number is shown on the screen.
- Press the NUMBER buttons to select the desired right hand programme number. Any number under 10 is entered with a numeric '0' in front of it, i.e. '05' for 5.
- Press the OK button. The station stored in the right hand programme number will now appear as the left hand programme number.
- Repeat steps 1 to 3 to exchange other programmes.
Assigning a station name
- Select the programme to which you want to assign a station name with the ¢,/¢" button.
- Press the ; a/; button to select Station.
- Enter a character position with the ¢, /¢" button.
- To select your desired first character, press the ; ^a button several times or continuously. The ■ will blink, followed by the alphabet A to Z, a to z, the numeric 0 to 9, -, +, . in turn. With the ; button you can select in the opposite direction.
- Select the next position by pressing the ♦" button and then take your choice of the second character, and so on.
- Press the OK button.
- Repeat steps 1 to 6 to assign another station name.

MENU 1
Setting up TV stations
MENU 1
Skipping a stored programme
- Press the ♦,/♦" button to select the programme you want to skip.
- Press the ; a/; button to select PR skip.
- Press the ¢,/¢"button to select On or Off. If you select On, the selected station is skipped.
- Press the OK button.
- Repeat steps 1 to 4 to skip another programme.

The selection of the skipped programme numbers with the NUMBER buttons is still possible and they will be indicated by blue numbers during programme selection.
Note : You cannot skip the programme number 1.
Auto AV setting (option)
In euro scart model, Auto AV On or Off appears.
If your external VCR outputs a switching voltage when it is switched to playback, select Auto AV On with the external VCR connected to Euro scart.
The set is automatically switched to AV1 mode when an AV signal is input. But if you want to keep on watching TV mode, set Auto AV to Off.
- Press the ♦,/♦" buttons to select your desired programme number.
- Press the ;a/; button to select Auto AV.
- Press the ¢,/¢"button to select On or Off.
- Press the OK button.
- Repeat steps 1 to 4 to set another programme.
Repeatedly press the MENU button to return to normal TV viewing.
Picture adjustment
Picture adjustment
You can adjust picture contrast, brightness, colour intensity and tint(NTSC AV only) to the levels you prefer.
- Repeatedly press the MENU button to select MENU 2.
- Press the ;a/; button to select the desired picture item.
- Press the ¢,/¢" button to make appropriate adjustments.
- Press the OK button to return to normal TV viewing.
MENU 2
Auto picture control
If you want to select the standard picture, select Standard On. The Standard picture is programmed for good picture reproduction at the factory and cannot be changed.
- Repeatedly press the MENU button to select MENU 2.
- Press the ;a/; button to select APC Standard.
- Press the ¢,/¢"button to select On.
- Press the OK button to return to normal TV viewing.
Other functions
MENU 3
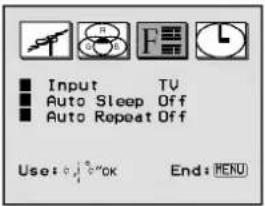
TV and AV modes
Inputs can be set for TV or AV mode. AV mode is used when an external VCR or other equipment is connected to the set.
Note : When an external equipment is connected via the aerial socket the set is used in TV mode. See the 'Connection of external equipment' section.
-
Repeatedly press the MENU button to select MENU 3.
-
Press the ;a/; button to select Input.
-
Press the ¢, /¢" button to select TV, AV1 or AV2.
The two AV modes are :
AV 1 : VCR connected to the AV1 sockets on the back
AV 2 : VCR connected to the AV2 sockets on the front
- Press the OK button.
Alternatively you can select the TV or AV mode by pressing the TV/AV button.
Auto sleep
If you select Auto Sleep On the set automatically switches itself to standby mode approximately 10 minutes after a TV station stops broadcasting.
-
Repeatedly press the MENU button to select MENU 3.
-
Press the ;a/; button to select Auto Sleep.
-
Press the ¢,/¢"button to select On.
-
Press the OK button to return to normal TV viewing.
Auto repeat
To play back the tape repeatedly, select Auto Repeat On.
- Repeatedly press the MENU button to select MENU 3.
- Press the ;a/; button to select Auto Repeat.
- Press the ♦,/¢"button to select On.
- Press the OK button to return to normal TV viewing.
Other functions
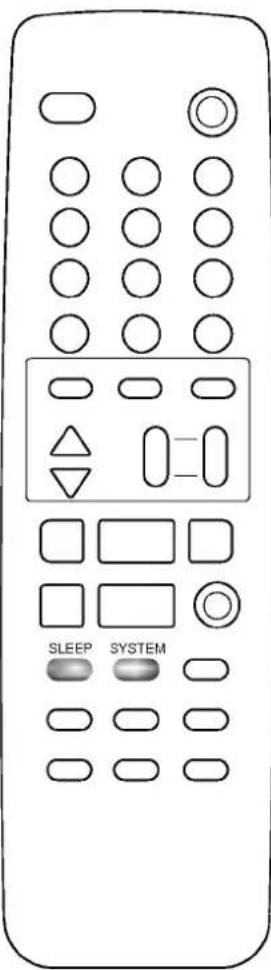
Colour system setting
You can adjust the colour system. Under normal circumstances, select AUTO. If necessary (if input signal is weak), change the colour system by using the instructions below.
- Press the SYSTEM button. The System mode will appear.
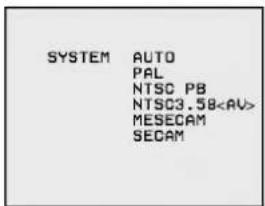
- Repeatedly press the SYSTEM button to select the correct system.
Option:
In some models, MESECAM/SECAM is an optional function. Only a set with MESECAM/SECAM can perform this function.
Note :
a. NTSC PB is for playback only. You cannot record NTSC signals.
b. NTSC3.58
c. If the picture is no colour during playing back a MESECAM video cassette tape in AUTO, select MESECAM instead of AUTO. In case of SECAM video cassette tape, select SECAM.
Sleep timer
You don't have to remember to switch the set off before you go to sleep. The sleep timer automatically switches the set to standby after the preset time elapses.
To select the number of minutes, repeatedly press the SLEEP button. -- will appear on the screen, followed by 180, 120, 90, 60, 30, 20 and 10.
The timer begins to count down from the number of minutes selected.
Note :
a. To view the remaining sleep time, press the SLEEP button once.
b. To cancel the sleep time, repeatedly press the SLEEP button until the display Sleep -- appears.
c. When you switch the set off, the set releases the preset sleep time.
Time setting
MENU 4
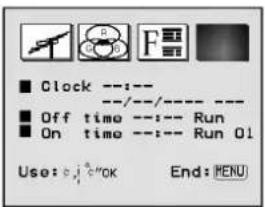
Clock
The clock uses the 24 hour system and must be set to the correct time before operating the set.
- Repeatedly press the MENU button to select MENU 4.
- Press the ;a/; button to select Clock.
- Select and adjust hour and minute by pressing the ♦,/♦" and ; a /; button.
- Select and adjust the day, the month and the year by pressing the ,/ '' and ;a/; button. The day of the week is automatically displayed.
- Press the OK button to start.
- Press the MENU button to return to normal TV viewing.
Note :
a. The clock operates for at least 10 minutes, if the power is switched off or there is a power interruption (disconnection or power failure).
b. If you have already set the timer programme, you cannot reset the clock.
On/off time
By using this function, the set automatically switches on or off at a preset time. You must set the time correctly before using on/off time function.
- Repeatedly press the MENU button to select MENU 4.
- Press the ;a/; button to select Off time or On time.
- Select and adjust hour and minute by pressing the ♦,/♦" and ;a /; button.
- Select and adjust Run or Hold by pressing the ¢,/¢" and ;a/; button.
- Select and adjust the programme number by pressing the ¢,/¢" and ;a/; button.
- Press the OK button to start.
- Press the MENU button to return to normal TV viewing.
For off time, please note the absence of programme number.
Note :
a. In the event of power interruption (disconnection or power failure), the clock must be reset.
b. If the same time is set for the on time and the off time, only the off time operates.
c. This set must be put into standby mode with the POWER button to operate the on time function.
d. If the on time function activates, the set will automatically switch to the on time programme number, even during viewing.
e. Two hours after the set is switched on by the on time function it will automatically switch back to standby mode unless a button has been pressed.
f. Once the on or off time is set, these functions operate daily at the preset time.
VCR operation
Playing tapes
To play back a tape which has no safety tab in position (this means you cannot record on to it): With the set in the standby mode, insert a VHS video cassette tape.
The set will at once switch itself on and perform the following sequence by itself:
PLAY □ASTOP □AREWIND □AEJECT
To play back a tape which has its safety tab in position (this means that you have recorded on it and left the tab untouched): With the set in the standby mode, insert a VHS video cassette tape.
Now you must press the PLAY(x2) button.
To stop playback, press the STOP/■ button.
To take out the tape, press the EJECT/▲ button.
Note :
a. During Timer programme set, if you try to insert a video cassette tape without a safety tab in standby mode, the tape will automatically be ejected.
b. If you have already set Auto Repeat to On in MENU 3, the tape will play back repeatedly.
c. On this set, only SP (Standard Play) speed is available.
Tape tracking control
Tracking ensures that the tape is correctly aligned with the playback head. It works only during playback and its principle purpose is to minimize picture shake and noise (fuzzy lines across the picture). It is adjusted automatically or manually.
Auto tracking
Whenever playback starts, auto tracking automatically adjusts the picture. The display □□□ ATRK will appear while the best picture is selected.
To reactivate auto tracking, press the AUTO TRK button on the remote control handset.
Manual tracking
You can manually adjust the picture by pressing the TRK +/- buttons.

VCR operation
Pause/still picture control
To temporarily stop playback, press the P/STILL button. A still picture and the display 📄 will appear on the screen.
To advance the picture frame by frame, repeatedly press the P/STILL button.
If a still picture lasts for more than five minutes, the set will switch to the stop mode to protect the tape and the video heads.
To restart play back, press the PLAY(x2) button.
To temporarily stop recording, press the P/ STILL button. The display ⬤ will appear. Press this button again to continue recording.
Fast forward, cue, rewind and review
Forward search
Press the FF/▶ button during playback.
The display ▶▶ will appear and the tape plays faster than normal speed. Press the PLAY(x2) button to return to normal speed.
Pressing and holding the FF/▶ button will cause the set to search the tape forward at very high speed while displaying the picture.
Release the FF/▶ button to return to normal speed.
Pressing the FF/▶ button in the stop mode winds the tape forward. Then the display ⏻ will appear on the screen.
If you press and hold the FF/▶ button in this mode, the searching picture will appear. This enables you to see what is on the tape. To return to the FF mode, release the FF/▶ button.
If the tape winds forward to the end, it will automatically stop, rewind to the beginning and then eject the tape.
Press the PLAY(x2) button twice.
The display ⏻¢'x2 will appear and the tape runs at twice play speed. Press the PLAY(x2) button again to return to normal speed.
Reverse search
Press the REW/◄◄ button during playback.
The display 📄 will appear and the tape will play in reverse faster than normal speed. Press the PLAY(x2) button to return to normal playback.
Pressing and holding the REW/◀ button will cause the set to search the tape backward at very high speed while displaying the picture. Release the REW/◀ button to return to normal playback.
Pressing the REW/◀ button in the stop mode winds the tape backward. Then the display 📄 will appear on the screen.
If you press and hold the REW/◀ button in this mode, the searching picture will appear. This enables you to see what is on the tape. To return to the REW mode, release the REW/◀ button.
Note : Sound is automatically muted during these operations.
VCR operation
Clock/count selection
Each time the CLOCK/COUNT button is pressed, the current time and the tape counter appears alternately.
The tape counter displays the tape travel time in hours, minutes and seconds during recording and playback.
Note : To reset the counter to M 0:00:00, press the RESET/CLEAR button.
Memory stop
The memory stop makes it easy to return to a particular spot on the tape after recording or playback. The tape automatically stops when the counter reaches M 0:00:00.
- Start recording or playback.
- Press the OK button twice to keep on displaying the current time or the tape counter.
- Press the CLOCK/COUNT button to display the tape counter.
- Press the RESET/CLEAR button at the point you want to review. The counter displays M 0:00:00.
- Press the STOP button when you finish recording or playing the tape.
- Press the REW/◄◄ button. The tape stops at the point M 0:00:00.
- Press the PLAY(x2) button to play back the tape.
VHS Index Search System (VISS)
VISS signal marks on the tape let you scan through the start of different programmes or search for a specific section of the tape.
Automatic VISS signal mark
A VISS signal is automatically marked on the tape whenever recording starts. The display V.MARK will appear.
Searching a particular VISS mark
- Press the VISS button during playback. The display VISS 00 will appear on the screen.
- Enter two digits with the NUMBER buttons to search for a specific section of the tape. For example, if the tape is at VISS 02 and you want to locate VISS 05, press 0 3.
- Press the REW/◄◄ button to search previous recorded programmes. Or press the FF/► button to search programmes further ahead. The display V.SEARCH 03 will appear on the screen.
When the specific section has been found, the tape plays back at normal speed.
Scanning each VISS mark
- Press the VISS button during playback.
- Press the REW/◄◄ or FF/►► button. The tape rewinds or advances rapidly to the next marked signal. Then the tape plays back for about 5 seconds. Each time VISS signal is detected and playback begins, the VISS scan number, for example V.SCAN 04, will appear on the screen.
- At the desired section, press the VISS button to play back at normal speed.
Recording
Manual recording
This is the function used to record a TV programme or signal from external equipment onto a video cassette tape. The set cannot record any programme in the NTSC system as the NTSC system is only for playback.
- Insert a tape with a safety tab into the cassette compartment.
- Press the REC/ITR button once. The display 🔍 🔍 ● appears on the screen. The REC/ITR indicator will illuminate.
- When the desired recording is completed, press the STOP button. If the tape reaches the end before you press the STOP button, the set automatically stops, rewinds to the beginning and ejects the tape.
Note :
a. If you try to record a tape without a safety tab, it will be automatically ejected to prevent accidental erasure. If you want to use the tape without the safety tab, stick a small piece of tape over the safety tab hole.
b. If you don't wish to monitor while recording, press the POWER button.
WARNING
Unauthorised recording of copyrighted programmes, films, video tape and other materials may infringe upon the right of copyright owners and be contrary to copyright laws.
Instant timer recording (ITR)
This function is convenient when you want to start recording immediately without going through the entire timer setting procedure. You don't have to set the time to use this function.
- Insert a tape with a safety tab.
-
Press the REC/ITR button twice. The display ⚙️ will appear. ITR 0:00
-
Repeatedly press the REC/ITR button to set the recording length, which appears on the screen. You can select up to 9 hours at 30-minute intervals.
After recording for the preset time, the set switches to standby.
To cancel the ITR function, press the REC/ITR button until the display ITR 0:00 appears.
Recording
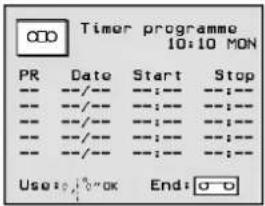
Timer programme setting
You can programme the set to start and end recording while you are away. Up to 5 recordings within one month can be programmed at the same time.
- Press the TIMER PROG button on the remote control handset to display the Timer programme menu. The current time and the day of the week automatically appears under the display Timer programme.
- Press the ;a/; button to select a recording item.
- Select the PR position with the ¢,/¢" button and adjust the programme number with the ;a/; button.
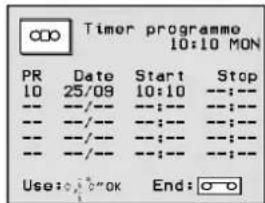
- Select the Date position with the , / '' button and adjust the day and the month with the ;a/; button. If the date is September 23, the Timer programme mode appears as shown below.
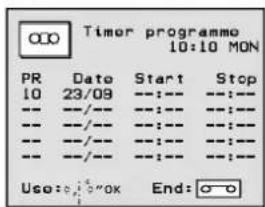
Each time you press the ; a button, the date changes as shown below.
24/09→25/09 ... 30/09→01/10→02/10 ... 23/10 Each time you press the ; button, the date changes as shown below.
Every DAY → Every SUN → Every MON … Every SAT SAT-SUN ← MON-FRI ← MON-SAT ←
- Select the Start position with the ¢,/¢"button.
Then adjust hour and minute with the ; a/; button.
- Select the Stop position with the ♦,/♦" button and adjust hour and minute with the ;a/; button.
- Press the OK button.
- Press the TIMER PROG button to return to normal TV viewing.
After you finish programming, insert a tape with a safety tab and press the POWER button to switch to standby mode. The TIMER REC indicator will illuminate.
Note :
a. If you want to cancel a timer programme, select the recording item with the ; ^a /; button, press the ¢/¢" button and then press the RESET/CLEAR button.
b. If you press the OK button after pressing an incorrect digit accidentally or setting the start and stop time that have already past, the recording will automatically be erased.
c. If the clock has not yet been set, when you try to set timer programme the MENU 4 will appear. Set the time and date before proceeding.
d. You can only display the Timer programme menu during a timer programme recording.
MENU 3
Connection of external equipment
You can connect additional equipment, such as external VCRs, camcorders, etc. to your set. Here shown may be somewhat different from your set.

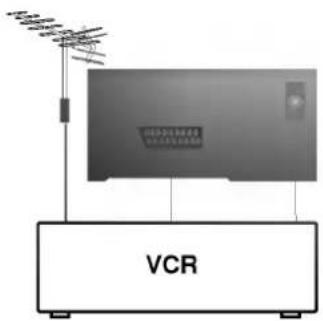
Aerial socket
- Connect the RF out socket of the external VCR to the aerial socket on the back of the set.
- Connect the aerial cable to the RF aerial in socket of the external VCR.
- Store the external VCR channel on a desired programme number using the 'Manual programme tuning' section.
- Select the programme number where the external VCR channel is stored.
- Press the PLAY button on the external VCR.
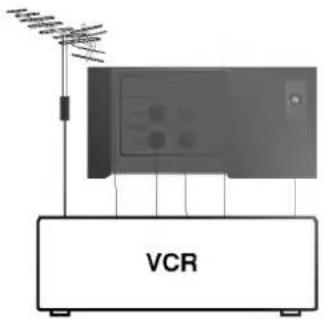
natural_image
Diagram of an electronic device labeled VCR with antenna and base (no readable text or symbols beyond label)Audio/Video in/out sockets (option)
- Connect the audio/video out sockets of the external VCR to audio/video in sockets of the set and in sockets of the VCR to out sockets of the set.
- Press the TV/AV button to select AV1.
- Press the PLAY button on the VCR.
The VCR playback picture appears on the screen.
You can also record programmes received by the TV on video tape via audio/video out sockets.
Euro scart socket (option)
- Connect the euro scart socket of the external VCR to the Euro scart socket 1 on the set.
- Press the PLAY button on the VCR.
If your external VCR outputs a switching voltage connect to Euro scart socket. If Auto AV On is selected, the set will switch to AV1 mode automatically.
Otherwise, press the TV/AV button on the remote control handset to select AV1. The external VCR playback picture appears on the screen.
You can also record programmes received by the TV on video tape.
You can dub the recording of the external VCR by pressing the REC/ITR button on the set or remote control handset.

Audio/Video in sockets
- Connect the audio/video out sockets of the external VCR to the audio/video sockets on the front.
- Press the TV/AV button to select AV2.
- Press the PLAY button on the external VCR. The external VCR playback picture appears on the screen.
Troubleshooting check list
IN TV/VCR RECEPTION
| Symptoms | Check Points |
| No picture or sound | Make sure the unit is plugged into a working AC power socket.Check that the power is switched to 'ON'.Check aerial is properly connected along with any other connections. If an indoor aerial is used, see it is pointing in the right direction. |
| Picture OK; sound poor | Check aerial is properly connected, If an indoor aerial is used, see it is pointing in the right direction.Adjust the volume. |
| Sound OK; no picture | Try another channel: it might be a transmitter fault.Adjust the picture. |
| Picture faint or blurred | Check aerial is properly connected. If an indoor aerial is used, see it is pointing in the right direction.Adjust the CONTRAST control. |
| Picture rolls vertically | Check aerial is properly connected. If an indoor aerial is used, see it is pointing in the right direction. |
| Ghosts or multiple images | Check aerial is properly connected. If an indoor aerial is used, see it is pointing in the right direction.Suspect reception interference and fit a directional or external aerial. |
| Wrong colour or no colour | Adjust the COLOUR control. With NTSC AV, try adjusting the TINT control. |
| No response to pressing front control buttons | Press the buttons again carefully. If no response, unplug the set from the mains socket, and then plug it in and try again. |
| No response to remote control | Check the batteries are fitted in right way round.Replace the batteries. |
IN TV/VCR OPERATION
| Symptoms | Check Points |
| The tape insertion is impossible | Insert the tape with the window side up and the safety tab facing you.See that there isn't a tape in the machine already. |
| Nothing happens when buttons are pressed | There is something programmed into the memory: cancel the set 'STOP' time. |
| Auto play function won't work | Check that the safety tab on the video cassette tape is removed. |
| TV programmes cannot be recorded | Have you tuned the set's channels properly?See that the safety tab on the video cassette is still intact.Check the aerial and its connections. |
| Timer recording can't be done | Set the recording start/stop time correctly.Has there been a power supply interruption before or during Timer recording? If so, the timer will have lost details of the instructions you gave it and it will not function.Try reprogramming again. |
| There is no picture in playback: the playback picture is of poor quality or is streaky | Check that the video cassette tape has been recorded on.Adjust the Tracking Control (This should remove 'streaks')Clean the Heads of TVCR. |
| VCR does not operate | Reconnect the mains plug to a power socket: reset programmes (problem caused by a power interruption).Check that you set the proper 'START' time. |
| Video cassette tape jammed in its slot | If the tape is inserted the wrong way it may become stuck. Wait a few seconds to see if the machine will automatically eject it. If it does not, and the machine stops working, on no account try free it but contact your local dealer. |
- LG
- Colour TVCR OWNER'S MANUAL
- Contents
- Installation 3
- Location and function of controls 4
- Basic operation 7
- On screen menus 8
- Setting up TV stations 9
- Picture adjustment 13
- Other functions 14
- Time setting 16
- VCR operation 17
- Recording 20
- Connection of external equipment 22
- Troubleshooting check list 23
- Installation
- Power
- Warning
- Service
- Aerial
- Location
- Location and function of controls
- Remote control handset
- POWER
- NUMBER BUTTONS
- MUTE
- MENU
- OK
- i a / i (PROGRAMME UP/DOWN)
- REW (REWIND/REVIEW)
- PLAY(x2)
- PAUSE/ STILL
- STOP
- SLEEP
- TRK AUTO, +/-
- CLOCK/COUNT
- RESET/CLEAR
- EJECT
- TV/AV
- TIMER PROG
- ♦,/♂" (VOLUME UP/DOWN)
- FF (FAST FORWARD/CUE)
- REC/ITR
- QUICK VIEW
- SYSTEM
- VISS
- Battery installation
- Basic operation
- On and off
- Programme selection
- Volume adjustment
- Mute function
- Quick view
- On screen language selection (option)
- On screen menus
- Menu selection
- Note :
- Setting up TV stations
- Auto programme tuning
- MENU 1
- Manual programme tuning
- Fine tuning
- Programme edit
- Exchanging programmes
- Assigning a station name
- Skipping a stored programme
- Auto AV setting (option)
- Picture adjustment
- Auto picture control
- Other functions
- MENU 3
- TV and AV modes
- Auto sleep
- Auto repeat
- Colour system setting
- Option:
- Sleep timer
- Time setting
- Clock
- On/off time
- VCR operation
- Playing tapes
- Tape tracking control
- Auto tracking
- Manual tracking
- Pause/still picture control
- Fast forward, cue, rewind and review
- Forward search
- Reverse search
- Clock/count selection
- Memory stop
- VHS Index Search System (VISS)
- Automatic VISS signal mark
- Searching a particular VISS mark
- Scanning each VISS mark
- Recording
- Manual recording
- Instant timer recording (ITR)
- Timer programme setting
- Connection of external equipment
- Aerial socket
- Audio/Video in/out sockets (option)
- Euro scart socket (option)
- Audio/Video in sockets
- Troubleshooting check list
Mærke : LG
Model : KF-21U40
Kategori : Fjernsyn