
Professional D - Støvsuger Sebo - Gratis brugsanvisning og manual
Find enhedens vejledning gratis Professional D Sebo i PDF-format.

Brugerspørgsmål om Professional D Sebo
0 spørgsmål om dette apparat. Besvar dem du kender, eller stil dit eget.
Stil et nyt spørgsmål om dette apparat
Download vejledningen til din Støvsuger i PDF-format gratis! Find din vejledning Professional D - Sebo og tag din elektroniske enhed tilbage i hånden. På denne side er alle dokumenter nødvendige for brugen af din enhed offentliggjort. Professional D af mærket Sebo.
BRUGSANVISNING Professional D Sebo
GEBRAUCHSANWEISUNG / INSTRUCTION MANUAL

natural_image
Illustration of two vacuum cleaner machines with coiled tubing, shown from different angles (no text or symbols present)Inhaltsverzeichnis C
Seite
A. CZubehör ....3
B. CService-Teile ....3
-
CSicherheitshinweise ....4
-
CHinweis zur Entsorgung ....5
-
CGerätebeschreibung ....6
-
Clnbetriebnahme ....6
-
CHandhabung ....7
-
CBodendüsen und Elektroteppichbürsten......8
-
CWartung und Pflege 9
-
CTechnische Daten ....12
Table of contents
A. CAttachments ....3
B. CService Parts ....3
-
CSafety Instructions ....4
-
CNote on Disposal ....5
-
CMachine Description ....6
-
CAssembly 6
-
COperating Instructions ....7
-
CFloor Cleaning Heads 8
-
CMaintenance and Servicing....9
-
CTechnical Details ......12
text_image
A 1 2 3 4 5 6 7 8 9 10 11 12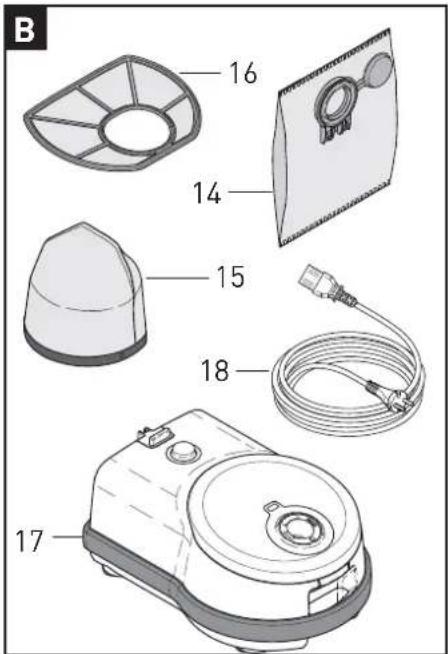
text_image
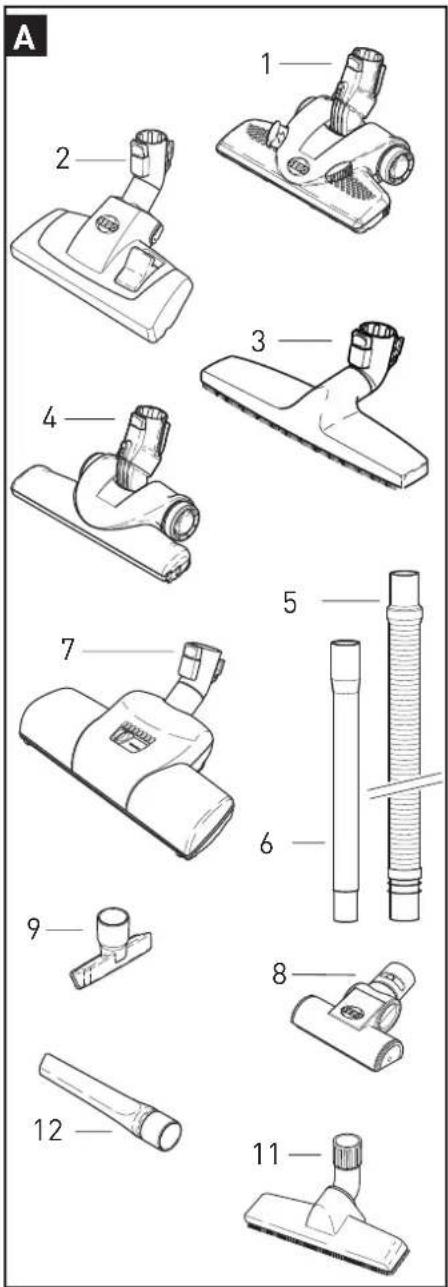
B 16 14 15 18 17A. AZubehör
1 A7260GS ASEBO KOMBI
2 A1397gs AStandard-Kombibodendüse
3 A8118ER AStandarddüse
4 A7200GS ASEBO PARQUET
5 1495ER AVerlängerungsschlauch
6 A1084gs AVerlängerungsrohr
7 A6780ER ATurbobürste SEBO TT-C
8 A6179ER APolsterturbobürste
A ASEBO PT-C
9 A8142gs APolsterdüse
11 1325gs AWand- und Polsterdüse
12 A8066gs AFugendüse
A6140 ATurbobürste SEBO TT-C
A Ahellgrau
B. AService-Teile
14 A8120SE SEBO Filterbox D mit
A A8 x Ultra-Bag ^TM Filtertüte
15 A8026ER A1x Hospital-Grade-Filter D
16 A8022ER A1x Motorschutzfilter D
17 A6047ER AAirbelt Stoßschutz
18 A819001 AAnschlußleitung mit
A AKonturenstecker
A. AAttachments
1 A7260GS ASEBO Kombi
2 A1397gs AVario Kombi
3 8118ER Standard Brush
4 A7200GS ASEBO Parquet
5 A1495ER AExtension Hose
6 A1084gs AStraight Tube
7 A6780ER AFloor Turbo Brush
A ASEBO TT-C
8 6179ER AStairs & Upholstery Turbo
A ABrush SEBO PT-C
9 A8142gs AUpholstery Nozzle
11 A1325gs AFloor and Wall Brush
12 A8066gs ACrevice Nozzle
6140 SEBO Turbo brush
A Alight grey
B. AService Parts
14 A8120SE ASEBO filter box D incl.
A A8 x Ultra Bag ™ Filterbag
15 8026ER A1x Hospital-Grade-Filter D
16 8022ER A1x Motor filter D
17 A6047ER AAirbelt bumper guard
18 819002 Mains cable GB plug

Lesen Sie bitte diese Gebrauchsanweisung auf- merksam durch und beachten Sie die darin ent- haltenen Sicherheits- und Warnhinweise, bevor Sie Bden BStaubsauger Bin BBetrieb Bnehmen. BB bewahren BSie Bdie BGebrauchsanweisung Bunbedingt auf.
Vielen Dank, dass Sie sich für einen SEBO entschieden haben. Wir sind sicher, dass Sie viel Freude an diesem Gerät haben werden. Für Ihre Hinweise und Wünsche stehen wir Ihnen gerne www.sebo.de zur Verfügung.
Ihr neuer SEBO ist ein hochwertiges, langlebiges und innovatives Produkt, das nach neuester Technologie in Deutschland entwickelt und gefertigt wird. Seine effiziente Saugleistung und sein serienmäßig integriertes dreistufiges Filtrationssystem bieten Ihnen außergewöhnlich hohe Standards. Erleben Sie selbst das professionelle Saugerlebnis!
1. Sicherheitshinweise
Die Gebrauchsanweisung bitte gut aufbewahren. Wird der Staubsauger an Dritte weitergegeben, muss unbedingt die Gebrauchsanweisung mit übergeben werden.
Die CBenutzung Cdes CGerätes Cgeschieht Cauf Ceigene CVe wortung. Der Hersteller haftet nicht für Schäden, die durch falsche Bedienung oder nicht bestimmungsgemäßen Gebrauch verursacht werden.
Bestimmungsgemäße Verwendung
Dieses Gerät kann von Kindern Cab C8 CJahren und darüber und Cvon CPersonen Cmit Cverringerten Cphysischen, Csenschen Coder Cmentalen Fähigkeiten oder CMangel Can CErfarung Cund/oder CWissen Cbenutzt Cwerden, Cwenn Csie Cbesichtigt werden oder bezüglich des sicheren Gebrauchs des Gerätes unterwiesen wurden und die daraus resultierenden Gefahren verstanden haben. Kinder dürfen nicht mit Cdem Gerät spielen. Reinigung und Benutzerwartung dürfen nicht durch Kinder ohne Beaufsichtigung durchgeführt werden.
Den Staubsauger nur an den vorgesehenen Griffen transportieren und bedienen. Handgriff während des Betriebes stets festhalten. Das Gerät erst abstellen sobald die rotierende Bürste* komplett zum Stillstand gekommen ist, der Netzschalter ausgeschaltet und Cder CNetzstecker Cgezogen wurde
Vor allen Arbeiten am Staubsauger:
Erst Cdas CGerät Causschalten Cund Cden CNetzstecker Cz Reparaturen Cund CErsatzteileaustausch Cam CStaubsaugen dürfen nur von Fachkräften ausgeführt werden.
Niemals bei angeschlossenem oder laufendem Gerät an die Bürste der SEBO PT-C*, SEBO TT-C*. Es besteht Verletzungsgefahr durch Einklemmung.

Please read these instructions carefully before using the machine and save them for future reference.
Thank you for choosing SEBO. Your new SEBO is an innovative, high quality product that has been developed and made in Germany utilising the most modern technology. The S-Class filter system and superb cleaning power ensure the highest standards of cleanliness for your home.
To ensure you get the most from your SEBO vacuum cleaner, please take time to read these instructions. We value your feedback and if you have any suggestions, please contact us at www.sebo.co.uk.
1. Safety Instructions
Please save these instructions. If you pass this vacuum to a third party, please pass these on as well. The use of the machine is at your own risk. The manufacturer/supplier is not liable for any injury or damage caused by incorrect usage of the machine.
This appliance can be used by children aged from 8 years and above and persons with reduced physical, sensory or mental capabilities or lack of experience and knowledge if they are given supervision or instruction concerning use of the appliance in a safe way and understand the hazards involved. CChildren Cshould Cnot Cplay Cwith Cthe Cappliance Cleaning Cand Cuser Cmaintenance Cshould Cnot Cbe done C children without strict supervision.
Only carry the vacuum cleaner by the carry handle. Always hold the hose handle when operating the vacuum cleaner. When you finish or interrupt your work, always turn off, unplug the Cmachine Cand Censure the rotating brush has stopped.*
Always turn off and unplug the machine before undertaking Cany Cmaintenance. CALL Crepairs Cwithin Cthe Cguarant period should be performed by an authorized SEBO ser - vice representative.
If Cyour CSEBO Cvacuum Ccleaner Chas Ca CSEBO CPT-C Ctu brush or a SEBO TT-C turbo brush please do not touch the brush when it is turning as this will cause a risk of in - jury to the fingers.
*depending on model
Sicherer Gebrauch
→ Vor Inbetriebnahme des Staubsaugers ist dieser auf sichtbare Schäden zu untersuchen und bei Beschädigung nicht in Betrieb zu nehmen.
→ Menschen oder Tiere nicht ab- bzw. aufsaugen.
→ Nicht zur Aufnahme von gefährlichem oder gesundheitsgefährdenden Staub geeignet.
→ Keine leicht entflammbaren, explosiven und gesundheitsschädlichen Stoffe oder Gase aufsaugen. Nichts Glühendes oder Heißes aufsaugen.

Dieser BStaubsauger Bist Bnur Bzur BTrockenanwendung Bb stimmt und darf nicht im Freien und unter nassen Bedingungen verwendet oder aufbewahrt werden.
→ Achten Sie auf einen sicheren Stand des Staubsauger und wickeln Sie die Netzanschlussleitung nach dem Betrieb wieder auf, da durch sie eine Stolpergefahr für Personen entsteht.
→ Den Staubsauger nur gemäß der Anschlusswerte des Typenschildes anschließen und betreiben. (Das Typenschild befindet sich auf der Unterseite des Gerätes)
Die Netzanschlussleitung ist regelmäßig auf Beschädigung zu untersuchen, wie z.B. Rissbildung oder Alterung. Falls eine Beschädigung festgestellt wird, muss diese Leitung vor weiterem Gebrauch des Staubsaugers ersetzt werden, um Gefährdungen zu vermeiden. Hierzu darf nur der vom Hersteller festgelegte Leitungstyp verwendet werden.
→ Benutzen Sie das Anschlusskabel oder den Saugschlauch nicht zum Tragen des Gerätes.
→ Netzstecker nicht am Kabel aus der Steckdose ziehen.
→ Netzkabel von scharfen Kanten fern halten.
→ Achten sie darauf, dass das Netzkabel niemals eingequetscht wird.
→ Den Staubsauger niemals ohne Filtertüte bzw. Filter benutzen. Der Filterdeckel schließt nur mit korrekt eingesetzter Filtertüte. Wenden sie keine Gewalt an.
→ Beobachten Sie die Füllanzeige des Staubbeutels und wechseln Sie diesen bitte rechtzeitig.
→ Motorschutz- und Abluftfilter bei Verschmutzung, spätestens aber nach 16 Filtertüten wechseln, um die optimale Saugleistung zu erhalten.
→ Vor Hitzequellen, Feuchtigkeit und Wasser schützen und nur trocken oder mit einem leicht feuchten Tuch reinigen.

Der BStaubsauger Bdarf Bnur Bmit Boriginal BSEBO BFiltertüten und original SEBO Ersatz- und Verschleißteilen betrieben werden. Nur die Verwendung von Originalteilen für dieses Produkt berechtigt zu Garantieleistungen und gewährleistet Bdie BBetriebssicherheit Bdes BGerätes. BÄnderungen Bam Staubsauger sind nicht zulässig.
2. Hinweis zur Entsorgung
Elektroaltgeräte gehören nicht in den Restmüll. Sie können dieses Gerät kostenlos an jeder öffentlichen Sammelstelle abgeben. Weitere Informationen erhalten Sie durch Ihre Kommune.
→ Before plugging in the vacuum cleaner, always check for any signs of damage, especially to the mains cable. Do not use a damaged machine.
→ Do not connect a damaged appliance to the power supply.
→ With the machine unplugged, inspect the mains cable at regular intervals for damage or signs of wear, especially if it has been trapped, crushed or in contact with sharp edges.
→ If the mains cable is damaged it must be replaced with a genuine SEBO part.
→ Do not use on people or animals.
→ This machine must not be used for picking up hazardous or harmful dust.
→ Do not use in the presence of flammable, explosive or harmful materials and gases.
Do not pick up hot material, such as fire ash.
→ Ensure that the connection data on the data label (voltage and frequency) match the mains electricity supply. The data label is on the bottom of the machine.
→ Always stand the machine on a stable surface. Rewind the mains cable if the machine is not in use to reduce the risk of tripping.

Use Bon Bdry Bsurfaces Bonly. BDo Bnot Bstore Boutdoors Bor E damp conditions.
→ Do not carry the vacuum cleaner by the cable or hose.
→ Only disconnect from the socket by pulling the plug.
→ Keep the cable away from sharp edges and prevent it becoming trapped, crushed or overstretched.
→ Do not use the vacuum cleaner without the filter bag or filters. If a filter bag is not fitted, the cover will not close. Never force it.
→ Inspect the filter bag indicator regularly and change the filter bag when necessary. We recommend changing all filters regularly, either when they have become dirty, or once 16 filter bags have been used.
→ Electrical appliance, do not expose to liquid, moisture or heat.
→ Only clean with a dry or slightly damp cloth.

This Bmachine Bshould Bonly Bbe Boperated Bwith Bgenuine SEBO filter bags, filters and replacement parts. The use of Bnon-genuine Bparts Bwill Bwaive Bthe Bwarranty Bfor Bthi product and could pose a serious safety risk
Attachments
Use only genuine SEBO Attachments.
2. Note on Disposal

For advice on disposal of used appliances, please contact your local authority.
text_image
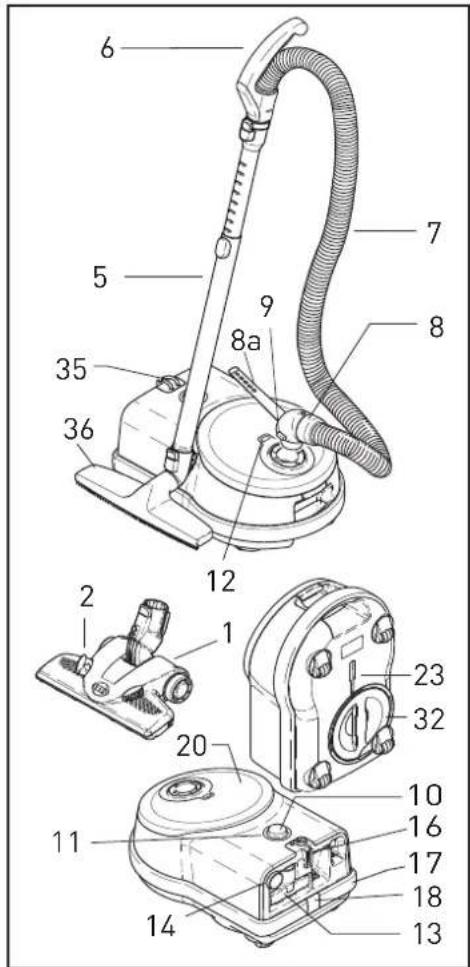
6 5 35 36 9 8a 12 2 1 20 11 14 7 8 23 32 10 16 17 18 133. Gerätebeschreibung
1 ASEBO KOMBI*
2 AFußschieber*
5 AEdelstahl-Teleskoprohr
6 AHandgriff
7 ASchlauch
8 ASchlauchstutzen
8a ALasche
9 AKnopf
10 ASchaltknopf mit
ALleistungsregulierung
11 ABetriebsanzeige
12 AFilteranzeige
13 APolsterdüse
14 AFugendüse
16 AParkhilfe
17 AAirbelt Stoßschutz
18 AClip
20 AFilterdeckel
23 AAbstellhilfe
32 AFilterhalter
35 AKabelhaken
36 AStandarddüse*
* je nach Modell
text_image
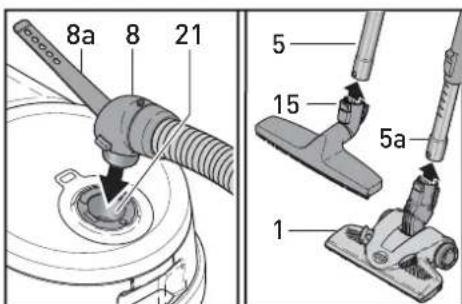
8a 8 21 5 15 5a 14. Alnbetriebnahme
Stecken Sie den Schlauchstutzen (8) in den Sauganschluss (21) bis er ein rastet. Schieben Sie eine SEBO Bo dendüse bis zur Rastung auf das untere Ende des Teleskoprohres (5a). Stecken Sie nun den Handgriff (6) in die andere Seite des Teleskoprohres (5) ein.
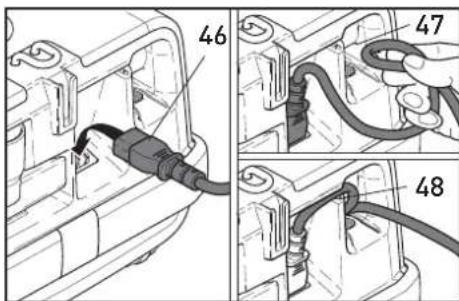
text_image
46 47 48Zur Montage der Anschlussleitung setzen Sie den Kaltstecker (46) in die Buchse ein. Führen Sie die Anschlussleitung anschließend in die Zugentlastung (47) ein, bis es hörbar einrastet. Drücken Sie die Anschlussleitung nun in die Führungsschiene (48) zwischen der Buchse und der Zugentlastung ein.
text_image
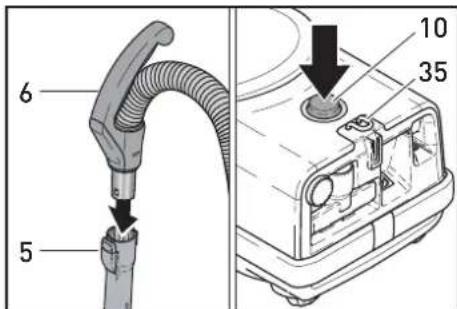
6 5 10 353. AMachine Description
1 SEBO Kombi*
2 A Hard floor/carpet Slider*
5 A Telescopic Tube
6 A Hose handle
7 A Hose
8 A Hose end
8a A Cable strap
9 A Catch
10 A On/Off knob with A power control
11 LED light
12 A Bag full indicator
13 A Upholstery Nozzle
14 A Crevice Nozzle
16 A Parking groove
17 A Airbelt bumper
18 A Clip
20 A Filter bag cover
23 A Carrying /Parking groove
32 A Filter holder
35 A Cable hook
36 A Standard Brush*
* Depending on model.
4. AAssembly
Push the hose end (8) into the neck (21). Push a SEBO floor head onto the lower end of the telescopic tube (5a) until it locks. Insert the telescopic tube (5) onto the hose handle (6) until it locks into place.
To assemble the mains cable to the machine, push the rubber plug (46) of the cable into the socket of the machine. Once the plug is fully connected to the socket, please insert the mains cable into the cable cleat (47). You can hear a „click“ when the mains cable is fully inserted. Finally insert the mains cable into the channel (48) which you will find between the machine socket and cable cleat.
text_image
22 22 5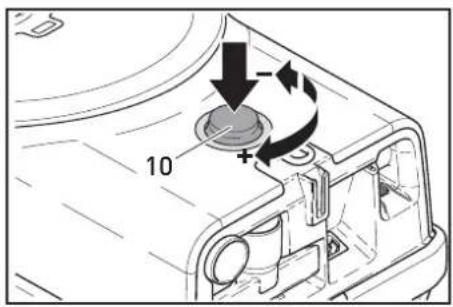
text_image
10 + -
text_image
5 14 6 13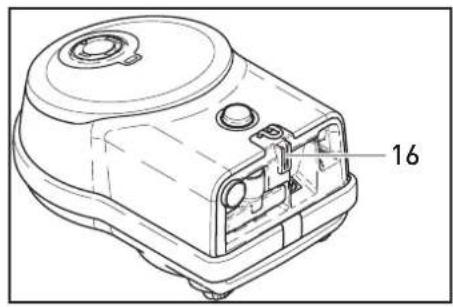
natural_image
Technical line drawing of a mechanical component with labeled part 16 (no text or symbols beyond label)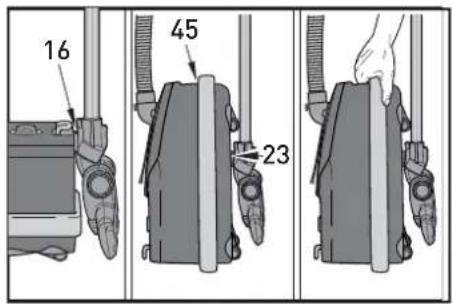
text_image
16 45 23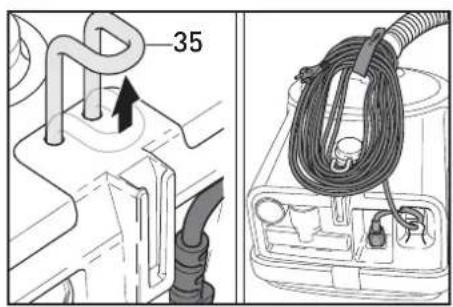
text_image
355. Handhabung
Stellen Sie sicher, dass der Schaltknopf (10) ausgeschaltet ist. Danach die Anschlussleitung abwickeln und den Netzstecker einstecken.
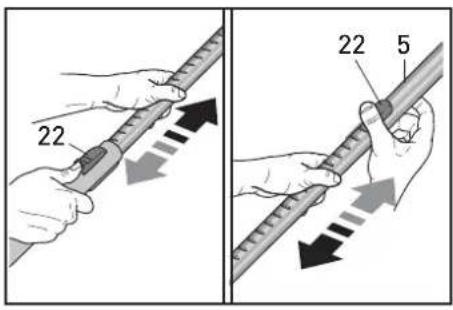
Das Teleskoprohr (5) sollte vor Arbeitsbeginn auf die gewünschte Arbeitshöhe eingestellt werden. Betäti gen Sie dazu die Schiebetaste (22). Das Teleskoprohr (5) sollte vor Arbeitsbeginn auf die gewünschte Arbeitshöhe eingestellt werden. Betätigen Sie dazu die Schiebetaste (22).
Schalten Sie nun das Gerät durch Drücken des Schaltknopfes (10) ein. Die gewünschte Saugkraft können Sie durch Drehen des Schaltknopfes (10) am Gerät von min. bis max. regulieren.
Ihr SEBO PROFESSIONAL D ist mit einer Fugendüse und einer Polsterdüse aus gestattet. Das Zubehör ist hinten am Gerät eingesteckt und passt sowohl auf das Teleskoprohr (5a) als auch auf den Handgriff (6).
Für kurze Saugpausen können Sie das Saugrohr mit der Bodendüse in der Parkhilfe (16) am Heck des Staubsaugers oder nach beendeter Arbeit in die Abstellhilfe (23) an der Unterseite des Gerätes einstecken. Der praktische Tragegriff (45) ermöglicht Ihnen je derzeit ein komfortables Tragen des Gerätes.
Nach Ende des Gebrauchs, das Gerät durch Drücken des Schaltknopfes (10) ausschalten. Ziehen Sie dann den Netzstecker aus der Steckdose und wickeln Sie die Anschlussleitung wieder auf. Ziehen Sie nun die aufgewickelte Anschlussleitung über den Kabelhaken (35) und fixieren Sie das andere Ende der Anschlussleitung mit der Lasche am Schlauchstutzen.
5. Operating Instructions
Please ensure that the on / off knob (10) is in the off position, unwind the mains cable und plug the cable into the mains socket. Before you start working adjust the telescopic tube (5). Use the slide button (22) to adjust the height of the telescopic tube. Start the machine by pressing the on/ off knob (10). To adjust the suction power, rotate the on / off power control knob (10).
The upholstery and crevice upholstery nozzles are located in the rear of the machine, and fit on to the hose handle (6) as well as on to the telescopic tube (5a).
When the vacuum cleaner is not in use, the telescopic tube with floor attachment can be parked in the parking groove (16) on the rear of the machine. For carrying the machine, the telescopic tube with floor attachment can be fitted into the carrying groove (23) on the underside. Push the on / off knob (10) to switch off the machine after use. Pull the plug out of the socket, wind the mains cable between the metal cable hook (35) and the cable strap fitted to the hose end and close the strap.
text_image
3 4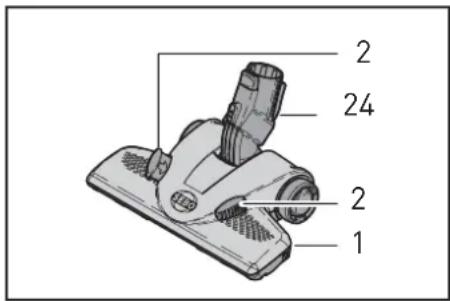
text_image
2 24 2 1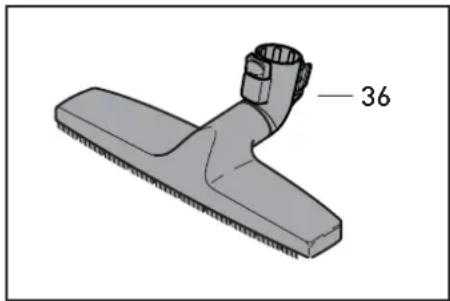
natural_image
3D diagram of a mechanical component with a labeled part (36), no text or symbols present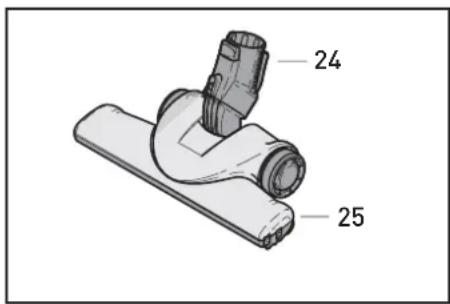
text_image
24 25- CBodendüsen Cund CElek troteppichbürsten
Standard-Kombibodendüse\*(3) / SEBO KOMBI\*(1):
Die Cespezielle CKombibodendüse SEBO KOMBI* (1) bietet mit ihrem einzigartigen CDreh-Kipp-Gelenk (24) Cgrößten CSaugkomfort. CDiese Düse Cverfügt Cüber Ceinen Cfederrnd gelagerten CNaturborstenstreifen, der Czudem Ceinfach Causwechselbar ist. Sie ist zusätzlich mit eingelassenen CVerschleißbügeln Cund einem CBodenblech Caus CEdelstahl für Chohe CBbeanspruchung Causgestattet.
Die SEBO KOMBI(1) bzw. die Standard-Kombibodendüse (3) können Sie Cjeweils Cmit Cden CFußrasten C(bzw. 4) nach Bedarf auf Hartboden (Borsten Craus) Cund CTeppichboden (Borsten rein) einstellen.
SEBO PARQUET (25)/Standarddüse (36)\*:
Die Standarddüse ist insbesondere für Hartböden geeignet. Mit einer Arbeitsbreite von 32 cm ist sie flexibel einsetzbar.
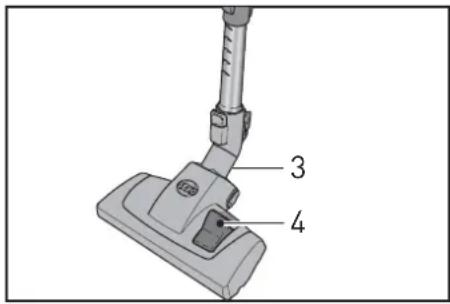
Die SEBO PARQUET ist speziell für Parkettböden und andere empfindliche, glatte Hartböden entwickelt worden. Ausgestattet mit dem gleichen wendigen Dreh-Kipp-Gelenk (24) wie die SEBO KOMBI und vier Laufrollen lässt sich die SEBO PARQUET Cganz Cleicht Cführen. CS verfügt Czudem Cüber Czwei Cfeder gelagerte CNaturborstenstreifen, die problemlos ausgetauscht werden können.
6. Floor Cleaning Heads
Vario Kombi\*(3) / SEBO Kombi\*(1):
The CSEBO AKombi C(1) Cis Cequipped with the unique double-jointed "flex" Cneck C(24) Cand Coffers Ca Cfu range of manoeuvrability. It has natural bristles that can be easily replaced if worn out. Furthermore this Chead Cis Cequipped Cwith Cheavy Cduty Cembedded Cstainless Csteel clamps and bottom plate for durability.
The CSEBO AKombi C(1) Cor the Va- rio CKombi C(3) Ccan Cbe Cadjusted fo hard floors (bristles out) or carpet (bristles in) through the slider (2) or pedal (4).
The Kombi heads are ideal for general purpose use and are the best choice for delicate carpets such as 2wool loop.
Please remove fluff and fibre caught Cin Cthe Cbristles Cby Cvacuuming them out with the crevice nozzle.
SEBO Parquet (25)/Standard Brush (36)\*:
The Standard Brush is particularly suitable for hard floors. The working width of 32 cm is ideal for efficient cleaning.
SEBO PARQUET
SEBO has developed this effective and durable parquet brush for optimum hard flooring cleaning. The "flex" neck (24) design provides superb manoeuvrability. Natural bristles and soft wheels make the SEBO Parquet ideal for any type of hard flooring, especially delicate or uneven. The brushes adjust to surface undulations to achieve ultimate performance. The brushes are removable for easy replacement. Please remove fluff and fibre caught in the bristles by vacuuming them out with the crevice nozzle.
natural_image
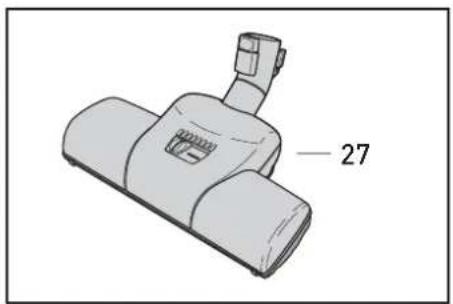
Technical illustration of a handheld device with a labeled part '27' (no other text or symbols)Turbobürste SEBO TT-C\* (27):
Die Bürstenwalze der Turbobürste SEBO ATT-C Cwird Cdurch Cden CLu strom des Staubsaugers angetrieben. Sie befreit Teppiche und Teppichböden von Fusseln und Fäden. Detaillierte Informationen können Sie Cder Cseparaten CGebrauchsanweisung entnehmen.
Floor Turbo Brush SEBO TT-C\* (27):
The Floor Turbo Brush is powered by the air stream of the vacuum cleaner. It provides very effective removal of pet hairs and fibres from carpets and rugs and is designed to be suitable for use on hard floors. Please remove fluff and fibre caught in the bristles by vacuuming them out with the crevice nozzle. For more information please see the separate SEBO TT-C instruction manual.
text_image
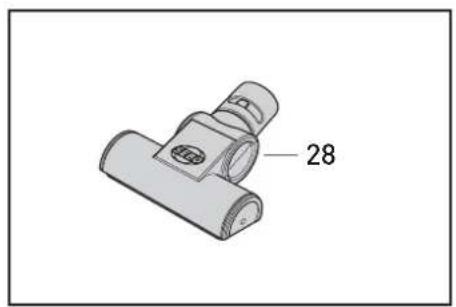
28Polsterturbodüse SEBO PT-C\* (28):
Die CSEBO APT-C Cwird Cvom CSauc strom des Staubsaugers angetrieben und ist ideal für die Reinigung von Cstrapazierfähigen CPolstermöbeln, Matratzen u.ä.
Stair A& AUpholstery ATurbo ABrush SEBO PT-C\* (28):
Powered by the air stream, the Stair & CUpholstery CTurbo CBrush Cis Cideal for Ccleaning Csmall Cor Cinaccessible areas of carpet. It lifts the pile and gives superior fibre/hair pick up. Please remove fluff and fibre caught in the bristles by vacuuming them out with the crevice nozzle. For more information Cplease Csee Cthe Cseparate SEBO PT-C instruction manual.

text_image
127. Wartung und Pflege
Zur AGewährleistung Ader ASicherheit und richtigen Funktion Anur Aoriginal ASEBO AErsatzfilter Averwenden. AAlle Filtermedien dürfen auf keinen Fall gewaschen werden.
7. Maintenance and Servicing
Use Aonly Agenuine ASEBO Areplacement Abags Aand Afilters to ensure performance, longevity Aand safety. Do Anot wash Afilters. ADo Anot Are-use bags.
Filter- und Betriebsanzeige
Die Corangefarbene CFilteranzeige (12) Czeigt Ceinen Creduzierten CLuftstrom Can. CEntweder Cmuß Cdie CFil tertüte Cgewechselt Cwerden Coder es liegt eine Verstopfung vor (siehe Abschnitt Verstopfungen beseitigen).
Je nach Art des Füllgutes kann ein Wechsel Cerforderlich Csein, Cohne dass die Filtertüte bis oben gefüllt ist.
Die CFilteranzeige Cerscheint Cnicht bei niedriger Saugkrafteinstellung. Sie sollte regelmäßig bei hoher CSaugkraft Cüberprüft Cwerden. Ihr CSEBO CPROFESSIONAL CD verfügt Cüber Ceine CBetriebsanzeige (11), die nach dem Einschalten blau leuchtet.
Bag full and Power indicator
When the orange bag full indicator (12) is showing, airflow is reduced. This Ccould Cbe Cbecause Cthe Cfilter bag is full, the filters are clogged, or Cthere Cmay Cbe Ca Cblockage C(se removing blockages). Vacuuming fine dust may require an earlier filter bag change even though the filter bag is not full. Fluff may overfill Cthe Cfilter Cbag Cwithout Cthe light coming on. The bag full indicator Conly Cworks Ccorrectly Cat Cful power. At lower levels, the indicator might not indicate correctly. Therefore please check the status regularly at full power. The SEBO PROFESSIONAL D features an LED light (11) which turns blue when the vacuum cleaner is on.
natural_image
Illustration of a hat and a curved object on a surface, no text or symbols present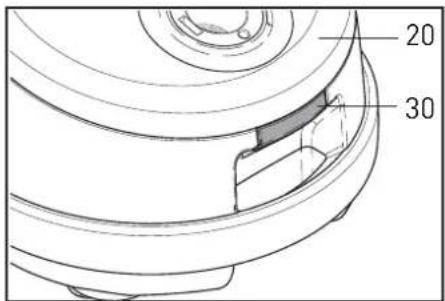
text_image
20 30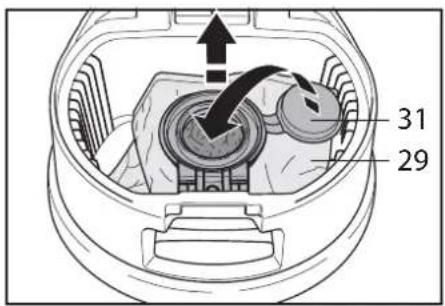
text_image
31 29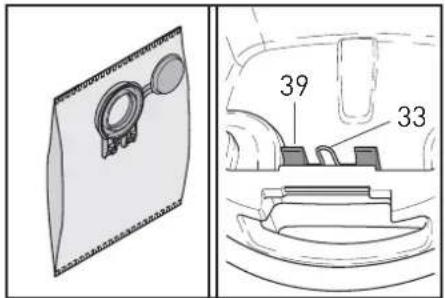
text_image
Technical diagram showing a magnified view of a device with labeled parts 39 and 33, likely illustrating a mechanical or architectural design.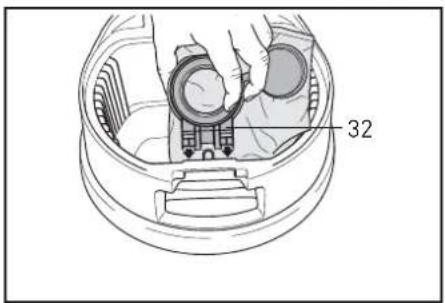
text_image
32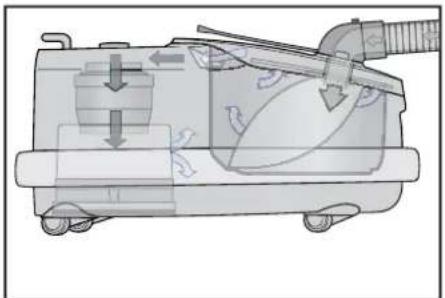
natural_image
Technical diagram of a mechanical device with directional arrows indicating flow or movement (no text or symbols present)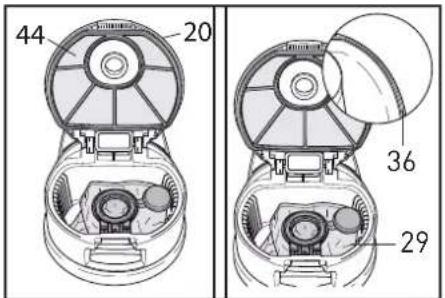
text_image
44 20 36 29Wechsel der Ultra-Bag™ Fil- tertüte
Zum CWechsel Cder CFiltertüte C(29) den Filterdeckel (20) durch Anheben Cder CEntriegelungstaste C(30) öffnen. Die Filtertüte mit dem Hygienedeckel C(31) Cschließen Cund durch Kippen des Filterhalters aus der CFiltertütenhalterung Centnehmen. CSchieben CSie Cden CFilterhalter C(32) Cder Cneuen CFiltertüte Cvon oben senkrecht in die Filtertütenhalterung (39) Cund kippen Sie die Filtertüte wieder Cab. CBitte Cachten Sie Chierbei Cauf Cdie Crichtige CPositionierung. Der grüne Filterhalter (32) muss dabei auf den Rastbügel (33) des Filtertütenhalters (39) geschoben werden. Der Filterdeckel (20) Cschließt Cnur Cmit CKorrekt Cein gesetzter Filtertüte.
Wechsel der Filter (Motor- schutzfilter und Hospital-Grade-Filter D)
Der CSEBO CPROFESSIONAL CD ist serienmäßig Cmit Ceinem Cdreistufigen CS-Klasse-Filtersystem Causgestattet, das die besonderen Ansprüche von Allergikern und Asthmatikern Cerfüllt. CDie CLuft Cströmthierbei Cdurch Cdrei Chochwirksame Filterstufen mit zwei CMicrofiltern: die CUltra-Bag™ CFiltertüte (29), den Motorschutzfilter (44) und den Hospital-Grade-Filter C(34). CWechseln Sie den Hospital-Grade- und den CMotorschutzfilter Cspätestens nach 16 Filtertüten aus, oder wenn Sie Cstark Cverschmutzt Csind Cauch schon Ceher. CDen CMotorschutzfilter Ckönnen CSie Cnach CÖffnen Cdes Filterdeckels (20) abziehen Cund wechseln. Der neue Motorschutzfilter muss rundum in die Nut (36) eingedrückt und in der Mitte aufgeschoben werden.
Changing the Filter Bag
To change the filter bag (29) open the Cfilter Cbag Ccover C(20) Cby Clift in the Ccatch (30). CSeal Cthe Cfilter bag with Cthe Csealing Ccap C(31). CLift Ct filter bag out of the filter bag holder by tilting the green collar (32) up. Insert the green collar (32) of a new filter bag down into the filter bag holder (39). Please ensure that the green collar (32) is inserted Cproperly Cover Cthe U-shaped metal spring (33) of the filter bag holder (39) and tilt the green collar (32) down. The cover (20) can only be closed with a correctly fitted filter bag.
Changing the Filters (Motor filter and Hospital-Grade-Filter D)
The CSEBO CPROFESSIONAL CD Ccomes with an S-Class filtration system, Cwhich Cmakes Cit Cthe Cperfect choice Cfor Ccustomers Cwith Callergies or asthma. This system uses three Chigh Cefficiency Cfilters: Cthe Ultra CBag™ C(29), Cthe Cmotor Cfilter (44) and the Hospital-Grade-Filter (34) Cto Cremove Seven Cmicroscopic particles. C CWe Crecommend Cchanging the Hospital-Grade and motor filter regularly, either if they have become very dirty, or once 16 filter bags Chave Cbeen Cused. CTo Cremove the motor filter, open the filter bag cover (20) and pull the motor filter out of the groove (36) which holds it. Fit the new filter into the groove (36) in the same position.
text_image
37 38 34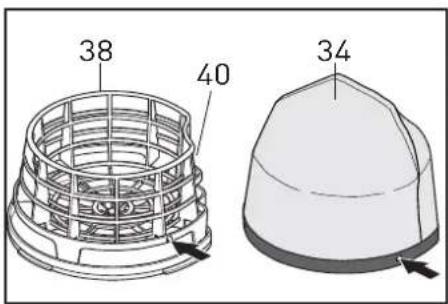
text_image
38 40 34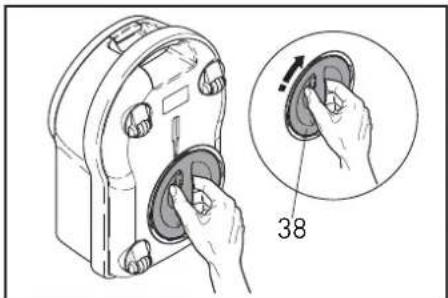
natural_image
Illustration of hands operating a mechanical device with a magnified inset showing a circular component labeled '38' (no text or symbols on the device itself)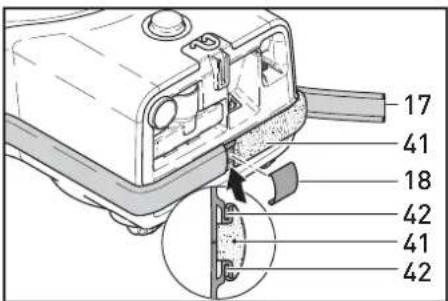
text_image
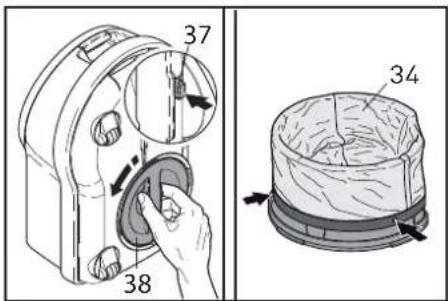
17 41 18 42 41 42Den CHospital-Grade-Filter CD C(34) erreichen CSie Cauf Cder CUnterseite des Gerätes. Dazu wird der Drehverschluss Cdes CFilterhalters C(38) nach CLösen Cder CVerrastung Cgeöffnet Cund Cherrausgezogen. CZum Austauschen des Filters wird dieser Caus Cder CAufnahme Cgezogen und abgenommen. Der neue Filter (34) wird über den Filterhalter (38) gestülpt, Cin Cden CAufnahmen Cfestgerastet und nach innen gedrückt. Die CBügel Cder CDichtlippe Cmüssen dabei hinter der Rippe (40) positioniert werden. Zum Schließen wird der Filterhalter (38) eingeschoben und nach rechts verriegelt.
Airbelt Stoßschutz
Ihr Cneuer CSEBO CBodenstaubsauger ist mit dem einzigartigen, patentierten Airbelt™ (17) Stoßschutz ausgestattet, der Ihre Einrichtung zuverlässig Cvor CBeschädigungen schützt. Er sorgt auch dafür, dass die gefilterte Luft rundum besonders Cleise Cund Csanft Cwieder Cau geblasen Cwird. CDen CAirbeltC(17) können CSie Caustauschen, Cindem Sie Cden CClip C(18) Cabnehmen Cui ihn einfach aus den Nuten ziehen. Der Schaumstoffträger (41) bleibt am CGerät. CFühren CSie Cden Cneu Airbelt™ Cmit Cden CVerstärkungsstreifen Cso Cin Cdie CNuten C(42) C dass die Cweiße Fläche Cvom Gerät weg Cnach Caußen Czeigt. CBeginne Sie Can Cder CRückseite, Cfahren CS rund um das Gerät fort und sichern Sie zum Schluss die Enden mit dem Clip (18).
To change the Hospital-Grade-Filter (34) press the release button (37) of the filter holder (38) on the bottom Cof Cthe Cmachine Cand Cturn the filter Cholder anti-clockwise. Remove the filter (34) from the filter holder (38) and fit a new Hospital-Grade-Filter (34). Please ensure that the lugs on the filter holder fit correctly to the cut-outs in the filter and that the lugs on the inner side of the filter fit over the frame of the filter holder Cat position C40. Re-fit the assembly to the machine and lock the holder by turning clockwise.
Airbelt Bumper System
Your new vacuum cleaner is fitted with Cthe Cpatented CAirbelt™ C(17) shock absorber system, which protects Cyour Cwalls Cand Cfurniture and Celiminates Cexhaust Cair Cblast. The CAirbelt™ C(17) Ccan Ceasily be changed if necessary. Take off the -clip (18) and remove the Airbelt™. The Cfoam Cpart C(41) Cstays Con Cth machine. To fit the new Airbelt™, slot the side rails into the grooves (42). CStart Cat Cthe Cback, Censuring the Crails Cbutt Cagainst Cthe Cend Co the groove and proceed round the machine. Secure the ends with the rclip (18).
text_image
987 6 43 5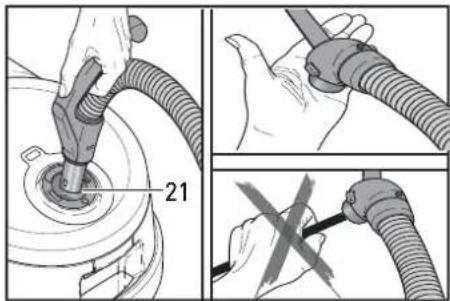
text_image
21Verstopfungen beseitigen
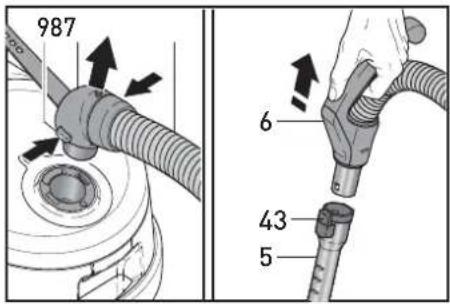
Bei Verstopfungen im Schlauch (7) nehmen Sie den Schlauchstutzen (8) durch Zusammendrücken der beiden Knöpfe (9) ab und lösen das Teleskoprohr (5) durch Drücken der Taste (43) vom Handgriff (6). Stecken Sie dann den Handgriff bei eingeschaltetem Gerät in den Sauganschluss (21) und saugen ihn von der anderen Seite aus. Bitte beachten Sie hierbei, dass der SEBO PROFESSIONAL D mit einem konischen Schlauch ausgestattet ist und der Handgriff nicht exakt in den Sauganschluss passt. Beim Aussaugen sollte der Schlauch an der verstopften Stelle gedehnt werden und mit der flachen Hand auf die Öffnung des Schlauches geklopft werden. Anschließend stecken Sie den Schlauchstutzen (8) wieder in den Sauganschluss (21) bis er einrastet und saugen den Schlauch noch einmal aus.

Reinigen Sie den Saugschlauch niemals mit einem Stab und tauchen Sie ihn niemals in Wasser.
Removing Blockages
To remove a blockage in the hose (7) remove the hose end (8) by squeezing both buttons (9). Next, release the telescopic tube (5) from the hose handle (6) by pressing the catch (43). Turn the machine on at full power. Reverse the airflow through the hose by fitting the handle (6) into the neck (21). Please note that the SEBO PRO-FESSIONAL D is fitted with a cone-shaped hose, so the hose handle does not fit exactly in the neck (21). Straighten the hose in the spot where the blockage is and close the free end of the hose repeatedly with your hand. At the end of this procedure please re-fit your hose the correct way round.

Never attempt to clear the hose by using a sharp object and do not immerse in water for cleaning.
8. Technische Daten \*
Gebläsemotor 1200 Watt
Luftmenge 41 l/s
Ultra-Bag™ Filtertüte....6l, 3-lagig
Gewicht 6,6 kg
Aktionsradius 15,5 m
Schalldruckpegel 61dB (A)
Für technischen Service wenden Sie sich bitte an Ihren SEBO Fachhändler oder direkt an die SEBO Stein & Co. GmbH
8. Technical Details \*
Vacuum motor nominal 1200 Watt
Air Flow 41 L/s
Ultra-BagTM Filter Bag....6l, Electrostatic fleece
Weight 6.6 kg
Cleaning Range 15.5 m
Sound pressure level....61dB (A)
For Service please contact your supplier or the address:

MADE IN GERMANY

SEBO Stein&Co. GmbH, Wülfrather Straße 47-49, 42553 Velbert, Germany Telefon +49 (0) 20 53 / 89 81, Telefax +49 (0) 20 53 / 89 85, www.sebo.de ©2012 SEBO Stein&Co. GmbH ©Eingetragenes Warenzeichen. Technische Änderungen vorbehalten.
SEBO (UK) Ltd - The Merlin Centre
Cressex Business Park, High Wycombe, Bucks HP12 3QL.
Phone: 0 14 94 - 46 55 33 , Fax: 0 14 94 - 46 10 44, www.sebo.co.uk
©2012 SEBO Stein&Co. GmbH ®Registered Trademark. Subject to change.