R400 - Sacoche pour ordinateur 3R System - Gratis brugsanvisning og manual
Find enhedens vejledning gratis R400 3R System i PDF-format.

Brugerspørgsmål om R400 3R System
0 spørgsmål om dette apparat. Besvar dem du kender, eller stil dit eget.
Stil et nyt spørgsmål om dette apparat
Download vejledningen til din Sacoche pour ordinateur i PDF-format gratis! Find din vejledning R400 - 3R System og tag din elektroniske enhed tilbage i hånden. På denne side er alle dokumenter nødvendige for brugen af din enhed offentliggjort. R400 af mærket 3R System.
BRUGSANVISNING R400 3R System
USER MANUAL R400
COOLING MASTER

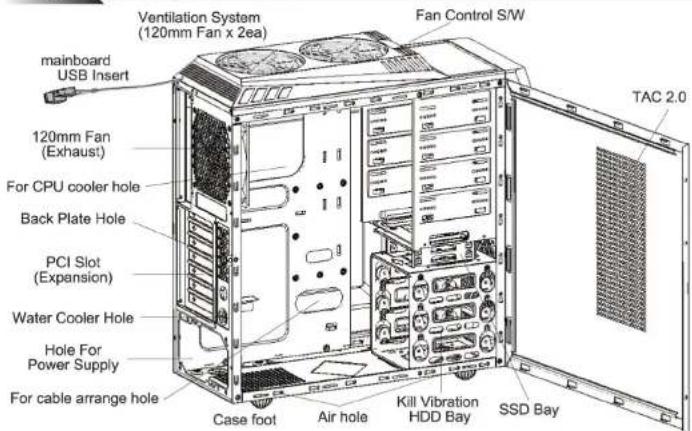
Each part's name
text_image
mainboard USB Insert Ventilation System (120mm Fan x 2ea) Fan Control S/W 120mm Fan (Exhaust) For CPU cooler hole Back Plate Hole PCI Slot (Expansion) Water Cooler Hole Hole For Power Supply For cable arrange hole Case foot Air hole Kill Vibration HDD Bay SSD Bay TAC 2.0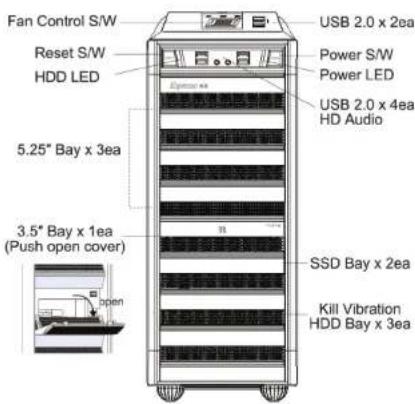
text_image
Fan Control S/W Reset S/W HDD LED 5.25" Bay x 3ea 3.5" Bay x 1ea (Push open cover) open USB 2.0 x 2ea Power S/W Power LED USB 2.0 x 4ea HD Audio SSD Bay x 2ea Kill Vibration HDD Bay x 3eaPart Number : C1HM-C93H
text_image
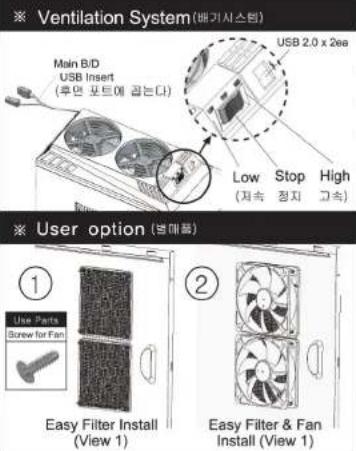
※ Ventilation System (배기시스템) Main B/D USB Insert (후면 포트에 곱는다) USB 2.0 x 2ee Low Stop High (저속 정지 고속) ※ User option (변매를) ① Use Parts Screw for Fan Easy Filter Install (View 1) ② Easy Filter & Fan Install (View 1)
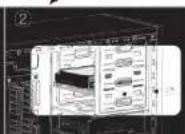
How to Install CD-ROM & PSU
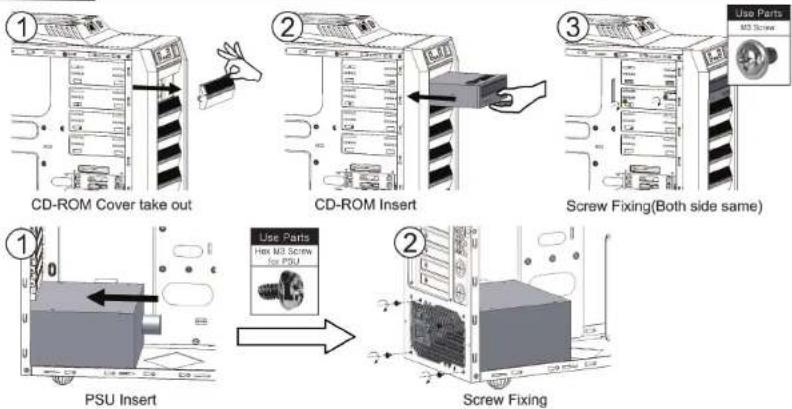
flowchart
graph TD
    A["CD-ROM Cover take out"] --> B["CD-ROM Insert"]
    B --> C["Screw Fixing(Both side same)"]
    C --> D["PSU Insert"]
    D --> E["Screw Fixing"]
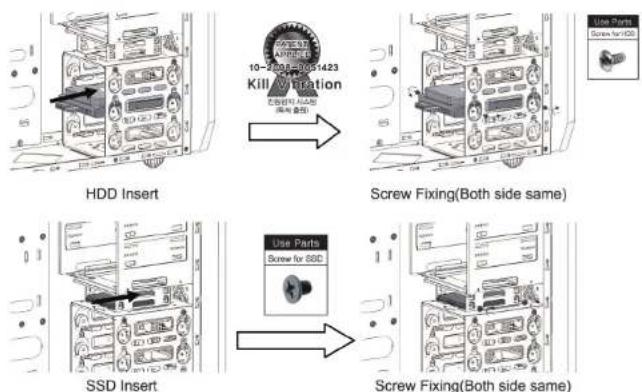
How to Install HDD & SSD
text_image
10-2500E-DCS1423 Kill Fixing Use Parts Screw Fixing(Both side same) HDD Insert Screw Fixing(Both side same) SSD Insert Use Parts Screw for SSD Screw Fixing(Both side same)※제품의 외관디자인 및 규격은 제품의 품질향상을 위하여 소비자에게 예고 없이 변경될 수 있습니다.
※The design and specifications of this product may change without prior notice to enhance its quality.
3R COOLING MASTER 3R SYSTEM
USER MANUAL R400
COOLING MASTER

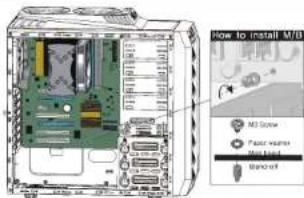
How to Install M/B & How to Clean Dust Filter
text_image
How to install M3B M3 Screw Fast server M31.12.14 Microsoft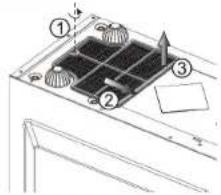
text_image
Technical diagram showing a grid installation with numbered components and directional arrows indicating flow or movement.
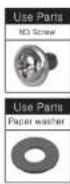
Accessory(부속물)
| No | Figure | Part Name | Q'ty | Used for |
| 1 | Stand-off | 3 | M/B Tray | |
| 2 | M3 Screw | 17 | M/B,CD-ROM Install | |
| 3 | Paper washer | 9 | M/B Install | |
| 4 | Hex M3 Screw for PSU | 5 | Power Supply Install | |
| 5 | Screw for HDD | 12 | HDD Install | |
| 6 | Screw for 2.5" HDD & SSD | 4 | SSD Install | |
| 7 | Buzzer | 1 | M/B Install |

Cable(케이블)
| Figure | Cable Name | Connector | Remark |
| Power LED Cable | M/B HDD LED Connector | Refer to M/B Manual, [Caution]+,- polarity | |
| HDD LED Cable | M/B HDD LED Connector | Refer to M/B Manual, [Caution]+,- polarity | |
| Power S/W Cable | M/B Power S/W Connector | Refer to M/B Manual | |
| Reset S/W Cable | M/B Reset S/W Connector | Refer to M/B Manual | |
| USB 2.0 Cable | M/B USB Connector | Refer to M/B Manual | |
| H/D Audio Cable | M/B Audio Connector | Refer to M/B Manual | |
| Fan Control Power Cable | PSU 4pin Cable | PSU 4pin | |
| Front Fan Cable | Front Fan Connector | Front Fan | |
| Rear Fan Cable | Rear Fan Connector | Rear Fan |
※제품의 외관디자인 및 규격은 제품의 품질향상을 위하여 소비자에게 예고 없이 변경될 수 있습니다.
※The design and specifications of this product may change without prior notice to enhance its quality.

Caution(주의사항)
- Check the condition of the product and its components before installation. If there is a problem with the product and/or its components, please contact the retailer for replacement.
- Avoid inserting any objects into the system while the power is ON. Doing so may result in injury and/or damage to the system.
- Check the manual when connecting cables. Incorrect connections may damage the component and system.
● The air vents must not be blocked. - Keep this unit away from heat sources, direct sunlight, water, oil, and humidity. Place the unit on a flat, leveled; solid, and well-ventilated area.
- Do not clean the product surface with chemicals or wet cloth. (chemicals: industrial brightener, wax, benzene, alcohol, mosquito, paint thinner, repellent, aromatics, lubricant, detergent etc.)
◆ Disclaimer 3R system Co., Ltd. is not responsible for any damages due to external causes, including but not limited to, improper use, problems with electrical power, accident, neglect, alteration, repair, improper installation, or improper to
※ Warranty Information (이정 사대소 및 고객지분)
▶성세한 A/S 및 고객지원 문의는 브리항시스템
홈파이지(http://www3rsys.com)를 참조해주시가 바랍니다
▶고객지원 - e-mail: support@3sys.com
▶ *소비자의 과실 혹은 현재지병으로 인한 장애는 유상처리됩니다.
*제품을 업의로 개조 및 변경사용어 대한 장애는 옹성 저러됩니다.
*본 체풀은 대한명국 내수용이며 그 외의 지역에서 사용시에는 불질보증을 받지 못합니다.
- 설치 전구성품 및 제품의 상태를 반드시 확인하시고 이상이 있을 경우 구입치에 상납하시기 바랍니다.
● 동작증인 제품에 손이나 물체를 넓지 아십시오, 인체 및 제품에 해를 피칠 수 있습니다. - 케이블 연결 시 반드시 매뉴얼을 확인한 후 연결하십시오. 잘못 면결할 경우 항선으로 인한 화채외 우려가 있습니다.
●제품의 통풍구가 딭히치 않도록 주의하십시오.
● 직사관선이 들어오는 곳이나 난방기 주변 등 열이 발생하는 곳, 둘(빛물)이 뒤는 곳, 기름, 습기가 않은 곳을 파하여 콩기가 잘 통하고, 평탄하며 진총이 없는 곳에 실치하십시오.
● 화학약품과 물 결레 등으로 제품표면를 닉지 마십시오. (화학약품 : 공업품 광택제, 약스, 변젠, 엘코풀, 신나, 모기 약, 빌황저, 윤활제, 서징저 등)
부인 (법적 책임 등의) 잘못 설치하여 발생하는 문제에 대해서 당사는 책임지지 않으므로 반드시 실명서를 침조하여 실치 해주시기 바랍니다. 정해진 용도 이익의 사용으로 인하여 발생하는 문제에 대하여 당사는 어떠한 책임도 지지 않습니다.
For the detailed A/S and support, please visit our website.
(http://www.drsys.com)
e-mail: support@jrsys.com
Warranty voids when damage is caused by user's abuse,
misuse or by a natural disaster.
*Warranty voids when damage is caused by modifying the product or by using the product in improper application.

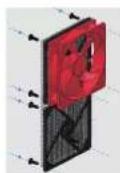
OPTION PART(별매품)

text_image
Raptor-N30 10-2008-06:54 Kill Vibrati (예정/출명)5.25 베이 설치용 진동방지 하드(HDD) 어댑터
● Raptor-N30
3.5 HDD Adapter
Kills Vibration for 5.25 Bay install


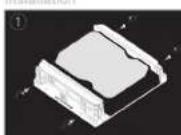
● Easy Filter
For TAC2.0 air hole of side-panel (Use for 3R SYSTEM's Case)
- No need screw
- Protect Vibration
-Able to 120MM Fan install - Easy cleaning
-3R SYSTEM 케이스 TAC2.0 전용
-120mm Fan(敞매) 장작 가능
-원터치 강착 백식

COOLING MASTER
3R SYSTEM