USB-Cast-Handled - Ukategoriseret Vocopro - Gratis brugsanvisning og manual
Find enhedens vejledning gratis USB-Cast-Handled Vocopro i PDF-format.

Brugerspørgsmål om USB-Cast-Handled Vocopro
0 spørgsmål om dette apparat. Besvar dem du kender, eller stil dit eget.
Stil et nyt spørgsmål om dette apparat
Download vejledningen til din Ukategoriseret i PDF-format gratis! Find din vejledning USB-Cast-Handled - Vocopro og tag din elektroniske enhed tilbage i hånden. På denne side er alle dokumenter nødvendige for brugen af din enhed offentliggjort. USB-Cast-Handled af mærket Vocopro.
BRUGSANVISNING USB-Cast-Handled Vocopro
VocoPro®
Trusted by Professionals Since 1991
natural_image
Line drawings of various handheld devices including a digital display and a multi-wheeled device with attached cables (no text or symbols present)USB-CAST-HANDHELDUSB-CAST-BODYPACK
natural_image
Line drawing of two microphones with coiled tubes and a spray bottle, no text or symbols presentUSB-CAST-CONFERENCE
USB-CAST
Digital Wireless USB Microphone
OWNER'S MANUAL
And thank you for purchasing USB-Cast from VocoPro. Along with quality products our commitment to customer satisfaction means we have technical support professionals ready to assist you. Be sure to visit our website-www.vocopro.com for the latest information on new products.
We are at:
VocoPro
1728 Curtiss Court
La Verne, CA 91750
Phone:
Toll Free: 800-678-5348
TEL: 909-593-8893
FAX: 909-593-8890

Tech Support:
techsupport@vocopro.com
Customer Service:
info@vocopro.com
Legal Disclaimer
All rights reserved. Information, specifications, diagrams, images, and instructions herein are subject to change without notice. VocoPro Products, logo and identifying product names and numbers herein are trademarks of VocoPro. Copyright protection claimed includes all forms and matters of copyrightable materials and information now allowed by statutory or judicial law or hereinafter granted. Product names used in this document may be trademarks or registered trademarks of their respective companies and are hereby acknowledged. All non-VocoPro Products, brands and product names are trademarks or registered trademarks of their respective companies.
VocoPro hereby disclaims any and all liabilities for property, equipment, building, and electrical damages, injuries to any persons, and direct or indirect economic loss associated with the use or reliance of any information contained within this document, and/or as a result of the improper, unsafe, insufficient and negligent assembly, installation, rigging, and operation of this product.
Please record the model number and serial number below, for easy reference, in case of loss or theft. These numbers are located on the packaging the item came in. Space is also provided for other relevant information.
This is not considered a receipt. Please keep a copy of your purchase receipt, provided by the dealer, in your records. A receipt is required for all warranty work.
Model Number
Serial Number
Date of Purchase
Place of Purchase
Listening for a Lifetime
Selecting fine audio equipment such as the unit you've just purchased is only the start of your musical enjoyment. Now it's time to consider how you can maximize the fun and excitement your equipment offers. VocoPro and the Electronic Industries Association's Consumer Electronics Group want you to get the most out of your equipment by playing it at a safe level. One that lets the sound come through loud and clear without annoying blaring or distortion and, most importantly, without affecting your sensitive hearing.
Sound can be deceiving. Over time your hearing "comfort level" adapts to a higher volume of sound. So what sounds "normal" can actually be loud and harmful to your hearing. Guard against this by setting your equipment at a safe level BEFORE your hearing adapts.
To establish a safe level:
Start your volume control at a low setting.
Slowly increase the sound until you can hear it comfortably and clearly, and without distortion.
Once you have established a comfortable sound level:
Set the dial and leave it there.
Pay attention to the different levels in various recordings.
Taking a minute to do this now will help to prevent hearing damage or loss in the future. After all, we want you listening for a lifetime.
Used wisely, your new sound equipment will provide a lifetime of fun and enjoyment. Since hearing damage from loud noise is often undetectable until it is too late, this manufacturer and the Electronic Industries Association's Consumer Electronics Group recommend you avoid prolonged exposure to excessive noise. This list of sound levels is included for your protection.
Level Example
30 Quiet library, Soft whispers
40 Living room, Refrigerator, Bedroom away from traffic
50 Light traffic, Normal Conversation
60 Air Conditioner at 20 ft., Sewing machine
70 Vacuum cleaner, Hair dryer, Noisy Restaurant
80 Average city traffic, Garbage disposals, Alarm clock at 2 ft.
The following noises can be dangerous under constant exposure:
Level Example
90 Subway, Motorcycle, Truck traffic, Lawn Mower
100 Garbage truck, Chainsaw, Pneumatics drill
120 Rock band concert in front of speakers
140 Gunshot blast, Jet plane
180 Rocket launching pad
-Information courtesy of the Deafness Research Foundation

CAUTION RISK OF SHOCK

CAUTION: To reduce the risk of electric shock, do not remove cover (or back). No user-serviceable parts inside. Only refer servicing to qualified service personnel.
Explanation of Graphical Symbols

The lightning flash & arrowhead symbol, within an equilateral triangle, is intended to alert you to the presence of danger.

The exclamation point within an equilateral triangle is intended to alert you to the presence of important operating and servicing instructions.
WARNING: To reduce the risk of fire or electric shock, do not expose this unit to rain or moisture.
- Read Instructions - All the safety and operating instructions should be read before the appliance is operated.
- Retain Instructions - The safety and operating instructions should be retained for future reference.
- Heed Warnings - All warnings on the appliance and in the operating instructions should be adhered to.
-
Follow Instructions - All operating and use instructions should be followed.
-
Attachments - Do not use attachments not recommended by the product manufacturer as they may cause hazards.
-
Water and Moisture - Do not use this unit near water. For example, near a bathtub or in a wet basement and the like.
-
Carts and Stands - The appliance should be used only with a cart or stand that is recommended by the manufacturer.
7 A. An appliance and cart combination should be moved with care. Quick stops, excessive force, and uneven surfaces may cause an overturn.
- Ventilation - The appliance should be situated so its location does not interfere with its proper ventilation. For example, the appliance should not be situated on a bed, sofa, rug, or similar surface that may block the ventilation slots.

-
Heat - The appliance should be situated away from heat sources such as radiators, heat registers, stoves, or other appliances (including amplifiers) that produce heat.
-
Power Sources - The appliance should be connected to a power supply only of the type described in the operating instructions or as marked on the appliance.
-
Grounding or Polarization - Precautions should be taken so that the grounding or polarization means of an appliance is not defeated.
-
Power-Cord Protection - Power-supply cords should be routed so that they are not likely to be walked on or pinched by items placed upon or against them, paying particular attention to cords at plugs, convenience receptacles, and the point where they exit from the appliance.
-
Cleaning - Unplug this unit from the wall outlet before cleaning. Do not use liquid cleaners or aerosol cleaners. Use a damp cloth for cleaning.
-
Power lines - An outdoor antenna should be located away from power lines.
-
Non-use Periods - The power cord of the appliance should be unplugged from the outlet when left unused for a long period of time.
-
Object and Liquid Entry - Care should be taken so that objects do not fall and liquids are not spilled into the enclosure through openings.
-
Damage Requiring Service - The appliance should be serviced by qualified service personnel when:
The power supply cord or plug has been damaged; or Objects have fallen into the appliance; or The appliance has been exposed to rain; or The appliance does not appear to operate normally or exhibits a marked change in performance; or The appliance has been dropped, or the enclosure damaged.
- Servicing - The user should not attempt to service the appliance beyond that described in the operating instructions. All other servicing should be referred to qualified service personnel.
Note: To CATV system installer's (U.S.A.): This reminder is provided to call the CATV system installer's attention to Article 820-40 of the NEC that provides guidelines for proper grounding and, in particular, specifies that the cable ground shall be connected as close to the point of cable entry as practical.

This device complies with Part 15 of the FCC rules. Operation is subject to the condition that this device may not cause harmful interference.
FCC license may be required
-
IMPORTANT NOTICE: DO NOT MODIFY THIS UNIT!: This product, when installed as indicated in the instructions contained in this manual, meets FCC requirements. Modifications not expressly approved by Vocopro may void your authority, granted by the FCC, to use this product.
-
IMPORTANT: When connecting this product to accessories and/or another product use only high quality shielded cables. Cable(s) supplied with this product MUST be used. Follow all installation instructions. Failure to follow instructions could void your FCC authorization to use this product in the U.S.A.
-
NOTE: This product has been tested and found to comply with the requirements listed in FCC Regulations, Part 15 for Class "B" digital devices. Compliance with these requirements provides a reasonable level of assurances that your use of this product in a residential environment will not result in harmful interference with other electronic devices. This equipment generates/uses radio frequencies and, if not installed and used according to the instructions found in the owner's manual, may cause interference harmful to the operation of other electronic devices. Compliance with FCC regulations does not guarantee that interference will not occur in all installations. If this product is found to be the source of interference, which can be determined by turning the unit "Off" and "On", please try to eliminate the problem by using one of the following measures:
Relocate either this product or the device that is being affected by the interference.
Use power outlets that are on different branch (circuit breaker or fuse) circuits or install AC line filter(s).
In the case of radio or TV interference, relocate/reorient the antenna. If the antenna lead-in is 300-ohm ribbon lead, change the lead-in to coaxial type cable.
If these corrective measures do not produce satisfactory results, please contact your local retailer authorized to distribute Vocopro products. If you can not locate the appropriate retailer, please contact Vocopro, 1728 Curtiss Court, La Verne, CA 91750.
CAUTION: READ THIS BEFORE OPERATING YOUR UNIT
-
To ensure the finest performance, please read this manual carefully. Keep it in a safe place for future reference.
-
Install your unit in a cool, dry, clean place - away from windows, heat sources, and too much vibration, dust, moisture or cold. Avoid sources of hum (transformers,
CALIFORNIA PROP 65 WARNING
WARNING: Cables, Cable Assemblies, and Printed Circuit Boards can expose you to chemicals including lead and lead compounds which are known to the State of California to cause cancer and birth defects or other reproductive harm. For more information, go to www.P65Warnings.ca.gov
electric motors). To prevent fire or electrical shock, do not expose to rain and water.
- Do not operate the unit upside-down.
- Never open the cabinet. If a foreign object drops into the set, contact your dealer.
- Place the unit in a location with adequate air circulation. Do not interfere with its proper ventilation; this will cause the internal temperature to rise and may result in a failure.
- Do not use force on switches, knobs or cords. When moving the unit, first turn the unit off. Then gently disconnect the power plug and the cords connecting to other equipment. Never pull the cord itself.
- Do not attempt to clean the unit with chemical solvents: this might damage the finish. Use a clean, dry cloth.
- Be sure to read the "Troubleshooting" section on common operating errors before concluding that your unit is faulty.
- This unit consumes a fair amount of power even when the power switch is turned off. We recommend that you unplug the power cord from the wall outlet if the unit is not going to be used for a long time. This will save electricity and help prevent fire hazards. To disconnect the cord, pull it out by grasping the plug. Never pull the cord itself.
- To prevent lightning damage, pull out the power cord and remove the antenna cable during an electrical storm.
- The general digital signals may interfere with other equipment such as tuners or receivers. Move the system farther away from such equipment if interference is observed.
NOTE: Please check the copyright laws in your country before recording from records, compact discs, radio, etc. Recording of copyrighted material may infringe copyright laws.
Voltage Selector (General Model Only)
Be sure to position the voltage selector to match the voltage of your local power lines before installing the unit.

CAUTION: The apparatus is not disconnected from the AC power source so long as it is connected to the wall outlet, even if the apparatus itself is turned off. To fully ensure that the apparatus is indeed fully void of residual power, leave unit disconnected from the AC outlet for at least fifteen seconds.
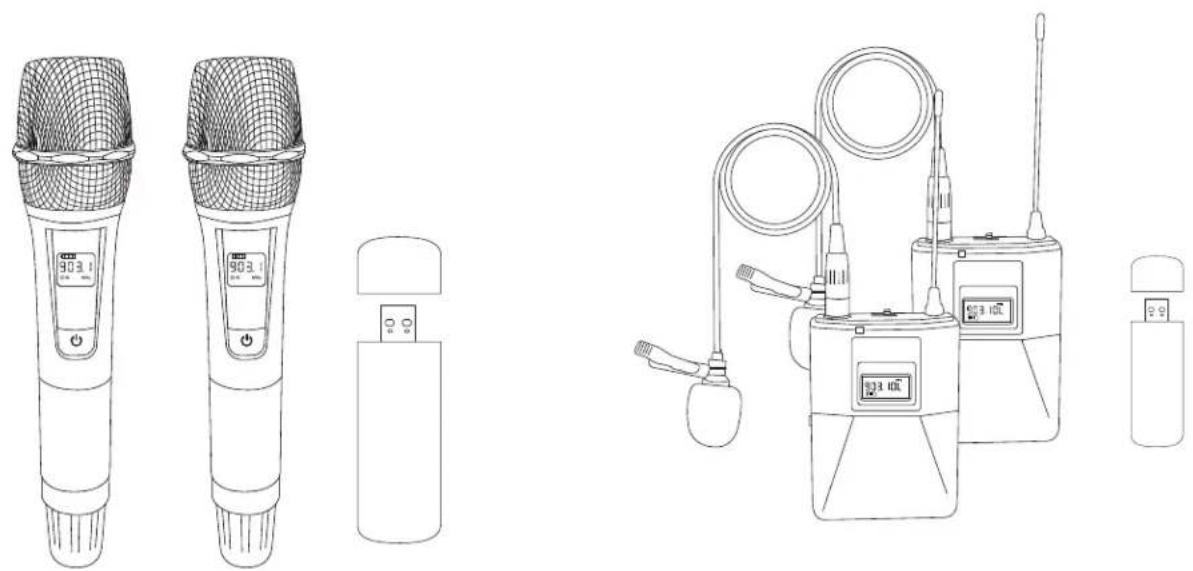
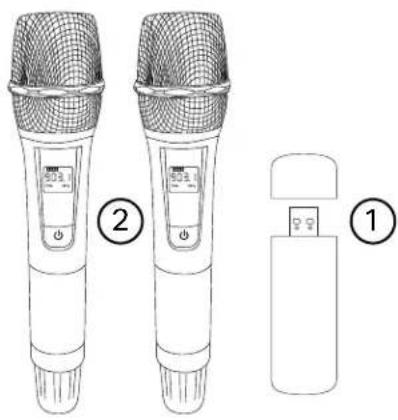
USB-CAST-Handheld
USB Receiver x1
Handheld Microphone Transmitter x2
text_image
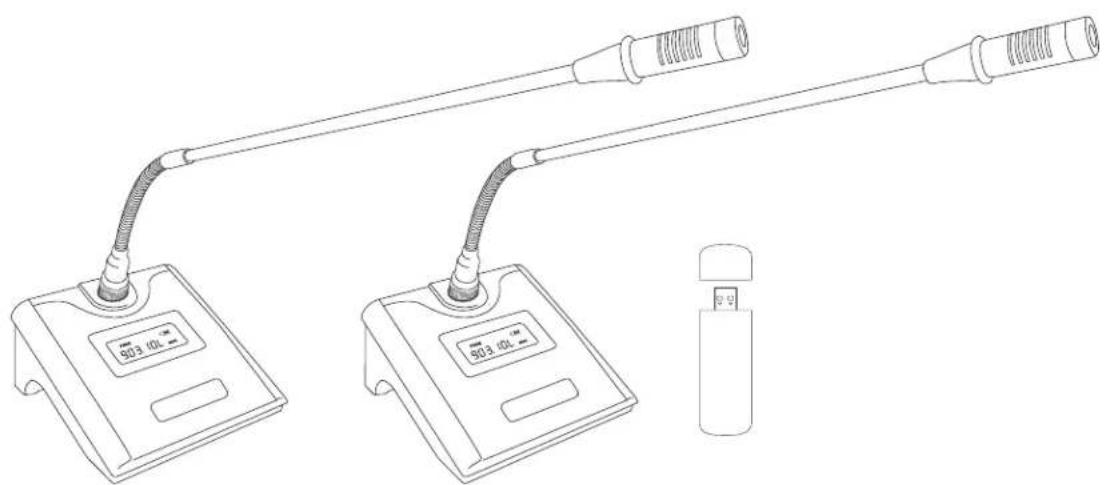
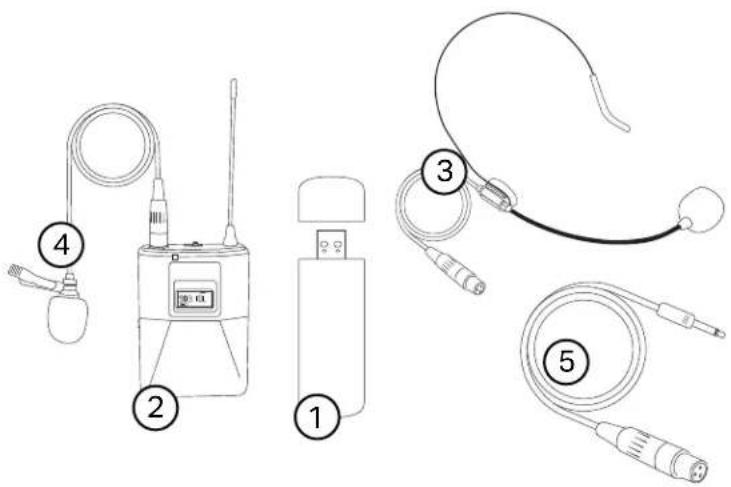
Diagram showing two wireless speakers with labeled parts: one with a grid pattern and power button, the other with a USB device.USB-CAST-Bodypack
USB Receiver x1
Bodypack Transmitter x2
Headset Microphone x2
Lavaliere Microphone x2
Instrument Cable x2
text_image
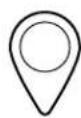
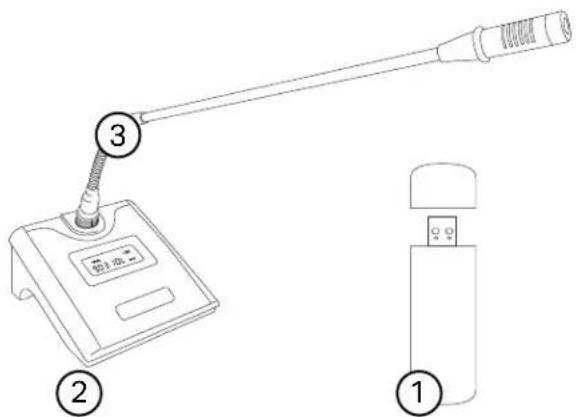
Diagram showing five types of medical or diagnostic devices with numbered labels indicating component identification.USB-CAST-Conference
USB Receiver x1
Tabletop Base Transmitter x2
Gooseneck Microphone x2
text_image
Diagram showing a device with labeled parts: sensor, device with digital display, and a device with ports.USB Receiver
USB male plug: This plug will go directly into a USB jack on your computer.
Connection Status Lights: These will light up when the transmitters are turned on to show they are connected to the receiver.
18 Inch Mic Output: Mic output for personal monitoring. Connect to an amplifier or powered speaker to hear yourself.
Note: The audio from the other people in the chat group will not come out of this output, their audio will come out of the computer's speakers, or whatever device is set for your sound output.
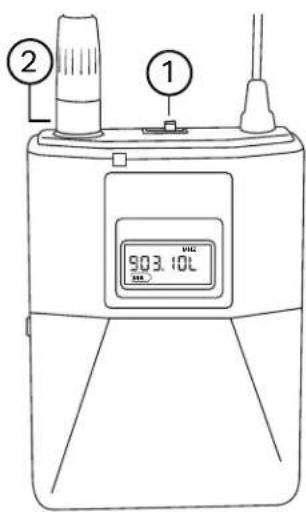
Handheld Microphone (USB-CAST-Handheld Only)
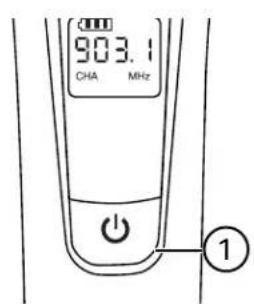
Power Button: Press the power button once to turn the mic on. Hold the power button for 3 seconds to power the mic off.
Menu Buttons: Press the Set button to cycle through the menu options for Frequency, Volume, and Echo. Use the up and down buttons to change the value, then wait 2 seconds for the mic to confirm your selection. If you change the frequency for the mic, it will automatically re-sync to the receiver.
Battery Cover: Unscrew the battery cover to access the battery compartment. Each handheld microphone takes 2x AA batteries to power it.

natural_image
Simple line drawing of a device with an electrical connector and a numbered circle (no text or symbols)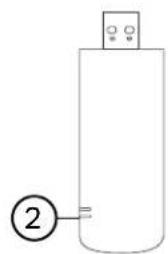
natural_image
Simple line drawing of a cylindrical container with a labeled connection point (no text or symbols)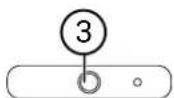
text_image
903.1 CHA MHz ①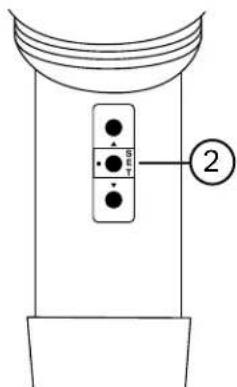
text_image
SET ②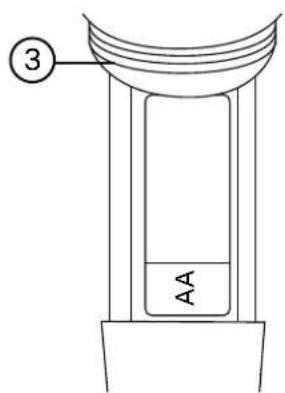
text_image
③ AAFunctions & Descriptions
Bodypack Transmitter (USB-CAST-Bodypack Only)
Power Switch: Move the switch to the right to power the pack on, move to the left to power it off.
Mini-XLR Output: This is where you will connect the headset mic, the lavaliere mic, or the instrument cable.
Battery Cover: Squeeze both sides of the cover to open and access the battery compartment. Each body pack takes 2x AA batteries to power it.
Set button: Press this button to change the frequency of the body pack and it will automatically re-sync to the receiver.
text_image
① ② 903.10L ③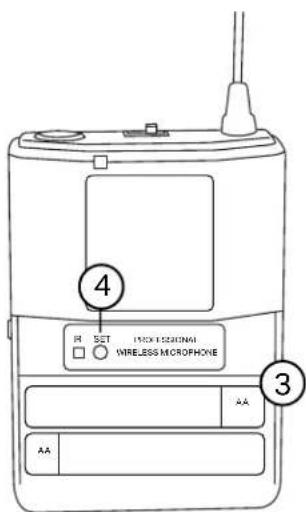
text_image
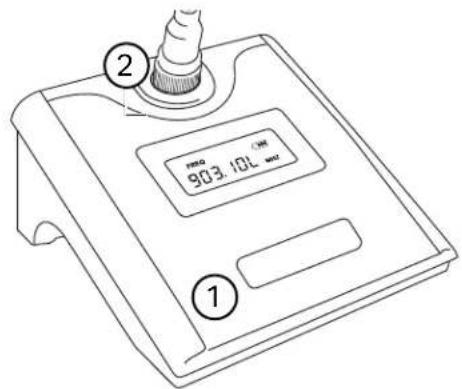
4 R SET PICK 1520NG WIRELESS MICROPHONE 3 AA AATabletop Base Transmitter (USB-CAST-Conference Only)
Power Button: Press the power button once to turn the base on. Press again to change the frequency of the base and it will automatically re-sync to the receiver. Hold the power button for 3 seconds to power the mic off.
4-Pin CB Mic Jack: This is where you will connect the gooseneck microphone. Screw the threaded connector on the gooseneck mic to ensure it is fastened to the base.
Battery Cover: Unlatch the cover to access the battery compartment. Each transmitter base takes 2x AA batteries to power it.
text_image
① 903.10L ###Begin by removing the cap from the USB receiver, and plug the receiver directly into a USB jack on your computer. If you are a using a desktop computer, plug it directly into the computer tower and not a USB jack on the keyboard, these are usually lower power and it may not work.
Make sure you have 2 fresh AA batteries installed in your transmitters and turn them on. When the transmitters are connected, the red and green status lights on the USB receiver will light up.
You may need to go into your computer's System Settings (PC) or System Preferences (Mac) and go to the Sound settings and change the Input Device. The USB-CAST receiver will be called "USB PnP Audio Device" on the Input list. For many computers this will be done automatically upon connecting the USB-CAST receiver.
PC
Sound
Output
Choose your output device
Speakers (Realtek High Definition...
Certain apps may be set up to use different sound devices than the one selected here. Customize app volumes and devices in advanced sound options.
Device properties
Master volume

Input
Choose your input device
Microphone (2- USB PnP Audio D...
Certain apps may be set up to use different sound devices than the one selected here. Customize app volumes and devices in advanced sound options.
Device properties
Test your microphone

Mac
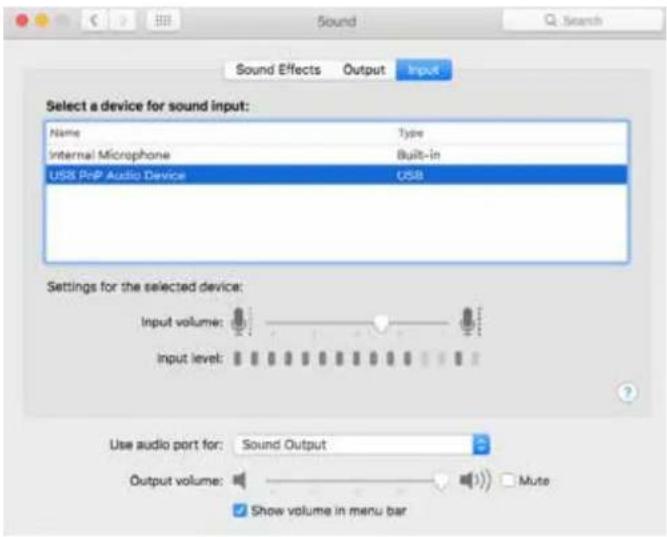
text_image
Sound Sound Effects Output Input Select a device for sound input: Name Type Internal Microphone Built-in USB PrP Audio Device USB Settings for the selected device: Input volume: Input level: Use audio port for: Sound Output Output volume: Mute Show volume in menu barWhile in the Sound settings, you can also test the microphones. Speak into the mics and see if the microphone meter is moving, showing that the computer is registering your voice. You will NOT hear yourself through your computer's speakers. If the mic input meter is moving, everything is connected properly.
Normally, your own voice is not played out of your speakers, this is by design to prevent echoes and feedback. If you wish to hear yourself for monitoring purposes, you will need to connect an amplified speaker to the 18 inch output on the USB receiver. Please see page 7 for more info.
Now open your video conferencing app of choice and start chatting!
Change Mic Input in Common Apps
Below we will go over some of the common software apps and where you can change the mic input settings within those apps if needed. Just like with the computer itself, many of the apps we use will automatically change the input source, but here is what to look for if you are having issues.
Zoom
The most popular video conference app of 2020, Zoom will actually perform a step by step set-up with you to select your output and input if you select "Test Speaker and Microphone" before joining a meeting.
After selecting your speaker (output), it will ask you to then select your microphone (input). In the microphone selection menu, you want to select "USB PnP Audio Device". If you've already changed your computer's input device as stated on the previous page of this manual, you can also select "Same as System".
text_image
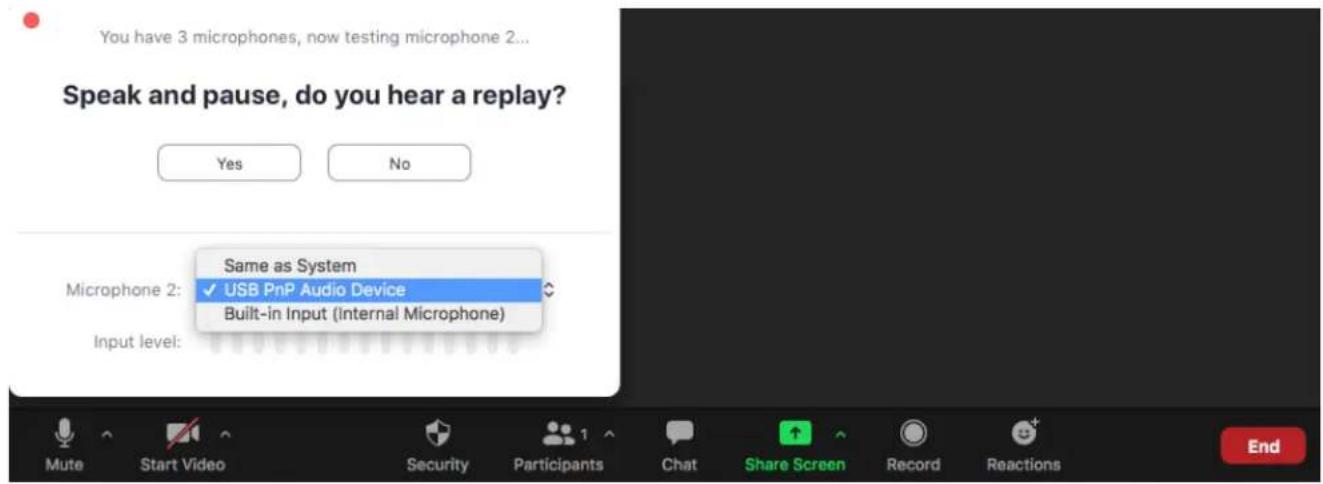
You have 3 microphones, now testing microphone 2... Speak and pause, do you hear a replay? Yes No Same as System ✓ USB PnP Audio Device Built-in Input (Internal Microphone) Microphone 2: Input level:Speak into the microphone briefly, you should see the microphone meter light up, and it will playback your voice for the purpose of testing the mic.
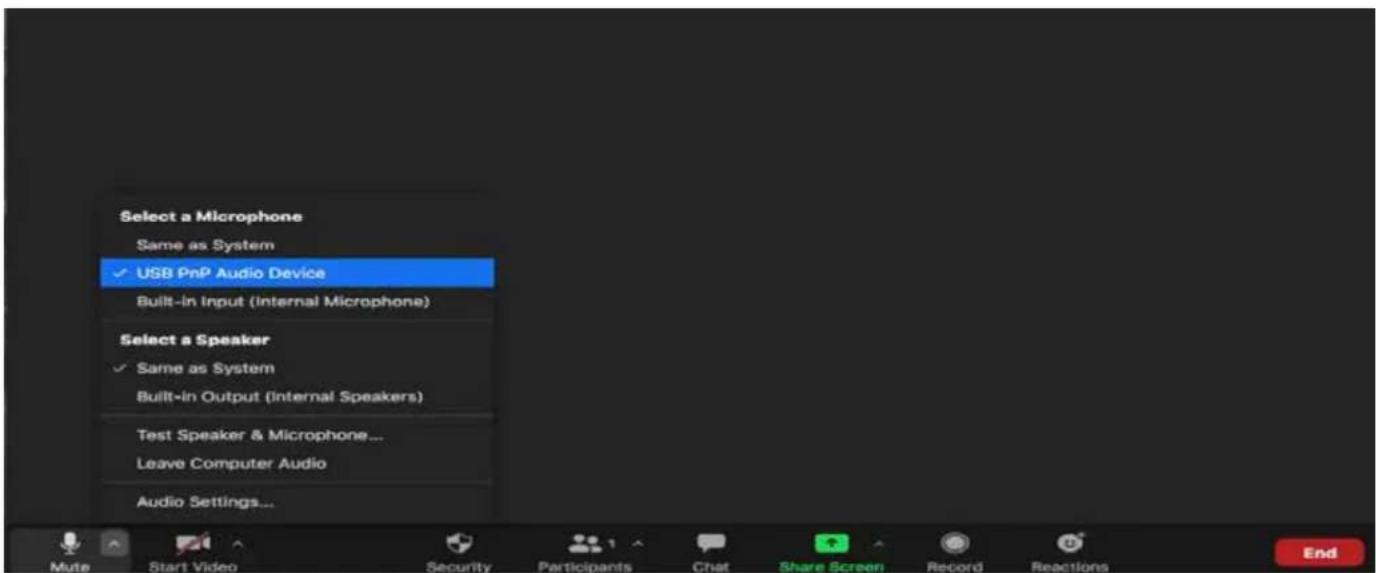
If you need to change the mic input while you are already in a meeting for any reason, look for the microphone symbol on the bottom left of the Zoom window. Click the up arrow to bring up a menu and see your current microphone and speaker selections. Select "USB PnP Audio Device" for your microphone, or if you have changed the input setting for your computer you can select "Same as System"
text_image
Select a Microphone Same as System ✓ USB PnP Audio Device Built-in Input (Internal Microphone) Select a Speaker ✓ Same as System Built-in Output (Internal Speakers) Test Speaker & Microphone... Leave Computer Audio Audio Settings...Change Mic Input in Common Apps
Google Meet
Recently made available free to all, Google Meet is a video conference software you can run directly on your computer's web browser, no need to download and install a separate application.
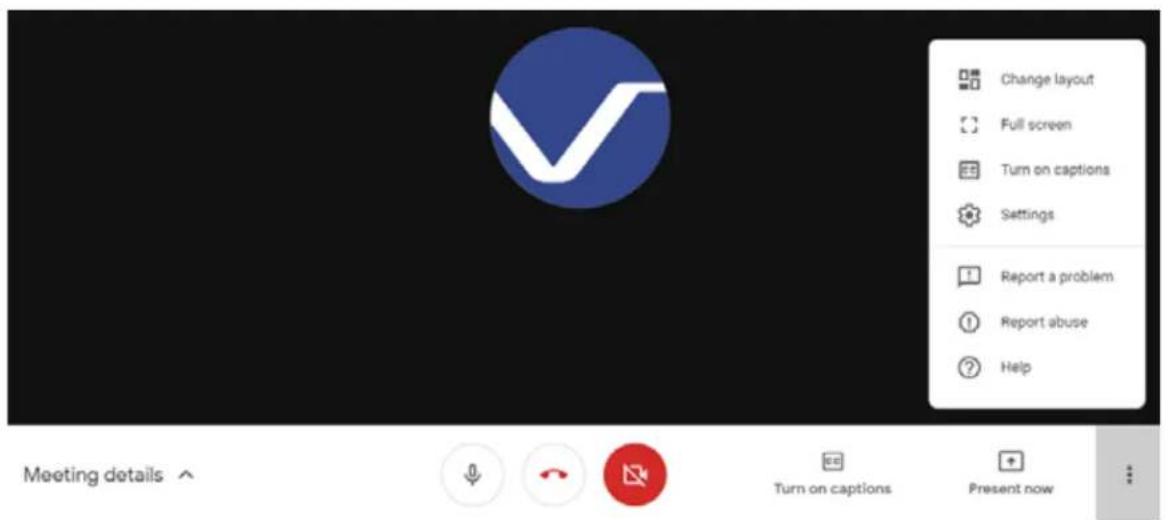
To change the microphone input, first open the menu by clicking on the three vertical dots, then select settings. Before joining a meeting, the dots to access the menu will be on the top right of the window, after joining they will be on the bottom right.
text_image
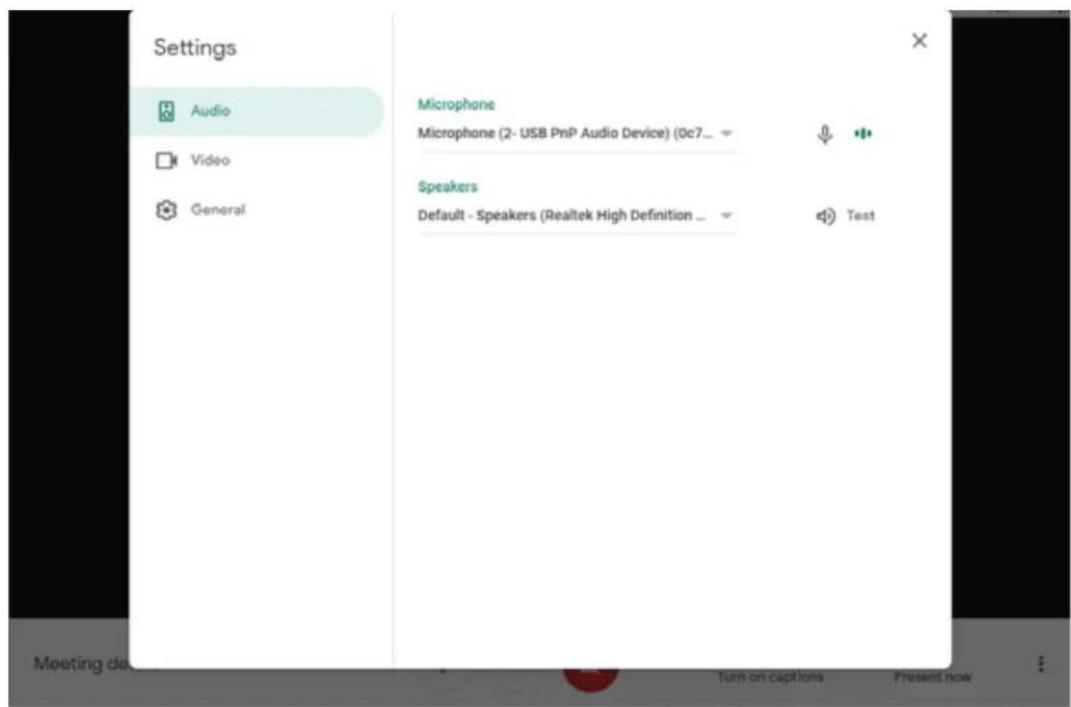
Change layout Full screen Turn on captions Settings Report a problem Report abuse Help Meeting details ↑ Turn on captions Present nowOnce you are in the audio settings, under Microphone there will be a drop down menu, make sure "USB PnP Audio Device" is selected. Once selected, when you speak into the mic the small meter to the right should move showing it is receiving the signal.
text_image
Settings Audio Video General Microphone Microphone (2- USB PnP Audio Device) (0c7__ Speakers Default - Speakers (Realtek High Definition __ Test Meeting de Turn on capions Present nowChange Mic Input in Common Apps
Facetime
An apple exclusive software, Facetime comes pre-installed on all iPhones and Mac computers. If everyone in your group is on an Apple device, Facetime is a perfectly fine application to use for group video calls.
After you open Facetime on your Mac, on the toolbar at the top of the screen, click on Video to drop down a menu. In this menu there is Microphone section where you can select your option. Make sure to select "USB PnP Audio Device". This menu can be accessed before or after joining a call.
| FaceTime Edit Video Window Help |
| Mute |
| Always On Top |
| Use Landscape R Enter Full Screen ^F |
| Microphone Internal Microphone |
| ✓USB PnP Audio Device |
The transmitter is not turning on.
Make sure there are two new AA batteries installed, and that they are installed with the positive and negative ends oriented the correct way.
The computer is not recognizing the USB receiver, it does not appear on the input list.
Try another USB input on the computer. Some USB jacks provide more power than others. Even if you can charge your phone from it, it may not supply enough power for the receiver and sound card in the USB receiver.
The red and green status lights do not light up when I turn on either of the mics.
Try changing the frequency of the transmitter. Use the set button on the handheld mic or bodypack, or press the power button on the tabletop base, and it should re-sync after a few seconds. See pages 7-8 for button operation. See Pairing the Microphones below if you are still having issues connecting to the receiver.
I cannot hear myself from the 18 inch output on the receiver.
This output is a mic level output, which is a very low voltage. If you plug in a pair of headphones, there will be no audio or very low audio. You must connect this output to an amplifier or a set of powered speakers, preferable into a Mic input if it has one.
The computer or video application is not registering my voice.
Make sure you have selected the correct input source for the microphone. Also make sure you have not muted yourself or no one has muted you in the video application. You should be able to switch inputs during a call, but if you are experiencing issues when doing this, try leaving the meeting and rejoining.
Pairing the Microphones:
If you are still having issues getting the transmitters to pair to the receiver, and have tried changing the batteries and changing the frequency as stated above, you may need to pair them again. Follow the steps below:
Make sure both transmitters are powered off and the USB receiver is unplugged.
Hold the power button on mic 1 until the display is flashing.
Hold the power button on mic 2 until the display is flashing.
Turn on the USB receiver by plugging it into the computer, or any 5V USB power source.
Press the power button for mic 1, and then for mic 2.
The display on the mics should stop flashing, and you should now see the red and green status lights lit up on the receiver. Go ahead and power the mics off, and the next time you power them on they should pair automatically.
Notes
LIMITED DOMESTIC WARRANTY
VOCOPRO WARRANTS ALL PRODUCTS PURCHASED IN U.S. AGAINST DEFECTS IN MATERIAL OR WORKMANSHIP FOR A PERIOD OF ONE YEAR FROM THE INITIAL DATE OF RETAIL PURCHASE FROM AN AUTHORIZED VOCOPRO DEALER, OR, ONE YEAR FROM THE DATE OF MANUFACTURE IF THE PROOF OF PURCHASE DATE IS NOT AVAILABLE. This limited warranty extends to all purchasers or owners of the product during the warranty period with the original retail purchase. VocoPro does not, however, warrant it's products against any and all defects: 1) arising out of material or workmanship not provided or furnished by VocoPro, 2) resulting from abnormal use of the product or caused by use in violation of product instructions, 3) in products repaired or serviced by other service technicians other than authorized VocoPro repair facilities, 4) in products with removed or defaced serial numbers or 5) in components, parts or products expressly warranted by another manufacturer. VocoPro agrees to supply all parts and labor to repair or replace defects covered by this limited warranty with parts or products of original or improved design, at its option in each respect, if the defective product is shipped prior to the end of warranty period to any authorized VocoPro warranty repair facility in U.S., or to the VocoPro, in the original packaging or a replacement supplied by VocoPro, with all transportation costs and full insurance paid each way by the purchaser or owner.
LIMITED WARRANTY OUTSIDE THE U.S.
VOCOPRO PRODUCTS ARE WARRANTED ONLY IN THE COUNTRY WHERE PURCHASED THROUGH AN AUTHORIZED VOCOPRO DISTRIBUTOR IN THAT COUNTRY AGAINST DEFECTS IN MATERIAL OR WORKMANSHIP. THE SPECIFIC PERIOD OF THIS LIMITED WARRANTY SHALL BE THAT WHICH IS DESCRIBED TO THE ORIGINAL RETAIL PURCHASER BY THE AUTHORIZED DEALER OR DISTRIBUTOR AT THE TIME OF PURCHASE.
VocoPro does not, however, warrant it's products against any and all defects: 1) arising out of material or workmanship not provided or furnished by VocoPro, 2) resulting from abnormal use of the product or caused by use in violation of product instructions, 3) in products repaired or serviced by other service technicians other than authorized VocoPro repair facilities, 4) in products with removed or defaced serial numbers or 5) in components, parts or products expressly warranted by another manufacturer. VocoPro agrees through the applicable authorized distributor, to repair or replace defects covered by this limited warranty with parts or products of original or improved design, at its option in each respect, if the defective product is shipped prior to end of warranty period to designated authorized VocoPro warranty repair facility in the country where purchased, or to the VocoPro Headquarter in the U.S., in the original packaging or a replacement supplied by VocoPro, with all transportation costs and full insurance paid each way by the purchaser or owner.
ALL REMEDIES AND THE MEASURE OF DAMAGES ARE LIMITED TO THE ABOVE SERVICES. IT IS POSSIBLE THAT ECONOMIC LOSS OR INJURY TO PERSON OR PROPERTY MAY RESULT FROM THE FAILURE OF THE PRODUCT; HOWEVER, EVEN IF VOCOPRO HAS BEEN ADVISED OF THIS POSSIBILITY, THIS LIMITED WARRANTY DOES NOT COVER ANY SUCH CONSEQUENTIAL OR INCIDENTAL DAMAGES. SOME STATES OR COUNTRIES DO NOT ALLOW THE LIMITATIONS OR EXCLUSIONS OF INCIDENTAL OR CONSEQUENTIAL DAMAGES, SO THE ABOVE LIMITATION MAY NOT APPLY TO YOU.
ANY AND ALL WARRANTIES, EXPRESSED OR IMPLIED, ARISING BY LAW, COURSE OF DEALING, COURSE OF PERFORMANCE, USAGE OF TRADE, OR OTHERWISE, INCLUDING BUT NOT LIMITED TO IMPLIED WARRANTIES OF MERCHANTABILITY AND FITNESS FOR A PARTICULAR PURPOSE, ARE LIMITED TO A PERIOD OF ONE YEAR FROM EITHER THE DATE OF ORIGINAL RETAIL PURCHASE OR, IN THE EVENT OF NO PROOF OF PURCHASE DATE IS AVAILABLE, THE DATE OF MANUFACTURE. SOME STATES OR COUNTRIES DO NOT ALLOW LIMITATIONS ON HOW LONG AN IMPLIED WARRANTY LASTS, SO THE ABOVE LIMITATIONS MANY NOT APPLY TO YOU.
THE LIMITED WARRANTY GIVES YOU SPECIFIC LEGAL RIGHTS, AND YOU MAY ALSO HAVE OTHER RIGHTS THAT VARY FROM STATE TO STATE, COUNTRY TO COUNTRY.
LIMITED DOMESTIC WARRANTY
From:
Place
Stamp
Here
To: VOCOPRO HEADQUARTER
1728 CURTISS COURT
LA VERNE, CA 91750
WARRANTY PROCEDURE
TO VALIDATE YOUR WARRANTY: Fill out the attached warranty card, being sure to include the model and serial number of the unit since this is how warranty cards are tracked. If your VocoPro product was purchased in the U.S., mail the completed card directly to VocoPro within 10 days of the date of purchase. If you purchased the product outside the U.S. you must file your warranty registration card with the distributor in that country. It is advised that you keep your bill of sale as proof of purchase, should any difficulties arise concerning the registration of the warranty card.
WARRANTY REGISTRATION is made and tracked by MODEL AND SERIAL NUMBER ONLY, not by the purchaser's or owner's name. Therefore any warranty correspondence or inquiries MUST include the model and serial number of the product in question. Be sure to fill in the model and serial number in the space provided below and keep this portion of the warranty card in a safe place for future reference.
WARRANTY SERVICE MUST BE PERFORMED ONLY BY AN AUTHORIZED VOCOPRO SERVICE FACILITY LOCATED IN THE COUNTRY WHERE THE UNIT WAS PURCHASED, OR AT THE VOCOPRO HEADQUARTERS IN THE U.S. It is recommended that advance notice be given to the repair facility to avoid needless shipment in case the problem can be solved over the phone. UNAUTHORIZED SERVICE PERFORMED WILL VOID ANY EXISTING FACTORY WARRANTY ON THAT PRODUCT.
FACTORY SERVICE: If you wish your product to be serviced at the factory, it must be shipped FULLY INSURED, IN THE ORIGINAL PACKING OR EQUIVALENT. This warranty will NOT cover repairs on products damaged through improper packaging. If possible, avoid sending products through the mail. Be sure to include in the package:
-
Complete return shipping address (P.O. Box number are NOT acceptable).
-
A detailed description of any problems experienced, including the make and model numbers of any other equipment in the system.
Repaired products will be returned freight C.O.D. unless sufficient return shipment funds are included with the unit.
Products sent to the factory from outside the U.S. MUST include return freight funds, and the sender is fully responsible for all, customs procedures, duties, tariffs and deposits.
RECORD THE MODEL AND SERIAL NUMBER BELOW AND RETAIN THIS PORTION OF THE WARRANTY CARD FOR YOUR FILES:
MODEL
DATE OF PURCHASE
SERIAL NUMBER
PLACE OF PURCHASE
LIMITED DOMESTIC WARRANTY
Detach this portion and mail it to the factory
MODEL____MANUFACTURE DATE____SERIAL NO.
OWNER'S NAME ADDRESS
CITY STATE ZIP
The following information is appreciated, but not required:
Dealer's name and address:
What other products and/or product changes would you like to see Manufactured?
Any other comments:
Our Team is Here to Help


Please do not return to the retailer if you are having a technical issue operating or connecting the unit. If you need additional help, have questions, or need support with your VocoPro product contact us:
Toll Free: 800-678-5348
TEL: 909-593-8893
FAX: 909-593-8890
Email Tech Support at:
techsupport@vocopro.com