
Pro Magnum Feeder - Ukategoriseret Moultrie - Gratis brugsanvisning og manual
Find enhedens vejledning gratis Pro Magnum Feeder Moultrie i PDF-format.

Brugerspørgsmål om Pro Magnum Feeder Moultrie
0 spørgsmål om dette apparat. Besvar dem du kender, eller stil dit eget.
Stil et nyt spørgsmål om dette apparat
Download vejledningen til din Ukategoriseret i PDF-format gratis! Find din vejledning Pro Magnum Feeder - Moultrie og tag din elektroniske enhed tilbage i hånden. På denne side er alle dokumenter nødvendige for brugen af din enhed offentliggjort. Pro Magnum Feeder af mærket Moultrie.
BRUGSANVISNING Pro Magnum Feeder Moultrie
Instructions for Pro Magnum Feeder
THANK YOU for your purchase of the Pro Magnum Feeder. Please read this sheet before operating the unit. If you should have any questions about this product or any other Moultrie product, please contact us using the information on the back of this sheet. To help us to better serve you and to activate your Lifetime Warranty, please submit your warranty information online at http://www.moultriefeeders.com/warranty
A
DRILLING YOUR DRUM/BARREL/BUCKET
NOTE: If you purchased a Moultrie barrel, go to step II
Pro Magnum will mount to the bottom of any drum or bucket
1 Turn drum over, measure and mark the center of the bottom.
2 Center the provided template on the bottom of the drum and secure with tape. Drill three 5/16" Feeder Leg Holes.
Using a Hole Saw, drill a 2.25" hole in the center of the bottom of your drum.
natural_image
3D diagram of a circular mechanical component with two black brackets and a central hole (no text or symbols)B
MOUNTING THE FEEDER
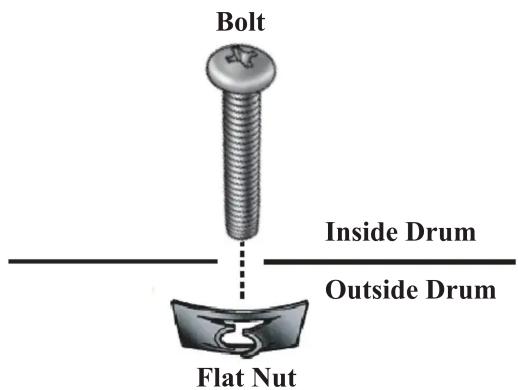
1 From the inside of the drum, slide the three provided Bolts through the holes on the bottom and into the provided Flat Nuts. From the inside, using a Phillips head screwdriver, turn the Bolt clockwise until the Flat Nut is tight against the bottom.
2 Slide feeder over three Bolts that are sticking firmly through the bottom of the drum. Attach Feeder Kit to the Drum using the three provided Wing-Nuts.
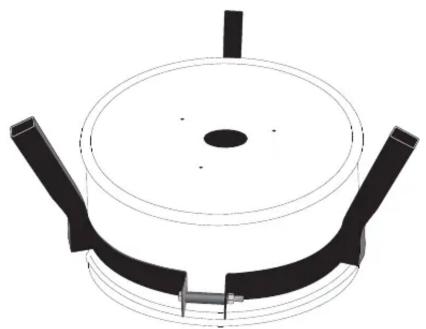
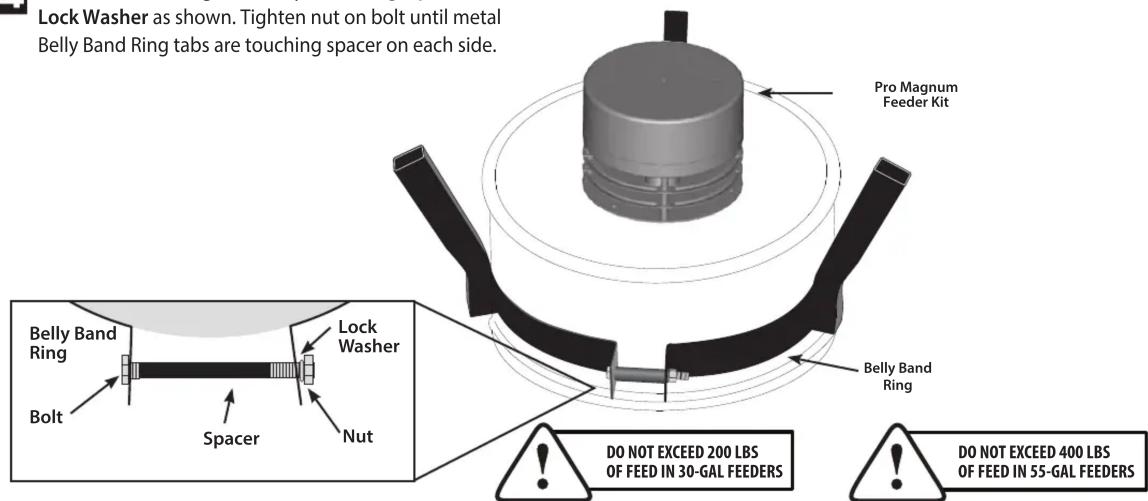
3 Turn the Metal Drum upside down and slide the Belly Band Ring around perimeter and make sure that belly band is snug against the bottom structure ring as shown (Moultrie barrel only).
4 Slide the bolt through the Belly Band Ring, Spacer and Lock Washer as shown. Tighten nut on bolt until metal Belly Band Ring tabs are touching spacer on each side.
NOTE: DO NOT LOAD FEEDER until it is standing up and in place (see Section E).
C INSTALLING BATTERY
CAUTION:WEAR EYE PROTECTION
Remove bottom and install one or two 6-volt alkaline (ex. Energizer ^™ ) or Moultrie rechargeable batteries by attaching the Red Alligator Clip to the positive terminal (+) and the Black Alligator Clip to the negative (-) terminal.
NOTE: Be sure that the Red and Black alligator clips labeled with a 1 are attached to the same to the same battery and that the Red and Black alligator clips labeled with a 2 (if used) are attached to the same battery.

D CONFIGURING AND TESTING FEEDER
INSTALL BATTERY: Open Kit by removing wingnut located on the bottom and remove outer case. Install a 6-Volt Alkaline (ex. Energizer™) or Moultrie rechargeable battery (MFH-SRB6) by attaching the Red Alligator Clip to the positive terminal (+) and the Black Alligator Clip to the negative (-) terminal. Note: When Battery Level Indicator is full, the battery is good. If the icon is flashing, you will need to replace or recharge your battery.
2 SET TIME OF DAY: Press the UP or DOWN button until the correct time of day appears. Press and release button to single-step through the minutes or hold down to advance quickly.
3 SET FEED TIMES: Press the SET button until the correct Timer Number appears in the upper right hand corner as shown. Press the UP or DOWN button to set the Feed Time. Note: Factory settings are 7am and 6pm.
4 SET RUN DURATION: Press the SET button again to set the RUN-TIME SECONDS which can range from zero to twenty seconds. Adjust RUN-TIME SECONDS using the chart below. Set the RUN-TIME SECONDS to zero to disable the specific timer. Note: Factory setting is 4 seconds.
| RUN TIME (sec.) | 1 | 2 | 3 | 4 | 5 | 6 | 7 | 8 | 9 | 10 | 11 | 12 | 13 | 14 | 15 | 16 | 17 | 18 | 19 | 20 |
| Approx. Feed Dispensed (lbs.) | .38 | .62 | .88 | 1.0 | 1.2 | 1.5 | 1.7 | 1.9 | 2.2 | 2.4 | 2.6 | 2.8 | 3.0 | 3.3 | 3.5 | 3.7 | 4.0 | 4.2 | 4.4 | 4.6 |
5 SET FEED LEVEL: Your Feeder Timer is equipped with a Feed Level Estimator. Press the SET button until "SET FEED REMAINING" appears. Enter the amount of feed (lbs.) added to Hopper. The timer will automatically estimate the amount of feed remaining in lbs. and days after auto-scroll begins. Note: The above estimates are based on using deer corn. Feed type, size and density will affect calculations.
TEST FEEDER: PRESS AND HOLD the SET button while the RUN-TIME SECONDS are displayed. Release the button and get away from the feeder when the message "TESTING GET AWAY" appears on the display.

Full Battery

Empty Battery


E STAND UP FEEDER AND INSTALL LID
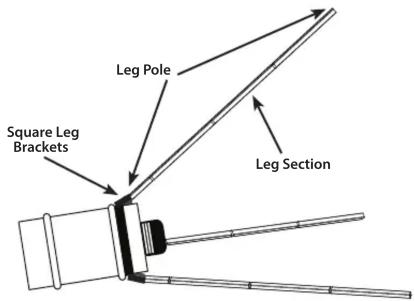
Place Hopper on side. Assemble three Leg Poles using four Leg Sections each. Install a Leg Pole on the inside of each of the Square Leg Brackets. Make sure to have all leg sections connected properly with the sections inserted as far as they will go. With two Leg Poles against the ground as shown, carefully stand up the Feeder assembly.
Install lid and tighten bolt securely after adding feed.
Helpful Tips:
– For extended battery life, the Moultrie Deluxe Solar Panel (MFH-DSP) or Feeder PowerPanel (MFA-12602) can be added using the External Power Port.
– For added security against pests, the Moultrie Varmint Guard (MFA-12650) can be added.
- Replacement parts can be purchased from Moultrie's customer service line at the number below.
- Your Moultrie Pro Magnum Feeder Kit has a Lifetime Warranty, just pay a \$35.00 processing fee. Call 800-653-3334 for payment and shipping information.
MOULTRIE
Our Service Department will gladly answer any questions you have. Call 800-653-3334, Monday - Friday, 8:00 AM to 5:00 PM CST.
www.moultriefeeders.com
Mærke : Moultrie
Model : Pro Magnum Feeder
Kategori : Ukategoriseret