Seamless FR1 - Subwoofer SpeakerCraft - Gratis brugsanvisning og manual
Find enhedens vejledning gratis Seamless FR1 SpeakerCraft i PDF-format.

Brugerspørgsmål om Seamless FR1 SpeakerCraft
0 spørgsmål om dette apparat. Besvar dem du kender, eller stil dit eget.
Stil et nyt spørgsmål om dette apparat
Download vejledningen til din Subwoofer i PDF-format gratis! Find din vejledning Seamless FR1 - SpeakerCraft og tag din elektroniske enhed tilbage i hånden. På denne side er alle dokumenter nødvendige for brugen af din enhed offentliggjort. Seamless FR1 af mærket SpeakerCraft.
BRUGSANVISNING Seamless FR1 SpeakerCraft
Seamless™

text_image
1 2 3 4 5 6 7 8 9Speaker Cutout - (H x W) 16 ½" x 13 ¼" (419 mm x 336 mm)
Speaker Dimensions - (H x W x D) 16 ^3/8 " x 13" x 2 ^3/4 " (416 x 330mm x 70mm)
Seamless FR1 Installation Instructions
Tape this template to drywall
Center between studs, and make sure a space of 13/4" x 21" x 3" is available for the speaker and installation blocks.
Mark the location of holes
Use a punch to mark holes #1 through #18.
Remove template and drill holes
Using a 1/8" (or smaller) bit, drill through holes at locations #1 through #1B.
Cut the drywall
Make the speaker cutout by connecting the corner holes 41, 9, 10, 18 (see dotted line of speaker cutout).
Install the installation blocks and springs
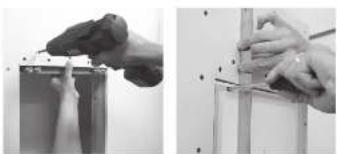
Using fourteen of the supplied drywall screws, attach the installation blocks to the top and bottom of the speaker cutout. Figure 1 and Figure 4.
Connect the speaker
Using the supplied wire nuts, connect the speaker observing proper polarity. Place the speaker on the springs, and loosely secure it using the supplied screws. A slow screw gun is ideal for this operation.
Flush the speaker to the wall
Using a conventional screwdriver, adjust the four speaker screws by hand, until the diaphragm of the speaker is perfectly flush to the surrounding drywall. Use a straight edge for this operation. Figure 2.
Test the speaker
Test the speaker thoroughly by playing music under actual conditions.
Tape and mud
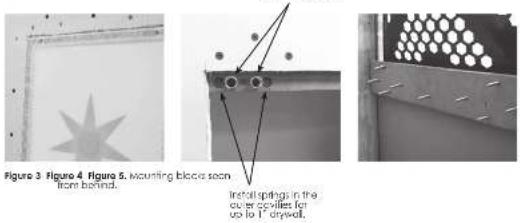
Tape edges and finish, using drywall compound prepared with adhesive mix (50% water, 50% acrylic admix by Westpac Materials recommended). Figure 3.
The total thickness of the drywall compound and texture (if any) must not exceed 116 " (1.6mm).
Wait at least 2 days
Let the compound dry completely.
Check for ghosting
Apply a thin skim coat of mud if the speaker begins ghosting.
Paint
Paint, and allow to dry before playing speaker.
Tips & Tricks
Placement
- Works fine with metal or wood studs.
- Place in ceilings, walls, soffits, light locations.
- Can be placed in steam showers, outdoors, in marine environments.
- Invisible behind paint, plaster, wall paper and stucco.
Template
Holes #1, 9, 10, 18 define the speaker cut-out. The other holes tell you where the mounting block screws go.
Mounting blocks
The supplied mounting blocks accommodate drywall from 12 " to 1" in thickness. Figure 4.
natural_image
Two black-and-white photos showing hands installing or adjusting a wall panel; no visible text or symbols.Figure 1 Figure 2
Leveling
To avoid unwanted bumps in the finished drywall, make the speaker as flush as possible.
nsoll springs in the
of this paper,
text_image
Figure 3. Figure 4. Figure 5. Mounting blocks soon from behind. Install springs in the cutter capacities for up to 1" drywall.Mudding
- A thin coat of drywall compound and texture, less than 12 , is all that's required to hide the speaker.
- For a smooth finish, we recommend sanding around the perimeter of the speaker after the mud has completely dried. Sanding makes shrink marks disappear, and ensures a perfect finish. Optionally, on additional—and very light—coat of mud can be used to make sandpaper marks invisible.
Note
Invisibility of the Seamless speaker is predicated on the skill of the drywaller. Standard level 5 finish is required to ensure a high quality finish.
Limited Warranty
For three years from the date of installation SpeakerCraft will repair or replace for the original owner any defect in materials or workmanship that occurs in normal use of the speaker system, without charge for parts. Excluded from this warranty is damage that results from abuse, misuse, accidents, shipping, repairs, or modifications. This warranty gives you specific legal rights, and you may also have other rights that vary from state to state. In case of service, please contact tech Support at techsupport2@speakercraft.com.. Please contact SpeakerCraft for additional warranty information.
Speaker Cutout
