
Primo 805 - Smartphone DORO - Gratis brugsanvisning og manual
Find enhedens vejledning gratis Primo 805 DORO i PDF-format.


Brugerspørgsmål om Primo 805 DORO
0 spørgsmål om dette apparat. Besvar dem du kender, eller stil dit eget.
Stil et nyt spørgsmål om dette apparat
Download vejledningen til din Smartphone i PDF-format gratis! Find din vejledning Primo 805 - DORO og tag din elektroniske enhed tilbage i hånden. På denne side er alle dokumenter nødvendige for brugen af din enhed offentliggjort. Primo 805 af mærket DORO.
BRUGSANVISNING Primo 805 DORO
Primo 805
Manual
English
text_image
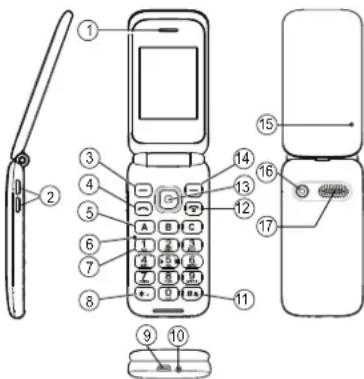
Diagram of a mobile phone with numbered parts for identification and usagewww.doro.com

- Earpiece
- Volume control
- Left selection button
- Call button
- Memory keys A - C
- Microphone
- Voice mail
- International prefix/Symbols
- Charging socket (micro-USB)
-
Headset socket
-
Input method/Silent
- End call and
Power on/Power off - Navigation key
- Right selection button
- Indicator light
- Camera lens
- Loudspeaker
Note! All illustrations are for illustrative purposes only and may not accurately depict the actual device. The items supplied with your phone might vary depending on the software and accessories available in your region or offered by your service provider. You can obtain additional accessories from your local Doro dealer. The supplied accessories provide the best performance with your phone.
1. GET STARTED
SIM card, memory card and battery Remove the battery cover
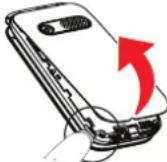
Be careful not to damage your fingernails when you remove the battery cover. Do not bend or twist the battery cover excessively as it may be damaged.
Insert the SIM card (required)
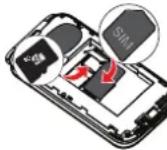
Remove the battery if it is already installed. Insert the SIM card by gently sliding it into the holder. Make sure the contacts are facing downwards and the cut-off corner is placed as shown on the drawing. Take care not to scratch or bend the contacts
on the SIM card. This device accepts mini SIM or 2FF SIM card.
If you have problem to remove/replace the SIM card, use adhesive tape on the exposed part of the SIM card to pull it out.
Insert the SD card (optional)
The device works with or without a SD card. Locate the SD card holder. Press the card's lid carefully to the right until it "clicks". Lift the lid to an upright position. Place the card in the compartment as shown on the drawing. Make sure the card's contacts are facing downwards. Close the lid. Carefully press down and slide the lid to the left until it "clicks" into place. Compatible card type: microSD, microSDHC.
Insert the battery and replace the
battery cover
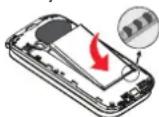
Insert the battery by sliding it into the battery compartment with the contacts facing downwards to the right. Replace the battery cover.
Charge the phone
CAUTION
Only use batteries, charger and accessories that have been approved for use with this particular model. Connecting other accessories may be dangerous and may invalidate the phone's type approval and guarantee.
When the battery is running low, it is displayed and a warning signal is heard.
Connect the mains adapter to a wall socket and to the charging socket on the phone.
Alternatively connect the cable to the charging socket on the phone and to a USB port on a computer.
2. GET TO KNOW YOUR PHONE
Turn the phone on and off
-
Press and hold the End call button 📋 the phone to turn it on/off.
-
If the SIM card is valid but protected with a PIN code (Personal Identification Number), Input PIN is displayed. Enter the PIN code and press OK. Delete with Clear.
Note! If PIN and PUK codes were not provided with your SIM card, please contact your service provider.
Tip: It is recommended to remove the protective plastic film from the display to enhance the visibility.
Remain: #shows the number of PIN attempts left. When no more attempts remain, PIN blockedis displayed. The SIM card must now be unlocked with the PUK code (Personal Unblocking Key).
-
Enter the PUK code and confirm with OK.
-
Enter a new PIN code and confirm with OK
-
Re-enter the new PIN code and confirm with OK,
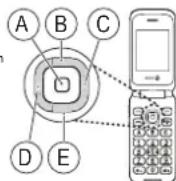
Navigation key
- Press (A) to confirm. Alternatively press selection button OK.
- Press (A) from standby to open the phone menu. Alternatively press left selection button Menu to access the phone menu.
Press the buttons: B (UP), C
(RIGHT), D (LEFT),
Shorcuts
The navigation key also have the following shortcuts from standby:
B Camera
C Messaging
D User profiles
E Alarm
Enter text
- Press a numerical key repeatedly until the desired character is shown. Wait a few seconds before entering the next character.
- Press ✪ for a list of special characters. Select the desired character with UP/DOWN/RIGHT/LEFT and press OK to select.
- Use navigation keys to move the cursor within the text.
- Press # to cycle upper case, lower case and numerals.
Volume control
Use the side buttons to adjust the sound volume during a call. The volume level is indicated on the display.
Silent
Silent is a fixed profile with keypad tone, message tone and ring tone disabled.
- Press and hold # to activate and to deactivate silent.
Phone indicators
LED light on the phone will:
- flash green when you have a new message or a missed call. After reading the new message/missed call, the flashing will stop.
• steady green when fully charged - flash red when the battery is running low
• steady red when charging.
3. CALLS
Make a call
-
Enter the phone number including the area code. Delete with Clear.
-
Press to dial. Press
Abort to cancel the call.
- Press to end the call.
Note! For international calls, always use+ before the country code for best operation. Press ✪ twice for the international prefix+.
Call from the phonebook
-
Press Name to open the phonebook.
-
Use UP/DOWN to scroll through the phonebook, or quick search by pressing the key corresponding to the first letter of the name.
- Press Options → Call, alternatively, press to dial the selected entry, or pressBack to return to standby.
Receive a call
- Press to answer, or Reject to reject the call.
Alternately, press to reject the call directly. - Press @ end the call.
Call options
During a call the selection buttons (L-40e access to additional functions.
4. SOS CALLS
As long as the phone is switched on, it is always possible to place an SOS call by entering the main local emergency number for your present location followed by
5. MESSAGES
Create and send text messages/picture messages
- Press Menu → Messages → Write message → Text message/Multimedia message.
- Write your message, then pressOptions.
- If you want to send a picture message, select: Add picture/Add sound/Add video/Add subject.
- When ready, pressOptions → Send to and select recipient from the phonebook[Add from Phobook]. Alternatively, selectEnter recipient to add recipient manually and press Done.
-
You can modify the recipients by selecting one and press Options.
-
When done, press Options → Send
Text messages/picture messages settings
- Press Menu → Messages → Message settings → Text message/Multimedia message
Inbox/Drafts/Outbox/Sent messages
- Press Menu → Messages.
-
Select Inbox/Drafts/Outbox/Sent messages
-
Select the wanted message.
-
Press Options to view the available options.
6. PHONEBOOK
The Phonebook in the phone can store 1000 entries.
Add contact
-
Press Menu → Phonebook → Add new contact → select To SIMor To phone.
-
Enter Name and Number for the contact.
-
Enter wanted fields.
-
When done, press Options →Save
To modify an entry press Options for the available options.
Memory keys A - C
Add numbers to Memory keys
-
Press Menu → Phonebook → Options → Phonebook settings → ABC-keys
-
Select Key A and enter the phone number including the area code. Delete with Clear.
- Repeat to add speed dial entries for buttons B and C.
- Press OK to save.
Use A - C to speed dial an entry from standby. - Press the corresponding button to dial.
Speed dial 2 - 9
Enable/disable speed dial
-
Press Menu → Phonebook → Options → Phonebook settings → Speed dial.
-
Select Status → On/Off
Add speed dial numbers
-
Press Menu → Phonebook → Options → Phonebook settings → Speed dial → Set numbers
-
Select the wanted position (2-9) → Edit → and select an entry from the phonebook.
-
Press OK to confirm.
-
Repeat to add speed dial for more entries.
To edit or remove an entry pressOptions →
Edit/Remove
Use 2 – 9 to speed dial an entry from standby.
- Press the corresponding button to dial.
Voicemail server
If your subscription includes an answering service, callers can leave a voice mail message when you are unable to answer a call. Voice mail is a network service and you may need to subscribe to it first. For more information and for the voice mail number, contact your service provider.
Call voice mail
- Press and hold shortcut button 1
Owner numbers
The phone number assigned to your SIM card is saved as Owner number if this is allowed by the card. You can also select to add additional numbers.
Fixed dial (FDN)
You can limit calls to certain numbers saved on the SIM card. The list of allowed numbers is protected by your PIN2-code.
Note1 A password is needed to apply fixed dial. Contact your service provider to get the password.
7. CALL LOG
Received, missed, and dialled calls are saved in a combined call log. 20 calls of each type can be stored in the log. For multiple calls related to the same number, only the most recent call is saved.
1. Press to find your call log.
2. Use UP/DOWN to scroll through the call log.
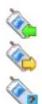
= Received call
= Dialled call
= Missed call
- Press to dial, or
Options for the available options.
8. MULTIMEDIA
Press Menu → Multimedia to reach the following features:
Camera
You can take photos, record videos and view your photos and videos.
- Press Menu → Multimedia → Camera.
- Press middle navigation key to take the photo.
- Press UP/DOWN to switch between camera and videocamera.
- Press Options ☑ press Back ☑ take a new photo (If you do not make any selection the picture is saved)
Camera settings
Press and scroll through the different options.
Press go back.
Image viewer
Here you can view your saved pictures. PressOptions to view the available options.
Video gallery
Here you can view your saved videos.
Sound recorder
Here you can record sounds using the in-built microphone. Recorded sounds can also be used as ring tones.
-
Press Menu → Multimedia → Sound recorder.
-
Press Options → New record to start the recording.
-
Press Pause/Continue or Stop to control the recording-
-
Press Options for the available options.
FM radio
The FM radio has a frequency range from 87.5 to 108.0 MHz. To listen to the radio, you need to connect a compatible headset which acts as an antenna.
- Press LEFT/RIGHT to change frequency
- Press UP/DOWN to control volume
- Press Options for the available options:
• Channel list to save up to 30 radio channels.
- Manual input to enter the frequency with the keypad.
- Auto search to search and save the strongest channels in your current location.
Please note! Previously stored channels will be
replaced by Auto search.
- Settings for more settings.
9. SETTINGS
Phone settings
- Time and date To set the time and date of the phone. You can also set your home city and let your phone auto update the time when you travel.
• Language Set the language of the phone. - Wallpaper Set background wallpaper of the display.
• LCD backlight Set brightness and timeout for the display.
Call settings
- Call waiting: You can handle more than one call at a time, put the current call on hold and answer the incoming call. When activated, an alert tone is heard if there is an Incoming call while talking.
- Call divert You can divert calls to an answering service or to another phone number. Set up which calls should be diverted. Select a condition and press OK, then select Activate, Deactivate or Query status for each.
- Call barring Your phone can be restricted to disallow certain types of calls.
Note1 A password is needed to apply call barring. Contact your service provider to get the password.
Network setup
Select network
- New search to perform new search if connection is lost.
- Select network to view available network, a list of available network operators is displayed (after a short delay). Select desired operator.
• Network mode to select another network. Select Automatic to select network automatically or Manual to select network manually.
Preferences
To set the priority of the service proders
Service selection
• GSM service only.
• WCDMA 3G service only.
• Automatic switch between GSM and 3G for best service.
Network information
View your current network settings.
GPRS connection
Set when GPRS data should be available, When needed or Always.
GPRS transfer pref. Set if data or voice call should have GPRS preference.
HSPA preferenceSet if HSPA should be on or off.
User profiles
The phone has 4 available user profiles. Each profile can have different settings for ring signals, ring volume, vibration, message notification etc. The user profiles can also be customized for different environment.
-
Select the wanted user profile.
-
Press Options to:
• Activate to activate the profile
- Customize to set it as you wish
- Reset to return the profile to default settings
Flight mode
To set flight mode on or off.
Bluetooth
You can connect wirelessly to other Bluetooth compatible devices such as headsets or other phones.
Important!
When you are not using Bluetooth connectivity, turn off Power or Visibility. Do not pair with an unknown device.
Activate Bluetooth
- Press Menu → Settings → Bluetooth → Power → On.
Visibility
Select On to make your device visible to other devices
Note! To prevent other devices from finding your device, select Off. Even if you select Off, paired devices can still detect your device.
My devices
Add new devices or view saved.
Search audio device
Search for available Bluetooth audio devices.
-
Press Menu → Settings → Bluetooth → Search audio device.
-
Select a device from the list and press Pair to connect.
-
When connecting to another Bluetooth device you need a shared password. Enter the password and press OK.
My name
Here you can enter the name your phone should appear with for other Bluetooth devices.
Advanced
Here you can find further features for your Bluetooth connection.
Data account
The data settings are used by services that communicates using Internet. The data settings for most major service providers are already included from start.
Should you still have problem, contact your service provider for correct settings:
-
Press Menu → Settings → Data account.
-
Select a profile.
-
Press Options → Edit to enter settings for your service provider:
-
Press OK, and press Yes to save.
-
Select your new profile in Menu → Messageing → Message settings → Multimedia message → Data account.
Services
This menu may contain pre-programmed services from your network provider depending on network support and subscription.
Security settings
SIM security
Set you PIN lock On/Off for your SIM card protection
IMPORTANT!
If enabling Off-mode and the SIM card is lost or stolen, it is unprotected.
You can also change you PIN.
Phone security
The phone lock protects your phone from unwanted usage. If activated, phone is locked after restart and the phone code needs to be entered to unlock.
Note! You need to enter the current phone code. Default phone code is 1234.
You can also change you password.
Restore factory settings
Select Restore factory settings to delete phone settings and content such as contacts, number lists and messages (SIM memory is not affected).
Note! You need to enter the current phone code. Default phone code is 1234.
10. FILE MANAGER
Manage the contents and properties of files. You can open, delete, move, copy and rename files.
11. ORGANIZER
Calendar
Here you can create and view scheduled events and appointments. You can also set alarms for calendar entries.
Add an calendar event
-
Press Menu → Organizer → Calendar → Options → Add event.
-
Enter the event details.
-
When done, press Ok to save.
-
Press Options for the available options.
Calculator
The Calculator can perform basic mathematical operations as: addition, subtraction, multiplication and division.
-
Press Menu → Organizer → Calculator
-
Enter digits using the keypad.
-
Use the navigation key get wanted operation.
-
Press twice on the navigation key to reach:
• M+ Current value added to saved number.
• M- Current value subtracted to the saved number.
• MR Recall the saved number.
• MC Clear the saved number.
- Press OK to calculate the result
Alarm
-
Press Menu → Organizer → Alarm → Select wanted entry and press Edit.
-
Enter the alarm details.
-
When done, press Done.
-
When the alarm goes off a signal will sound. Press Stop to turn off the alarm or press Snooze to repeat the alarm after the set snooze time.
Note! The alarm will work even when the phone is switched off. Do not power on if wireless phone use is prohibited or when it may cause interference or danger. Please also note, that if the FM radio is used as the alarm signal you must connect a compatible headset which acts as an antenna.
Stopwatch
Typical stopwatch
You can select between Split timing or Lap timing.
-
Press Menu → Organizer → Stopwatch → Typical stopwatch → Split timing/Lap timing.
-
Press Start to start the clock.
-
Press Split/Lap for split or lap timing.
-
Press Pause to pause the clock.
-
When done, press Done. Press Yes to save and set a name for the timing.
Use View records to see a stored timing.
nWay stopwatch
This feature let's you control 4 timings. Use the navigation key to start the respective timer. When one timer is started the others are paused. The total time is displayed at the top.
-
Press Menu → Organizer → Stopwatch → nWay stopwatch.
-
Press Start to start the clock.
-
Press the navigation key for each individual timer.
-
Press Pause to pause the current timer.
12. SAFETY INSTRUCTIONS
WARNING
The unit and the accessories can contain small parts. Keep all of the equipment out of the reach of small children.
The mains adapter is the disconnect device between the product and mains power. The mains socket outlet must be close to the equipment and easily accessible.
Network services and costs
Your device is approved for use on the WCDMA 900/2100 MHz, GSM 850/900/1800/1900 MHz networks. To use the device, you need a subscription with a service provider. Using network services may result in traffic costs. Some product features require support from the network, and you may need to subscribe to them.
Operating environment
Follow the rules and laws that apply wherever you are, and always turn off the unit whenever its use is prohibited or can cause interference or hazards. Only use the unit in its normal user position.
Parts of the unit are magnetic. The unit can attract metal objects. Do not keep credit cards or other magnetic media near the unit. There is a risk that information stored on them can be erased.
Medical units
The use of equipment that transmits radio signals, for example, mobile phones, can interfere with insufficiently protected medical equipment. Consult a doctor or the manufacturer of the equipment to determine if it has adequate protection against external radio signals, or if you have any questions. If notices have been put up at health care facilities instructing you to turn off the unit while you are there, you should
comply. Hospitals and other health care facilities sometimes use equipment that can be sensitive to external radio signals.
Implanted medical devices
To avoid potential interference, manufacturers of implanted medical devices recommend a minimum separation of 15 cm between a wireless device and the medical device. Persons who have such devices should:
• Always keep the wireless device more than 15 cm from the medical device.
• Not carry the wireless device in a breast pocket.
- Hold the wireless device to the ear opposite the medical device.
If you have any reason to suspect that interference is taking place, turn the phone off immediately. If you have any questions about using your wireless device with an implanted medical device, consult your health care provider.
Areas with explosion risk
Always turn off the unit when you are in an area where there is a risk of explosion. Follow all signs and instructions. There is a risk of explosion in places that include areas where you are normally requested to turn off your car engine. In these areas, sparks can cause explosion or fire which can lead to personal injury or even death.
Turn off the unit at filling stations, and any other place that has fuel pumps and auto repair facilities.
Follow the restrictions that apply to the use of radio equipment near places where fuel is stored and sold, chemical factories and places where blasting is in progress. Areas with risk for explosion are often - but not always - clearly marked. This also applies to below decks on ships; the transport or storage of chemicals; vehicles that use liquid fuel (such as propane or butane); areas where the air contains chemicals or particles, such as grain, dust or metal powder.
Li-ion battery
This product contains a Li-ion battery. There is a risk of fire and burns if the battery pack is handled improperly.
WARNING
Danger of explosion if battery is incorrectly replaced. To reduce risk of fire or burns, do not disassemble, crush, puncture, short external contacts, expose to temperature above 60^ C ( 140^ F), or dispose of in fire or water. Recycle or dispose of used batteries according to the local regulations or reference guide supplied with your product.
Protect your hearing

WARNING
Excessive exposure to loud sounds can cause hearing damage.
Exposure to loud sounds while driving may distract your attention and cause an
accident. Listen to a headset at a moderate level, and do not hold the device near your ear when the loudspeaker is in use.
Emergency calls
Important!
Mobile phones use radio signals, the mobile phone network, the terrestrial network and user-programmed functions. This means that connection cannot be guaranteed in all circumstances. Therefore, never rely only on a mobile phone for very important calls such as medical emergencies.
Vehicles
Radio signals can affect electronic systems in motor vehicles (for example, electronic fuel injection, ABS brakes, automatic cruise control, air bag systems) that have been incorrectly installed or are inadequately protected. Contact the manufacturer or its representative for more information about your vehicle or any additional equipment.
Do not keep or transport flammable liquids, gases or explosives together with the unit or its accessories.
For vehicles equipped with air bags: Remember that air bags fill with air with considerable force. Do not place objects, including fixed or portable radio equipment in the area above the airbag or the area where it might expand. Serious injuries may be caused if the mobile phone equipment is incorrectly installed and the airbag fills with air.
It is prohibited to use the unit in flight. Turn off the unit before you board a plane. Using wireless telecom units inside a plane can pose risks to air safety and interfere with telecommunications. It may also be illegal.
13. CARE AND MAINTENANCE
Your unit is a technically advanced product and should be treated with the greatest care. Negligence may void the warranty.
- Protect the unit from moisture. Rain, snow, humidity, and all types of liquids can contain substances that corrode the electronic circuits. If the unit gets wet, you should immediately power off the phone, remove the battery and allow the unit to dry completely before you replace it.
- Do not use or keep the unit in dusty, dirty environments. The unit's moving parts and electronic components can be damaged.
- Do not keep the unit in warm places. High temperatures can reduce the lifespan for electronic equipment, damage batteries and distort or melt certain plastics.
- Do not keep the unit in cold places. When the unit warms up to normal temperature, condensation can form on the inside and can damage the electronic circuits.
- Do not try to open the unit in any other way than that which is indicated here.
- Do not drop or shake the unit. If it is treated roughly the circuits and precision mechanics can be broken.
- Do not use strong chemicals to clean the unit.
- Do not disassemble, open, crush, bend, deform, puncture or shred.
- Do not modify or remanufacture, attempt to insert foreign objects into the battery, immerse or expose to water or other liquids, expose to fire, explosion or other hazard.
- Only use the battery for the system for which it is specified.
- Only use the battery with a charging system that has been qualified with the system per IEEE-Std-1725. Use of an unqualified battery or charger may present a risk of fire, explosion, leakage, or other hazard.
- Do not short circuit a battery or allow metallic conductive objects to contact battery terminals.
- Replace the battery only with another battery that has been qualified with the system per this standard, IEEE-Std-1725. Use of an unqualified battery may present a risk of fire, explosion, leakage or other hazard.
- Promptly dispose of used batteries in accordance with local regulations.
- Battery usage by children should be supervised.
- Improper battery use may result in a fire, explosion or other hazard.
For devices that utilize a USB port as a charging source, the device's user manual shall include a statement that the device shall only be connected to CTIA certified adapters, products that bear the USB-IF logo or products that have completed the
USB-IF compliance program.
The advice applies to the unit, battery, power adapter and other accessories. If the phone is not working as it should, please contact the place of purchase for service. Don't forget the receipt or a copy of the invoice.
14. WARRANTY
This product is guaranteed for a period of 24 months from the date of purchase. In the unlikely event of a fault occurring during this period, please contact the place of purchase. Proof of purchase is required for any service or support needed during the guarantee period.
This guarantee will not apply to a fault caused by an accident or a similar incident or damage, liquid ingress, negligence, abnormal usage, non-maintenance or any other circumstances on the user's part. Furthermore, this guarantee will not apply to any fault caused by a thunderstorm or any other voltage fluctuations. As a matter of precaution, we recommend disconnecting the charger during a thunderstorm.
Batteries are consumables and are not included in any guarantee. This guarantee does not apply if batteries other than DORO original batteries are used.
15. COPYRIGHT AND OTHER NOTICES
© 2016 Doro AB. All rights reserved.
Bluetooth ^* is a registered trademark of Bluetooth SIG, inc. eZiType ^™ is a trademark of Zi Corporation.
vCard is a trademark of the Internet Mail Consortium. microSD is a trademark of SD Card Association.
The contents of this document are provided "as is". Except as required by applicable law, no warranties of any kind, either express or implied, including, but not limited to, the implied warranties of merchantability and fitness for a particular
purpose, are made in relation to the accuracy, reliability or contents of this document. Doro reserves the right to revise this document or withdraw it at any time without prior notice. Other product and company names mentioned herein may be the trademarks of their respective owners.
Any rights not expressly granted herein are reserved. All other trademarks are property of their respective owners.
To the maximum extent permitted by applicable law, under no circumstances shall Doro or any of its licensors be responsible for any loss of data or income or any special, incidental, consequential or indirect damages howsoever caused.
Doro does not provide a warranty for or take any responsibility for the functionality, content, or end-user support of third-party apps provided with your device. By using an app, you acknowledge that the app is provided as is. Doro does not make any representations, provide a warranty, or take any responsibility for the functionality, content, or end-user support of third-party apps provided with your device.
Content copyright
The unauthorised copying of copyrighted materials is contrary to the provisions of the Copyright Laws of the United States and other countries. This device is intended solely for copying non-copyrighted materials, materials in which you own the copyright, or materials which you are authorised or legally permitted to copy. If you are uncertain about your right to copy any material, please contact your legal advisor.
16. TECHNICAL DATA
Specifications
Network: WCDMA 900/2100 MHz GSM 850/900/1800/1900 MHz Dimensions: 107 mm x 53 mm x 18 mm
Weight: 103 g (including battery) Battery: 3.7 V / 800 mAh Li-ion battery
Operating ambient Min: 0°C (32°F) Max: 40°C (104°F)
temperature:
Charging ambient Min: 0°C (32°F) Max: 40°C (104°F)
Storage temperature: Min: -20°C (-4°F) Max: 60°C (140°F)
Specific Absorption Rate (SAR)
This device meets applicable international safety requirements for exposure to radio waves. Your mobile device is a radio transmitter and receiver. It is designed not to exceed the limits for exposure to radio waves (radio frequency electromagnetic fields) recommended by international guidelines from the independent scientific organization ICNIRP (International Commission of Non-Ionizing Radiation Protection).
The radio wave exposure guidelines use a unit of measurement known as the Specific Absorption Rate, or SAR. The SAR limit for mobile devices is 2 W/kg averaged over 10 grams of tissue and include a substantial safety margin designed to assure the safety of all persons, regardless of age and health.
Tests for SAR are conducted using standard operating positions with the device transmitting at its highest certified power level in all tested frequency bands. The highest SAR values under the ICNIRP guidelines for this device model are:
Head SAR: 0.128 W/kg
Body SAR: 1.661 W/kg
During normal use, the SAR values for this device are usually well below the values stated above. This is because, for purposes of system efficiency and to minimize interference on the network, the output power of your mobile device is automatically decreased when full power is not needed for the call. The lower the power output of the device, the lower its SAR value.
This device meets RF exposure guidelines when used against the head or when positioned at least 0.5 cm away from the body. When a carry case, belt clip or other form of device holder is used for body-worn operation, it should not contain metal and should provide at least the above stated separation distance from the body.
The World Health Organization (WHO) has stated that current scientific information does not indicate the need for any special precautions when using mobile devices. If you are interested in reducing your exposure, they recommend you reduce your usage or use a hands-free accessory to keep the device away from your head and body.
Correct disposal of this product
(Waste Electrical & Electronic Equipment)
(Applicable in countries with separate collection systems)
This marking on the product, accessories or manual indicates that the product and its electronic accessories (e.g. charger, headset, USB cable) should not be disposed of with other household waste. To prevent possible harm to the environment or human health from uncontrolled waste disposal, please separate these items from other types of waste and recycle them responsibly to promote the sustainable reuse of material resources.
Household users should contact either the retailer where they purchased this product, or their local government office, for details of where and how they can take these items for environmentally safe recycling. Business users should contact their supplier and check the terms and conditions of the purchase contract. This product and its electronic accessories should not be mixed with other commercial wastes for disposal. This product is RoHS compliant.
Correct disposal of batteries in this product
(Applicable in countries with separate collection systems)
The marking on the battery, manual or packaging indicates that the battery in this product should not be disposed of with other household waste. Where marked, the chemical symbols Hg, Cd or Pb indicate that the battery contains mercury, cadmium or lead above the reference levels in EC Directive 2006/66. If batteries are not properly disposed of, these substances can cause harm to human health or the environment. To protect natural resources and to promote material reuse, please separate batteries from other types of waste and recycle them through your local, free battery return system.
Declaration of Conformity
Doro hereby declares that Primo 805 conforms to the essential requirements and other relevant regulations contained in the Directives 1999/5/EC (R&TTE) and 2011/65/EU (RoHS). A copy of the Declaration of Conformity is available at www.doro.com/dofc.
Primo 805 (1011)
English
Version 2.0
www.doro.com