BHL2S - Stativ Induro - Gratis brugsanvisning og manual
Find enhedens vejledning gratis BHL2S Induro i PDF-format.


Brugerspørgsmål om BHL2S Induro
0 spørgsmål om dette apparat. Besvar dem du kender, eller stil dit eget.
Stil et nyt spørgsmål om dette apparat
Download vejledningen til din Stativ i PDF-format gratis! Find din vejledning BHL2S - Induro og tag din elektroniske enhed tilbage i hånden. På denne side er alle dokumenter nødvendige for brugen af din enhed offentliggjort. BHL2S af mærket Induro.
BRUGSANVISNING BHL2S Induro
INDURO®
BHL-SERIES BALLHE AD
OPERATING INSTRUCTIONS
Thank you for making Induro your choice for professional photographic gear. Your Induro gear is manufactured to provide years of dependable service. In order to obtain optimum satisfaction and performance we suggest that you carefully read these instructions and provide them to anyone who may also use your Induro gear.
natural_image
Technical line drawing of a mechanical valve assembly (no text or symbols)INDURO INDURO Camera Support Gear | 75 Virginia Road, North White Plains, NY 10603 | T 914-347-3300 | F 914-347-3309 | info@indurogear.com | indurogear.com
Specifications and design are subject to change without notice.
All tradenames, logos, and brand references are the respective trademarks of their owners.
INDURO
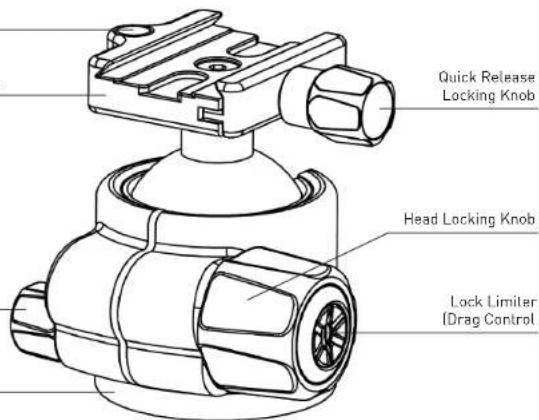
Bubble Level
Mounting Platform
text_image
Quick Release Locking Knob Head Locking Knob Lock Limiter IDrag ControlPan Locking Knob
Base
1
2

SETUP
Head Mounting
Install by screwing the head clockwise onto the 3/8" mounting thread of the top plate of the Tripod or Monopod. Once it is hand tight, secure by fully tightening the Head Locking Screw(s) [on select models] from below.
OPERATION
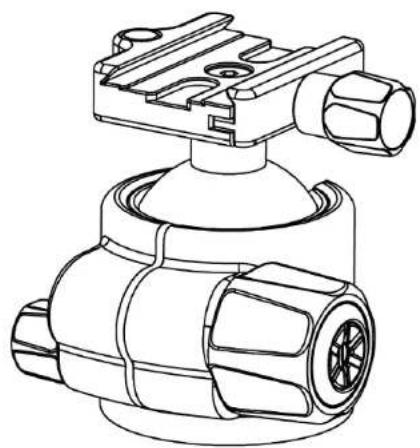
The BHL-Series Ballheads are professional Low Profile machined Heavy Duty Black Aluminum Alloy designs. They feature a separate Pan Locking Knob and a unique Limit controlled Head Locking Knob which provides both a Drag Control and Rapid Locking action. In addition, a Universal Quick Release Clamp with secondary Safety Lock System and Bubble Level is incorporated.
Universal Quick Release Plate System
The BHD-Series Ballheads feature a Universal Arca-Swiss style Quick Release Plate system. It offers a quick method of mounting or releasing a Camera or Equipment from the Head. It is important that the correct Quick Release Plate be used along with the proper mounting screw (1/4-20 is included as the standard size but spare 1/4-20 plates of various lengths are available as accessories). The Mounting Screw can be tightened with either an Allen Key or a coin. Extra Plates are recommended as you can screw one to each Camera or Lens for even greater convenience when rapidly mounting and dismounting gear. And because of compatibility with the Universal Arca-Swiss style system, most plates and special brackets from other manufacturers can be used as well.
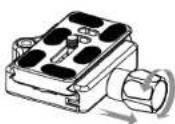
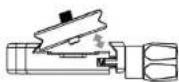
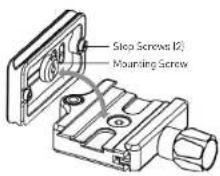
Quick Release Lock (FIGURE 1)
The Quick Release Lock offers two levels of security for your gear. To remove the Quick Release Plate, turn the Quick Release Locking Knob counterclockwise. A partial opening of the clamping mechanism allows the Quick Release Plate to slide on the Mounting Platform for proper balance and positioning. Two Stop Screws (removable) on the bottom of the Quick Release Plate provide this first level of security. An additional pull and counterclockwise turn of the Quick Release Locking Knob opens the clamp fully so that the Quick Release Plate can be tilted out to be removed. Reverse the process and tighten the Quick Release Locking Knob to secure the Quick Release Plate.
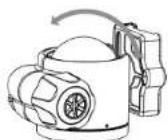
Ballhead Controls (FIGURE 2)
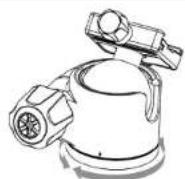
A large Head Locking Knob locks the Ballhead in place. Once the Knob is turned counter-clockwise and loosened, the Ballhead can move freely allowing the Mounting Platform to be positioned anywhere within a 0-90° vertical orientation. This movement is expanded by the use of the Pan Locking Knob which
adds a 360° Panning range. The Pan control is fully independent and positioning can be adjusted easily and accurately by using the Graduated Panning Scale and Pointer on the Base of the Ballhead.
A unique feature of the BHL is the ability to incorporate and set a fixed level of Drag in the Ball movement using the Lock Limiter. For optimum results attach a camera of typical weight capacity to the head and while holding, just tighten the Head Locking Knob clockwise until there is enough tension on the ball so that the camera doesn't slip on it's own but that you can make comfortable camera movements. Then rotate the inner Lock Limiter clockwise in order to fix this position as the "off" setting of the Head Locking Knob. You will now find the Lock has a new limited range of movement with just enough tension at one end so you shouldn't have to hold the camera/ens in order for it to stay in position, but can fully lock the head with a quick clockwise turn. Slots in the Lock Limiter make it possible to use a coin rather than your fingers if it's necessary to loosen the Lock Limiter.
FOR OPTIMUM RESULTS: Adjust the Drag under the weight capacity, temperature and conditions under which the Ballhead will be used.
NOTE: Do not over tighten any Locking Knobs as this could damage the Ballhead locking mechanism.
USER NOTICE
②Do not exceed the maximum specified load capacity (see specifications on the package label, or visit www.indurogear.com).
①Always ensure that all Ballhead locks are tightly engaged before mounting any gear.
①Always clean and dry any Ballhead after it has been exposed to wet, dusty, sandy or salty conditions. Your Ballhead is not recommended for use in salt water. If required, clean Ballhead using a mild soap solution applied with a soft cloth, rinse with fresh water and dry with soft towel. Remove any dust, dirt or sand from all locks and all moving parts.
①Do not leave any Ballhead in the sun for prolonged periods and avoid high temperature exposure.
⑧ Avoid leaving any Tripod or Monopod unattended in areas where people could trip over the gear and get hurt.
①Remove camera, lens, and all gear from any Tripod or Monopod when transporting.
②For your safety, don't let your Induro gear come in contact with any electrical power source.