X10016G - Bilkamera myGEKOgear - Gratis brugsanvisning og manual
Find enhedens vejledning gratis X10016G myGEKOgear i PDF-format.

Brugerspørgsmål om X10016G myGEKOgear
0 spørgsmål om dette apparat. Besvar dem du kender, eller stil dit eget.
Stil et nyt spørgsmål om dette apparat
Download vejledningen til din Bilkamera i PDF-format gratis! Find din vejledning X10016G - myGEKOgear og tag din elektroniske enhed tilbage i hånden. På denne side er alle dokumenter nødvendige for brugen af din enhed offentliggjort. X10016G af mærket myGEKOgear.
BRUGSANVISNING X10016G myGEKOgear
GEKO
Quick Start Guide
-

/HELLO
Than k you f or cho os ing GE KO for yo ur da sh cam ne eds. In th is gu ide we will s how yo u how to pro pe rly se tu p and ins tal l your GE KO X ped it ion .
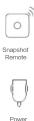
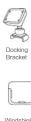
/ Accessories
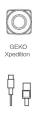
/ GEKO Xpedition Product Overview
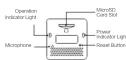

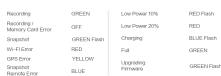
Status LED
Power LED
How to Install GEKO Xpedition in Vehicle


Prepare your GEKO Xpedition for installation:
-
Hold device and docking bracket with both hands and mount GEKO Xpedition securely to docking bracket as shown in image above.
-
Insert a microSD memory card into the microSD slot located on the back of the GEKO Xpedition as indicated in the image shown under the Product Overview section of this manual.
(Note: SDHC Class 10 or above micro SD memory cards are recommended for use with GEKO Xpedition)
- Press memory card in until you feel a click and the card is fully inserted into the slot.
- For your safety and proper installation of camera make sure your vehicles engine is off during the installation process of your GEKO Xpedition.
- Once ready to install make sure to clean the windshield to ensure secure installation of your GEKO Xpedition.
- Once area has been cleaned and a safe installation spot has been chosen (make sure chosen location does not block or obscure a driver's view when driving as described in the How to Choose Installation Location of this manual). Install camera at the desired location.
- Once camera has been installed and mounted, connect the USB power cable provided with your GEKO Xpedition to the Power Adapter.
- You are now ready to start recording your journey. (Note: The GEKO Xpedition will automatically begin recording once engine starts, and will stop recording 20 seconds after engine has been shut down.)
/ How to Connect to GEKO Xpedition
- Download Mobile App
The GEKO X edition App s are available from the App le® App Store
and Android® Market. Search for “Xpedition”, a nd download it.
- Connect to Device via Wi-Fi Connection
Make sure your smartphone's Wi-Fi is switched on and search for your GEKO Xpedition. It will appear as SSID "Xpedition_xxxxxx". Once you have selected it, you will be asked for a connection password (Default: 12345678). Once connected, open your Xpedition App and search for your GEKO Xpedition.
For Android users:
Make sure your smartphone's Wi-Fi is switched on. Open the App and find your GEKO Xpedition in the list. Once selected you should be connected.
- Snapshot Remote Pairing
Power on the GEKO Xpedition. Once it has powered on, switch on the Snapshot Remote. You should see a blue LED light flashing during the auto-pairing process. After it has successfully paired, the Snapshot Remote LED will stop flashing and the GEKO Xpedition should beep upon pressing the Snapshot Remote button.
/ How to Choose Installation Location
-
Conot install device in a location that will interfere with driver visibility or safety.
-
Do not install device on, near or in the path of any area where air bags may be present or may deploy. If you are uncertain of air bag placement for your car, please contact your vehicle manufacturer for details.
-
Donot install device on uncontrolled film (window tint) to prevent any potential damage.
-
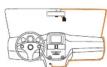
Donot hangpower cable across windshield. Install/route power cable where it will not interfere with driver and is not on, near or in the path of any airbags as shown in image above.
-
Install deviceinalocation near the rearview mirror with the best view, andinalocation where it is not obstructing or distracting drivervisibility.
-
Install in a location where the GEKO Xpedition will not be affected by the sun film (window tint) or any other electronic device which may cause potential issues.
Note: The manufacturer is not liable for any injury or death which may be caused by deployment of airbag.
/ Frequently Asked Questions
1 Q: My GEKO Xpedition will not record.
A: Make sure you are using a SDHC compatible microSD memory card (it is recommended you use a Class 10 rated or higher card). Also make sure the card you are using has enough space, or try formatting to the card to see if that resolves the issue.
2 Q: My GEKO Xpedition is heating up a lot.
A: Heat is normal during normal operation. Normal operating temperatures are between -20^ C - 70^ C. (Note: Our GEKO Xpedition meets and exceeds product specifications, and has passed extensive testing from a third party authority.)
3 Q: My device has stopped responding.
A: If device has stopped responding to all commands, use a paperclip to reset your device. The reset button is located on the back of the unit as shown in the overview image.
4 Q: What is the maximum capacity microSD card that can be used?
A: The maximum recommended capacity is 320B. (Note: This is not a Plug & Play device. Please do not remove microSD card during operation of device. Please make sure to power off unit before inserting or removing memory card.)
5 Q: How do I change the recording settings?
A: It is recommended that any change of recording settings or shutoff delay settings be done via the Xpedition App. Once the Xpedition App has been launched and connected to your GEKO Xpedition, click on the GEAR icon located at the top right of the App and then click Device Settings to make changes.
6 Q: What's seamless loop recording?
A: This feature is to ensure continuous recording. The feature will begin to overwrite previous footage in order to continue recording. (Notes: Files/footage which are lock-protected or emergency footage will not be overwritten).
Note: GEKO is not responsible for the loss, corruption, or accidental deletion of footage, and is in no way liable for any damages which may arise from failure of the device or data loss.
Mærke : myGEKOgear
Model : X10016G
Kategori : Bilkamera