
S102 - Teleskop MEADE - Gratis brugsanvisning og manual
Find enhedens vejledning gratis S102 MEADE i PDF-format.

Brugerspørgsmål om S102 MEADE
0 spørgsmål om dette apparat. Besvar dem du kender, eller stil dit eget.
Stil et nyt spørgsmål om dette apparat
Download vejledningen til din Teleskop i PDF-format gratis! Find din vejledning S102 - MEADE og tag din elektroniske enhed tilbage i hånden. På denne side er alle dokumenter nødvendige for brugen af din enhed offentliggjort. S102 af mærket MEADE.
BRUGSANVISNING S102 MEADE
MEADE S102 USER'S GUIDE

WARNING!
Never use a Meade telescope to look at the Sun! Looking at or near the Sun will cause instant and irreversible damage to your eye. Eye damage is often painless, so there is no warning to the observer that damage has occurred until it is too late. Do not point the telescope at or near the Sun. Do not look through the telescope or viewfinder as it is moving. Children should always have adult supervision while observing.
INTRODUCTION
Your telescope is an excellent beginner's instrument and is designed to observe objects in the night sky and also on land. It can be your personal window on the universe or allow you to intimately study the behavior of nesting birds on a distant hillside. The telescope is shipped with the following parts:
• 102mm Optical tube
- Two 1.25" Eyepieces:
- Red Dot finder
MA26mm, MA9mm
- Yoke-style mount
- Diagonal Mirror
- Software disk
• 1.25" 2X Barlow Lens
• Aluminum tripod with
- Smart Phone Adapter
accessory tray
- Instruction sheet
text_image
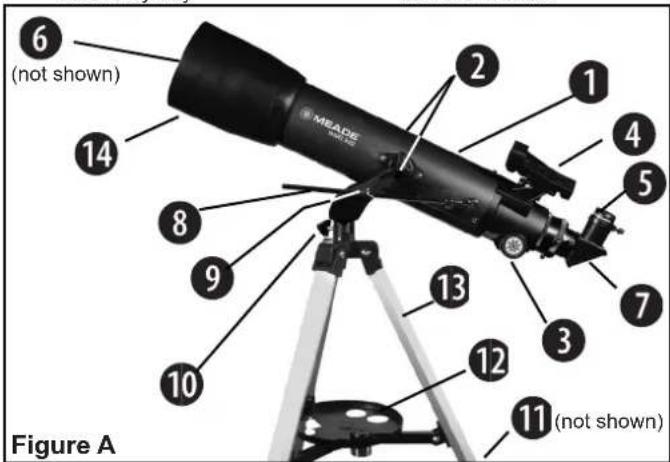
6 (not shown) 14 8 9 10 2 MEATE Figure A 13 12 11 (not shown)| 1. Optical Tube Assembly (OTA) | 6. Front Dust Cap | lock knob |
| 7. Diagonal Mirror | 11. Tripod leg locks | |
| 2. Vertical Motion Lock Knob | 8. Slow-Motion Control | 12. Accessory tray |
| Rod | 13. Tripod legs | |
| 3. Focusing Knob | 9. Slow-Motion Control | 14. Dew Shield |
| 4. Red-dot Viewfinder | Lock Knob | |
| 5. Eyepiece | 10. Horizontal motion |
ASSEMBLY
The tripod is the basic support for your telescope and comes pre-assembled from the factory; except for the accessory tray. In order to use the scope a small amount of assembly is
text_image
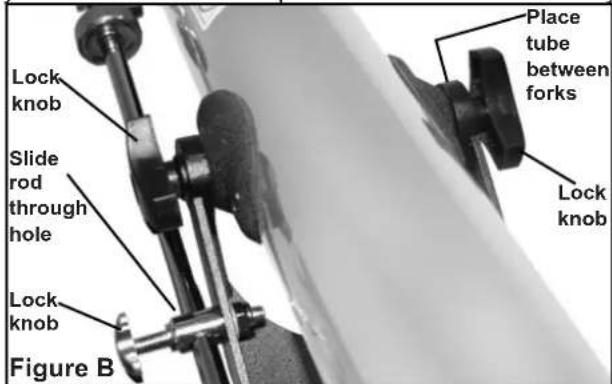
Lock knob Slide rod through hole Lock knob Figure B Place tube between forks Lock knobrequired. Follow the below steps to assemble the telescope.
Note: Number in brackets, e.g., (3), refer to the item numbers in Fig. A.
text_image
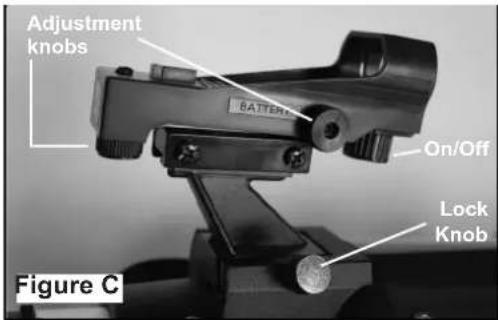
Adjustment knobs BATTERY On/Off Lock Knob Figure C- To setup the tripod, spread the legs out evenly and place on solid ground. Loosen the leg lock knobs and extend the inner legs to desired height. Do this for each leg until the top of the tripod is approximately level. Re-lock the leg lock knob.
- Attach the accessory tray to the tripod by threading it into the center nut between the tripod legs.
ATTACHING THE OPTICAL TUBE ASSEMBLY (OTA)
- Remove the two lock knobs (2) from the optical tube mount.
- Slide the Slow-motion control rod (8) into the slow-motion control lock knob hole (9).
- Place the optical tube (1) between the forks of the mount, oriented as shown.
- Thread the lock knobs (2) through each of the holes in the forks of the mount and tighten to a firm feel.
ATTACHING THE RED-DOT FINDER
An eyepiece (1) has a narrow field of view. The included viewfinder (4) has a wider field of view and red dot to make it even easier to locate the viewing object. The red dot viewfinder also comes with an easy to install dovetail bracket.
- To install the red dot viewfinder, slide the viewfinder bracket into the dovetail adapter (Fig C).
- Next, secure the viewfinder in place with the single locking knob.
REMOVING THE DUST COVERS
-
Remove dust covers(6) at the front of the scope by pulling the cover away from the telescope.
-
Remove the dustcover from the focuser by pulling it out of the focuser draw tube.
INSERTING THE EYEPIECE
- Slide the 26mm eyepiece (5) into focuser draw tube.
- Tighten thumbscrew to hold the eyepiece in place.
ALIGNING THE RED-DOT FINDER
Perform the first part of this procedure during the daytime and the last step at night.
- Point the telescope at an easy-to-find land object such
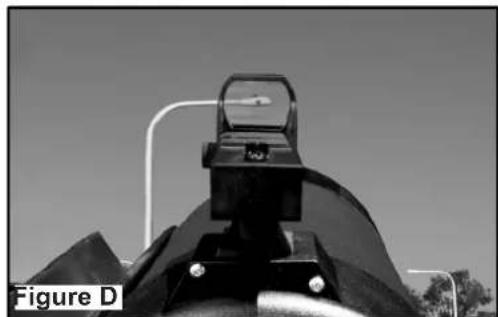
natural_image
Close-up of a mechanical component with a circular top and mounting holes, labeled 'Figure D' (no other text or symbols visible)as the top of a telephone pole or a distant mountain or tower. Look through the eyepiece and turn the focuser knob (3) until the image is sharply focused. Center the object precisely in the eyepiece's field of view.
- Turn on the red-dot viewfinder by rotating the large knob under the viewfinder lens clockwise (see Fig. C). Turn the knob to adjust the intensity of the red dot as desired.
- Look through the viewfinder. Turn one or both of the viewfinder's alignment screws (see Fig. C) until the red-dot is precisely over the same object as you centered in the eyepiece.
- Check this alignment at night on a celestial object, such as the Moon or a bright star, and use the viewfinder's alignment screws to make any necessary refinements.
- When finished, turn off the viewfinder by turning the large knob under the viewfinder lens counter-clockwise until it clicks.
MOVING THE TELESCOPE
Your telescope is alt-azimuth mounted. Alt-azimuth is just a complicated way of saying that your telescope moves up and down and from side to side. Other telescopes may be mounted in different ways.
- Slightly loosen both of the star-shaped vertical control knobs (2) and slow-motion rod lock knob (9). Loosening these knobs allow you to move the telescope up and down.
- Slightly loosen the horizontal lock knob (10). Loosening this lock allows the telescope to be moved from side to side.
- Once an object is found, re-tighten the control knobs. You can then turn the slow motion control knurled knob(8) to make smooth and precise movements as you can follow (or "track") an object vertically as it moves in the eyepiece.
- To use the slow motion control feature (8) aim the telescope at an object and tighten the control knobs (2,9). Then lock the altitude lock knob (2) and rotate the slow motion control (8) to follow the target in the vertical direction.
A NOTE ABOUT THE TELESCOPE
The Meade 102mm refracting telescope uses lenses to achieve focus and is designed primarily for night-sky viewing where image orientation is not important. However when looking at daytime objects often image orientation is important. For day time terrestrial use, the refracting telescope will present an image that is left-to-right reversed and words will appear backwards. This is normal behavior for refracting telescopes.
For those interested in correct image orientation, Meade sells the #928 45° Erect-Image Diagonal Prism (1.25") that will orient the image correctly.
CARING FOR YOUR TELESCOPE
Your telescope is a precision optical instrument designed for a lifetime of rewarding viewing. It will rarely, if ever, require factory servicing or maintenance. Follow these guidelines to keep your telescope in the best condition:
Avoid cleaning the telescope's optics. A little dust on the mirror or lens surfaces of the telescope will not cause loss of image quality. When absolutely necessary, dust on the lens or mirrors should be removed with very gentle strokes of a camel hair brush or blown off with an ear syringe (available at most pharmacies)
Fingerprints and organic materials on the optics may be removed with a solution of 3 parts distilled water to 1 part isopropyl alcohol. You may also add 1 drop of biodegradable dish washing soap per pint of solution. Use soft, white facial tissues and make short, gentle strokes. Change tissues of ten. CAUTION: Do not use scented or lotioned tissues or damage could result to the optics. DO NOT use a commercial photographic lens cleaner.
CHANGING THE VIEWFINDER BATTERY
If the viewfinder red dot does not illuminate, verify the viewfinder is on by rotating the knob below the viewfinder lens clockwise. If the red dot does not illuminate, the battery may need replacing. To replace the battery, press the left side of the viewfinder housing labeled "push". The battery compartment will slide out on the right side of the viewfinder (see Fig. E). Replace the battery with a Lithium CR-2032 battery with the positive side up. Then push the battery compartment back into the viewfinder and power on.
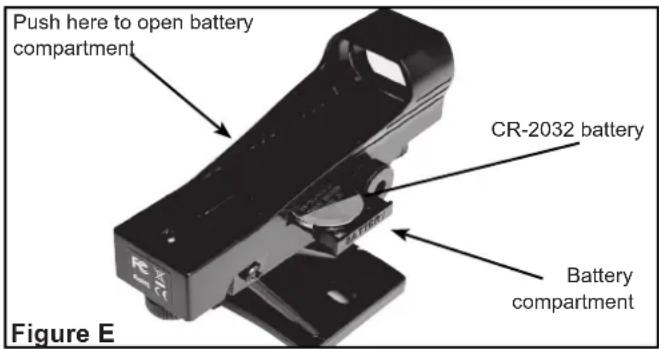
text_image
Push here to open battery compartment CR-2032 battery Battery compartment Figure EMEADE LIMITED WARRANTY
Every Meade telescope and telescope accessory is warranted by Meade Instruments Corp ("Meade") to be free of defects in materials and workmanship for a period of ONE YEAR from the date of original purchase in the U.S.A. Meade will repair or replace a product, or part thereof, found by Meade to be defective, provided the defective part is returned to Meade, freight-prepaid, with proof of purchase. This warranty applies to the original purchaser only and is non-transferable. Meade products purchased outside North America are not included in this warranty, but are covered under separate warranties issued by Meade international distributors.
RGA Number Required: Prior to the return of any product or part, a Return Goods Authorization (RGA) number must be obtained from Meade by writing, or by calling (800) 626-3233. Each returned part or product must include a written statement detailing the nature of the claimed defect, as well as the owner's name, address, and phone number.
This warranty is not valid in cases where the product has been abused or mishandled, where unauthorized repairs have been attempted or performed, or where depreciation of the product is due to normal wear-and-tear. Meade specifically disclaims special, indirect, or consequential damages or lost profit which may result from a breach of this warranty. Any implied warranties which cannot be disclaimed are hereby limited to a term of one year from the date of original retail purchase. This warranty gives you specific rights. You may have other rights which vary from state to state. Meade reserves the right to change product specifications or to discontinue products without notice. This warranty supersedes all previous Meade product warranties.

MEADE®
27 Hubble, Irvine, California 92618
(800) 626-3233 ■ www.meade.com
14-2721-00 Rev 0