EX-1315IS - Computer tilbehør EXSYS - Gratis brugsanvisning og manual
Find enhedens vejledning gratis EX-1315IS EXSYS i PDF-format.


Brugerspørgsmål om EX-1315IS EXSYS
0 spørgsmål om dette apparat. Besvar dem du kender, eller stil dit eget.
Stil et nyt spørgsmål om dette apparat
Download vejledningen til din Computer tilbehør i PDF-format gratis! Find din vejledning EX-1315IS - EXSYS og tag din elektroniske enhed tilbage i hånden. På denne side er alle dokumenter nødvendige for brugen af din enhed offentliggjort. EX-1315IS af mærket EXSYS.
BRUGSANVISNING EX-1315IS EXSYS
EX-1315IS
English
EX-1315IS
English
CONNECTORS
USB 3.2 A-Port:
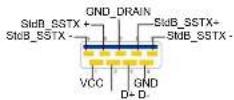
Attention! Never plug in with force or in wrong direction.
RS-232 Connector:

| Serial 9 Pin D-SUB Connector | |||||
| Pin | Signal | Pin | Signal | Pin | Signal |
| 1 | CDC | 4 | DTR | 7 | RTS |
| 2 | RXD | 5 | GROUND | 8 | CTS |
| 3 | TXD | 6 | DSR | 9 | RI |
RJ45 Connector:

| RJ45 Connector | |||||
| Pin | Signal | Pin | Signal | Pin | Signal |
| 1 | BI_DA+ | 4 | BI_DC+ | 7 | BI_DD+ |
| 2 | BI_DA- | 5 | BI_DC- | 8 | BI_DD- |
| 3 | BI_DB+ | 6 | BI_DB- | ||
+7V - 24V T-Block:
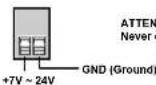
ATTENTION!!! Never connect power to GND It will destroy your Hardware!
12 Volt Connector:

ATTENTION!!! Use only with included power supply!
HARDWARE INSTALLATION
Because there are large differences between PC's, we can give you only a general installation guide for the EX-1315IS. Please refer your computers reference manual whenever in doubt.
- Connect the EX-1315S USB to the USB A-Port at the your PC.
- When you are ready you can start your PC and continue with the Driver Installation.
DRIVER INSTALLATION
USB 3.2
After the hardware installation, the OS will recognize the device automatically and install the drivers
CHECK INSTALLED DRIVER
Open the >Device manager<. Now you should see at „USB Devices" the following new entry
Serial RS-232
After the hardware installation Windows will recognize the device automatically and install the drivers. If the driver should not be installed automatically, please download the driver from our homepage (www.exsys.de / www.exsys.ch) first. Now select the folder with your operating system and install the driver. Follow the hardware assistant and finish the installation. Important! Restart your PC in any case after installing the drivers.
CHECK INSTALLED DRIVER
Open the >Device manager<. Now you should see at „Ports (COM & LPT)” and „USB-Controller“ the following new entry:
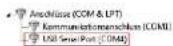
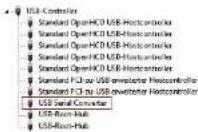
If you see this or a similar information the device is installed correctly.
Ethernet LAN
After the hardware installation Windows will recognize the device automatically and install the drivers. If the driver should not be installed automatically, please download the driver from our homepage (www.exsys.de / www.exsys.ch) first. Now select the folder with your operating system and install the driver. Follow the hardware assistant and finish the installation. Important! Restart your PC in any case after installing the drivers.
CHECK INSTALLED DRIVER
Open the >Device manager#. Now you should see at „Ethernet Adapter“ the following new entry:

If you see this or a similar information the device is installed correctly.
CLEANING
To clean the unit, use only a dry, lint-free cloth and apply light pressure to remove dirt. Be careful not to leave any fibres of the cloth in the connector area. Never use a damp or wet cloth for cleaning!
Germany: BISCH Germany GmbH Institutivazione 1 61442 Cambrai www.rngy.do
Bischka Vittente GmbH Extravisione 17 8902 Kargan www.comys.it
Italy: BISCH Italy 81 Vita Sotovama, 2531 122'00 Corso www.corso.it
CEFC UK CA

EX-1315IS
Anleitung
AUFBAU
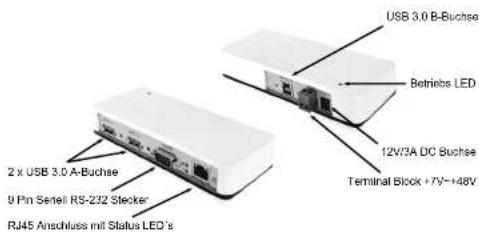
text_image
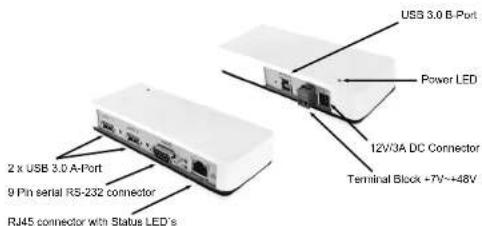
USB 3.0 B-Buchse Betriebs LED 12W3A DC Buchse Terminal Block +7V~+48V 2 x USB 3.0 A-Buchse 9 Pin Setell RS-232 Stecker RJ45 Anschluss mit Status LED'sBESCHREIBUNG & TECHNISCHE DATEN
Die EX-1315IS USB 3.2 Gen 1 Dockingstation stellt einen seriellen RS232 Port mit Überspannungsschutz und Isolation, einen Port mit Ethernet 10/100/1000Mbps sowie zwei USB 3.2 Gen 1 Ports zur Verfügung. Durch die einfache Installation muss der Rechner nicht geöffnen werden und die EX-1315IS kann bei laufendern Betrieb installiert werden
Kompetibilität: USB 1.1, 2.0, 3.0, 3.1, 3.2 / TCP/IP 10/100/1000
Betriebssysteme: Win 9 x/ME/2000XP/Vista7/8.x/10/11/Server 20xx/Linux/MAC Anschlüsse: 1x USB 3.0 B-Buchse, 2x USB 3.0 A-Buchse, 1x 9 Pin D-SUB Stecker, 1x RJ45 Ethernet Anschluss, 1x T-Block 7-48V, 1x 12V/3A Buchse Lieferumfang: EX-131515, USB-Kabel, DIN-Rail Kit, Netzteil 12V/3A, Anleitung
ANSCHLÜSSE
USB 3.2 B-Buchse:
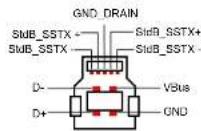
Achtung! Stecker niemals umgekehrt oder mit Gewalt einstecken.
EX-1315IS
Deutsch
EX-1315IS
Deutsch
ANSCHLÜSSE
USB 3.2 A-Buchse:
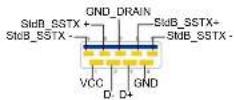
Achtung! Stecker niemals umgekehrt oder mit Gewalt einstecken.
RS-232 Stecker:

Seriell 9 Pin D-SUB Stecker
| Pin | Signal | Pin | Signal | Pin | Signal |
| 1 | CDC | 4 | DTR | 7 | RTS |
| 2 | RXD | 5 | GROUND | 8 | CTS |
| 3 | TXD | 6 | DSR | 9 | RI |
RJ45 Anschluss:

RJ45 Anschluss
| Pin | Signal | Pin | Signal | Pin | Signal |
| 1 | BI_DA+ | 4 | BI_DC+ | 7 | BI_DD+ |
| 2 | BI_DA- | 5 | BI_DC- | 6 | BI_DD- |
| 3 | BI_DB+ | 6 | BI_DB- |
+7V - 24V T-Block:
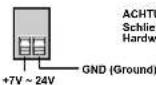
ACHTUNGIII Schließen Sie niemals Strom an Ground an, da dies Ihre Hardware zerstören kann!
12 Volt Buchse:

ACHTUNG!!! Nur zur Verwendung mit im Lieferumfang enthaltenem Netzteil!
HARDWARE INSTALLATION
Beachten Sie bitte die folgenden Installationshinweise. Da es große Unterschiede zwischen PC's gibt, können wir Ihnen nur eine generelle Anleitung zum Einbau der EX-1315IS geben. Bei Unklarheiten halten Sie sich bitte an die Bedienungsanleitung Ihre Computersystems.
- Schließen Sie die FX-1315IS an eine USB 3.0 A-Buchse Jahres PCs an
- Jetzt können Sie Ihren PC starlen und mit dem Punkt Treiber Installation fortfahren.
TREIBER INSTALLATION
USB 3.2
Nach Abschluss der Hardware Installation erkennt das Betriebssystem den EX-1315IS automatisch und installiert diesen.
CHECK INSTALLED DRIVER
Öffnen Sie den >Geräte-Manager<. Jetzt müssen Sie unter „USB Geräte“ folgenden Eintrag sehen.
Serial RS-232
Nach Abschluss der Hardwareinstallation erkennt das Betriebssystem automatisch den Adapter und installiert diesem Falls die Treiber nicht automatisch installiert werden sollen, lassen Sie bitte als erstes den Treiber auf unserer Homepage (www.exsys.de / www.exsys.ch) herunter. Nun wihlen Sie den Ordner Ihres Betriebssystems aus und installieren Sie die Treiber. Folgen Sie den Installationsanweisungen und schließen Sie die Installation ab. Wichtigt! Starten Sie Ihren PC nach der Installation neu.
CHECK INSTALLED DRIVER
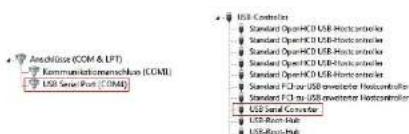
Öfthen Sie den >Geräte-Manager<. Jetzt müssten Sie unter „Anschlüsse (COM & LPT)" und unter „USB-Controller" folgenden Eintrag sehen:
text_image
Anschlase (COM & LPT) Kommunikationschuss (CGM) USB Serial Provider (COM) USB Controller Standard Open/HD USB-HostController Standard Open/HD USB-HostController Standard Open/HD USB-HostController Standard Open/HD USB-HostController Standard Open/HD USB-HostController Standard F1.0 or USB deviceable HostController Standard F1.0 or USB deviceable HostController USB Serial Converter USB-Road User USB-Road UserIst dieser oder ein ähnlicher Eintrag vorhanden, ist die EX-1302IS richtig installiert.
Ethernet LAN
Nach Abschluss der Hardwareinstallation erkennt das Betriebssystem automatisch den Adapter und installiert diesen Falls die Treiber nicht automatisch installiert werden sollten, lassen Sie bitte als erstes den Treiber auf unserer Homepage (www.exsys.de / www.exsys.ch) herunter. Nun wahlen Sie den Orderer Ihres Betriebssystems aus und installieren Sie die Treiber. Folgen Sie den Installationsanweisungen und schließen Sie die Installation ab. Wichtigt! Starten Sie Ihren PC nach der Installation neu.
CHECK INSTALLED DRIVER
Open the >Device manager<. Now you should see at „Ethernet Adapter“ the following new entry:

If you see this or a similar information the device is installed correctly.
REINIGUNG
Zur Reinigung des Gerätes verwenden Sie bitte ausschließlich ein trockenes nicht faserndes Tuch und entfemen Sie die Verschmutzung mit leichtem Druck. Im Bereich der Anschlüsse bitte darauf Achten, dass keine Fasern des Tuchs in der Buchse hinterlassen werden. Verwenden Sie bitte zu Reinigung in keinem Fall ein feuchtes oder nasses Tucht!
Deutschland: EXTRAZARES (400) INDUSTRIKSWI 51427 SANSAT: 666 69945 20
Salves: POKAYA VITMOYA 17 DOWAROTOMA 17 8902 Kungan MUNICOLAYS 17 Italia: POKAYA BISAK 81 VII SAWARMA, 4501 1-22'00 Cunis MUNICOLAYS 8


EX-1315IS
Manual
Yes.1.1-220834
LAYOUT
text_image
2 x USB 3.0 A-Port 9 Pin serial R5-232 connector RJ45 connector with Status LED's USB 3.0 B-Port Power LED 12V/3A DC Connector Terminal Block +7V~+48VDESCRIPTION & TECHNICAL INFORMATION
The EX-1315IS USB to Serial RS-232/422/485 converter in a metal case provides a high performance RS-232, 422 or 485 serial UART 16C550 interface with 15KV ESD protection and 2.5KV isolation. It is designed to connect serial devices to the USB 1.1 to 3.2 Gen 2 bus of a PC, server or workstation. The supplied EX-K1542V cable can be attached to the EX-1315IS using knurled screws without the need for a screwdriver. It is therefore impossible to disconnect the cable yourself. A DIN-Rail kit is included for mounting on a top hat rail.
Compatibility: USB 1.1, 2.0 & 3.2
Operating Systems: Win 9.x/ME/2000/XP/Vista/7/8.x/10/11/Server 20xx/Linux/MAC
Connectors: 1x 9 Pin RS-232M22M85 connector, 1x USB B-Port (screw lock)
Extent of delivery: EX-1315IS, USB cable, DIN-Rail Kit. Manual
CONNECTORS
USB 3.2 B-Port:
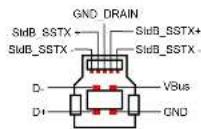
Attention! Never plug in with force or in wrong direction.