
GW4K30GH60 - Extension AV IOGEAR - Gratis brugsanvisning og manual
Find enhedens vejledning gratis GW4K30GH60 IOGEAR i PDF-format.

Brugerspørgsmål om GW4K30GH60 IOGEAR
0 spørgsmål om dette apparat. Besvar dem du kender, eller stil dit eget.
Stil et nyt spørgsmål om dette apparat
Download vejledningen til din Extension AV i PDF-format gratis! Find din vejledning GW4K30GH60 - IOGEAR og tag din elektroniske enhed tilbage i hånden. På denne side er alle dokumenter nødvendige for brugen af din enhed offentliggjort. GW4K30GH60 af mærket IOGEAR.
BRUGSANVISNING GW4K30GH60 IOGEAR
IOGEAR
Quick Start Guide 60GHz Wireless 4K @ 30Hz Video Extender
GW4K503H60 PART NO. Q1577-a
www.iogear.com
Package Contents
1 x HDMI Extender Transmitter
1 x HDMI Extender Receiver
2 x 5 VDC/2A Switching Power Supply
2 x HDMI Cables
1 x Quick Start Guide
1 x Warranty Card
System Requirements
1 HDMI source device (Bluray, Satellite box, PC etc.)
1 HDMI display device (HDTV, projector with HDMI port, etc.)
1
Overview
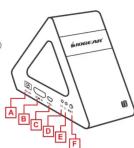
Transmitter
A. Power input
B. HDMI input
C. Power input with USB (optional)
D. Data transmission indicator
E. Power indicata
F. 057
F. SET BUTTON
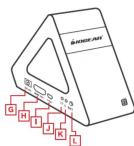
Receiver
G. Power input
H. HDMI output
I. Power input with USB (optional)
J. Data transmission indicator
K. Power indicator
L. SET button
2
Hardware Installation
Transmitter
STEP 1 Connect the included HDMI cable to your video source
(such as laptop, projector or Bluray player) HDMI output port.
STEP 2 Connect the other side of your cable to the HDMI input port on your GW4K30GH60 transmitter.
STEP 3 The GW4K30GH60 is unique in that it has an option for dual power input. Using the included power adapter, plug the power supply cable into the power inlet port. For optional method, if you have a USB-A to micro USB cable you can plug the USB-A made into your USB port (if it has one) on your source device such as your laptop, satellite box or your Buray player. Plug the micro USB (the other end of the cable) to your transmitter and the transmitter should now be powered up.
3
Hardware Installation
Receiver
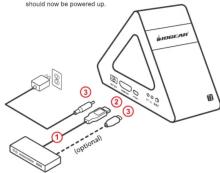
STEP 4 Connect the included HDMI cable to your TV vacant HDMI port.
STEP 5 Connect the other side of your cable to the HDMI output part on
STEP 5 Connect the other side of your your GW4K30GH60 receiver.
STEP 6 Using the included power adapter, plug the power supply cable into the power inlet port. For optional method, if you have a USB-A to micro USB cable you can plug the USB-A male into your USB port (if it has one) on your TV or projector. Plug the micro USB to your receiver and the receiver should now be powered up. Make sure that this port on your TV/projector can supply power and is not a firmware upgrade port.

Hardware Installation
These devices operate in line-of-site mode only. 60 GHz signals will NOT go through walls or any obstructions and is intended for same room use only. However the advantage over 2.4 and 5GHz bands is that there is zero latency and the video is uncompressed which makes this device ideal for gamers where latency is number one concern. Video streaming is pure 4K @ 30 Hz taking advantage of HDMI 1.4 with HDCP 2.2 compliant. Wireless connection indicator of the transmitter and receiver will light up when the transmitter and receiver is established wirelessly. Please wait up to 1 minute for connection to be established.
If your video source and your display is on, you should be able to see the content of the source on your display
NOTE: Distances may vary depending on environment.
5
FAQ
Q Transmitter and receiver will not connect wirelessly
A 1. Please check if the wireless connection light is on and blinking 2. Restart the transmitter and receiver by starting the transmitter first, then receiver in that order. You can also press the transmitter "set" button and then the receiver "set" button to establish connection
- Reconnect HDMI cables make sure they can support 4K resolution or use the cables that came with the kit
Q The wireless indicator is on but nothing on the display
A Please check and see if the video source is working correctly by connecting the HDMI link from the video source directly to the display and see if the
Name: basic from the video source survey to the display and see it the operation is now normal
Q Video is flickering or not stable
A 1. Change the position of the transmitter and receiver and make sure that
they are within the specified operating distance 2. Restart the transmitter and receiver
-
Reconnect the HDMI cables
-
Check for any obstacles that may block the wireless signal from the transmitter to the receiver.
transmitter to the receiver
6
Compliance Information
WARNING: This product can expose you to chemicals including styrene which is known to the State of California to synne species and birth defects as
other reproductive harm. For more information, go to www.P65Warnings.ca.gov
Federal Communication Commission Interference Statement
This equipment has been tested and found to comply with the limits for a Class B digital service, current to Part 15 of the 500 notes. These limits are designed to
digital service, pursuant to Part 15 of the FCC rules. These limits are designed to provide reasonable protection against harmful interference in a residential
installation. Any changes or modifications made to this equipment may void the user's authority to operate this equipment. This equipment generates uses, and
can radiate radio frequency energy. If not installed and used in accordance with the instructions, may save harmful interference to radio communications.
However, there is no guarantee that interference will not occur in a particular
Installation: ■ this equipment does cause harmful interference to radio or television reception, which can be determined by turning the equipment off and
on, the user is encouraged to try to correct the interference by one or more of the following measures:
- Reorient or relocate the receiving antenna
- Increase the separation between the equipment and receiver
- Connect the equipment into an outlet on a circuit different from that to which the receiver is connected
- Consult the dealer or an experienced radio/TV technician for help
FCC Caution: Any changes or modifications not expressly approved by the party
Responsible for compliance board void the user's authority to operate its equipment.
Limited Warranty
This product carries a 1 Year Limited Warranty. For the terms and conditions of this warranty, please go to https://www.inpear.com/support/warranty.
2、本次股东大会的召集人和召集人联系方式如下:
Register online at https://www.logear.com/register
Important Product Information
Product Model ____ Serial Number
(No text)
Contact
WE'RE HERE TO HELP YOU! NEED ASSISTANCE SETTING
NEB 710365 7142E SE 7142G 7143 7143E 71
Make sure you:
- Visit www.iogear.com/support for live help and produ
198548
https://iogear.custheip.com
support@iogear.co
www.igear.com

Final Folded size: 146mm (H) x 112mm (W)
Final spread size: 146mm (H) x 560mm (W)
Bleed size: 3.175mm on each side
Mærke : IOGEAR
Model : GW4K30GH60
Kategori : Extension AV