
FF4400 - Hane FRANKE - Gratis brugsanvisning og manual
Find enhedens vejledning gratis FF4400 FRANKE i PDF-format.


Brugerspørgsmål om FF4400 FRANKE
0 spørgsmål om dette apparat. Besvar dem du kender, eller stil dit eget.
Stil et nyt spørgsmål om dette apparat
Download vejledningen til din Hane i PDF-format gratis! Find din vejledning FF4400 - FRANKE og tag din elektroniske enhed tilbage i hånden. På denne side er alle dokumenter nødvendige for brugen af din enhed offentliggjort. FF4400 af mærket FRANKE.
BRUGSANVISNING FF4400 FRANKE
STANDARD MAINTENANCE AND TROUBLESHOOTING
REPLACING THE CARTRIDGE
-
Shut off the water supply to the faucet.
-
Turn on the faucet briefly to relieve any pressure inside the faucet.
-
Move the faucet handle to the "OFF" position.
-
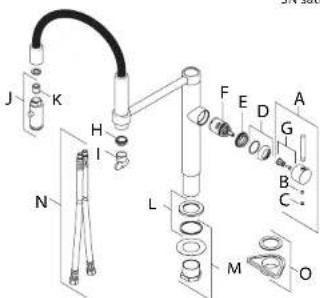
Remove indicator cap C from the lever handle.
-
Remove the screw B using an allen key.
-
Pull the lever handle A from the faucet body.
-
Slide the cap D off of the lock nut E.
-
Unscrew the cartridge lock nut E.
-
Lift ceramic disk cartridge F from the body and repalce it with a new
one. Ensure the two lugs on bottom of the cartridge sit properly in the
allocated holes at the base of the body.
-
Re-assemble faucet in reverse order.
-
Test for leakage.
GENERAL MAINTENANCE
Clean aerator periodically for any buildup
Do not use harsh detergents, solvents, chemical agents, metallic sponges,
etc. that could harm the surface and damage the finish.
Clean only with a soft sponge and soapy water.
Do not store chemicals or cleaning agents in the immediate vicinity of the
faucet and connection hoses. Chemical vapors could cause damage.
SPARE / REPLACEMENT LIST
A+B+C+G. Handle assembly F4302*
| D. | Cap with o-ring | F2902* |
| E. | Lock nut | F2903 |
| F. | Cartridge | F2904 |
| H | Aerator | F4311 |
| I. | Aerator Key | F4313 |
| J. | Spray head assembly | F4306* |
| K. | Check Valve 1.75 gpm | F3706 |
| L. | Escutcheon | F4309* |
| M. | Mounting Hardware Kit | F3110 |
| N. | Supply hoses | F3709 |
| O. | Fixing Kit | F3125 |
*Must specify finish
CH chrome
SN satin nickel
text_image
Technical diagram of a mechanical assembly with labeled components and partsLIMITED LIFETIME WARRANTY
Franke Kitchen Systems, LLC extends the following warranty to the original purchaser of its faucets effective January 1, 2003.
All faucets installed in a private residence will carry a limited lifetime warranty on all mechanical parts to be free of manufacturing defects in material and workmanship under normal usage. All chrome finishes carry a limited lifetime warranty; all other finishes are warranted for five (5) years form the original date of purchase.
Marine and Outdoor Installation: Franke faucets are NOT warranted for Marine and Outdoor installations.
This warranty applies only to the original owner, providing the product has been installed in accordance with our installation instructions, used as recommended and in a normal residential application. In the event of a warranty claim, the owner will be required to provide proof of purchase - save sales receipt. This warranty covers all components which make the product operational. Franke, at its option, may repair or replace the product or components necessary to restore the product to good working condition. Franke reserves the right to inspect the installation prior to the actual replacement of the product or component part. This warranty does not cover misuse or abuse, accidental damages, scuffs or scratches, improper installation, abnormal usage, negligence or damage caused by improper maintenance or cleaning. Normal wear of parts is excluded from the warranty. Damage caused by impurities or acts beyond our control are not covered. Any product or part which has been repaired or altered in any manner outside of Franke's factory, unless previously authorized in writing by Franke, will void warranty. Any replacement excludes transportation and any labor re-installation costs. This warranty does not allow recovery of incidental or consequential damages such as loss of use, delay, property damage or other consequential damage, and Franke accepts no liability for such damages.
The Franke warranty is limited to the above conditions and to the warranty period specified herein and is exclusive. Franke DISCLAIMS all other warranties, expressed or implied, including IMPLIED WARRANTIES OF MERCHANTABILITY AND/OR FITNESS FOR A PARTICULAR PURPOSE. This warranty gives you specific legal rights that may vary from state to state.
Further information
For any further information about our products, about the installation of them or about the guarantee, please contact our customer service department:
Franke Kitchen Systems
800 Aviation Parkway
Smyrna, TN 37167, USA
Phone: 800-626-5771
Email: ks-customerservice.us@franke.com
INTERNATIONAL SCORED RESEARCH
INSTALLATION MANUAL
PESCARA
FF4400 - FF4480
natural_image
Modern kitchen sink with curved glass handle and cylindrical shaft (no text or symbols visible)9107/90107318
MAKE IT WONDERFUL
FRANKE
TECHNICAL DATA
Flow Rate 1.75 GPM at 60 PSI
Recommended Water Pressure 30-75 PSI
Max. Water Pressure 145 PSI
Recommended Hot Water Temp. 120°-140° F
Hole Size For Faucet 1.3/8"
Certifies this faucet complies with ASME A112.18.1 / CSA B125.1 & NSF 61, NSF 372 and AB1953
NOTE:
Contact us immediately if you see inconsistencies.
Phone: (1-800-626-5771)
website: www.frankeksd.com
email: ks-customerservice.us@franke.com
CONTENTS IN BOX
text_image
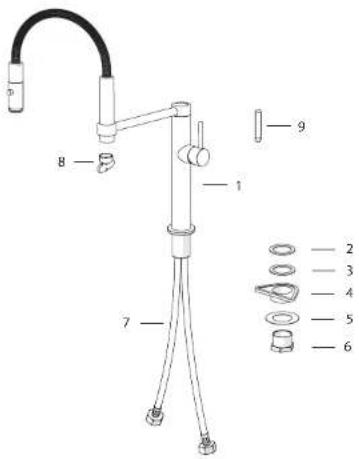
8 1 7 9 2 3 4 5 61 Faucet assembly
2 Rubber washer
3 Rubber washer
4 Plastic flange
5 Fixing plate
6 Fixing nut
7 Flexible supply hoses
8 Key for aerator
9 Optional pin handle
text_image
1 2 3 4 5 6 7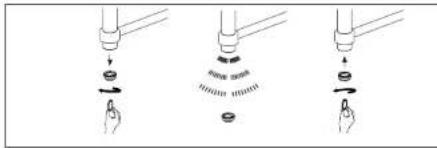
text_image
Diagram illustrating three steps of a mechanical or electrical component with directional arrows and labeled componentsINSTALLATION INSTRUCTIONS
-
Remove all contents from the package and check for completeness.
-
Turn off water supply.
-
Cut a mounting hole 1 3/8 diameter (35mm) in the desired position in counter top or sink (if one isn't available).
-
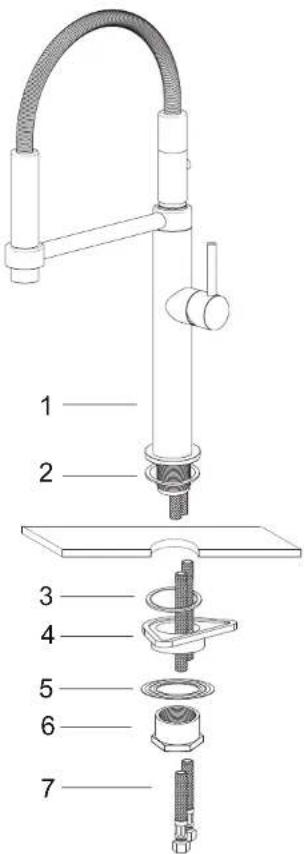
Place the rubber washer (2) over the mounting shank.
ATTENTION: The washer should be sitting between the countertop and faucet base.
DO NOT use putty or other sealant at this location.
NOTES
Solid surface installation: The countertop mounting surface needs to be flat and free of debris otherwise the faucet may not sit properly. For tile installations, avoid installing faucet near or on top of grout lines. This may cause a weak joint between the faucet and the counter and could cause leaks.
-
Install the mounting hardware to the base of the faucet body in the following order - rubber washer (3); plastic flange (4) and the fixing plate (5) as illustrated.
-
Secure the faucet by tightening the Fixing Nut (6) onto the mounting shank of the faucet the body (1).
-
Connect the flexible supply hoses (7) to the water supply in the house.
-
Remove the aerator using the aerator key, turn on water, flush the faucet for any debris and check for leaks.
Reinstall the aerator and ensure everything is functioning properly.