 — Bil — Mode d'emploi PDF")
Vectra (2007) - Bil OPEL - Gratis brugsanvisning og manual
Find enhedens vejledning gratis Vectra (2007) OPEL i PDF-format.

Brugerspørgsmål om Vectra (2007) OPEL
0 spørgsmål om dette apparat. Besvar dem du kender, eller stil dit eget.
Stil et nyt spørgsmål om dette apparat
Download vejledningen til din Bil i PDF-format gratis! Find din vejledning Vectra (2007) - OPEL og tag din elektroniske enhed tilbage i hånden. På denne side er alle dokumenter nødvendige for brugen af din enhed offentliggjort. Vectra (2007) af mærket OPEL.
BRUGSANVISNING Vectra (2007) OPEL
Vehicle features
natural_image
Front view of a vintage air conditioner unit with control knobs and a small fan (no visible text or symbols)S 12211
S 12212
natural_image
Illustration of a car gear shift lever inside a vehicle (no text or symbols)S 12215
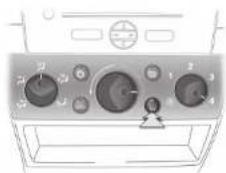
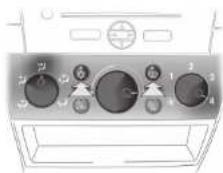
Heated rear window,
heated exterior mirrors
On = Press 24.
Off = Press □ again.
LED in pushbutton
Heating operational with ignition on.
Heating switches off automatically after approx. 15 minutes.
Window demisting and defrosting:
Set air distribution to 2, turn rotary knob
for temperature and airflow clockwise.
Air conditioning system
Press buttons and sp:
Automatic air conditioning system *:
Also turn rotary knob for temperature
clockwise and airflow to A;
Electronic Climate Control * press
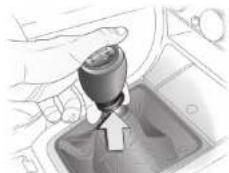
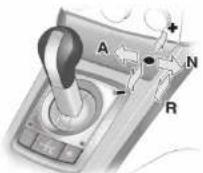
Manual transmission:
Reverse gear: with vehicle stationary,
pull the ring up three seconds after
depressing clutch pedal and engage
geo
If gear does not engage, set lever to
neutral, release clutch and depress
again, then repeat gear selection.
text_image
Diagram showing a hand operating a gear shift with Chinese characters on the buttonS 12213

513774
§ 130778
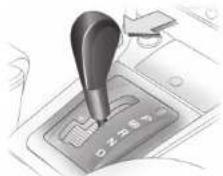
Automatic transmission
P - Park position (with vehicle
stationary, first apply handbrake)
R - Reverse (with vehicle stationary)
N = Neutral (idling)
D - Automatic gear selection
Start in P or N. To leave P, switch on
ignition, depress footbroke and press.
ignition, depress footbrake and press selector lever button. To engage P or R
selector lever button: To engage 1.0% press selector lever button
Manual mode (ActiveSelect)*:
- = Shift to a higher gear
- = Shift to a lower gear
Shift lever from D first to the left, then
forwards or backwards to change gears
Stirling off pink Paper & buttons
Staming-by did: Press & button, indicator # illuminates in transmission
display vehicle starts off in 4th year.
display, vehicle starts-on in 4th gear.
Press button again to switch off.
Transmission foult: «à illuminates.
Easytronic
N = Neutral (idling)
● = Drive position
+ - Higher gear
-- Lower gear
A = Automatic/Manual mode selector B = Devers (with selected level/lock)
R = Reverse (with selector lever lock)
Depress footbrake before starting.
Move selector lever in appropriate
direction as far as it will go. Lever returns
to original position when released.
Tyre psi (3 person loads), Estate
| Engines | Tyres | Front Rear |
| 1.8P | All tyres | 29 32 |
| 2.0P | All except below | 33 33 |
| 205/55 R16 | 35 35 | |
| 2.2P | All except below | 32 32 |
| 205/55 R16, 195/65 R15 | 33 33 | |
| 2.8P | All except below | 39 35 |
| 215/55 R16 (manual) | 36 33 | |
| 215/55 R16 (auto) | 38 35 | |
| 225/45 R17 (auto) | 41 36 | |
| VXR | All except below | 42 38 |
| 225/45 R17 | 41 36 | |
| 1.9 | All except below | 33 33 |
| 195/63 R15, 205/55 R16 | 35 35 | |
| 1.9DT | All except below | 32 32 |
| 195/63 R15, 205/55 R16 | 33 33 | |
| 3.0D | All except below | 38 35 |
| 225/45 R17 | 39 35 | |
| 215/55 R16 | 36 33 |
Tyre psi (3 person loads), Saloon/Hatch
| Engines | Tyres | Front Res |
| 1.BP | All tyres | 29 32 |
| 2.0P | All except below | 33 33 |
| 205/55 R16 | 35 35 | |
| 2.2P | All except below | 32 32 |
| 195/65 R15, 205/55 R16 | 33 33 | |
| 2.BP | All except below | 38 35 |
| with automatic transmission | 39 35 | |
| 215/55 R16 (manual) | 35 35 | |
| 215/55 R16 (auto) | 36 33 | |
| VXR | All except below | 42 38 |
| 225/45 R17 | 41 36 | |
| 1.9 | All except below | 33 33 |
| 195/65 R15, 205/55 R16 | 35 35 | |
| 1.9DT | All except below | 32 32 |
| 195/65 R15, 205/55 R16 | 33 33 | |
Tyre psi (3 person loads), Saloon/Hatch
| (continued) | |||
| Engines | Tyres | Front Rear | |
| 3.0D | All except below | 38 | 35 |
| 225/45 R17 | 39 | 35 | |
| 215/55 R16 | 36 | 33 | |
Tyre psi (3 person loads), Saloon/Hatch,
Estate with 19-inch wheels
1.8P, 2.0P,
| 2.2P, 1.9D | All except below 33 | 33 | |
| 235/35 R19 | 39 | 35 | |
| 1.9D, 2.0P | 205/50 R17 | 39 | 35 |
| 2.8P, 3.0D | 235/35 R19 | 42 | 38 |
| 205/50 R17 | 42 | 38 | |
| 2.8P 215/55 R16, 225/45 R17 | 41 | 36 | |
| 3.0D 215/55 R16, 225/45 R17 | 39 | 36 | |
All temporary space saver spare wheels
T 115/70 R16 61 psi

VAUXHALL
Vectra
Quick Reference Guide
Refer to Owner's Manual for detailed information.

VAUXHALL
Note: some items described may be optional *.
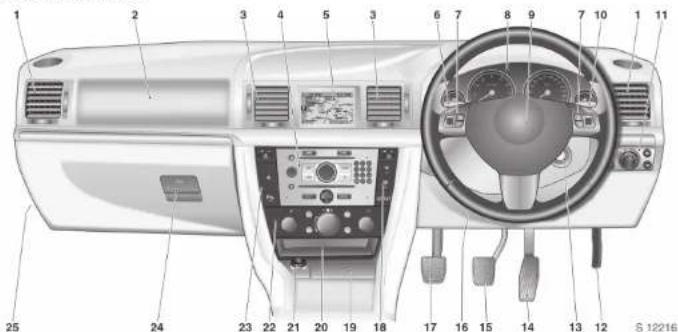
Instruments and controls
text_image
Diagram of a car dashboard with numbered parts for identification and function-
Side air vents
-
Front passenger's airbag
-
Centre air vents
-
Infection system
-
Intra-ment system
-
Control information display for
-
Central information display for time, date, outside temperature
time, date, outside temperature,
Inforainment system
check control
trip computer
Electronic Climate Control
- Turn signal lights, headlight flash,
dipped and main beam,
door-to-door lighting *,
parking lights, cruise control *
- Steering wheel remote control
Vehicle security
B. Instruments
-
Horn, driver's airbag
-
Windscreen wiper and wash system.
headlight wash system *
redlight wash system, rear window wash system
- Parking lights, dipped beam
instrument illumination
instrument information,
fog tail light, front fog lights
headlight range adjustment
-
Bonnet release lever
-
Starter switch
with steering column lock
-
Accelerator pedal
-
Brake pedal
-
Steering wheel adjustment
-
Clutch pedol※
-
Heated seat (right)*. seat climate
control* Youxhall alarm system *
rear window blind 宏
Electronic Stability Programme
ELECTRONIC STUDI SPORT mode
19 Ashtruv※
- Stowage compartment with
AUX input
- Cigarette lighter * or
accessory socket
-
Climate control
-
Climate control
-
Hatched seat (left)
-
Heated seat (fer), HAZARD WORNING lights, driving distance screw *
lights, panking distance sensors 4 24. Cloud environment
- Glove compartment
- Everbra

§ 11571
\$11572
3.14773
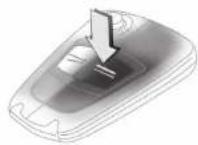
Unlocking:
Press button ≥ on remote control
-or-
turn key in driver's door lock towards
front of vehicle, turn key back to the
vertical position and remove.
To unlock from inside, press central
locking button ✉ in the driver's door.
Locking:
Press button == on remote control.
To lock from inside, press central locking.
button in the driver's door with the
doors closed.
Electronic immobiliser
■ Deactivated with key in starter switch.
■ Activated when key is removed.
Engine cannot be started in any other
Engine cannot be started in any other way so have open key in a safe place.
way, so keep spare key in a safe place:
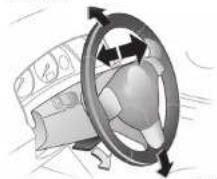
Steering wheel adjustment*:
Move lever down, adjust height and
distance, move lever up and engage
into position.
Adjust steering wheel only when vehicle
is stationary and steering column lock is released.
July 2007T5 156
Vehicle features
natural_image
Diagram of a car seat assembly with arrows indicating movement or force (no text or symbols present)S 12219
S 12220
S 12210
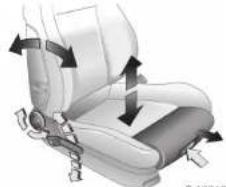
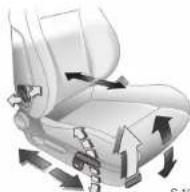
Front seat adjustment:
1. Backrest roke
2. Seat height*
3. Thigh support *
To adjust front and outboard rear seat head restraints: Press button on side of head restraint to release, adjust height and engage.
Front seat adjustment (continued)
4. Lumbar support
5. Seat inclination *
6. Longitudinal positioning
Important: Do not sit nearer than 10 inches (25cm) from steering wheel, to permit safe airbag deployment.
Starting the engine:
Operate clutch and brake pedals.
Automatic transmission * in P or N.
Easytronic * depress brake pedal,
do not accelerate. Petrol engines:
Turn key to 3. Diesel engines: Turn key
to 2, wait for preheating control
indicator 100 to go out, then turn key to 3.
Release key once engine is running.

natural_image
Interior view of a car showing the dashboard and control panel with a small inset image (no visible text or symbols)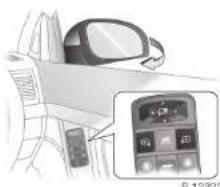
natural_image
Interior view of a car showing the dashboard and control panel with a magnified inset (no visible text or symbols)S 12223
S 12224
Adjusting exterior mirrors:
Outer mirror switch pressed: four-way switch adjusts driver's and passenger's mirror. Inner mirror switch pressed: only front passenger's mirror is adjusted.
Electric seat adjustment with Memory function *: Select reverse gear with inner mirror switch pressed; front passenger's mirror points to rear tyres as a parking aid.
Automatic anti-dazzle mirror on driver's side*: Dazzle at night is reduced.
Swinging in exterior mirrors
Push four-way switch to the right
Exterior mirrors swivel in
Push four-way switch to the left:
Exterior mirrors swivel out.
Swivelling allowed up to speeds of 4 mph. If necessary, the exterior mirrors can be swivelled manually: Press outer edge of mirror housing gently.
Driving with swivelled-in exterior mirrors is not permitted.
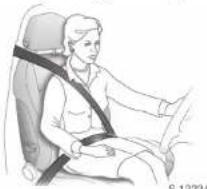
Fitting seat belt:
Draw seat belt smoothly from inertia reel, guide over shoulder and engage in belt buckle.
The belt must not be twisted at any point. The lap belt must lie snugly against the body.
The front seat backrests must not be tilted back too far (recommended maximum tilting angle approx. 25°).
To release belt, press button on buckle.
§ 12225
Press button:
- Courtesy light
\$0 - Front fog lights *
QF - Fog fail light
2 - Instrument illumination
P - Headlight range adjustment:
REDUCES DOZZLE FOR UNCOMING ITEMS.
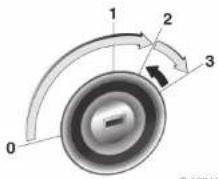
Manual headlight range adjustment:
Without level control system
0 - Front seals occupied only
1 - All seats occupied
2* All seats and luggage
3 - Driver's seat only and luggage
With level control system *
U = Front seats occupi
In All seats occupied
1 - All seats and luggage
2 - Driver's seat only and luggage
natural_image
Close-up of a black USB connector with '110' label, no visible text or symbols beyond the connector brandingS 12226
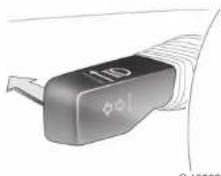
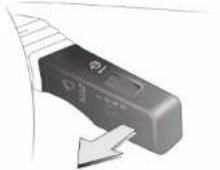
Switching to dipped or main beam:
Main beam = Push stalk forwards.
Dipped beam = Push forwards again.
To operate the headlight flash, pull stalk towards the steering wheel.
Vehicle features

text_image
0 1.00 S 12227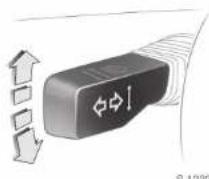
§ 12228
text_image
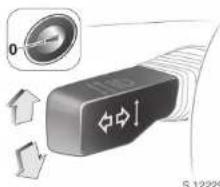
S.12229Turn signal lights:
Right = Move stalk up
Left = Move stalk down
After operation, the turn signal stalk returns to its starting position.
If the stalk is moved past the resistance point, the turn signal light remains on. When the steering wheel moves back towards the straight-ahead position, the turn signal light is automatically deactivated.
When lane changing, move stalk to resistance point and release: turn signal flashes three times.
Parking lights:
The front parking light and the tail light on one side of the vehicle can be activated when parking the vehicle: Turn light switch to 0 or AUTO, switch ignition off, move turn signal stalk fully upwards (right parking light) or downwards (left parking light).
An acoustic signal sounds and the respective turn signal control indicator illuminates briefly in instrument cluster. Remove ignition key before leaving the vehicle.
Switch off by switching ignition on or by moving stalk in opposite direction.
natural_image
Diagram of a mechanical component with directional arrows indicating movement or force (no text or symbols)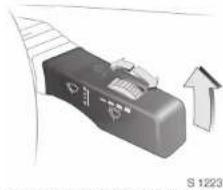
natural_image
Close-up of a black electronic device with a scroll wheel and directional arrow, no visible text or symbolsS 12231
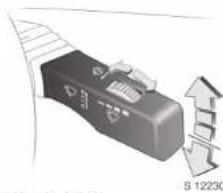
Automatic wiping with rain sensor *
Gently push stalk upwards.
O - Off
--- Automatic wiping with rain sensor
The rain sensor detects the amount of water on the windscreen and automatically controls the windscreen wiper.
Adjust the sensitivity of the system using the adjuster wheel:
Adjuster wheel right - High sensitivity, Adjuster wheel left - Low sensitivity. Keep the sensor area clean by operating the windscreen wash system regularly.
Windscreen wash system and headlight wash system *:
Pull stalk towards steering wheel.
The wiper is switched on for several wipe operations. A single after-wipe occurs at low speeds.
The headlight wash system is ready for operation when the headlights are switched on. Wash fluid is sprayed onto the headlights once. Then the headlight wash system is disabled for 2 minutes.
On vehicles fitted with rain sensor *, keep the sensor area clean by operating the windscreen wash system regularly.
Windscreen wiper:
Gently push stalk upwards.
①-Off
-- - Adjustable timed interval wipe
- Slow
= - Fast
Stalk always moves back to the starting position. To select the next higher or lower stage: move stalk slightly.
Push stalk past resistance point and hold: wiper stages are run through; an acoustic signal sounds at position
Adjustable timed interval wipe =:
Adjuster wheel right = Short intervals,
Adjuster wheel left = Long intervals.
Stalk down from position ☐ Single wipe.
Warning:
In freezing conditions, wiper blades can freeze to the windscreen. Release wiper blades from the ice before starting the vehicle, to prevent wiper motor damage
Engine oil:
Check every 300 miles and prior to long journeys.
Important: It is the owner's responsibility to maintain the correct level of an appropriate quality oil in the engine.
Refuelling:
Use unleaded fuel for petrol engines.
Fuel tank capacity Soloon: 61 litres,
Hatch: 61 litres,
Estate: 60 litres