Blink 500 - Mikrofon Saramonic - Gratis brugsanvisning og manual
Find enhedens vejledning gratis Blink 500 Saramonic i PDF-format.

Brugerspørgsmål om Blink 500 Saramonic
0 spørgsmål om dette apparat. Besvar dem du kender, eller stil dit eget.
Stil et nyt spørgsmål om dette apparat
Download vejledningen til din Mikrofon i PDF-format gratis! Find din vejledning Blink 500 - Saramonic og tag din elektroniske enhed tilbage i hånden. På denne side er alle dokumenter nødvendige for brugen af din enhed offentliggjort. Blink 500 af mærket Saramonic.
BRUGSANVISNING Blink 500 Saramonic
Saramonic
Sound.Remarkable.
Ultracompact 2.4 GHz Dual-Channel
Wireless Microphone
Blink500 Pro
User Manual
General Introduction
The Saramonic Blink500 Pro systems are incredibly lightweight, ultracompact and easy-to-use wireless microphone system for up to 2 people. The microphone delivers exceptional, broadcast-quality sound to DSLR, Mirrorless and Video cameras, Smartphones, Tablets, Computers, and more.
The transmitters and receivers deliver a remarkable 8-hours of run time on a single charge and feature quick charging. The supplied charging case allows you to charge the transmitters and receivers anywhere and can be recharged or powered via the USB-C DC 5v port using USB-A chargers and battery packs.
The system series is comprised of three different receivers. The Blink500 Pro RX receiver has a vivid OLED display and a 3.5mm output. It also includes both TRS and TRRS output cables, allowing it to work with cameras, mobile devices, computers and any device with a 3.5mm audio input. The Blink 500 Pro RXDi receiver has a MFi Certified Lightning output and is designed for Apple iOS devices. And the RXUC receiver has a USB-C output and is designed for devices with a USB-C port, including smartphones, tablets, computers and more.
All the receivers feature a 3.5mm headphone output for real-time monitoring and selectable Mono/Stereo switch. Making the Blink 500 Pro meet the demands of professional users.
The Blink500Pro TX clip-on transmitter has a great sounding built-in omnidirectional microphone and it is small and light enough to clip to shirts and clothing, or you can use it as a traditional belt pack transmitter with the included SR-M1 professional lavalier microphone. It features a vivid OLED display and has 3.5mm input for microphones and line-level inputs.
No technical knowledge of audio is required to operate, with no complicated menus or setting. The Blink500 Pro system operates on the 2.4GHz spectrum and automatically hops to free channels to avoid static noise and audio dropouts.
Available Kits:
| Model | In the box |
| Blink500 Pro B1 | 1×Blink500 Pro RX1×Blink500 Pro TX |
| Blink500 Pro B1W | 1×Blink500 Pro RXW1×Blink500 Pro TXW |
| Blink500 Pro B2 | 1×Blink500 Pro RX2×Blink500 Pro TX |
| Blink500 Pro B2W | 1×Blink500 Pro RXW2×Blink500 Pro TXW |
| Blink500 Pro B3 | 1×Blink500 Pro RXDi1×Blink500 Pro TX |
| Blink500 Pro B4 | 1×Blink500 Pro RXDi2× Blink500 Pro TX |
| Blink500 Pro B5 | 1×Blink500 Pro RXUC1×Blink500 Pro TX |
| Blink500 Pro B6 | 1×Blink500 Pro RXUC2×Blink500 Pro TX |
Note: If using an Android phone, please set the "OTG Connection" to "ON." The OTG connection menu is usually in the "Additional Settings" in your phone setting menu.
Product Structure
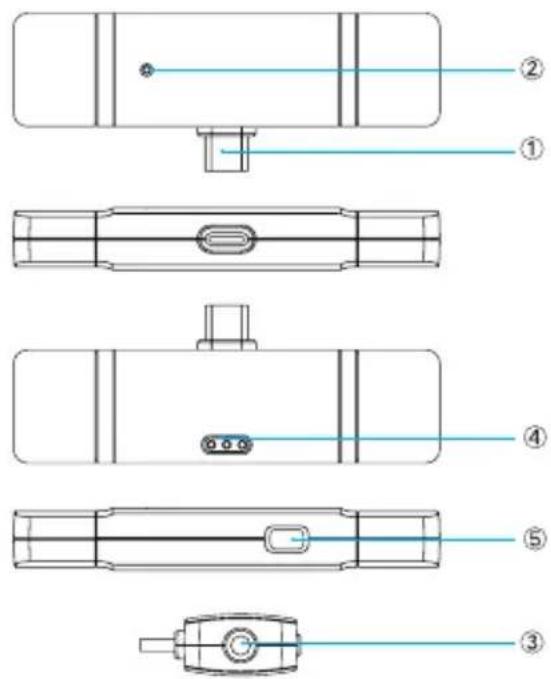
1. Blink500 Pro TX: Body-pack Transmitter with OLED Display and Microphone

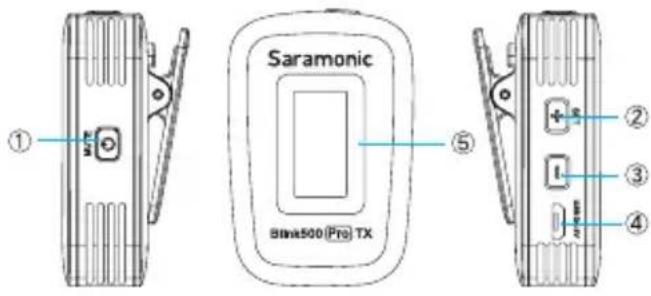
① Power/Mute Button
| Function | Operation |
| Power ON | Press button for 3 second or longer |
| Power OFF | Press button until it turns off |
| Mute ON | Short press button |
| Mute OFF |
② +/SET Button
| Function | Operation |
| + | Short press the SET button to select different functions or values shown on the display. |
| SET | Long press the SET button to enter the displayed menu.Then, long press the SET button again to confirm your option. |
③ - Button
Short press the button to select different functions or values shown on the display.
④ Micro USB Charging Port (DC 5V)
⑤ OLED Display
Display menus, please refer to "OLED Display Operation Guide" for more details.
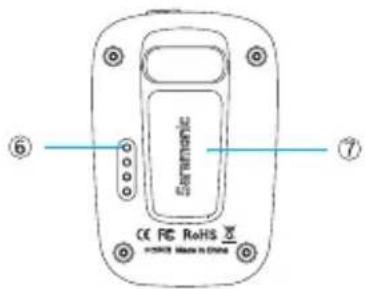
⑥ Charging & Pairing Contacts
⑦ Belt Clip
⑧ Built-in Microphone
⑨ MIC/LINE IN Jack
It can be connected to the 3.5mm lavalier microphones, and other 3.5mm microphones or line-in devices.
⑩ Antenna
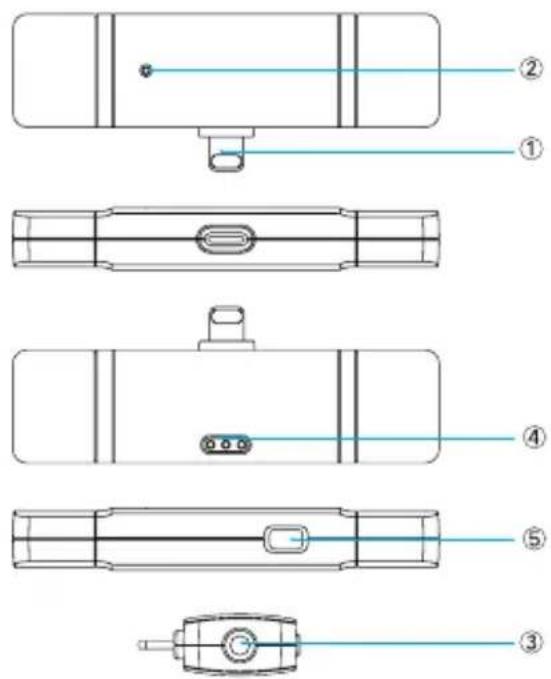
2. Blink500 Pro RX: Clip-On and Shoe-Mountable Receiver
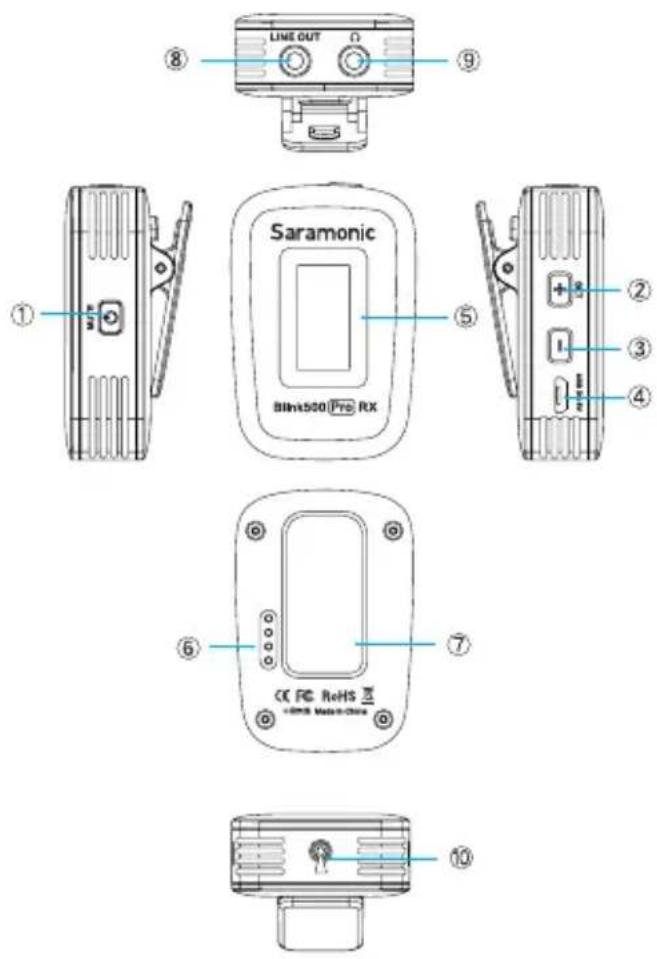
① Power/Mute Button
| Function | Operation |
| Power ON | Press button for 3 second or longer |
| Power OFF | Press button until it turns off |
| Mute ON | Short press button |
| Mute OFF |
② +/SET Button
| Function | Operation |
| + | Short press the SET button to select different functions or values shown on the display. |
| SET | Long press the SET button to enter the displayed menu.Then, long press the SET button again to confirm your option. |
③ - Button
Short press the button to select different functions or values shown on the display.
④ Micro USB Charging Port (DC 5V)
⑤ OLED Display
Display menus, please refer to "OLED Display Operation Guide" for more details.
⑥ Charging & Pairing Contacts
⑦ Belt Clip
⑧ LINE OUT Jack
Connect the Blink500 Pro RX to a DLSR camera, smartphone with a 3.5mm headphone jack, mixer or amplifier with the supplied output cable.
⑨ 3.5mm Headphone Output
Connect a headphone to monitor the audio output.
⑩ Antenna
3. Blink500 Pro RXUC: USB-C Receiver
① USB-C Connector
② Pairing Indicator
Note: Please make sure the receiver is fully plugged into your device to check indicator status.
| Mode | Indicator Status |
| Unpaired | Flashing Blue Light |
| Paired Successfully | Solid Blue Light |
③ 3.5mm Headphone Output
Connect a headphone to monitor the audio output in real-time.
④ Pairing Contacts
⑤ M/S Switch
The output mode can be set to mono or stereo. When the output mode is in mono, the audio from the left and right channel will be mixed. When in stereo, the transmitters' audio output will be separated to the left and right of the stereo output.
4. Blink500 Pro RXDi: Lightning Receiver
① MFi Certified Apple Lightning Connector
② Pairing Indicator
Note: Please make sure the receiver has fully plugged into your device to check indicator status.
| Mode | Indicator Status |
| Unpaired | Flashing Blue Light |
| Paired Successfully | Solid Blue Light |
③ 3.5mm Headphone Output
Connect a headphone to monitor the audio output in real-time.
④ Pairing Contacts
⑤ M/S Switch
The output mode can be set to mono or stereo. When the output mode is in mono, the audio from the left and right channel will be mixed. When in stereo, the transmitters' audio output will be separated to the left and right of the stereo output.
- Charging Box
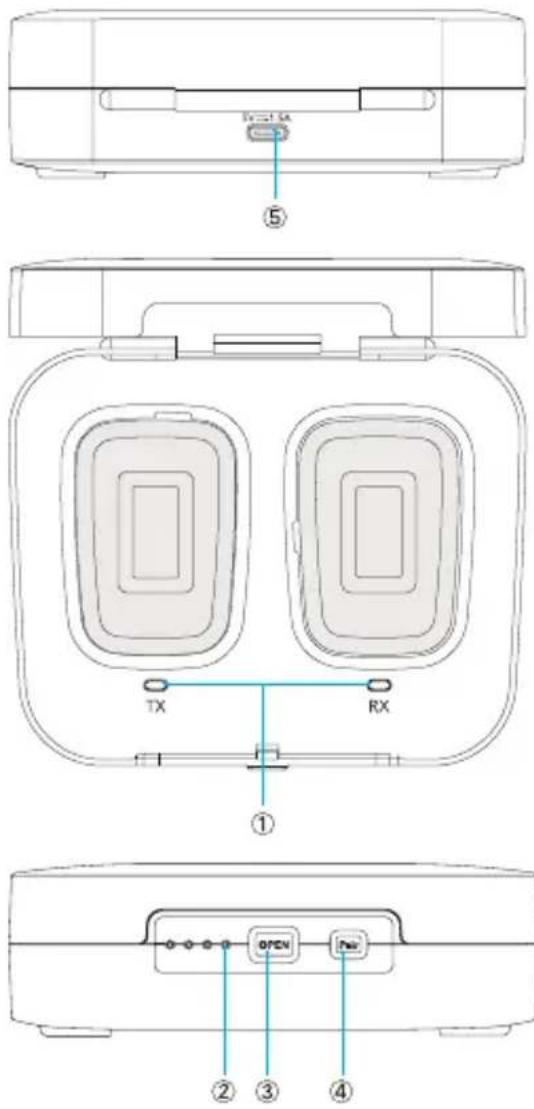
① TX & RX Charging Indicator
Charging = Solid Red
Fully Charged=Lights Off
② Power Capacity Indicator
| Indicator | Status |
| Charging (Flashing blue light in circle) | |
| Current Box's Battery Level | |
| Low Battery | |
| Battery runs out/Case closed |
③ OPEN Button
④ Pair Button
Long press the Pair button for 3 seconds to enter pairing mode. For details on setting the level, please see "Operational Guide".
⑤ USB-C Charging Port (DC 5V)
6. Blink500 Pro HM
Handheld Microphone Holder Accessory for Blink500 Pro TX Transmitter
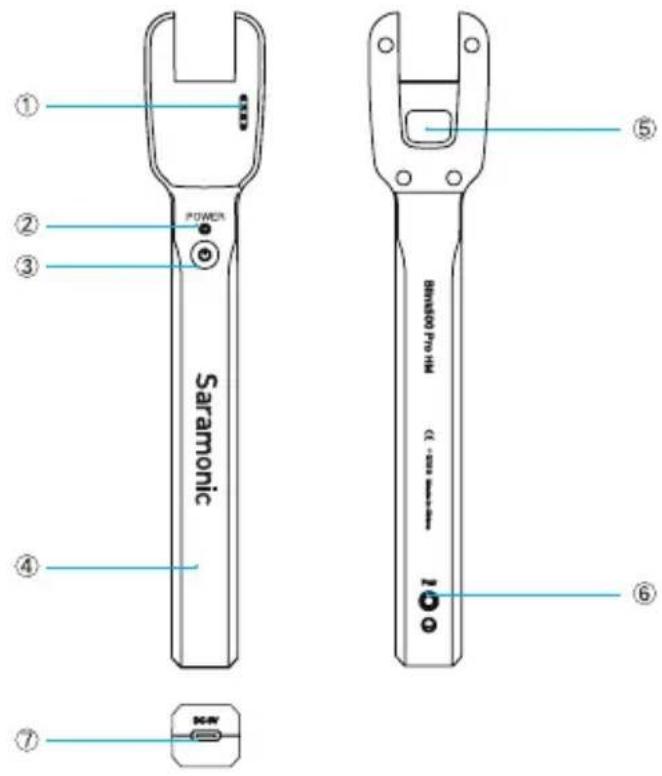
① Charging Contacts
② Power Indicator
③ Power Button
④ Handheld Holder
⑤ Belt-clip Slot
⑥ Pair Button
⑦ USB-C Charging Port
Note: The Blink500 Pro package is not include the Blink 500 Pro HM, it is an available accessory. It provides a perfect solution for handheld mic applications, such as interviews when using Blink500 Pro TX transmitter.
OLED Display Operation Guide
OLED Display Introduction (Transmitter)
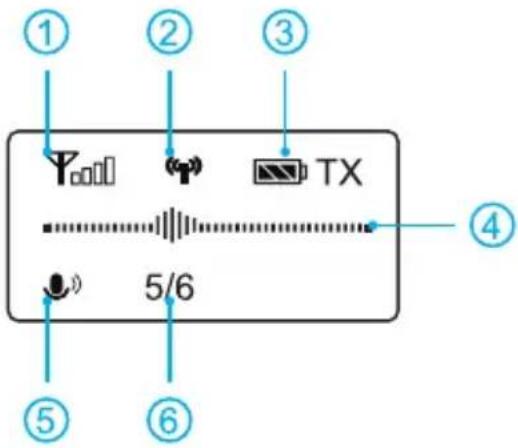
Home screen
If no operation is performed within 20-seconds any of the menu screens, the display will automatically return to the home screen.
① RF Level Indicator
② Pairing Indicator

Paired Successfully

Disconnected
For details on setting the level, please see "Operation Guide".
③ TX's battery level indicator
Displays the TX battery level. Please recharge the device immediately when the indicator starts flashing.
④ Audio input level meter
Displays the audio input level
⑤ Input mode
Displays the input mode the TX transmitter is currently set to, either Mic in or Line in. The system's default is "Mic in".

=Mic in

=Line in
⑥ MIC GAIN
Displays the TX transmitter's mic gain level
Menus Introduction


Mic Gain
5

5/6
MIC GAIN.
Adjust the microphone's input gain level. (0-6). Default is "5".


Input Mode
Mic In

5/6
Input mode.
The input mode can be selected to Mic in or Line in. When the input mode is Mic in mode, the transmitter can be connected to the included SR-M1 lavalier microphone, or other microphones with a 3.5mm output. When the input mode is Line in mode, the receiver can be connected to line-level output devices. The system's default is "Mic in".

=Mic in

=Line in
Mute ON

=Mic in (Mute ON)

=Line in (Mute ON)


Backlight Mode
On

5/6
Set Backlight.
Set backlight to Always On or On for 10, 30, or 60 seconds. Default is "On".


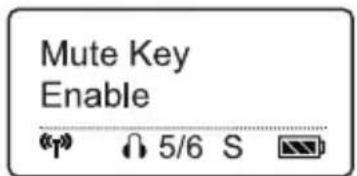
Mute Key
Enable

5/6
Set Mute key.
Enable or Disable Mute key button function. Default is "Enable".


Language
English

5/6
Language Setting.
English or 简体中文 (Chinese) are available. Default is "English".


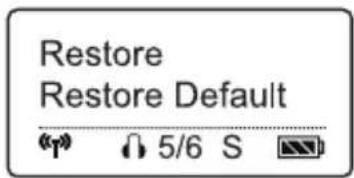
Restore
Restore Default

5/6
Restore Default Setting.
Yes: restores default settings, No: exits restore default settings


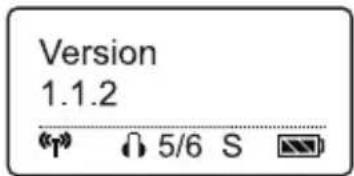
Version
1.0.1

5/6
Version of the Blink500 Pro TX's firmware.
OLED Display Introduction (Receiver)
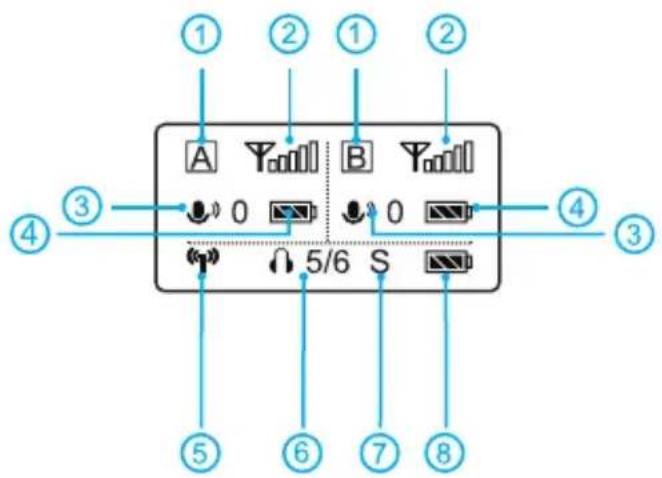
Home Screen
If no operation is performed within 20-seconds any of the menu screens, the display will automatically return to the home screen.
① Group Icon
A Indicates the power of group A is turned off.
A Indicates the power of group A is turned on.
② RF Level Indicator
Indicates the current signal level.
Signal is strong (Paired successfully)
Signal is weak (Paired successfully)
Unpaired status
③ TX's input mode & gain
The Input Mode displays the what mode each of the TX transmitters are currently set to, either Mic in or Line in. The system's default is "Mic in".
The Mic Gain displays the microphone input gain level of each of the transmitters.
MIC GAIN: The transmitter's gain level can be set from 00 to 06. Default is "05"

=Mic in

=Line in
Mute ON

=Mic in (Mute ON)

=Line in (Mute ON)
④ TX's Battery Level Indicator
Displays the TX battery level. Please recharge the device immediately when the indicator starts flashing.
⑤ Pairing indicator

Paired Successfully

Disconnected
⑥ Headphone Volume
⑦ RX's Output Mode
⑧ RX's Battery Level Indicator
Displays the RX battery level. Please recharge the device immediately when the indicator starts flashing.
Menus Introduction

Headphone Output Volume.
The headphone monitoring volume can be set from 00 to 06. Default is "05".
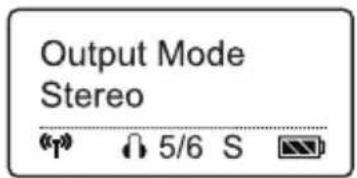
Output Mode.
The output mode can be set to either mono or stereo. When in mono mode, the audio from the transmitter, or transmitters will be mixed to both the left and right sides. When in stereo mode, the two transmitters' audio output will be separated to the left and right sides. System default is mono.
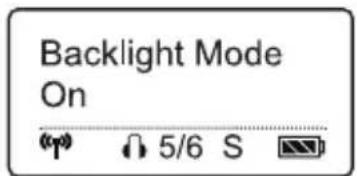
Set Backlight.
Set backlight to Always On or On for 10, 30, or 60 seconds. Default is "On".
Set Mute Key.
Enable or Disable Mute key button function.
Default is "Enable".

Language Setting.
English or 简体中文 (Chinese) are available.
Default is English.
Restore default setting.
Yes: restores default settings, No: exits restore default settings.
Version of the Blink500 Pro RX.
Version of the Blink500 Pro RX's firmware.
Operation Guide
For the Blink500 Pro B1/B2 kit
- Turn on the transmitter TX by holding down the power key.
- Turn on the receiver RX by holding down the power key.
Before leaving factory, the system has been paired successfully. If they are disconnected or unpaired, please see below for pairing instructions:
① With the system powered on and the components in the charging case, hold down the pairing button on the charging case.
② The system is successfully paired when the pairing indicator on the OLED display of RX(s) display the TX's battery level, and the pairing indicator displays "p".
3. Connect the receiver RX to the mic input of a camera, recorder or mixer with the supplied 3.5mm TRS cable. Or connect the RX to a smartphone, tablet, or computer with the supplied 3.5mm TRS to TRRS cable.
4. You are ready to record.
Note: The output of receiver RX is a line-level signal. If you are connecting it to a speaker or PA system, please mute the input or system and do not use the headphones when connecting the RX to avoid speaker or hearing damage.
For the Blink500 Pro B3/B4/B5/B6 kit
- Turn on the transmitter by holding down the power key.
Before leaving factory, the system has been paired successfully. If they are disconnected or unpaired, please see below for pairing instructions:
① With the system powered on and the components in the charging case, hold down the pairing button on the charging case.
② When the system is successfully paired, the pairing indicator of receiver is solid blue.
2. Plug the RXDi into an iOS device or the RXUC into an USB Type-C device. Please make sure the antenna (yellow side) is oriented on the top of the device, when in landscape mode, to get the best signal.
3. You are ready to record.
Specification
Blink500 Pro RXUC
| Transmission Type | 2.4GHz Digital Frequency |
| Modulation | GFSK |
| Operating Range | Up to 328' (100m) |
| Audio Output Connector | USB-C Connector |
| Power Requirements | Supplied by USB-C Devices |
| Other functions | 3.5mm headphone jack, Mono / Stereo switch |
| Antenna | PIFA Antenna |
| Weight | Approx. 10.5g (0.37oz) |
| Dimensions | 31×82×12mm |
| Operating Temperature | 0°C to 50°C |
| Storage Temperature | -20°C to +55°C |
Blink500 Pro RXDi
| Transmission Type | 2.4GHz Digital Frequency |
| Modulation | GFSK |
| Operating Range | Up to 328' (100m) |
| Audio Output Connector | MFi Certified Lightning connector |
| Power Requirements | Supplied by iOS Devices |
| Other functions | 3.5mm headphone jack, Mono / Stereo switch |
| Antenna | PIFA Antenna |
| Weight | Approx. 10.5g (0.37oz) |
| Dimensions | 31×82×12mm |
| Operating Temperature | 0°C to 50°C |
| Storage Temperature | -20°C to +55°C |
Blink500 Pro RX/RXW
| Transmission Type | 2.4GHz Digital Frequency |
| Modulation | GFSK |
| Operating Range | Up to 328' (100m) |
| Audio Output Connector | 3.5 mm Jack |
| Audio Output level | -60dBV to -20dBV |
| Power Requirements | Built-in Li-ion Battery or Micro USB DC 5V or Charging Contact |
| Other functions | 3.5mm headphone jack |
| Built-In Battery Life | Approx. 8 hours |
| Antenna | PIFA Antenna |
| Weight | Approx. 32g (1.13oz) |
| Dimensions | 56×38×29.4mm |
| Operating Temperature | 0°C to 50°C |
| Storage Temperature | -20°C to +55°C |
Blink500 Pro BOX Charging Case
| Power Requirements | Powered by USB-C port (5V/1.5A) |
| Power Capacity | 2000mAh (B2/B2W/B4/B6)1200mAh (B1/B1W/B3/B5) |
| Box's Charging Time | B1/B1W/B3/B5: 3 hoursB2/B2W/B4/B6: 4 hours |
| Weight | B1/B1W/B3/B5: 200g (7.05 oz)B2/B2W/B4/B6: 268g (9.45 oz) |
| Dimensions | B1/B1W/B3/B5:123x102×39.7mmB2/B2W/B4/B6:165.8×102.9×39.7mm |
| Operating Temperature | 0°C to 50°C |
| Storage Temperature | -20°C to +55°C |
Blink500 Pro TX/TXW
| Transmission Type | 2.4GHz Digital Frequency |
| Modulation | GFSK |
| Operating Range | Up to 328' (100m) |
| RF Output Power | 10mW |
| Polar Pattern | Omnidirectional |
| Frequency Response | 50Hz to 18KHz |
| Maximum SPL | Built-In Microphone:120dB SPLLavalier Microphone:110dB SPL |
| Sensitivity | Built-In Microphone: -39dB Lavalier Microphone: -39dB |
| Signal-to-Noise Ratio | >78dB |
| Reference audio input level | -30~-42dBv MIC input,0 dB attenuation) |
| Power Requirements | Built-in Li-ion Battery or Micro USB DC 5V or Charging Contact |
| Other Functions | Mute functionHigh-contrast OLED Display |
| Built-In Battery Life | Approx. 8 hours |
| Antenna | PIFA Antenna |
| Audio Inputs | 3.5mm TRS Lavalier Mic/Line-in Input or Built-in Microphone |
| Weight | Approx. 32g (1.13oz) |
| Dimensions | 56.5×38×26.1mm |
| Operating Temperature | 0°C to 50°C |
| Storage Temperature | -20°C to +55°C |
Blink500 Pro HM
| Power Requirements | Powered by USB-C port (5V) |
| Power Capacity | Built-in Li-ion Battery1100mAh |
| Box's Charging Time | Approx. 3 hours |
| Weight | 68.5g (2.4 oz) |
| Dimensions | 206.7x38.1x25.2mm |
Packing List
Blink500 Pro B1(1×Blink500 Pro RX+1×Blink500 Pro TX)
1× Blink500 Pro RX Receiver with Built-In Clip and Camera Shoe-Mount
(Integrated with OLED Display)
1× Blink500 Pro TX Transmitter with OLED
Display and Built-In Microphone
1× Blink500 Pro B1 BOX Charging Case
1× 1' (30.5 cm) Gold-Plated 3.5mm TRS to TRS
Output Cable for Cameras
1× 1' (30.5 cm) Gold-Plated 3.5mm TRS to TRRS
Output Cable for Smartphones and Tablets
1× 1' (30.5 cm) Gold-Plated USB-C to USB-A
Charging Cable
1× 1' (30.5 cm) Gold-Plated Micro USB to USB-A
Charging Cable
1× SR-M1 Omnidirectional Lavalier Microphone
1× Alligator-Style Lavalier Microphone Clip
1× Foam Lavalier Windscreen
1× High-Wind Fur Windscreen for TX Transmitter
1× Warranty Card
1× User Manual
Blink500 Pro B2(1×Blink500 Pro RX+2×Blink500 Pro TX)
1× Blink500 Pro RX Receiver with Built-In Clip and Camera Shoe-Mount
2× Blink500 Pro TX Transmitter with OLED
Display and Built-In Microphone
1× Blink500 Pro B2 BOX Charging Case
1× 1' (30.5 cm) Gold-Plated 3.5mm TRS to TRS
Output Cable for Cameras
1× 1' (30.5 cm) Gold-Plated 3.5mm TRS to TRRS
Output Cable for Smartphones and Tablets
1× 1' (30.5 cm) Gold-Plated USB-C to USB-A
Charging Cable
1× 1' (30.5 cm) Gold-Plated Micro USB to USB-A
Charging Cable
2× SR-M1 Omnidirectional Lavalier Microphone
2× Alligator-Style Lavalier Microphone Clip
2× High-Wind Fur Windscreen for TX Transmitter
2× Foam Lavalier Windscreen
1× Warranty Card
1× User Manual
Blink500 Pro B3(1×Blink500 Pro RXDi +1×Blink500 Pro TX)
1× Blink500 Pro RXDi Receiver with MFi Certified Apple Lightning Connector
1× Blink500 Pro TX Transmitter with OLED
Display and Built-In Microphone
1× Blink500 Pro B3 BOX Charging Case
1× 1' (30.5 cm) Gold-Plated USB-C to USB-A
Charging Cable
1× 1' (30.5 cm) Gold-Plated Micro USB to USB-A
Charging Cable
1× SR-M1 Omnidirectional Lavalier Microphone
1× Alligator-Style Lavalier Microphone Clip
1× High-Wind Fur Windscreen for TX Transmitter
1× Foam Lavalier Windscreen
1× Warranty Card
1× User Manual
Blink500 Pro B4(1×Blink500 Pro RXDi +2×Blink500 Pro TX)
1× Blink500 Pro RXDi Receiver with MFi Certified Apple Lightning Connector
2× Blink500 Pro TX Transmitter with OLED
Display and Built-In Microphone
1× Blink500 Pro B4 BOX Charging Case
1× 1' (30.5 cm) Gold-Plated USB-C to USB-A Charging Cable
1× 1' (30.5 cm) Gold-Plated Micro USB to USB-A Charging Cable
2× SR-M1 Omnidirectional Lavalier Microphone
2× Alligator-Style Lavalier Microphone Clip
2× High-Wind Fur Windscreen for TX Transmitter
2× Foam Lavalier Windscreen
1× Warranty Card
1× User Manual
Blink500 Pro B5(1×Blink500 Pro RXUC+1×Blink500 Pro TX)
1× Blink500 Pro RXUC Receiver with USB-C Connector
1× Blink500 Pro TX Transmitter with OLED
Display and Built-In Microphone
1× Blink500 Pro B5 BOX Charging Case
1× 1' (30.5 cm) Gold-Plated USB-C to USB-A
Charging Cable
1× 1' (30.5 cm) Gold-Plated Micro USB to USB-A Charging Cable
1× SR-M1 Omnidirectional Lavalier Microphone
1× Alligator-Style Lavalier Microphone Clip
1× High-Wind Fur Windscreen for TX Transmitter
1× Foam Lavalier Windscreen
1× Warranty Card
1× User Manual
Blink500 Pro B6(1×Blink500 Pro RXUC+2×Blink500 Pro TX)
2× Blink500 Pro RXUC Receiver with USB-C Connector
1× Blink500 Pro TX Transmitter with OLED Display and Built-In Microphone
1× Blink500 Pro B6 BOX Charging Case
1× 1' (30.5 cm) Gold-Plated USB-C to USB-A Charging Cable
1× 1' (30.5 cm) Gold-Plated Micro USB to USB-A Charging Cable
2× SR-M1 Omnidirectional Lavalier Microphone
2× Alligator-Style Lavalier Microphone Clip
2× High-Wind Fur Windscreen for TX Transmitter
2× Foam Lavalier Windscreen
1× Warranty Card
Blink500 Pro B1W(1×Blink500 Pro RXW+1×Blink500 Pro TXW)
1× Blink500 Pro RXW Receiver with Built-In Clip and Camera Shoe-Mount
1× Blink500 Pro TXW Transmitter with OLED Display and Built-In Microphone
1× Blink500 Pro B1W BOX Charging Case
1× 1' (30.5 cm) Gold-Plated 3.5mm TRS to TRS Output Cable for Cameras
1× 1' (30.5 cm) Gold-Plated 3.5mm TRS to TRRS Output Cable for Smartphones and Tablets
1× 1' (30.5 cm) Gold-Plated USB-C to USB-A Charging Cable
1× 1' (30.5 cm) Gold-Plated Micro USB to USB-A Charging Cable
1× SR-M1W Omnidirectional Lavalier Microphone
1× Alligator-Style Lavalier Microphone Clip
1× High-Wind Fur Windscreen for TX Transmitter
1× Foam Lavalier Windscreen
1× Warranty Card
1× User Manual
Blink500 Pro B2W(1×Blink500 Pro RXW+2×Blink500 Pro TXW)
1× Blink500 Pro RXW Receiver with Built-In Clip and Camera Shoe-Mount
2× Blink500 Pro TXW Transmitter with OLED Display and Built-In Microphone
1× Blink500 Pro B1W BOX Charging Case
1× 1' (30.5 cm) Gold-Plated 3.5mm TRS to TRS Output Cable for Cameras
1× 1' (30.5 cm) Gold-Plated 3.5mm TRS to TRRS Output Cable for Smartphones and Tablets
1× 1' (30.5 cm) Gold-Plated USB-C to USB-A Charging Cable
1× 1' (30.5 cm) Gold-Plated Micro USB to USB-A Charging Cable
2× SR-M1W Omnidirectional Lavalier Microphone
2× Alligator-Style Lavalier Microphone Clip
2× High-Wind Fur Windscreen for TX Transmitter
2× Foam Lavalier Windscreen
1× Warranty Card
1× User Manual
Blink500 Pro HM
1× Handheld Microphone Holder
1× USB-C Charging Cable
1× Foam Windscreen
- Saramonic
- General Introduction
- Product Structure
- Blink500 Pro TX: Body-pack Transmitter with OLED Display and Microphone
- ③ - Button
- ④ Micro USB Charging Port (DC 5V)
- ⑤ OLED Display
- ⑥ Charging & Pairing Contacts
- ⑦ Belt Clip
- ⑧ Built-in Microphone
- ⑨ MIC/LINE IN Jack
- ⑩ Antenna
- Blink500 Pro RX: Clip-On and Shoe-Mountable Receiver
- ⑧ LINE OUT Jack
- ⑨ 3.5mm Headphone Output
- Blink500 Pro RXUC: USB-C Receiver
- Blink500 Pro RXDi: Lightning Receiver
- Blink500 Pro HM
- OLED Display Operation Guide
- Home screen
- ⑤ Input mode
- ⑥ MIC GAIN
- Menus Introduction
- MIC GAIN.
- Input mode.
- Mute ON
- Set Backlight.
- Set Mute key.
- Language Setting.
- Restore Default Setting.
- Headphone Output Volume.
- Output Mode.
- Version of the Blink500 Pro RX.
- Operation Guide
- For the Blink500 Pro B1/B2 kit
- Before leaving factory, the system has been paired successfully. If they are disconnected or unpaired, please see below for pairing instructions:
- Note: The output of receiver RX is a line-level signal. If you are connecting it to a speaker or PA system, please mute the input or system and do not use the headphones when connecting the RX to avoid speaker or hearing damage.
- For the Blink500 Pro B3/B4/B5/B6 kit
- Specification
- Packing List
- Blink500 Pro B1(1×Blink500 Pro RX+1×Blink500 Pro TX)
- Blink500 Pro B2(1×Blink500 Pro RX+2×Blink500 Pro TX)
- Blink500 Pro B3(1×Blink500 Pro RXDi +1×Blink500 Pro TX)
- Blink500 Pro B4(1×Blink500 Pro RXDi +2×Blink500 Pro TX)
- Blink500 Pro B5(1×Blink500 Pro RXUC+1×Blink500 Pro TX)
- Blink500 Pro B6(1×Blink500 Pro RXUC+2×Blink500 Pro TX)
- Blink500 Pro B1W(1×Blink500 Pro RXW+1×Blink500 Pro TXW)
- Blink500 Pro B2W(1×Blink500 Pro RXW+2×Blink500 Pro TXW)
- Blink500 Pro HM
Mærke : Saramonic
Model : Blink 500
Kategori : Mikrofon