
Yi Home Camera - Kamera Xiaomi - Gratis brugsanvisning og manual
Find enhedens vejledning gratis Yi Home Camera Xiaomi i PDF-format.

Brugerspørgsmål om Yi Home Camera Xiaomi
0 spørgsmål om dette apparat. Besvar dem du kender, eller stil dit eget.
Stil et nyt spørgsmål om dette apparat
Download vejledningen til din Kamera i PDF-format gratis! Find din vejledning Yi Home Camera - Xiaomi og tag din elektroniske enhed tilbage i hånden. På denne side er alle dokumenter nødvendige for brugen af din enhed offentliggjort. Yi Home Camera af mærket Xiaomi.
BRUGSANVISNING Yi Home Camera Xiaomi

Thanks for choosing Mi Xiaoyi Smart-camera! www.Xiaomi-Mi.com
1. Installation 2. Fast synchronization with Mi router in one click
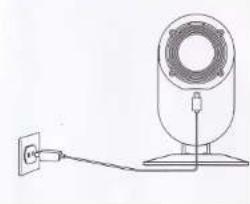
Power Connection
From below find the socket for an USB cable and connect it, connect a cable to power. The lit forward indicator means that the camera is switched on.
Before installation of the camera be convinced available 2.4G of a network and a signal of Wi Fi
natural_image
Simple line drawing of a microphone connected to a power outlet (no text or symbols)Very simple and fast installation
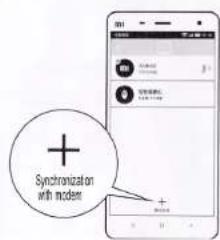
Open Mi router application and wait until the yellow indicator lights up. After that in «smart settings», choose «fast synchronization with a router». The lit blue indicator means that synchronization is successfully complete.
text_image
+ Synchronization with modern3. What to do if you do not have Mi router?
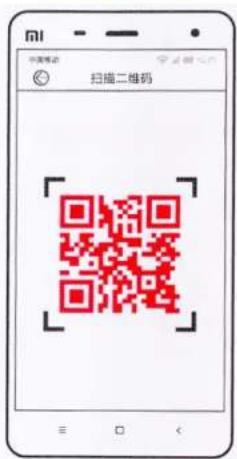
Download and install Mi smart home application or Mi Xiaoyi Smart-camera.
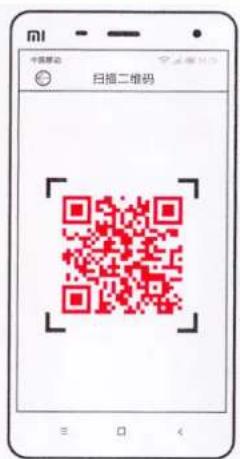
Scan the below-specified QR codes Mi the smart house or Mi Xiaoyi Smart-camera and finish your installation.
QR-code Mi smart home
text_image
MI 扫描二维码 扫码二维码QR-code application Mi Smart-camera
text_image
mi 中国移动 扫码二维码4. Switching up
Turn power on, wait about 20 seconds that the yellow indicator lit up.
If the yellow indicator doesn't light up, press the reset button and hold it approximately within 5 seconds when there is a blue indicator, inclusion is complete.

text_image
reset button blue indicator YI5. Addition of Mi Xiaoyi Smart-camera
The procedure of a successful addition of the camera (It is also possible to install some cameras)

text_image
guide The blue indicator will light up after connection next QR-code search next camera settings camera name name the camera Wi Fi settings Wi Fi name Wi Fi password6. After successful addition of the camera, you can watch video remotely
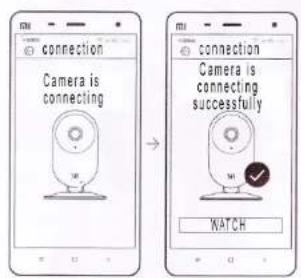
text_image
connection Camera is connecting → connection Camera is connecting successfully watch7 Instruction on use of the app of remote video 8. Precautions
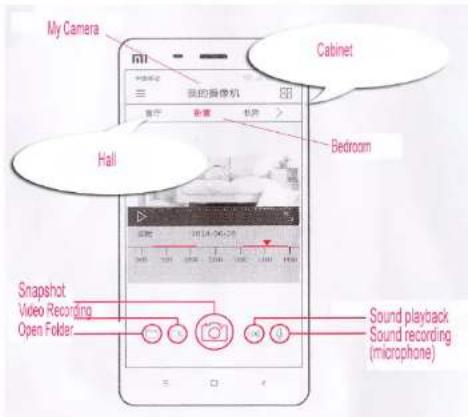
text_image
My Camera Cabinet Hall Bedroom Snapshot Video Recording Open Folder Sound playback Sound recording (microphone)10 Warranty
Warranty terms
If during period of validity of a guarantee you had production malfunctions, you can use guarantee service:
- Within 7 days from the moment of purchase, in case of a problem, after presentation of the receipt, you can return money or choose free replacement of goods at the same cost.
- Within 15 days from the moment of purchase, in case of a problem, you can use the right for free replacement of goods at the same cost; If you have a warranty card for a year.
- This warranty card can't be corrected, differently it will be considered as the invalid.
Conditions of warranty repair
The list of circumstances (including, but without being limited), under which guarantee maintenance is impossible:
- absence of the warranty card, receipt or period of validity of a guarantee I ended;
- the damages which arose in a consequence of use of the device not to destination, wrong leaving or wrong technical service;
- the damages which arose at force majeur circumstances such as: lightning stroke, fire or flood;
- number of model specified in the guarantee certificate, and number on the device don't coincide;
- the malfunctions which arose in a maintenance consequence in the service centers of other trademark;
- at emergence of similar cases you should address to the relevant service centers or to choose paid services;
- decolouration or wear in a consequence of operation of the device aren't included into guarantee service.
• To establish far from metal subjects;
- Not to install the camera behind furniture and nearby with the microwave oven;
- To avoid complication of an audiocable, a video cable, an USB cable and to leave rather free space for an electric cable;
- It is necessary to provide a cover zone of wireless Wifi of a signal and to place the camera most close to the Internet.
9. Connection of other Internet
- At connection of other Internet it is necessary, to press the reset button and to hold it about 5 seconds. The lit-up blue indicator means that inclusion is complete. Then again it is necessary it will be connected to the Internet.
11. Presence of toxic and harmful substances
| Name | Toxic and harmful substances or elements | |||||
| Flu | Flu | Cul | Cl2+ | PDD | PDDE | |
| Camera bass | 0 | 0 | 0 | 0 | 0 | 0 |
| Electronic plate | x | 0 | 0 | 0 | 0 | 0 |
| Charger | 0 | 0 | 0 | 0 | 0 | 0 |
| Accessories | 0 | 0 | 0 | 0 | 0 | 0 |
| Clarification | On toxic and harmful substances in all accessories of this device to certain in quantity below limit value 5/1T11363-2006 "Requirements of Restriction Existence of Toxic and Harmful Agents in Goods" agrees.X: means existence of toxic and harmful substances at least in one of in accessories of this device in the quantity exceeding limit value according to 5/1T11363-2006 "Requirements of Restriction Existence of Toxic and Harmful Agents in Goods". | |||||
These goods correspond European requirements to RoHS and standards for environmental protection; the international countries can't still replace or reduce the content of aluminum in a copper alloy.