
A1 - Overvågningskamera IMOU - Gratis brugsanvisning og manual
Find enhedens vejledning gratis A1 IMOU i PDF-format.


Brugerspørgsmål om A1 IMOU
0 spørgsmål om dette apparat. Besvar dem du kender, eller stil dit eget.
Stil et nyt spørgsmål om dette apparat
Download vejledningen til din Overvågningskamera i PDF-format gratis! Find din vejledning A1 - IMOU og tag din elektroniske enhed tilbage i hånden. På denne side er alle dokumenter nødvendige for brugen af din enhed offentliggjort. A1 af mærket IMOU.
BRUGSANVISNING A1 IMOU
imou
About the Guide
This quick start guide is for reference only. Minor difference might be found in user interface.
All the design and software here are subject to change without prior written notice.
All trademarks and registered trademarks mentioned are the properties of their respective owners.
Please visit our website or contact your local service engineer for more information.
If there is any uncertainty or controversy, please refer to our final explanation.
Operating With Imou AppOperating
Step 1
Scan the following QR code or search "lmou" in Google Play or App Store to download and install lmou App.

Step 2
Run Imou App, and then register an account for first use.
Step 3
Connect the camera to power source with the power adapter.
Step 4
Wait for booting to be finished, and then the camera indicator flashes with green light.
Step 5
Connect your smart phone to your Wi-Fi network, and make sure your smartphone is connected to Wi-Fi network with 2.4 GHz band, and then do the following operations to finish adding camera.
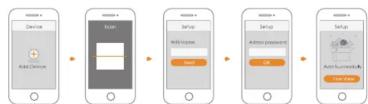
Note: If you have more than one camera, do step 5 to add them one by one.
- If the Wi-Fi network changed or the indicator status goes wrong, reset the camera, and then do step 5 to add it again.
Installing Camera
Note: Make sure the mounting surface is strong enough to hold at least three times of the device weight.

Step1 Drill screw holes on the mounting surface as the mounting map shows, and then put in the expansion bolts.
Step2 Attach the mounting plate to the mounting surface with the self-tapping screws.
Step3 Attach the camera to the mounting plate, then power it up, and then, adjust the lens to the ideal angle.
imou
Quick Start Guide
Version 1.0.0

Packing List

Camera × 1

Power Adapter × 1

Power Cable × 1

QSG × 1

Screw Package × 1

Mounting Plate × 1

Positioning Map × 1
Camera Introduction

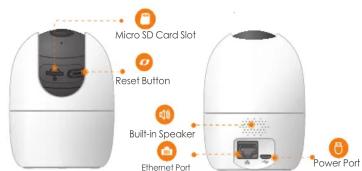
Note: Press and hold the reset button for 10 s to reset the camera.
The pattern of the LED indicator is included in the following table.
| LED Indicator Status | Device Status |
| Off | ● Powered off/LED turned off● Rebooting after reset |
| Red light on | ● Booting● Device malfunction |
| Green light flashing | Waiting for network |
| Green light on | Operating properly |
| Red light flashing | Network connection failed |
| Green and Red light flashing alternately | Firmware updating |




Mærke : IMOU
Model : A1
Kategori : Overvågningskamera