SK-A7C1 - Fotostativ Sevenoak - Gratis brugsanvisning og manual
Find enhedens vejledning gratis SK-A7C1 Sevenoak i PDF-format.

Brugerspørgsmål om SK-A7C1 Sevenoak
0 spørgsmål om dette apparat. Besvar dem du kender, eller stil dit eget.
Stil et nyt spørgsmål om dette apparat
Download vejledningen til din Fotostativ i PDF-format gratis! Find din vejledning SK-A7C1 - Sevenoak og tag din elektroniske enhed tilbage i hånden. På denne side er alle dokumenter nødvendige for brugen af din enhed offentliggjort. SK-A7C1 af mærket Sevenoak.
BRUGSANVISNING SK-A7C1 Sevenoak
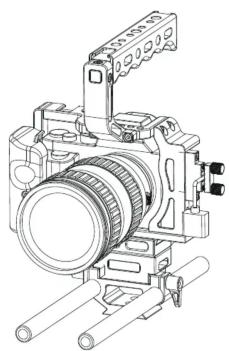
SK-A7C1 is a portable aluminum cage kit built for the Sony A7, A7S, A7R, A7 II, A7R II, A7S II which adds protection, stability and mounting options to the camera. It includes form fitting camera cage, wood grip, top hand grip, micro HDMI adapter cable, HDMI plug protector, quick release base plate, cold shoes, 1/4" and 3/8" mounting points etc. The form fitting camera cage allows full access to the camera's controls, buttons, battery and SD card slot. The cold shoes, 1/4" and 3/8" mounting points allows you to mount different accessories.
The HDMI plug protector frees you from worrying about wearing out or damaging the micro HDMI port by repeatedly plugging or replugging a micro HDMI cable into your camera body. It also helps to prevent your HDMI cable from accidentally coming unplugged during a shoot which is particularly important when using an external monitor or recorder.
The comfortable wood grip and removable top hand grip enable users to switch from one to the other easily for different shooting requirement. The built in 1/4" and 3/8" mounting points as well as two cold shoes on the top hand grip enables users to mount various kinds of useful accessories.
The cage also comes with quick release base plate and a pair of 15mm standard rods that allows you to remove and remount the camera from the rods easily and quickly. With 1/4" and 3/8" mounting points on the quick release plate, the cage can be easily mounted onto or removed from a tripod, rig or other device.
Features:
■ Form-fitting cage
■ Aluminum construction
■ Comfortable wood grip
■ Removable top hand grip
■ Quick release plate
■ Built in 1/4" and 3/8" mounting points
■ Built in cold shoes
■ A pair of 15mm standard rods
Full access to camera's controls, buttons, memory slot and battery
Limited One-year Warranty
Sevenoak provides a limited warranty that this product is free from defects in materials and workmanship to the original purchaser under normal use for a period of one (1) year from the original purchase date or thirty (30) days after replacement (the "Warranty Period"), whichever occurs later. Our responsibility with respect to this limited warranty shall be limited solely to repair or replacement, at its option, of any product which fails during normal consumer use.
To obtain warranty coverage during the Warranty period, contact your place of purchase ("Seller") to obtain a return merchandise authorization ("RMA") number, and return to Seller the defective product along with proof of purchase and the RMA number.
This warranty does not extend to damage or failure which results from misuse, neglect, accident, alternation, abuse, improper installation or maintenance. EXCEPT AS PROVIDED HEREIN, SEVENOAK MAKES NEITHER ANY EXPRESS WARRANTIES NOR ANY IMPLIED WARRANTIES, INCLUDING BUT NOT LIMITED TO ANY IMPLIED WARRANTY OF MERCHANTABILITY OR FITNESS FOR A PARTICULAR PURPOSE. This warranty provides you with specific legal rights, and you may also have additional rights which vary from state to state.
Warnings
■ Please read and follow these instructions, and keep this manual in a safe place.
■ Handle the unit with care.
■ Clean the unit with a soft, dry cloth.
■ Use only parts provided by the manufacturer.
■ Make sure everything is secure before proceeding.
■ Make sure the item is intact and that there are no missing parts.
■ Do not exceed the maximum load capacity.
■ All photos are for illustrative purposes only.
SEVENORK®
natural_image
Technical line drawing of a mechanical device with cylindrical components and mounting brackets (no text or symbols)SK-A7C1
Cage Kit for Sony
A7, A7S, A7R, A7 II, A7R II, A7S II
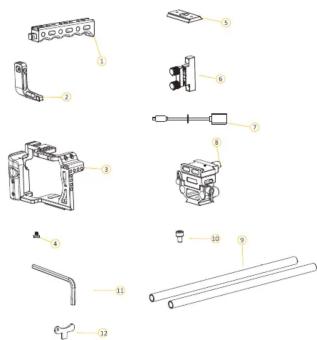
Components:
- Top hand grip
- Top hand grip connector
- Main body
- 1/4" camera locking screw
- Quick release plate
- HDMI plug protector
- Micro HDMI adapter cable
- Base plate
- 2*15mm standard rods
- M4 Screws
- Allen Key
- Key for camera locking screw
© 2016 Sevenoak Inc. Visit us on the
web at www.sevenoak.biz
Instruction Manual:
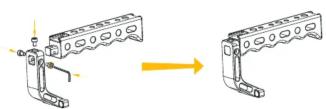
Step 1:
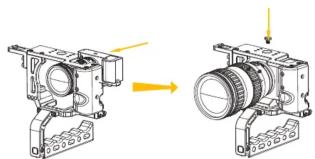
Use the included Allen key and three M4*6 screws to install the top hand grip and the top hand grip connector as shown in the below picture, ensure the screws are tightened.
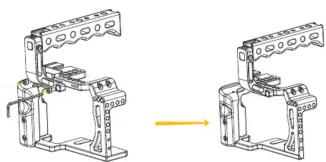
Step 2
Use the Allen key and two M4*8 screws to attach the top hand grip to he main body as shown in the following picture, ensure the screws are tightened.
natural_image
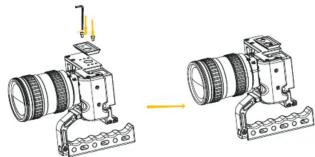
Technical line drawing of two mechanical assembly components with no visible text or symbolsStep 3
Turn the cage and camera upside down, put the camera into the cage, make sure the camera locking screw point is right under the locking point on the cage (see following picture), use the 1/4" screw to lock the camera, you may need to use a coin to tighten the screw, make sure the camera is securely fastened.
natural_image
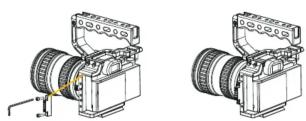
Mechanical assembly diagram showing two views of a device with no visible text or symbolsStep 4:
Use two M4*8 screw to lock the quick release plate onto the main body as shown in the below picture, tighten the screws with the Allen key.
natural_image
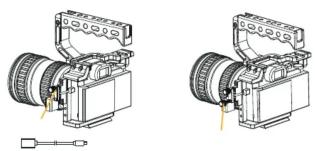
Diagram showing two camera assembly steps: one with a lens and sensor, the other with a film reel and frame (no text or symbols)Step 5:
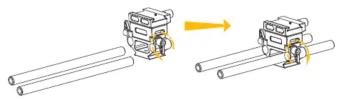
Attach the HDMI plug protector to the main body as shown in the following picture, use two M4*10 screws and Allen key to lock the HDMI plug protector, make sure the screws are securely fastened.
Step 6:
Insert the HDMI D (Micro) plug through the plug protector and into the camera's HDMI D (Micro) port. Secure the cable by tightening the two plug protector screws.
Fit the HDMI plug through the gap in the plug protector and lock it into place by tightening the plug protector screws.
natural_image
Technical line drawing of two mechanical assembly components with no visible text or symbolsStep 7:
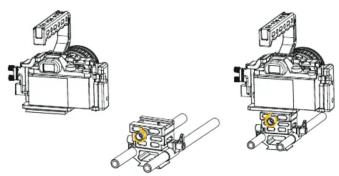
Insert two 15mm rods into the base plate, fix the rods at a proper position by tighten the screws on both sides of the base plate.
Step 8:
Loosen the locking screw on the base plate, put the quick release plate onto the base plate, lock the quick release plate by tightening the locking screw on the base plate, make sure the screw is securely fastened.
natural_image
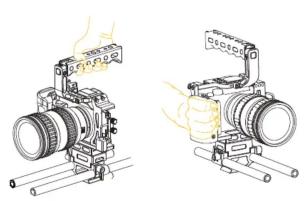
Technical line drawings of mechanical components (no text or symbols)Now the basic installation is completed, it is ready for shooting. You can add other accessories to this kit according to your requirement. You can hold the wood grip or top hand grip while shooting, or you can mount on tripod. After shooting, remember to remove the camera from the cage.
natural_image
Technical line drawing of a camera assembly with no visible text or symbols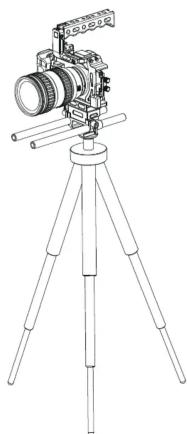
natural_image
Line drawing of a tripod-mounted camera with dual camera arms (no text or symbols)jiayz™ 深圳市长丰影像器材有限公司
| 产品/零件名称 | SK-A7C1说明书 | 比例 | 1:1 | 版本 | V02 |
| 工程图号 | SK-A7C1说明书V02 | 物料描述 | 1286双铜 双面 4折页 | ||
| 物料编号 | 1F14015SK0082 | 尺寸/用量 | 尺寸: 385 × 216 mm | 1PCS | |
| 制图人/日期 | 吴蒙蒙/2016-3~17 | 审核/日期 | |||
Mærke : Sevenoak
Model : SK-A7C1
Kategori : Fotostativ