Knitmaster 360 - Symaskine Empisal - Gratis brugsanvisning og manual
Find enhedens vejledning gratis Knitmaster 360 Empisal i PDF-format.

Brugerspørgsmål om Knitmaster 360 Empisal
0 spørgsmål om dette apparat. Besvar dem du kender, eller stil dit eget.
Stil et nyt spørgsmål om dette apparat
Download vejledningen til din Symaskine i PDF-format gratis! Find din vejledning Knitmaster 360 - Empisal og tag din elektroniske enhed tilbage i hånden. På denne side er alle dokumenter nødvendige for brugen af din enhed offentliggjort. Knitmaster 360 af mærket Empisal.
BRUGSANVISNING Knitmaster 360 Empisal
Empirical-KNITMASTER
OPERATION MANUAL
MOD.360/260
natural_image
Illustration of two yarn spools with yarn threads, no text or symbols present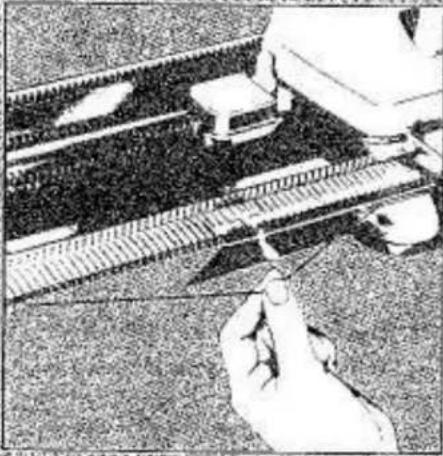
natural_image
Hand holding a pen writing on a mechanical component (no visible text or symbols)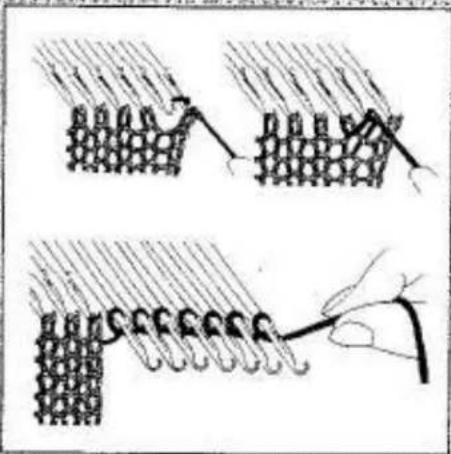
natural_image
Illustration of a hand weaving a knotted structure with threads and rods (no text or symbols)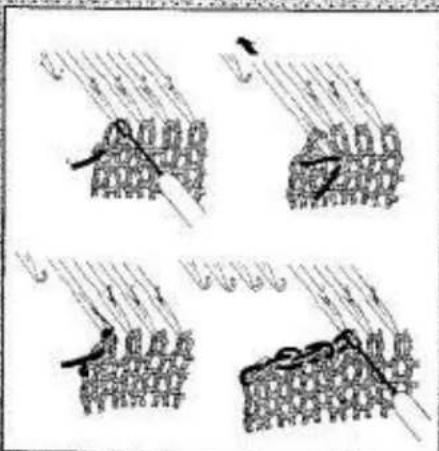
text_image
Four-panel diagram illustrating a mechanical or electrical process with labeled components and directional arrows.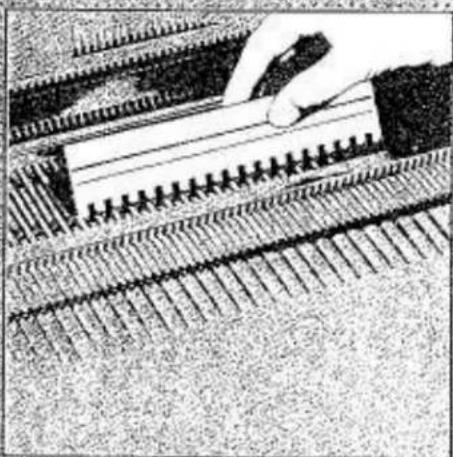
natural_image
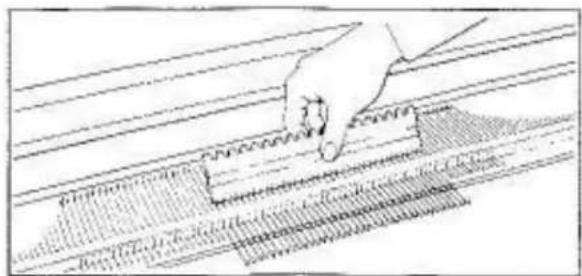
Close-up of a hand using a tool to cut or mark a mechanical component with parallel grooves (no visible text or symbols)PREFACE
Our congratulations to you on the purchase of your new knitting machine — Model 360/260.
This Operation Manual has been prepared to assist you in using and operating your knitting machine. It is composed of four parts as prescribed below.
PART 1 - Using 360/260KL ...... Pages 1-20
Part one contains the easy-to-follow basic information required for yarn preparation before knitting, setting up of the machine, cast on and stockinet knitting with the Main Carriage.
The Lace Carriage and its use is covered in PART 3.
If you are anxious to knit a garment in stockinet knitting while using the Main Carriage, refer to the Knitting Manual. Should you wish to use the Lace Carriage instead, refer to PART 3.
PART 2 - Using 360/260K Carriage ...... Pages 21-42
Part two gives necessary information to knit a wide range of stitch patterns in mono/polycolours using the Punch Card. Over a hundred stitch pattern samples have been introduced in the Pattern Book.
PART 3 - Using 360/260L Carriage....Pages 43-60
Part three contains the easy-to-follow basic information required for the Lace Carriage covering setting up of the Lace Carriage, cast on, stockinet knitting and how to knit lace patterns using the Punch Card.
PART 4 - Using 360/260KL ...... Pages 61-71
Part four guides you to WHAT TO DO, HOW TO DO and MAINTENANCE of the machine as a lifetime companion of yours.
If you are in need of further information or knitting accessories for your machine, please do not hesitate to call on your nearest knitting shop or service centre.
Enjoy knitting!
CONTENTS
MACHINE AND ACCESSORIES....page 1
PREPARATION OF YARNS....3
SETTING UP THE KNITTER AND KNITTING 4
PATTERN KNITTING WITH MAIN CARRIAGE....21
Knit-in (Fair Isle)....25
Slip stitch pattern 27
Slip stitch pattern in colour. 27
Tuck stitch pattern 29
Tuck stitch pattern in colours....30
Tuck lace....31
Punch lace 32
Weaving 33
Platting. 35
Single motif....37
LACE CARRIAGE 43
PATTERN KNITTING WITH LACE CARRIAGE. 54
Plain lace 56
Fashion lace....57
Single motif lace 59
HELPFUL HINTS....61
MAINTENACE 71
REPACKING THE KNITTER 72
INDEX....73
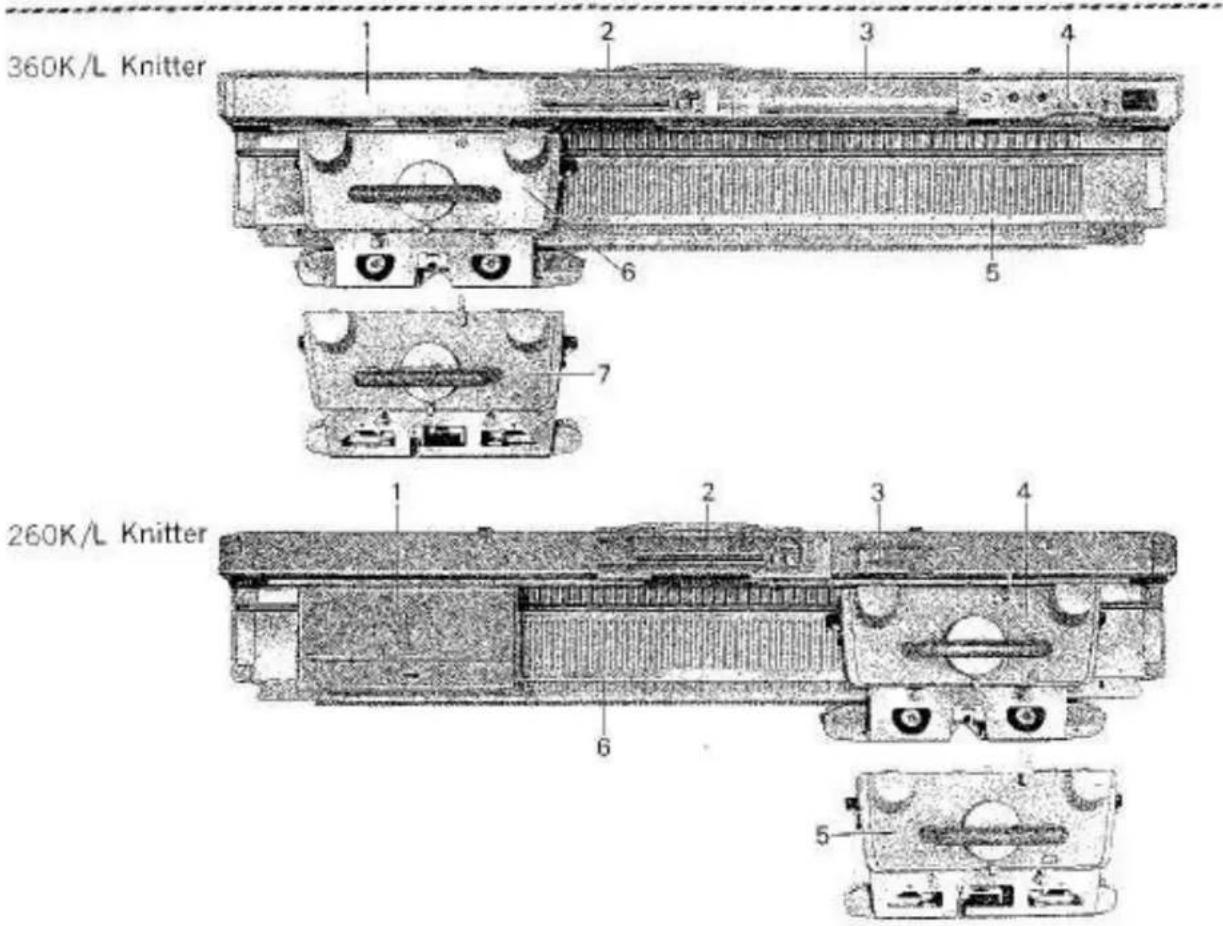
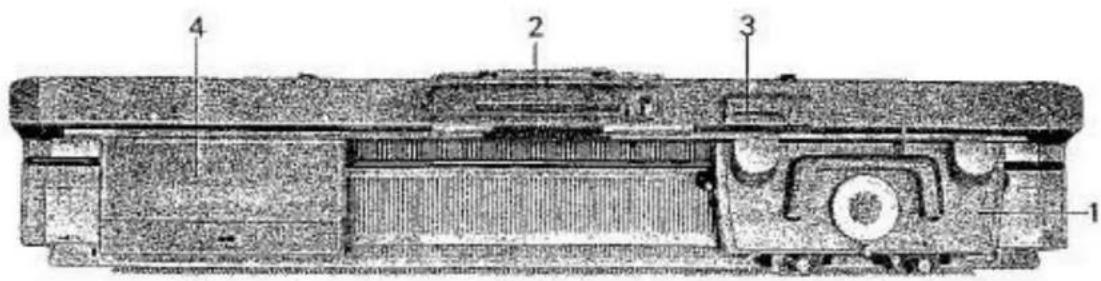
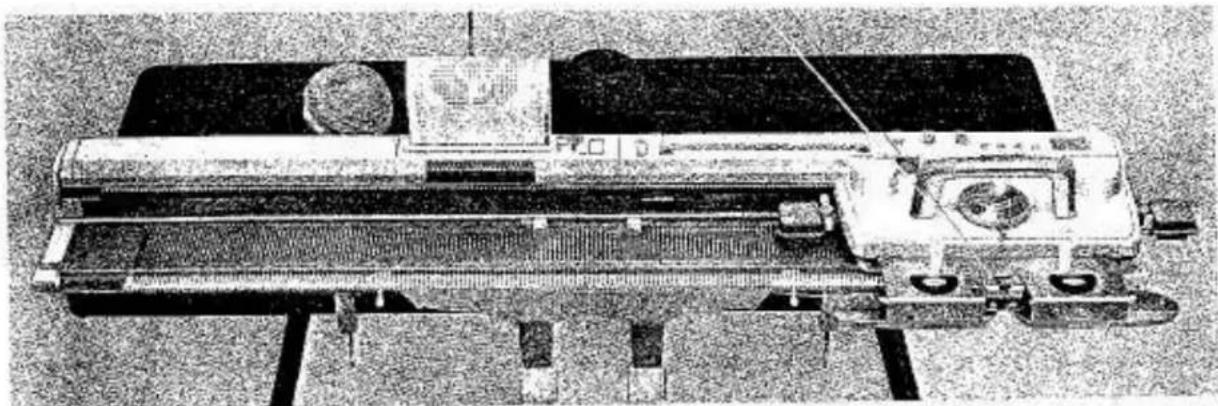
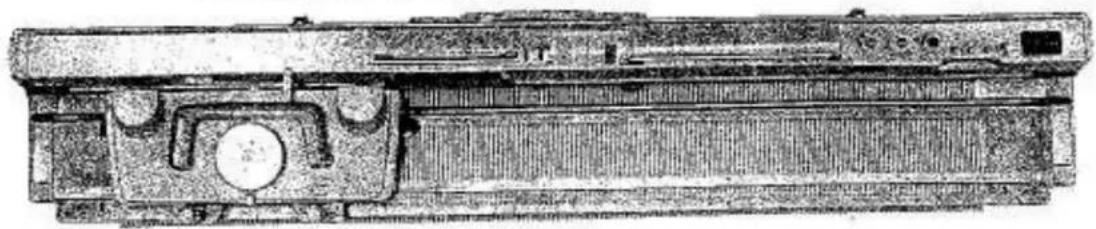
MACHINE AND ACCESSORIES
text_image
360K/L Knitter 260K/L Knitter360K/L
1 Built-in Accessory Box
2 Pattern Card Panel
3 Knit Contour (Radar)
4 Row Counter
5 Needle Bed
6 Main Carriage
7 Lace Carriage
260K/L
1 Accessory Box
2 Pattern Card Panel
3 Row Counter
4 Main Carriage
5 Lace Carriage
6 Needle Bed
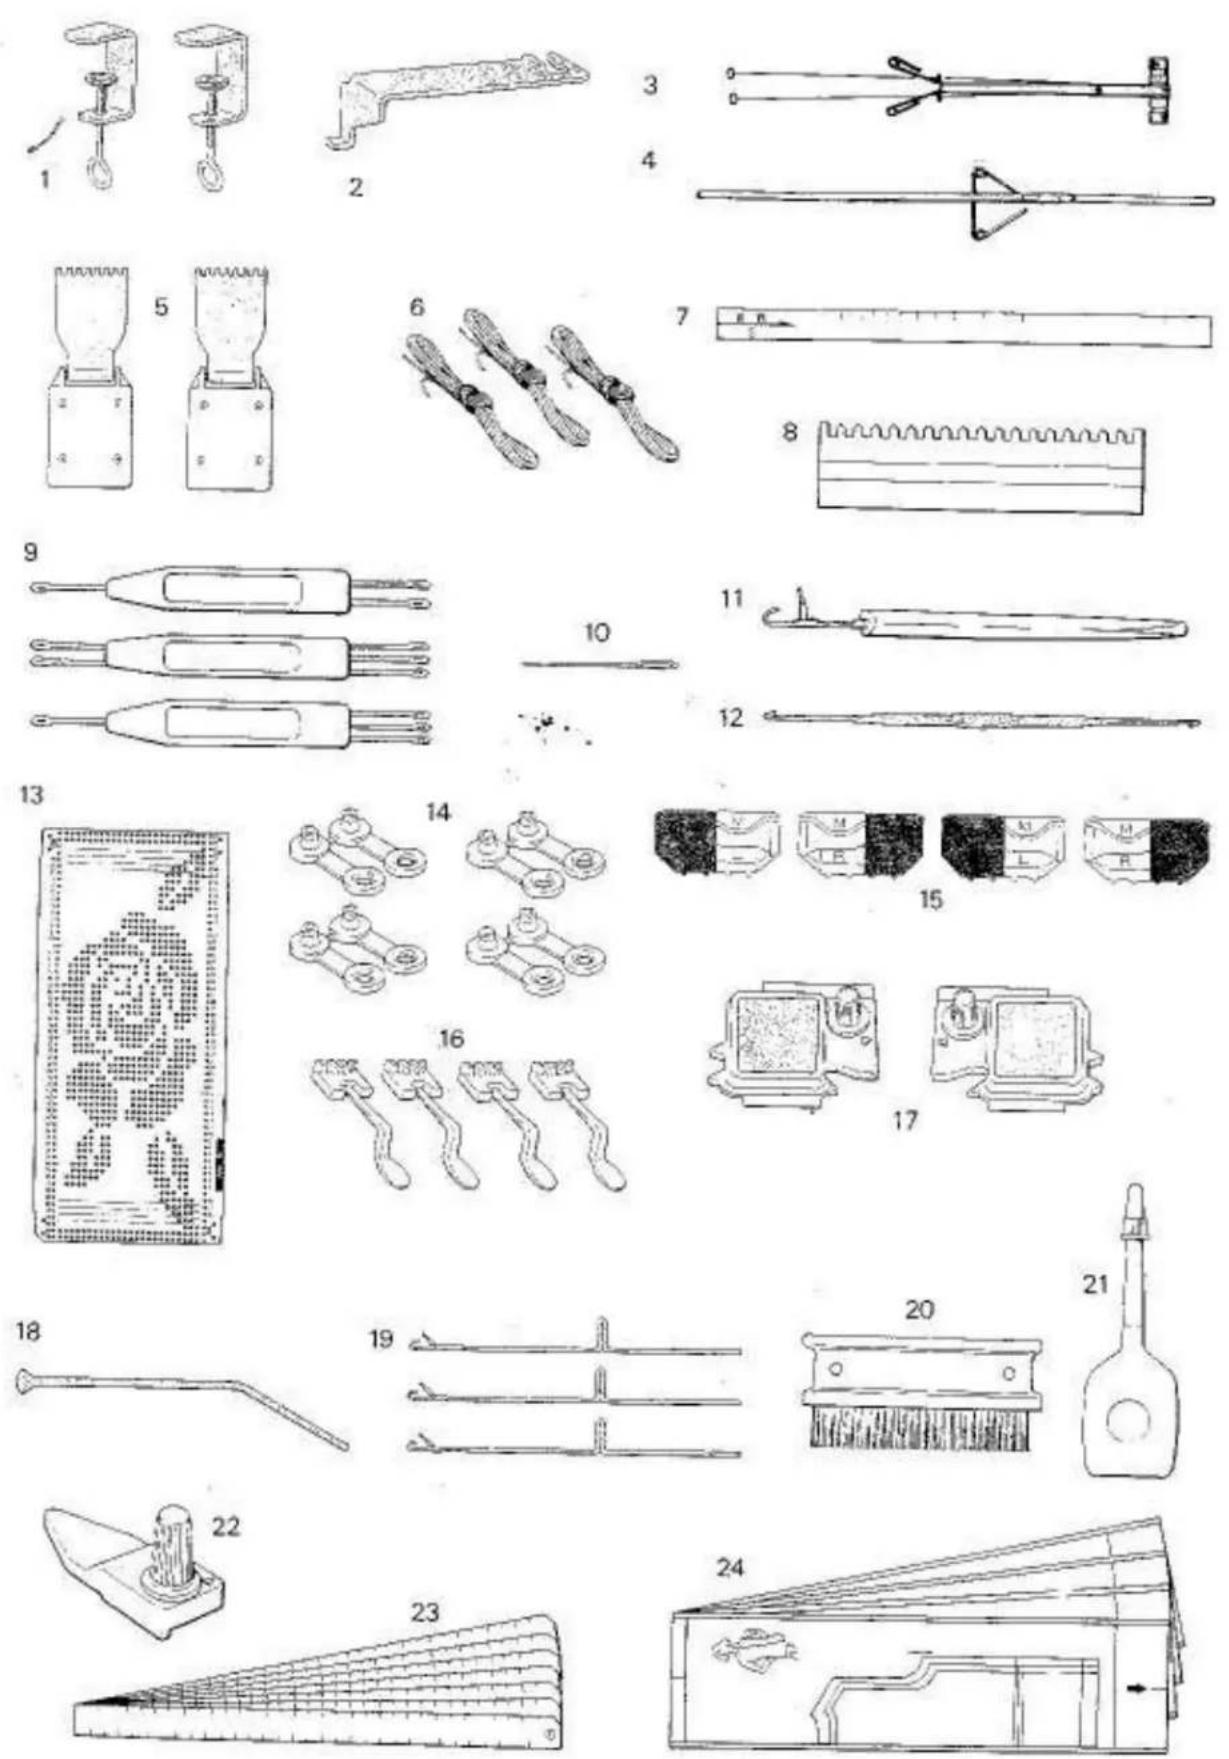
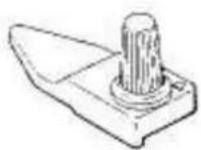
ACCESSORIES - 360/260K
1 Clamp (2) 07321201
2 Carriage Fastener
360KL 07080617
260KL 07241201
3 Auto Tension 07011604
4 Yara Rod 07021751
5 Claw Weight (2) 07422009
6 Ravel Cord (3) 07332000
7 Gauge Scale 08252116
8 Needle Pusher 07292006
9 Transfer Tool
1×2 07352008
1×3 07362007
2×3 07372006
10 Tapestry Needle 07402001
11 Tappet 07312002
12 Crochet Hook 07440621
13 Punch Card (20) 07701618
14 Card Snap (4) 17191008
15 Point Cam M (4)
left 07641756
right 07631757
16 Yarn Separator (4) 17221201
17 Magic Cam (2)
left 07171606
right 07161607
18 Card Guide* 17581000
19 Spare Needle (3) D1130618
20 Cleaning Brush 07342009
21 Oil 07922008
22 Auxiliary Feeding Cam 07170814
23 Scale Set **
Stitch Scale (7) 08142119
Centre Scale (6) 08242117
24 Pattern Paper (19) ** 07740509
* exclusive for 260K/L
** exclusive for 360K/L
(To order, specify part name with part number)
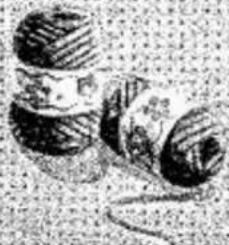
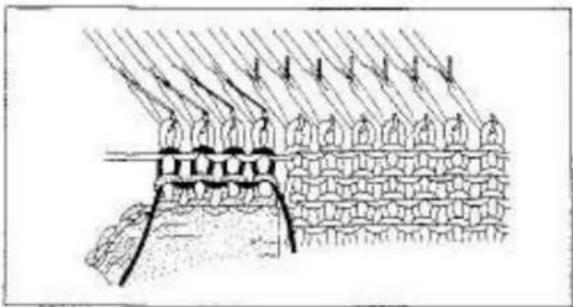
PREPARATION OF YARNS
Your machine has been designed to give you perfect results using a wide range of yarns from cotton thread to very thick yarn. However, for practice it is best to start with A NEW MEDIUM 4-PLY YARN (see page 9).
Correct preparation of yarns before you start knitting is very important. This extra care will make knitting more enjoyable, easier, and the quality of your garment much better.
natural_image
Historical illustration of a mechanical device with a coiled cable and lever mechanism (no visible text or symbols)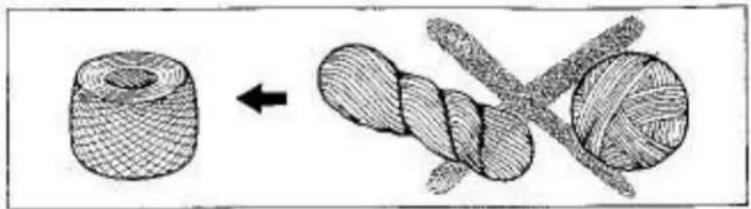
natural_image
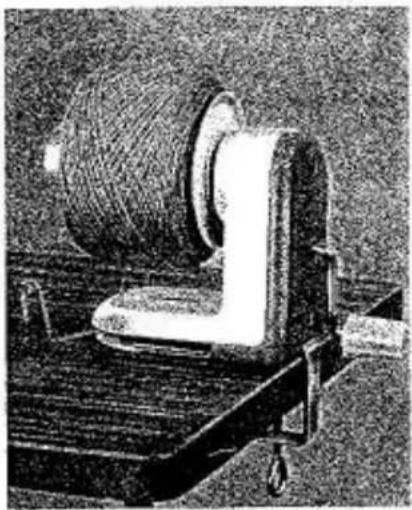
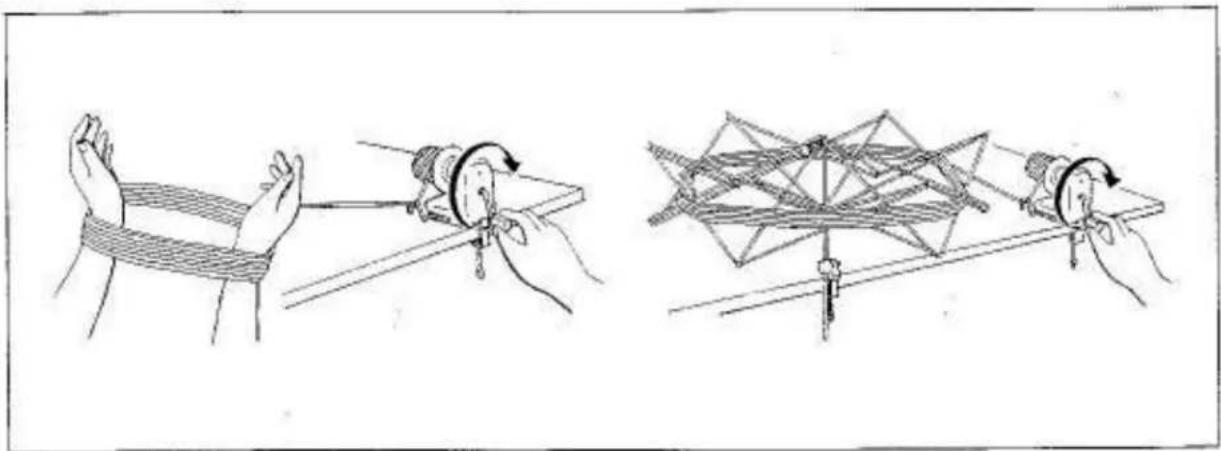
Diagram showing two stages of textile fiber bending process: initial sheath and twisted rope (no text or symbols)It is not possible to knit from a bank of yarn or hand wound ball, as for machine knitting it is essential for the yarn to feed into the machine freely. Place the bank onto your arms or a Skein Holdar and wind into a ball using the Yarn Ball Winder.
The Skein Holder and Yarn Ball Winder are useful optional accessories.
natural_image
Illustration of two rope knotting techniques showing hand positioning and folding (no text or symbols)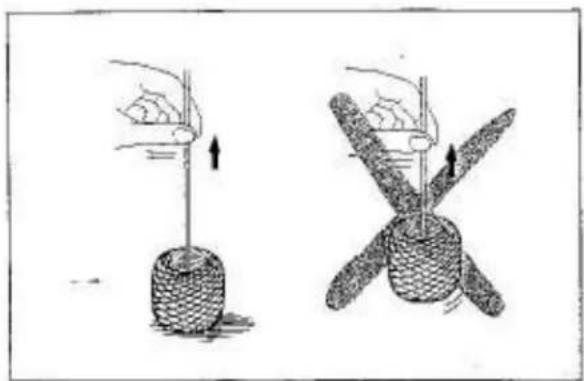
natural_image
Illustration of two hands performing a rope manipulation technique (no text or symbols present)When yarn is rewound, ensure that the yarn end comes out freely without lifting the ball from the table.
We recommend you wax the yarn during winding by simply letting the yarn run over an ordinary white candle or knitting wax.
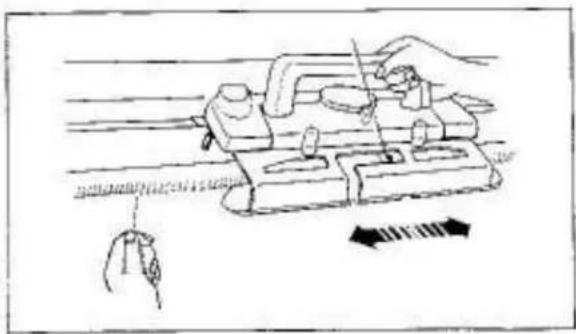
SETTING UP THE KNITTER
natural_image
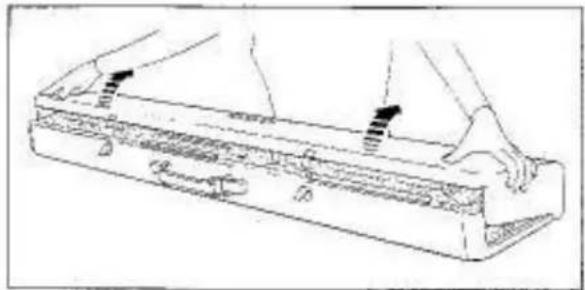
Line drawing of a hand using a tool to clean or mark a small object on a rectangular surface (no text or symbols)Place the Knitter on a table with the Carrying Handle away from you.
Unfasten the latches.
natural_image
Line drawing of a mechanical device with hands operating it, no text or symbols presentLift the Top Cover slightly, pull it towards you and remove it from the Knitter.
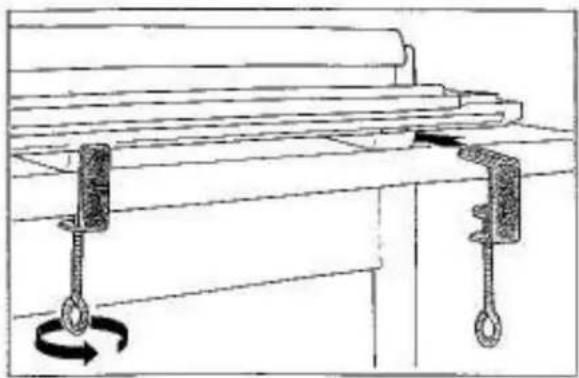
natural_image
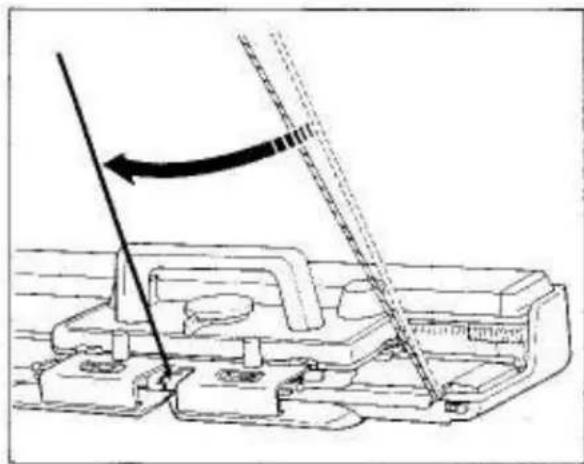
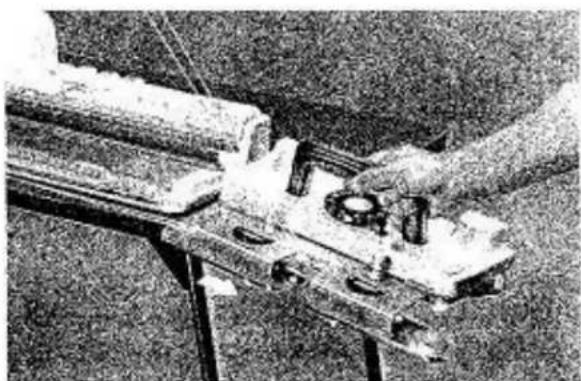
Technical line drawing of a mechanical component with three circular features and mounting holes (no text or symbols)Loosen both Arm Nuts by turning them in the arrowed direction.

natural_image
Diagram of a mechanical device with arrows indicating motion or force direction (no text or symbols)Remove the Carriage Fastener.
Do not lose the Carriage Fastener as this is used for securing the Carriage to the Needle Bed while the Knitter is not in use.
natural_image
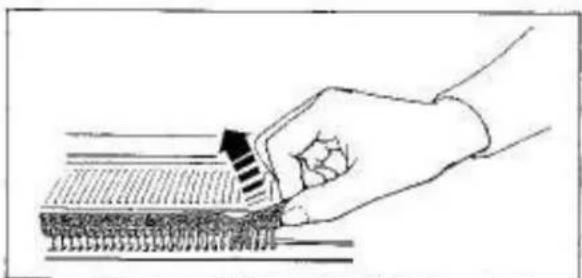
Hand holding a tool interacting with a textured surface (no text or symbols visible)Remove cardboard needle protector from the front of the Needle Bed.
360K
text_image
1 2 3 4 5 6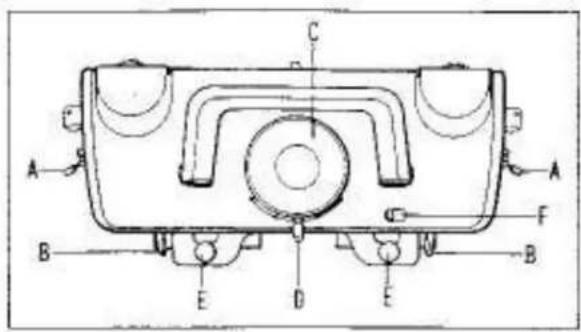
text_image
Technical diagram of a mechanical component with labeled parts A, B, C, D, E, F and directional arrows indicating assembly or assembly.
text_image
Scanned historical document with Chinese text, showing a rectangular layout and interior scenes
text_image
A B C D E F
text_image
Technical drawing with dimension annotations and component labels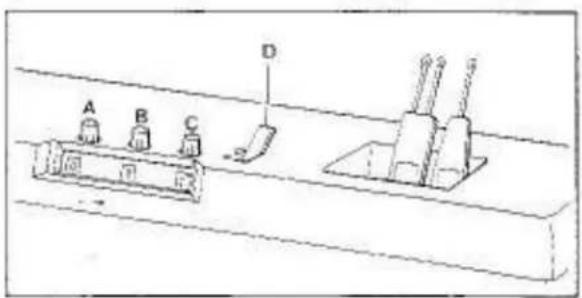
text_image
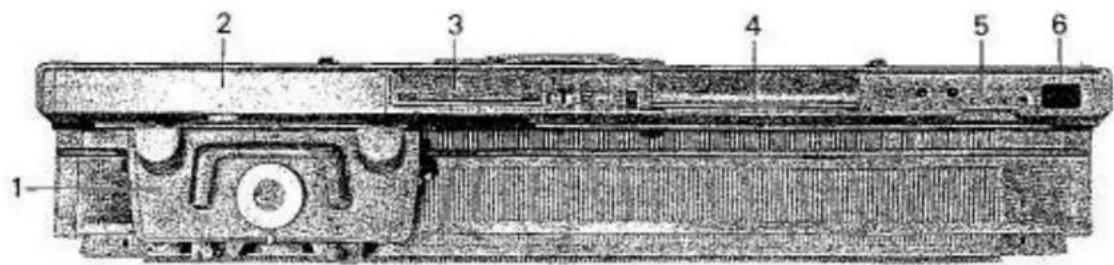
A B C D1. CARRIAGE
A - Side Levers
B - Russel/Front Levers
C - Stitch Diigi
D - Cam Lever
E - Arm Nuts
F - Release Lever
2. BUILT-IN ACCESSORY BOX
Lift the lid to remove the accessories.
3. PATTERN CARD PANEL
A - Punch Card Insertion Slit
8 - Touch Levers
C - Card Row Number Indicator
D - Stap Knob
E - L Knob
F - Punch Card Feeding Dial
4. KNIT CONTOUR (RADAR)
See Knitting Manual.
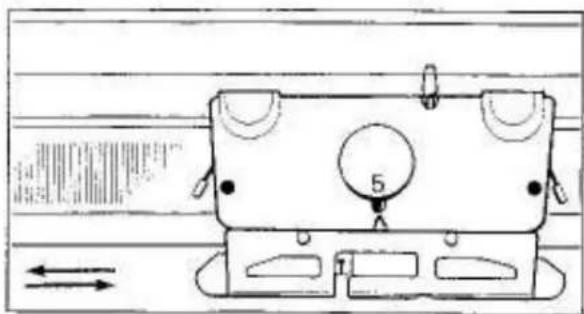
5. ROW COUNTER
To reset numbers, turn the knurled knobs "A", "B" and "C" to either direction.
"0" - Row Counter Set Lever
▼......operating position
●.....locked position
6. TOOL HOLDER
260K
text_image
Technical diagram of a mechanical device with numbered components for identification
text_image
Technical diagram of a mechanical device with labeled parts and a close-up showing a hand operating a tool.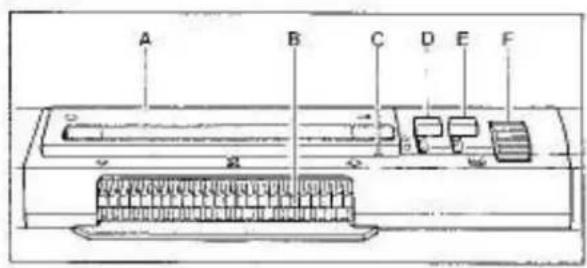
text_image
A B C D E F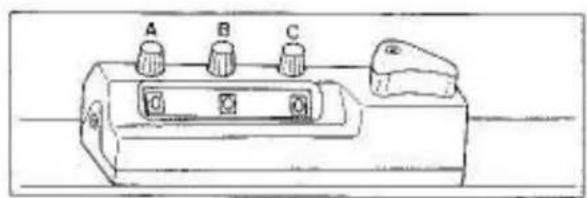
text_image
A B C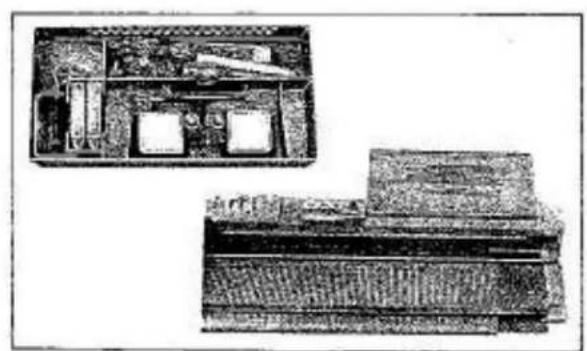
natural_image
Two technical illustrations of a vintage office setup with desks, chairs, and equipment (no visible text or symbols)1. CARRIAGE
A - Side Levers
B - Russel/Front Levers
C - Stitch Dial
D - Cam Lever
E - Row Counter Tripper*
F - Arm Nuts
G - Release Lever
* To engage the Row Counter Tripper with the Row Counter, lift it and point it towards the Row Counter. To disengage the Row Counter Tripper, lift it and turn it to the side.
2. PATTERN CARD PANEL
A - Punch Card Insertion Slit
B - Touch Levers
C - Card Row Number Indicator
D - Stop Knab
E - L Knob
F - Punch Card Feeding Dial
3. ROW COUNTER
To reset numbers, turn the knurled knobs "A", "B" and "C" to either direction.
4. ACCESSORY BOX
Lift the Accessory Box and remove it from the Knitter.
- Use the Accessory Box Lid as an accessory tray by fitting it onto the pin on the right side of casement.
natural_image
Technical line drawing of a mechanical assembly with two hanging weights and a rotational arrow (no text or symbols)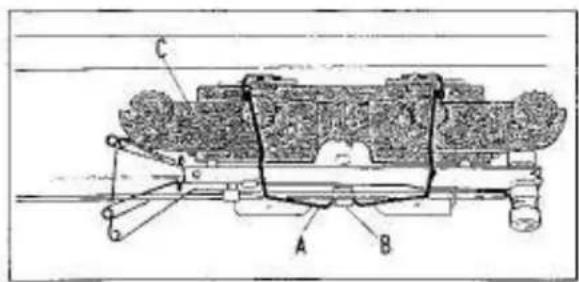
text_image
Technical diagram of a mechanical assembly with labeled components A, B, and C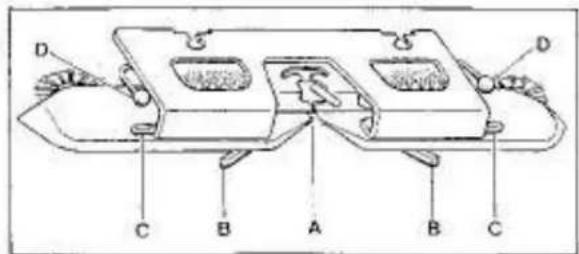
text_image
D C B A B C D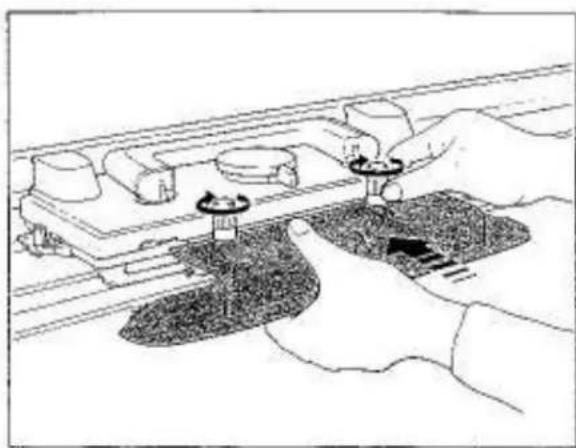
natural_image
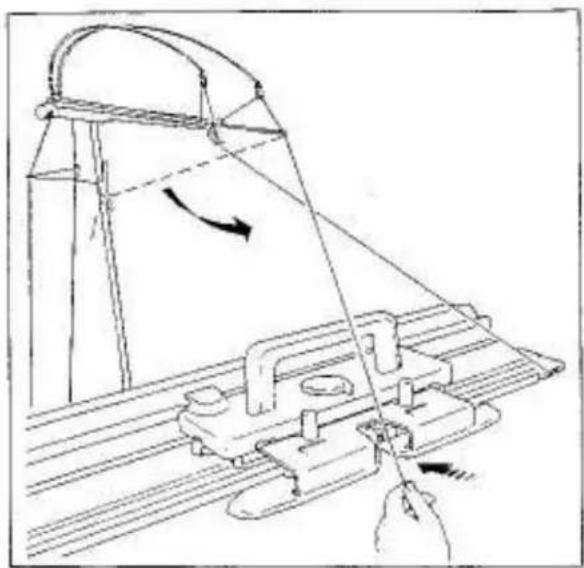
Illustration of hands using a tool to adjust or install a component on a rail track (no text or symbols visible)
natural_image
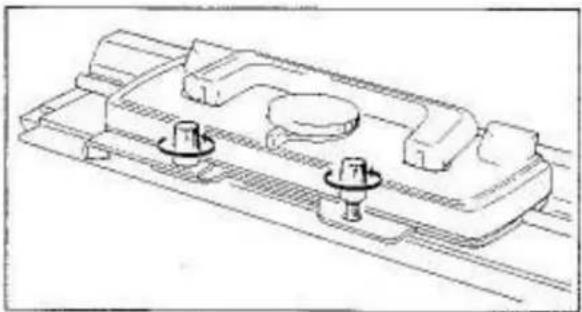
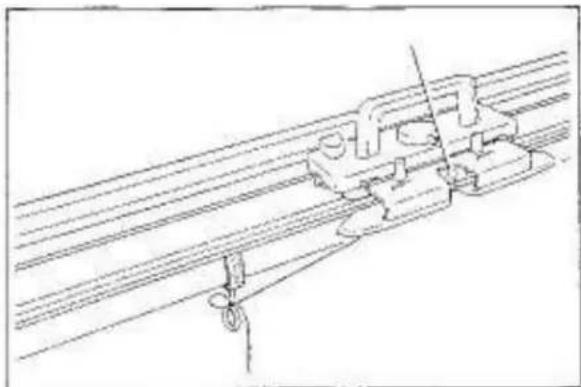
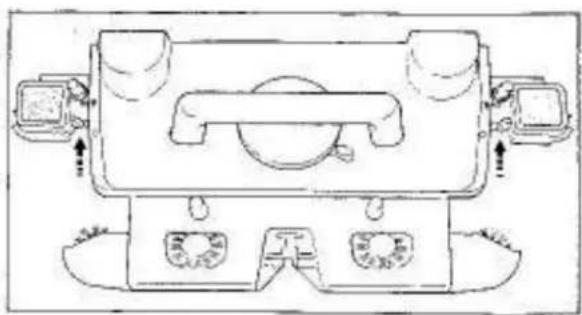
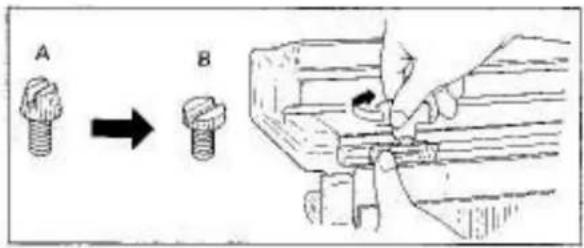
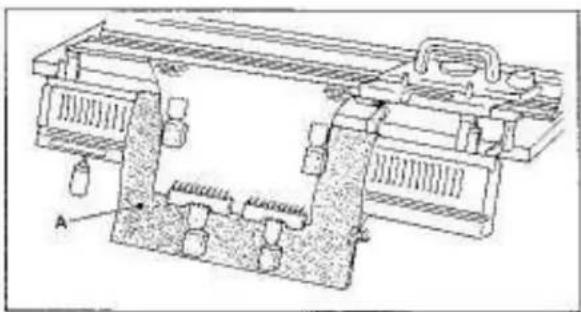
Two technical illustrations of a screw with cross-shaped blades, shown from different angles (no text or symbols)CLAMP
Insert the Clamps into the slots at the bottom of Needle Bed.
Fasten the Clamps by turning screws in the arrowed direction.
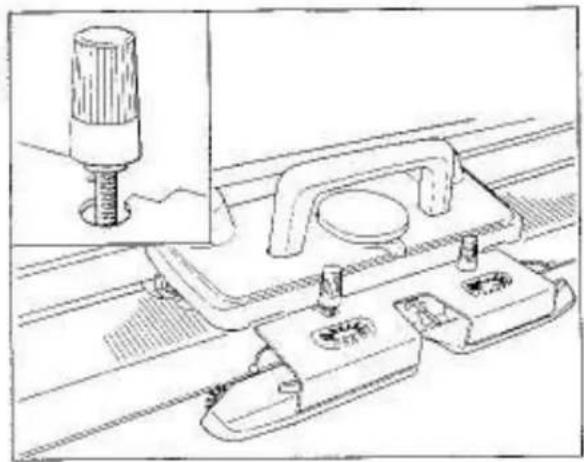
ARM
Release the wire spring "A" from holding bracket "B" located inside the Top Cover and remove the Arm "C".
A - Yarn Feeders
B - Tuck Knobs
C — Weaving Knobs
0 - Weaving Yarn Holders
Insert the Arm under the two Arm Nut screws.
Push the Arm as far as it will go and tighten the Arm Nuts firmly by turning them in the arrowed direction.
Do not attach this Arm to the Lace Carriage.
Ensure that the Arm Nuts fit correctly into the cut-out of the Arm.

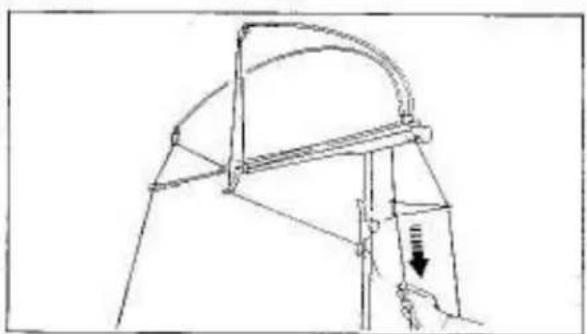
natural_image
Technical line drawing of a mechanical assembly with a hand operating a bracket (no text or symbols)Raise the Carriage Handle.
text_image
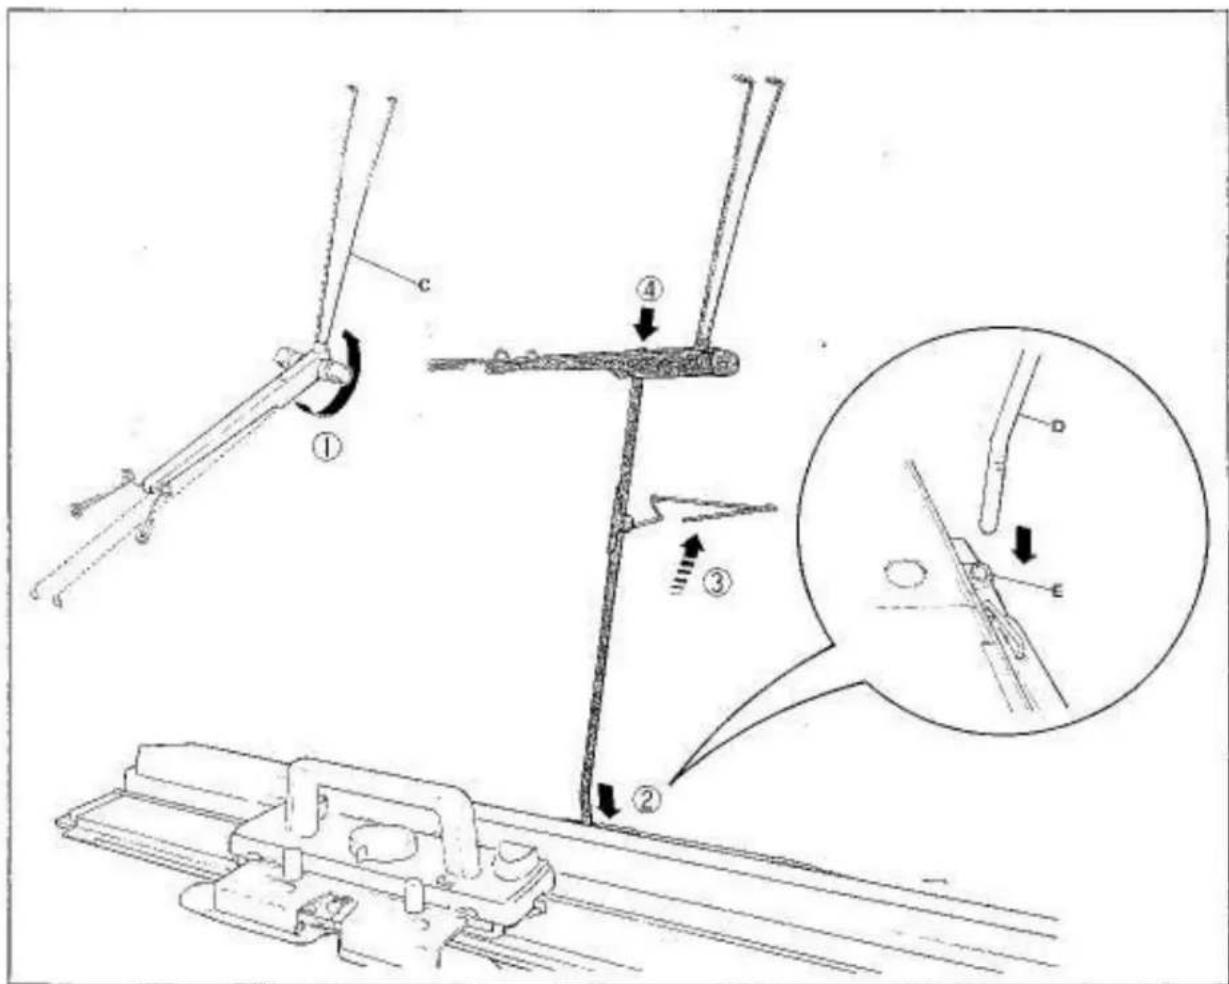
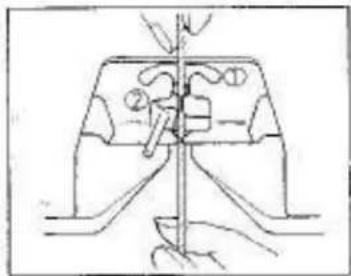
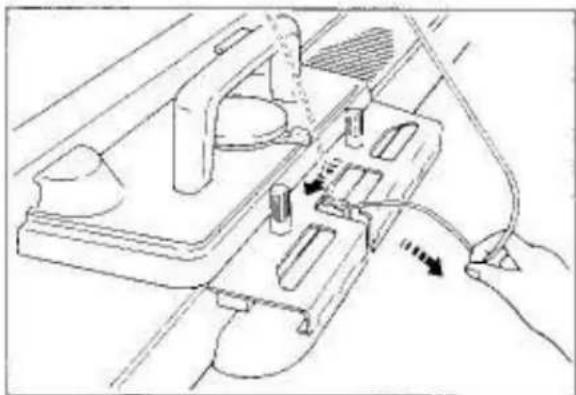
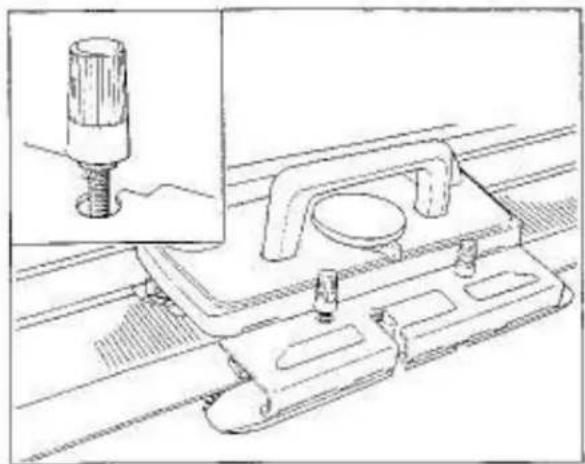
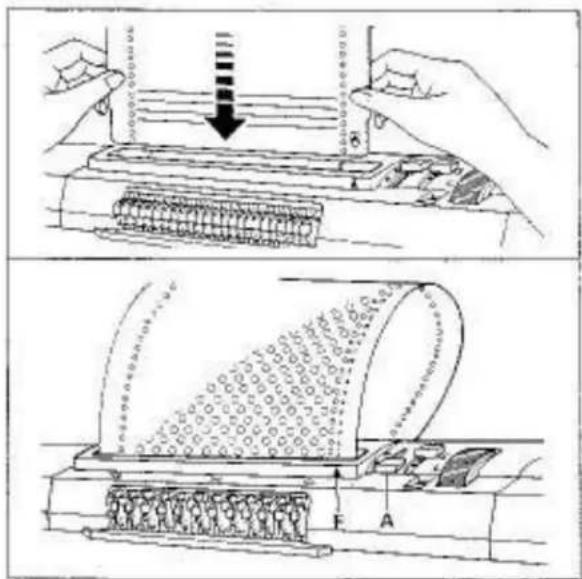
Technical diagram showing two mechanical or electrical components labeled A and B, with arrows indicating motion or force directions.AUTO TENSION
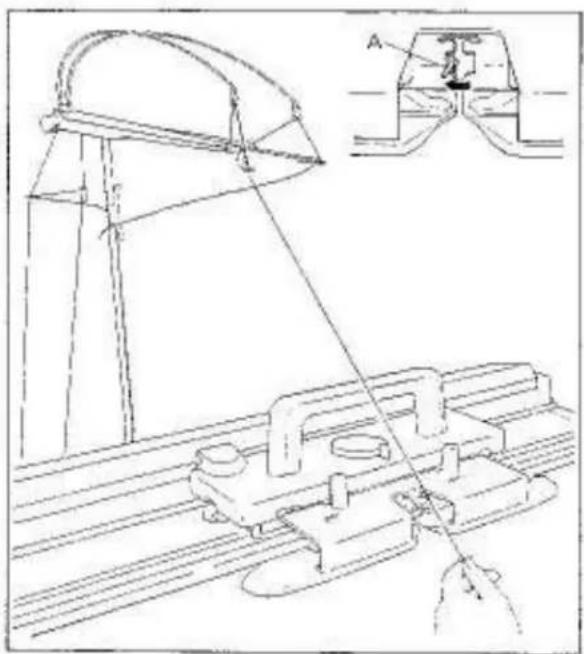
Remove the Auto Tension "A" and Yam Rod "B" from the inside of the Top Cover.
① Turn the two Tension Springs "C" until they snap into position.
② Insert the short bent end of the Yarn Rod "D" into the left side handle bracket socket "E".
③ Raise the Tension Guide.
④ Place the Auto Tension onto the Yarn Rod.
text_image
Technical diagram illustrating mechanical assembly steps with labeled components and a magnified inset showing detailed detail.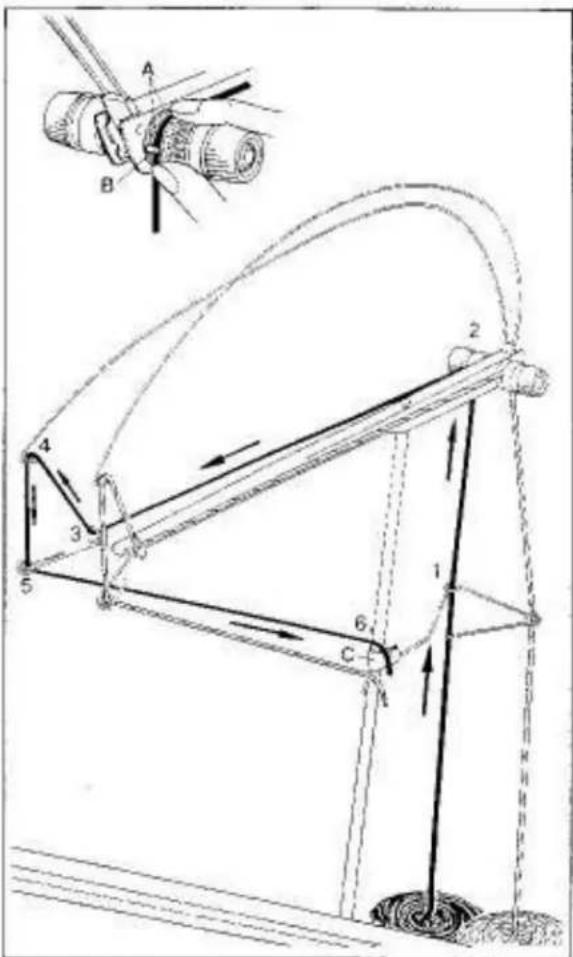
text_image
Technical diagram of a mechanical linkage system with labeled components and directional arrows indicating motion or force.
text_image
Technical diagram showing a mechanical assembly with labeled parts A and B, likely illustrating a tool or component assembly.
natural_image
Simple line drawing of a mechanical structure with no text or symbolsTHREADING AUTO TENSION WITH TWO COLOUR YARNS A, B
For practice, prepare TWO NEW BALLS OR CONES of different colour medium 4-ply yarns A, B and thread them as follows:
MAIN YARN A
Thread the left side of Auto Tension as follows:
-
through left Tension Guide eyelet,
-
between two Tension Discs "A" and under the copper colour Guide Pin "B".
-
through left yarn guide eyelot,
-
through left Tension Spring eyelet,
-
through left yarn guide ayelet.
Pull the yarn end and hook it in the upper Yarn Clip "C".
SECOND YARN B
Thread the second yarn into the right side of Auto Tension in the same manner as you threaded the main yarn into the left side of the Auto Tension.
Hopk the yarn end in the lower Yam Clip.
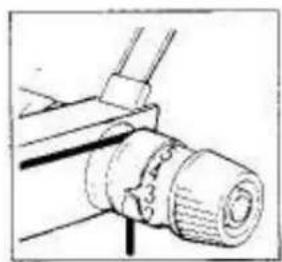
ADJUSTING TENSION DIAL
Adjust the Tension Dial according to type of yarn as guided below by turning the Tension Dial "A" until a required number corresponds to the < shape cut-out "B".
In this instance, 3 is suitable.
Cotton or nylon thread 6-7
This yarn (2-ply)....4-5
Medium yarn (4-ply)....3
Thick yarn 1-2
Incorrect threading of the Auto Tension will never assure success in knitting. Before going further, ensure that:
-
correct tension is given to yarn,
-
yarn comes out freely from yarn ball.
It is advisable to pull out a certain length of yarn of the ball before starting to knit.
text_image
A B C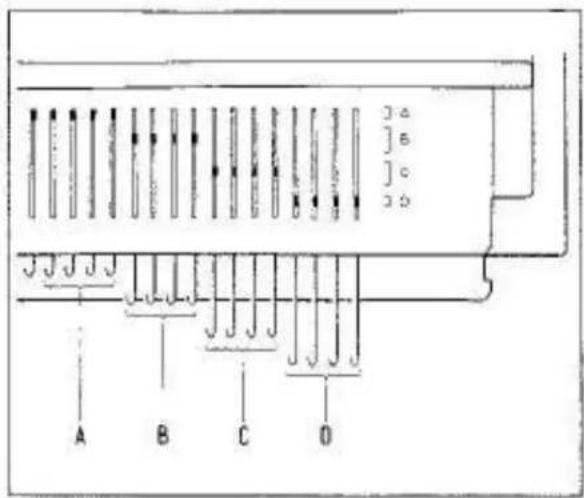
text_image
A B C O 3 o ] o ] o 2 o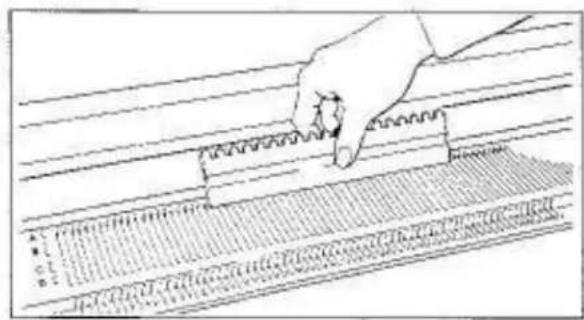
text_image
A B C D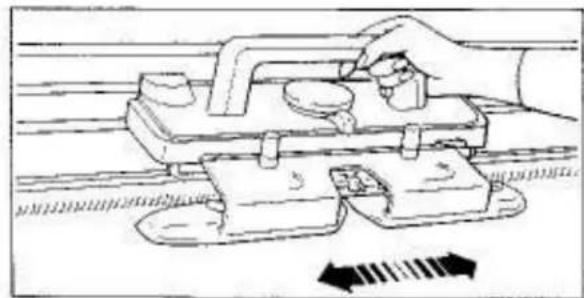
natural_image
Illustration of a hand using a tool to adjust or install a mechanical component, with no visible text or symbols.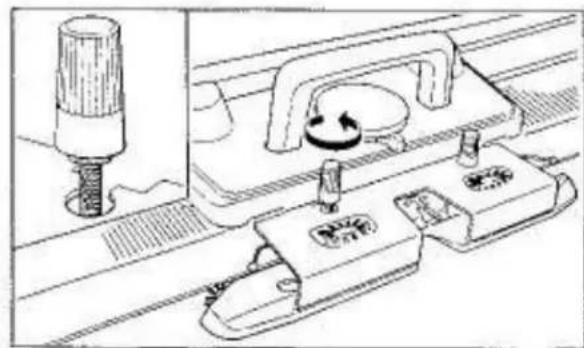
natural_image
Technical line drawing of a mechanical assembly with no visible text or symbolsLATCH NEEDLE
A - butt
B - latch
C - hook
NEEDLE POSITIONS
On both left and right ends of the Needle Bed, the letters A, B, C and D associated with the corresponding brackets "i" are engraved.
To operate the needles, align their butts within the brackets.
A - needles do not knit.
B - needles knit stockinet and stitch pattern.
C - needles knit stockinet only.
D — needles do not knit with Russel Levers at I. needles are knitted back to B position with Russel Levers at II.
NOTE: C AND D POSITIONS ARE NOT APPLICABLE TO LACE CARRIAGE.
ALIGNING NEEDLES
Ensure all needles are in the "A" non-knitting position. If some needles are not, using the straight edge of the Needle Pusher push the needles to "A" non-knitting position.
Slide the Carriage across the Needle Bed a few times to ensure it moves smoothly.
If the Carriage does not slide smoothly, ensure that the Arm Nut fits correctly into the cut-out of the Arm.
natural_image
Hand using a tool to cut or mark a surface with a ruler, no text or symbols visible
natural_image
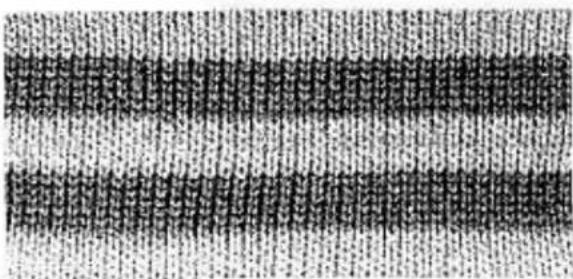
Abstract grayscale texture with horizontal bands and no visible text or symbols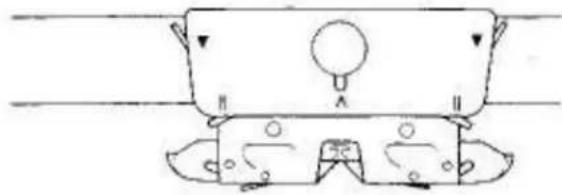
natural_image
Simple line drawing of a mechanical component with no text or symbols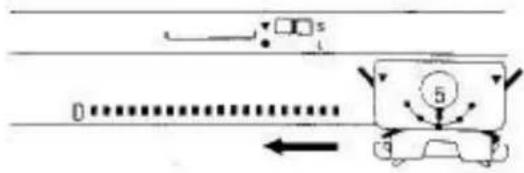
text_image
Diagram showing vehicle motion with labeled components and directional arrows, including a car and a numbered circle marker.
text_image
B 5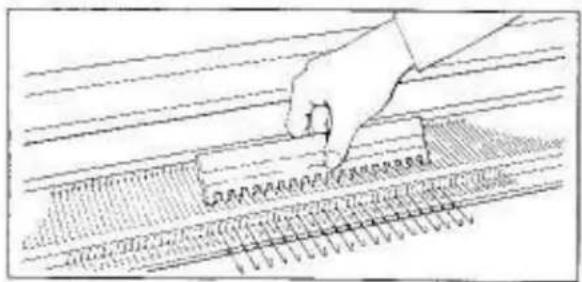
text_image
Diagram showing a hand pressing down on a ruler with measurement markings and grid lines, likely illustrating a measurement or calibration process.TO CAST ON
Push up 35 needles on the right and left side of centre (Q), 70 needles in total, from A position to D using the Needle Pusher.
SETTING CARRIAGE
Stitch Dial....5
Cam Lever
Side Levers (left and right)
Russel Levers (left and right)....II
Weaving Knobs (left and right)....O
Tuck Knobs (left and right)....O
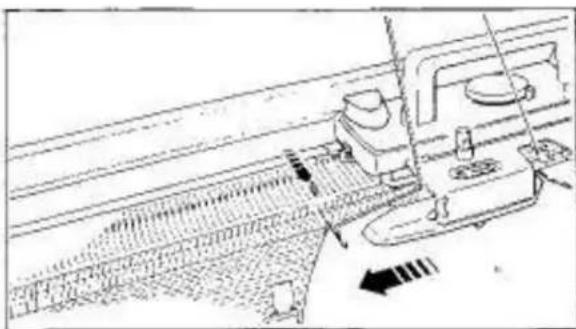
Slowly move the Carriage across the Needle Bad until it has passed all the needles.
The needles are aligned in B position. Place the Carriage at the right side.
Using the Needle Pusher, push every 2nd needle from B to D position.

text_image
Scanned image of a musical notation or staff with numbered notes and corresponding rhythmic patterns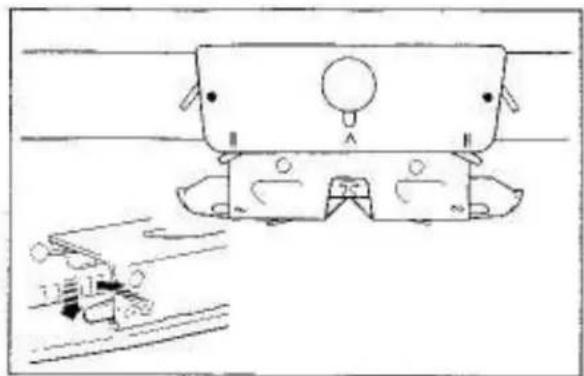
natural_image
Simple line drawing of a car with wheels and a roof, no text or symbols presentBoth Side Levers....
Both Weaving Knobs....\~
To set the Weaving Knob to ∞, slightly push it forward, it will drop into position.
natural_image
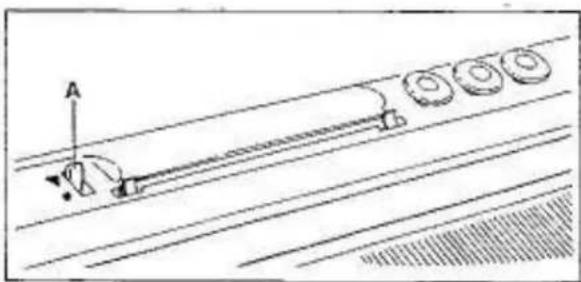
Technical line drawing of a mechanical assembly with an inset showing a component labeled A (no text or symbols present)Open Yarn Feeder by moving the Yarn Feeder Gate "A" to the left.
Remove the main yarn end from the upper Yarn Clip and bring it to the Yarn Feeder.

natural_image
Diagram of a mechanical assembly with hands and a central vertical rod (no text or symbols)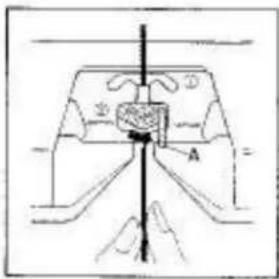
text_image
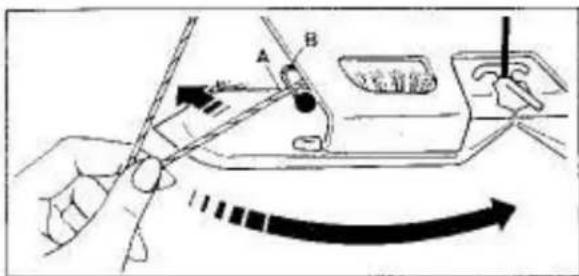
Technical diagram showing a mechanical or electrical component with labeled parts A and B, and directional arrows indicating flow or movement.Hold the yarn with both hands and slide it into the Yarn Feeder.
Close the Yarn Feeder by moving the Yarn Feeder Gate "A" to the right.
natural_image
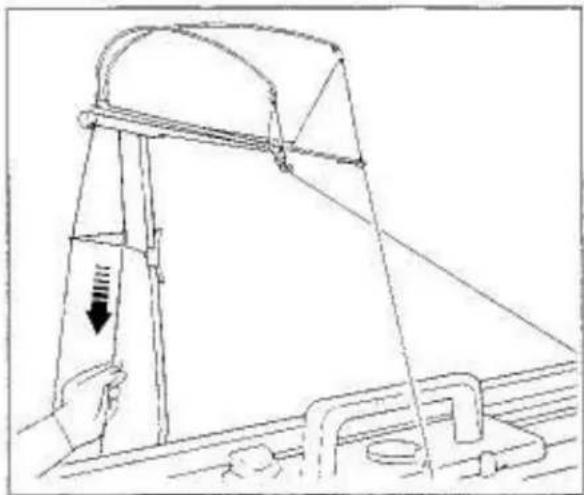
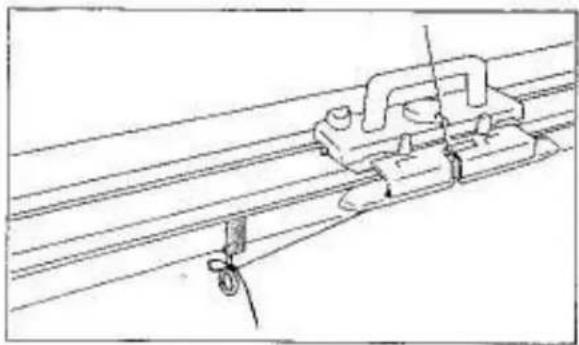
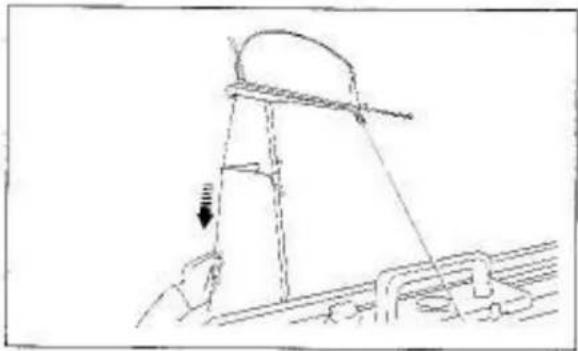
Technical line drawing of a mechanical structure with a curved bracket and vertical supports (no text or symbols)Hold yarn end beneath the Arm and eliminate slack yarn by pulling the yarn down at the back of Yarn Rod until the Tension Spring is nearly in a horizontal position.
text_image
Technical diagram illustrating a mechanical or electrical setup with labeled components and directional arrows indicating motion or movement.
text_image
2-3cm
text_image
2-3cm,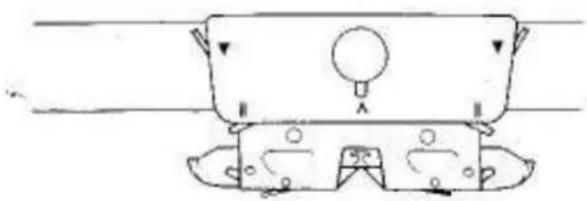
natural_image
Simple line drawing of a mechanical component with no text or symbols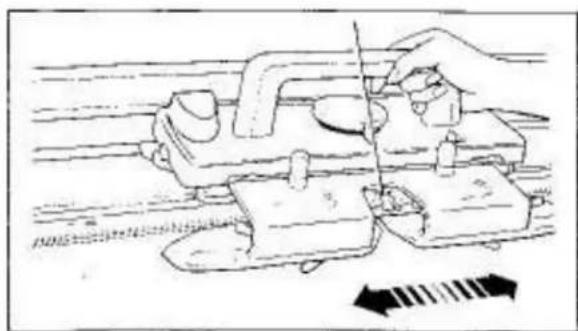
natural_image
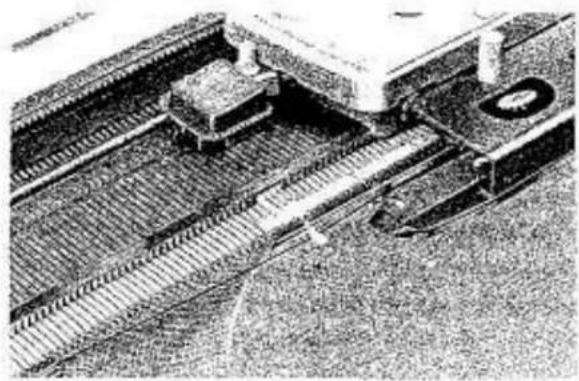
Diagram of a hand operating a mechanical device with arrows indicating motion or force direction (no text or symbols present)Pull yarn approximately 40cm, and extend it from underneath the Plastic Round Brush Cover in the Arm and lay it across all needles in D position.
Hold the yarn end at the left side of the needles.
Slowly move the Carriage from right to left until it has passed all the needles, knitting 1 row.
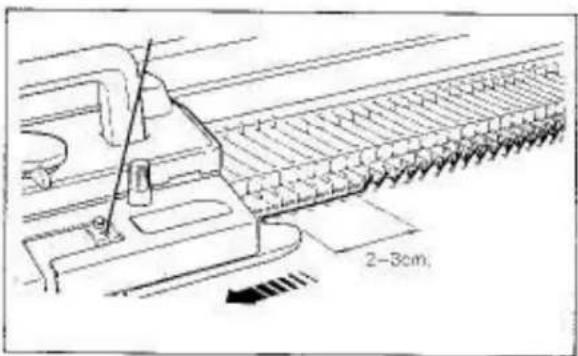
Ensure that the Arm has passed the last knitting needle by approximately 2–3cm.
Knit 3 rows.
On each row, ensure that the Arm has passed the last knitting needle by approximately 2–3cm.
Both Side Levers....▼ Both Weaving Knobs.....O
Knit 20 rows.
text_image
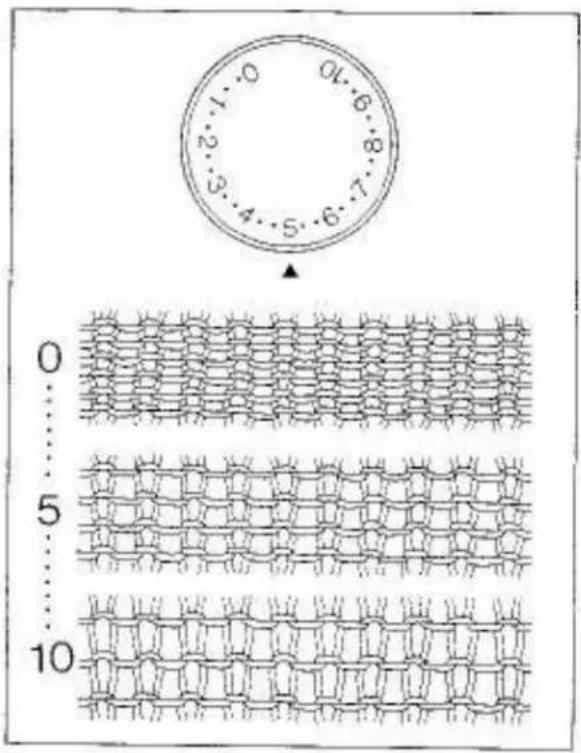
0 5 10LEARNING ABOUT STITCH SIZE AND YARN
STITCH DIAL
Ensure that the correct Stitch Dial number is always selected for the yarn you will select.
Stitch Dial regulates the size of a stitch. When the Stitch Dial is set to 0, the tightest stitch size is obtained. (smallest stitch)
When the Stitch Dial is set to 10, the loosest stitch size is obtained. (largest stitch)
To select a number, turn the Stitch Dial until the required number or dot corresponds to ▲
If the tension is too tight — it will be difficult or even impossible to knit, you will use more yarn and waste money — your garment will be hard and uncomfortable to wear.
If the tension is too loose — your garment will have no shape or will very soon lose its shape.
For practice, continue to knit with different Stitch Dial numbers as follows:
- with the Stitch Dial number 3, knit 10 rows - tightest stitch size is obtained.
- with the Stitch Dial number 9, knit 10 rows - loosest stitch size is obtained.
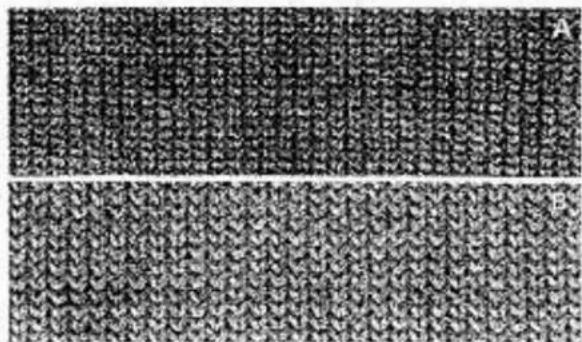
STITCH SIZE AND STITCH DIAL NUMBER FOR A YABN
A - Stitch Dial at 1 with yarn ②(2-ply)
B - Stitch Dial at 5 with yarn ⑤(4-ply)
C. - Stitch Dial at 9 with yam ⑥ (thick)

natural_image
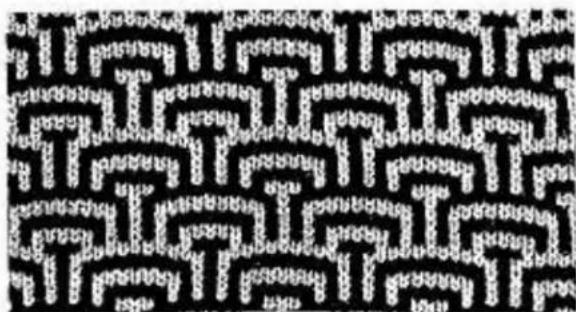
Three identical textured fabric swatches labeled A, B, and C, showing uniform woven patterns without any text or symbols.
text_image
① ② ③ ④ ⑤ ⑥ ⑦ ⑧| Type of yarn | Stitch Dial |
| 1 Cotton thread | 2 - 3 |
| 2 Thin yarn (2-ply) | 2 - 3 |
| 3 Summer yarn | 3 - 4 |
| 4 Light yarn (3-ply) | 3 - 5 |
| 5 Medium yarn (4-ply) | 4 - 6 |
| 6 Thick yarn | 6 - 9 |
| 7 Mohair (every second needle) | 8 - 10 |
| 8 Very thick yarn (every second needle) | 6 - 9 |
natural_image
Close-up of a textured fabric with horizontal black bands and dot patterns (no text or symbols)
natural_image
Diagram of a vehicle interior showing a valve and directional arrow (no text or labels)
natural_image
Technical line drawing of a mechanical assembly with no visible text or symbols
natural_image
Technical line drawing of a mechanical assembly with no visible text or symbols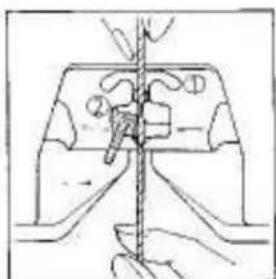
natural_image
Technical line drawing of a mechanical assembly with no visible text or symbols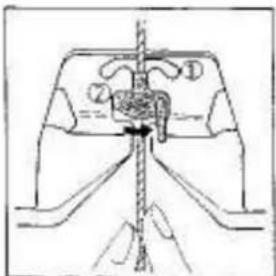
natural_image
Pure mechanical diagram showing a lever mechanism with no text or symbolsKNITTING STRIPE PATTERN
For practice, continue to knit stripe pattern using two different colour yarns alternately in the Yarn Feedar ①.
Stitch Dial....5
Open the Yarn Feeder by moving Yarn Feeder Gate "A" to the left.
Remove main yarn from the Yarn Feeder.
Place the main yarn at the out-out "B" at the side of Needle Bed.
Remove the second colour yarn from the lower Yam Clip and pull it down towards the Yarn Feedar.
Hold the second colour yarn with both hands and slide it into the Yarn Feeder.
Close the Yarn Feeder by moving the Yarn Feeder Gate to the right.
natural_image
Technical line drawing of a mechanical assembly with rods and clamps (no text or symbols)Fasten the yarn end to either Clamp.
natural_image
Line drawing of a mechanical device with a hand operating a lever and a curved arm, showing no text or symbols.Eliminate slack yarn by pulling the yarn down at the back of Yarn Rod until the Tension Spring is nearly in the horizontal position.
For practice, knit 6 rows.

natural_image
Technical line drawing of a mechanical assembly with no visible text or symbolsRemove the second colour yarn from Yarn Feeder ① and place it at the cut-out as done for main yarn.
natural_image
Technical line drawing of a mechanical assembly with a tool and directional arrow (no text or symbols)Remove the main yarn from the cut-out and slide it into the Yarn Feeder ① with both hands.
Eliminate slack yarn.
Knit 6 rows.
By using two contrasting yarns alternately, a striped pattern can be knitted.
natural_image
Close-up of a textured, knotted fabric pattern with no visible text or symbols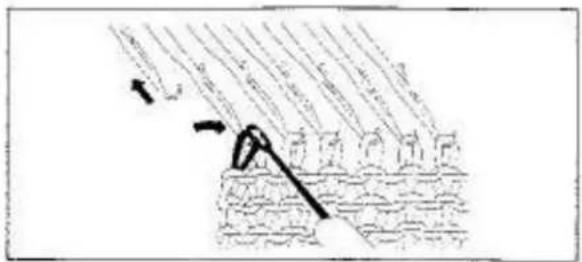
text_image
Diagram showing a mechanical or structural assembly with labeled components and directional arrows indicating motion or force.
natural_image
Abstract pattern of vertical lines forming a textured, irregular shape (no text or symbols)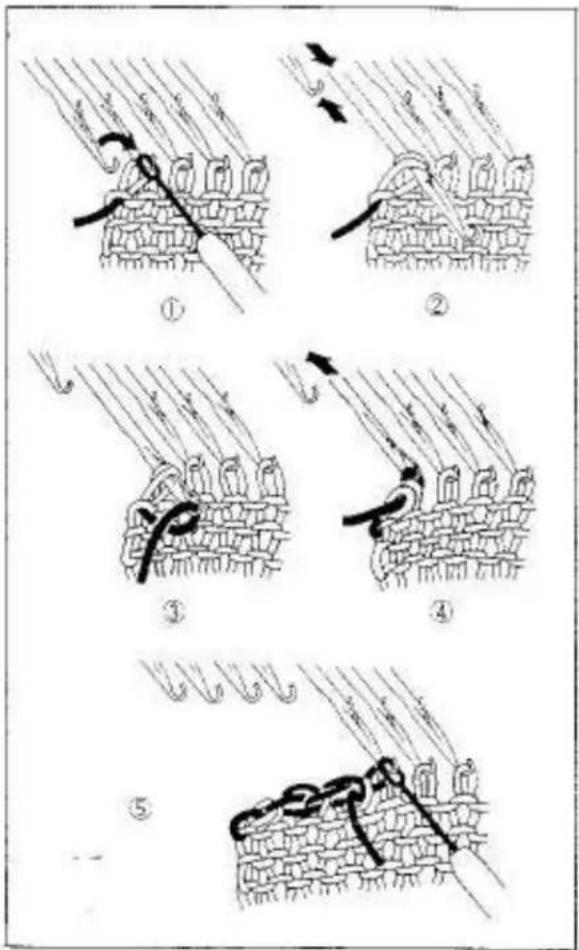
text_image
Diagram illustrating five sequential steps of fabric or textile sewing process, labeled ① to ⑤ with directional arrows and Chinese text.DECREASING 1 STITCH
You can decrease 1 stitch on both sides of the row,
Using the Transfer Tool, transfer the and stitch onto its adjacent needle.
Push back the empty needle to A position.
Knit 1 row
For practice, knit more rows decreasing 1 stitch on both sides of the roe.
DECREASING MULTIPLE STITCHES
You can only decrease on the Carriage side.
① Dr the Carriage side, hold the fabric against the Knittar. Transfer the end stitch to the adjacent needle.
② Push the empty needle to A position. Push the second needle to D position until both stitches are behind the latch.
③ Lay yarn from right to left in the open hook of the needle.
④ Hold yarn slightly down and push the needle back to B position. The two stitches slip off the needle.
⑤ Continue this procedure until the required number of stitches have been decreased. Place the last decreased stitch onto its adjacent needle.
For practice, decrease four stitches on both sides.
natural_image
Close-up of a textured fabric with vertical grooves and no visible text or symbols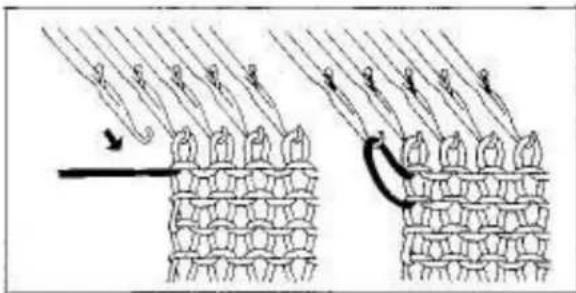
text_image
Diagram illustrating hair follicle growth process with labeled arrows and patterned fabric layers
natural_image
Abstract pattern of repeating black and white shapes with diagonal lines (no text or symbols)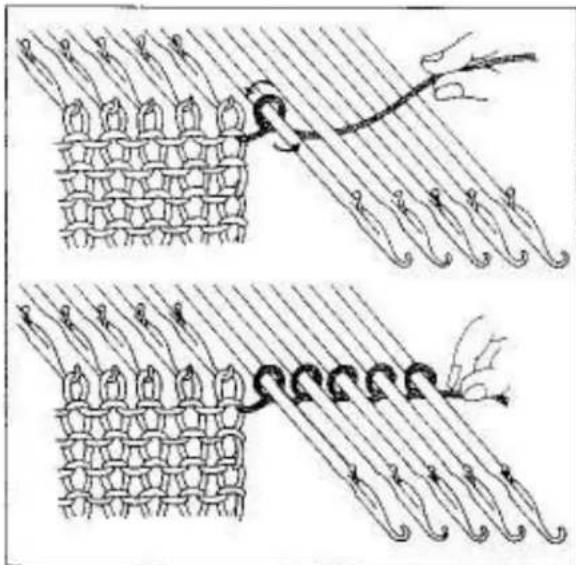
natural_image
Illustration of two textile weaving techniques showing fabric folds and threads (no text or symbols)
natural_image
Illustration of a decorative pattern with curved lines and floral motifs, no text or symbols presentINCREASING 1 STITCH
You can increase 1 stitch at a time on the Carriage side.
Push 1 needle on the Carriage side from A to B position.
Knit 1 row.
For practice, knit more rows increasing 1 stitch on the Carriage side on each row.
INCREASING MULTIPLE STITCHES
You can only increase on the Carriage side.
Carriage is on the right side.
- Pull some yarn from the Yarn Feeder.
- Push the required number of needles from A to D position.
- Wind yarn loosely around the empty needles in the anti-clockwise direction.
- Push loops against sinker posts.
- Eliminate slack yarn.
- Continue knitting.
When the Carriage is on the left side, wind yarn around the needles in the clockwise direction.
For practice, increase five stitches on both sides.
natural_image
Close-up of a textured fabric with repeating diamond-like patterns (no text or symbols)
text_image
Diagram showing a mechanical or fluid system with labeled components and directional arrow indicating flow or movement.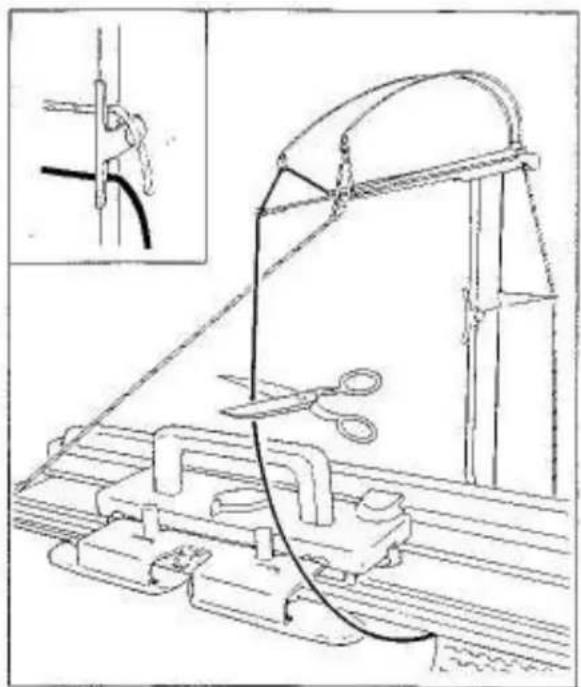
natural_image
Technical line drawing of a mechanical assembly with ropes and clamps, no visible text or symbols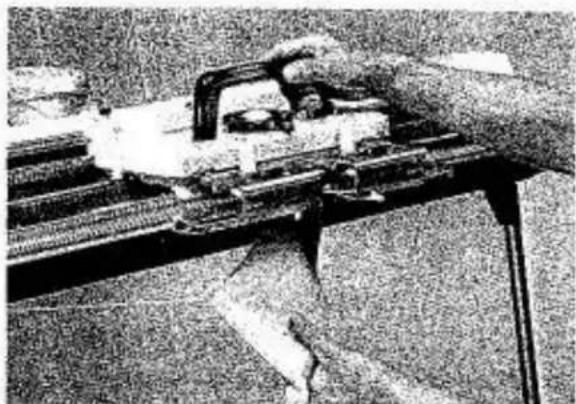
natural_image
Close-up of a mechanical assembly with no visible text or symbolsREMOVING KNITTED FABRIC
- without closing end stitches
Open the Yarn Feeder and remove yard.
Break the main yarn and hook its top end onto the lower Yarn Clip of the Yarn Rod.
Break the second yarn and hook its top end onto the upper Yarn Clip.
Let both bottom yarn ends hang loosely on the side of the fabric.
Cam Lever....A
Move Carriage across the fabric.
The fabric will come off the needles.
natural_image
Technical line drawing of a mechanical assembly with a component inserted into a housing (no text or symbols)IMPORTANT
IF YOU HAVE ANY DIFFICULTY IN KNITTING THE FIRST ROW, ENSURE THAT:
Arm is attached to the Carriage correctly.
natural_image
Simple line drawing of a mechanical assembly with no text or symbols
natural_image
Pure technical diagram of a mechanical component with no visible text, numbers, or symbolsYam is threaded correctly through the Auto Tension and Yam Feeder,
natural_image
Technical line drawing of a mechanical component with no visible text or symbols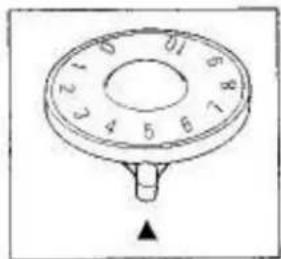
natural_image
Simple line drawing of a circular dial with numbered segments and a pointer (no text or symbols)Tension Dial and Stitch Dial are set correctly.
natural_image
Illustration of a hand pulling a wire into a cylindrical container with an arrow indicating motion (no text or symbols)
natural_image
Hand holding a vertical object with a downward arrow indicating compression or force (no text or symbols)Yarn is wound correctly.
Slack yarn is eliminated and Tension Spring is nearly in a horizontal position.
text_image
2-3cm.Arm has passed the last knitting needles by approximately 2-3cm. before knitting the next row.
PATTERN KNITTING WITH MAIN CARRIAGE
natural_image
Simple rectangular outline with dotted border and labeled corners (no text or symbols)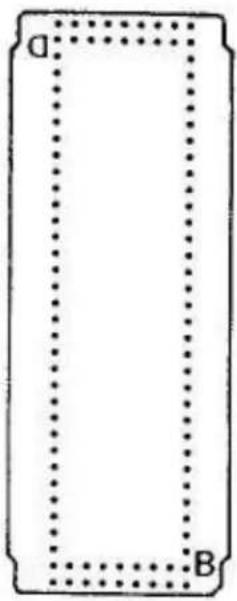
text_image
A BSTANDARD PUNCH CARDS FOR MAIN CARRIAGE
Twenty Punch Cards are numbered No.1 - No.20.
Each Punch Card can be used in four different ways and is marked "A", "B", "C" and "D"
"A" indicates the basic pattern.
If "B", "C" or "D" side of the Punch Card is inserted into the Pattern Card Panel, direction of pattern can be changed.
IMPORTANT Do not fold or band the Card.
With the Punch Cards, the following patterns can be produced.
| Card No. | A | B | C | D | E | F | G | H |
| 1 | ○ | ○ | ○ | ○ | ○ | |||
| 2 | ○ | ○ | ○ | ○ | ○ | ○ | ○ | |
| 3 | ○ | ○ | ○ | ○ | ○ | ○ | ||
| 4 | ○ | ○ | ○ | ○ | ○ | ○ | ||
| 5 | ○ | ○ | ||||||
| 6-03 | ○ | ○ | ||||||
| 7 | ○ | ○ | ○ | ○ | ○ | ○ | ||
| 8 | ○ | ○ | ○ | ○ | ||||
| 9 | ○ | ○ | ○ | ○ | ||||
| 10 | ○ | ○ | ○ | |||||
| 11 | ○ | ○ | ○ | ○ | ||||
| 12 | ○ | ○ | ○ | |||||
| 13 | ○ | |||||||
| 14 | ○ | ○ | ○ | ○ | ||||
| 15 | ○ | ○ | ||||||
| 16 | ○ | ○ | ||||||
| 17 | ○ | ○ | ||||||
| 18 | ○ | ○ | ○ | ○ | ||||
| 19-03 | ○ | ○ | ||||||
| 20 - | ○ |
A KNIT-IN/FAIR ISLE
B SINGLE MOTIF
C SLIP STITCH PATTERN
D TUCK STITCH PATTERN
E TUCK LACE
F PUNCH LACE
6 WEAVING
H WEAVING LACE

natural_image
Line drawing of a hand holding a flag atop a mechanical device (no text or symbols)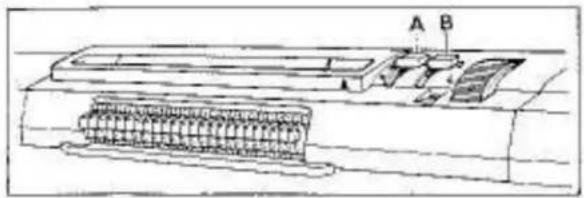
natural_image
Technical line drawing of a mechanical assembly with labeled parts A and B (no text or symbols beyond labels)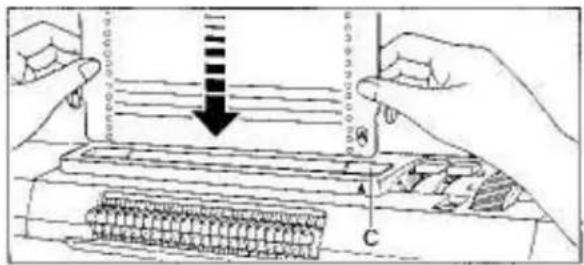
text_image
Diagram illustrating a printer's printing process with labeled parts A and C, showing paper feeding into a printer.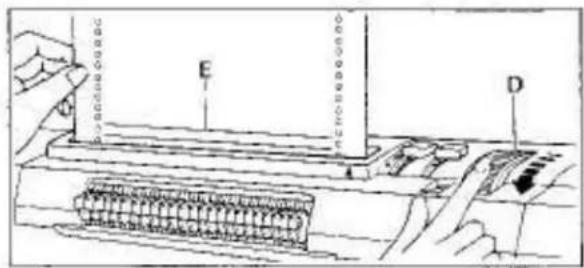
text_image
Diagram showing a device with labeled components E and D, likely illustrating a mechanical or electronic assembly.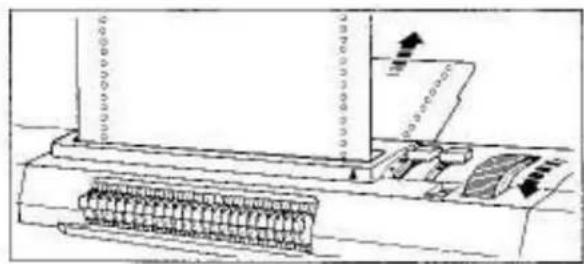
natural_image
Technical line drawing of a mechanical device with spring-loaded base and paper holder (no text or symbols)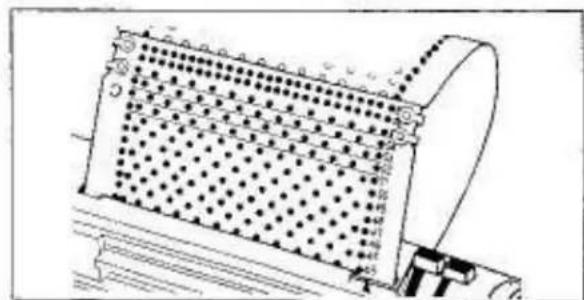
natural_image
Technical line drawing of a mechanical component with grid pattern and mounting bracket (no text or symbols)INSERTING PUNCH CARD
Prepare two Card Soaps and the Punch Card.
For Model 260K/L, remove the Card Guide from the Accessory Box and insert it vertically into the receiving hole at the back of the casement.
Stop Knab "A" ..... L Knob "B" .... S
Holding the Punch Card straight with the letter A on the bottom right hand corner facing you, insert it into Punch Card Insertion Slit "C" and push it down slightly.
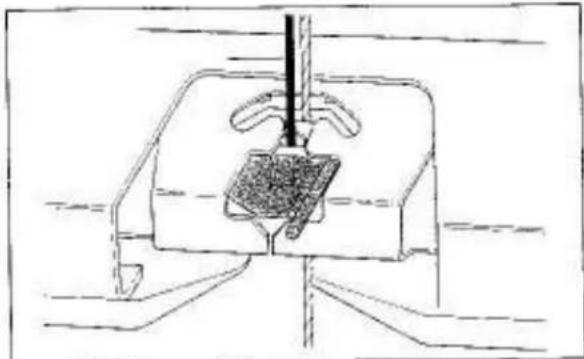
Turn the Punch Card Feeding Dial "D" towards you and at the same time check that the red horizontal lines "E" on the Punch Card are paralleled with the Punch Card Insertion Slot.
To advance the Punch Card, turn the Punch Card Feeding Dial towards you.
To return the Punch Card, turn the Punch Card Feeding Dial towards the side away from you.
Continue turning the Punch Card Feeding Dial until the Card end comes out from the back of Pattern Card Panel and the front and back edges of the Card are in line.
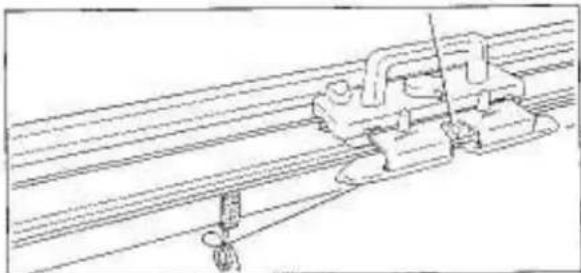
Overlap the ends of the Punch Card with the letter "C" on the top left side of the Card.
Line up the 2 holes on each side.
Insert the Card Snap and join the Card ends by pressing the Snap together.
text_image
Technical diagram of a mechanical device with labeled components and assembly detailsTurn the Punch Card Feeding Dial until Card memory number 1 reaches above the triangle mark "F" on Pattern Card Panel.
No.1 is always the beginning of a pattern.
Stop Knob "A"
text_image
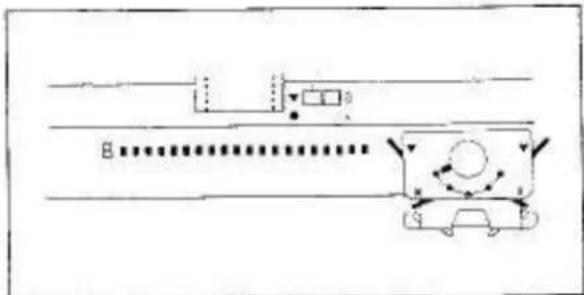
Technical diagram showing a mechanical assembly with labeled components and dimensional annotationsOn the front of the Pattern Card Panel and front edge of the Needle Bed, are markings X and ◊.
X - indicates the centre of a pattern.
◇-indicate width of pattern.
Between two ◇ markings are 24 needles.
text_image
10 9 2 7 5 1 2 9 10 H GThe numbers 0–10 on the left and right side of centre(0) indicate the number of needles
The pattern of the Punch Card is produced on the needles on the left and right sides of centre(0).
text_image
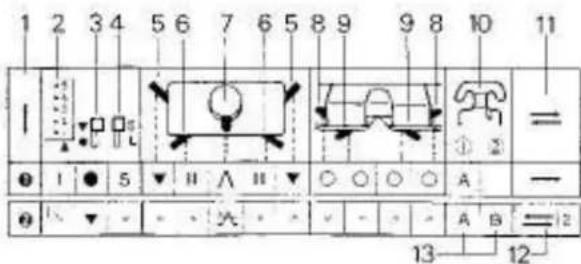
1 2 3 4 5 6 7 6 5 8 9 9 8 10 11 I ① ② = ● I ● 5 ▼ II ∧ II ▼ ○ ○ ○ ○ A — ● ↓ ▼ - - × - - - - - - A B = 12 13 12READING OPERATION TABLE
1 - Order
2 - Card Memor Number
3-Stop Knob
4-LKnob
5 - Side Levers
6 - Russel Levers
7 - Cam Lever
8 - Weaving Knobs
9 - Tuck Knobs
10 - Yarn Feeder ① and ②
Yam Feeder ② column also includes Weaving Yam Holder or Plating Yam Feeder.
11 - Knitting direction.
12 - The required number of rows should be knitted.
13 - A, B and C stand for different yarns,

text_image
Musical notation showing a sequence of eighth notes with slurs and rests, likely representing a simplified musical staff or pattern.Needle arrangement

text_image
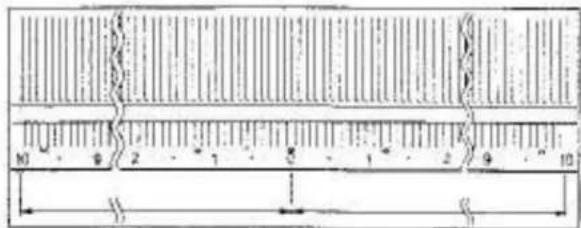
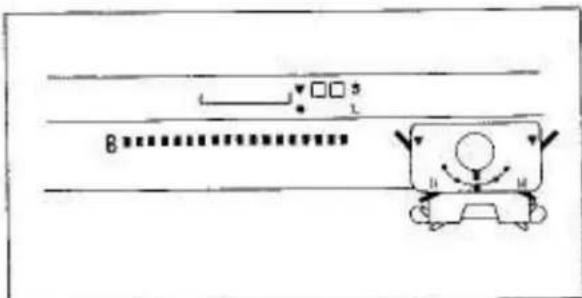
24Point Cams M setting
CAUTION ON PATTERN KNITTING
natural_image
Black-and-white photo of a vintage piano with a large screen and stand (no visible text or symbols)Before practicing pattern knitting, knit 9–10 rows of stockinet and place the Carriage at the left side of the Needle Bed.
natural_image
Diagram of a ceiling structure with two hanging weights and a wavy floor, no text or symbols presentAlways hook the Claw Weights at both edges of the knitting.
Move the Claw Weights up as knitting progresses.
natural_image
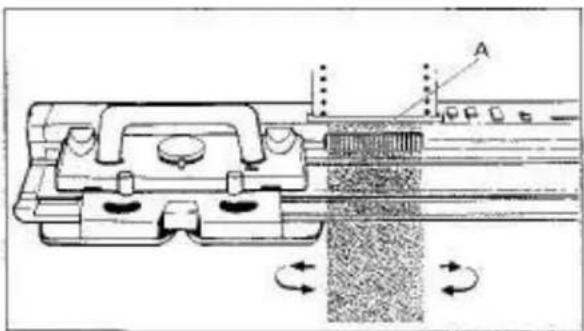
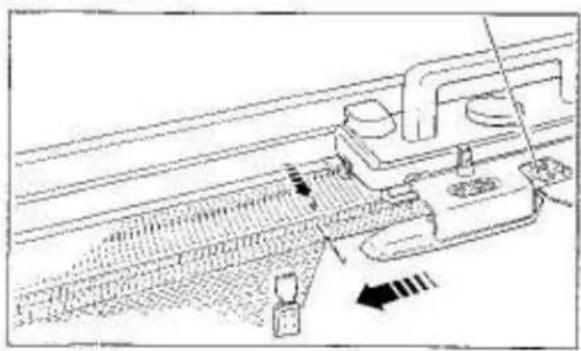
Technical diagram of a mechanical assembly with rotating components and alignment indicators (no text or symbols)When moving the Carriage back and forth, ensure that the Carriage has passed the 24 needles corresponding to the Touch Levers "A".
Move the Carriage at an even speed,
natural_image
Close-up of a hand operating a mechanical assembly with rollers and components (no visible text or symbols)Do not remove the Carriage from the Needle Bad.
If the Carriage has been removed by accident, see page 68 for adjustment.
natural_image
Abstract black-and-white pattern with repeating diamond-like shapes (no text or symbols)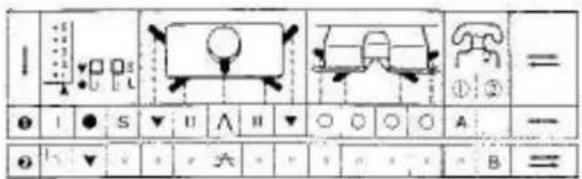
text_image
1 2 3 4 5 6 7 8 9 10 11 12 13 14 15 16 17 18 19 20 21 22 23 24 25 26 27 28 29 30 31 32 33 34 35 36 37 38 39 40 41 42 43 44 45 46 47 48 49 50 51 52 53 54 55 56 57 58 59 60 61 62 63 64 65 66 67 68 69 70 71 72 73 74 75 76 77 78 79 80 81 82 83 84 85 86 87 88 89 90 91 92 93 94 95 96 97 98 99 100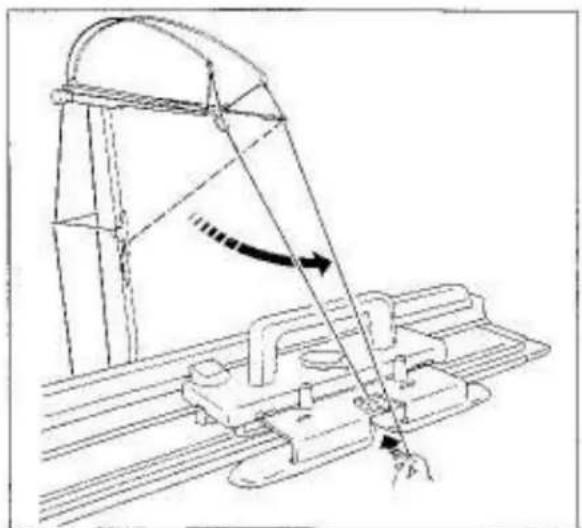
natural_image
Technical line drawing of a mechanical assembly with a lever and guide mechanism (no text or symbols)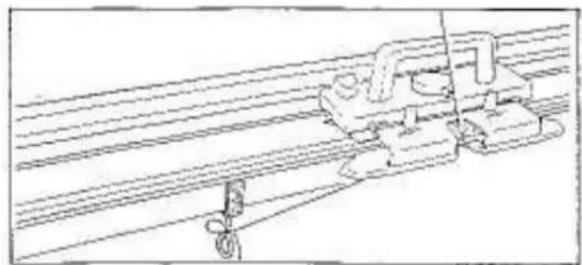
natural_image
Technical line drawing of a mechanical assembly with no visible text or symbols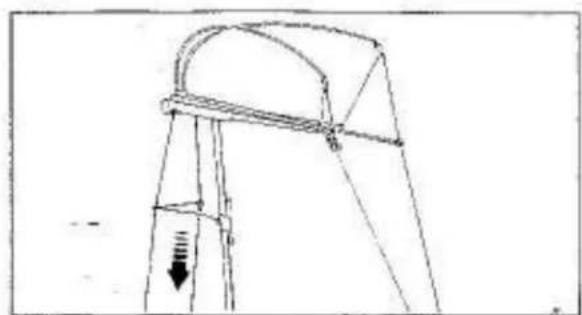
natural_image
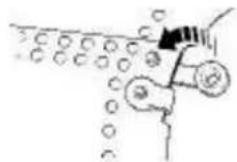
Simple line drawing of a mechanical structure with a downward arrow indicating force or direction (no text or symbols)KNIT-IN (FAIR ISLE)
Punch Card No.20-A
Insert the Punch Card.
Set the Controls as required in ORDER 1.
Knit I row from left to right.
Hang the Claw Weights at both edges of the knitting.
Set the Controls as required in ORDER 2.
Remove the second yarn end from the Yarn Clp and pull it down towards the Carriage.
Insert the second yarn into the Yam Feeder ②.

text_image
Technical diagram showing a mechanical assembly with labeled components and directional arrowsFasten the yarn end to the Clamp.
Eliminate slack yarn by pulling yarn down at the back of Yarn Rod until Tension Spring "A" is nearly in the horizontal position.
Knit the required number of rows.
natural_image
Technical line drawing of a mechanical assembly with no visible text or symbolsIf the end stitches are not knitted perfectly, push one end needle on the Carriage side to D (or C in partial knitting) position before knitting the next row.
text_image
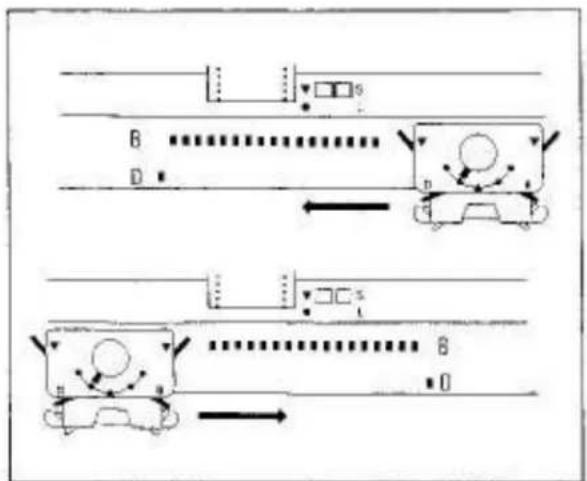
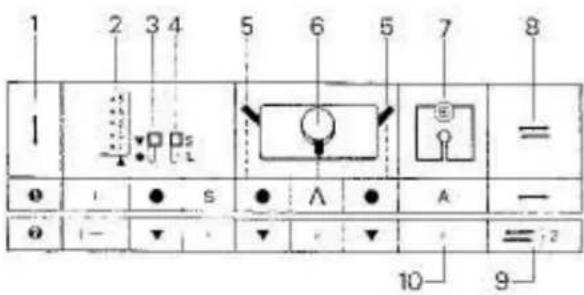
Technical diagram of a device with labeled components A, B, C, D and internal connectorsPATTERN CARD PANEL FUNCTION
STOP KNOB
When the Stop Knob "A" is set to ●, the Punch Card is locked and not advanced by the Punch Card Feeding Dial "C" and by the Carriage.
When the Stop Knob "A" is set to ▼, the Punch Card is free and advanced by the Punch Card Feeding Dial "C" and by the Carriage.
natural_image
Two abstract black-and-white pixelated patterns with diamond and triangle motifs, no text or symbols present.L KNOB
When the L Knob "B" is set to S, the Punch Card is advanced every row as the Carriage moves and standard pattern is knitted.
When the L. Knot is set to L, the Punch Card is advanced every second row as the Carriage moves, thus producing vertically expanded pattern.
L KNO8 INDICATOR
Colours in the L Knob Indicator "D" alternate.
Blue.....the current row is repeated on the next row.
Red.....the Punch Card advances to the next row and a new pattern row is knitted.
natural_image
Black and white checkerboard pattern with repeating geometric shapes (no text or symbols)HINTS
This L Knob function is mostly used with KNIT-IN but can be used for other stitch types, if the Punch Card is suitable, such as WEAVING, SLIP STITCH PATTERN and PUNCH LACE.
natural_image
Abstract black-and-white textured pattern with no discernible text, symbols, or structured elements.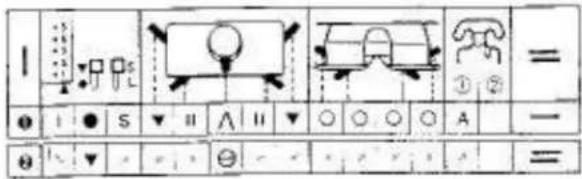
text_image
1 ① ② = ● I ● S ▼ II A II ▼ ○ ○ ○ A — θ ↓ ▼ √ ⊖ - √ √ √ √ =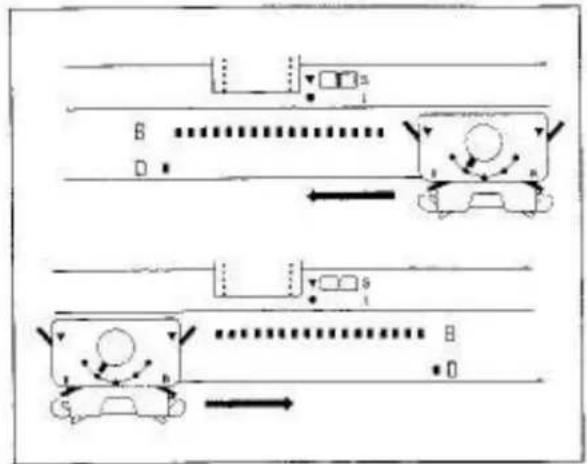
flowchart
graph TD
    A["Start"] --> B["Path 1: A"]
    B --> C["Path 2: B"]
    C --> D["Path 3: C"]
    D --> E["Path 4: E"]
    E --> F["Path 5: F"]
    F --> G["Path 6: G"]
    G --> H["End"]
    style A fill:#f9f,stroke:#333
    style B fill:#ccf,stroke:#333
    style C fill:#cfc,stroke:#333
    style D fill:#fcc,stroke:#333
    style E fill:#cff,stroke:#333
    style F fill:#ffc,stroke:#333
    style G fill:#cfc,stroke:#333
    style H fill:#fcc,stroke:#333
    style I fill:#ffc,stroke:#333
    style J fill:#cfc,stroke:#333
    style K fill:#fcc,stroke:#333
    style L fill:#ffc,stroke:#333
    style M fill:#cfc,stroke:#333
    style N fill:#fcc,stroke:#333
natural_image
Patterned fabric with repeating geometric shapes and interlocking lines (no text or symbols)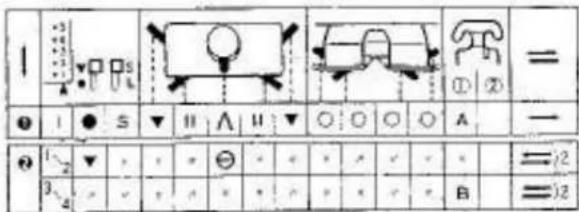
text_image
1 2 3 4 5 6 7 8 9 10 11 12 13 14 15 16 17 18 19 20 21 22 23 24 25 26 27 28 29 30 31 32 33 34 35 36 37 38 39 40 41 42 43 44 45 46 47 48 49 50 51 52 53 54 55 56 57 58 59 60 61 62 63 64 65 66 67 68 69 70 71 72 73 74 75 76 77 78 79 80 81 82 83 84 85 86 87 88 89 90 91 92 93 94 95 96 97 98 99 100SLIP STITCH PATTERN
Punch Card No.18-A
Insert the Punch Card.
Set the Controls as required in ORDER 1.
Knit 1 raw from left to right.
Hang the Claw Weights at both edges of the knitting.
Set the Controls as required in ORDER 2.
Set the Stitch Dial 1 number higher than that for stockinat as the fabric of slip stitch pattern is rather tight,
Push one end needle on the side opposite the Carriage to D (or C in partial knitting) position before knitting the next row.
Continue knitting by pushing the end needles on the side opposite the Carriage before knitting the next row.
SLIP STITCH PATTERN IN COLOUR
Punch Card No.10-A
Insert the Punch Card.
Set the Controls as required in ORDER 1.
Knit 1 row from left to right.
Hang the Claw Weights at both edges of the knitting.
Set the Controls as required in ORDER 2.
Knit 2 rows.
natural_image
Technical line drawing of a mechanical assembly with a diagonal line and base plate (no text or symbols)Remove main yarn from the Yarn Feeder and place it at the cut-out on the side of the Needle Bed.
natural_image
Technical line drawing of a mechanical device with a handle and lever mechanism (no text or symbols)Remove second yarn from the Yarn Clip.
Insert second yarn into the Yarn Feeder ①.
natural_image
Technical line drawing of a mechanical assembly with no visible text or symbols
natural_image
Technical line drawing of a mechanical assembly with rods and a hanging hook (no text or symbols)Faster the yarn and to either Clamp.
Set the Stitch Dial 1 number higher than that for stockinet as the fabric of slip stitch pattern is rather tight.
flowchart
graph TD
    A["Top: Vehicle Position"] --> B["Left: Horizontal Line with 'B' at start"]
    B --> C["Right: Horizontal Line with 'D' at end"]
    C --> D["Bottom: Vertical Line with 'B' at start and 'D' at end"]
    D --> E["Bottom: Horizontal Line with 'B' at end"]
    style A fill:#f9f,stroke:#333
    style B fill:#ccf,stroke:#333
    style C fill:#cfc,stroke:#333
    style D fill:#fcc,stroke:#333
    style E fill:#ffc,stroke:#333
On each row, push one end needle on the side opposite the Carriage to D (or C in partial knitting) position before knitting the next row.
Knit 2 rows with the second yarn.
Knit required number of rows using two yarns alternately.

natural_image
Close-up of a textured, granular surface with no visible text or symbols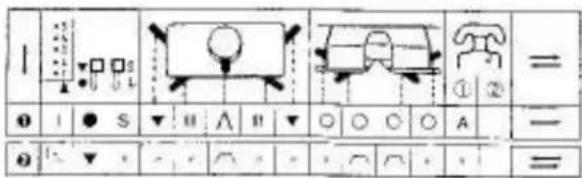
text_image
1 ① I ● S ▼ □ ∧ □ ▼ ○ ○ ○ A ② ▼ ▼ ▼ ○ □ ▼ ○ ○ □ =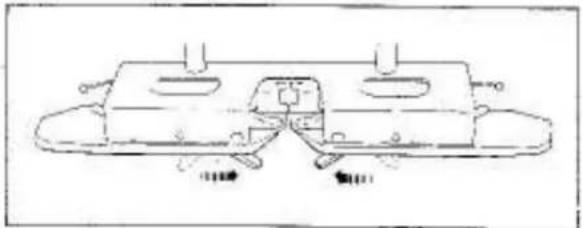
natural_image
Technical line drawing of a mechanical component with no visible text or symbols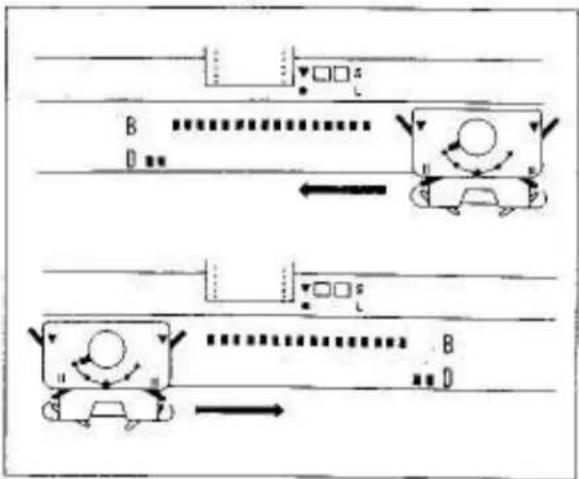
flowchart
graph TD
    A["Car"] --> B["Motor"]
    B --> C["Arrow to Car"]
    C --> D["Directional Arrow"]
    D --> E["Point B"]
    E --> F["Point D"]
    F --> G["Arrow to Car"]
    G --> H["Point B"]
    H --> I["Point D"]
natural_image
Aerial view of railway tracks with visible tracks and tracks, no text or symbols present.TUCK STITCH PATTERN
Punch Card No.12-A
Insert the Punch Card.
Set the Controls as required in ORDER 1.
Knit 1 row from left to right.
Hang the Claw Weights at both edges of the knitting.
Both Tuck Knobs....
Set the other Controls as required in ORDER 2.
Knit the required number of rows.
If the edge stitches are not knitted perfectly, push up two and needles on the side opposite the Carriage to D (or C in partial knitting) before knitting the next row.
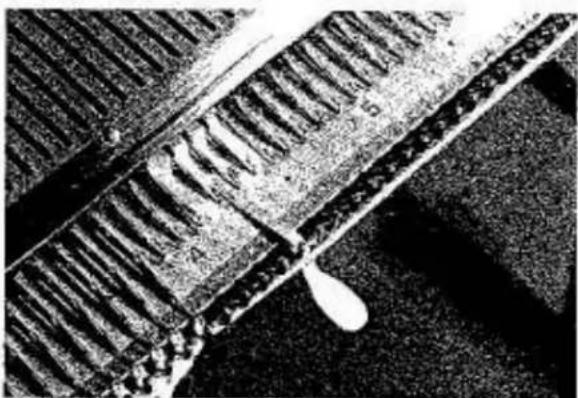
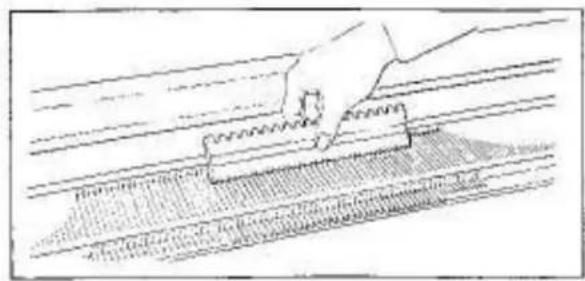
If the yarn easily entangles with the Round Brushes in the Arm, set the Yarn Separators at both sides of the knitting needles.
The yarn must pass over separators.
For instruction, see page 38, 39.
text_image
Black-and-white image of a patterned surface with labeled circular features (A, B, C, D) and numbered regions (1–6), likely from a scientific or engineering document.
text_image
1 2 3 4 5 6 7 8 9 10 11 12 13 14 15 16 17 18 19 20 21 22 23 24 25 26 27 28 29 30 31 32 33 34 35 36 37 38 39 40 41 42 43 44 45 46 47 48 49 50 51 52 53 54 55 56 57 58 59 60 61 62 63 64 65 66 67 68 69 70 71 72 73 74 75 76 77 78 79 80 81 82 83 84 85 86 87 88 89 90 91 92 93 94 95 96 97 98 99 100
text_image
B D
natural_image
Technical line drawing of a mechanical assembly with a diagonal line and base plate (no text or symbols)
natural_image
Technical line drawing of a mechanical assembly with no visible text or symbolsTUCK STITCH PATTERN IN COLOURS
Punch Card No.12-A
Insert the Punch Card.
Set the Controls as required in ORDER 1.
Knit 1 row from left to right.
Hang the Claw Weights at both edges of knitting.
Both Tuck Knobs....
Set the other Controls as required in ORDER 2.
Knit 2 rows.
Remove main yarn from the Yarn Feeder ① and place it at the cut-out on the side of Needle Bed.
Insert second yarn into the Yarn Feeder ①.
For instructions, see page 28.
Knit 2 rows with second yam.
Knit the required number of rows using two yarns alternately.
If the edge stitches are not knitted perfectly, see page 29.
If the yarn easily entangles with the Round Brushes in the Arm, see page 29.
natural_image
Grainy black-and-white image of a dense, granular texture with no discernible text or symbols.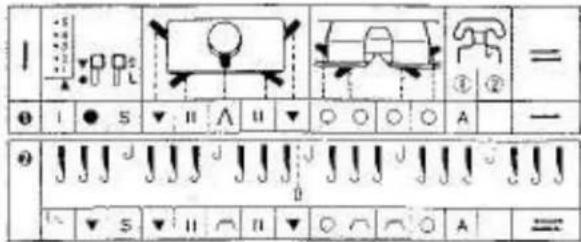
text_image
I ① ② = ● I ● S ▼ II ∧ II ▼ ○ ○ ○ A — ● J J J J J J J J J J J J J J J J J J J J J J J J J J J J J J J J J J J J J J J J J J J J J J J J J J J J J J J J J J J J J J J J J J J J J J J J J J J J J J J J J J J J J J J J J J J J J J J J J J J J L S ▼ II ∩ II ▼ ○ ∩ ○ A =
text_image
Diagram showing a vehicle with motion indicators and a dotted path, possibly indicating movement or navigation.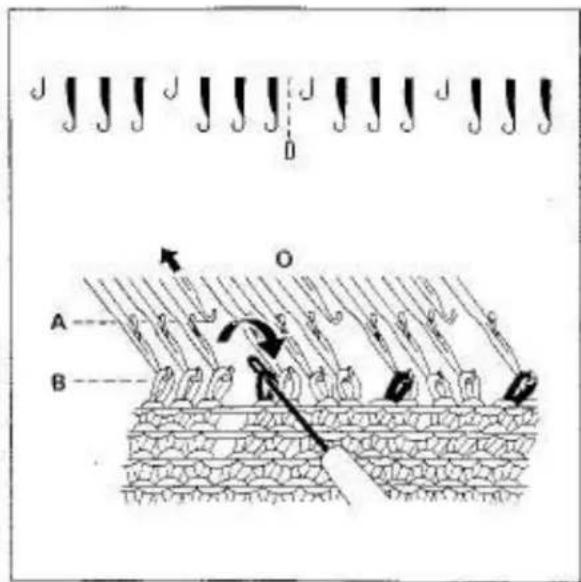
text_image
Diagram illustrating a biological or mechanical process with labeled components A and B, and directional arrows indicating movement or force.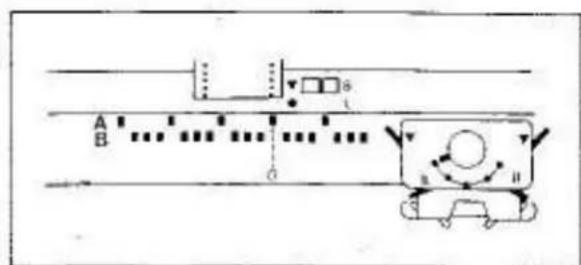
text_image
A B CTUCK LACE
Punch Card No.3-A
This is a variation of tuck stitch pattern placing selected needles in A position.
Insert the Punch Card.
Set the Controls as required in ORDER 1.
Knit 1 row from left to right.
Hang the Claw Weiths at both edges of the knitting.
Transfer every fourth stitch to its adjacent needle starting at centre "0" on the Needle Bed as shown.
Push every fourth empty needle to A position.
Set the Controls as required in ORDER 2.
Knit the required number of rows.
If the edge stitches are not knitted perfectly, see page 29.
If the yarn easily entangles around the Round Brushes in the Arm, see page 29.
natural_image
Close-up of a textured fabric surface with no visible text or symbols
text_image
1 2 3 4 5 6 7 8 9 10 11 12 13 14 15 16 17 18 19 20 21 22 23 24 25 26 27 28 29 30 31 32 33 34 35 36 37 38 39 40 41 42 43 44 45 46 47 48 49 50 51 52 53 54 55 56 57 58 59 60 61 62 63 64 65 66 67 68 69 70 71 72 73 74 75 76 77 78 79 80 81 82 83 84 85 86 87 88 89 90 91 92 93 94 95 96 97 98 99 100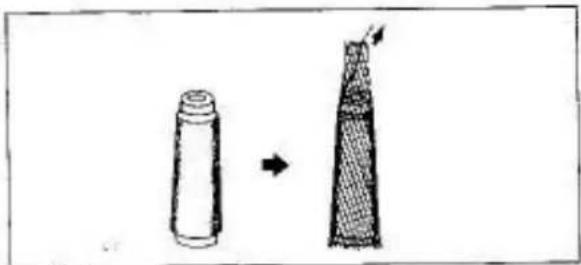
natural_image
Two cylindrical objects with different top surfaces, one white and one dark, connected by an arrow (no text or symbols)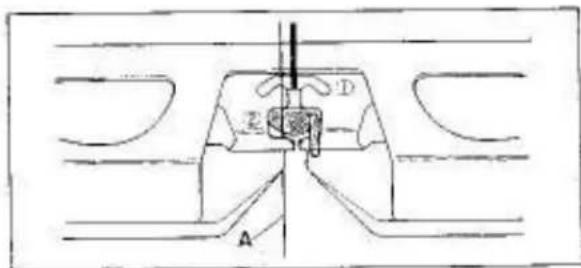
text_image
A Z D
flowchart
graph TD
    A["Start"] --> B["Car Position"]
    B --> C{Position 0}
    C --> D["Car Position 1"]
    D --> E{Position 1}
    E --> F["Car Position 2"]
    F --> G{Position 2}
    G --> H["Car Position 3"]
    H --> I{Position 3}
    I --> J["Car Position 4"]
    J --> K{Position 4}
    K --> L["End"]
PUNCH LACE
Punch Card No.17-A
A fine transparent nylon thread is used with main yard.
Insert the Punch Card.
Set the Controls as required in ORDER 1.
Knit 1 raw from left to right.
Hang the Claw Weights at both edges of the knitting.
Set the Controls as required in ORDER 2.
Cover spool of nylon thread with Stop Net (an optional accessory) or with a cut-piece of stocking.
Thread nylon thread into one side of the Auto Tension.
Insert the nylon thread "A" into the Yarn Feeder ②.
Fasten the thread end to the Clamp.
Tension Dial for nylon thread....7
Push one end needle at both sides of the knitting to D position.
Knit from right to left.
The end needles will not knit.
Knit from left to right.
The end needles will be knitted back to B position.
Knit the required number of raws.
Do not fail to push the two end needles to D position when you move the Carriage from right to left.
natural_image
Microscopic view of a granular or cellular structure with no visible text or symbols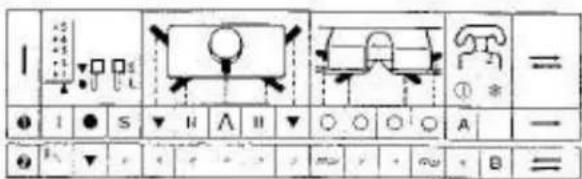
text_image
I ① = ● I ● S ▼ H A II ▼ ○ ○ ○ ○ A ● F ▼ < + - > 2 m v r + ∞ + B =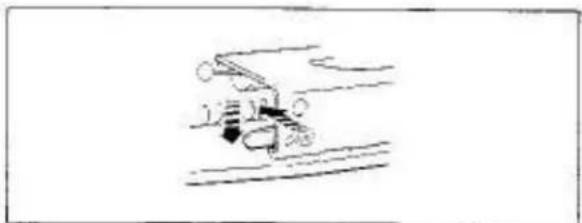
natural_image
Simple line drawing of a car on a road with a ramp and exhaust pipe (no text or symbols)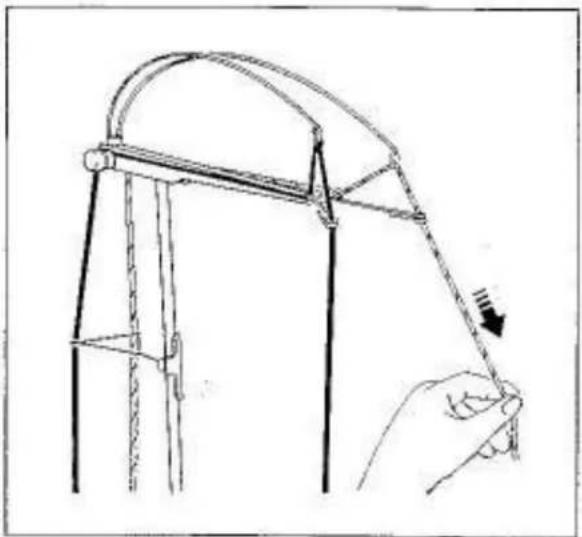
natural_image
Line drawing of a hand holding a curved object with a downward arrow, no text or symbols present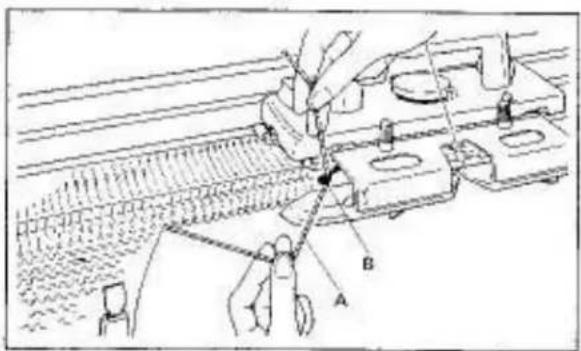
text_image
Technical diagram showing a mechanical assembly with labeled parts A and B, likely illustrating a cutting or positioning process.WEAVING
Punch Card No.9-A
Insert the Punch Card.
Set the Controls as required in ORDER 1.
Knit I row from left to right.
Hang the Claw Weights at both edges of the knitting.
Both Weaving Knobs....
To set the Weaving Knob to ∞, slightly push it forward, it will drop into position.
Set the other Controls as required in ORDER 2.
* Weaving Yam Holder,
Insert second yarn (weaving yarn) into the Auto Tension and pull it down towards the Needle Bad.
Fasten the yarn and to the Clamp.
Set the Tension Dial for weaving yarn as follows:—medium/thick yarn....2-3
Hook weaving yarn "A" onto the left Weaving Yam Holder "B". (main yarn is in the Yarn Feeder ①.)
Set the Stitch Dial 1 number higher than that for stockinai.
natural_image
Technical line drawing of a mechanical assembly or conveyor system with no visible text or symbolsPush one end needle on the Carriage side to D (or C in partial knitting) position.
Knit 1 row.
text_image
Diagram showing a hand operating a device with labeled points A and B, indicating a mechanical or electrical component.Remove weaving yarn "A" from the left Weaving Yarn Holder "B".
Bring the weaving yarn underneath the Arm and move it to the right side of the Carriage.

text_image
Technical diagram showing a mechanical assembly with labeled parts A and B, likely illustrating a tool or procedure in a machine tool.Hook the weaving yarn "A" onto the right Weaving Yarn Holder "B". (main yarn is in the Yarn Feeder ①.)

natural_image
Technical line drawing of a mechanical assembly with no visible text or symbolsPush one end needle on the Carriage side to D (or C in partial knitting) position before knitting the next row.
Knit from left to right.
natural_image
Technical line drawing of a mechanical device with no visible text or symbolsKnit the required number of rows by placing weaving yarn on the leading side of the Carriage alternately.
WEAVING LACE
To knit weaving with selected needles rested in A position as shown on page 25 in Pattern Book, refer to the tuck lace-instruction on page 31.
natural_image
Close-up of a textured fabric with repeating geometric patterns (no text or symbols)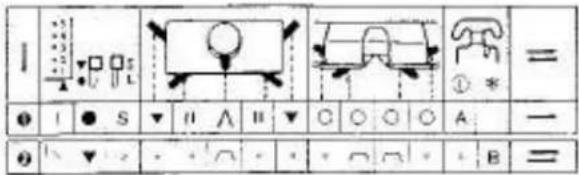
text_image
1 2 3 4 5 6 7 8 9 10 11 12 13 14 15 16 17 18 19 20 21 22 23 24 25 26 27 28 29 30 31 32 33 34 35 36 37 38 39 40 41 42 43 44 45 46 47 48 49 50 51 52 53 54 55 56 57 58 59 60 61 62 63 64 65 66 67 68 69 70 71 72 73 74 75 76 77 78 79 80 81 82 83 84 85 86 87 88 89 90 91 92 93 94 95 96 97 98 99 100
natural_image
Mechanical device with a flanged top and circular base, mounted on a workbench (no visible text or symbols)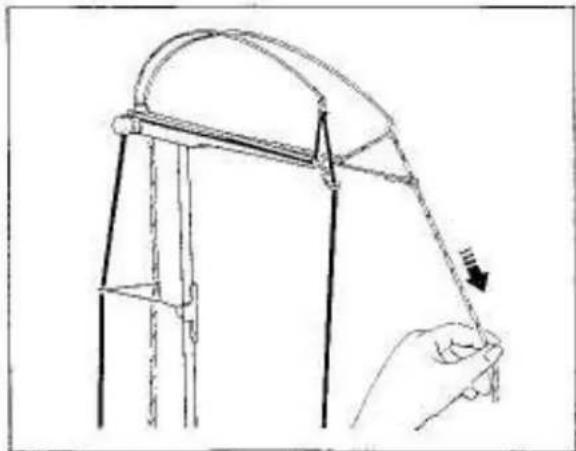
natural_image
Line drawing of a hand holding a rope tied to a metal frame structure (no text or symbols)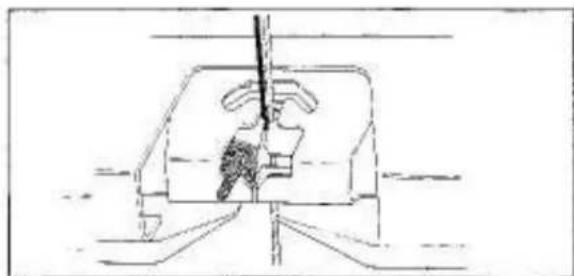
natural_image
Simple line drawing of a person inside a vehicle, viewed from above (no text or symbols)PLATTING
Punch Card No.11-A
Insert the Punch Card.
Set the Controls as required in ORDER 1.
Knit 1 row from left to right.
Move the Carriage to the right until the Yarn Feedar has passed the end sinker post.
Hang the Claw Weights at both edges of the knitting.
Remove second yarn (platting yarn) from the Yarn Clip and pull it down towards the Carriage.
Insert the second yarn into the Yarn Feeder.
Main yarn and second yarn are in the Yarn Feeder ①.

natural_image
Technical line drawing of a mechanical assembly with no visible text or symbolsThread the Plating Yarn Feeder as follows:—
With the right hand, insert the Tappet Tool from underneath the Arm and catch the second yarn (platting yarn) in the hook and pull it through the slit at the rear of the Yarn Feeder ①.
natural_image
Technical line drawing of a mechanical assembly with no visible text or symbolsClose the Yarn Feeder Gate.
natural_image
Technical line drawing of a mechanical assembly with rods and clamps (no text or symbols)Fasten the yarn end to either Clamp.
natural_image
Diagram showing a road with a bus, a car, and a circular object with directional arrows (no text or labels)Set the Controls as required in ORDER 2.
* Platting Yarn Feeder.
Knit the required number of rows.
Each yarn appears on the fabric as follows:— Platting yarn....on purl side Main yarn....on knit side
text_image
B H MTo knit platting in stockinet, set the Controls as required in stockinet knitting.
natural_image
Pixelated black-and-white illustration of a rose with leaves (no text or symbols)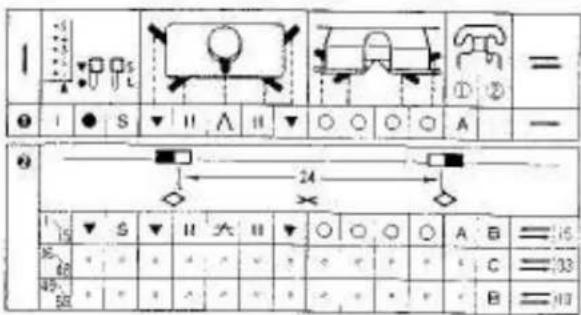
text_image
1 2 3 4 5 6 7 8 9 10 11 12 13 14 15 16 17 18 19 20 21 22 23 24 25 26 27 28 29 30 31 32 33 34 35 36 37 38 39 40 41 42 43 44 45 46 47 48 49 50 51 52 53 54 55 56 57 58 59 60 61 62 63 64 65 66 67 68 69 70 71 72 73 74 75 76 77 78 79 80 81 82 83 84 85 86 87 88 89 90 91 92 93 94 95 96 97 98 99 100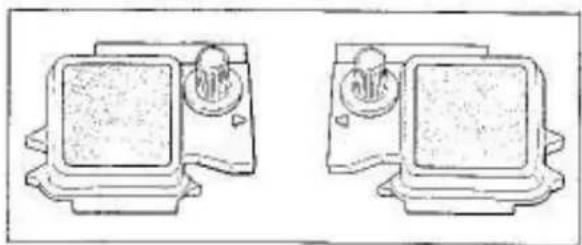
natural_image
Two identical mechanical components with circular ports and mounting brackets, shown side by side (no text or symbols)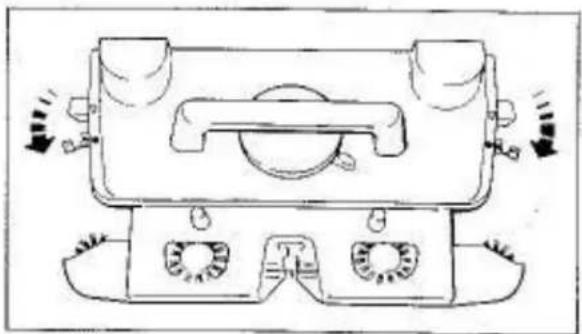
natural_image
Technical line drawing of a mechanical device with mounting holes and directional arrows indicating motion (no text or symbols)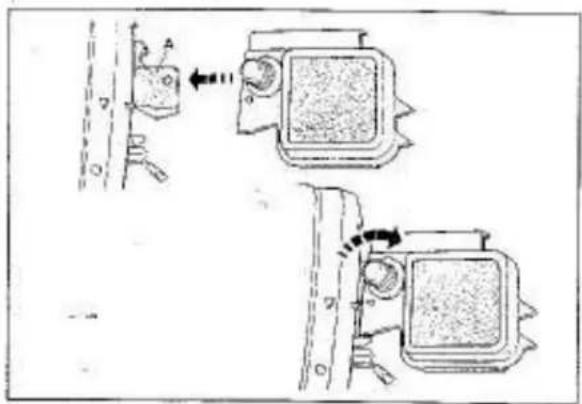
text_image
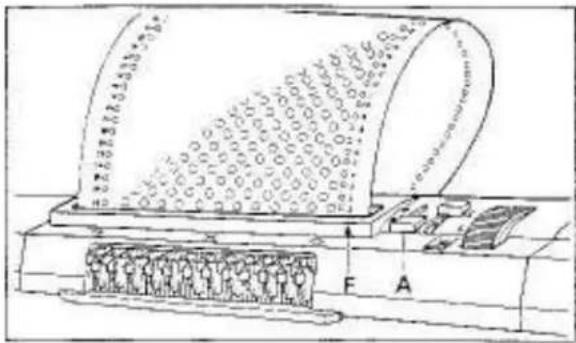
Diagram showing two mechanical device configurations with labeled parts and directional arrows indicating movement or force.SINGLE MOTIF
Card No.5-A
Insert the Punch Card.
Set the Controls as required in ORDER 1.
Knit 1 row from left to right.
Remove the left and right Magic Cams from the Accessory Box.
Both Side Levers....
Place both Magic Cams onto the extension plates "A" ensuring that the triangle marks on the Magic Cams correspond with triangle marks on the Carriage.
Fasten the Magic Cams to the extension plates by turning the knurled knobs in the clockwise direction.
natural_image
Technical line drawing of a mechanical device with no visible text or symbols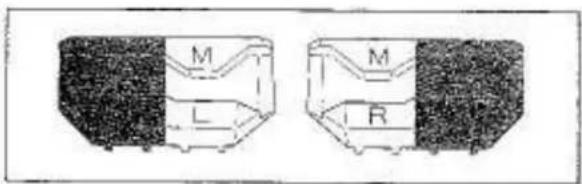
text_image
M L M R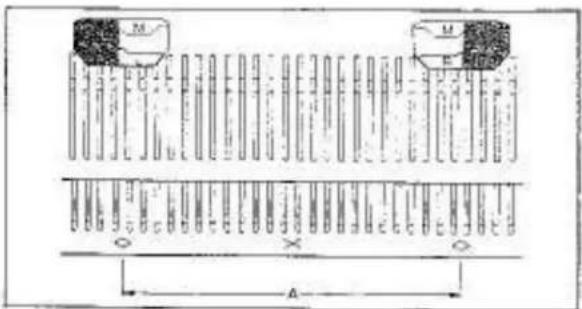
text_image
M M X A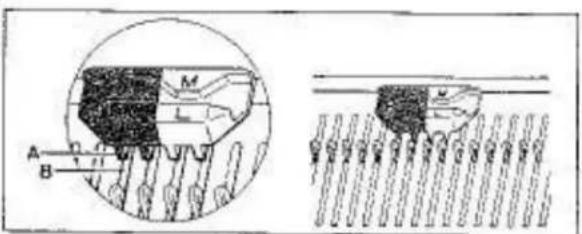
text_image
Technical diagram showing cross-sectional views of a mechanical component with labeled parts A, B, M, L and numbered sections 1-11 and 1-12.
natural_image
Two identical mechanical tools with curved and straight ends, no text or symbols visible
natural_image
Aerial view of a rural road with visible irrigation channels and a water droplet (no text or symbols)Both Side Lovers....▼
Remove the left and right Point Cams M (orange and white) from the Accessory Box.
left Point Cam - marked M.L.
right Point Cam - marked M.R.
Set both Point Cams M with their division lines (for orange and white) are between 12th and 13th needle on both sides of centre(0) of the Needle Bed.
“D” → needles knitting single motif.
Ensure that the four studs "A" of the Point Cam M fit correctly into the needle bed grooves "B" at the rear of the Needle Bed.
Remove two Yarn Separators from the Accessory Box.
Open latches of the 4th, 5th and 6th non-working needle on the left and right side of the knitting.
Insert the Yarn Separators between these three needles and the Needle Bed as far as they will go.
The yarn must pass over the Yarn Separator.
natural_image
Technical line drawing of a mechanical assembly with a lever and guide mechanism (no text or symbols)Remove the second yarn end from the Yarn Clip and pull it down towards the Carriage.
Insert the second yarn into the Yarn Feeder ②. Fasten the yarn end to the Clamp.
natural_image
Technical line drawing of a mechanical assembly with no visible text or symbols
natural_image
Traditional Chinese architectural roof with tiled roof and decorative eaves (no visible text or symbols)Hang the Claw Weights on the knitting, below the left and right Point Cams M.
Set the Controls as required in ORDER 2.
natural_image
Front view of a vintage typewriter with control panel and display unit (no visible text or symbols)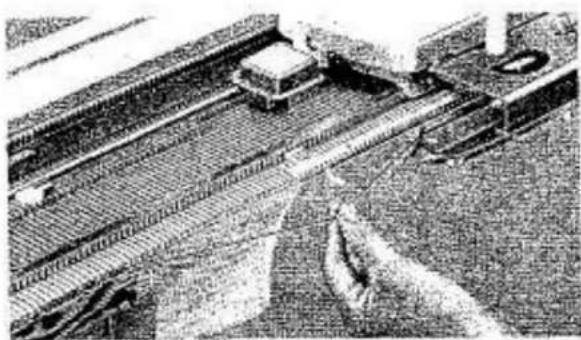
natural_image
Aerial view of a bridge over water with vehicles and structures (no visible text or symbols)Knit 1 row from right to left.
When knitting single motif, yarns must be arranged as follows:—
main yarn - over Yarn Separator. second yarn - under Yarn Separator.
natural_image
Aerial view of a conveyor belt system with rollers and a moving cart (no visible text or symbols)Ensure that the Arm has passed the Yarn Separator by approximately 2–3cm. before knitting the next row.
natural_image
Illustration of a historical or mythological scene with figures under a banner, emitting smoke or fire (no text or symbols present)TO OBTAIN A BETTER FINISH IN KNITTING SINGLE MOTIF, WE RECOMMEND THE FOLLOWING.
After each row has been knitted, wind second yarn "A" around hook of the first needle (on the Carriage side) adjacent to the last stitch of motif knitted.
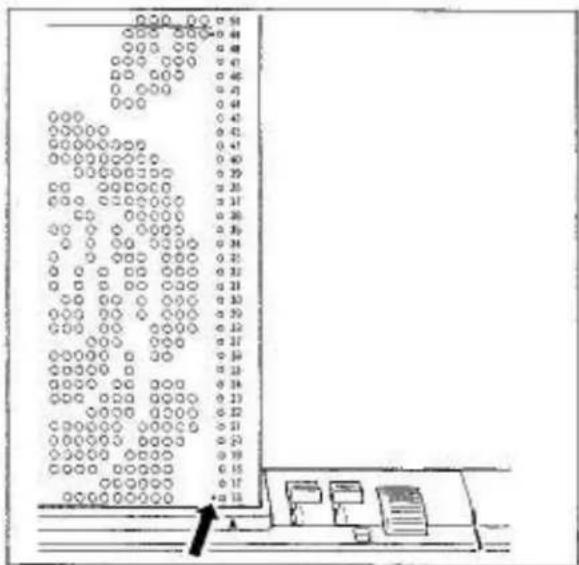
text_image
Diagram showing a vertical panel with numbered rows and a control panel at the bottom, featuring circular symbols and a black arrow pointing to the bottom panel.Knit the required number of rows using the two yarns B and C in the Yarn Feeder ② alternately.
TO CHANGE YARNS IN YARN FEEDER ②
Punch Cards No.5, 6-03, 19-03 have red dots alongside Card Memory Numbers indicating the rows to change yarn.
When a red dot on the Card is visible above the triangle mark on the Pattern Card Panel, remove yarn B from the Yarn Feeder ②; insert yarn C into the Yarn Feeder ② and knit to the point where the next red dot appears above the triangle mark.
In this instance Card memory numbers 16 & 49.
natural_image
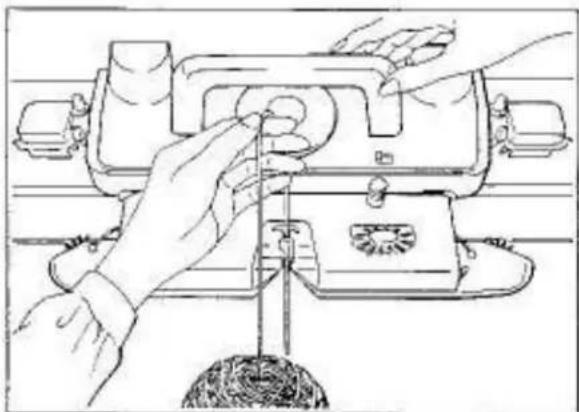
Line drawing of hands operating a sewing machine with a sewing machine handle (no text or symbols)If you knit with more than two yarns, we recommend hand feeding (see page 42) or the purchase of an additional Auto Tension with Yarn Rod.
While working single motif if tension on the second yarn becomes loose, slip the second yarn out of the Yarn Feeder ②, knit to the motif point, slip the second yarn back into the Yarn Feeder ② and complete knitting the motif and the row.
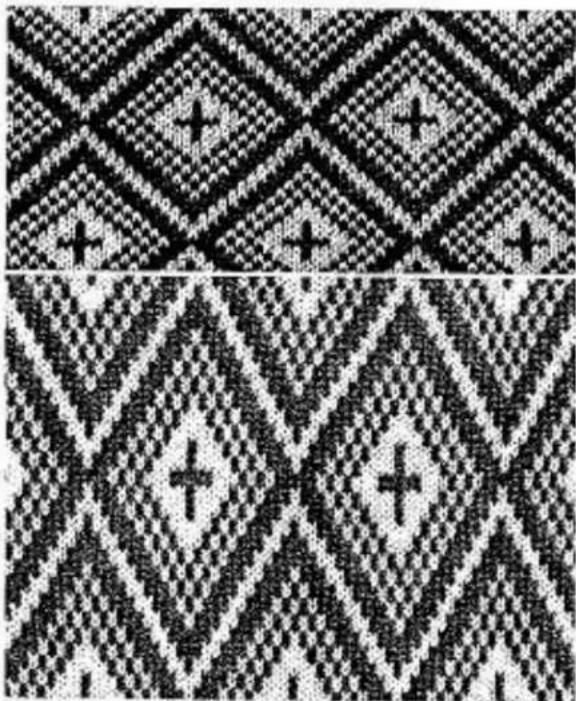
LEARNING SINGLE MOTIF VARIATIONS
2 sets of left and right Point Cams M (orange and white) are included with your Knitter.
You can enjoy a wide variety of single motif knittings by use of these Point Cams M, some are shown below.
KNITTING I ROSE
To knit 1 rose, place the left and right Point Cams M at two nearest ◇ marks. See page 38.

natural_image
Pure electrical circuit lines without any symbols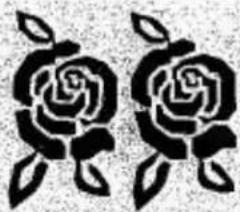
natural_image
Black and white stylized illustration of two roses with leaves (no text or symbols)KNITTING 2 ROSES
To knit 2 roses, move the left or right Point Cam M to adjacent ◇ mark.

text_image
Diagram illustrating a process with labeled components and directional arrow, showing a container with internal structure and marked points.
KNITTING 2 ROSES WITH SPACE IN BETWEEN
To knit 2 roses, with a space in between in stockinet, place another set of the left and right Point Cams M at two nearest ◇ marks apart from the first set.

text_image
Diagram showing three containers with different liquid levels and directional arrows, likely illustrating a physical or engineering concept.
natural_image
Diagram of a mechanical component with labeled parts and an arrow indicating direction (no text or symbols present)
natural_image
Technical line drawing of a mechanical assembly with no visible text or symbols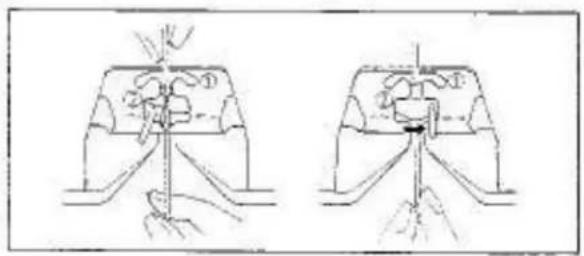
natural_image
Two technical diagrams showing a hand operating a tool on a mechanical component, with no visible text or symbols.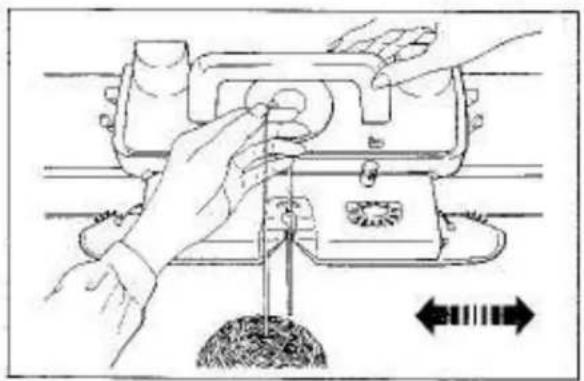
natural_image
Illustration of hands operating a mechanical device with directional arrows indicating movement or force (no text or symbols present)
natural_image
Black-and-white photo of a person sitting on a traditional wooden balcony with lattice windows (no visible text or symbols)PRACTICING HAND FEEDING
Remove yarn from the Yarn Feeder.
Place the yarn at the cut-out on the side of the Knitter.
Thread new yarn into the Yarn Feeder with the yarn and hanging approximately 10cm, below the Yarn Feeder.
Close Yarn Feeder Gate.
Hold the yarn lightly between the thumb and forefinger.
Knit required number of rows.
Hand feeding is useful for the following occasions:
- When more than two colour yarns are being used for a small area.
- When making a knitted-in hem using the Ravel Cord for separating the main from waste knitting.
AUXILIARY FEEDING CAM
This attachment is used when you knit a garment on the Knit Contour.
See page 8 on Knitting Manual.
LACE CARRIAGE
For setting up the Knitter and preparation of yarn before knitting, read the instructions on pages 1–10.
natural_image
Technical line drawing of a mechanical component or device with no visible text or symbols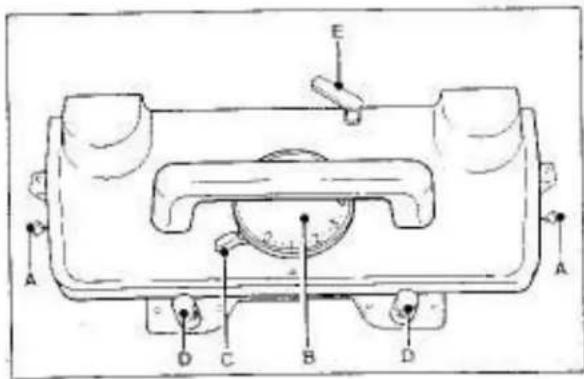
text_image
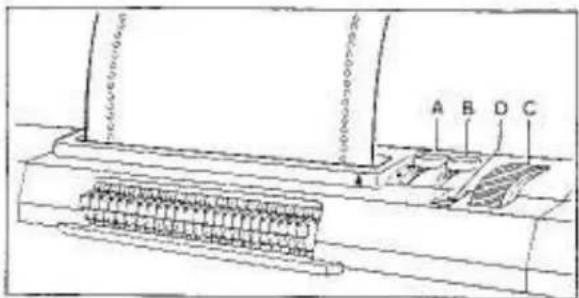
Technical diagram of a mechanical device with labeled components A, B, C, D and ECARRIAGE
A - Side Levers
B - Stitch Dial
C - Cam Lever
D - Arm Nuts
E -- Raw Counter Tripper
ADDITIONAL ACCESSORIES
F - Comb Weight (3) 02470367
G - Claw Weight (3) 07422009
H - Ribber Join Screw (2) 01933712
- Edge Pin (6) 02270361
J - Punch Card (10) 07700438
(To order, specify part name with part number)
text_image
F G H I J
text_image
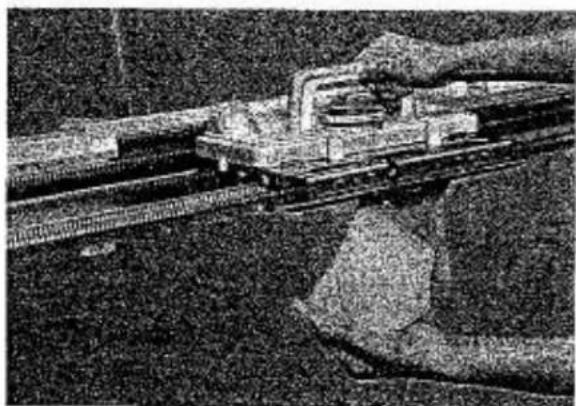
Lace Carriage and Arm for 360/260KL has been packed separately in styrofoam packing. Remove the Lace Carriage with Arm from the packing and raise the Carriage Handle. Mount the Lace Carriage to the Needle Bed from the right side.
natural_image
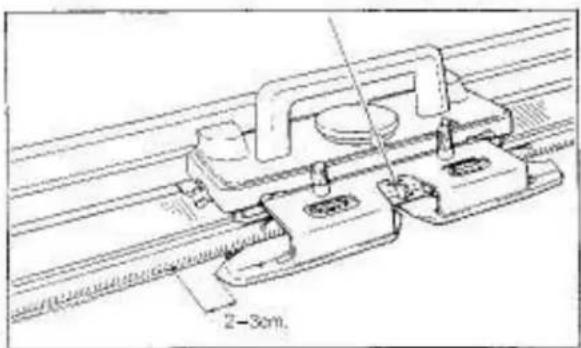
Technical line drawing showing two mechanical assembly steps: top view with hand operating a clamp, bottom view with hand using a tool on a track (no text or symbols)NOTE FOR USING THE LACE CARRIAGE
Do not attach the Main Carriage Arm to the Lace Carriage.
Do not connect the Ribber Arm to the Lace Carriage. The Ribber Arm can only be connected to the Main Carriage.
text_image
A BIf you knit with the SRP-50 Ribber connected in the lower position, ensure the following:—
- Replace the Ribber Join Screws "A" with the included Screws "B".
natural_image
Hand holding a pen writing on a ruler (no visible text or symbols)- Remove the Close Knit Bar from the Needle Bed, if it is in use.
natural_image
Technical line drawing of a mechanical assembly with no visible text or symbols- With hard paper or heavy cloth "A", cover the Ribber needles and sinker posts to bring the knitting in front of the Ribber.
(Optional Plastic Ribber Needle Bed Cover is available.)
natural_image
Pure technical line drawing of a mechanical or electrical component without any text, numbers, or symbolsIf the L Carriage is used on the Model 360 Knitter, be sure to set the Paper Lever "A" of the Knit Contour to ▼ mark, otherwise it will interfere with the Row Counter Tripper.
natural_image
Hand using a tool to cut or mark a surface with a wavy line, no text or symbols visible
text_image
Scanned text of a document with dense vertical lines and horizontal lines, likely from a technical or legal document.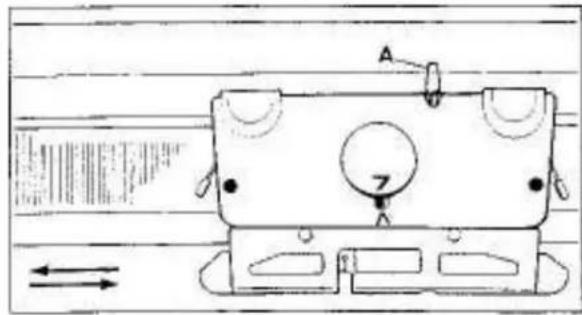
text_image
Technical diagram of a mechanical component with labeled parts and directional arrows indicating motion or flow.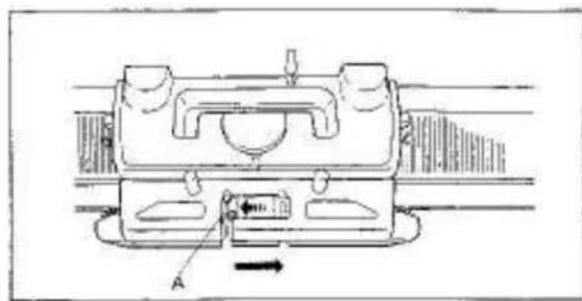
natural_image
Technical line drawing of a mechanical component with labeled parts and directional arrow (no text or symbols)
natural_image
Technical line drawing of a mechanical assembly with a tool and component, no visible text or symbolsTO CAST ON
Push 35 needles on the left and right side of centre (0), 70 needles in total, from A position to B using the straight edge of the Needle Pusher.
SETTING CARRIAGE
Stitch Dial....7
Cam Lever
Side Levers (left and right).....●
The Cam Lever is synchronized with the Row Counter Tripper "A".
Cam Lever position
A.....Row Counter is operated.
(a).....Row Counter is not operated.
Do not adjust the Row Counter Tripper by hand.
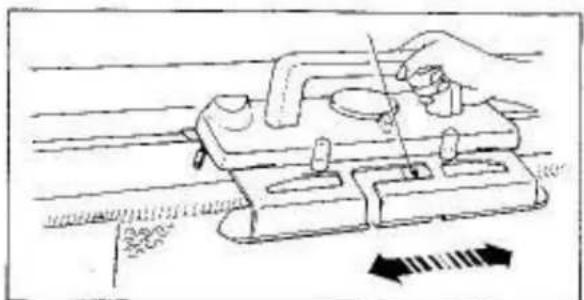
Slowly move the Carriage across the Needle Bed until it has passed all the needles.
Place the Carriage at the right side.
Move the Carriage to the right to allow Yarn Feeder "A" to slide to the left side in the Arm.
For threading or unthreading the Yarn Feeder, it must be at the left side.
Remove the yarn end from Yarn Clip and bring it down to the Carriage.
Hold the yarn with both hands and slide it into the yarn feeder.
The yarn must be pushed behind guide pin "A".
natural_image
Technical line drawing of a mechanical assembly with pulleys and rods (no text or symbols)Faston the yarn end to either Clamp.
natural_image
Technical line drawing of a mechanical assembly with a suspended component and structural supports (no text or symbols)Eliminate slack yarn by pulling the yarn down at the back of Yarn Rod until the Tension Spring is nearly in the horizontal position,
natural_image
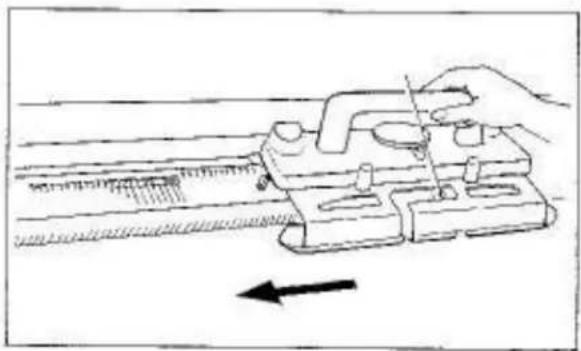
Line drawing of a hand using a measuring tool to measure a ruler, with an arrow indicating measurement direction (no text or symbols present)Move the Carriage from right to left, knitting 1 row.
natural_image
Technical line drawing of a mechanical assembly with no visible text or symbolsEnsure that the Arm has passed the last knitting needle by approximately 2–3cm, on each row.
text_image
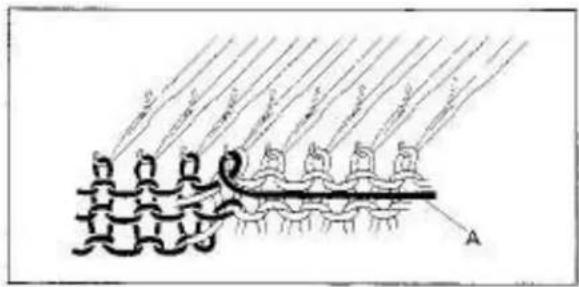
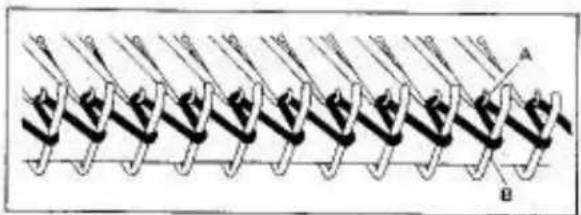
A BEven loops have been formed between needle hooks "A" and sinker posts "B".
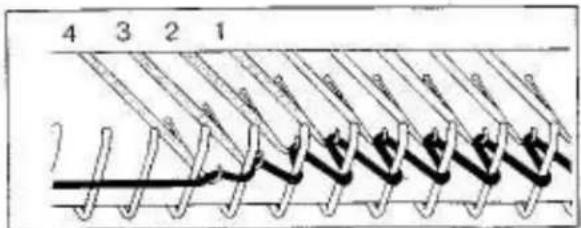
text_image
4 3 2 1 7When knitting the first row, it might happen that the loops get smaller towards the left side on the needle hooks "1", "2", "3" and "4".
To have successful cast on, these smaller loops must be corrected.
natural_image
Illustration of a hand using a tool to adjust or install a mechanical component (no text or symbols visible)To correct, hold yarn above the Yarn Feeder and pull it down to allow some slack.
text_image
4 3 2 1 0 0 0 0 0 0 0 0 0 0 0 0 0 0 0 0 0 0 0 0 0 0 0 0 0 0 0 0 0 0 0 0 0 0 0 0 0 0 0 0 0 0 0 0 0 0 0 0 0 0 1Starting from the smallest loop furthest away from the Carriage, in this case the loop on the needle "1", push the needles with small loops one by one back to B position.
natural_image
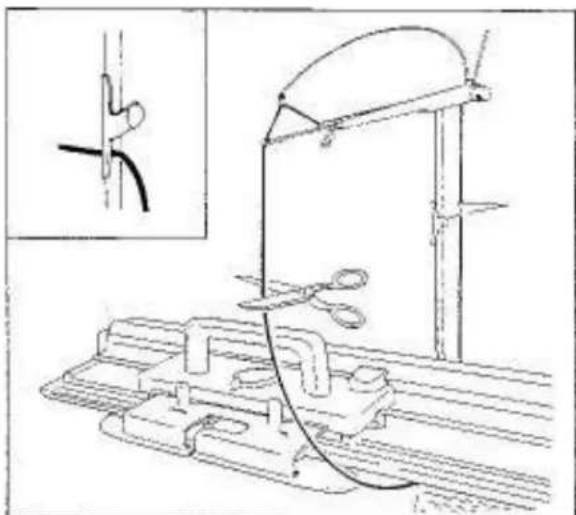
Simple line drawing of a rope tied with a loop (no text or symbols)Remove Ravel Cord from the Accessory Box.
Untwist it and check that there are no knots in the Cord before using, otherwise you can not pull it out of the knitting after cast on.
text_image
Technical diagram showing a spring-loaded tool interacting with a device labeled A and B, with an arrow indicating motion direction.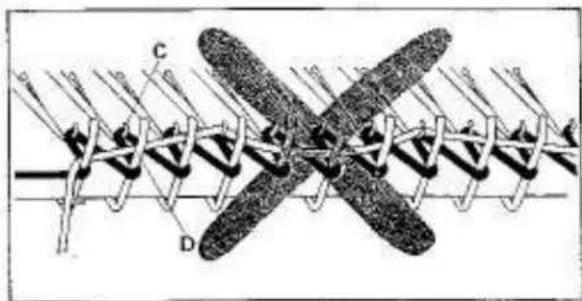
text_image
Diagram of a mechanical or electrical component with labeled parts C and D, showing internal structure and connections.Hook the end of the Ravel Cord "A" in the Yarn Holder "B" at the right side of the Needle Bed.
Lay the Ravel Cord across the yarn loops between needle hooks "C" and sinker posts "D". Strain the Ravel Cord with the left hand.
Ensure that the Ravel Cord lies correctly across the loops and will not entangle with needle hooks.
natural_image
Illustration of a hand using a tool on a mechanical device with directional arrows indicating motion (no text or symbols)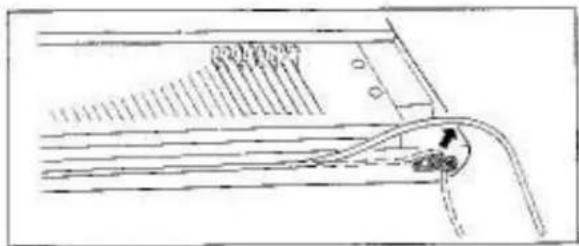
text_image
Technical diagram showing a mechanical or fluid system with labeled components and directional arrows indicating flow or movement.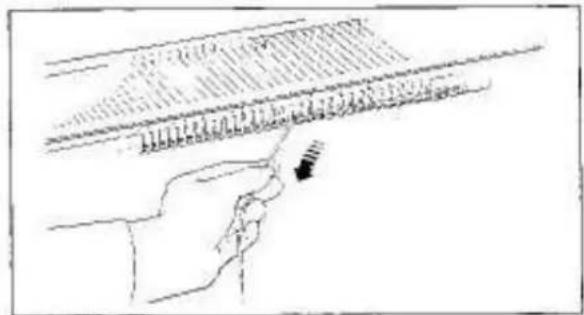
natural_image
Line drawing of a hand holding a ruler with measurement markings (no text or symbols)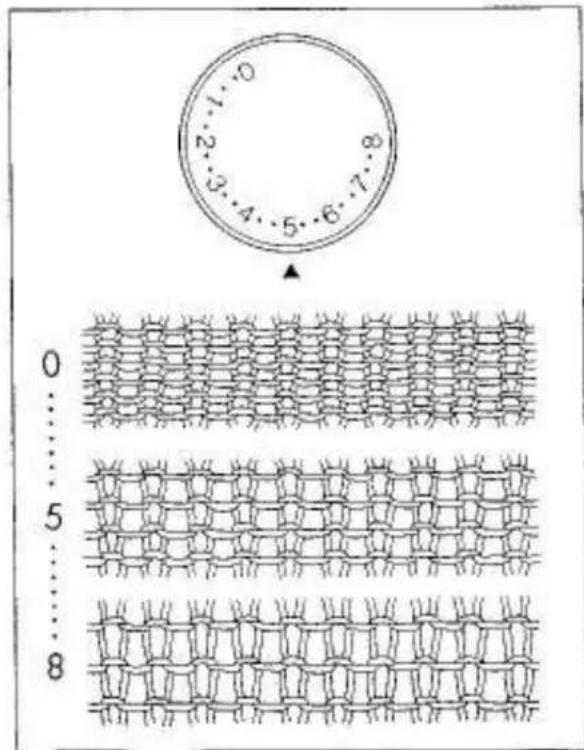
text_image
0 1 2 3 4 5 6 7 8 0 ... 5 ... 8Move the Carriage from left to right.
Continue to knit 5-6 rows.
Remove the end of the Raval Cord from the Yarn Holder at the side of the Needle Bed.
Remove the Ravel Cord by pulling it to the left.
You have finished cast on.
LEARNING ABOUT STITCH SIZE AND YARN
STITCH DIAL
Ensure that the correct Stitch Dial number is always selected for the yarn you will select.
Stitch Dial regulates the size of a stitch.
When the Stitch Dial is set to 0, the tightest stitch size is obtained, (smallest stitch)
When the Stitch Dial is set to 8, the loosest stitch size is obtained. (largest stitch)
To select a number, turn the Stitch Dial until the required number or dot corresponds to ▲.
If the tension is too tight — it will be difficult or even impossible to knit, you will use more yarn and waste money — your garment will be hard and uncomfortable to wear.
If the tension is too loose — your garment will have no shape or will very soon lose its shape.
For practice, continue to knit with different Stitch Dial numbers as follows:—
- with the Stitch Dial number 3, knit 10 rows - small stitch size is obtained.
- with the Stitch Dial number 8, knit 10 rows - large stitch size is obtained.
natural_image
Two textured fabric swatches with no visible text or symbolsSTITCH SIZE AND STITCH DIAL NUMBER FOR A YARN
A - Stitch Dial at 1 with yarn ② (2-ply)
θ - Stitch Diel at 5 with yarn ⑤ (4-ply)
①
②
31
④
⑤
⑤
①
⑧
道
| Type of yarn | Stitch Dial (stockinet) | Stitch Dial (lace knitting) |
| 1 Thin yarn (2-ply) | 2-3 | (3)-4 |
| 2 Light yarn (3-ply) | 3-5 | 4-5 |
| 3 Medium yarn (4-ply) | 4-6 | 5-6 |
| 4 Cotton thread (thin) | 3-4 | 4-5 |
| 5 Cotton thread (regular) | 4-5 | 5-6 |
| 6 Synthetic (thin) | 2-3 | (3)-4 |
| 7 Synthetic (regular) | 3-4 | 4-5 |
| 8 Synthetic (regular) | 3-4 | 4-5 |
| 9 Mohair (thin) | 3-5 | 4-5 |
NOTE FOR LACE KNITTING
DO NOT ADJUST THE STITCH DIAL TO THE NUMBERS IN PARENTHESISES WHEN THE PUNCH CARDS NO. L-5, L-6 AND L-7 WHICH PRODUCE MESHLIKE PATTERNS ARE IN USE.
DO NOT USE KNOBBLY YARN OR THICK MOHAIR YARN.
natural_image
Technical line drawing of a mechanical component with no visible text or symbolsKNITTING STOCKINET
Remove the yarn end from the Clamp.
Stitch Dial....6
Cam Lever....A
Both Side Levers....
natural_image
Illustration of a hand using a tool on a mechanical device with directional arrows indicating movement (no text or symbols)For practice, knit 30 rows.

natural_image
Close-up of a textured fabric with repeating knitted patterns (no text or symbols)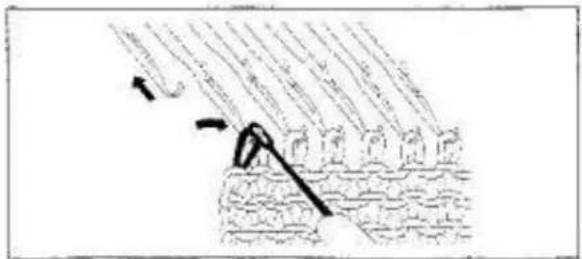
natural_image
Diagram showing a person bending over water with arrows indicating direction (no text or symbols)
natural_image
Abstract pattern of repeating arrow-like shapes forming a grid-like structure (no text or symbols)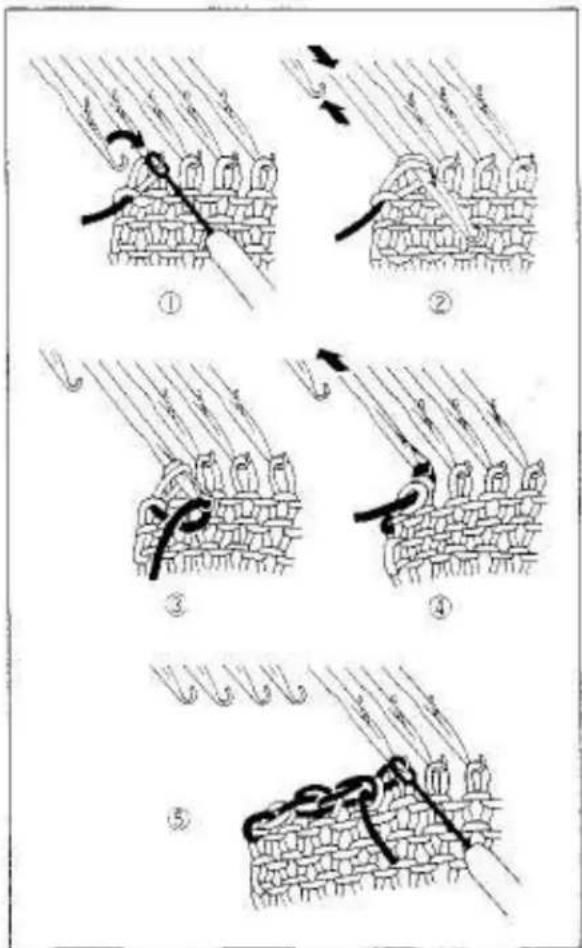
text_image
Illustration showing five sequential steps of fabric or textile sewing, labeled ① to ⑤ with Chinese characters and directional arrows.DECREASING 1 STITCH
You can decrease I stitch on both sides of the row.
Using the Transfer Tool, transfer the end stitch onto its adjacent needle.
Push back the empty needle to A position.
Knit 1 row.
For practice, knit more rows decreasing 1 stitch on both sides of the row.
DECREASING MULTIPLE STITCHES
You can only decrease on the Carriage side.
① On the Carriage side, hold the fabric against the Knitter.
Transfer the end stitch to the adjacent needle.
② Push the empty needle to A position.
Push the second needle to D position until both stitches are behind the latch.
③ Lay yarn from right to left on the open hook of the needle.
④ Hold yarn slightly down and push the needle back to B position.
The two stitches slip off the needle.
⑤ Continue this procedure until the required number of stitches have been decreased.
Place the last decreased stitch onto its adjacent needle.
For practice, decrease four stitches on both sides.
natural_image
Close-up texture of a knitted fabric with no visible text or symbols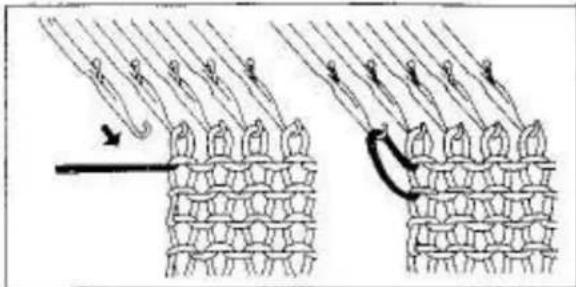
natural_image
Diagram showing two stages of hair follicle growth with arrows indicating direction (no text or symbols)
natural_image
Abstract pattern of repeating zigzag lines forming a curved shape (no text or symbols)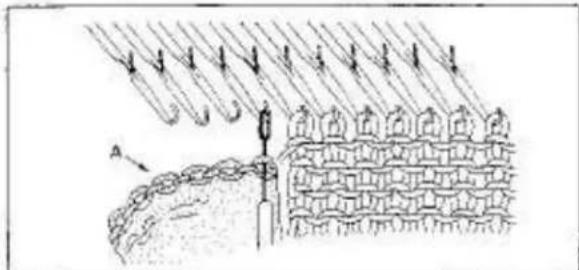
natural_image
Diagram of a mechanical or structural assembly with hanging weights and a brick wall, no visible text or symbols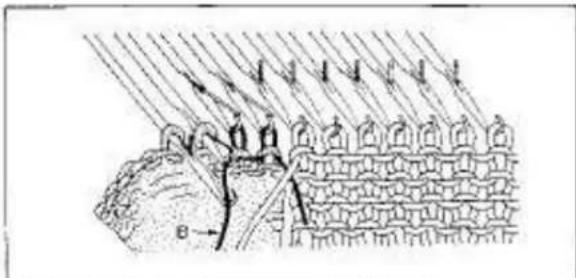
natural_image
Diagram of a mechanical or structural assembly with layered components and directional arrows (no text or symbols)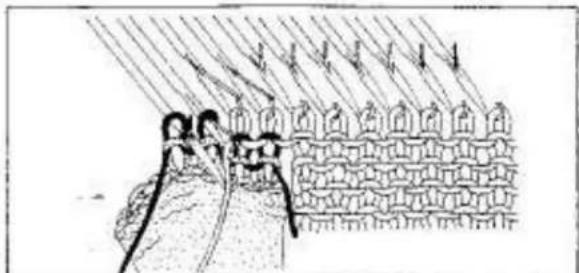
natural_image
Illustration of a person climbing a rope with arrows indicating motion or force, next to a brick wall (no text or symbols)INCREASING 1 STITCH
You can increase 1 stitch at a time on the Carriage side.
Push 1 needle on the Carriage side from A to B position
Knit | row,
For practice, knit more rows increasing 1 stitch on the Carriage side on each row.
INCREASING MULTIPLE STITCHES
You can only increase on the Carriage side.
Push up the required number of needles for increase from A position to B.
Prepare a knitted place "A", and using the Transfer Tool pick up stitches from it and hook them on the needles.
Hook the Clay Weight onto the knitted piece.
Push up the needles from B position to Q and lay the Ravel Cord "B" on needle hooks.
(Stitches of the knitted piece are behind needle latches.)
Push the needles one by one and form loops.
Push up the needles from B position to D and lay main yarn on the needle hooks.
Push the needles one by one and form loops in the same manner as done for the Raval Cord.
natural_image
Diagram of a mechanical or structural assembly with layered components and directional arrows (no text or symbols)Knit the required number of rows.
For practice, increase four stitches on both sides.
Close the increased edge of the main knitting using back stitch.
natural_image
Line drawing of a hand operating a device with arrows indicating motion or movement (no text or symbols present)REMOVING KNITTED FABRIC
- without closing and stitches
Place the Yarn Feeder at the left side and remove the yarn.
To remove yarn from the Yam Feeder, pull yarn towards you.
The yarn will then be released from guide pin.
natural_image
Technical line drawing of a mechanical setup with tools and components (no text or symbols)Break the yarn and hook its top end onto the Yarn Clip.
Let bottom yarn end hang loosely on the side of the fabric.
natural_image
Black-and-white photo of a train on an elevated track with a person standing nearby (no visible text or symbols)Cam Lever....^
Move the Carriage across the knitting.
The fabric will come off the needles.
PRACTICING HAND FEEDING
If you wish to practice hand feeding on your Lace Carriage, see page 42.
natural_image
Technical line drawing of a mechanical assembly with a magnified inset showing a cylindrical component inserted into a housing (no text or symbols)
natural_image
Diagram of a mechanical assembly with a tool inserted into a cylindrical component (no text or symbols visible)
natural_image
Simple line drawing of a mechanical clamp or bracket with a vertical line and circular components (no text or symbols)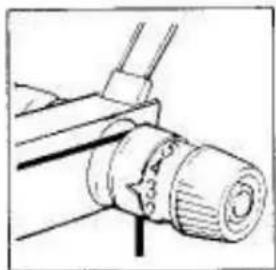
natural_image
Technical line drawing of a mechanical component with no visible text or symbols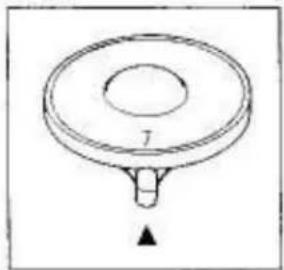
natural_image
Simple line drawing of a circular object with a central hole and a downward arrow at the bottom (no text or symbols)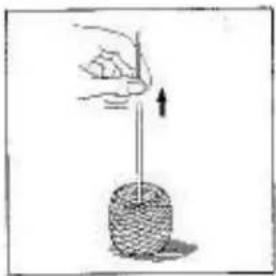
natural_image
Illustration of a hand holding a vertical rod above a circular object with a downward arrow (no text or symbols)
natural_image
Hand holding a vertical rod with a downward arrow indicating force or pressure (no text or symbols)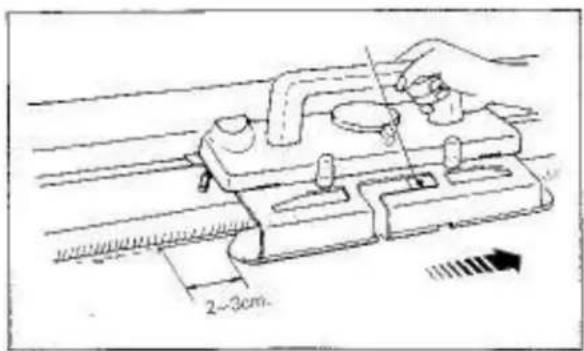
text_image
2-3cmIMPORTANT
IF YOU HAVE ANY DIFFICULTY IN KNITTING THE FIRST ROW, ENSURE THAT:
Arm is attached to the Carriage correctly.
Yarn is threaded correctly through the Auto Tension and Yarn Feeder.
Tensión Dial and Cam Lever are set correctly.
Yarn is wound correctly.
Slack yarn is eliminated and Tension Spring is nearly in a horizontal position.
Arm "A" has passed the last knitting needles by approximately 2–3cm. before knitting the next row.
PATTERN KNITTING WITH LACE CARRIAGE

natural_image
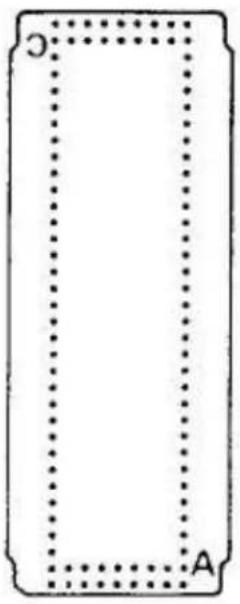
Simple rectangular outline with dotted border and label 'A' at bottom (no text or symbols within the shape)
natural_image
Simple rectangular frame with dotted border and label 'B' at bottom (no text or symbols within the frame)STANDARD PUNCH CARDS FOR LACE CARRIAGE
10 Punch Cards are numbered L-1 - L-10.
Punch Card No.L-1-L-8 (for plain lace)
Each Punch: Card can be used in two ways and is marked "A" and "B".
If "A" or "B" side of Punch Card is inserted into the Pattern Card Panel, direction of pattern can be changed.
Punch Card No.L-9-L-10 (for fashion lace)
Only one side of Punch Card can be used.
text_image
Technical diagram illustrating a mechanical device with force application and internal structure, including labeled components A and F.IMPORTANT: Do not fold or bend the Card.
INSERTING PUNCH CARD
For instruction, see pages 22–23.
text_image
1 2 3 4 5 6 5 7 8 1 = ● I ● S ● ∧ ● A — ● I— ▼ ▼ ▼ ▼ = :2 10 9READING OPERATION TABLE
1 - Order
2 - Card Memory Number
3 - Stop Knob
4 - L Knol
5 - Side Levers
6 - Cam Lever
7-Yam Feeder
8 - knitting direction
9 - the required number of rows should be knitted
10 - A stands for knitting yarn

text_image
Diagram showing two vertical lines with diamond markers and a labeled distance '24' between them, possibly indicating measurement or position.Point Cams M setting
natural_image
Pure technical line drawing of a mechanical component or assembly (no text or symbols)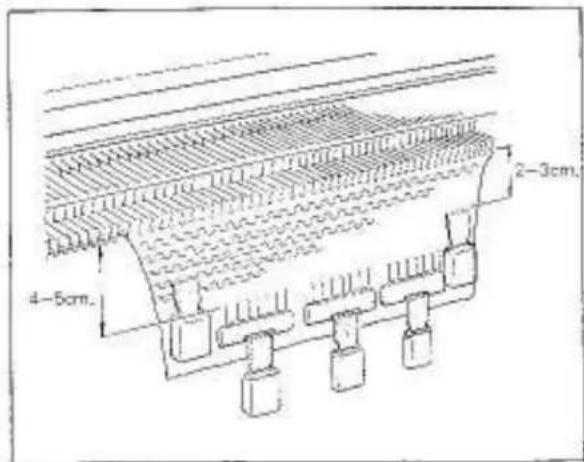
text_image
4-5cm. 2-3cm.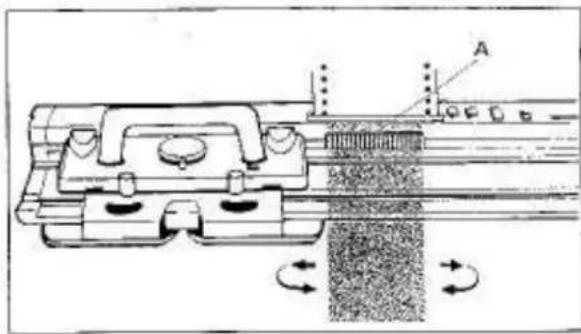
natural_image
Technical diagram of a mechanical assembly with rotating components and labeled section A (no text or symbols present)
natural_image
Technical line drawing of a mechanical assembly with a hand operating a tool (no text or symbols present)CAUTION ON LACE KNITTING
Before practicing lace knitting, knit about 30 rows in stockinet.
When you use A side of the Punch Card, place the Carriage at the left side of the Needle Sed.
Hook the Comb Weights on the knitting approximately 4--5cm away from the Needle Bed. Hang the Claw Weights on the Comb Weights.
Hook the Claw Weights on both edges of the knitting approximately 2–3cm away from the Needle Bed.
Move the Weights up after you have knitted about 50 rows.
While lace knitting, do not set the L Kaph to L.
When moving the Carriage back and forth, ensure that the Carriage has passed the 24 needles corresponding to the Touch Levers "A". Move the Carriage at an even speed.
Do not remove the Carriage from the Needle Bed.
If the Carriage has been removed from the Needle Bed by accident, see page 64 for adjustment.
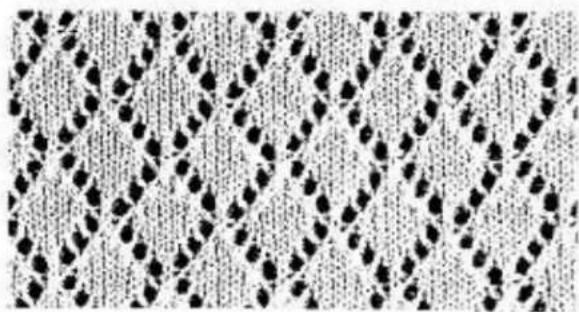
natural_image
Patterned fabric with repeating diamond-like motifs (no text or symbols)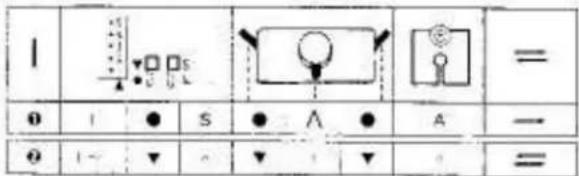
text_image
1 0 1 ● S ● ∧ ● A — 2 1- ▼ △ ▼ + ▼ =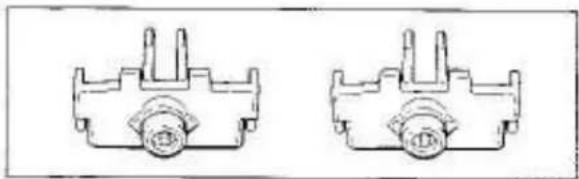
natural_image
Two identical mechanical component diagrams with no visible text or symbols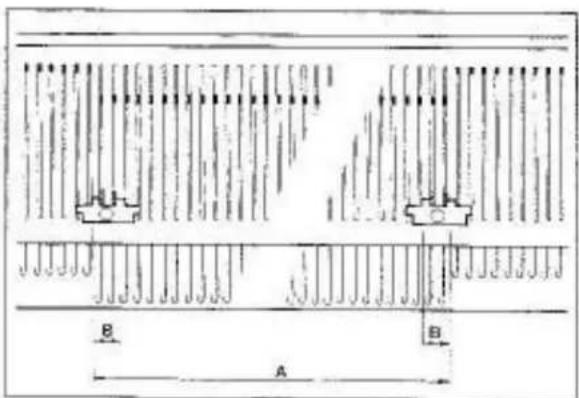
text_image
B A B
text_image
A B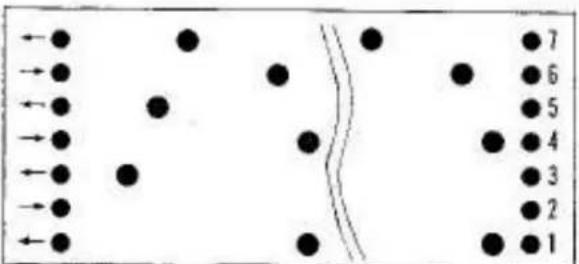
text_image
Diagram showing particle trajectories with numbered points and directional arrows, possibly illustrating a physics or engineering concept.PLAIN LACE
Punch Card No.L-1-A
Insert the Punch Card.
Set the Controls as required in ORDER 1.
Knit T raw from left to right.
Hang the Comb Weights and Claw Weights.
Remove two Edge Pins (orange) from the Accessory Box.
Set the Edge Pins with their knobs between last two working needles on both sides of the knitting:
A - needles knitting lace in B position
B - 2 needles knitting stockinet
When increasing or decreasing, move the Edge Pin following increased or decreased needles.
Ensure that the four studs "A" of the Edge Pin fit correctly into the needle bed grooves "B" and slide to the front of the Needle Bed.
Set the Controls as required in ORDER 2.
Knit the required number of rows.
Move the Carriage in the directions indicated by arrows at the left side of the Punch Card.
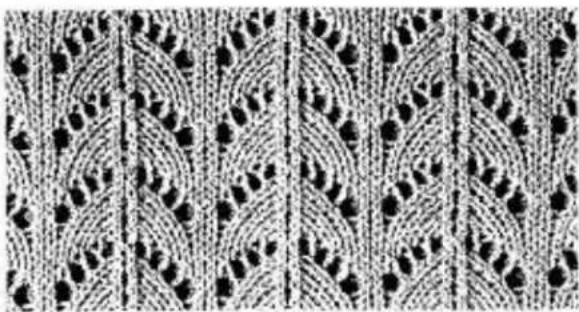
natural_image
Repeating pattern of black and white geometric motifs with curved and straight lines (no text or symbols)| 0 | 1 | ● | S | ● | Λ | ● | A | - |
| n | 1-2 | ▼ | + | ▼ | - | ▼ | - | = 12 |
| 3-10 | + | - | + | (4) | - | = 18 | ||
| θ | 11-12 | + | - | + | Λ | - | A | = 12 |
| 13~18 | + | - | + | (4) | - | = 16 | ||
| ∅ | 19~20 | - | + | + | Λ | - | A | = 12 |
| 21~24 | - | + | √ | (4) | - | = 14 | ||
| ∅ | 25-26 | - | + | + | Λ | - | A | = 12 |
| 27-28 | - | + | + | (4) | - | = 12 | ||
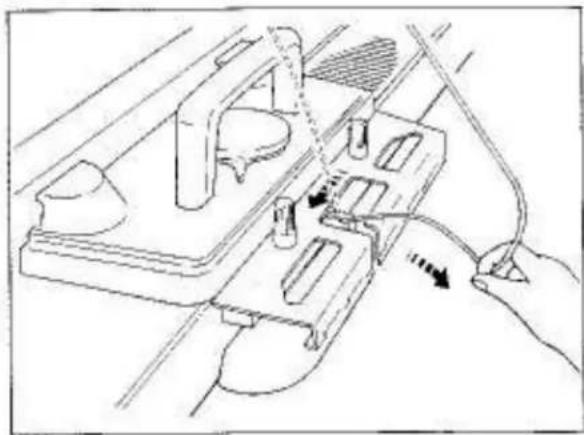
natural_image
Technical line drawing of a mechanical assembly with a hand connecting components (no text or symbols)
text_image
15cm.FASHION LACE
Punch Card No.L-10
Insert the Punch Card.
Set the Controls as required in ORDER 1.
Knit 1 row from left to right.
Hang the Comb Weights and the Claw Weights.
Set the Edge Pins with their knobs between last two working needles on both sides of the knitting (see page 56).
When increasing or decreasing, move the Edge Pin following increased or decreased needles.
Set the Controls as required in ORDER 2.
Knit 2 rows and place the Carriage at the right side.
Cam Lever....
Remova yarn from the Yarn Feeder.
To remove yarn from the Yarn Feeder, pull yarn towards you. The yarn will then be released from Guide Pia.
With the left forefinger, pull the yarn down approximately 15cm, holding it slightly away from the Needle Bed, to allow sufficient leeway for the Carriage to be moved freely across the needles, without the yarn in the Yarn Feeder.
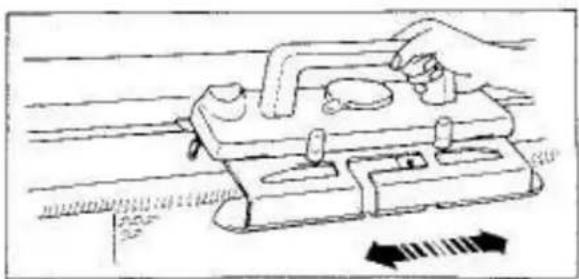
natural_image
Illustration of a hand using a tool on a mechanical device with directional arrows indicating motion (no text or symbols)Move the Carriage 8 times over the marked Card Memory Numbers 3–10, and place the Carriage at the right side of the Needle Bed.
During the Carriage movement, the Carriage does not knit but transfer the required stitches to adjacent needles.
scatter
| Category | Value | | -------- | ----- | | A | 14 | | B | 13 | | A | 12 | | B | 11 | | A | 10 | | B | 9 | | A | 8 | | B | 7 | | A | 6 | | B | 5 | | A | 4 | | B | 3 | | A | 2 | | B | 1 |READING CARD MEMORY NUMBERS
A - Insert yarn into the Yarn Feedar and knit with the Cam Lever at A.
B. - Remove yarn from the Yarn Feeder and move the Carriage with the Cam Lever at 45.
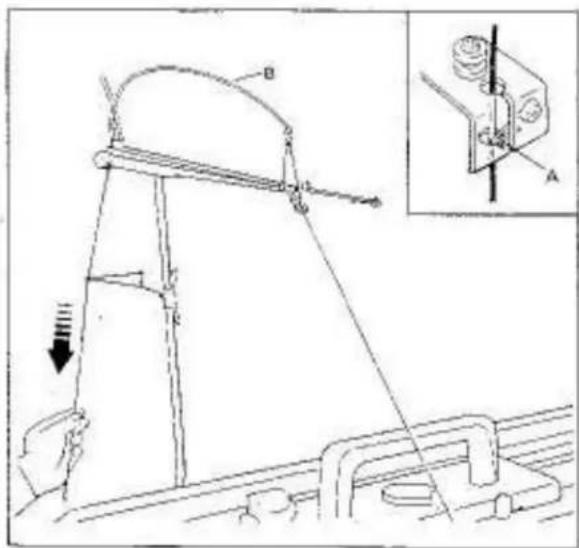
text_image
Technical diagram showing a mechanical device with labeled components and an inset view of a mechanical component with labeled parts A and B.Insert yarn back into the Yarn Feeder.
Yarn must be inserted behind the Guide Pin "A".
Eliminate slack yarn by pulling the yarn down at the back of the Yam Rod until tension spring "B" is nearly in the horizontal position.
Set the Cam Lever to A as required in ORDER 3.
Knit 2 rows over the Card Memory Numbers 11–12.
From the Card Memory Number 13 onwards, knit the required number of rows following the instructions for READING CARD MEMORY NUMBERS.
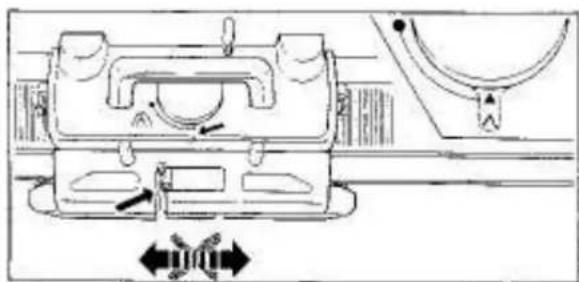
natural_image
Technical line drawing of a mechanical assembly with directional arrows indicating movement (no text or symbols)DO NOT MOVE THE CARRIAGE WHEN YARN IS NOT IN THE YARN FEEDER AND CAM LEVER IS SET TO A. OTHERWISE THE FABRIC WILL DROP FROM THE MACHINE.
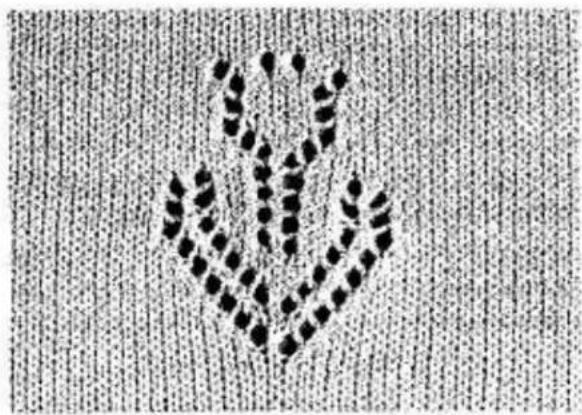
natural_image
Abstract pattern of black dots forming a symmetrical V-shape on a textured background (no text or symbols)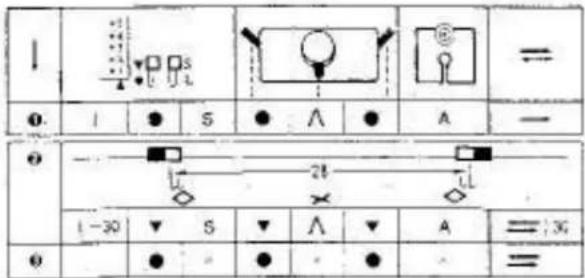
text_image
I = I ● S ● ∧ ● A — ● — L 21 × L 1-30 ▼ S ▼ ∧ ▼ A = :30 ● =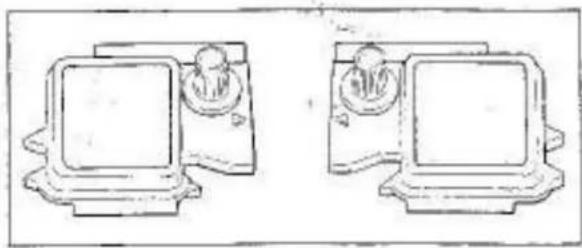
natural_image
Two identical line drawings of vintage computer monitors with no text or symbols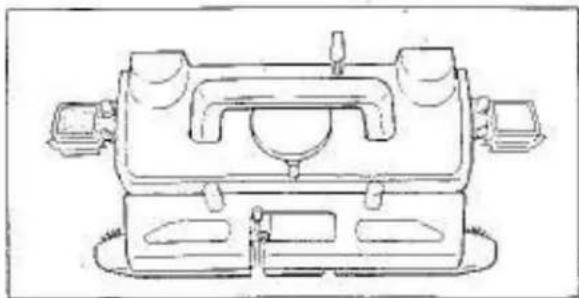
natural_image
Technical line drawing of a mechanical device with no visible text or symbols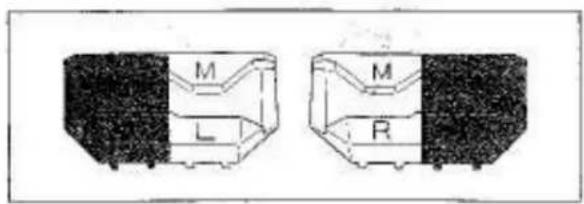
text_image
M L M R
natural_image
Two identical mechanical component diagrams with no text or symbolsSINGLE MOTIF LACE
Punch Card No. L-8 - A
Insert the Punch Card.
Set the Controls as required in ORDER 1.
Knit 1 row from left to right.
Hang the Comb Weights and Claw Weights.
Remove the left and right Magic Cams from the Accessory Box.
Attach the Magic Camis to the Carriage. For instruction, see pages 37–38.
Remove the left and right Point Caps M (orange and white) from the Accessory Box.
left Point Cam - marked M. L. right Point Cam - marked M. R.
Remove two Edge Pins (orange) from the Accessory Box.
text_image
Technical diagram of a mechanical component with labeled dimensions A and B, showing internal structure and mounting points.
text_image
A BSet the Edge Pins (as shown on page 58) with the Knobs between the first and second needle on both sides of the needles selected for the single motif: lace "A".
B - working needles
(in this case the 13th and 14th needles)
text_image
Technical diagram showing mechanical assembly with labeled components A, B, M and a cross-sectional view of a component.Set the left and right Point Cams M with the division line (for orange and white) lying between the second and third needles on both sides of the motif.
(in this case, the 14th and 15th needles)
Ensure that the four studs "A" of the Point Cam M fit correctly into the needle bed grooves "B" at the back of the Needle Bed.
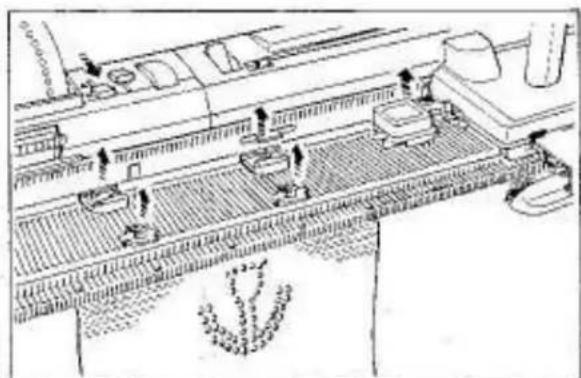
natural_image
Line drawing of a conveyor belt system with workers and equipment (no text or symbols)Set the Controls as required in ORDER 2. Knit 30 rows for single motif lace.
After the single motif lace has been knitted, remove the Magic Cams, Point Cams M and Edge Pins.
Set the Controls as required in ORDER 3.
Continue knitting in stockinet.
HELPFUL HINTS
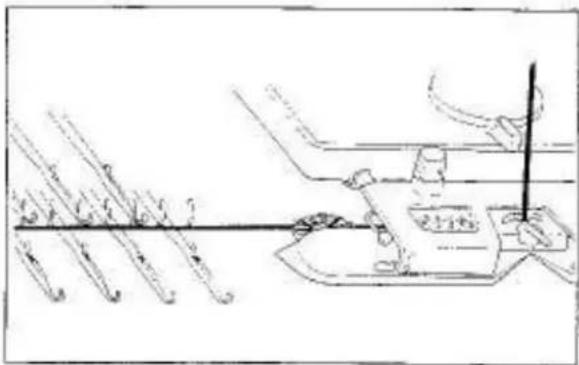
natural_image
Technical line drawing of a mechanical assembly with tool and component (no text or symbols)If cast on row is not knitted...
FOR MAIN CARRIAGE
Ensure that the yarn from the Yarn Feeder extends from underneath of the Plastic Round Brush Cover in the Arm to the needles in D position.
If the yarn is PLACED ON THE ROUND BRUSH, it will entangle with the Brush.
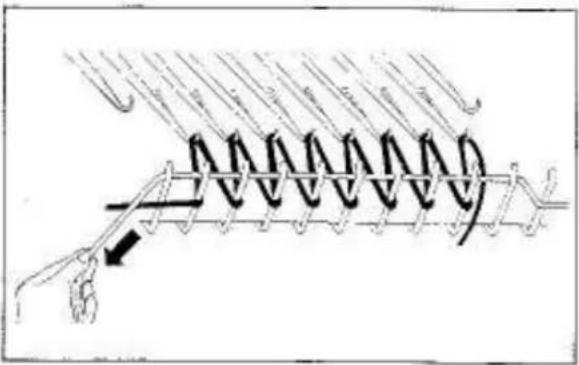
text_image
Technical diagram showing a spring-loaded assembly with labeled components and directional arrows indicating motion or force.FOR LACE CARRIAGE
Ensure that the Stitch Dial is set to 6 or higher number for the first row. This setting makes large loops between sinker posts and needle hooks, and thus you are able to pull out the Raval Cord easily. Strain the Raval Cord laid across big loops before you move the Carriage.
Ensure that the Ravel Cord has been pulled out after knitting 6–7 rows.
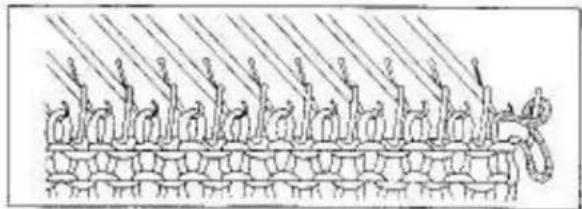
natural_image
Diagram of a chain with chains of arms and chains of chains, no text or symbols presentIf stitches are dropped or knitted incorrectly...
This can be caused by:
- Yarn with knots of incorrectly wound
- Moving the Carriage too far past the end needle.
- Tension Dial needs adjusting.
- Damaged seedle
Reform dropped stitches using the Transfer Tool (see page 70) or unravel the row incorrectly knitted. (see pages 66, 67)
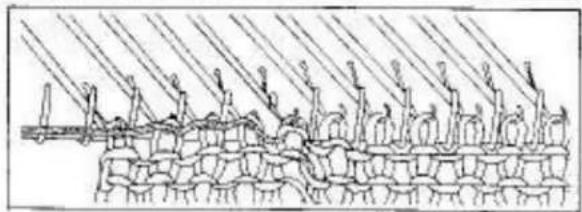
natural_image
Diagram of a mechanical or structural assembly with layered components and diagonal lines (no text or symbols)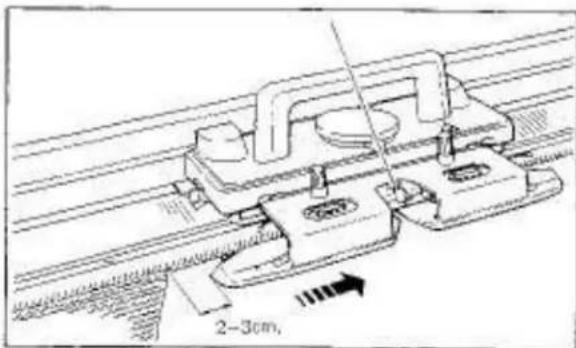
text_image
2-3cm,To continue knitting, ensure that:
- the Carriage has passed the last knitting needle by approximately 2-3cm before knitting the next row.
- you move the Carriage at an even speed.
- yarn is in good condition (see page 66).
natural_image
Illustration of a hand using a tool to adjust a mechanical component (no text or symbols visible)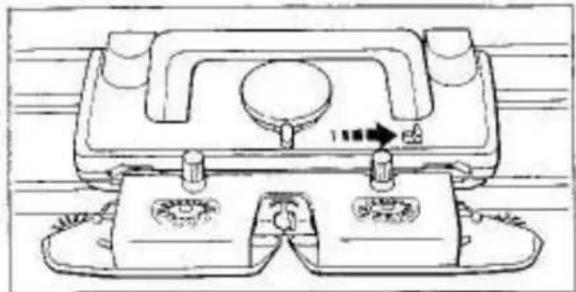
natural_image
Technical line drawing of a mechanical component with mounting holes and a central knob (no text or symbols)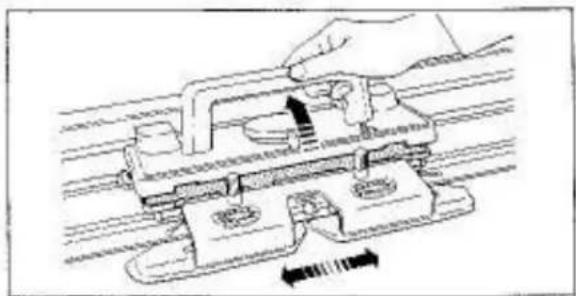
natural_image
Technical line drawing of a mechanical assembly with a hand operating a component (no text or symbols present)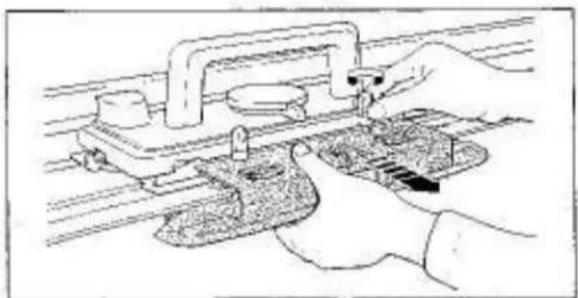
natural_image
Illustration of hands operating a mechanical clamp or fixture on a rail track (no text or symbols visible)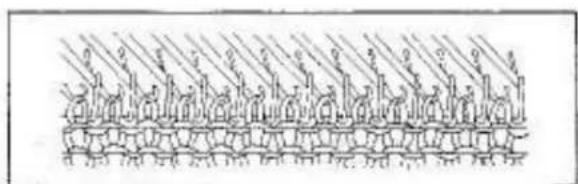
natural_image
Diagram of a chain of vertical structures with curved elements, possibly representing a mechanical or structural assembly (no text or symbols present)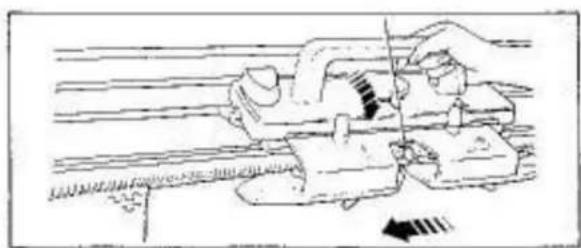
natural_image
Illustration of a hand using a lathe machine to adjust or install a mechanical component (no text or symbols visible)If Carriage has jammed...
In the middle of a row, do not use force to free the Carriage, but proceed as follows:—
FOR MAIN CARRIAGE
In pattern knitting, set the Stop Knob to ●, and remove the Magic Cams if they are in use, before moving the Carriage.
For Model 260K Carriage, disengage the Row Counter Tripper.
(1) Remove yarn from the Yarn Feeder.
(2) Push the Release Lever in the arrowed direction.
(3) With the Handle lifted, move the Carriage in the proceeding direction until it passes the knitting needles.
If yarn is entangled with the Yarn Feeder or Arm, loosen the Arm Nuts and remove the Arm. Push the Release Lever and move the Carriage.
(4) If stitches have slipped behind the latches of needles, using the Transfer Tool replace these stitches into the needle hooks, unravel the knitted stitches (see page 68, 67) and align the needles in B position.
(5) Move the Carriage to the yarn side without knitting.
If the Punch Card is in use, let the Carriage memorize pattern. (see page 68)
(6) Press down the Carriage Handle.
For Model 260K Carriage, engage the Row Counter Tripper.
(7) Insert yarn and continue knitting.
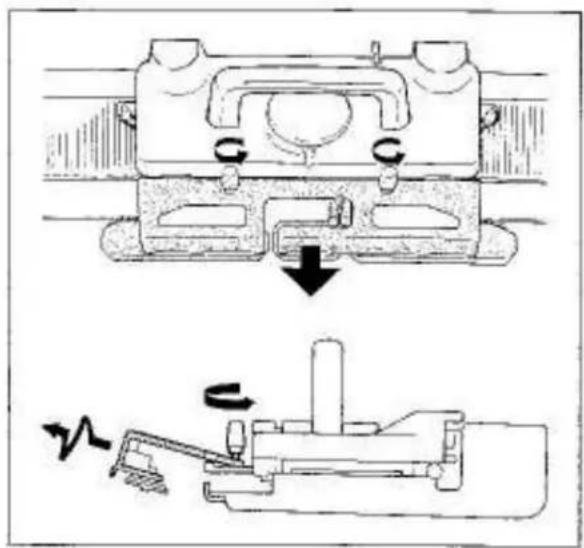
natural_image
Technical diagram showing mechanical assembly with two views: top shows a component with downward arrow, bottom shows a rotating mechanism (no text or symbols)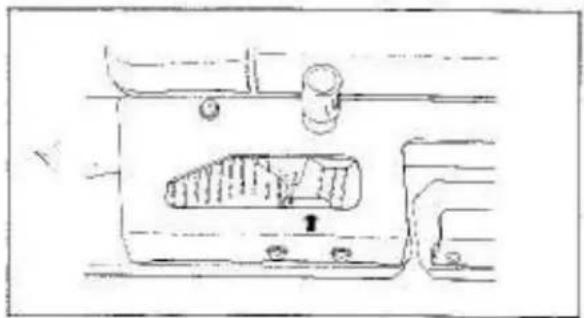
natural_image
Technical line drawing of a mechanical component with no visible text or symbols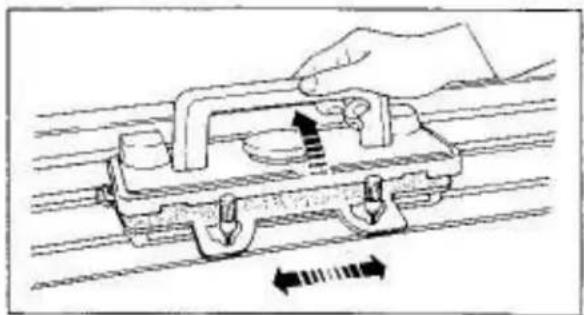
natural_image
Diagram of a hand operating a mechanical device with directional arrows indicating motion (no text or symbols)
natural_image
Diagram of a mechanical or architectural structure with vertical supports and a central object, no visible text or symbols.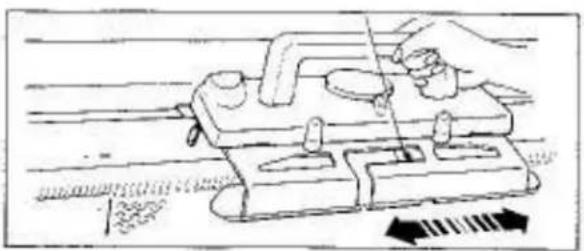
natural_image
Illustration of a hand using a tool to adjust or install a mechanical component, with directional arrows indicating movement (no text or symbols present)FOR LACE CARRIAGE
In pattern knitting, set the Stop Knob to ● and remove the Magic Cams if they are in use, before moving the Carriage.
(1) Remove yarn from the Yam Feeder,
(2) Loosen the Arm Nuts and pull out the Arm by moving it up and down.
If needle hooks have jammed at the inside of the Arm, remove them using the Transfer Tool.
(3) Cam Lever..... Both Side Levers.....●
(4) With the Carriage Handle lifted, move the Carriage in the proceeding direction until it has passed the knitting needles.
(5) If stitches have slipped behind the fatches of needles, using the Transfer Tool replace these stitches into the needle hooks, unravel the knitted stitches (see page 66, '67) and align the needles in B position.
(6) Move the Carriage to the yarn side without knitting. If the Punch Card is in use, let the Carriage memorize pattern (see page 68).
(7) Press down the Carriage Handle. Cam Lever.....original position Both Side Levers.....original position Stop Knob.....▼
(8) Insert yarn and continue knitting.
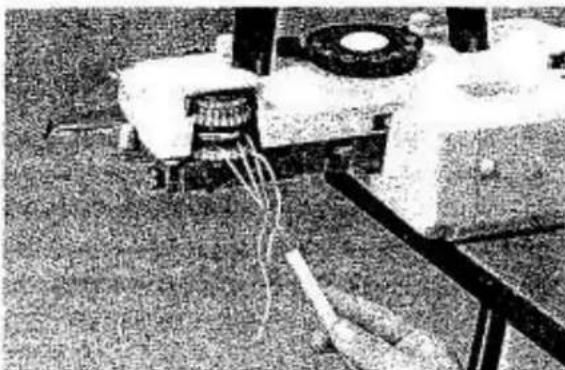
natural_image
Close-up of a mechanical device with wires and components, no visible text or symbols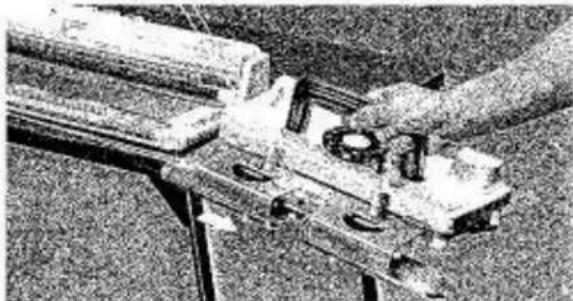
natural_image
Close-up of mechanical components or tools with no visible text or symbols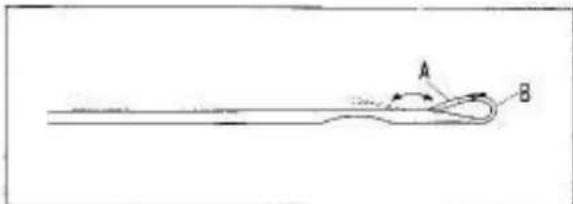
natural_image
Simple line drawing of a curved object with labeled points A and B, no text or symbols present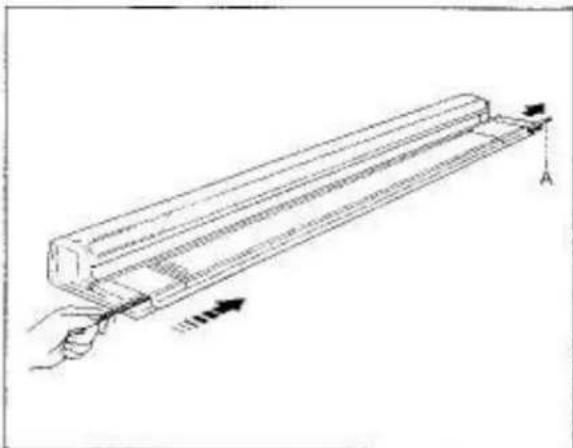
natural_image
Diagram of a hand holding a cylindrical object with arrows indicating force or movement (no text or symbols present)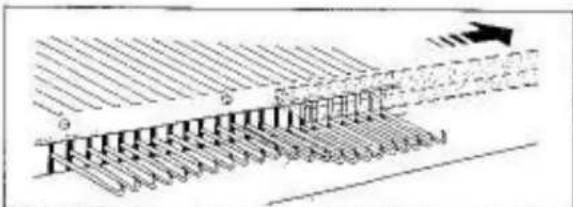
text_image
Diagram illustrating a layered structure with labeled components and directional arrow, likely representing a geological or engineering process.If yarn is entangled in Memory Drums...
Ensure that the rear of the Carriage is clear of yarn.
If yarn does become entangled inside the Memory Drums, move the Carriage to the side of the Needle Bed and carefully remove the yarn using the Tappet Tool.
If this happens during pattern knitting, follow the instruction on page 68 for letting the Carriage memorize pattern.
If the Carriage has been pulled out.....
Mount the Carriage to the Needle Bed (see page 43).
If the Punch Card is in use, let the Carriage memorize pattern following instruction on page 68.
If a needle has been damaged...
A needle with a damaged latch or a bent needle will cause incorrect knitting or dropped stitches.
The needle latch "A" must move smoothly and lie flat over the hook "B".
At each side of the Needle Bed you can see the Needle Retainer "A".
If the damaged needle is at the left half of the Needle Bed, using the blunt end of a pencil, push the plastic end of the Needle Retainer in at the left.
If the Yarn Separator is in use, remove it before removing the Needle Retainer.
At the right, pull the Needle Retainer out of the Needle Bed until the damaged needle has been cleared.
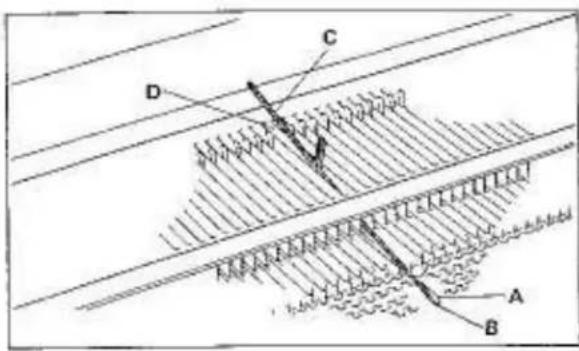
text_image
Technical diagram showing layered structure with labeled components A, B, C, D and directional arrows indicating flow or movement.Push the damaged needle to D position by prassing its butt. Close the latch "A" and press the hook "B" down. The shank "C" will then come out of the needle bed groove "D".
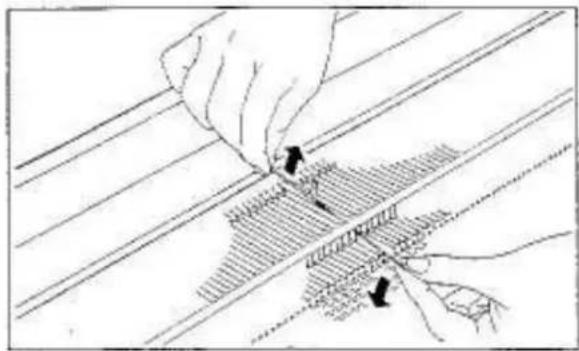
natural_image
Illustration of hands performing a mechanical or electrical process with no visible text or symbolsLift up the needle by holding the shank and pull it to remove from the Needle Bed.
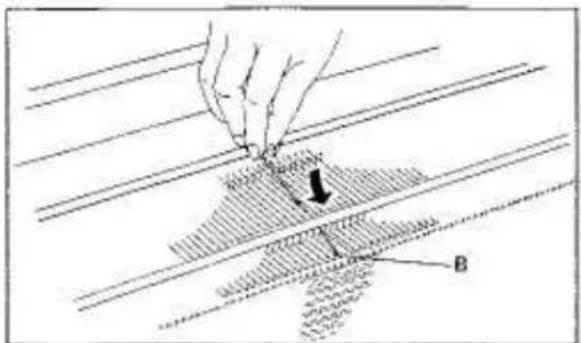
text_image
Technical diagram showing a hand pressing a component on a textured surface with labeled point B and directional arrowTo replace a new needle, open its latch and slide it into the needle bed groove until the hook "B" comes out of the front opening of the Needle Bed. Push the needle back to A position by holding the butt.
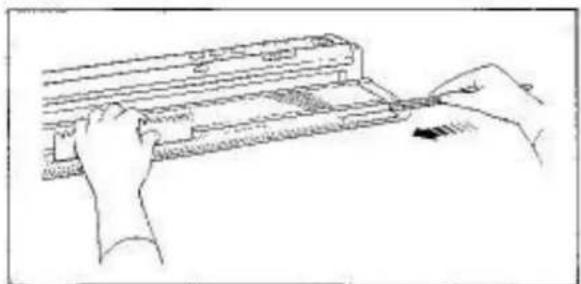
natural_image
Line drawing of hands operating a computer with a keyboard (no text or symbols)With the Needle Pusher press and hold the needles down against the Needle Bed. From the right, push the Needle Retainer back into position.
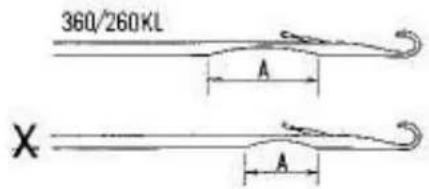
text_image
360/260KL A X AAs a needle for Model 360/260KL is completely different from the needles of other Models in its bored diameter "A", when replacing or ordering the needle, be sure to specify its Part No.01130616.
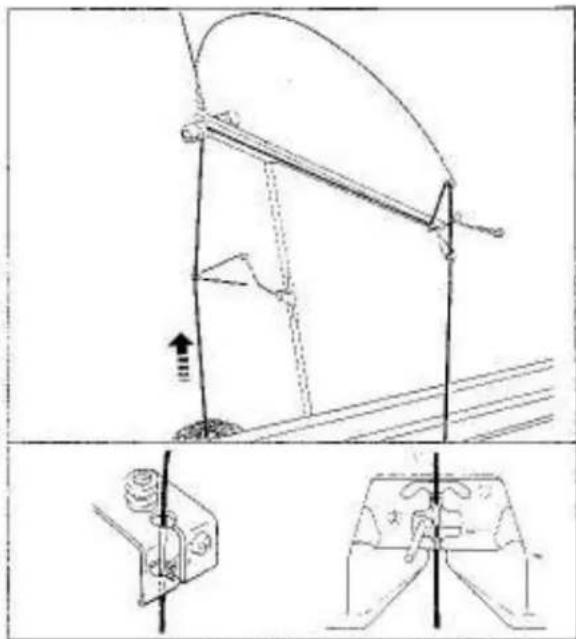
text_image
Technical diagram showing mechanical assembly with labeled components and directional arrows, including a close-up of a device component.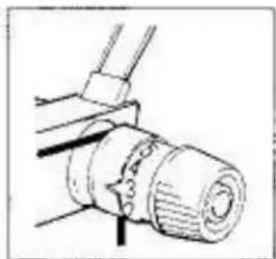
natural_image
Mechanical assembly diagram showing a cylindrical component with threaded end and connecting rod (no text or symbols)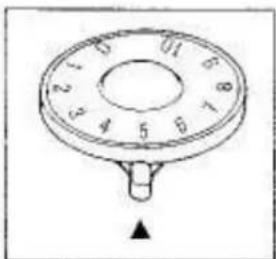
natural_image
Circular dial indicator with numbered segments and a small black arrow at the bottom (no text or symbols)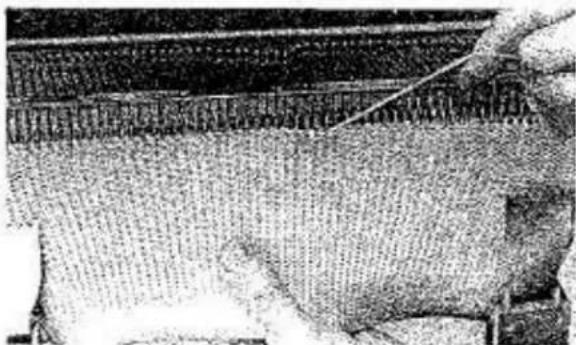
natural_image
Close-up of a textured fabric surface with a hand holding a thin wire, no visible text or symbols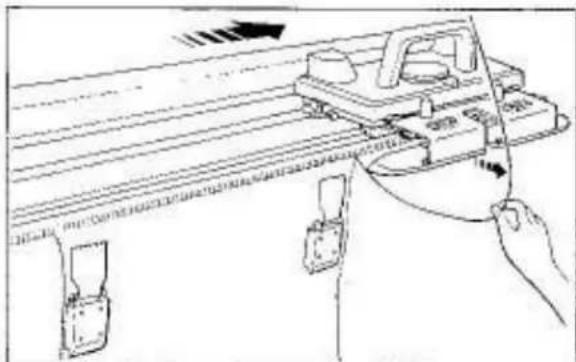
natural_image
Line drawing of a mechanical device with a hand holding a tool, showing alignment and adjustment (no text or symbols)Checking yarn condition
Check of yarn is required when:
- cast on row is not knitted.
- stitches have dropped or knitted incorrectly.
- Carriage has jammed.
CHECK THE FOLLOWING POINTS:-
(1) Ensure that yarn is properly threaded into the Auto Tension and Yarn Feeder.
(2) Ensure that the Tension Spring is nearly in the horizontal position.
(3) Ensure that yarn does not have a knot.
(4) Ensure that yarn comes freely from yarn ball.
(5) Ensure that the Tension Dial and Stitch Dial numbers are selected correctly.
To unravel the knitting
Unravelling is required when:
- you have knitted too many rows.
- you have made a mistake in your knitting.
- Carriage has jammed.
- stitches have dropped or knitted incorrectly.
TO UNRAVEL, PROCEED AS FOLLOWS:—
Remove the Carriage from the knitting before you start to unravel. (If the Carriage has jammed, see page 62.)
Remove yarn from the Yarn Feeder.
Hang the Claw Weights on both edges of the knitting.
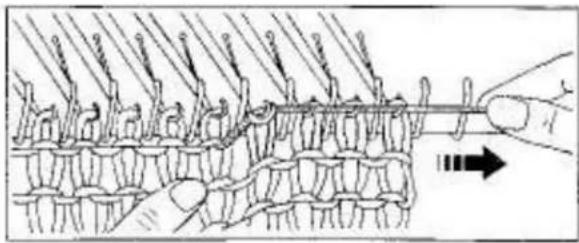
natural_image
Diagram of a knotted fabric or textile being sewn by a hand, showing rope routing and a directional arrow (no text or symbols)Holding the knitting downwards with your left hand, pull yarn sideways.
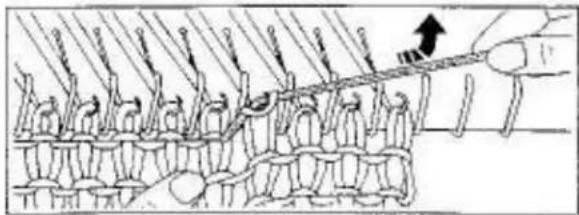
natural_image
Diagram of a mechanical assembly with multiple components and a hand holding a tool, no visible text or symbolsLift the yarn upwards and very slightly backwards. The stitches of previous row slide back onto needle hooks.
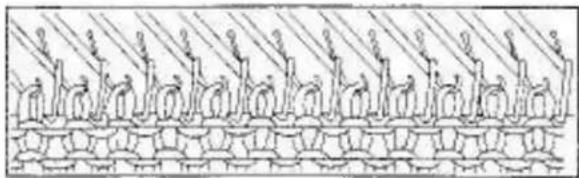
natural_image
Illustration of a chain of stylized human figures in a row, no text or symbols presentEnsure all stitches are in the needle hooks and the needles are in B position.
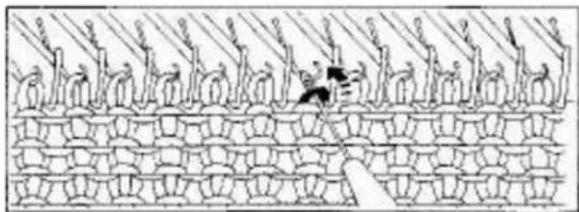
natural_image
Illustration of a crowd with raised objects on a patterned wall (no text or symbols)If some of stitches are not in needle hooks, place them into the hooks using the Transfer Tool.
Repeat the above procedure until the required number of rows have been unravelled.
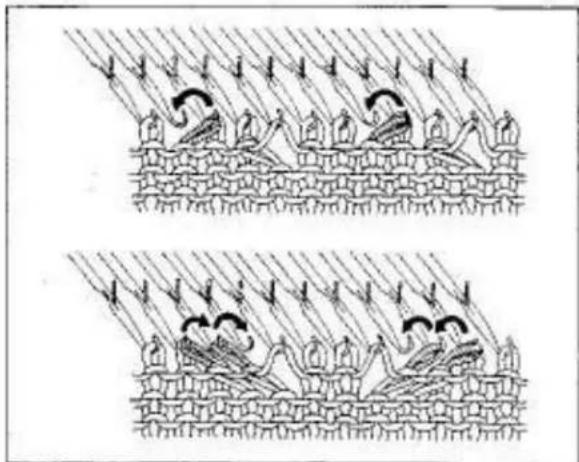
natural_image
Two identical line drawings of a battle scene with soldiers, birds, and footprints under hatched terrain (no text or symbols)NOTES FOR UNRAVELLING
In case of using L KNOB, unravel an even number of rows.
In case of LACE KNITTING, place the transferred stitches back to their original needles before unravelling the row. (Illustration)
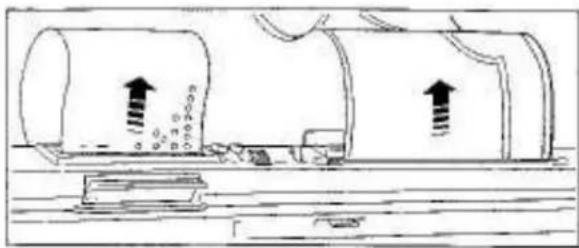
natural_image
Diagram of a cylindrical tank with two upright arrows indicating flow or movement, no text or symbols presentNOTES FOR RE-KNITTING
Return the Row Counter by the same number of rows unravelled before re-knitting.
In case of using the PUNCH CARD, return the Card and let the Carriage memorize the pattern before re-knitting. (see page 88).
In case of using the KNIT CONTOUR, return the Pattern Paper before re-knitting.
(see page 23 of the Knitting Manual.)
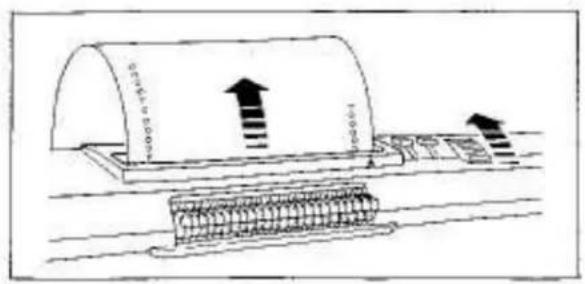
text_image
Diagram showing a cylindrical object with an upward arrow and labeled dimensions, possibly representing a measurement or process step.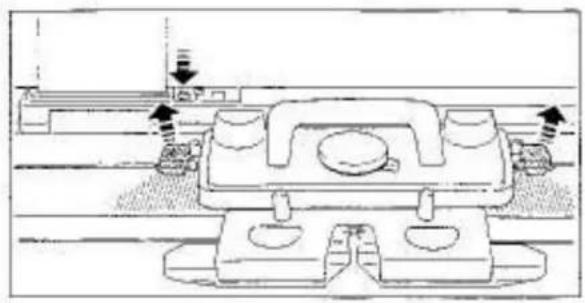
natural_image
Technical line drawing of a mechanical assembly with mounting holes and a central component (no text or symbols)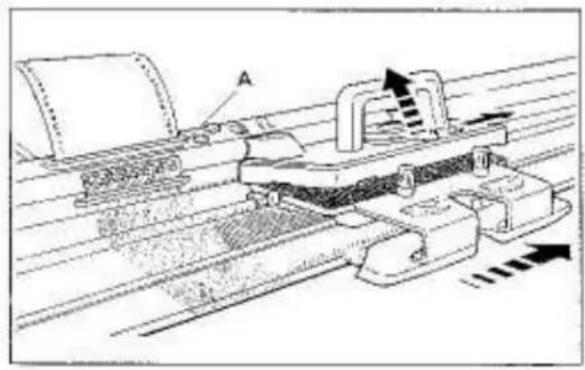
natural_image
Technical line drawing of a mechanical assembly with conveyor belt and cutting tool (no text or symbols)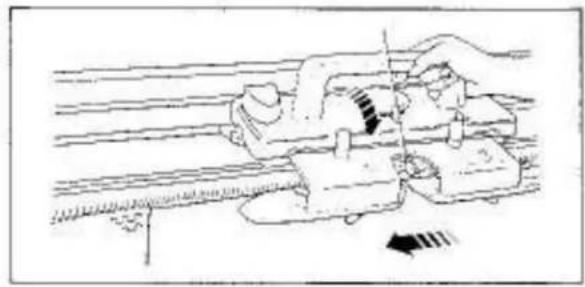
natural_image
Illustration of a hand operating a mechanical device with a tool, showing motion lines and no text or symbols.
text_image
32 31 30 29 28 27 B A BTo memorize the pattern
Memorizing the pattern is required when:
- Carriage has been pulled out from the Needle Bed,
- unravelling has been done.
FOR MAIN CARRIAGE
If unravelling has been done, return the Punch Card and Row Counter by the same number of rows unravellled.
In case of using L KNOB, return the Punch Card ONLY HALF THE NUMBER of rows unravelled.
For example: 3 rows incorrectly knitted. Unravel 4 rows. Return the Card only 2 rows.
Set the Stop Knob to ● and remove the Magic Cams if they are in use.
For Model 260K Carriage, disengage the Row Counter Tripper.
Remove yarn from the Yarn Feeder.
Push the Release Lever to the right and with the Carriage Handle lifted, move the Carriage once or twice across the Needle Bed until it has passed the 24 needles corresponding to the Touch Levers "A" and place it at the side of yarn.
Insert yarn into the Yarn Feeder and set the Controls to their original positions.
Continue to knit.
FOR LACE CARRIAGE
If unravelling has been done, return the Punch Card and Flow Counter by the same number of rows unravelled.
When the Punch Card for Fashion Lace (L-9 and L-10) is in use, return the Card by the same numbers unravelled over the Card Memory Numbers "A" skipping the marked Card Memory Numbers "B". "B" is not knitted rows but rows for transferring stitches.
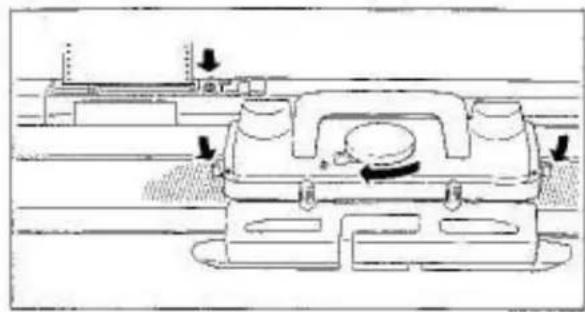
natural_image
Technical line drawing of a mechanical component with directional arrows indicating motion or movement (no text or symbols)Stop Knob
Cam Lever....
Both Side Levers....
Remove yarn from the Yarn Feeder,
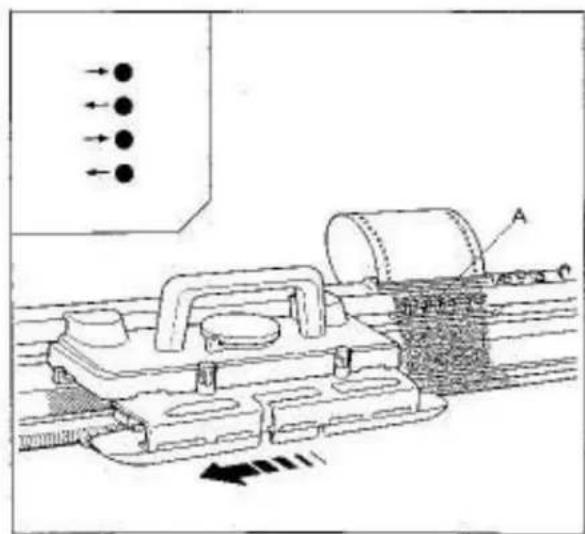
text_image
Technical diagram showing mechanical assembly with labeled components and directional arrows indicating flow or movementMove the Carriage once or twice across the Needle Bed until it has passed the 24 needles corresponding to the Touch Levers "A" and place it at the side of yarn.
NOTE
Ensure that the arrow mark on the Punch Card corresponds with the Carriage proceeding direction.
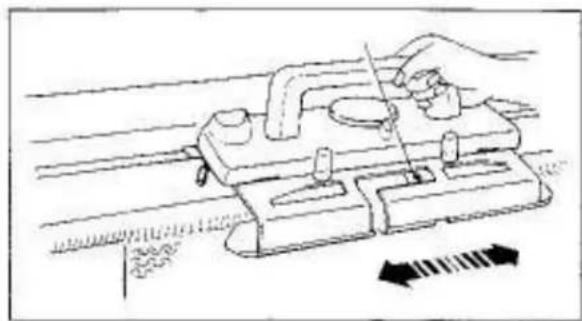
natural_image
Illustration of a hand using a tool to press or install a mechanical component, with directional arrows indicating movement (no text or symbols present)Insert yarn into the Yarn Feeder and set the Controls to their original position.
Continue to knit.
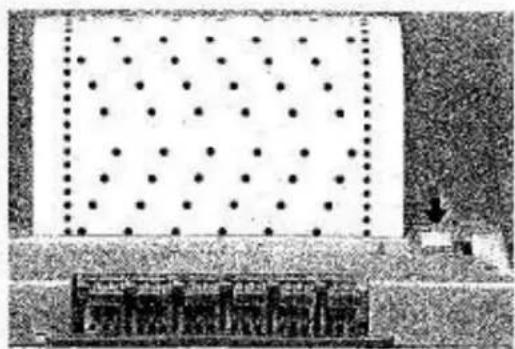
natural_image
Pure electrical circuit lines without any symbolsTO LOCATE PATTERN ON PUNCH CARD
To locate pattern of the Punch Card to be knitted on the next row, set the Stop.Knob to ●.
The Touch Levers are aligned in two positions. upper position .... perforated area lower position.... non-perforated area
To locate the pattern on the last knitted row, return the Punch Card by one row before setting the Stop Knob.
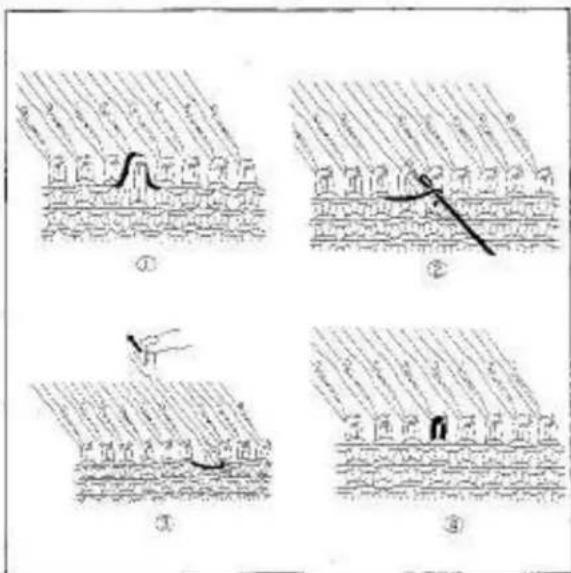
text_image
Four-panel illustration showing a person climbing a rope over a surface, with Chinese labels indicating different scenes or contexts.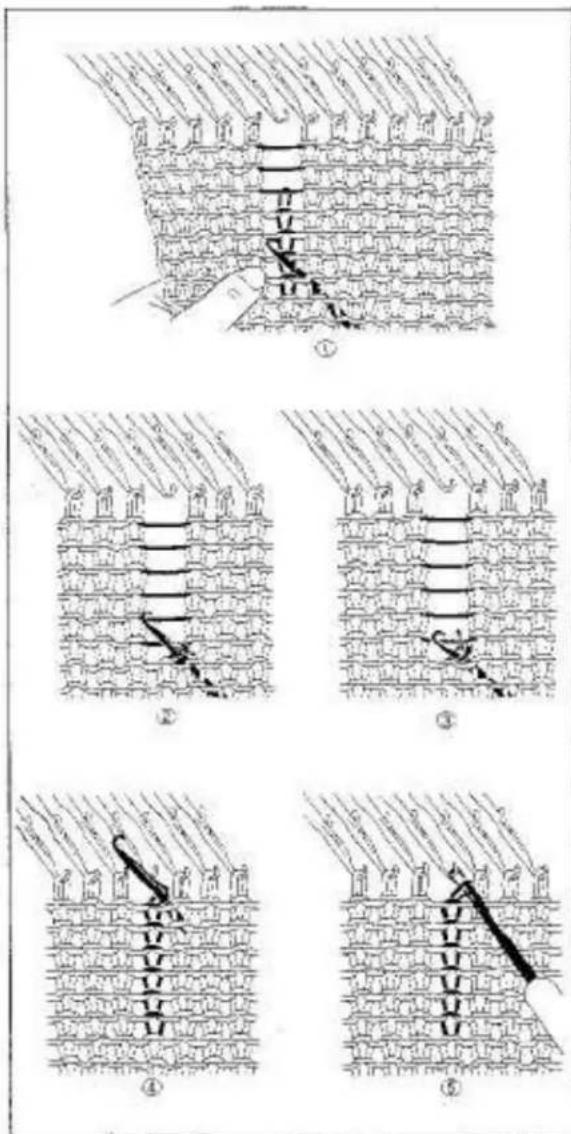
text_image
Diagram illustrating five sequential steps of fabric or textile sewing, labeled ① to ⑤ with Chinese annotations.To reform stitch
Reforming stitch is required when the stitches have dropped while knitting.
A DROPPED STITCH
(1) Insert the One-Eye Transfer Tool into a stitch below the dropped stitch and replace it into needle hook together with loose yarn.
[2] Slowly pull the needle out until the stitch is behind the open latch leaving the loose yarn in the hook.
(3) Push the needle back so the latch will close and the stitch behind will slide over the hook reforming a stitch.
STITCHES DROPPED IN SEVERAL ROWS
(1) Insert the Tappet Tool into a stitch a few rows below the dropped stitch from the side away from you. Unravel the stitches down to the Tool.
With the other hand, pull the knitting downwards. This makes unravelling easier.
(2) Push the Tool toward you so the stitch will be behind the open latch. Catch the yarn crossing above into the hook.
(3) By pulling the Tool backwards, the latch will close and the loose yarn will be trapped in the hook.
(4) Continue pulling and the old stitch will slide down over the closed latch forming a new stitch in the book.
(5) Repeat this operation up to the top.
If one or more stitches have dropped or when pattern knitting using the Punch Card, we recommend you to unravel than to reform stitches. (see page 66, 67)
MAINTENANCE
natural_image
Diagram of a hand using a tool to cut or mark a patterned surface, with no visible text or symbols.To clean your Knitter, remove the Carriage from the Needle Bed.
NEEDLE BED
Remove all lints using the Cleaning Brush.
natural_image
Diagram showing a hand using a tool to mark a track or track with directional arrows (no text or symbols present)Apply oil along the rail and front guide of the Needle Bed.
With an oiled soft cloth, wipe needle butts.

natural_image
Technical line drawing of a vehicle chassis with labeled components A and B (no text or symbols present)CARRIAGE AND ARM
Remove the Arm from the Carriage.
Remove all lints from the Round Brushes and Plastic Fabric Gears or the Rollers "A" and Yarn Feeder "B" of the Lace Carriage Arm.
natural_image
Technical line drawing of a mechanical component with no visible text or symbolsTurn up the Carriage and brush out all fluff and oil the sides of all the metal parts and Runner Rail.
The metal parts "C" of the Lace Carriage Arm must be handled very carefully.
natural_image
Technical line drawing of a mechanical assembly with no visible text or symbols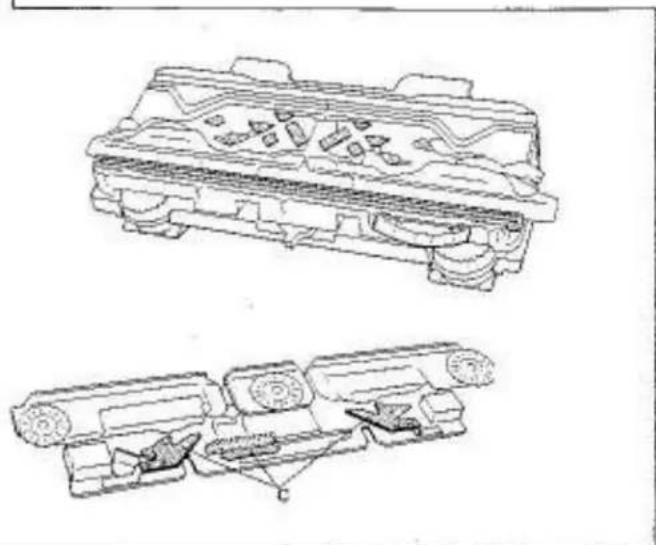
natural_image
Technical line drawings of mechanical components, showing exploded and assembled views (no text or symbols)REPACKING THE KNITTER

natural_image
Interior view of a vintage office or library with furniture and display panels (no visible text or symbols)Replace the Accessories in the Accessory Box.
Remove the Punch Card from the Pattern Card Panel. Do not fold or bend it.
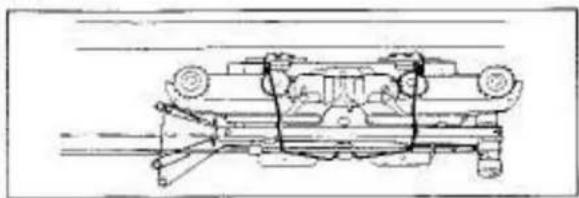
natural_image
Technical line drawing of a vehicle chassis with suspension components (no text or symbols)Remove the Auto Tension and Arm from the Knitter and pack them inside the Top Cover.
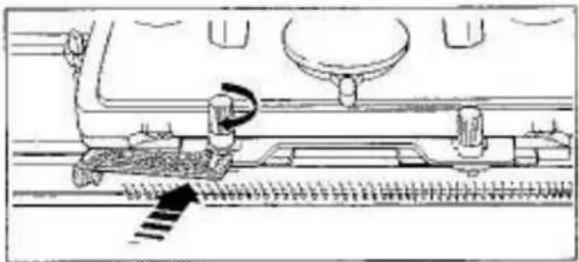
natural_image
Technical line drawing of a mechanical assembly with no visible text or symbolsSecure the Carriage to the Needle Bed with the Carriage Fastener.
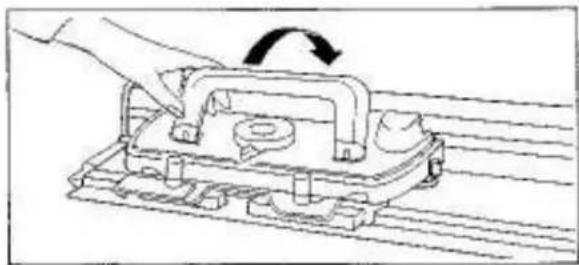
natural_image
Line drawing of a hand pressing a mechanical component with an arrow indicating rotation (no text or symbols)Lay the Carriage Handle down.
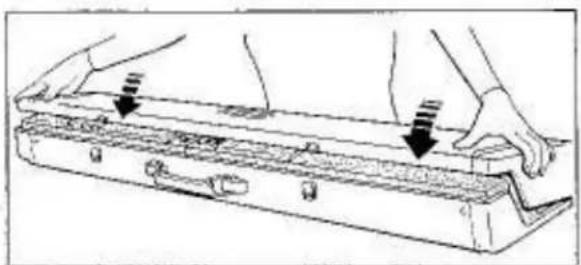
natural_image
Line drawing of hands installing or adjusting a mechanical component with arrows indicating assembly (no text or symbols)Place the Top Cover onto the Needle Bed.
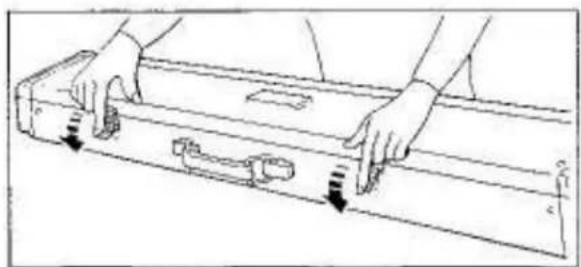
natural_image
Line drawing of a mechanical part with hands holding a tray, showing motion arrows (no text or symbols)Fasten the latches.
Store the Knitter in a dry place.
INDEX
(M) - Main Carriage
(L) - Lace Carriage
K/M— Knitting Manual
A
Arm 7(M) 43(L)
Arm Nuts. 4,7(M) 44(L)
Automatic Linker 75
Auto Tension 8
Auxiliary Feeding Cam. 42, K/M
B
Basic knitting techniques....15,16,17,18(M)50,51(L)
Butt 10
C
Cam Lever 6,11(M)43,45(L)
Carm memory number . . . . . . . . . . . . . . . . . . . . . . . . . . . . . . . . . . . . . . . . . . . . . 23(M) 54, 58(L)
Card Guide 2,22
Card Snap. 2.22
Carriage Fastener 2.4
Cast on 11(M) 45(L)
Clamp 2,7
Claw Weight 2,24,39
Cleaning Brush 2.71
Comb Weight 43.55
Crochet Hook 2.K/M
D
Decreasing 17
Dropped stitch 70
E
Edge Pin....43,56,59
F
Fair Isle (Knit-in), 25
Fashion Lace 57
G
Gauge Scale 2. K/M
H
Hand feeding 42
Helpful hints 61
Hook 10
1
Increasing....18(M) 51(L)
Incorrect knitting. 66
J
Jam in knitting 62(M) 63(L)
K
Knit Contour (Radar)....1.K/M
Knit-in 25
Knitting yarns....14(M) 49(L)
L
Lace Carriage 43
Lace knitting 54
Latch needle 10
L Knob....26
L Knoa Indicator 26
M
Magic Cams 2,37,59
Main Carriage 5,6
Main knitting 42
Main yarn....9
Maintenance 71
Marked card memory number 58
Memorizing pattern 68
Moving Carriage without knitting ..... 6B(M) 68, 69(L)
N
Needle arrangement 23, 31
Needle Pusher 2,10
Needle Retainer 64
Nylon thread 32
0
Oil 2.71
Operation table 23(M) 54(L)
P
Pattern Card Panel 26
Pattern knitting 21(M) 54(L)
Pattern Paper 2, K/M
Plain lace 56
Platting 35
Platting Yarn Feeder....36
Point Cams 11 2,38,59
Punch Card....21(M) 54(L)
Punch Card Feeding Dial....22
Punch Lace 32
R
Ravel Cord 2,42,47
Reforming stitches....70
Release Lever 5,62,68
Removing fabric ..... ,19(M) 52(L)
Repacking the Knitter 72
Replacing a damaged needle 64
Ribber Join Screws 43, 44
Ribber Needle Bed Cover 44
Row Counter 5,6
Row Counter Set Lever 5
Row Counter Triper....6
Russell Levers 5,6
s
Second yarn....9
Side Levers....5,6
Single motif 37(M) 69(L)
Sinker post 46
Skein Holder 3
Slack yarn 16,20
Slip stitch pattern 27
Stitch Diet 11, 14(M) 45, 48(L)
Stitch Scale 2, K/M
Stitch size 14(M) 48(L)
Stockinet knitting 11(M) 45(L)
Stop Knob 5
Stop Net 32
Stripe pattern 15
T
Tapestry Needle 2
Tappet Tool 2,70
Tension Dial....9
Threading Auto Tension 9
Threading Yam Feeder....12(M) 45(L)
Touch Levers 5,24
Transfer Tool 2,17
Tuck Knob 7,29
Tuck stitch pattern 29
U
Unravelling 66
W
Weaving 33
Weaving Knob....7,33
Weaving Yarn Holder 7.33
Weight 2,24,39
Y
Yarn Ball Winder 3
Yam change mark 40
Yarn Clip 9
Yam Feeder 7(M) 45(L)
Yarn Holders 47
Yarn preparation....3
Yam Rod. 2,8
Yam Separators.... 2,38
OPTIONAL ACCESSORIES TO EXPAND
natural_image
Exterior view of a modern office building (no signage)— Automatic Linker SC-3
You can save much of time in making up a garment! Casting off and joining knitted pieces can all be done on your Knitter so quickly.
Use only Automatic Linker SC-3 for your 360/260K Knitter.
Yarn Ball Winder SHW-3
An essential for those who machine-knit. Use this Yarn Ball Winder with Skein Holder when you wind yarn into balls.
Skein Holder - adjustable
This umbrella type skein holder holds skein of yarn when you wind it into balls using Yarn Ball Winder.
natural_image
Black-and-white illustration of a person observing a high-speed train on a slope (no text or symbols visible)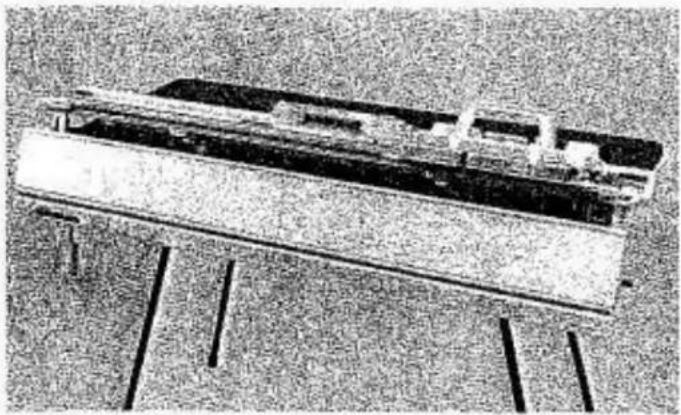
natural_image
Exterior view of a modern office building (no signage)← Ribber Needle Bed Cover
This very easy-to-fit plastic cover enables you to operate your Lace Carriage with Ribber attached in the lowest position.
Intarsia Carriage AG-20
An aid to knit argyle patterns. Comes with fully explained instruction book.
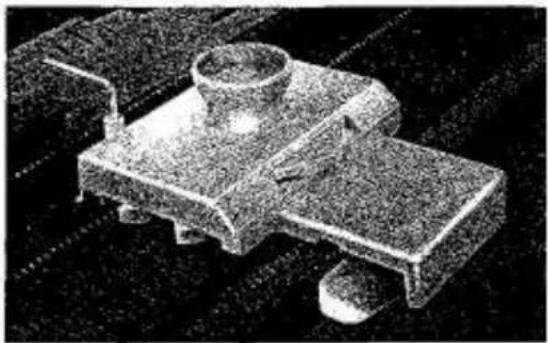
natural_image
Mechanical component with a cylindrical housing and rectangular base (no visible text or symbols)YOUR SCOPE OF KNITTING
Pattern Collection No.4
Presents nearly a thousand of stitch patterns including lace patterns. You can enjoy several colour variations produced from a punch card.
text_image
横栃高-51000集
text_image
Knit Pattern Knit Pattern Knit Pattern Knit PatternBlank KR Pattern Paper Set
Yet another aid to the creative knitter. You draw patterns to a 12 size, and these patterns can be used any number of times thereafter.
Blank Tracing Paper Set
Enables you to trace a pattern from knit pattern or magazine, etc.
Only guide lines are given.
Knit Pattern Paper Set
Series 100, 200, 300 and 400 provide a wide selection of pattern styles ranging from infant to adult, in five sizes for each pattern style.
text_image
Scanned document with two rectangular fields, some labeled with Chinese characters and numbers, possibly a form or table.
text_image
Scanned pages of a newspaper with multiple pages and headlines, including one titled '新 York Times' (New York Times).Knitting Book
Two books make up this set, "How to Knit Garments" and "Guide to Knitting Techniques".
Step-by-step approach guides you through the basics to advanced level of knitting.