
Argus 2 - Overvågningskamera REOLINK - Gratis brugsanvisning og manual
Find enhedens vejledning gratis Argus 2 REOLINK i PDF-format.

Brugerspørgsmål om Argus 2 REOLINK
0 spørgsmål om dette apparat. Besvar dem du kender, eller stil dit eget.
Stil et nyt spørgsmål om dette apparat
Download vejledningen til din Overvågningskamera i PDF-format gratis! Find din vejledning Argus 2 - REOLINK og tag din elektroniske enhed tilbage i hånden. På denne side er alle dokumenter nødvendige for brugen af din enhed offentliggjort. Argus 2 af mærket REOLINK.
BRUGSANVISNING Argus 2 REOLINK
natural_image
White digital camera with black lens and white base (no text or symbols visible)Content
Chapter 1 Introduction of the Camera 4
Chapter 2 Install Reolink App 5
2.1 System Requirement 5
2.2 Install the App 5
Chapter 3 Device Management 7
3.1 Add New Device 7
3.2 Modify Camera Login Password 10
3.3 Edit the Device Information 11
3.4 Delete Device 12
3.5 Reset Camera 13
Chapter 4 Install the Camera 14
4.1 Reolink Argus Placement 14
4.2 Camera Placement Dos & Don'ts 15
Chapter 5 Quick Configuration 16
5.1 Disable/Enable Push Notification 16
5.2 Disable/Enable PIR/Audio Alarm/E-mail 16
5.3 Wi-Fi Settings 17
5.4 Device Settings 18
Chapter 6 Live View 19
6.1 Start Live View 20
6.2 Two-way Audio 22
6.3 Video/Image Quality 23
6.4 Adjust Display Settings 25
Chapter 7 Playback 27
Chapter 8 Alarm Settings 31
8.1 Setup PIR Motion Schedule 31
8.2 Disable Audio Alarm/E-mail/Record 32
8.3 Adjust the PIR Sensitivity 33
8.4 E-mail Settings 33
Chapter 9 SD Card 36
9.1 Requirement of the SD Card 36
9.2 Install the SD Card 37
9.3 Format the SD Card 37
Chapter 10 Battery 38
10.1 Requirement of the Battery 38
10.2 Battery Status 38
10.3 Important Safeguards on Battery Use 39
Chapter 11 Warranty & Technical Support 40
Chapter 1
Introduction of the Camera
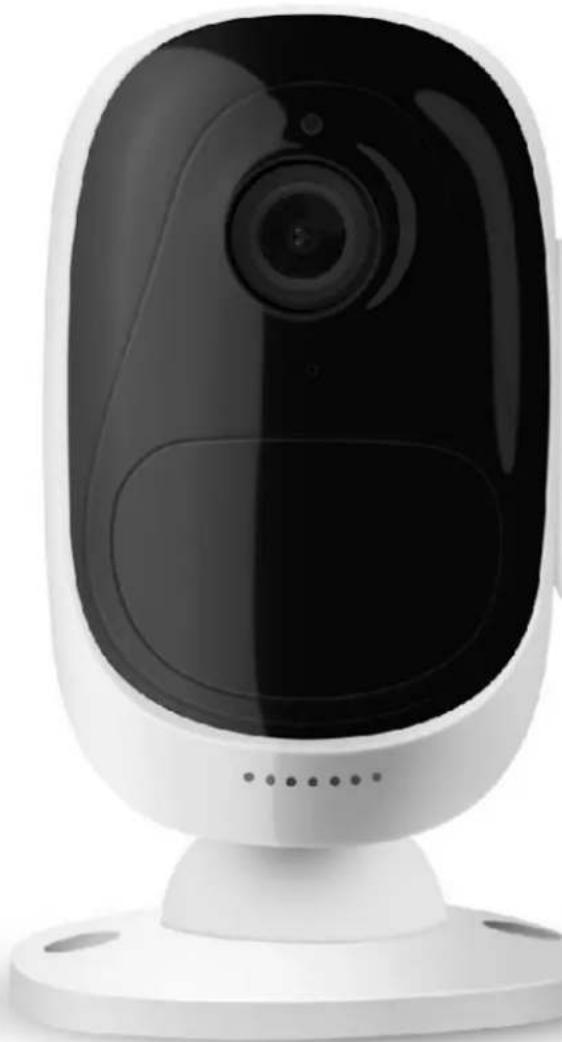
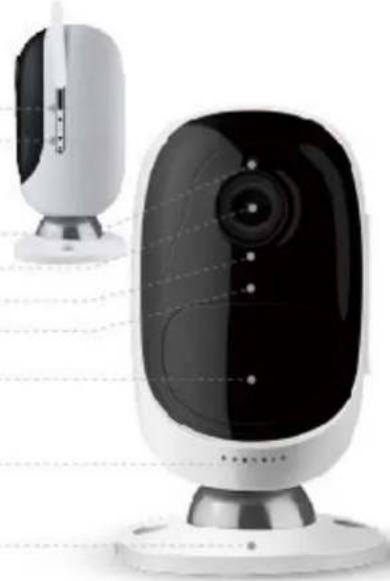
▶ Physical Appearance
Micro SD Card Slot Reset Button
Daylight Sensor Lens Status LED Built-in Mic
Built-in PIR Motion Sensor
Speaker
Magnetic Base
natural_image
Exterior view of a modern office building (no signage)> Working Mode
Reolink Argus has two working modes:
- Standby Status: The camera is in the power-saving mode; there is no live view or motion recording.
- Working Status: The camera is running at full capacity. It enters the working status when someone is accessing the camera via Reolink App or the PIR motion sensor detects a movement.
> LED Status
| Color | Meaning | Status |
| Red | WiFi Connection failed | Blinking: Standby |
| On: Working | ||
| Blue | WiFi Connection is successful | Blinking: Standby |
| On: Working |
Note: LED will flash every 20 seconds when the camera is in Standby status.
Chapter 2 Install Reolink App
2.1 System Requirement
Reolink App will run on both the Android and iOS system.
| System | Requirement |
| iOS | iOS 8.0 or higher version, compatible with iPhone, iPad and iPod touch. |
| Android | Android 3.0 or higher version. |
2.2 Install the App
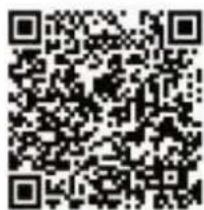
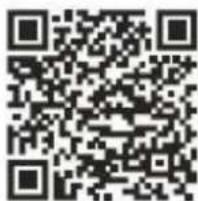
There are two ways to get the Reolink App:
- Search "Reolink" in App Store or Google Play, download and install the app.
- Scan the QR code below to download and install the app.
text_image
QR code image containing encoded data, no visible human-readable text
text_image
QR code image containing encoded data, no visible human-readable text
After successfully installed it, tap the
icon to launch the Reolink App.
text_image
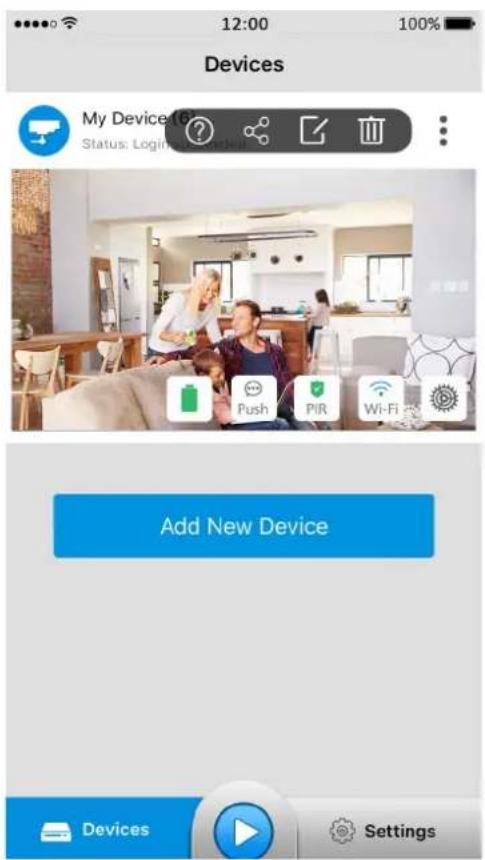
Devices My Device Status: Login Add New Device Devices Settings: More Option, tap this icon to show more configuration icons.
?: Help, tap to read the tips regarding camera usage and installation.
Share the QR code, tap this icon to get the QR code/UID of the camera.
Edit Device, tap this icon to edit the login parameters of the camera.
Delete, tap this icon to delete the camera from the device list.
: Battery Status, tap this icon to enter the battery usage page.
...
Push /Push : Push Notification, tap this icon to enable or disable Push Notification.

PIR

Wi-Fi


Settings
: PIR Motion Sensor, tap the button to enable or disable the PIR.
: Wi-Fi Settings, tap this icon to enter the WiFi settings page.
: Device Settings, tap this icon to enter the setup menu of the camera.
: Play, tap this icon to enter the live view page to view the video stream.
: Settings, tap this icon to enter the settings page of the App.
Chapter 3
Device Management
This chapter will introduce how to add new device, modify the device information and modify device login password etc.
3.1 Add New Device
You can add the camera by scanning QR code (on camera's back) or manually entering camera UID (below QR code).
➢ Scan the QR Code
Steps:
- Tap Add New Device to start.
- Scan the QR code on the back of camera to continue.
Note: In the dark environment, please turn on the flashlight on your phone by
tapping

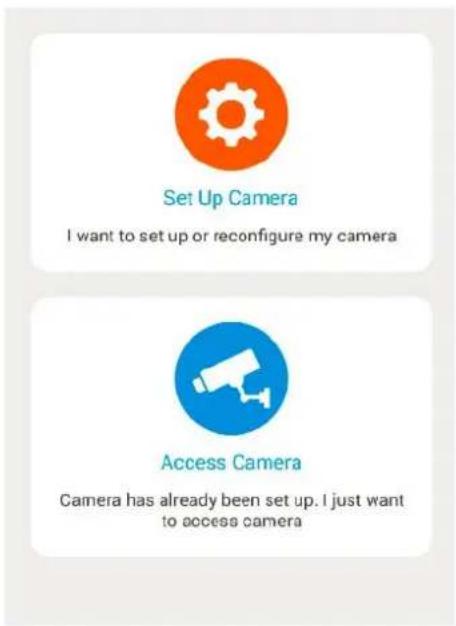
- To configure the camera, tap to "Set Up Camera" and follow the instruction to continue.
If the camera has already been configured, tap 📋 to "Access Camera".
text_image
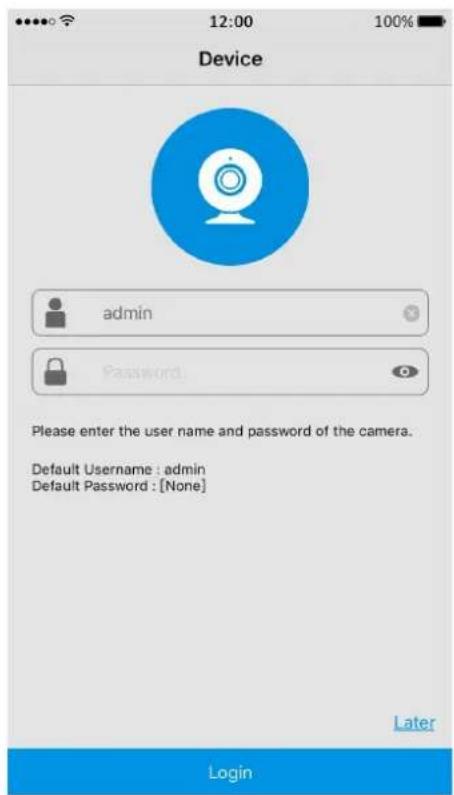
Set Up Camera I want to set up or reconfigure my camera Access Camera Camera has already been set up. I just want to access camera- Enter the login password of the camera, if there is no password yet, leave it blank, then tap the "Login" button on the bottom to login the camera.
text_image
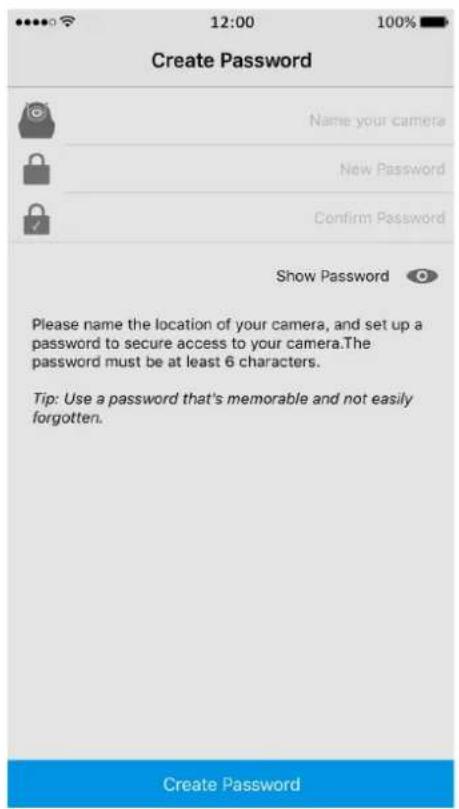
Device admin Password Please enter the user name and password of the camera. Default Username : admin Default Password : [None] Later Login- The camera has no password by default, system will require you to create a new password for security reason. Please name the camera
in the field, and create a password in the field, tap "Create Password" to finish.
text_image
12:00 100% Create Password Name your camera New Password Confirm Password Show Password Please name the location of your camera, and set up a password to secure access to your camera. The password must be at least 6 characters. Tip: Use a password that's memorable and not easily forgotten. Create Password- To read the tips, slide the page to go through, or tap the "Skip" button on top right to skip these tips.
▶ Manually Enter the UID
Steps:
- Tap
Add New Device
to start.
-
Tap down on the bottom to type in information.
-
Enter the UID of the camera in the UID field, tap "Done" on top right to save the settings.

text_image
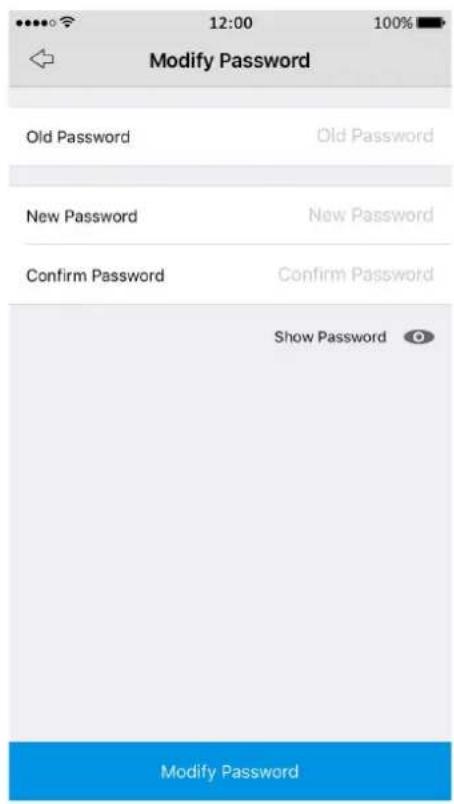
12:00 100% Add Device Done GO UID UID UID3.2 Modify Camera Login Password
To change the login password, follow the steps below:
Steps:
- Go to "Device Settings" > "Password" > "Account Security" > "Password".
- Enter the old password, then type in the new password and confirm, tap "Modify Password" to save changes.
text_image
Modify Password Old Password Old Password New Password New Password Confirm Password Confirm Password Show Password Modify PasswordTap 🔒 to see the passwords in details.
Note: The password is between 6 and 31 characters in length, and may consist of numbers, letters or symbols. Space is allowed in the middle, but not at the first or last character.
For your account's security, please create a strong password (at least 6 characters) that contains letters and numbers.
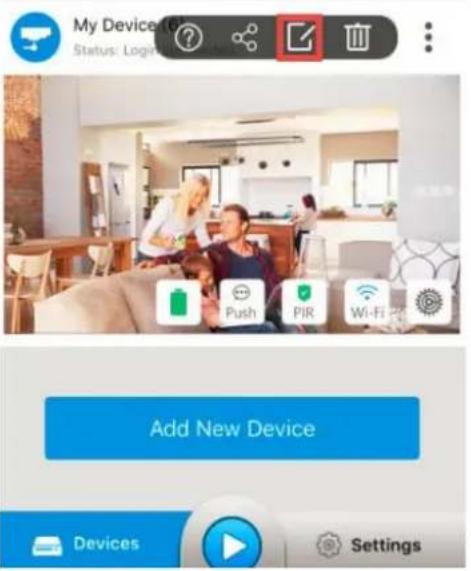
3.3 Edit the Device Information
To modify the login information of your camera, follow the steps below:
- Tap : and choose 📋 on the screen.
text_image
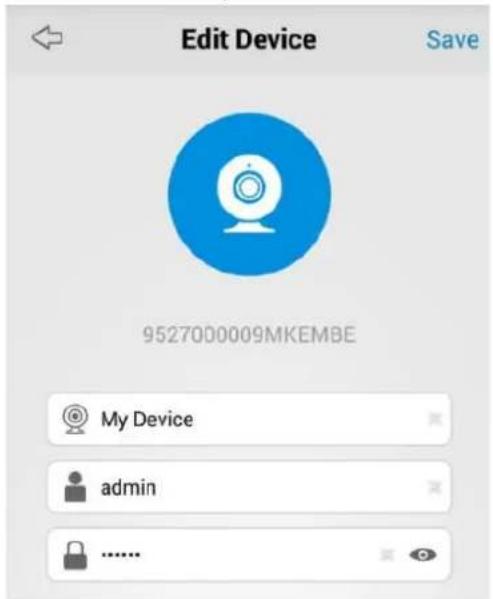
My Device Status: Login Add New Device Devices Settings- You can change the device name in the field, then enter the login username and password.
text_image
Edit Device Save 9527000009MKEMBE My Device adminTap "Save" on top right to save settings. Tap ⇔ on top left to return to the previous page.
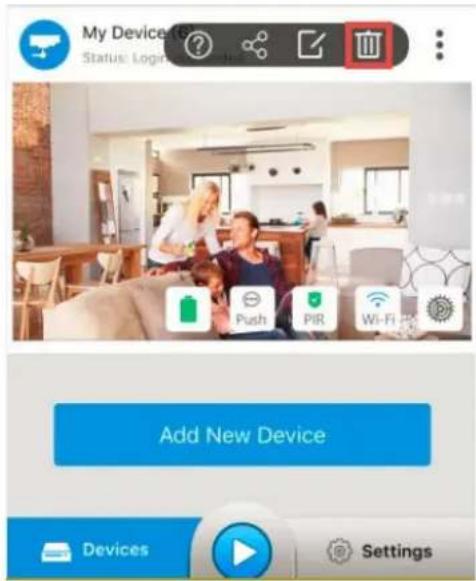
3.4 Delete Device
On the Devices Page, tap : and choose to delete camera from the list.
text_image
My Device Status: Login Add New Device Devices Settings3.5 Reset Camera
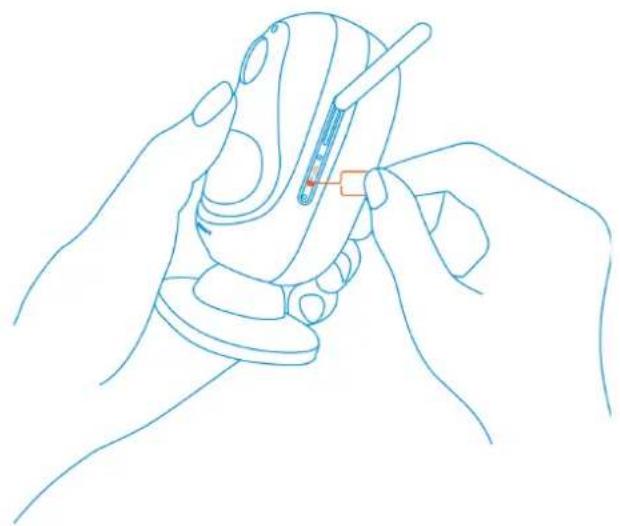
To rest the camera, use the provided reset needle to hold the reset button for several seconds, a voice prompt “factory resets succeeds” means the camera has been reset successfully.
natural_image
Line drawing of two hands holding a small electronic device with a red indicator light (no text or symbols)Chapter 4
Install the Camera
4.1 Reolink Argus Placement
➢ Rule No.1: Know Camera’s Field of View
The field of view of Reolink Argus is diagonal 130^ and horizontal 110^ , please make sure the monitoring area is well within its field of view.
The ideal viewing distance is 2 to 10 meters (7ft — 33ft), which enables you to recognize a human. To achieve better viewing experience, it's advised not to place the camera too far away or too high from designated monitoring areas (7ft — 33ft).

text_image
Ideal Viewing Distance: 2-10 meters (7-33ft)➢ Rule No.2: Understand the Detecting Field of the PIR Motion Sensor
Our PIR motion sensor is more sensitive to side-to-side movement than movement heading straight toward the camera or away from the detecting field (horizontal 120°) of the PIR motion sensor.
For example, when a person moves straight toward the camera (shown below), the PIR motion sensor will be less sensitive to the movement.

text_image
Camera View POORNote: To get the best performance of the camera, please make sure the camera is mounted well within the coverage of your wireless network.
4.2 Camera Placement Dos & Don'ts
For reducing False alarms, please note that:
- Do not install the camera facing any objects with bright lights, including sunshine, bright lamp lights, etc.
- Do not place the camera too close to a place where many vehicles move frequently; 15 meters (55ft) away from the vehicle is the recommended distance based on our numerous tests.
- Stay away from the outlets, including the air conditioner vents, humidifier outlets, the heat transfer vent of projectors, etc.
- Do not install the camera facing the mirror.
- Keep the camera at least 1 meter away from any wireless devices, including Wi-Fi routers and phones in order to avoid wireless interference.
Chapter 5
Quick Configuration
On the Devices page, there are several icons which allow you to tweak camera settings quickly.
5.1 Disable/Enable Push Notification
Tap the Push icon to enable or disable Push Notification, Push means Push
Notification is enabled while Push means not enabled.
Note: You need to allow Reolink App to send you notifications on your smartphones.
Go to "Settings" > "Notifications" on your smartphone, and then click Reolink App to allow notifications.
5.2 Disable/Enable PIR/Audio Alarm/E-mail
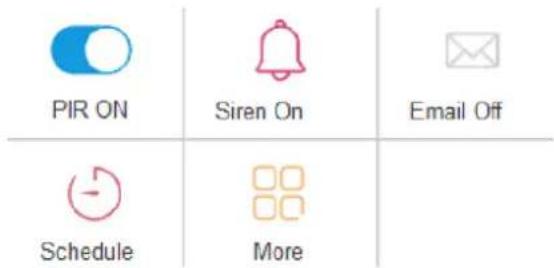
Tap on the main page, the following menu will come up.
text_image
PIR ON Siren On Email Off Schedule More- To disable the PIR motion sensor, please tap the PIR button to turn it off.
• To disable the audio alarm, tap the Siren button to disable it.
• To disable Email alert, tap the Email button. - Tap the Schedule button to enter the PIR Schedule Settings, for more information, please refer to 8.1 Setup PIR Schedule.
- Tap to enter the Alarm Settings menu, for more information, please refer to Chapter 8 Alarm Settings.
5.3 Wi-Fi Settings
To set up the camera for the first time, follow the voice prompt to configure. If you want to modify the WiFi settings of the camera, please follow the steps below:
- Tap Wi-Fi to enter the "Wi-Fi Settings" page.
- Tap on the Wi-Fi network you want to join, enter the password of the Wi-Fi network.
- Tap on the top right to save settings.
Note:
→ Tap 🔍 to show the password in details.
→ The WiFi password should be within 31 characters.
5.4 Device Settings
Tap 📍 to enter the camera's configuration menu.

text_image
Device Settings Network Wi-Fi > Network Status 192.168.177.101 > Video & Audio Display > HQ Quality > Encode Sound Encode sound to video stream Storage SD-Card 14.60 GB free > Alarm PIR Sensor > PIR Settings > Account Security Password >Chapter 6
Live View
To view live video feed, tap 📋 on the Devices page or tap your camera to enter Live View.
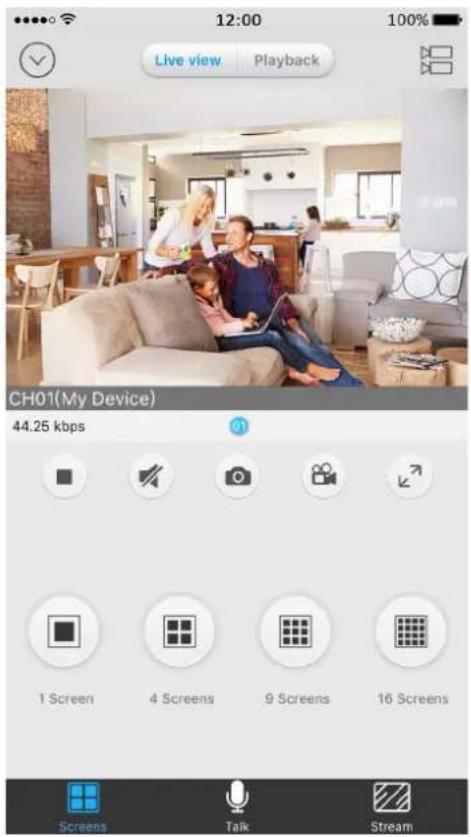
text_image
12:00 Live view Playback 100% CH01(My Device) 44.25 kbps 1 Screen 4 Screens 9 Screens 16 Screens Screens Talk Stream| Icons | Meaning |
 | Tap this icon to go back to the Devices page. |
 | Tap this icon to select a camera that you want to view. |
 | Tap this icon to stop or start live view feed. |
 | Tap the icon to enable or disable audio. |
 | Tap this icon to snap a picture of the selected live view window. |
 | Tap this icon to record video of the selected live view window. |
 | Tap this icon to enter the full-screen mode. |
 | Tap this icon to enter the 1/4/9/16 windows division menu. |
| Tap this icon to enter the two-way audio menu. | |
 | Tap this icon to enter the Stream menu. |
Note: The videos recorded manually and snapshots will be saved to your mobile devices: iOS (Album) Android (Storage/Internal Storage/Reolink).
6.1 Start Live View
To view video live feeds, tap your camera on the Devices page or tap 📋 on the Devices page.
How to View Multiple Cameras at the Same Time:
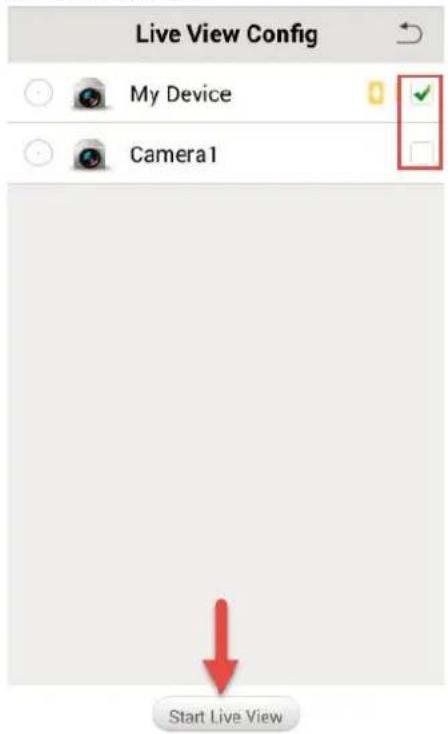
- On the Live View page, tap 📋 on top right to enter the "Live View Config" page.
- Tick the cameras you want to view in the list, and tap "Start Live View" on the bottom.
text_image
Live View Config My Device Camera1 Start Live View- To View several cameras on the same screen, tap to choose.
When there are multiple pages of playing windows, you can slide the screen to go to the next or previous page.
You can double-tap Live View window to display the camera in 1-Screen mode and double-tap again to restore.
- To enable live audio, tap once and audio is available when the icon turns to .
Note:
→ The live video feed is streamed in Fluent by default.
→ Up to 32 cameras can be selected for live viewing simultaneously. Only 16 cameras can be shown on one screen, slide to see another 16 cameras.
➤ Full Screen Live View
During live view, you can tap ↗ to enter the full-screen mode, tap on the control panel to enter the main menu.
You can touch the screen to activate the control panel after it hides.
natural_image
Interior view of a modern living room with a family, featuring a woman and a man in the background (no visible text or symbols)| Items | Meaning |
 | Tap this icon to snap a picture of the selected live view window. |
 | Tap this icon to stop live view of the live view windows. |
| [43ZS] | Tap this icon to enter the Stream menu. |
| Tap this icon to enter the 1/4/9/16 windows division menu. | |
| Tap this icon to record video of the selected live view window. | |
 | Tap this icon to enable or disable audio. |
 | Tap this icon to enable or disable two-way audio. |
6.2 Two-way Audio
Reolink Argus two-way audio allows you to talk and listen. Follow the steps below to enable it:
-
On the Live View page, tap 📋 on the bottom to enter the two-way audio window.
-
Tap to enable two-way audio, when the icon turns from Grey to Blue, which means two-way audio is enabled.

text_image
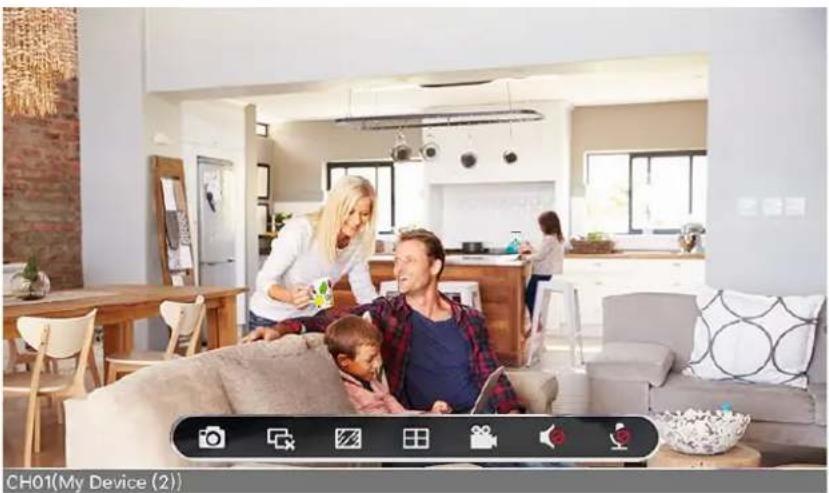
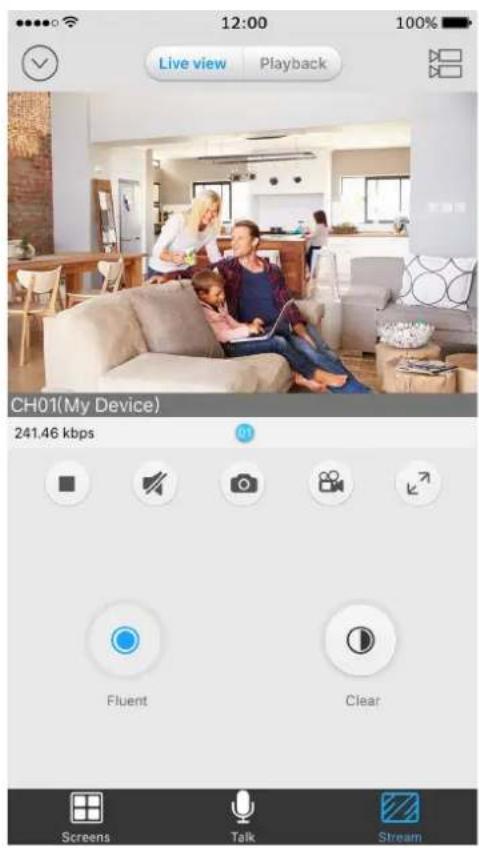
12:00 100% Live view Playback CH01(My Device) 87.65 kbps Tap to Talk Screens Talk Stream6.3 Video/Image Quality
Choose Stream Type
In Stream tab, you can choose video stream type by tapping Fluent or Clear according to your needs.
Note: By default, the live video will stream in Fluent.
text_image
12:00 Live view Playback CH01(My Device) 241.46 kbps Fluent Clear Screens Talk Stream- Clear (Main-Stream): The highest-quality stream, clear stream has the highest quality of picture, but it also consume more bandwidth and require high CPU to decode.
- Fluent (Sub-Stream): The lower-quality stream, default stream type for the mobile App, the video stream that the Camera will send to remote devices via a network or the Internet.
▶ Customize Video/Image Quality
Go to "Device Settings" > "Quality", configuring the encoding parameters of different stream types according to your actual needs, including Resolution, Frame Rate and Max Bitrate.
- Resolution: Choose the resolution for the selected stream type.
- Frame Rate (fps): Choose the frame type for the selected stream type.
- Maximum Bitrate (kbps): Choose the bitrate for the selected stream type. The higher the bitrate is, the better quality the recording will be, and the more space each recording will take up on the microSD card.
Tap on the top right corner to save settings. Tap ⇔ on the top left to return to the previous page.
6.4 Adjust Display Settings
▶ Image Rotation
The camera image can be rotated 180 degrees. To adjust that, go to "Device Settings" > "Video&Audio" > "Display", enable "Rotation" or "Mirroring" according to your needs.
➢ Display Timestamp & Camera Name
By default, the timestamp will be shown on Top Center. Camera name will be shown on Bottom Right.
To manage it, go to "Device Settings" > "Video&Audio" > "Display", if you do not want to display the camera name and timestamp on the live view screen, uncheck "Display Camera Name" and "Display Date" according to your need.
To change their position, select a different position from the dropdown list of "Name Position" and "Date Position".
If you want to change the camera name, rename it in the Name field.
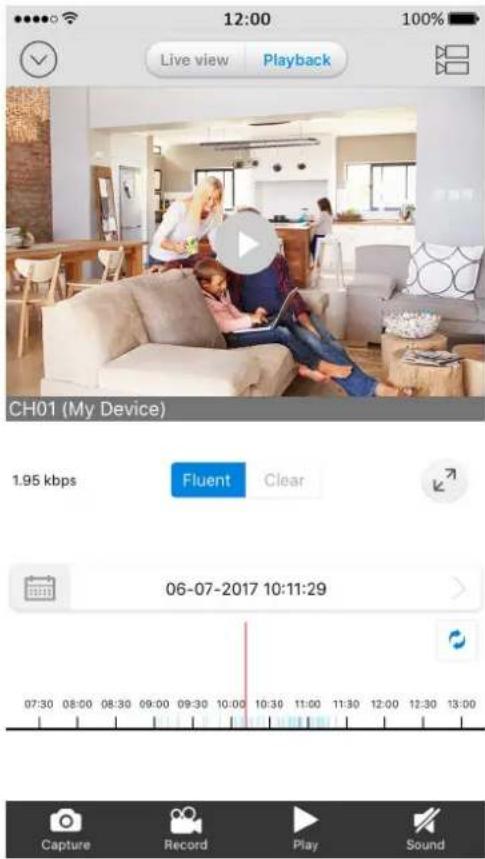
Chapter 7 Playback
This chapter will cover how to play back the videos recorded to your SD card.
Note: Playback is only available when the SD card is inserted and recognized by the camera.
text_image
12:00 Live view Playback 100% CH01 (My Device) 1.95 kbps Fluent Clear 06-07-2017 10:11:29 07:30 08:00 08:30 09:00 09:30 10:00 10:30 11:00 11:30 12:00 12:30 13:00 Capture Record Play Sound| Items | Meaning |
| Tap this icon to go back to the Devices Page. | |
| Tap this icon to choose a camera to playback. | |
| Choose which stream type used when playback the video. | |
| Tap this icon to enter the full-screen mode. | |
| Tap this icon to choose the date when the video was recorded. | |
| Tap this icon capture a picture of the playback video. | |
| Tap this icon to record the playback video. | |
| Tap this icon to start/stop playing the video. | |
| Tap this icon to enable/disable audio. |
➢ How to playback Videos Recorded in a SD Card:
- Tap Playback to enter the playback page.
- Tap 📋 to enter the "Playback Search" page, please tick the camera that you want to play back videos, then tap "Return" on the top right to go back to playback window.
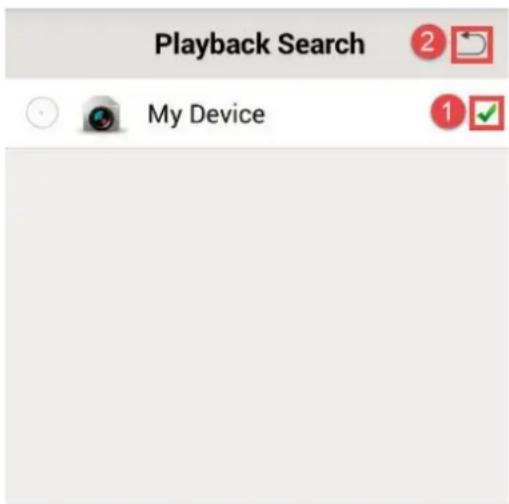
text_image
Playback Search My Device- Tap 📋 to choose the date when the video was recorded, slide to choose a month to view. Tap "Done" to finish. The date in blue color means there was video recorded.
| Cancel | 2017-6 | Done | ||||
| Sun | Mon | Tue | Wed | Thu | Fri | Sat |
| 28 | 29 | 30 | 31 | 1 | 2 | 3 |
| 4 | 5 | 6 | 7 | 8 | 9 | 10 |
| 11 | 12 | 13 | 14 | 15 | 16 | 17 |
| 18 | 19 | 20 | 21 | 22 | 23 | 24 |
| 25 | 26 | 27 | 28 | 29 | 30 | 1 |
| 2 | 3 | 4 | 5 | 6 | 7 | 8 |
- On the Timeline bar, time periods with recordings are marked as Blue, tap "Play" to start playback. You can slide the timeline bar to adjust the playback time.
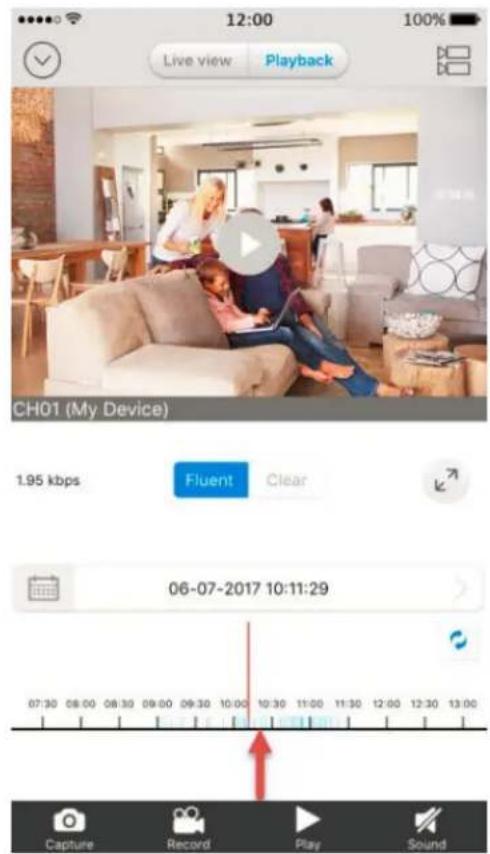
text_image
12:00 Live view Playback 100% CH01 (My Device) 1.95 kbps Fluent Clear 06-07-2017 10:11:29 Capture Record Play SoundYou can pinch open on the timeline for more details and pinch closed to see the hours the recordings in.
-
Choose the stream type you would like to playback by tapping Fluent/Clear, the current stream used will be highlighted in Blue.
-
If you want to play audio, tap the Sound icon on the bottom to enable it, will change to .
-
To capture a screenshot of the playing video, tap the Capture button on the bottom, to record the playback video, tap the Record icon.
Note: The videos recorded manually and snapshots will be saved to your mobile devices: iOS (Album) Android (Storage/Internal Storage/Reolink).
During playback, you can tap the button ↗ to enter the full-screen mode. You can touch the screen to activate the control panel after it hides.
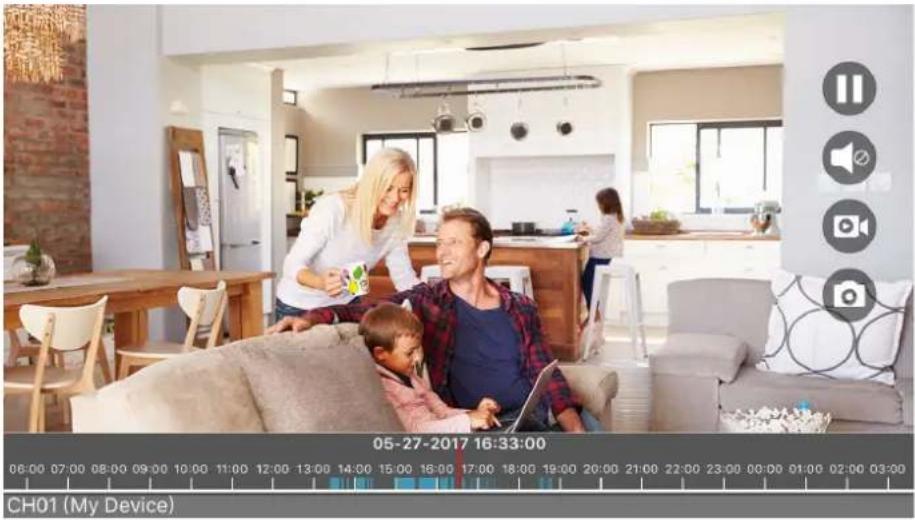
natural_image
Interior scene of a modern living room with a family, a child, and a woman (no visible text or symbols)| Items | Meaning |
 | Tap this icon to stop the playback recording. |
| Audio control, tap this icon to enable/disable audio. | |
 | Tap this icon to record the playback video. |
 | Tap this button to capture a picture of the playback video. |
Note: Only one camera can be selected to playback at one time.
Chapter 8 Alarm Settings
The built-in PIR motion sensor will detect changes in temperature/radiation. When the PIR motion sensor detects motion, it will trigger an alarm and prompt the camera to take the following action: sound siren/alarm, send Push Notification to your mobile devices, send E-mail alert and Record movement to your SD card.
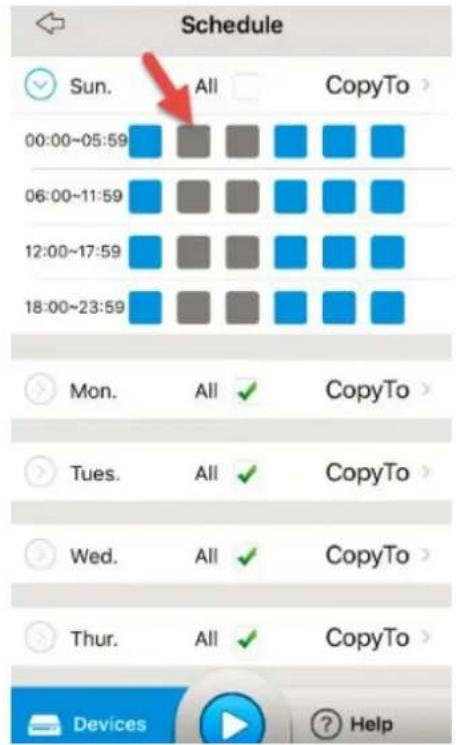
8.1 Setup PIR Motion Schedule
By default, the PIR motion sensor is enabled. If you want to schedule it to arm or disarm, follow the steps below:
Steps:
-
Go to "Device Settings" > "Alarm" > "PIR Settings". Tap on "Schedule".
-
Tap on the Square (hour) to disable PIR detection (Grey) or tap again to enable PIR detection (Blue). Tap to return to the previous page and then tap on the top right to save the settings.
text_image
Schedule Sun. All CopyTo 00:00~05:59 06:00~11:59 12:00~17:59 18:00~23:59 Mon. All CopyTo Tues. All CopyTo Wed. All CopyTo Thur. All CopyTo Devices HelpNote: To repeat same PIR schedule in a week, tap "Copy To" to continue.
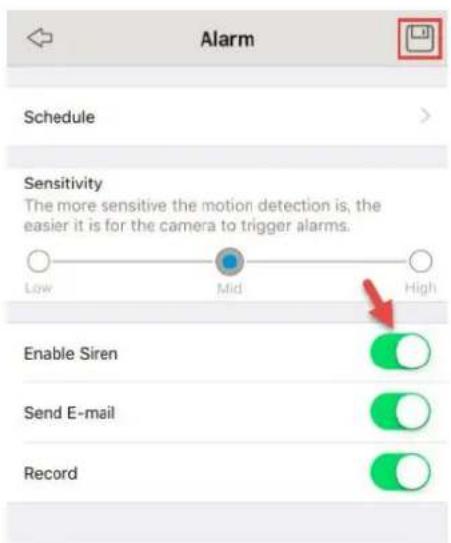
8.2 Disable Audio Alarm/E-mail/Record
By default, when triggered by motion, the camera sends out audio alarm/siren, E-mail, push notification and record to SD card(optional).
To disable some actions, follow the steps below:
Steps:
- Go to "Device Settings" > "Alarm" > "PIR Settings".
- To disable the action, tap , it changes to , to enable it, tap the icon again. Tap on the top right to save the settings.
text_image
Alarm Schedule Sensitivity The more sensitive the motion detection is, the easier it is for the camera to trigger alarms. Low Mid High Enable Siren Send E-mail Record8.3 Adjust the PIR Sensitivity
PIR sensitivities include Low, Mid, and High. PIR sensitivity could have an impact on detecting distance, the higher the sensitivity is, the longer distance the PIR will detect.
By default, PIR sensitivity is set as "Mid". You can adjust PIR sensitivities according to your needs. Follow the steps below to change PIR sensitivity.
Steps:
-
Go to "Device Settings" > "Alarm" > "PIR Settings".
-
Tap Low/Mid/High to choose the Sensitivity you want, tap the button on top right to save the settings.
| Sensitivity | Detecting Distance (for moving and living things) | Detecting Distance (for moving vehicles) |
| Low | Up to 4 meters (13ft) | Up to 10 meters (33ft) |
| Mid | Up to 6 meters (20ft) | Up to 12 meters (40ft) |
| High | Up to 9 meters (30ft) | Up to 15 meters (50ft) |
Note: Higher sensitivity offers longer detecting distance, but it would lead to more false alarms. You are advised to set up the sensitivity level to "Low" or "Mid" when you install the camera outdoors.
8.4 E-mail Settings
When triggered by motion, Reolink Argus will send you an email alert if you
have configured it to.
Steps:
- To configure E-mail settings, please go to "Device Settings" > "E-mail Settings".
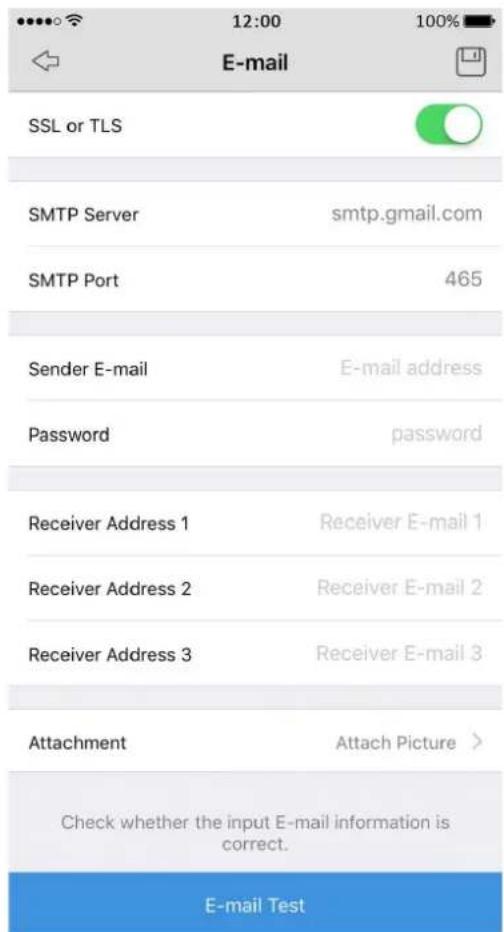
text_image
12:00 100% E-mail SSL or TLS SMTP Server smtp.gmail.com SMTP Port 465 Sender E-mail E-mail address Password password Receiver Address 1 Receiver E-mail 1 Receiver Address 2 Receiver E-mail 2 Receiver Address 3 Receiver E-mail 3 Attachment Attach Picture > Check whether the input E-mail information is correct. E-mail Test- Enable SSL or TLS: Whether the email server you're using requires a secure link. This is on by default and should be left on if you're using any of the preset email servers.
- SMTP Server: Type in the SMTP server for the sender Address.
- SMTP Port: Set the correct port number for the SMTP server you use.
- Sender Address: Enter your address which will be used to send out the notification email. Type it in the format youraddress@gmail.com (please NOTE, the email address should be your own email account).
- Password: Enter the password for the Sender email address.
- Recipient Address: Enter the receiver's E-mail address that the notification E-mail will be sent to. You can specify up to three recipient E-mail addresses.
- Attachment: Select to attach picture or receive only notification(disable) when send E-mail.
- E-mail Test: Click this button to test whether the e-mail setting is successful. If test failed, please check the internet connection and the
settings above.
Tap on the top right to save settings. Tap ⇔ on the top left to return to the previous page.
Note: For most of the E-mail server, they will not allow a third-party software to use its SMTP server, please login to your E-mail account settings and make sure you have allowed a third-party software to use it.
Chapter 9
SD Card
Reolink Argus supports SD card local storage (used only for motion-triggered recordings). When the camera detects a movement, it will record and save the video to the SD card.
You can insert a microSD card into the camera. When the SD card is inserted in, you can check its status in "Device Settings" > "SD Card".
Note:
- This window will only show up when the SD card is inserted in and recognized by the camera.
- There is no SD card included in the product package, please purchase one and insert it in the camera.
9.1 Requirement of the SD Card
| Item | Requirement |
| Capacity | 8GB or 16GB card is suggested (Up to 64GB) |
| Read and Write speed | Class 4 or higher level |
| Format | FAT32 |
9.2 Install the SD Card
Steps:
- Power off the camera by taking out the batteries before inserting the SD card.
-
Insert the SD card in the SD card slot on the right side of the camera. Use your fingernail (or use the provided reset needle) to push the SD card in until you feel it is locked.
-
Power on the camera by putting batteries back into the camera.
9.3 Format the SD Card
Tap the Format icon on the bottom to format the SD card.
Note: Please backup the important data on the SD card before formatting it.
Chapter 10 Battery
Reolink provides 4 non-rechargeable CR123A batteries, one of which has 1600mAh.
With these 4 batteries, the Argus supports up to:
• 180 days in Standby mode;
- 840 minutes of motion recording and Live view in day time;
- 420 minutes of motion recording and Live view in night vision with IR LED's on.
Note: Reolink Argus is not designed for 24/7 full capacity running or around-the-clock live streaming. It's designed to record motion events and remotely view live streaming only when you need it. Long time live view or frequently PIR triggering will drain the batteries more quickly.
10.1 Requirement of the Battery
The Reolink Argus camera will work with the following batteries:
| Battery | Type | Voltage |
| non-rechargeable | CR123A | 3V |
| Rechargeable | CR123A | 3.6V~4.2V |
10.2 Battery Status
The camera will keep a record of the power consumption for the last 4
weeks, to check the battery status, tap on the camera in Devices, or go to "Device Settings" > "Battery".
Daily amount of time for live streaming & motion recording will be shown on the calendar.
Note: When time of live streaming/recording exceeds 10 minutes, the date will be marked as Orange.
▶ Low Battery Notification
- If the battery is running low, the camera will send you a push notification every day until the batteries are replaced.
- When batteries are running low, the Battery icon on the Battery status page will show as below:
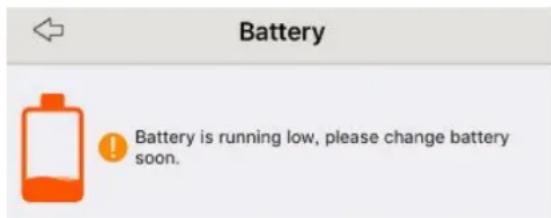
text_image
Battery Battery is running low, please change battery soon.10.3 Important Safeguards on Battery Use
To use the battery safely, please note that:
- The batteries must be placed in the right direction of polarity;
- Do not use batteries of different brands and different models together;
- Do not use new and old batteries together;
- If you don't use the products for long periods, please remove the batteries in avoidance of erosion resulting from battery leakage.
Chapter 11
Warranty & Technical Support
Warranty
Reolink warrants this product against defects in workmanship and material for a period of Two (2) years from its original purchase date. You must present your receipt as proof of purchase for warranty validation. Any unit which proves defective during the stated period will be repaired without charge for parts or labor or replaced at the sole discretion of Reolink. The end user is responsible for all freight charges incurred to send the product to Reolink's repair center. The end user is responsible for all shipping costs incurred when shipping from and to any country other than the country of origin.
The warranty does not cover any incidental, accidental or consequential damages arising from the use of or the inability to use this product. Any costs associated with the fitting or removal of this product by a tradesman or other person or any other costs associated with its use are the responsibility of the end user. This warranty applies to the original purchaser of the product only and is not transferable to any third party. Unauthorized end user or third party modifications to any component or evidence of misuse or abuse of the device will render all warranties void.
By law some countries do not allow limitations on certain exclusions in this warranty. Where applicable by local laws, regulations and legal rights will take precedence.
▶ Technical Support

If you have any questions or problems, you may refer to https://reolink.com/faqs/ for the answers and solutions.

If you may need any technical support, please contact us at support@reolink.com

We have developed user-friendly products and documentation. You may download the software and manual from https://reolink.com/software-and-manual/

You may download Firmware from https://reolinkhello.com/firmware/